DVR User Manual Gebruiksaanwijzing Gebrauchsanweisung. Digitale Video Recorder V1.1
|
|
|
- Helene Esser
- vor 8 Jahren
- Abrufe
Transkript
1 DVR Digitale Video Recorder User Manual Gebruiksaanwijzing Gebrauchsanweisung V1.1

2 NOTES & STATEMENT The power supply of this DVR is provided through DC12V adapter, please check the power output before installation and ensure it can meet the requirements; Do not place the DVR at a place subject to rain and moisture; Do not install the DVR at a place subject to violent vibration; Do not install the DVR at a place subject to direct sunlight, and be far away from high temperature environment; The DVR should be installed in a space without much dust, and the environment should be kept clean and tidy; The DVR s back panel should be placed 15cm or more away from other objects or wall for cooling; The DVR should work under temperature, humidity and voltage according to its technical specifications; The space where DVR is installed should not be stored with corrosive chemicals that may produce volatile gases to avoid affecting the DVR s life; Proper grounding should be guaranteed during operation; The DVR shall be installed to ensure proper connection with other devices. Please buy HDD from official channel to meet DVR s long time and large data reading and writing requirements. Statement: This manual only introduces basic operation. Products are subject to the real products and this manual is just for reference. Products update without further notice. Nuances of partial functions are permitted before and after updating. Please contact the Customer Service Department for the latest program and supplementary instruction files. This manual is applicable to various models, and the specific operation of each product is not listed here. Users can operate the DVR based on this manual for the actual products. We have tried our best to ensure the completeness and accuracy of this manual. However, due to the unstable environment and other reasons, the real value of some data may differ. If any problem or dispute arises, the company s final explanation will prevail. If carrying out operation not according to the instruction of this manual, the user shall bear the losses sustained. OVERVIEW Introduction : This product is a consumer-oriented 4-channels CIF/Half-D1/D1 real-time network DVR and adopt the industry's most advanced SOC technology and standard H.264 encoding method, so that the image quality is higher, network transmission effect is better and system is more stable; the body is made under stylish appearance design and sophisticated manufacturing process, the 1U standard chassis is suitable for small-scale monitoring places such as shop, supermarket, residential, school, hotel, Internet cafe, family and other civilian sites where require more on video quality, network transmission and real-time playback. Packaging and accessories : One IR remote controller A pair of remote controller batteries One piece of product certificate One piece of product instruction One piece of SATA hard disk data cable(installed in the host) One DC12V3A power adapter Support HDD(already installed) and a set of mounting screws. One piece of HDD power cable (already installed in the host) One piece of CD.

3 Main features : Standard H.264 video compression format 16-bit true-color semi-transparent graphical menu interface, menu options tip A variety of recording modes: manual, timing, movement and alarm recording Optimized four-channel simultaneous playback (single playback for eight-channel ones) A variety of backup (USB flash drives, mobile hard disk, network) One USB2.0 for data backup, one USB2.0 for the mouse operation Multi-functional operation, recording, playback, monitor, backup and network transmission can be realized at the same time Dual stream technology Support network to implement multi-screen real-time browsing, parameter setting, copy or playback Support mobile phone monitoring Support event classification and precise time search and playback Defaulted parameter value fast recovery Flexible USB interface for mouse Features Description Operating system Embedded LINUX OS Video compression H.264 Video input 4/8/16 channels BNC Video output Support BNC, VGA and HDMI Audio input/output Without/1/2/4/8-ch input RCA ;without/1-ch output RCA (optional) Alarm input/output Without/4/8-ch input (optional);without/1-ch output(optional) Display 1/4/9/16-channels Multiplex operation Live, recording, network,,mobile phone surveillance simultaneously Recording mode Timer/manual/motion detection/alarm Recording frame rate PAL:25fps NTSC:30fps Recording quality Highest, higher,medium,low,lower,lowest Recording resolution CIF/Half-D1/D1 frame rate adjustable Recording playback 1/4/8 /16 channels playback simultaneously(optional) Recording backup Support USB flash drives backup, moved hard disk backup, network backup, backup by files, backup by time Action with Alarm Support alarm Send pictures to the designated FTP transmission Support PTZ control Support PTZ protocol PELCO-D,PELCO-P etc PIP Support Zoom Support HDD Support 1 SATA HDD,capacity to 4T Network and protocol 1 RJ-45 10/100M via Ethernet,support TCP/IP DHCP DNS DDNS UPNP NTP etc IE browser Support

4 Client software CMS Dual stream Group play Multi-language Mobile phone surveillance QR code P2P cloud DDNS Mouse interface Backup interface Remote controller User authority Power Support Support Support(main and secondary interchange) Support five users online access Support Support windows/symbian/iphone/blackberry/android operation system Support Support Support domain name USB2.0 USB2.0 Support(Support controller ID matching) Support multi-level user authority distribution DC12V 3A/5A Working temperature 0-50 Working humidity 10%-90% HDD installation (1)Open the cover of the DVR, fix the HDD into the bracket;. (2)Connect the HDD data and power cables to the HDD; (3)Tighten the screws to fix the HDD in the case; (4)Lock the cover with crews. Note: Do not plug in or out the HDD when the DVR powered on. Connection to the camera and monitor Connecting the signal of camera with a BNC cable to the DVR video input, connect the signal of DVR vide output with a BNC cable to the monitor (Please refer to the back panel figure). Connect the RS485A (+) and the B (-) respectively to corresponding DVR interface with wires, if camera is the PTZ which can be controlled. Note: Please refer to the electric topology in the last page to connect the devices
Connect the HDD data and power cables to the HDD; (3)Tighten the screws to fix the HDD in the case; (4)Lock the cover with crews.")
5 DVR INTRODUCTION 1. Connect the video cable with the camera. 2. Connect the other end of the cable with the desired input. 3. Connect the adapterplug of the video cable with the splitter cable. 4. Do the same steps for each camera. 5. Connect the output, with the interference suppression, of the splitter cable with the input of the DVR set. 6. Connect the adapter with the input of the splitter cable.

6 Front panels:
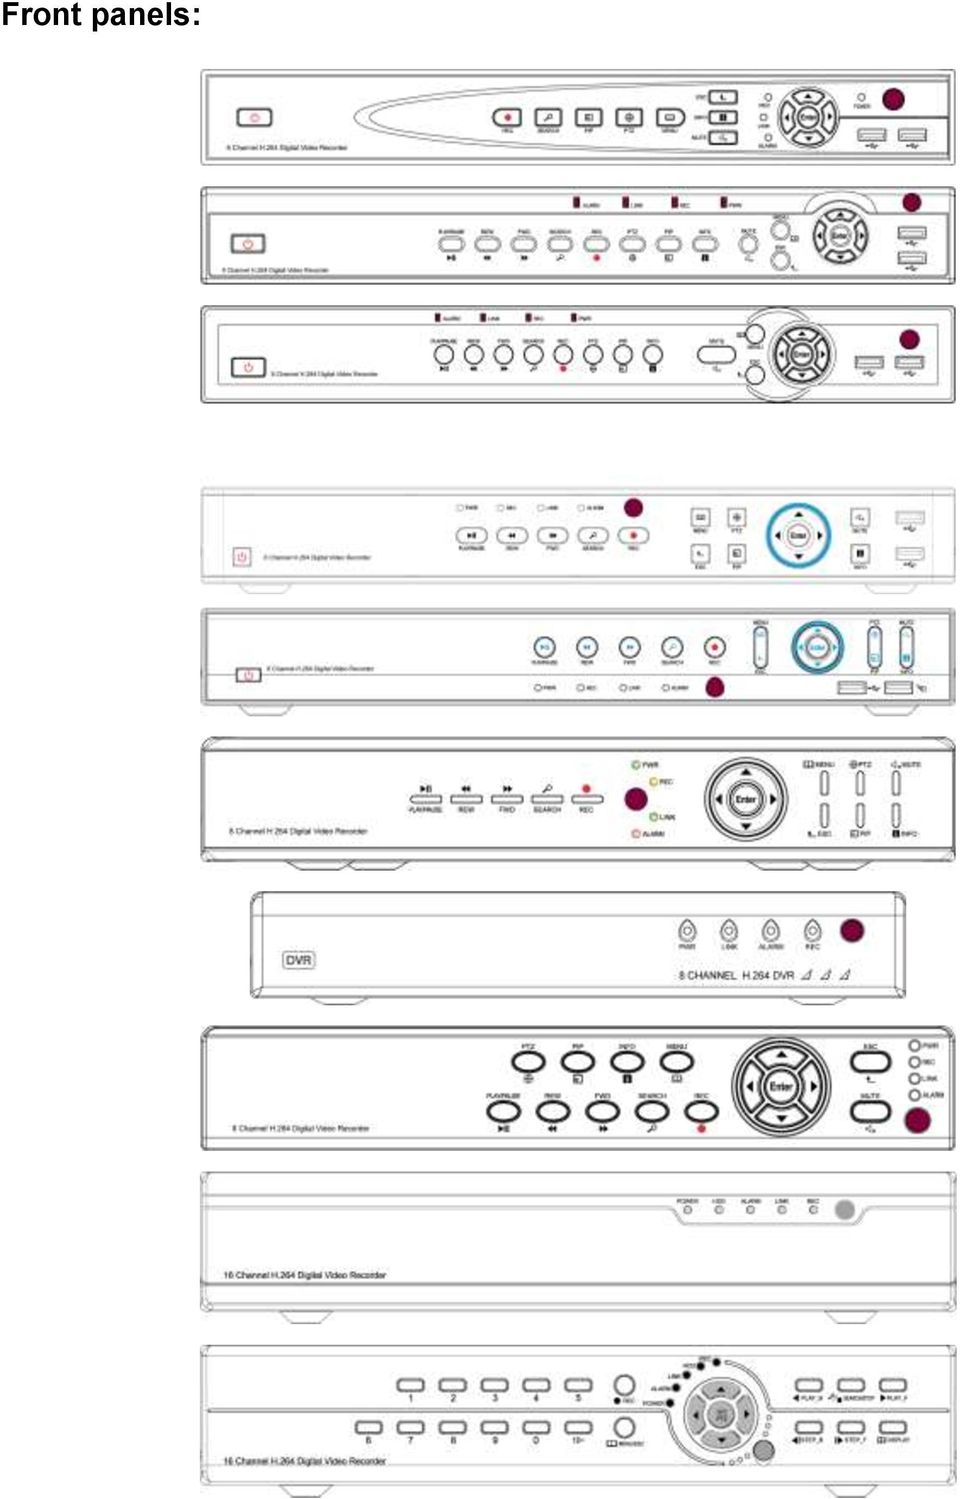
7 DESCRIPTION NO Tag Name Description. 1 MUTE Disable the sound output 2 INFO Check the device system information 3 PIP Display live images picture in picture 4 PTZ Call the PTZ camera 5 PLAY / PAUSE Compound button play and pause 6 REW Rewind 7 SEARCH Search the video file 8 REC Start or stop the manual record 9 MENU Enter the main menu(press it 15sec to switch VGA and CVBS operation menu) 10 ESC Quit 11 USB Connect the USB deceives 12 POWER Power switch button 13 DIRECTION Move the cursor to right/left/up/down 14 Enter Confirm the change(press it 15sec to restore factory default) 15 IR Receiver IR remote receiver window 16 STATUS Indicate the running status
 10 ESC Quit 11 USB Connect the USB deceives 12 POWER Power switch button 13 DIRECTION Move the cursor to right/left/up/down 14 Enter")
8 REAR PANEL AND PORTS Note: the real production maybe have some difference with this panels below.

9 Ports descriptions: NO. Name Description 1 VIDEO IN BNC connectors for analog video input 2 VIDEO OUT BNC connector for analog video output 3 AUDIO IN RCA connectors for analog audio input 4 AUDIO OUT RCA connector for analog audio output 5 VGA DB15 for VGA monitor 6 HD-port To connect the HDMI high definition monitor(optional) 7 NETWORK RJ-45 connector for Ethernet 8 RS485 To control the PTZ camera(a > +,B > -,G > Ground) 9 DC 12V DC 12V power supply 10 ALARM Alarm output(on-off switch output) 11 SENSOR Alarm input(on-off switch input) 12 Ground Note: 1, RS485 A should connect to PTZ data+, B to data-; 2, Recommend connecting the DVR housing to ground (PE cable).
 9 DC 12V DC 12V power supply 10 ALARM Alarm output(on-off switch output) 11 SENSOR Alarm")
10 IR REMOTE CONTROL The DVR can be controlled with the IR remote control. Ensure the batteries are installed before using. NO. Name Description 1 POWER OFF Shutdown the DVR 2 ESC Quit the menu 3 FAST Change the rewind speed REWIND 4 SETP Playback frame by frame 5 PIP Show video picture in picture 6 RECORD Start/stop manual record 7 MUTE Disable the sound 8 NUMBER Switch the channel 9 MENU Enter to the menu(press it 15sec to switch VGA and CVBS operation menu) 10 ENTER Confirm an item (press it 15sec to restore factory default) 11 FAST Change the forward speed FORWARD 12 PLAY / Play and pause when playback PAUSE 13 PTZ Move the PTZ camera 14 SEARCH Playback the video 15 ZOOM Enlarge the channel image
 11 FAST Change the forward speed FORWARD 12 PLAY / Play and pause when playback PAUSE 13 PTZ Move the PTZ camera 14")
11 BASIC OPERATION Tips:The DVR defaulted display mode is VGA, if user use DVR BNC(CVBS) port for output, please press the front panel "menu" button for about 15s till system switching to BNC display mode automatically, or use VGA output, to access into the DVR system and adjust the screen display resolution too CVBS, then user can operate and control the DVR. the Setup Wizard 1. Connect the DC 12V output plug to power port on the back panel of the DVR; 2. Connect the power supply plug to the outlet; 3. Switch on the Power button, (the Power light is on); 4. After system start up, start the setup Wizard; 5. This step you can configure the basic parameters, such as, device name, language, date time,etc. 6. If the DVR will connect to the Internet via a router, the network parameters should be configured. 7. In the last step, you should format the HDD if you want save the video files. 8. After finished all the steps above and click apply, the DVR will start recording in normal. End

12 System Login the factory default user name: admin; password: (eight Zero) Live View The green icon: means manual record. The blue icon:means normal record. The red icon: means sensor alarm record ( S means the alarm sensor has been triggered). The yellow icon : means motion detection alarm record (red human figures means the motion detection function is on).

13 Live control bar Just by one right click the mouse, a control bar will pop up on the screen (as following picture shows): Main menu: click and enter to the Main Menu; Split mode: click and select different display mode; it has 1x1,2x2 display mode etc; PIP: The screen display a main picture, meanwhile, it display a small picture of the others channel at the bottom, (display picture in picture); Sequence patrol: enable multi-camera auto sequence in Live View mode; Digital zoom: enlarge the image in selected single channel; Sound: adjust or disable the audio output; PTZ: control the PTZ dome camera; set the preset direction, cruise line and track, 1. Preset point setting: need to move the PTZ camera in setting the preset point, suggest to set 5 or more direction. 2. Cruise line setting: click Add,then you can set the residence time on each preset point. Then the PTZ will start to cruise 3. Tracking: Click start record, then click the direction key and select the required rotation path. After it recorded, click Start Track, it will follow the recorded path.

14 Capture: make a channel screen-shot and save to HDD; and the picture can be search in data retrieval. REC: start / stop recording manually; Quickly review: start a playback of the record file. Click, then left click and hold the mouse button and drag, the live control bar can be drag to any position. Playback interface 1- Pause: Pause the displaying recording files 2- Stop: Stop the displaying recording files 3- Playback in frame : playback the files in frame after paused. 4- Fast Forward:display the recording files forward at the speed of X1/4, X1/2, X1,X2,X4,X8,X16, etc. 5- Fast rewind: display the recording files rewind at the speed of X1/4, X1/2, X1,X2,X4,X8,X16, etc. 6- Single screen : display by one screen 7- multi-screen: display in multi-screen 8- file type: chose the type of recording file, ie. motion detection, sensor alarm, etc : chose the previous or next files 11-digital zoom: zoom partly in the selected channel.

15 12-color: adjust the color of selected channel. 13- snapshot: capture the picture of the selected channel or all channels, which can be found in the image search. 14- Edit: edit recording files during playback, which can be gotten after saved. 15- save: save the edited recording files. 16-Audio: close or start the voice while playing back. Main Menu Click Menu button and enter, it s including seven function for the DVR: Basic setting,backup & Playback, Upgrade & Maintenance, Record & Schedule, Alarm & Schedule, Advanced Setting, and QR & information. Basic setting is including 6 options: System, Time, DST, Live, Monitor, and Mask. System Click System, as following Picture shows, in this window, user can set up the Device Name, and do Video Format, Password Check, show System Time, Startup Wizard, Max online Users, Screen Resolution, Language, Auto Logout setting etc. The following are the Names and definitions: Device Name: The system name shows in the Client Software or CMS. Video Format : Two kind of Format: Pal and NTSC. User can select it according to the recorder. Password Check: When apply this function, the user need to type in the User name and Password to do system setting operations. show System Time: To select whether display live Time tamp on screen

16 Startup Wizard:Click and it will shows the related information of the Wizard. Max online Users: set up the Max quantity of online user. Screen Resolution: The resolution of the live view. Optional: VGA800*600 VGA1024*768 VGA1280*1024 and HDMI(1920*1080). Tips:Please connect to relevant Device to control,while switch between the BNC and HDMI Language: Select the Menu language Screen Saver (S): User can set the time interval of the screen saver(30s,60s,180s,300s), If there is no operation,the system will auto logout and back to login. Time In this window,user can set up and adjust the system Date,System Time,Time zone. The factory default is GMT timezone,please select the right timezone in the drop-down column(for example:china GMT+8:00). Click"Default",the system will restore default setting; Click"Apply",it will save the setting above. DST In DST window,select DST,Time offset,mode,from Month/Week/Date/Time etc. Click Default,the system will restore default setting;click Apply,it will save the setting above.
, If there is no operation,the system will auto logout and back to login. Time In this window,user can set up and adjust the system Date,System Time,Time zone.")
17 Live Click Live and enter the setting window like Picture : Click Channel name, a virtual keyboard will pop up. Click Shift, it can switch the input state between Capital letter and Chinese, user can rename the Channel. Click and select the channels in Live interface, then click Setting, it will enter Image Adjust interface: User can adjust the Brightness, Hue, Saturation,and Contrast; Click Default it will restore factory default settings. Click OK and save the setting above. User can set the same color parameters to all Channels at once, just by clicking ALL,enter and do the settings. Click Default, system will restore factory default setting; click Apply, it will save the setting above.

18 Image adjust: Monitor Display Mode options : Single SEQ Time (Second): Live view switching interval from channel to next channel

19 Mask Mask: User can mask at most three area in live view pictures. Mask Area Settings: Click Setting, enter live view picture, left click and hold the Mouse button and drag the mask area, as the picture shows below, Click Apply and save the setting. Mask Area Setting

20 Open Menu To enter the menu press the Menu key. The default display mode is VGA, when you want to use the BNC output you are able to select it by pressing and holding the menu button on the remote control for 15 seconds. BACK UP & PLAYBACK Playback System support Playback By Time, By Even, By File,and Image. Click and enter data retrieval. By Time First Step:Click Payback By Time, as following Picture shows: Second Step: select the Channel and display mode, the highlighting date in calendar means it has record. Third Step: Select the date you want to playback, click Search, elect the start time and click button to start playback. The selected Time-sheets will shows in blue. Note: The Rows are Hours, the Columns are Channels. When the monitor resolution is set to VGA800*600, the time the search interface will show a hide button, click the button can be expanded.

21 By Event First Step: Click Payback By Time, as following Picture shows: Second Step: Click Search, the event information will be displayed in the event list box, double click the event file to playback. Third Step: User can select the date,channel, click Motion, Sensor or All to search. By File First Step:Click Search, the event information will be displayed in the file list box. User also can select the date, channel to search. Second Step: Click All, user can backup all the selected file. Third Step: Double click the file to playback.
22 By Image User can do live capture by selecting time and channel, and can do the operation like delete, lock, save to the images. Click the direction key to view the images. The system default image storage is 2000, if over 2000, system will auto cover the old image. Double click the image to playback the record. Backup System support backup the file by USB Device, and remote backup by Internet First Step: Insert the USB storage device, and enter the data backup interface, as picture shows below: Second Step: Select the Start Time and End Time, the Channel, click Search, the data information will be displayed in the list box Third Step: Click one data or click All to select, then click Backup, an Backup Information Window will pop up. Forth Step: In Backup Information window, user can check the file information. Select the Storage Media,Save file Type, click Start to start backup. Note:When the monitor resolution is set to VGA800*600, the backup interface will show a hide button, click the button can be expanded.
, AVI, WAVE (Audio format). During backup, a backup Progress Meter displays the files being backup and the progress.")
23 Select the file and click Backup, will pop up a window as picture shows below, User can check the size of selected files and select backup format of the record file, like: H.264 (with Media play, recommended backup format), AVI, WAVE (Audio format). During backup, a backup Progress Meter displays the files being backup and the progress. Due to the frame rate, the AVI format file sometimes has fast forward situation during playback. we will optimize this situation Notice: Pls use computer to format the Removable Hard drive (FAT32 format) before backup the files. The DVR doesn t support Removable HDD formatting.
24 Disk Here you can see the state of the connected Hard Disk and U disk, and do the formatting operation. UPGRADE & MAINTENANCE Upgrade Simple upgrading procedures: 1. format the U-disk ( FAT32)/ or empty the U-disk 2. Unzip the zip file 3. Put all the firmware file without folder into the root of the USB Stick. 4. insert the U-disk into DVR 5. power off the DVR 6. power on the DVR & restart 7. then the DVR will Auto Detect the firmware and upgrade the DVR. P.S: while the DVR upgrading pls don't turn off the DVR, it takes few minute.
25 Import / Export User can export the Data to USB storage device for backup. and import the Data from USB storage device to DVR.
26 Maintenance Including Factory setting, Logout and Shut Down. RECORD & SCHEDULE Record Click Record, will shows as following Picture:
27 Enable: Click Record, Audio of the Channel, or Click All to do the same setting. Record Bit rate: User can select the Resolution, fps, Encode, Quality, and Max Bitrate, and do the same setting to all channels by clicking All. Click Default, system will restore the default settings; click Apply, it will save the setting above. Note: If the fps setting is over than the Max resources, the fps will be auto adjusted. Note: The Record file Size is depending on the bitrate, the bigger the bitrate is, the more.
28 memory storage it needs. Time: 1. Pre Record Time: The record length before the event, such as before Motion detection, Alarm event etc. 2. Post Record:The record length after Alarm,Optional time length: 10/15/20/30/60/120/180/300 second; 3. Expired: The effective period of preservation for the record file, When it beyond the setting time, the record file will be auto deleted. Overlay: The Camera Name and the Time Stamp on the Live view pictures. Click Camera Name, Time Stamp, Setting, In live view, user can drag the Camera Name and Time Stamp to any place, as picture shows below: User can do the same Time Stamp setting to all Channel at once, just by clicking All and enter to set the place. Click Default, system will restore the default settings; click Apply, it will save the setting above.
29 Before drag : After drag : Recycle Record: Click Recycle Record,when the HDD is full, DVR will keep recording and auto cover the old record file. Click Default, system will restore the default settings; click Apply, it will save the setting above.
30 Schedule: the row lines means the seven days a week, and the columns means the 24 hours a day, User can set the time by dragging the mouse, the blue area means selected, the gray area means unselected. Select the Channel, double left click the mouse,and edit the weekly plan, as the picture below, Click Add to add the record schedule of that day; Click Delete to delete the selected schedule. Note: Left click the mouse to drag the time period can quick add the schedule Copy: 1. 1.User can copy the appointed date schedule to the other days. Click Apply and save the setting above. 2.User also can apply one channel s setting to another channel or all channels, just select the channel and click Copy to apply. Click Default, system will restore the default settings; click Apply, it will save the setting above. Motion : it s the same setting way as Time Record, for more information,please refer to Time record above. Note: The Motion schedule default setting is all selected,and it shows in yellow.
31 Sensor : it s the same setting way as Time Record, for more information,please refer to Time record above. Note: The Motion default schedule is all selected,and it shows in Red. Advance Setting: User can set the actual date and time. Sub-Stream user can adjust the resolution,fps.encode,quality and max bitrate setting to a singlechannel,or click"all" to adjust the setting to all channels. Click"Default",system will restore the default setting,click"apply",it will set above Note:after select the resolution and fps,system will shows the remaining CIF fps
32 ALARM & SCHEDULE It includes 5 sub-manus Motion, Loss, Sensor, Other, and Output. Motion It includes 2 sub-manus: Motion and Motion Schedule Motion: Enable the Motion Alarm, Set the Alarm Continue Time, Action and Area.
33 Click All, Enable to enable motion alarm to all channel, or select the needed Channel Continue Time: After the Motion, the continue record time length, it can be set according requirements. Action: Click and pop up the following window as below: Buzzer: Click Buzzer, it will buzzer while it detect the motion Show Full Screen: A full screen will pop up while it detect the motion To Alarm Out: Click, and it will enable sense the motion.. Click OK, it will save the setting above. Click Exit to exit the window. Click, when the alarm is triggered, the system will send the alarm information to the specified , such as Event, capture, device name, device ID etc. FTP: Build a FTP sever in LAN PC, when it has motion alarm, system will send the Snapshot to computer specify Directory Snapshot : Select the Channel, when it has alarm event, system will auto save the snapshot to HDD, if is clicked, it will send the Snapshot to the specified ID or FTP Sever. To Record: Click the need Channel and OK to save the setting above,. Click Exit to exit the current interface.
34 To P.T.Z: Set the Alarm Type and No., when there is alarm event the PTZ Camera will record the event at the alarm point at the first time. Click OK to save the setting above, click Exit to exit the current interface.. User can apply the same setting parameters to all channels, just by clicking All,enter to Alarm Handling., Motion Area Setting: Click Area, a window will pop up, as the picture above Set the sensitivity level(1-8), default level is 4, the higher the value is, the greater the sensitivity. Click select all area as Motion Detection Area,; Click to delete all selected Area,; Click to the sensitivity level; Click to save the settings; Click to exit the current window. Motion Schedule: it s the same setting way as Time Record, for more information, please refer to Time record above. Note:If you only set motion detecting,plz enter the recording schedule and detele the normally recording schedule, Only in this way, when you do not trigger the motion detecting and there doesn't have a video file. to
35 Loss: Here you can specify which action should be taken when the camera loses the image or no longer operates.


36 Click Action, it will pop up the following window: The trigger setting of The Alarm and To PTZ in Video lost are the same as in motion detection. User can apply the same parameters of video lost to all Channels by clicking All for corresponding setting. Default means recover default setting; Apply means save above setting. Sensor Alarm Sensor alarm includes 3 sub-menu : Basic, alarm handling, Sensor Schedule. Basic: enable sensor alarm channel, chose alarm type according to alarm trigger type : NO or NC User can apply the same alarm type parameters to all channels by clicking ALL. Default means restore factory setting, and Apply means saves setup above.
37 Alarm handling : chose the alarm continue time,and Click Action. Buzzer: when event triggered, Buzzer will work. Show Full Screen: A full screen will pop up while it s triggered. To Alarm Out: The alarm will be triggered to the appointed alarm output. If alarm triggered, the relevant information, like alarm event, captured pictures, device name, device ID, etc will be send to appointed box. FTP:Build a FTP sever in LAN PC, when it has motion alarm, system will send the Snapshot to computer specify Directory Snapshot::Select the Channel, when it has alarm event, system will auto save the snapshot to HDD, if is clicked, it will send the Snapshot to the specified ID or FTP Sever.
38 To Record: Select the Channel and click OK to save the setting above,. Click Exit to exit the current interface. To P.T.Z: Same setting method as Motion part. Sensor Schedule:The Sensor Schedule Setting way is most the same as Time Record, Please refer to the Record Schedule. Note: The Sensor record schedule default setting is all selected,and it shows in blue. Other : The Disk Full in Alarm type means if the disk capacity is less than the set of Disk Shortage Alarm, relevant prompt will be shown at the bottom right of screen; IP confliction means when 2 or more than 2 PC share the same IP address in the same network segment, alarm will work after setting up the buzzer alarm and trigger alarm; Select Disconnect ---Click Buzzer or Trigger, The system will buzzer or send the relevant alarm tips while the internet disconnect. Select Connection Problem, user can do Buzzer, and Alarm Trigger setting. When the HDD is disconnected, the alarm will be triggered. Click Default, the system will restore the factory setting,;click Apply it will save the setting above.
39 Output Sensor alarm includes 3 sub-menu : Relays, Alarm out Schedule, Buzzer. Relays: In this column, set the Alarm out name,and select the Alarm Continue Time (means the time intervals between two alarm action), user can apply the same alarm setting to all the channel by clicking All. Click Default, the system will restore the factory setting,;click Apply it will save the setting above. Alarm out Schedule: Alarm out Schedule Setting way is most the same as Time Record, please refer to the Record Schedule Note: The Alarm Out Schedule default setting is all selected,and it shows in blue.
40 Buzzer: In this interface, click : Buzzer, and select the Continue Time Note: The Buzzer must be clicked, or otherwise it won t buzzer.
41 Advanced Setting It includes 7 sub-manus: Network, , DDNS, FTP, PTZ, User Admin, and Block / Allow List. Network HTTP Port: Default port: 80, if it is changed, when using IE browser to do remote surveillance, need to add new port after the IP address. For example: if you reset as 7840, you need to type instead of Media Port: for CMS,, Mobile App, default setting : 9000 UPNP:Click UPNP and enable the function, user can visit the DVR through WAN ( Manual port forwarding is suggested.) Network Type: Including :STATIC, DHCP, PPPOE, and 3G. If select STATIC, it need to set IP address, Subnet Mask, Gateway, preferred DNS Server and Alternate DNS Server. Note: The DVR and the router must in the same network. For example: The Router IP is , then the DVR IP must be xxx, the Gateway is If select DHCP, The device will automatic dispose and set the IP address, Subnet Mask, Gateway, preferred DNS Server and Alternate DNS Server etc. If select PPPoE, user need to enter Broadband or dial-up user name and password, save and restart the system, DVR will will auto obtain an IP address. The 3G type is not supported on this device.
42 Network Control In the menu refer to the "Advanced settings", select "Network". You are able now to select between STATIC, DHCP, PPPoE or 3G. The setting UPNP is discouraged with regard to security risks. When set to "STATIC", you need to fill in the network settings by yourself. We recommend setting the network settings to "DHCP". The network cable must be connected to the router. Now press the "Test" button, at the bottom of the screen you will now find, if it's correct, "OK". Pls find in the menu the "QR & Information" page and select Network. You will see the IP address obtained, here are listed the gates too. With this IP address, you are able, within your network, to view the images of the DVR set on the computer. Start Internet Explorer and enter, in the address bar, the IP address. If you are unable to connect to the DVR set, you can apply the settings below in Internet Explorer. These settings you should adjust once. The figures are shown in Dutch with the English translation next to the images!
43 Set DVR on Internet Explorer 11. Open IE 11 and refer to Extra(ALT+X)/Tools and select the Internet options: Internet options Turn to Security and click Trusted Sites : Security Trusted Sites Turn to Websites and fill in the IP-address of the DVR:
44 Don t tick this option (see below) and click Add. Add Don t tick this option Now the IP-address has been added to Trusted Websites. Turn to Custom level : Custom level
45 Pls find Security Settings Trusted Sites Zone, switch and tick to Enable of Download signed ActiveX controls & Download unsigned ActiveX controls, then click OK. Turn to OK. Click Exit to save. Turn again to Extra (ALT+X)/Tools and select Compatibility View settings : Compatibility View settings
46 Fill in the IP-address, click Add and the IP-address will be shown, find below: Pls be sure that you have ticked both options!! Add Turn again to Extra (ALT+X)/Tools and Safety, DO NOT TICK ActiveX Filtering. If this option has been ticked, pls disable the option. Safety To view the images outside of your network, eg on a computer in another location, you need to "forward" the ports on your router. How to "forward" or switching the ports, will be in the manual of your router. There are also on the internet movies or clips to find the necessary "explanation" of various router models.
47 SMTP Server/ Port: you can find out SMTP port in the internet Click SSL Check, enable to set the SMTP server (Like Gmail). Send Address/ Password: Sender s ID and password. Receive Address: user can enter three different Address. Click Test to verify . Number of snapshot: Click and enable to send the the snapshot as attached file by . Snap Time interval: Set the Time Interval between two snapshot. DDNS: User can set the WANIP address, ORAY, 3322 IP and Domain Name etc. Click DDNS, and select the recommended DDNS Type: leadingdvr.com, the device will auto obtain an Domain Name, User also can use the other Domain Name, but it need to register on the website. Note:When visiting by Domain Name, User need to do port forwarding setting in router, and do HTTP and server port mapping., or enable the DMZ host in the router, and the IP as the DVR IP address.
48 Note:when you use the DDNS:leadingdvr.com,pls change your PC DNS like this:
49 FTP: this function is similar to the SMTP Server, build a FTP server by LAN computer, set user name and password. Add computer LAN IP address, Port in the DVR, and set the Remote Directory, after setting, then the snapshot can be sent to specify Catalog in computer PTZ: After connect the PTZ to DVR and enable, user can set the Address, Baud Rate and Protocol, only they match the PTZ, then can connect the PTZ Camera to DVR successfully. Address: The supported address range is 1~255, the PTZ address can be set manually on Dome Camera. Baud Rate: Each PTZ has a fixed factory Baud rate, while it connect to the DVR, the two Baud Rate must be consistent. Protocol: Each PTZ has a protocol, while it connect to the DVR, the two protocol must be consistent.
50 User Admin: Use the user name to login the system and has all the operating right, Administrator can add and delete Non-admin account, change all the account passwords,including administrator s,and set the Permissions right to non-admin account Add User
51 Permission setting: set the Permissions right to non-admin account according to needs. Block/ Allow List: to block or allow the computer user in a segments to visite the DVR. Click Block list,and set the initial IP address and end IP address, the computer users in this segments can not visit the DVR; if click Allow List,set the segments, the only allow these users to visit the DVR.
52 QR Code QR & INFORMATION The QR code Image can be scaned by Mobile phone. If the mobile phone didn t install a surveillance APP, can use other mobile scanning software to scan the QR Code to connect to the download address (Android & Apple ), and download a free Mobile App. If it already install surveillance software (Mobile App), can scan the UID (P2P) to realize mobile live view. System: user can find the Device Name, Device ID, Firmware Version and Release Date.
53 Event: user can search all the events here like: Motion detection, Sensor Alarm,Video loss Log: User can check all users device operation (including administrator)
54 Network: user can check the device port, IP Address and P2P (UID) information etc, also can check the Cloud status in this column. Online User: User can check the PC port and APP visitors list in this column.
55 REMOTE VIEW If the Computer is Win8 System, pls log on the computer as administrator LAN When DVR connect to the Router, firstly, check the router IP address,generally, the IP is ( ), then enter the network control setting of the DVR, and enter the IP Address and Gateway ( Router IP), the IP address must in the same segments with the router. For example: Router IP is , the DVR IP set as X After finishing the setting, open the IE Browser, and enter the cloud web site: or you can enter DVR IP address: X:Web port, then click Enter, and it will download the IE Active-X control ( IE Browser must allow to download the Active-X control, for more detailed operation, please refer to appendix 1) after complete download, a dialogue window will pop up, as the Picture:
56 There are two kind of login way in Login window: IP Login and P2P Login. 1) IP Login: The default User name is admin, Password: ,Device port is the same as Media port. Click Login and enter the live view. 2) P2P Login: P2P ID can be found in the DVR ( QR & Information Column), The default User name is admin, Password: ,Click Login and enter the live view.
57 Live view : WAN 1. Via Router Step 1: Please refer to LAN setting above. Step2: After confirm the LAN connection, user need to do port forwarding in the router, as the the picture below. Each DVR need two port forwarding : Web & media port ( user also can add the LAN IP Address to DMZ, and different router has different setting way, please refer to the router user manual). After port forwarding, check the WAN IP Address in Status of the router, and add the WEB port via WAN IP to visite the DVR. For example: Visit via Port or Name:WEB Port.
58 Step 3: Because the changing WAN IP Address is not convenient for visiting, user can visit via Domain Name. Enter Main Manuel---Advanced Setting ----DDNS---Click DDNS ----Select the Domain Name :leadingdvr.com Just enter: Name:WEB Port to visit the DVR. Via CMS First, please copy the PC CMS from the software disk and install, for the first running,you need to register administrator and set the Password. As the picture below:
59 After registered, then you can login the CMS Live View : Add Device: right click the Device List, click Add Device, and will pop up a window as picture below. There are two kinds of Login Type: IP Login ( visit via DDNS), and P2P Login (visit via UID)
60 1.IP Login: Need IP Forwarding via IP Enter the Device Name, Device IP : Enter the IP Address or Domain Name ; Device Port: Enter the Media Port, and the Factory Default is 9000 Factory Default User Name: admin,and Device Password: P2P Login: No need Port Forwarding via UID After finish adding, right click the new-added device, Click all the Channel and open to remote control
61 The Function Key in Live View: Key Name Live View Remote Playback Local Playback E-Map Config (Screen) Lock PTZ Preset Point Setting Cruise Video (Adjustment) Remote Playback

62 Right click the added device, and click DVR Setup, as the picture below.
63 MOBILE SURVEILLANCE Android for Example, Apple App is Similar 1.Please download VIDEODEFENCEV2 from Google Play or App Store 2. Download VIDEODEFENCEV2 fr om Google Play Click Device
64 Click Register Type [Common login]
65 Select QR Code
66 Click Live
67 Click this
68
69 Q & A 1. Q: The DVR can not detect HDD A: Please check the HDD cable and the power cable whether is in connection to DVR, or the Main board s HDD Port whether is in good condition. If yes, please check the HDD whether is the support type to the DVR, please refer to the specification. 2. Q: No video signal or abnormal view shows on the Monitor while the DVR and camera in good connection and power supply. A: Please check the BNC connection status, or wether the cable is in aging, or whether the resolution (NTSC/PAL) math or not. 3. Q:The DVR radiating effect A:The DVR will produce heat while it s running, please put the DVR in a safe and good ventilating place to avoid any bad effect causing by longterm work in high temperature environment. 4. Q:Why the remote control doesn't work while the the remote view and the front panel button is working normally. A:Pls make sure the remote control and the DVR IR receiver must be aligned while operating. If remote control still not working,please check the battery condition. If it's the the problems above, please check whether the remote control is broken or not. 5. Q: Can the DVR support PC HDD if it have been install into DVR? A: The HDD can be used if it is our system support type, but please be noted that all the file will be loss once the DVR runs. 6. Q: Can the DVR keep recording and playback at the same time? A: Yes, it can. Our DVR system support to record and playback at the same time. 7. Q: Can I delete some record file in the DVR HDD? A: For safety, we suggest no to delete some record file, user can format the HDD if he need to delete all the record 8. Q: Why I can not login the DVR CMS? A: Please check the network connection and the setting is correct or not,or whether RJ-45 port is in good connection, or the user name or password for network login is correct or not. 9. Q: Why there is a temporary stutter while remote live viewing. A: It s normal thing if it stutter within 5 second temporally 10.Q: Can not find any record information while need to playback A: Please check the HDD whether in good connection with the DVR, or the system time is correct or not. If this still happen after setting and restart the system, please check the HDD is damaged or not. 11.Q:After setting, the PTZ can not be controlled. A: Please check the following reasons:,1 PTZ Camera fault,2 The PTZ decoder setting, connection,installation are incorrect.,3 The DVR PTZ setting is incorrect.,4 The PTZ decoder don t match to the DVR protocol ;,5 The PTZ decoder don t match the device address;,6while it connect with multi-decoder,you need to add a resistance of 120 ohms at the end of the PTZ decoder line A,B, to eliminate reflection and impedance matching. Otherwise it will cause the PTZ control instability
70 12. Q: Why the Motion Detection function is not working A: Please check the Motion Detection setting, level of sensitive are correct or not. 13. Q: Why the Alarm is not working? A: Please check the alarm setting, alarm port, alarm input are correct or not. 14. Q:Why the DVR keep buzzer? A: Please check the relevant Alarm setting, the Motion Detection is enable or not, I/O Alarm whether set as NC, and the relevant Disk Alarm setting. 15. Q: After connected to BNC, DVR can display video but the menu, mouse, front panel button and remote control are all unavailable. A: Connect VGA output : change the output to "CVBS" in "main menu-basic setup--system" and then connect BNC output.if no VGA displayer, please press the front panel "menu" button for about 15s till system switching to BNC output mode automatically Q: How to do if forgetting password. A: If the modified password is lost, you can press the front panel "enter" button for about 15s to restore the factory default. Factory default password is Q: If DVR always happens reboot or stops at the turn on logo and can't enter into the system, how to do? A: First of all, take the HDD out and check the problem solved or not. If problem solved, then it should be the HDD's error and formating the HDD is the solution. If problem still exist, please connect seller or supplier for latest upgrading software 18. Q: Connected with VGA or BNC (CVBS definition) output, DVR shows logo but no image displays after entering system. How to do? A: Connect the DVR with HDMI displayer,then alter the definition to VGA or BNC via it. FYI: The suitable definition of BNC is CVBS ; HDMI is 1920*1080 ; VGA are the left options.
71 Nothing contained in the manual attached to this product shall be duplicated, disseminated, transcribed or stored in any retrieval system or translated into any other language without written consent. The product specifications and information contained in this manual are for reference only, and the contents thereof are subject to updating without notice, and If you want to waste this product, please hand over to have environmental qualification of third parties. We assume no responsibility for any damage arising from the improper use of this product, the product names mentioned in this manual are intended for identification only, and may also be registered trademarks or copyrights owned by other companies. The product color provided in this marketing package may differ from the color shown on the original package.the pictures are for reference only, the technical specifications are subject to change without notice, the accessories available may differ from market to market, please consult your local dealer. This manual has been checked carefully but any spelling or technical error is precluded, such error or omission will be corrected in the new version, we have the right to modify any and all information contained in this manual without notice. Electric products must not be put into household waste. Please bring them to a recycling centre. Ask your local authorities or your dealer about the way to proceed. The specifications are typical. The actual values can slightly change from one unit to the other. Specifications can be changed without prior notice. WARRANTY CONDITIONS The date the product leaves the importer is considered to be the date the warranty begins. Only companies approved by Tronios are allowed to work on the equipment. During warranty period (defective) equipment must be returned to the dealer by pre-paid mail in the original box. Potentiometers have a limited lifetime and are not covered by the manufacturer for more than normal use. For all service enquiries, refer to your local distributor,as he is best able to help you. Do not attempt to make any repairs yourself. This would invalid your warranty. Do not make any changes to the unit. This would also invalid your warranty. The warranty is not applicable in case of accidents or damages caused by inappropriate use or disrespect of the warnings contained in this manual. Tronios cannot be held responsible for personal injuries caused by a disrespect of the safety recommendations and warnings. This is also applicable to all damages in whatever form.
72 NEDERLANDS Veiligheid 1. Bewaar de verpakking zodat u indien het apparaat defect is, dit in de originele verpakking kunt opsturen om beschadigingen te voorkomen. 2. Voordat het apparaat in werking wordt gesteld, altijd eerst een deskundige raadplegen. 3. In het apparaat bevinden zich onder spanning staande onderdelen; open daarom NOOIT dit apparaat. 4. Bij het verwijderen van de stekker/12vdc adapter uit het stopcontact nooit aan het snoer trekken. 5. Verwijder of plaats een stekker nooit met natte handen resp. uit en in het stopcontact. 6. Indien zowel de stekker en/of netsnoer als snoeringang in het apparaat beschadigd zijn dient dit door een vakman hersteld te worden. 7. Indien het apparaat zo beschadigd is dat inwendige (onder)delen zichtbaar zijn mag de stekker NOOIT in het stopcontact worden geplaatst én het apparaat NOOIT worden ingeschakeld. Neem in dit geval contact op met de dealer. 8. Reparatie aan het apparaat dient te geschieden door een vakman of een deskundige. 9. Sluit de 12Vdc adapter alléén aan op een VAC / 50Hz stopcontact.verwijder altijd de adapter uit het stopcontact bij vervanging. (Gebruik een originele Lithium pack ter vervanging). 10. Toestel niet opstellen in een stoffige ruimte, in een ruimte waar zich bijtende chemicaliën bevinden, in de buurt van warmte bronnen zoals radiatoren, in direct zonlicht en niet op een vibrerende ondergrond plaatsen. Dek ventilatie-openingen nooit af en plaats de DVR altijd meer dan 15 cm verwijderd van objecten ivm koeling. 11. Bij onweer altijd de stekker uit het stopcontact halen, zo ook wanneer het apparaat voor een langere tijd niet gebruikt wordt. 12. Als u het apparaat lang niet gebruikt heeft en het weer wil gebruiken kan er condens ontstaan; laat het apparaat eerst op kamertemperatuur komen alvorens het weer in werking te stellen ; apparaat nooit in vochtige ruimten en buiten (in de regen) gebruiken. 13. Om ongevallen in bedrijven te voorkomen moét rekening worden gehouden met de daarvoor geldende richtlijnen en moeten de aanwijzingen/waarschuwingen worden gevolgd. 14. Het apparaat buiten bereik van kinderen houden. 15. Gebruik geen schoonmaakspray om de schakelaars te reinigen. Restanten van deze spray zorgen ervoor dat smeer en stof ophopen. Raadpleeg bij storing te allen tijde een deskundige. 16. Zorg dat uw handen schoon zijn tijdens het gebruik. 17. Gebruik geen overmatige kracht bij het bedienen van het apparaat. 18. Tracht het apparaat niet schoon te maken met chemische oplossingen. Dit kan de lak beschadigen. Gebruik een droge doek om schoon te maken. 19. Blijf uit de buurt van electronische apparatuur die bromstoringen zouden kunnen veroorzaken. 20. Bij reparatie dienen altijd originele onderdelen te worden gebruikt om onherstelbare beschadigingen en/of ontoelaatbare straling te voorkomen. 21. Schakel eerst het toestel uit voordat u het netsnoer en/of aansluitsnoeren verwijdert. Verwijder netsnoer en aansluitsnoeren voordat u dit product gaat verplaatsen. Zorg ervoor dat het netsnoer niet beschadigd/defect kan raken wanneer mensen erover heen lopen. In Nederland/Belgie is de netspanning Vac/50Hz. Indien u reist (en u neemt het apparaat mee) informeer dan naar de netspanning in het land waar u verblijft. 22. Harddisks altijd bij erkende bedrijven kopen. 23. Deze handleiding gaat over de basisinstructies van een DVR. 24. Nuances of niet-gedetaillerde updates vinden plaats zonder u op de hoogte te brengen. OVERZICHT Introductie : Dit product is een consument-gericht 4 -kanaals CIF/Half-D1/D1 real-time netwerk DVR en bezit de meest geavanceerde SOC technologie en neemt de standaard H.264 encoding methode aan, zodat de beeld kwaliteit en de netwerk overdracht beter is en het systeem stabieler is; de 1U standaard uitvoering is overal te gebruiken zoals in winkels, supermarkten, scholen, hotels, Internet cafés en voor allerlei privé doeleinden waar kwaliteit een eerste vereiste is.
73 Verpakking en accessoires : Één IR afstandsbediening Een set batterijen Certificaat Handleiding Een SATA hard disk datakabel Een 12Vdc adapter Een set montageschroeven. Een CD. Eigenschappen : Standaard H.264 video compressie formaat 16-bit true-color semi-transparante grafische menu interface Diverse opname modes: manual, timing, movement en alarm recording Geoptimaliseerde 4-kanaals gelijktijdige playback (single playback voor 8-kanaals) Backup s (USB stick, externe hard disk en via het netwerk) Een USB2.0 poort voor data backup, een USB2.0 poort voor de muis Multi-functionele bediening, opname, playback, monitor, backup en netwerk overdracht gelijktijdig Dual stream technologie Ondersteunt netwerk om multi-screen real-time browsing, parameter instellingen, copy of playback te implementeren Ondersteunt het live bekijken van beelden via de mobiele telefoon (via netwerk) Ondersteunt het classificeren van gebeurtenissen en heeft een preciese tijdzoekfunctie en playback De mogelijkheid om de fabrieksinstellingen terug te zetten. Flexibele USB interface voor de muis Kenmerken Omschrijving Systeem Embedded LINUX OS Video compressie H.264 Video ingang 4/8/16 channels BNC Video uitgang Ondersteuning BNC, VGA en HDMI Audio in/uitgang Zonder /1/2/4/8-kan. RCA ingang ;zonder/1-kan. RCA uitgang (optioneel) Alarm in/uitgang Zonder/4/8-kan. ingang (optioneel);zonder/1 kan. uitgang(optioneel) Display 1/4/9/16-channels Multiplex bediening Live, opname, netwerk,mobiele telefoon gelijktijdig Opname mode Timer/handmatig/bewegingdetectie/alarm Opname frame rate PAL:25fps NTSC:30fps Opname quality Hoogste, hoger,medium,laag,lager,laagste Opname resolutie CIF/Half-D1/D1 frame rate instelling Playback 1/4/8 /16 kanaals playback gelijktijdig (optioneel) Backup Ondersteuning USB stick backup, externe hard disk backup, netwerk backup, file backup, backup met tijdinstelling Actie / Alarm Ondersteuning alarm Zendt beelden naar het gewenste -adres FTP transmissie Ondersteuning
74 PTZ control Ondersteuning PTZ protocol PELCO-D,PELCO-P etc PIP Ondersteuning Zoom Ondersteuning HDD Ondersteuning 1 SATA HDD,capaciteit tot 4T Network and protocol 1 RJ-45 10/100M via Ethernet,Ondersteuning TCP/IP DHCP DNS DDNS UPNP NTP etc IE browser Ondersteuning Client software Ondersteuning CMS Ondersteuning Dual stream Ondersteuning(hoofd en secundaire afwisseling) Group play Ondersteuning toegang 5 gebruikers online Multi-language Ondersteuning Beelden via smartphone bekijken Ondersteuning windows/symbian/iphone/blackberry/android systeem QR code Ondersteuning P2P cloud Ondersteuning DDNS Ondersteuning domein naam Muis interface USB2.0 Backup interface USB2.0 Afstandsbediening Ondersteuning(Support controller ID matching) Gebruiker Ondersteuning multi-level gebruiker Voeding DC12V 3A/5A Bedrijfstemperatuur 0-50 en vochtigheidsgraad 10%-90% HDD vervangen (1)Open het deksel van de DVR, monteer de HDD in de steun;. (2)Sluit de HDD data en voedingskabels aan; (3)Draai de schroeven vast van de HDD; (4)Plaats het deksel terug. Opmerking! Haal allereerst de stekker uit het stopcontact. Aansluiting camera en monitor Sluit de camera met een BNC kabel aan op de DVR video ingang, sluit de DVR video uitgang met een BNC kabel aan op de monitor (Zie achterzijde ). Verbind de RS485A (+) en de B (-) met een camera die geschikt is om gebruikt te worden als Pan, Tilt Zoom camera. Zie hieronder de afbeeldingen voor de achterzijde.
75 DVR INTRODUCTIE 1. Sluit de camera aan met de video kabel. 2. Sluit het andere einde aan op de gewenste input. 3. Sluit vervolgens de voedingsplug van de video kabel aan op de mee geleverde splitterkabel. 4. Herhaal de bovenstaande stappen voor iedere camera. 5. Sluit de uitgang, met het ontstoor blokje, van de splitterkabel aan op input van de DVR set. 6. Sluit ten slotte de Adapter aan op de input van de splitterkabel.
76 Voorzijden:
77 OMSCHRIJVING NO Beeld Naam Omschrijving. 1 MUTE Het geluid wordt uitgeschakeld 2 INFO Check informatie bij het toestel 3 PIP Geeft live beelden picture in picture weer 4 PTZ Roep de PTZ camera op 5 PLAY / PAUSE Play en pauze schakeling 6 REW Terugspoelen 7 SEARCH Zoek een video file op 8 REC Start of stop de handmatige opname 9 MENU Roep het hoofdmenu op(druk 15sec om naar VGA -CVBS menu te gaan) 10 ESC Uitschakelen 11 USB USB aansluiting 12 POWER Aan/Uit schakelen 13 DIRECTION Beweeg de cursor naar rechts/links/boven/beneden 14 Enter Bevestiging (druk 15sec om naar fabrieksinstelling te gaan) 15 IR Receiver Sensor IR afstandsbediening 16 STATUS Status indicatie
78 ACHTERZIJDE EN POORTEN Opmerking: Uw DVR kan een andere uitvoering hebben dan de onderstaande figuren.
79 Poort omschrijving: NO. Naam Omschrijving 1 VIDEO IN BNC connector voor analoge video ingang 2 VIDEO OUT BNC connector voor analoge video uitgang 3 AUDIO IN RCA connectoren voor analoge audio ingang 4 AUDIO OUT RCA connector voor analoge audio uitgang 5 VGA DB15 voor VGA monitor 6 HD-port HDMI high definition aansluiting 7 NETWORK RJ-45 connector voor Ethernet 8 RS485 Aansluiting voor de PTZ camera(a > +,B > -,G > Ground) 9 DC 12V DC 12V voeding 10 ALARM Alarm uitgang (Aan/Uit schakelaar Out) 11 SENSOR Alarm ingang ( Aan/Uit schakelaar In) 12 Ground - Aarding Opmerking: 1, RS485 A moet worden verbonden met PTZ data+, B to data-; 2, Aanbeveling om de DVR behuizing met aarde te verbinden.
80 IR AFSTANDSBEDIENING De DVR kan worden bediend met de IR afstandsbediening. Controleer of de batterijen geplaatst zijn. NO. Naam Omschrijving 1 POWER OFF Uitschakelen van de DVR 2 ESC Het menu verlaten 3 FAST Snel terugspoelen REWIND 4 SETP Frame voor frame afspelen 5 PIP Laat video picture in picture zien 6 RECORD Start/stop handmatige opname 7 MUTE Schakelt het geluid uit 8 NUMBER Numeriek toetsenbord 0-9, MENU Roep het menu op (druk 15sec om naar VGA en CVBS menu te gaan) 10 ENTER Bevestig een instelling (druk 15sec om naar de fabrieksinstelling te gaan) 11 FAST Snel vooruitspoelen FORWARD 12 PLAY / Afspelen en pauzeren PAUSE 13 PTZ Beweeg de PTZ camera 14 SEARCH Zoeken van videofiles 15 ZOOM Zoomen van het beeld
81 BASIS BEDIENING Tips:De DVR standaard display mode is VGA, als de gebruiker de DVR BNC(CVBS) poort wil gebruiken, druk dan de "menu" toets ongeveer 15sec tot het systeem automatisch schakelt naar BNC display mode, of gebruik de VGA uitgang om toegang te krijgen tot het DVR systeem en regel de scherm display resolutie af op CVBS. De Setup Wizard 1. Sluit de DC 12V adapter aan op de DVR aan de achterzijde 2. Zet de DVR aan, ( Power lamp brandt) 3. Start de setup Wizard 4. Nu kunt u de basis parameters configureren zoals toestelnaam, taal, datum en tijd,enz. 5. Als u de DVR met het Internet via een router wilt verbinden, moeten de netwerk parameters worden geconfigureerd. 6. De HDD moet worden geformatteerd als u de video files wilt opslaan 7. Klik apply, de DVR begint met normaal opnemen
82 Systeem Login Fabrieksinstelling: user name: admin; password: (8x 0) Live Beeld Iconen weergegeven in het beeld van de monitor: Groene icoon: Handmatig opnemen. Blauwe icoon: Normaal opnemen. Rode icoon: Sensor alarm ( S = De alarm sensor is getriggered ). Gele icoon : Bewegingdetectie alarm opname (rode menselijk figuur betekent een opname).
83 Live bedieningspaneel Door een rechter klik met de muis, zal onderstaand bedieningspaneel verschijnen in het scherm : Main menu: klik en ga naar het hoofdmenu Split mode: klik en selecteer de display mode: 1x1,2x2 display mode enz PIP: Op het scherm verschijnt een beeld, ondertussen verschijnt onderaan een klein beeld van de andere kanalen (picture in picture) Sequence patrol: Camerabeelden van de camera s volgen elkaar op in Live View mode Digital zoom: Vergroot het beeld van het geselecteerde kanaal Sound: Afregelen of uitschakelen van het audio signaal PTZ: Bediening van de PTZ dome camera; stel de verblijf, bewegingsgraad en route in 1. Voorafinstelling: Voor de bewegingsgraad van de PTZ camera (standaard op 5 of hoger zetten) 2. Cruise line instelling: Klik op "Add", u kunt nu de verblijftijd instellen op elk vooraf ingesteld punt. Dan zal de PTZ beginnen te bewegen 3. Tracking: Klik op start record, klik dan op de richting toets en selecteer de te volgen rotatie route. Na opname klikt u op Start Track, de camera zal de opgenomen weg volgen.
84 Capture: Maak een scherm opname en sla deze op (HDD). REC: start / stop handmatige opname Quickly review: start de weergave van een opgenomen file. Ga met de muis op het bedieningspaneel tot u het gewenste element hebt gevonden en u ziet, klik nogmaals en houd de linker muisknop vast en sleep met de muis het gewenste element op het bedieningspaneel naar een bestemming. De elementen kunnen naar elke positie worden gesleept. Playback interface 1- Pause: Pauzeer het afspelen van het beeld van de opgenomen files 2- Stop: Stop het afspelen van het beeld van de opgenomen files 3- Playback in frame : Afspelen van de files in frame in pauze mode. 4- Fast Forward: Snel verderspoelen van het opgenomen beeld met een snelheid van X1/4, X1/2, X1,X2,X4,X8,X16, etc. 5- Fast rewind: Snel terugspoelen van het opgenomen beeld met een snelheid van X1/4, X1/2, X1,X2,X4,X8,X16, etc. 6- Single screen : Weergave in enkel scherm mode 7- multi-screen: Weergave in multi scherm mode
85 8- file type: Kies het type van de opname file, bv. bewegingdetectie, sensor alarm, etc : Kies voorgaande of volgende files 11-digital zoom: zoom in het geselecteerde kanaal 12-color: Stel de kleur in van het kanaal. 13- snapshot: Zoek een scherm opname die op de HDD is opgeslagen 14- Edit: Bewerk tijdens het afspelen opgenomen files 15- save: Sla de bewerkte files op 16-Audio: Tijdens afspelen audio in/uitschakelen Hoofdmenu Klik de Menu toets en geef enter, het omvat 7 functies voor de DVR: Basic setting, Backup & Playback, Upgrade & Maintenance, Record & Schedule, Alarm & Schedule, Advanced Setting en QR & informatie. De basisinstelling bevat 6 opties: System,Time, DST, Live, Monitor and Mask. Systeem Klik System en de volgende figuur verschijnt. Hier is intestellen de Device Name, Video Format, Password Check, show System Time, Startup Wizard, Max online Users, Screen Resolution, Language, Auto Logout etc. Hier volgen de namen en definities: Device Name: De systeem naam staat in de Client Software of CMS. Video Format : 2 mogelijkheden: Pal en NTSC. Password Check: De gebruiker moet de User name en Password invullen om instellingen te kunnen doen. show System Time: Het selecteren of de tijd aangegeven moet worden.
86 Startup Wizard:Click and it will shows the related information of the Wizard. Max online Users: Geef het maximale aantal gebruikers online in. Screen Resolution: De resolutie van live view. Optioneel: VGA800*600 VGA1024*768 VGA1280*1024 and HDMI(1920*1080). Tip: Controleer het toestel terwijl u schakelt tussen BNC en HDMI Language: Selecteer de gewenste taal Screen Saver (S): Hier is de time interval van de screen saver intestellen:(30s,60s,180s,300s), Als het toestel niet gebruikt wordt zal deze automatisch uitloggen en u dient opnieuw inteloggen. Tijd Hieronder kunt instellen Datum,Systeemtijd,Tiid zone. De fabrieksinstelling is GMT timezone, selecteer de juiste timezone in de kolom(bv:china GMT+8:00). Klik"Apply" en de instelling wordt opgeslagen.
87 DST In het DST scherm,selecteer DST,Time offset,mode, from Month/Week/Date/Time etc en vul in. Klik Apply en de instelling wordt opgeslagen. Live Klik Live : Klik kanaalnaam, een virtueel keyboard zal verschijnen. Klik Shift, hier kunt u schakelen tussen hoofdletter en Chinese, de gebruiker kan het kanaal herbenoemen. Klik en selecteer de kanalen in Live interface, dan klik Setting, u komt in Image Adjust interface: De gebruiker kan Brightness, Hue, Saturation en Contrast regelen; Klik Default, u komt dan in de fabrieksinstelling. Klik OK en alles wordt opgeslagen. De gebruiker kan direct dezelfde kleurparameters instellen van alle kanalen door ALL te klikken. Vul de parameters in en klik op Apply.
88 Beeld instelling: Monitor Display Mode optie : Single SEQ Time (Second): Live view schakelinterval tussen het weergeven van opeenvolgende kanalen.
89 Mask Mask: De gebruiker kan drie zones maskeren in live view beelden. Mask Area Settings: Klik Setting, ga naar live view beeld, klik met de linker muisknop, houd deze vast en sleep de maskeerzone zoals hieronder is weergegeven, Klik Apply en sla de instelling op. Mask Area Setting
90 Menu openen Om in het menu te komen drukt u op de menu toets. De standaard ingestelde display mode is VGA, wanneer u de BNC output gebruikt kunt u deze selecteren door 15 seconden de menu toets op de afstandsbediening, in te drukken. OPSLAAN & AFSPELEN Playback Systeemondersteuning "Playback By Time", By Even, By File en Image. Klik en ga naar Data retrievel (ophalen). By Time Eerste stap: Klik Playback By Time, zoals volgende afbeelding toont: Tweede stap: Selecteer het kanaal en de weergavemodus, de datum markering in de kalender betekent dat het is opgenomen. Derde stap: Selecteer de datum waarop u wilt afspelen, klik op "Search", kies de starttijd en klik op de knop om het afspelen te starten. De geselecteerde Time-bladen worden getoond in blauw. Opmerking: De rijen zijn de uren, de kolommen zijn kanalen.
91 By Event 1 e Stap: Klik Playback By Time, zie hieronder: 2 e Stap: Klik Search, de informatie over de gebeurtenis wordt getoond in de event list box, dubbelklik deze file om aftespelen. 3 e Stap: De gebruiker kan datum en kanaal selecteren, klik Motion, Sensor of All om te zoeken. By File 1 e Stap: Klik Search, de informatie over de gebeurtenis wordt getoond in de file list box. De gebruiker kan datum en kanaal selecteren om te zoeken. 2 e Stap: Klik All, de gebruiker kan alle geselecteerde files opslaan. 3 e Stap: Dubbelklik de file om aftespelen.
92 By Image De gebruiker kan Live beelden ophalen door tijd en kanaal te selecteren en deze verwijderen, vastzetten en opslaan. Klik de richtingtoetsen om beelden te bekijken. Standaard zijn 2000 beelden opteslaan, indien er meer dan 2000 zijn behoud het systeem de oude beelden. Dubbelklik op de beelden om aftespelen. Backup Het systeem ondersteunt backup op een USB-stick en backup via Internet Eerste stap: Plaats de USB-stick en voer de gegevens in in de back-up-interface, zoals de afbeelding hieronder laat zien: Tweede stap: Selecteer de starttijd en eindtijd en het kanaal, klik op "Search", de data informatie wordt weergegeven in de keuzelijst Derde stap: Klik op één van de gegevens of klik op "All", en klik op 'Back-up', een back-up Informatiescherm zal verschijnen. Vierde Stap: In het Backup Informatievenster kan de gebruiker het bestand controleren. Selecteer de Storage Media en Save file type en klik op "Start" om de back-up te starten.
93 Selecteer het bestand en klik op "Backup", er verschijnt een venster zoals de afbeelding hieronder laat zien, de gebruiker kan de grootte van de geselecteerde bestanden controleren en selecteert het backup formaat van het opgenomen bestand, zoals: H.264 (aanbevolen backup-formaat), AVI, WAVE (Audio-formaat). Tijdens de back-up, toont een back-up voortgangsbalk de bestanden die zijn opgeslagen en de voortgang. Opmerking: Gebruik de computer om de verwisselbare harde schijf (FAT32-formaat) te formatteren voordat bestanden worden opgeslagen. De DVR ondersteunt geen verwisselbare harde schijf formattering.
94 Disk Hier kunt u de status van de Hard Disk en U disk zien en kunt u formatteren.
95 UPGRADE & ONDERHOUD Upgrade Simpele upgrading procedures: 1. Formatteer de USB Stick ( FAT32)/ of leeg de USB Stick 2. Unzip de zip file 3. Zet al de firmware software in de root van de USB-stick (Geen folder gebruiken). 4. Plaats de USB Stick in de DVR 5. Schakel de DVR uit 6. Schakel de DVR in & herstart 7. De DVR zal de firmware Auto Detecteren en de DVR upgraden. P.S: Tijdens de DVR upgrading dient u de DVR niet uit te schakelen, wacht een aantal minuten.
96 Import / Export De gebruiker kan de Data naar een USB stick( storage device ) exporteren voor een backup en importeren van de USB stick naar de DVR. Onderhoud Voor Factory setting, Logout en Shut Down.
97 OPNAME & TIJDPLANNING Opname Klik Record en de volgende afbeelding wordt getoond: Inschakelen: Klik op "Record", "Audio" van het Kanaal, of klik op "Alle" om dezelfde instelling te doen. Record Bitrate: De gebruiker kan de resolutie, fps, codering, kwaliteit, en max bitrate selecteren per kanaal en voor alle kanalen door te klikken op "All". Klik op "Standaard" /Default en het systeem zal de standaardinstellingen herstellen; Klik op "Apply" en de bovenstaande instellingen worden opgeslagen. Opmerking: Als de fps instelling meer is dan de max. instelling, zal de fps automatisch worden aangepast. NB: De grootte van de opgenomen file hangt af van de bitrate, hoe hoger de bitrate, deste groter.
98 Tijd: 1. Pre Record Time: De opname tijd voor een bewegingdetectie, Alarmering enz. 2. Post Record: De opname lengte na Alarm, Optionele tijd: 10/15/20/30/60/120/180/300 seconden; 3. Expired: De verlopen tijd na de opname, wanneer deze buiten de ingestelde tijd valt wordt de opname file automatisch verwijderd. Overlay: De camera naam en de Tijdscode weergeven op de Live beelden. Druk op de overlay tab vervolgens selecteer Setting, In de Live view kan de gebruiker de naam van de camera en de tijdscode ergens in het beeld plaatsen, zie onderstaande plaatjes. De gebruiker kan de zelfde Time stamp instellingen toepassen op elk kanaal tegelijkertijd door op All te drukken en enter om de plaatst te bepalen. Druk op Default, het system zal de standaard instellingen terug zetten; druk op Apply, dit zal de bovenstaande data opslaan.
99 Voor het slepen : Na het slepen : Recycle Record: Klik Recycle Record, wanneer de HDD vol is, de DVR blijft opnemen en bewaart automatisch de oude opname files. Klik Apply en de files worden opgeslagen.
100 Planning: u kunt hier instellen: 7 dagen per week en 24 uur per dag, Door de muis te slepen kan de tijd worden ingesteld, de blauwe zone betekent geselecteerd, de grijze zone betekent niet-geselecteerd. Selecteer het kanaal, dubbel klik links met de muis en vul de wekelijkse planning in, zie hieronder, Klik Add om de opname planning van die dag toe te voegen; Klik Delete om het geselecteerde te verwijderen. NB: Met de muis kunt u sneller slepen v.w.b. het regelen van de planning. Copy: U kunt de ingestelde dag kopiëren naar de volgende dag(en). Klik Apply en de instelling wordt opgeslagen. 2. U kunt ook een kanaalinstelling kopiëren naar een ander kanaal of alle kanalen, selecteer het kanaal en klik op Copy, klik Apply en de instelling wordt opgeslagen. Beweging/Motion : Dit is dezelfde instelling als bij Opname, zie hierboven. NB: Zie hieronder de Motion planning, dit is in geel weergegeven. Bij de standaard instelling zijn alle instellingen geel weergegeven.
101 Sensor : Ook dit is dezelfde instelling als Opname, zie hierboven. NB: Bij de standaard instelling zijn alle instellingen rood weergegeven. De gebruiker kan hier de datum en tijd invullen:
102 Sub-Stream U kunt hier de resolutie, fps, encode, quality en max bitrate instellen voor een enkel kanaal, of klik "ALL" voor alle kanalen. Klik "Apply" om op te slaan. NB: Na het selecteren van resolution en fps zal het systeem de remaining/resterende CIF fps laten zien. ALARM & TIJDPLANNING 5 Sub-menu s zijn aanwezig: Motion, Loss, Sensor, Other en Output. Motion/Beweging Het omvat 2 sub-menu s: Motion en Motion Schedule Motion: Inschakelen van Motion Alarm, instellen van de Alarm Continue Time (betekent de interval tussen twee alarm detecties), Action en Area.
103 Klik All, om alarm in te schakelen voor alle kanalen of selecteer het gewenste kanaal. Continue Time: Na de bewegingdetectie kan een tijd worden ingesteld (betekent de interval tussen twee alarm detecties). Action: Zie hieronder: Buzzer: Klik Buzzer, deze gaat af bij een bewegingdetectie Show Full Screen: Het getoonde beeld wordt op 100% zoom ingesteld tijdens een bewegingdetectie To Alarm Out: Klik en de gevoeligheid van de beweging wordt hier ingesteld. Klik OK om op te slaan. Klik Exit om uit de popup te gaan. Klik,wanneer het alarm wordt getriggerd, zal het systeem de alarm informatie naar het gewenste adres sturen. De info is: Event, capture, device name, device ID enz. FTP: Selecteer een ftp server in uw netwerk, bij een bewegingdetectie zal het systeem een momentopname naar een gespecificeerde Computer Directory sturen.
104 Snapshot/Momentopname : Selecteer het kanaal, bij een bewegingdetectie zal het systeem automatisch de momentopname op de HDD opslaan, als op is geclickt, zal het systeem de alarm informatie naar het gewenste -adres of FTP Server sturen To Record: Klik het gewenste kanaal en klik op OK om op te slaan. Klik Exit om te beëindigen. P.T.Z: Stel het Alarm Type en No. in, bij een bewegingdetectie zal de PTZ Camera de gebeurtenis opnemen Klik OK om op te nemen, klik Exit om te beëindigen.. U kunt dezelfde parameters gebruiken voor alle kanalen, Motion Area Setting: Klik Area, bovenstaand beeld wordt getoond. Zet het gevoeligheidsniveau in op(1-8), standaard is dat 4, hoe hoger de waarde hoe groter de gevoeligheid. Klik om alle zones te selecteren als Motion Detection Area,; Klik om alle geselecteerde zones te verwijderen,; Klik voor het gevoeligheidsniveau; Klik om de instellingen op te slaan; Klik om uit de mode te gaan. Motion Schedule: dit is dezelfde instelling als bij Opname. Opmerking: Wanneer u de instelling op alleen motion detecting zet moet u in de planning de normally record planning ge delete worden. Alleen dan neemt het toestel op bij een bewegings detectie.
105 Loss: Hier kunt u aangeven welke actie moet worden ondernomen wanneer de camera zijn beeld verliest of niet meer werkt.
106 Klik Action, zie hieronder: De trigger instelling van Alarm en To PTZ in Video lost is dezelfde instelling als in Motion/Beweging. U kunt dezelfde parameters gebruiken bij video lost to all Channels door op All te klikken. Klik Apply om op te slaan. Sensor Alarm Sensor alarm omvat 3 sub-menu s : Basic, alarm handling, Sensor Schedule. Basic: inschakelen sensor alarm kanaal en kies alarm type : NO of NC U kunt dezelfde alarm type parameters gebruiken bij alle kanalen, klik dan op ALL. Klik op Apply om op te slaan.
107 Alarm handling : Kies de alarm continue time en klik op Action. Buzzer: Klik Buzzer, deze gaat af bij een bewegingdetectie Show Full Screen: Het getoonde beeld wordt op 100% zoom ingesteld tijdens een bewegingdetectie To Alarm Out: Het alarm wordt gestart Klik,wanneer het alarm wordt getriggerd, zal het systeem de alarm informatie naar het gewenste adres sturen. De info is: Event, capture, device name, device ID enz. FTP: Maak en/of selecteer een ftp, bij een bewegingdetectie zal het systeem een momentopname naar een gespecificeerde Computer Directory sturen Snapshot: : Selecteer het kanaal, bij een bewegingdetectie zal het systeem automatisch de momentopname op de HDD opslaan, als op is geclickt, zal het systeem de alarm informatie naar het gewenste -adres of FTP Server sturen.
108 To Record: Klik het gewenste kanaal en klik op OK om op te slaan. Klik Exit om te beëindigen. To P.T.Z: Dezelfde instellingen als bij Motion/Beweging. Zie boven in deze handleiding Sensor Schedule: Deze instelling is hetzelfde als bij Opname. Zie boven in deze handleiding NB: De Sensor record schedule fabrieksinstelling wordt in blauw weergegeven. Other: Disk Full in Alarm type (zie hieronder) betekent dat als de disk capaciteit minder is dan de instelling van Disk Shortage Alarm, een prompt wordt weergegeven rechtsonder in het scherm; IP confliction betekent dat als 2 of meer PC s hetzelfde IP adres delen in hetzelfde netwerk segment, alarm werkt na het instellen van het buzzer alarm en trigger alarm; Selecteer Disconnect ---Klik Buzzer of Trigger. Het system zal een toon laten horen of schakelt de alarm schakelaar of zend een . Hetzelfde geldt voor de volgende alarm instellingen, Connection problem en HDD disconnected. Om alle instellingen weer op de standard instellingen te zetten selecteerd u default en vervolgens apply om de instellingen op te slaan.
109 Uitgang Sensor alarm omvat 3 sub-menu s : Relays, Alarm out Schedule, Buzzer. Relays: In deze kolom kan de Alarm out name, worden ingesteld per kanaal, selecteer de Alarm Continue Time (betekent de interval tussen twee alarm detecties); u kunt ook alle kanalen instellen door op All te klikken. Klik op Apply om op te slaan. Alarm out Schedule: Deze kan ingesteld worden zoals bij Opname, zie boven in deze handleiding.
110 NB : De fabrieksinstelling is hieronder blauw weergegeven. Buzzer: Klik : Buzzer en selecteer Continue Time NB: De Buzzer moet worden aangeklikt anders werkt deze niet!
111 Geavanceerde instellingen De volgende 7 sub-menus zijn van toepassing: Network, , DDNS, FTP, PTZ, User Admin, en Block / Allow List. Netwerk HTTP Poort: Standaard poort: 80, bij het gebruik van de IE browser en u wilt op afstand kijken dan dient u een nieuwe poort toe te voegen. IP adres als u bv reset als 7804, dient u in te voeren en niet Media Poort: voor CMS,, Mobile App, standaard instelling : 9000 UPNP: Klik UPNP de gebruiker kan de DVR gebruiken via WAN ( handmatig de poort forwarden wordt aanbevolen.) Netwerk Type: Inclusief : STATIC, DHCP, PPPOE en 3G. Als u STATIC selecteert, moet het IP adres, Subnet Mask, Gateway, aanbeveling DNS Server en Alternate DNS Server worden ingesteld. NB: De DVR en de router moeten in hetzelfde netwerk. B.v.: Router IP is , dan is de DVR IP xxx, de toegangspoort is Als u DHCP selecteert zal automatisch het IP adres, Subnet Mask, Gateway, aanbevolen DNS Server en Alternate DNS Server enz worden ingesteld. Bij PPPoE moet de gebruiker gebruikersnaam, passwoord, opslaan en herstart-het-systeem kiezen, De DVR zal automatisch een IP adres verwerven. De 3G functie wordt op dit toestel niet ondersteund.
112 Netwerk instellen Ga in het menu naar de Advanced settings, selecteer de keuze Netwerk. U kunt nu kiezen uit de instellingen STATIC, DHCP, PPPoE of 3G. De setting UPNP wordt afgeraden i.v.m. veiligheidsrisico s. Bij de instelling STATIC dient u zelf de netwerk instellingen in te vullen. Wij raden aan de netwerk instellingen op DHCP te zetten. De netwerk kabel dient met de router verbonden te zijn. Druk nu op de Test button, onder in het scherm zal nu, als het goed is, OK te zien zijn. Ga nu in het menu naar de QR&Information pagina en selecteer de optie Network. Nu krijgt u het verkregen IP-adres te zien, tevens staan hier de poorten vermeld. Met dit IP-adres kunt u, binnen uw eigen netwerk, de beelden van de DVR-set op de computer bekijken. Start de Internet Explorer op en voer in de adres balk het IP-adres in. Wanneer het niet lukt verbinding te maken met de DVR-set kunt u onderstaande instellingen toepassen in de Internet Explorer. Deze instellingen dient u éénmalig toe te passen.
113 Instellingen DVR op Internet Explorer 11. Open IE 11 en ga dan naar Extra(ALT+X) kies vervolgens Internet opties: Druk vervolgens op beveiliging en selecteer vertrouwde websites: Druk op de knop websites en vul het IP-adres van de DVR in:
114 Haal het vinkje bij de serververificatie weg en druk vervolgens op Toevoegen Nu zal het IP-adres zijn toegevoegd aan de vertrouwde websites. Selecteer vervolgens de knop aangepast niveau :
115 Zoek dan in deze lijst de onderstaande instellingen op, stel deze in op Inschakelen: Druk vervolgens op OK. Sluit nu de internet opties af. Ga wederom naar Extra (ALT+X) en kies vervolgens Instellingen voor compatibiliteitsweergave: Vul hier het IP-adres ook in, door op Toevoegen te klikken zal het IP-adres in het onderstaande vak worden weer gegeven: Zorg er voor dat de beide optie aangevinkt zijn.
116 Ga wederom naar Extra (ALT+X) en kies vervolgens Beveiliging, check of er een vinkje voor ActiveX Filtering staat. Wanneer dit het geval is deze weg halen. Om de beelden buiten uw netwerk te bekijken, bv op een computer op een andere locatie, dient u de poorten in uw router te forwarden. Hoe dit forwarden c.q. doorschakelen van de poorten gaat, zal in de handleiding van uw router staan. Tevens zijn er op het internet de nodige uitleg filmpjes te vinden van diverse router modellen.
117 SMTP Server/ Port: u kunt de SMTP port op internet vinden Klik SSL Check om de SMTP server (Like Gmail) in te schakelen. Zend Adres/ Passwoord: Zender s ID en passwoord. Ontvanger Adres: de gebruiker kan drie verschillende adressen gebruiken. Klik Test om te verifiëren. Number of Snapshot: Klik om de snapshot als bijgevoegde file te kunnen versturen. Snap Time interval: Stel de Time Interval tussen twee snapshots in. DDNS: De gebruiker kan het WANIP adres, ORAY, 3322 IP en Domain Name instellen. Klik DDNS en selecteer het aanbevolen DDNS Type: leadingdvr.com, de DVR zal automatisch een Domain Name verwerven. De gebruiker kan ook een andere Domain Name kiezen, deze dient eerst op de website te worden geregistreerd. NB: Als voor Domain Name wordt gekozen dient de gebruiker eerst de poort-forwarding instelling in de router te doen.
118 NB: als u DDNS gebruikt:leadingdvr.com,dient u PC DNS te veranderen zoals hieronder is beschreven:
119 FTP: deze functie is gelijk aan die van de SMTP Server, maak een ftp server met bv een computer of gebruik een bestaande ftp server, voer de gebruikers naam, paswoord en het IP-adres in. De ftp poort is standaard 21 maar kan veranderd worden, stel de directory, waarin de foto s opgeslagen moeten worden, ook in. PTZ: Als de verbinding PTZ naar DVR is gemaakt, kan de gebruiker Address, Baud Rate en Protocol instellen, alleen als de instelling DVR met PTZ overeenkomt kan de PTZ Camera naar DVR verbinding succesvol tot stand komen. Address: Address range is 1~255, het PTZ adres kan handmatig worden ingesteld op de Dome Camera. Baud Rate: Iedere PTZ heeft een vaste fabrieksingestelde Baud rate, de twee Baud Rates van PTZ en DVR moeten gelijkblijven tijdens de verbinding. Protocol: Iedere PTZ heeft een protocol, de twee protocollen van PTZ en DVR moeten gelijkblijven tijdens de verbinding.
120 User Admin: Gebruik de user name om in het system in te loggen, De Administrator kan de Non-admin account toevoegen en verwijderen, alle account passwords veranderen, inclusief die van de administrator en het Permissions right to non-admin account instellen. Add User
121 Permission setting: stel het Permissions right to non-admin account in naar uw wens. Block/ Allow List: Om computergebruikers te blokkeren of toe te staan (in segmenten) de DVR te gebruiken. Klik Block list en stel het initial IP address en end IP address in, de computergebruikers in deze segmenten kunnen de DVR niet gebruiken; bij een klik op Allow List kunnen de segmenten door de gebruikers worden gebruikt.
122 QR Code QR & INFORMATIE Het QR code beeld kan met een smartphone worden gefotografeerd. Als op de smartphone geen surveillance APP zit, kan andere mobile scanning software worden gebruikt om de QR Code te scannen naar het download address (Android & Apple ). Als de surveillance software (Mobile App) is geïnstalleerd, kan de UID (P2P) worden gescant om op uw mobiel live beelden te realiseren. System: De gebruiker kan hier Device Name, Device ID, Firmware Version en Release Date vinden.
123 Event: De gebruiker kan hier naar alle gebeurtenissen zoeken zoals Bewegingdetectie, Sensor Alarm,Video loss Log: De gebruiker kan alle gebruikersverrichtingen controleren inclusief die van de administrator.
124 Network: De gebruiker kan de device port, IP Address en P2P (UID) informatie controleren, inclusief de Cloud status in de kolom. Online User: De gebruiker kan de PC IP poort en APP visitors-lijst in de kolom controleren.
125 Bij een Win8 Systeem, kunt u inloggen als administrator LAN OP AFSTAND BEKIJKEN Wanneer de DVR wordt verbonden met de Router, controleer het router IP adres, deze is normaal ( ), ga dan naar network-control-setting van de DVR en voer IP Adres en de toegangspoort ( Router IP) in, het IP adres moet in hetzelfde segment als de router. B.v.: Router IP is , het DVR IP instellen als X,open na de instelling de IE Browser en ga naar de cloud web site: of voer in DVR IP adres: X:Web port, dan klik Enter, en IE Active-X control wordt gedownload ( de IE Browser moet het downloaden van de Active-X control wel toelaten, voor gedetailleerde info zie appendix 1) Na het downloaden verschijnt een dialoogvenster, zie afbeelding:
126 Er zijn 2 Login-modes: IP Login en P2P Login. 1) IP Login: De standaard User name is admin, Password: , Device port is hetzelfde als Media port. Klik Login en ga naar live view. 2) P2P Login: P2P ID zie DVR ( QR & Informatie Column), De standaard User name is admin, Password: , klik Login en ga naar live view.
127 Live view : WAN 1. Via Router Stap 1: Zie de LAN instelling hierboven. Stap2: Na het bevestigen van de LAN verbinding, moet de gebruiker de poort forwarden in de router, zie hieronder. Bij iedere DVR moeten twee poorten worden geforward : Web & media port ( de gebruiker kan het LAN IP Address naar DMZ toevoegen, zie de gebruiksaanwijzing van de router). Na de poort forwarding controleert u het WAN IP Adress in Status van de router en voeg de WEB port via WAN IP toe. B.v.: Ga via Poort of Naam:WEB Port.
128 Stap 3: Wanneer het veranderen van het WAN IP Address niet goed gaat, ga dan via Domain Name. Ga naar Main Manuel---Advanced Setting ----DDNS---Klik DDNS ----Selecteer de Domain Name :leadingdvr.com Ga naar: Naam:WEB Port. Via CMS Kopiëer PC CMS van de software diskette en installeer, u dient administrator en Password te registreren. Zie hieronder:
129 Na registratie kunt u inloggen. Live View : Toevoegen Device: Klik-rechts de Device List, klik Add Device, er verschijnt een beeld zoals hieronder weergegeven. Er zijn 2 Login Types: IP Login ( ga via DDNS) en P2P Login (ga via UID).

130 1.IP Login: IP Forwarden via IP Device Name invoeren, Device IP : Voer IP Address of Domain Name in ; Device Port: Standaard is dat 9000 Standaard naam: admin en Device Password: P2P Login: Via UID is poortforwarding niet nodig Stel alle kanalen in en open to remote control.
131 Element iconen in Live View: Element Omschrijving Live View Live beeld Playback op afstand Playback E-Map Configureren (Screen) Lock - Blokkeren PTZ Preset Point Setting Vooraf ingesteld moment Cruise - Bewegen Video (Instelling) Playback op afstand
132 Klik-rechts added device en klik DVR Setup en voer de gewenste instellingen in.
133 SMARTPHONE TOEZICHT Android bv ofapple App Download VIDEODEFENCEV2 van Google Play of App Store Download VIDEODEFENCEV2 van Google Play Klik Device
134 Klik Register Type [Common login]
135 Selecteer QR Code
136 Klik Live
137 Klik hier
138
139 Vraag en antwoord 1. V: De DVR detecteert HDD niet A: Please check the HDD cable and the power cable whether is in connection to DVR, or the Main board s HDD Port whether is in good condition. If yes, please check the HDD whether is the support type to the DVR, please refer to the specification. 2. V: Geen video signaal of abnormaal beeld op de Monitor terwijl de DVR en camera goed werken en van spanning zijn voorzien. A: Please check the BNC connection status, or wether the cable is in aging, or whether the resolution (NTSC/PAL) math or not. 3. V: Waar moet de DVR gemonteerd worden? A:The DVR will produce heat while it s running, please put the DVR in a safe and good ventilating place to avoid any bad effect causing by longterm work in high temperature environment. 4. V: Waarom werkt de afstandsbediening niet terwijl het live beeld aanwezig is en de toets op het voorpaneel normaal werkt. A: Zorg ervoor dat de afstandsbediening en de DVR IR-ontvanger moeten worden afgestemd tijdens het gebruik. Als de afstandsbediening nog steeds niet werkt controleer dan de batterij(en), de afstandsbediening kan defect zijn. 5. V: Kan de DVR de PC HDD ondersteunen als deze in DVR is geïnstalleerd? A: De harde schijf kan worden gebruikt maar er dient te worden opgemerkt dat alle bestand verloren gaan zodra de DVR loopt. 6. V: Kan de DVR opnemen en afspelen op hetzelfde moment? A: Ja, dat kan. 7. V: Kan ik sommige opgenomen bestanden in de DVR HDD verwijderen? A: Voor de veiligheid raden wij u aan geen enkel opname bestand te verwijderen. 8. V: Waarom kan ik niet inloggen op de DVR CMS? A: Controleer de netwerkverbinding of de instelling correct is of niet, of de RJ-45-poort goede verbinding maakt en of de gebruikersnaam of het wachtwoord voor de netwerk login correct is of niet. 9. V: Waarom is er een tijdelijk stotteren tijdens een livebeeld-weergave op afstand. A: Het is de normaalste zaak dat het stotteren tijdelijk 5 seconde duurt 10.V: Kan geen opname informatie vinden als ik wil afspelen. A: Controleer de harde schijf of deze goed verbonden is met de DVR en of de systeemtijd correct is of niet. Als alles correct is aangesloten en u heeft het systeem opnieuw gestart controleer dan of de harde schijf beschadigd is of niet. 11.V: Na het instellen kan de PTZ niet worden bediend. A: Controleer de volgende redenen:,1 PTZ Camera defect,2 PTZ decoder instelling, verbinding, installatie zijn niet correct.,3 De DVR PTZ instelling is nietcorrect.,4 De PTZ decoder komt niet overeen met het DVR protocol.,5 De PTZ decoder komt niet overeen met het DVR adres.,6 Bij een verbinding met een multi-decoder, dient u een weerstand van 120 ohms op het eind van de PTZ decoderlijn te plaatsen om reflectie te elimineren. De PTZ bediening zal anders instabiel worden.
140 12. V: Waarom werkt de Motion/Bewegingdetectie-functie niet A: Controleer de detectie instelling, het gevoeligheidsniveau kan niet goed zijn. 13. V: Waarom werkt het alarm niet? A: Controleer de alarm instelling, alarm-poort en alarm ingang. 14. V: Waarom blijft de buzzer aan? A: Controleer de relevante Alarm instelling, de Motion/Bewegingdetectie, In / Uitgang-alarm is ingesteld als "NC", en de relevante Disk Alarm instelling. 15. V: Na verbinding met BNC, geeft de DVR een beeld weer terwijl het menu, de muis, knop op het voorpaneel en de afstandsbediening zijn allemaal niet beschikbaar. A: Open de VGA-uitgang : wijzig de uitgang in "CVBS" in "mainmenu-basic setup - system" en open dan BNC uitgang. Als geen VGA wordt weergegeven, drukt u op de "menu" knop ongeveer 15sec totdat het systeem automatisch naar BNC uitgang schakelt. 16. V: Wachtwoord vergeten. A: Drukt u op de "enter" knop ongeveer 15 sec om de fabrieksinstellingen te herstellen. Standaard wachtwoord is V: Wat als de DVR altijd reboot of stopt aan het begin en ik kan niet in het systeem? A: Ten eerste neemt u de HDD uit de DVR en controleert u of het probleem is opgelost of niet. Als het probleem opgelost is moet u de HDD formatteren. Als het probleem nog steeds bestaat vraagt u de verkoper of leverancier naar de meest recente upgrade van de software 18. V: Wanneer de set aangesloten wordt met een VGA of de BNC uitgang (CVBS), zien we wel het DVR logo maar wanneer het systeem is opgestart zien we geen beelden. Wat te doen? A: Sluit het toestel aan op een HDMI bron en verander nu de VGA/BNC instellingen. Info : De juiste instelling voor BNC is CVBS ; HDMI is 1920*1080 ; voor VGA zijn de overige opties.
141 Niets in de handleiding bij dit product mag worden verveelvoudigd, verspreid, overgezet of opgeslagen worden in een geautomatiseerd gegevensbestand of vertaald in een andere taal zonder voorafgaande schriftelijke toestemming. De product specificaties en informatie in deze handleiding zijn alleen ter referentie, en de inhoud daarvan is onderhevig aan het updaten zonder voorafgaande kennisgeving. Wij nemen geen verantwoordelijkheid voor eventuele schade voortvloeiend uit het onjuiste gebruik van dit product, zijn de in deze handleiding genoemde productnamen alleen bedoeld voor identificatie en kunnen ook geregistreerd zijnde handelsmerken of auteursrechten eigendom zijn van andere bedrijven. De kleur van de DVR en de verpakking zijn alleen ter referentie, de technische specificaties kunnen zonder voorafgaande kennisgeving worden gewijzigd, de beschikking kan verschillen van markt tot markt. Deze handleiding is zorgvuldig gecontroleerd, maar geen spelling of technische fout wordt uitgesloten. Wij hebben het recht om alle informatie in deze handleiding zonder voorafgaande kennisgeving te wijzigen. Afgedankte artikelen!! Raadpleeg eventueel en/of v.w.b. het afdanken van elektronische apparaten in het kader van de WEEE-regeling. Vele artikelen kunnen worden gerecycled, gooi ze daarom niet bij het huisvuil maar lever ze in bij een gemeentelijk depot of uw dealer. Lever ook afgedankte batterijen in bij uw gemeentelijk depot of bij de dealer, zie Voer zelf geen reparaties uit aan het toestel; in élk geval vervalt de totale garantie. Ook mag het toestel niet eigenmachtig worden gemodificeerd, ook in dit geval vervalt de totale garantie.
142 DEUTSCH Originalverpackung für eventuellen späteren Transport aufbewahren. - Vor Inbetriebnahme des Geräts erst einen Fachmann zu Rate ziehen - Das Gerät enthält spannungsführende Teile. Darum das Gehäuse NICHT öffnen. - Beim Abziehen des Steckers/Netzadapter aus der Steckdose niemals an der Netzschnur ziehen. - Den Netzstecker nie mit nassen Händen einstecken oder abziehen. - Wenn Stecker und/oder Netzschnur, sowie der Netzschnureinritt am Gerät beschädigt sind, müssen sie von einem Fachmann repariert werden. - Wenn das Gerät so beschädigt ist, dass Innenteile sichtbar sind, darf das Gerät auf KEINEN FALL ans Netz angeschlossen oder eingeschaltet werden. Nehmen Sie Kontakt auf mit Ihrem Fachhändler. - Reparaturen dürfen nur von einem Fachmann vorgenommen werden. - Das Gerät nur an eine VAC / 50Hz Netzsteckdose mit Sicherung anschließen. - Bei Gewitter oder längerem Nichtgebrauch den Netzstecker abziehen. - Nach längerem Nichtgebrauch kann Kondenswasser entstehen. Das Gerät erst auf Zimmertemperatur kommen lassen. Das Gerät niemals in feuchten Räumen oder draußen benutzen. - Um Unfälle in Betrieben zu verhindern, müssen die geltenden Sicherheitsvorschriften unbedingt einhalten. - Apparat nicht verwenden in einer staubigen Umgebung, in einem Bereich wo sich ätzende Chemikalien befinden, in der Nähe von Wärmequellen wie Heizkörpern, in direktem Sonnenlicht und nicht auf eine vibrierende Oberfläche hinstellen. Lüftungsöffnungen nie abdecken und setzen Sie den DVR immer mehr als 15 cm entfernt von Objekten i.b.a. Abkühlung. - Bleiben Sie weg von elektronischen Geräten die Brummstörungen verursachen könnten. - Festplatten immer kaufen von seriösen Unternehmen. - In diesem Handbuch werden die grundlegenden Anweisungen eines DVR behandelt. - Nuancen oder Nicht Detaillierten Updates erfolgen ohne Mitteilung an Sie. - Das Gerät für Kinder unzugänglich aufstellen. - Keine Reinigungssprays verwenden. Die Rückstände dieser Sprays verursachen Fett- und Staub. - Keine Flüssigkeiten in der Nähe der Anlage abstellen und keine Metallgegenstände in die Lüftungsöffnungen stecken. Diese können zu Stromschlag führen. - Die Schalter und Knöpfe nicht mit Gewalt betätigen. - Bei Wandbefestigung darauf achten, dass der Wandhalter die Last tragen kann. Im Zweifelsfall Fachpersonal zu Rate ziehen. Wand- und Deckenbefestigung Das Gerät nur auf die vom Hersteller empfohlene Weise befestigen. Das Gerät nicht mit chemischen Lösungsmitteln reinigen. Diese können den Lack beschädigen. Das Gerät nur mit einem trockenen Tuch abwischen. Nicht in der Nähe von elektronischen Geräten aufstellen, die Brummgeräusche verursachen können. Bei Reparaturen nur Originalersatzteile verwenden, um Schäden und/oder gefährliche Strahlungen zu vermeiden. Erst das Gerät ausschalten, bevor Sie den Netzstecker. Netzschnur und Anschlusskabel entfernen, bevor Sie das Gerät umstellen. Übersicht Einführung : Vor Inbetriebnahme des Geräts bitte erst die Anleitung durchlesen. Bitte alle Anweisungen befolgen, um den Garantieanspruch nicht zu verlieren. Bitte alle Vorsichtsmassnahmen treffen, um Feuer und Stromschlag zu vermeiden. Reparaturen und Wartungsarbeiten nur von qualifiziertem Fachpersonal ausführen lassen. Diese Anleitung für spätere Bezugnahme aufbewahren. Dieses Produkt ist ein verbraucherorientierter 4-Kanal-CIF / Half-D1 / D1 Real-time Netzwerk DVR und besitzt die modernste SOC-Technologie und übernimmt die H.264-Codierungsverfahren, so dass die Bildqualität und das Übertragungsnetz besser ist und das System stabil ist; verwenden Sie die Standard-1U Ausführung überall wie in Geschäften, Supermärkten, Schulen, Hotels, Internet-Cafés und alle Arten von privaten Gebrauch, wo Qualität eine Voraussetzung ist.
143 Verpackung und Zubehör : 1x IR Fernbedienung 2x Batterien Zertifikat Gebrauchsanweisung Ein SATA hard disk Datakabel Ein 12Vdc Netzadapter Montageschrauben. 1x CD. Eigenschaften : H.264 Videokompressionsformat 16-Bit-True-Color-semi-transparent grafische Menüoberfläche, Menüoptionen Spitze Verschiedene Aufnahmemodi: Manuell, Zeitplan, Bewegung und Alarm-Aufnahme Optimierte Vier-Kanal gleichzeitige Wiedergabe (single-wiedergabe für Acht-Kanal) Backups (USB-Stick, externe Festplatte und über das Netzwerk) Ein USB 2.0-Anschluss für die Datensicherung, ein USB 2.0-Anschluss für die Maus Multi-funktionale Bedienung, Aufnahme, Wiedergabe, Monitor, Backup und Netzwerk-Übertragung gleichzeitig Dual-Stream-Technologie Unterstützt Netzwerk, Multi-Screen Realtime Browsing, Parametrierung, kopieren oder die Wiedergabe zu implementieren Unterstützt das beobachten der Live-Bilder per Handy (über Netzwerk) Unterstützt Klassifizierung von Ereignissen und eine präzise Zeitsuche und Wiedergabe Die Möglichkeit die Standardparameterwert wieder zu herstellen Flexible USB-Schnittstelle für Maus Merkmale Umschreibung System Embedded LINUX OS Video Kompression H.264 Video Eingang 4/8/16 Kanäle BNC Video Ausgang Unterstützung BNC, VGA und HDMI Audio Ein/Ausgang Ohne /1/2/4/8-Kan. RCA Eingang ; ohne/1-kan. RCA Ausgang (optional) Alarm Ein/Ausgang Ohne/4/8-Kan. Eingang (optional); ohne/1 Kan. Ausgang(optional) Display 1/4/9/16-Kanäle Multiplex Bedienung Live, Aufnahme, Netzwerk, Mobil Telefon gleichzeitig Aufnahme Modus Timer/Manual/Bewegungserkennung/Alarm Aufnahme Frame rate PAL:25fps NTSC:30fps Aufnahme Qualität Höchste, höhere, medium, niedrig, niedriger,niedrigste Aufnahme Resolution CIF/Half-D1/D1 Frame rate Einstellung Playback 1/4/8 /16 Kanäle playback gleichzeitig (optional) Backup Unterstützung USB-stick backup, Externe hard disk backup, Netzwerk Backup, File Backup, Backup mit Zeiteinstellung Aktion / Alarm Unterstützung alarm Übertragung von Bildern zur gewünschten -adresse
144 FTP transmissie Unterstützung PTZ control Unterstützung PTZ protocol PELCO-D,PELCO-P usw PIP Unterstützung Zoom Unterstützung HDD Unterstützung 1 SATA HDD,Kapazität bis 4T Network and protocol 1 RJ-45 10/100M via Ethernet,Unterstützung TCP/IP DHCP DNS DDNS UPNP NTP usw IE browser Unterstützung Client software Unterstützung CMS Unterstützung Dual stream Unterstützung Group play Unterstützung Zugang 5 Benutzer on-line Multi-language Unterstützung Beelden via smartphone bekijken Unterstützung windows/symbian/iphone/blackberry/android System QR code Unterstützung P2P cloud Unterstützung DDNS Unterstützung Domain Name Muis interface USB2.0 Backup interface USB2.0 Afstandsbediening Unterstützung(Support controller ID matching) Gebruiker Unterstützung multi-level Gebraucher Voeding DC12V 3A/5A Bedrijfstemperatuur 0-50 en vochtigheidsgraad 10%-90% Installation Festplatte (HDD ersetzen) (1) Gehäuse öffnen des DVR, montieren Sie die Festplatte in die Unterstützung;. (2) Verbinden Sie die HDD Data- und Stromkabel; (3) Drehen Sie die schrauben fest der Festplatte; (4) Schließen Sie den Deckel Hinweis! Ziehen Sie zuerst den Netzstecker Kamera-Anschluß und Monitor Verbinden Sie die Kamera mit einem BNC-Kabel mit dem DVR-Videoeingang, verbinden Sie den DVR- Videoausgang mit einem BNC-Kabel mit dem Monitor (siehe Rückseite). Verbinden Sie RS485A (+) und B (-) mit einer Kamera die Pan/Tilt und Zoom unterstützt. Im folgenden sehen Sie die Bilder auf der Rückseite.
145 DVR EINFÜHRUNG 1. Verbinden Sie den Video Kabel mit der Kamera. 2. Verbinden Sie das andere Kabelende mit dem gewünschten Eingang. 3. Verbinden Sie den Stromstecker des Video Kabel mit dem mitgelieferten Splitter-Kabel. 4. Wiederholen Sie obenstehenden Stufen i.b.a. jede Kamera. 5. Verbinden Sie den Ausgang, mit Entstörfilter, des Splitter-Kabels mit dem Eingang des DVR. 6. Verbinden Sie den Adapter mit dem Eingang des Splitter-Kabel.
146 Vorderseiten:
147 UMSCHREIBUNG NO. Bild Name Umschreibung 1 MUTE Der Ton wird abgeschaltet 2 INFO Überprüfen Sie die Informationen mit dem Gerät 3 PIP Zeigt Live-Bilder "Bild in Bild" (PIP) 4 PTZ Rufen Sie die PTZ-Kamera auf 5 PLAY / PAUSE Wiedergabe und Pause Schaltung 6 REW Zurückspulen 7 SEARCH Suchen Sie eine Videodatei 8 REC Starten oder Beenden der manuellen Aufnahme 9 MENU Rufen Sie das Hauptmenü auf (Taste 15 Sekunden drücken um ins VGA -CVBS Menü zu gelangen) 10 ESC Ausschalten 11 USB USB-Anschluss 12 POWER Ein- / Ausschalter 13 DIRECTION Bewegen Sie den Cursor nach rechts / links / oben / unten 14 Enter Bestätigung (drücken Sie 15 Sekunden, um in die Werkseinstellung zu gelangen) 15 IR Receiver IR-Fernbedienungssensor 16 STATUS Statusanzeige
148 RÜCKSEITE UND PORTEN Hinweis: Der DVR kann eine unterschiedliche Ausführung wie die Abbildungen unten haben.
149 Port Umschreibung: NO. Name Omschreibung 1 VIDEO IN BNC-Anschluss für Analog-Video-Eingang 2 VIDEO OUT BNC-Anschluss für Analoge Videoausgabe 3 AUDIO IN Cinch-Buchsen für Analoge Audio-Eingang 4 AUDIO OUT RCA-Anschluss für Analoge Audioausgabe 5 VGA DB15 für VGA-Monitor 6 HD-port HDMI High-Definition-Verbindung 7 NETWORK RJ-45-Anschluss für Ethernet 8 RS485 Anschluss für PTZ-Kamera (A> + B> -, G> Erdung) 9 DC 12V DC 12V Netzteil 10 ALARM Alarmausgang (Ein / Aus-Schalter Out) 11 SENSOR Alarmeingang (Ein / Aus-Schalter In) 12 Erdung Hinweis: 1, RS485 A muß verbunden werden mit PTZ data+, B to data-; 2, Empfehlung : das DVR-Gehäuse mit Erde verbinden.
150 IR FERNBEDIENUNG Der DVR kann mit der IR-Fernbedienung gesteuert werden. Achten Sie darauf daß die Batterien eingelegt werden. NO. Name Omschreibung 1 POWER OFF Das Abschalten des DVR 2 ESC Verlassen Sie das Menü 3 FAST Schnellrücklauf REWIND 4 SETP Bild für Bild abspielen 5 PIP Zeigt Video "Bild in Bild" 6 RECORD Start / Stop manuelle Aufnahme 7 MUTE Ausschalten des Sounds 8 NUMBER Zifferntasten 0-9, MENU Rufen Sie das Menü auf (Taste 15 Sek. drücken um ins VGA und FBAS-Menü zu gelangen) 10 ENTER Bestätigen Sie eine Einstellung ( 15 Sekunden drücken, um in die Werkseinstellungen zu gelangen) 11 FAST Schnellvorlauf FORWARD 12 PLAY / Wiedergabe und Pause PAUSE 13 PTZ Bewegen Sie die PTZ-Kamera 14 SEARCH Suche nach Video-Dateien 15 ZOOM Bild zoomen
151 GRUNDBETRIEB Der DVR Standard-Anzeigemodus ist VGA, wenn der Benutzer den DVR BNC (CVBS) Port benutzen möchte, auf der Vorderseite die "Menü" -Taste etwa 15 Sekunden drücken, bis das System automatisch schaltet auf BNC- Anzeigemodus, oder verwenden Sie den VGA-Ausgang um ins DVR-System zu gelangen und stellen Sie die Bildschirmauflösung ein auf CVBS. Setup Wizard 1. Verbinden Sie den DC 12 V-Adapter mit den DVR auf der Rückseite 2. Schalten Sie den DVR, ("Power" leuchtet) 3. Starten Sie den Setup-Wizard/Assistenten 4. Jetzt können Sie die grundlegenden Parameter wie Gerätename, Sprache, Datum und Uhrzeit, usw. konfigurieren 5. Wenn Sie den DVR mit dem Internet über einen Router anschließen möchten, müssen die Netzwerkparameter konfigurieren. 6. Die Festplatte muss formatiert werden um die Video-Dateien zu speichern 7. Klicken Sie auf Apply/Anwendung, die DVR beginnt die normale Aufnahme
152 System Login Standardeinstellung: user name: admin ; password: (8x die 0) Live Bild Symbole werden auf dem Bildschirm des Monitors gezeigt: Grünes Symbol: Manuelle Aufnahme. Blaues Symbol: Normale Aufnahme. Rotes Symbol: Sensor Alarm ("S" = Der Alarm Sensor ausgelöst). Gelbes Symbol: Bewegungserkennung Alarmaufzeichnung (rote menschliche Figur bedeutet eine Aufnahme).
153 Live Bedienfeld Mit einem Rechtsklick mit der Maus wird das folgende Bedienfeld auf dem Bildschirm angezeigt: Hauptmenü: Klicken Sie und gehen Sie in das Hauptmenü Split-Mode: Klicken Sie und wählen Sie den Anzeigemodus: 1x1,2x2 Anzeigemodus usw. PIP: Auf dem Bildschirm erscheint ein Bild, mittlerweile wird am unteren Rand ein kleines Bild der anderen Kanäle (Bild im Bild) gezeigt Sequence Patrol: Kamera Bilder der Kameras folgen einander im Live-View-Modus Digital Zoom: Vergrößert das Bild des ausgewählten Kanals Sound: Einstellen oder deaktivieren des Audiosignals PTZ: Bedienung PTZ-Dome-Kamera; stellen Sie Aufenthalt, Art der Bewegung und Route ein 1. Voreinstellung: Für die Art der Bewegung der PTZ Kamera (standard auf 5 oder höher) einstellen 2. Cruise line Einstellung: Klicken Sie "Add", Sie können jetzt Aufenthaltzeit einstellen auf jedem voreingestellten Punkt. Dann beginnt PTZ sich zu bewegen. 3. Tracking: Klicken Sie auf Start Aufzeichnung, klicken Sie auf die Richtungstaste um die folgenden Drehrichtungen zu wählen. Nach der Aufnahme klicken Sie auf Start Track, die Kamera wird den aufgenommenen Weg folgen.
154 Capture: Machen Sie ein Bildschirmfoto und speichern Sie dieses Foto (Festplatte). REC: Starten / Stoppen der manuellen Aufnahme Quick review: Starten Sie die Wiedergabe einer aufgenommenen Datei. Bewegen Sie die Maus auf dem Bedienfeld bis Sie das gewünschte Symbol gefunden haben und Sie sehen, klicken Sie erneut und halten Sie die linke Maustaste gedrückt und ziehen Sie mit der Maus das gewünschte Symbol auf dem Bedienfeld zu einem Ziel. Die Symbole können auf jede beliebige Position gezogen werden. Playback interface 1-Pause: Hält die Wiedergabe des Bildes der aufgezeichneten Dateien 2- Stopp: Stoppt die Wiedergabe des Bildes der aufgezeichneten Dateien 3- Playback in Frame: Die Wiedergabe von Dateien in Frames im Pause-Modus. 4- Fast Forward: Schneller Vorlauf des aufgenommenen Bildes mit einer Rate von X1/4, X1/2, X1, X2, X4, X8, X16 usw. 5- Fast Rewind/ Schneller Rücklauf: Spulen Sie das aufgezeichnete Bild mit einer Rate von X1/4, X1/2, X1, X2, X4, X8, X16 usw. 6 Single Screen: Anzeige im Einzelbild Modus 7 Multi-Screen: Anzeige im Multiscreen-Modus 8- Dateityp: Wählen Sie die Art der Aufnahmedatei, beispielsweise Bewegungserkennung, Sensor Alarm usw. 9-10: Wählen Sie die vorherigen oder folgenden Dateien 11 Digital Zoom: Zoom auf den gewählten Kanal 12-Color: Stellen Sie die Farbe des Kanals ein.
155 13- Snapshot/Momentaufnahme: Finden Sie eine Bildschirm-Aufnahme auf der Festplatte gespeichert 14- Edit: Während der Wiedergabe von aufgezeichneten Dateien bearbeiten 15- Save: Speichern Sie die bearbeiteten Dateien 16 Audio: Während der Wiedergabe Audio Ein/ Aus-schalten Hauptmenü Klicken Sie die Menu Taste >>>>ENTER, es umfasst sieben Funktionen für den DVR: Grundeinstellung, Backup & Wiedergabe, Upgrade & Pflege, Aufnahme & Zeitplan, Alarm & Zeitplan, Erweiterte Einstellungen und QR & Informationen. Die Grundeinstellung umfaßt 6 Optionen: System,Time, DST, Live, Monitor und Mask. System Klicken Sie auf System und das folgende Bild erscheint. Hier können Sie Gerätenamen, Video-Format, Passwort überprüfen, Systemzeit, Startup-assistenten, Maximal Online-Gebraucher, Bildschirmauflösung, Sprache, Automatische Abmeldung usw einstellen. Hier folgen die Namen und Begriffsbestimmungen: Device Name: Können Sie finden in Client Software oder CMS. Video Format : 2 Möglichkeiten: Pal und NTSC. Password Check: Sie müssen User name und Password eingeben um die Einstellungen machen zu können. show System Time: Eine Wahl ob Sie die Zeit angeben müssen. Startup Wizard:Klicken Sie und es wird die entsprechenden Informationen des Assistenten/Wizard zeigen.
156 Max online Users: Geben Sie die maximale Anzahl der On-Line Gebraucher ein. Screen Resolution: Die Auflösung von Live View. Optional: VGA800*600 VGA1024*768 VGA1280*1024 und HDMI(1920*1080. Language: Wählen Sie die gewünschte Sprache. Screen Saver (S): Hier können Sie das Zeitintervall des Bildschirmschoner (30s, 60s, 180s, 300s) einzustellen. Wenn das Gerät nicht benutzt wird wird es automatisch abgemeldet und Sie müssen erneut einloggen. Zeit Hier können Sie einstellen: Datum,Systemzeit, Zeitbereich. Die Standardeinstellung ist GMT timezone, wählen Sie den richtigen Zeitbereich (zb:china GMT+8:00). Klicken Sie "Apply" und die Einstellung wird gespeichert.
157 DST Wählen Sie DST, Time offset, Mode, von Month/Week/Date/Time usw und geben Sie ein. Klicken Sie Apply und die Einstellung wird gespeichert. Live Klicken Sie auf "Live": Klicken Sie auf den Kanalnamen und eine virtuelle Tastatur wird angezeigt. Klicken Sie "Shift", hier können Sie zwischen Groß und Chinese wechseln, der Benutzer kann den Kanal umbenennen. Klicken Sie und wählen Sie die Kanäle in Live-Interface/Schnittstelle, klicken Sie auf "Setting", Sie gelangen in "Image Adjust" Interface: Der Benutzer kann die Helligkeit, Farbton, Sättigung und Kontrast einstellen; Klicken Sie auf "Default", Sie gelangen in die Werkseinstellungen. Klicken Sie auf "OK" und die Einstellung wird gespeichert. Der Benutzer kann direkt die gleiche Farbparameter einstellen aller Kanäle durch auf "ALL" zu klicken. Tragen Sie die Parameter ein und klicken Sie "Apply".
158 Bildeinstellung: Monitor Display Mode Single SEQ Time (Second)>> Live view : Schaltintervalls zwischen der Darstellung der aufeinanderfolgenden Kanälen.
159 Mask Mask: Der Benutzer kann drei Zonen im Live-View Bild maskieren. Mask Area Settings: Klicken Sie auf "Setting", gehen Sie zum Live-View Bild, klicken Sie auf die linke Maustaste, halten und ziehen Sie die Maskierzone wie unten dargestellt, klicken Sie auf "Apply" und speichern Sie die Einstellung. Mask Area Setting
160 Menü Öffnen Um in das Menü zu gelangen, drücken Sie die Menütaste. Der Standard-Anzeigemodus ist VGA, bei der Verwendung des BNC-Ausgang müssen Sie 15 Sekunden die Menü-Taste auf der Fernbedienung drücken. SPEICHERN & ABSPIELEN Playback Systemunterstützung "Playback By Time", By Even, By File und Image. Klick und gehen Sie zu Data retrievel (aufrufen). By Time 1 e Stufe: Klicken Sie Playback By Time, wie folgende Abbildung zeigt: 2 e Stufe: Wählen Sie ein Kanal und den Wiedergabemodus, das Datum markiert im Kalender bedeutet daß aufgenommen wurde. 3 e Stufe: Wählen Sie das gewünschte Abspieldatum, klicken Sie auf "Search", wählen Sie die Startzeit und klicken Sie die Taste um die Wiedergabe zu starten. Die ausgewählte Zeitnachweise wird blau angezeigt. Hinweis: Die Zeilen entsprechen die Stunden, die Spalten die Kameras/Kanälen.
161 By Event 1 e Stufe: Klicken Sie Playback By Time, siehe unten: 2 e Stufe: Klicken Sie Search, die Ereignisinformationen werden im List Box angezeigt, doppelklicken Sie auf diese Datei, um ab zu spielen. 3 e Stufe: Der Benutzer kann hier Datum und Kanal wählen, klicken Sie auf "Motion", "Sensor" oder "Alle" um zu suchen. By File 1 e Stufe: Klicken Sie auf "Search", die Ereignisinformationen werden im List Box/Dateilistenfeld angezeigt. Der Benutzer kann das Datum und Kanal wählen um zu suchen. 2 e Stufe: Klicken Sie All, Sie können jetzt alle gewünschten Dateien speichern. 3 e Stufe: Doppelklicken Sie auf die Datei um ab zu spielen.
162 By Image Sie können Live Bilder aufrufen indem Sie Zeit und Kanal wählen um diese zu entfernen, zu sichern und zu speichern. Klicken Sie auf die Pfeiltasten um Bilder anzuzeigen. Standardmäßig können 2000 Bilder gespeichert werden, mit mehr als 2000 Bilder wird das System die alten Bilder bewahren. Doppelklicken Sie auf die Bilder, um ab zu spielen. Backup Es unterstützt eine Speicherung über USB-Stick und Internet 1e Stufe: über USB-Stick, geben Sie die Daten ein in der Backup-Schnittstelle, wie in der folgenden Abbildung dargestellt: 2e Stufe: Wählen Sie die Startzeit und die Stoppzeit und Kanal, klicken Sie auf "Search", die Dateninformationen werden in der Liste angezeigt 3e Stufe: Klicken Sie auf einer der Daten oder klicken Sie auf "Alle" und klicken Sie auf "Backup", die Speicherinformationen werden angezeigt. 4e Stufe: Der Benutzer kann die Datei im Backup-Dialog überprüfen. Wählen Sie das Speichermedium und speichern Sie den Dateityp und klicken Sie auf "Start", um das Backup zu starten.
163 Wählen Sie die Datei und klicken Sie auf "Backup", ein Fenster wird gezeigt wie in der Abbildung unten, der Benutzer kann die Größe der ausgewählten Dateien kontrollieren und wählt das Backup-Format der aufgenommenen Datei wie : H.264 (empfohlen Backup Format), AVI, WAVE (Audio-Format). Während der Speicherung zeigt einen Fortschrittsbalken die gespeicherten Dateien und Fortschritt. Hinweis: Verwenden Sie den Computer um die Wechselfestplatte (FAT32) zu formatieren bevor Dateien gespeichert werden. Der DVR unterstützt keine Wechselfestplatte formatierung.
164 Disk Hier sehen Sie den Status der Festplatte und U-Disk, und können Sie formatieren.
165 UPGRADE & PFLEGE Upgrade Einfaches Upgrade Verfahren: 1. Formatieren Sie den USB Stick (FAT32) / oder leeren Sie den USB Stick 2. Entpacken Sie die Zip-Datei 3. Sie müssen die gesamte Firmware-Software im Stammverzeichnis des USB-Stick setzen 4. Schieben Sie den USB Stick in den DVR 5. Schalten Sie den DVR aus 6. Schalten Sie den DVR ein & Neustart 7. Der DVR wird die Firmware automatisch erkennen und den DVR aktualisieren. PS: Während der DVR-Upgrade müssen Sie den DVR nicht ausschalten, warten Sie einige Minuten.
166 Import / Export Sie können die Data zu einem USB stick ( storage device ) exportieren zum Speichern und importieren vom USB stick zu dem DVR. Pflege Für Factory setting, Logout und Shut Down.
167 AUFNAHME & ZEITPLAN Aufnahme Klicken Sie Record und die folgende Abbildung wird gezeigt: Einschalten: Klicken Sie auf "Record", "Audio" Kanal, oder klicken Sie auf "Alle" um dieselbe Einstellung zu tun. Record Bitrate: Der Benutzer kann die Auflösung, fps, Codierung, Qualität und die maximale Bitrate je Kanal wählen und für alle Kanäle indem Sie auf "Alle" klicken. Klicken Sie auf "Standard" / Default und das System wird die Standardeinstellungen wiederherstellen; Klicken Sie auf "Apply" und die oben genannten Einstellungen werden gespeichert. Hinweis : Wenn die fps (frames pro Sekunde) Einstellung mehr ist als die max Einstellung wird fps automatisch eingepaßt. Die Größe der aufgezeichnete Datei hängt von der Bitrate ab, je höher die Bitrate ist, desto größer.
168 Zeit: 1. Pre Record Time: Aufnahme Zeit i.b.a. Bewegungserkennung, Alarmanzeige usw. 2. Post Record: Die Aufzeichnungsdauer nach einer Alarmanzeige, Optional Zeit: 10/15/20/30/60/120/180/300 Sekunden 3. Expired: Die verstrichene Zeit nach einer Aufnahme, wenn die außerhalb der eingestellten Zeit liegt wird die Aufnahme-Datei automatisch gelöscht. Overlay: Der Kameraname und der Zeitcode anzeigen i.b.a. "Live" Bildern: Drücken Sie auf die Registerkarte "Overlay" und wählen Sie dann "Setting", in der Live-Ansicht können Sie den Benutzernamen der Kamera und Zeitcode irgendwo im Bild setzen, siehe Bilder unten. Sie können die gleiche "Time stamp" Einstellungen anwenden für jeden Kanal indem Sie auf "All" klicken und klicken Sie "Enter" um die Stelle zu bestimmen. Klicken Sie auf "Default" und das System wird die Standardeinstellungen wiederherstellen; Klicken Sie auf "Apply" und die oben genannten Daten werden gespeichert.
169 Vor dem ziehen der Maus : und nachher : Recycle Record: Klicken Sie auf "Recycle Record", wenn die Festplatte voll ist und der DVR noch immer aufzeichnet werden automatisch die alten Aufnahmedateien bewahrt. Klicken Sie auf "Apply" und die Dateien werden gespeichert.
170 Planung: hier kann eingestellt werden: 7 Tage jede Woche, 24 Stunden am Tag. Indem Sie die Maus ziehen kann die Zeit eingestellt werden, die blaue Zone bedeutet "ausgewählt", die Grauzone bedeutet "nicht ausgewählt". Wählen Sie den Kanal, Doppelklick-links mit der Maus und füllen Sie den Wochenplan aus, siehe unten, klicken Sie auf "Add/Hinzufügen" um den Aufzeichnungsplan des Tages hinzuzufügen; Klicken Sie auf "Delete/Löschen" zum Löschen der Auswahl. Hinweis: Mit der Maus können Sie schneller ziehen i.b.a. die Einstellung des Zeitplans. Kopieren: 1. Sie können den aktuellen Tag auf den anderen Tag(e) kopieren. Klicken Sie auf "Apply", um die Einstellung zu speichern. 2. Sie können auch eine Kanaleinstellung auf einen anderen Kanal oder alle Kanäle kopieren, wählen Sie den Kanal und klicken Sie auf "Copy", klicken Sie auf "Apply", um die Einstellung zu speichern. Bewegung/Motion : Entspricht die gleiche Einstellung wie in Aufnahme, siehe oben. Hinweis: Siehe unten die Bewegungsplanung (ist in gelb dargestellt). In der Grundeinstellung werden alle Einstellungen in gelb angezeigt.
171 Sensor : Entspricht die gleiche Einstellung wie in Aufnahme, siehe oben. Hinweis: In der Grundeinstellung werden alle Einstellungen in rot angezeigt. Sie können hier Datum und Zeit eingeben:
172 Sub-Stream Sie können hier Auflösung, fps, codieren, Qualität und maximale Bitrate einstellen für einen einzelnen Kanal oder klicken Sie auf "Alle" für alle Kanäle. Klicken Sie auf "Apply", um zu speichern. Hinweis: Nach Auswahl der Auflösung und fps, wird das System die restlichen CIF fps zeigen. ALARM & ZEITPLANUNG Es gibt hier 5 Sub-Menüs: Motion, Loss, Sensor, Other en Output. Motion/Bewegung Es umfaßt 2 Sub-Menüs: Motion und Motion Schedule Motion: Aktivieren Motion Alarm, stellen Sie die Alarm Dauerzeit (d.h. die Zeit zwischen zwei Alarmerkennungen), Aktion & Area ein.
173 Klicken Sie auf "All", um Alarm zu aktivieren für alle Kanäle, oder wählen Sie den gewünschten Kanal. Continue Time : Nach einer Bewegungserkennung kann eine Zeit eingestellt werden (d.h. das Intervall zwischen zwei Alarmerkennungen). Action: Siehe unten: Buzzer: Klicken Sie auf "Buzzer", nachdem eine Bewegungserkennung erfolgt wird der Alarm ausgelöst. Vollbild zeigen/full screen: Das angezeigte Bild wird während einer Bewegung auf 100% Zoom eingestellt To Alarm Out: Klicken Sie und die Empfindlichkeit der Bewegung wird hier eingestellt. Klicken Sie auf "OK", um zu speichern. Klicken Sie auf "Exit", um das Popup zu schließen. Klicken Sie hier, wenn der Alarm ausgelöst wird, wird das System die Alarminformationen an die gewünschte -Adresse senden. Die Info ist: Event, Capture/Erfassung, Gerätename, Gerätekennung ID. FTP: Erstellen Sie einen FTP-Server in Ihrem Netzwerk, nachdem eine Bewegungserkennung erfolgt wird eine Momentaufnahme zu einem bestimmten Computer-Directory geschickt.
174 Snapshot/Momentaufnahme : Wählen Sie den Kanal, nachdem eine Bewegungserkennungssystem erfolgt wird das System automatisch die Momentaufnahme auf der Festplatte speichern, wenn Sie auf " " klicken, wird das System die Alarminformationen an die gewünschte -Adresse oder FTP Server senden. To Record: Klicken Sie den gewünschten Kanal und klicken Sie auf OK um zu speichern. Klicken Sie Exit. P.T.Z: Stellen Sie den Alarmtyp und Nummer ein, nachdem eine Bewegungserkennung erfolgt wird die PTZ- Kamera das Event aufzeichnen. Klicken Sie auf "OK" um auf zu nehmen, klicken Sie auf "Exit" um zu verlassen. Sie können dieselben Parameter benutzen für alle Kanäle., Motion Area Setting: Klicken Sie auf Area, obenstehende Abbildungen werden gezeigt. Stellen Sie den Empfindlichkeitspegel auf (1-8), Standard ist 4, desto höher der Wert desto größer die Empfindlichkeit. Klicken Sie um alle Zonen zu wählen als Bewegungserkennungsbereich; Klicken Sie um alle gewählten Zonen zu löschen; Klicken Sie i.b.a. die Empfindlichkeitspegel; Klicken Sie um die Einstellungen zu speichern; Klicken Sie um den Modus zu verlassen. Motion Schedule: Entspricht die gleiche Einstellung wie in Aufnahme, siehe oben. Hinweis: Wenn Sie nur die Motion Detection/Bewegungserkennung einstellen müssen Sie in der Planung "normally record planning" löschen. Erst dann wird das Gerät eine Bewegungserkennung aufnehmen.
175 Loss: Hier können Sie angeben, welche Maßnahmen ergriffen werden sollten wenn Kamerabilder verloren gehen oder die Kamera nicht mehr funktioniert.
176 Klicken Sie auf Action, siehe unten: Die Triggereinstellung von Alarm und To PTZ in -Video lost- entspricht die gleiche Einstellung wie in Motion. Sie können die gleiche Parameter verwenden in video lost to all Channels indem Sie All klicken. Klicken Sie Apply um zu speichern. Sensor Alarm Sensor alarm umfaßt 3 Sub-Menüs : Basic, Alarm handling, Sensor Schedule. Basic: Einschalten Sensor Alarm Kanal und wählen Sie alarm type : NO oder NC Sie können die gleiche Alarmtyp Parameter gebrauchen i.b.a. alle Känale, dann klicken Sie auf ALL. Klicken Sie auf Apply um zu speichern.
177 Alarm handling : Wählen Sie Alarm continue time und klicken Sie auf Action. Buzzer: Klicken Sie auf "Buzzer", nachdem eine Bewegungserkennung erfolgt wird der Alarm ausgelöst. Vollbild zeigen/full screen: Das angezeigte Bild wird während einer Bewegung auf 100% Zoom eingestellt To Alarm Out: Klicken Sie und die Empfindlichkeit der Bewegung wird hier eingestellt. Klicken Sie auf "OK", um zu speichern. Klicken Sie auf "Exit", um das Popup zu schließen. Klicken Sie hier, wenn der Alarm ausgelöst wird, wird das System die Alarminformationen an die gewünschte -Adresse senden. Die Info ist: Event, Capture/Erfassung, Gerätename, Gerätekennung ID. FTP: Erstellen Sie einen FTP-Server, nachdem eine Bewegungserkennung erfolgt wird eine Momentaufnahme zu einem bestimmten Computer-Directory geschickt. Snapshot/Momentaufnahme : Wählen Sie den Kanal, nachdem eine Bewegungserkennungssystem erfolgt wird das System automatisch die Momentaufnahme auf der Festplatte speichern, wenn Sie auf " " klicken, wird das System die Alarminformationen an die gewünschte -Adresse oder FTP Server senden.
178 To Record: Klicken Sie den gewünschten Kanal und klicken Sie auf OK um zu speichern. Klicken Sie Exit To P.T.Z: Entspricht dieselben Einstellungen wie bei Motion/Beweging. Siehe oben. Sensor Schedule: Entspricht dieselben Einstellungen wie bei Aufnahme. Siehe oben. Hinweis: Die Standard Sensor record schedule wird blau angezeigt. Disk Full in -Alarmtyp- (siehe unten) bedeutet, dass wenn die Festplattenkapazität geringer ist als die Einstellung in "Disk Shortage Alarm", ein Fenster erscheint rechts unten im Bildschirm; "IP confliction" bedeutet, dass wenn zwei oder mehr PCs die gleiche IP-Adresse im selben Netzwerksegment teilen, eine Alarmanzeige ausgelöst wird nach der Einstellung der Summeralarm und Triggeralarm; Wählen Sie "Disconnect" --- Klicken Sie auf "Buzzer" oder "Trigger". Das System wird einen Signalton aussenden, den Alarmschalter aktivieren oder sendet ein . Das gleiche gilt für die folgenden Alarmeinstellungen: "Connection problem"/ Verbindungsproblem und HDD "disconnected"/nicht angeschlossen. Um alle Einstellungen wieder auf die Standardeinstellungen zurückzusetzen wählen Sie "Default" und nachher "Apply" zum Speichern der Einstellungen.
179 Ausgang Sensor alarm umfaßt 3 Sub-Menüs : Relays, Alarm out Schedule, Buzzer. Relays: In dieser Spalte kann die "Alarm out Name" für jeden Kanal eingestellt werden, wählen Sie Alarm Continue Time (d.h. die Zeit zwischen zwei Alarmerkennungen); Sie können auch alle Kanäle einstellen, indem Sie auf "All" klicken. Klicken Sie auf "Apply" um zu speichern. Alarm out Schedule: Entspricht die gleiche Einstellung wie in Aufnahme, siehe oben. NB : Die Grundeinstellung ist hierunten blau angezeigt.
180 Buzzer: Klicken Sie : Buzzer und wählen Sie Continue Time Hinweis: Der Buzzer muß angeklickt werden sonnst funktioniert er nicht!
181 Weiterführende Einstellungen Die folgende 7 Sub-Menüs sind zutreffend: Network, , DDNS, FTP, PTZ, User Admin, und Block / Allow List. Netzwerk HTTP Port: Standard port: 80, bei Verwendung des IE-Browser und Sie möchten sich die Bilder ansehen (Fernansicht), dann müssen Sie einen neuen Anschluss hinzufügen. IP-Adresse z.b. 7804, dann müssen Sie eingeben und nicht Media Port: für CMS,, Mobile App, Grundeinstellung : 9000 UPNP: Klicken Sie UPNP, Sie können den DVR benutzen über WAN Netzwerk Typ: Inclusive: STATIC, DHCP, PPPOE und 3G. Wenn Sie -STATIC- wählen sollte IP-Adresse, Subnet Mask, Gateway, DNS-Server und Alternate DNS-Server eingestellt werden. Hinweis: Der DVR und der Router gehören in dem gleichen Netzwerk. Z.B..: Router IP Adresse ist , dann ist die DVR Adresse IP xxx, Gateway ist Wenn Sie DHCP wählen wird automatisch die IP Adresse, Subnet Mask, Gateway, DNS Server und Alternate DNS Server eingestellt werden. PPPoE : Hier müssen Sie Gebrauchername und Passwort speichern und System erneut starten wählen, Der DVR wird automatisch eine IP Adresse erwerben. Die 3G Funktion wird auf diesem Gerät nicht unterstützt!
182 Netzwerk Einstellung Im Menü finden Sie in "Advanced settings" die Option "Netzwerk". Sie können nun zwischen STATIC, DHCP, PPPoE oder 3G wählen. Die Einstellung UPNP ist im Hinblick auf die Sicherheitsrisiken abgeraten. In der Einstellung "STATIC", müssen Sie den Netzwerkeinstellungen selbst ausfüllen. Wir empfehlen, die Netzwerkeinstellungen auf "DHCP" ein zu stellen. Das Netzwerkkabel muss mit dem Router verbunden werden. Drücken Sie nun die Taste "Test" und am unteren Rand des Bildschirms finden Sie jetzt, wenn es stimmt, "OK". Finden Sie jetzt im Menü die "QR-Information" und wählen Sie Netzwerk. Die IP-Adresse wird angezeigt, hier werden auch die Gates aufgeführt. Mit dieser IP-Adresse sind Sie in der Lage, in Ihrem Netzwerk, die Bilder des DVR auf dem Computer anzusehen. Starten Sie Internet Explorer und geben Sie in der Adresszeile die IP-Adresse ein. Wenn Sie sich nicht mit dem DVR-Gerät anschließen können, müssen Sie die folgenden Einstellungen in Internet Explorer hinzufügen. Diese Einstellungen sollten Sie nur einmal einstellen. Die Bilder werden in Holländisch mit einer Deutschen Übersetzung neben den Bildern angezeigt!
183 Einstellungen DVR auf Internet Explorer 11. Öffnen Sie IE 11 und gehen Sie zu Extra(ALT+X) und wählen Sie die Internet Optionen: Internet Optionen Gehen zu Vertrauenswürdige websites : Sicherheit / Schutz Vertrauenswürdige Sites Klicken Sie auf Websites und geben Sie die IP-Adresse des DVR ein:
184 Wählen Sie nicht diese Option (Serververification / Serverüberprüfen) und klicken Sie auf Addieren / Hinzufügen. Hinzufügen Nun ist die IP-Adresse hinzugeführt an Vertrauenwürdige websites. Wählen Sie jetzt : Benutzerdefiniert
185 Gehen Sie zur ActiveX -Unterzeichnungen i.b.a. Bedienelemente und wählen Sie Enable/Inschakelen/Einschalten: KLicken Sie auf OK. Verlassen Sie Internet Optionen. Gehen Sie erneut zu Extra (ALT+X) und wählen Sie die Einstellungen i.b.a. die Kompatibilitätswiedergabe: Geben Sie auch hier die IP-Adresse ein, Wenn Sie auf Toevoegen / Hinzufügen klicken wird die IP-Adresse, wie unten, angezeigt. Seien Sie sicher daß beide Optionen markiert sind.
186 Gehen Sie noch einmal zu Extra (ALT+X) und wählen Sie Beveiliging / Sicherheit oder Schutz, kontrollieren Sie ob ActiveX Filtering angekreutzt wurde. In diesem Fall müssen Sie diese Option inaktivieren. Um die Bilder außerhalb des Netzwerks, beispielsweise auf einem Computer an einer anderen Stelle zu sehen, müssen Sie die Ports an Ihrem Router "forwarden"/weiterleiten. Wie "Forwarding" oder weiterleiten der Anschlüsse vorgeht wird in der Bedienungsanleitung Ihres Routers angegeben. Es gibt auch im Internet Filme oder Clips um die notwendige "Erklärung" der verschiedenen Router-Modelle zu finden.
187 SMTP Server/ Port: Sie können den SMTP Port auf der Internetseite finden Klicken Sie SSL Check um den SMTP Server (Like Gmail) ein zu stellen. Send Address/ Password: ID und Passwort des Senders. Empfänger Adresse: der Gebaucher kann drei verschiedene Adressen benutzen. Klicken Sie Test um zu überprüfen. Number of Snapshot: Klicken Sie snapshot um dieses als eingeschlossene Datei schicken zu können. Snap Time interval: Einstellung des Intervalls zwischen zwei snapshots. DDNS: Sie können die WANIP Adresse, ORAY, 3322 IP und Domain Name einstellen. Klicken Sie DDNS und wählen Sie den empfohlenen DDNS Type: leadingdvr.com, der DVR wird automatisch einen Domain Name erwerben. Sie können auch einen anderen Domain Name wählen, der zuerst auf der Website registriert werden muß. Hinweis: Wenn Sie Domain Name wählen müssen Sie erst Port-forwarding des Routers einstellen.
188 Hinweis: Wenn Sie DDNS verwenden:leadingdvr.com,müssen Sie PC DNS ändern wie hierunten angezeigt wird:
189 FTP: Diese Funktion entspricht die des SMTP Servers, erstellen Sie einen FTP-Server mit zb einen Computer oder ein vorhandener FTP-Server, geben Sie den Benutzernamen, Kennwort und IP-Adresse ein. Der FTP-Port ist 21, kann aber geändert werden. Stellen Sie auch "Directory" ein indem die Bilder gespeichert werden müssen. PTZ: Wenn die Verbindung zum DVR PTZ hergestellt ist, können Sie die Adresse, Baudrate und Protokoll- Einstellung einstellen, nur dann wenn die Einstellung des DVR die PTZ Einstellung entspricht kann die Verbindung "PTZ-Kamera DVR" erfolgreich hergestellt werden.address: Adressbereich 1 ~ 255, die PTZ- Adresse kann manuell auf der Dome-Kamera eingestellt werden. Baudrate: Jeder PTZ hat eine feste Baudrate Werkseinstellung, die beiden Baudrates von PTZ und DVR sollten während der Verbindung konstant bleiben. Protocol: die beiden Protokollen des PTZ und DVR sollten während der Verbindung konstant bleiben.
190 User Admin: Verwenden Sie den Benutzernamen zum System Log-in, der Administrator kann "Non-admin account" hinzufügen und löschen, alle Passwörter ändern, einschließlich die vom Administrator und kann "Permissions right to non-admin account" festlegen. Add User/Gebraucher hinzufügen
191 Permission setting: Legen Sie Permissions right to non-admin account fest nach Ihrem Wunsch. Block/ Allow List: Um Gebraucher zu blockieren oder zu zulassen (in Segmenten) den DVR zu verwenden. Klicken Sie auf "Block List" und stellen Sie die ursprüngliche IP-Adresse und End-IP-Adresse ein, die Computer- Nutzer in diesen Segmenten können den DVR nicht verwenden; indem Sie auf "Allow List" klicken können die Segmente von Benutzern verwendet werden.
192 QR Code QR & INFORMATION Das QR Code Bild kann mit einem Smartphone fotografiert werden. Wenn es auf dem Smartphone kein "Surveillance APP" gibt kann andere mobil Scan-Software verwendet werden um den QR-Code zu scannen zur Download Adresse (Android und Apple). Wenn die Überwachungs-Software (Mobile App) installiert ist, kann die UID (P2P) gescannt werden um auf Ihrem Handy Live-Bilder zu erzielen. System: Der Gebraucher kann hier Device Name, Device ID, Firmware Version und Release Date finden.
193 Event: Der Gebraucher kann hier alle Events finden sowie Bewegungserkennung, Sensor Alarm,Video loss Log: Der Gebraucher kann alle Benutzerverhandlungen überprüfen, einschließlich die des Administrators.
194 Network: Der Gebraucher kann Device Port, IP Address und P2P (UID) Informationen überprüfen, einschließlich den Cloud Status in der Spalte. Online User: Der Gebraucher kann PC IP Port und APP Visitors-Liste in der Spalte überprüfen.
195 In Win8 System, können Sie einloggen als Administrator LAN FERNANSICHT Wenn der DVR mit dem Router verbunden ist, überprüfen Sie die IP-Adresse des Routers, das ist normal ( ), gehen Sie zur Netzwerk-Steuereinstellung/control setting des DVR und geben Sie die IP-Adresse und Gateway (Router IP) ein, die IP-Adresse muss im gleichen Segment wie der Router. Beispiel: Router IP ist , die DVR IP einstellen als X, rufen Sie nach der Einstellung der IE-Browser auf und gehen Sie zur Cloud Webseite: oder geben Sie ein DVR IP Adresse: X:Web port, dann klicken Sie Enter, und IE Active-X control wird heruntergeladen ( der IE Browser muß das herunterladen von Active-X control zulassen, siehe Anhang 1 für Detail-Info). Nach dem herunterladen erscheint ein Dialogfenster, siehe Abbildung:
196 Es gibt 2 Login-Modi: IP Login und P2P Login. 1) IP Login: Der standard User name ist admin, Passwort: , Device port ist Media port. Klicken Sie Login en gehen Sie zu Live View. 2) P2P Login: P2P ID siehe DVR ( QR & Information), Der standard User name ist admin, Passwort: , klicken Sie Login und gehen Sie zu Live View.
197 Live view : WAN Über Router Stufe 1: Siehe die LAN Einstellung hieroben. Stufe2: Nach der Bestätigung der LAN-Verbindung, muss der Benutzer den Port weiterleiten/forwarding im Router, siehe unten. Mit jedem DVR müssen zwei Ports weitergeleitet werden: Web & Mediaport (der Benutzer kann die LAN IP-Adresse auf DMZ hinzufügen, Siehe Handbuch des Routers). Wenn Sie die Port forwarding erledigt haben überprüfen Sie die WAN IP Adresse in Status des Routers und fügen Sie den WEB Port über WAN IP hin zu. Z.B.: Gehen Sie über Port oder Name: WEB Port.
198 Stufe 3: Wenn das Ändern der WAN-IP-Adresse nicht gut läuft, gehen Sie dann über Domain Name. Gehen Sie zu Main Manuel---Advanced Setting ----DDNS---Klicken Sie DDNS ----Wählen Sie Domain Name :leadingdvr.com Gehen Sie zu: Name: WEB Port. Über CMS Kopieren Sie PC CMS von der Softwarediskette und installieren Sie PC CMS, Sie müssen Administrator und Passwort anmelden. Siehe unten:

199 Nach Registrierung können Sie einloggen. Live View : Gerät hinzufügen: Rechtsklick auf Device list, klicken Sie auf "Add Device", ein Bild wird gezeigt. Es gibt zwei Arten Benutzername: IP-Login (über DDNS) und P2P-Login (über UID).
Cameraserver mini. commissioning. Ihre Vision ist unsere Aufgabe
 Cameraserver mini commissioning Page 1 Cameraserver - commissioning Contents 1. Plug IN... 3 2. Turn ON... 3 3. Network configuration... 4 4. Client-Installation... 6 4.1 Desktop Client... 6 4.2 Silverlight
p^db=`oj===pìééçêíáåñçêã~íáçå=
 p^db=`oj===pìééçêíáåñçêã~íáçå= How to Disable User Account Control (UAC) in Windows Vista You are attempting to install or uninstall ACT! when Windows does not allow you access to needed files or folders.
Android APP NVR Viewer
 Android APP NVR Viewer User Manual DN-16111 DN-16112 DN16113 2 DN-16111, DN-16112, DN-16113 for Android User Manual Table of Contents Download the APP... 3 Running the app - Add NVR... 3 Running the app
p^db=`oj===pìééçêíáåñçêã~íáçå=
 p^db=`oj===pìééçêíáåñçêã~íáçå= Error: "Could not connect to the SQL Server Instance" or "Failed to open a connection to the database." When you attempt to launch ACT! by Sage or ACT by Sage Premium for
Word-CRM-Upload-Button. User manual
 Word-CRM-Upload-Button User manual Word-CRM-Upload for MS CRM 2011 Content 1. Preface... 3 2. Installation... 4 2.1. Requirements... 4 2.1.1. Clients... 4 2.2. Installation guidelines... 5 2.2.1. Client...
ONLINE LICENCE GENERATOR
 Index Introduction... 2 Change language of the User Interface... 3 Menubar... 4 Sold Software... 5 Explanations of the choices:... 5 Call of a licence:... 7 Last query step... 9 Call multiple licenses:...
Ingenics Project Portal
 Version: 00; Status: E Seite: 1/6 This document is drawn to show the functions of the project portal developed by Ingenics AG. To use the portal enter the following URL in your Browser: https://projectportal.ingenics.de
Quick Start Guide. PoE IP Camera. Technical Support EN/DE QG4_B
 EN/DE Technical Support PoE IP Camera Quick Start Guide For Windows Client & Mac Client, please download the PC software: https://reolink.com/software-and-manual/ For advanced setup, please download the
VGM. VGM information. HAMBURG SÜD VGM WEB PORTAL USER GUIDE June 2016
 Overview The Hamburg Süd VGM Web portal is an application that enables you to submit VGM information directly to Hamburg Süd via our e-portal Web page. You can choose to enter VGM information directly,
Tube Analyzer LogViewer 2.3
 Tube Analyzer LogViewer 2.3 User Manual Stand: 25.9.2015 Seite 1 von 11 Name Company Date Designed by WKS 28.02.2013 1 st Checker 2 nd Checker Version history Version Author Changes Date 1.0 Created 19.06.2015
Quick Installation Guide
 LevelOne WHG-1000 300Mbps Wireless PoE Hotspot Gateway Quick Installation Guide English Deutsch Table of Contents English... 3 Deutsch... 13 Default Settings IP Address-LAN1 192.168.1.254 IP Address-LAN2
1. General information... 2 2. Login... 2 3. Home... 3 4. Current applications... 3
 User Manual for Marketing Authorisation and Lifecycle Management of Medicines Inhalt: User Manual for Marketing Authorisation and Lifecycle Management of Medicines... 1 1. General information... 2 2. Login...
VGM. VGM information. HAMBURG SÜD VGM WEB PORTAL - USER GUIDE June 2016
 Overview The Hamburg Süd VGM-Portal is an application which enables to submit VGM information directly to Hamburg Süd via our e-portal web page. You can choose to insert VGM information directly, or download
ALL1681 Wireless 802.11g Powerline Router Quick Installation Guide
 ALL1681 Wireless 802.11g Powerline Router Quick Installation Guide 1 SET ALL1681 Upon you receive your wireless Router, please check that the following contents are packaged: - Powerline Wireless Router
Yealink W52 DECT IP Telefon
 Yealink W52 DECT IP Telefon Manuelle Neukonfiguration Dokumentenversion 1.0 Yealink W52 DECT IP Telefon Mauelle Neukonfiguration Copyright Hinweis Copyright 2016 finocom AG Alle Rechte vorbehalten. Jegliche
NEWSLETTER. FileDirector Version 2.5 Novelties. Filing system designer. Filing system in WinClient
 Filing system designer FileDirector Version 2.5 Novelties FileDirector offers an easy way to design the filing system in WinClient. The filing system provides an Explorer-like structure in WinClient. The
How-To-Do. OPC-Server with MPI and ISO over TCP/IP Communication. Content. How-To-Do OPC-Server with MPI- und ISO over TCP/IP Communication
 How-To-Do OPC-Server with MPI and ISO over TCP/IP Content OPC-Server with MPI and ISO over TCP/IP... 1 1 General... 2 1.1 Information... 2 1.2 Reference... 2 2 Procedure for the Setup of the OPC Server...
Exercise (Part V) Anastasia Mochalova, Lehrstuhl für ABWL und Wirtschaftsinformatik, Kath. Universität Eichstätt-Ingolstadt 1
 Anastasia Mochalova, Lehrstuhl für ABWL und Wirtschaftsinformatik, Kath. Universität Eichstätt-Ingolstadt 1") Exercise (Part V) Notes: The exercise is based on Microsoft Dynamics CRM Online. For all screenshots: Copyright Microsoft Corporation. The sign ## is you personal number to be used in all exercises. All
Exercise (Part V) Notes: The exercise is based on Microsoft Dynamics CRM Online. For all screenshots: Copyright Microsoft Corporation. The sign ## is you personal number to be used in all exercises. All
NVR Mobile Viewer for iphone/ipad/ipod Touch
 NVR Mobile Viewer for iphone/ipad/ipod Touch Quick Installation Guide DN-16111 DN-16112 DN16113 2 DN-16111, DN-16112, DN-16113 for Mobile ios Quick Guide Table of Contents Download and Install the App...
How-To-Do. Hardware Configuration of the CC03 via SIMATIC Manager from Siemens
 How-To-Do Hardware Configuration of the CC03 via SIMATIC Manager from Siemens Content Hardware Configuration of the CC03 via SIMATIC Manager from Siemens... 1 1 General... 2 1.1 Information... 2 1.2 Reference...
300Mbps Wireless Outdoor PoE Access Point/Bridge Quick Installation Guide
 LevelOne WAB-5120 300Mbps Wireless Outdoor PoE Access Point/Bridge Quick Installation Guide English Deutsch - 1 - Table of Content English... - 3 - Deutsch... - 9 - This guide covers only the most common
MANUAL_EN ANLEITUNG_DE PHONE SUITE SYNCHRONISATION SOFTWARE
 MANUAL_EN ANLEITUNG_DE PHONE SUITE SYNCHRONISATION SOFTWARE 2 PHONE SUITE MANUAL PHONE SUITE MANUAL 3 RESERVATION Technical Data is subject to change without notice. Changes, errors and misprints may not
Quick Guide Home Network Mode
 Quick Guide Home Network Mode English > 1 German > 3 About the Home Network Mode EN Tivizen Nano & iplug normally work on their own created networks (whose SSID starts with tivizentv or iplug ) in which
DVR / QuickQuide Adroid
 DVR 351.154/351.155 QuickQuide Adroid INSTRUCTION MANUAL GEBRUIKSAANWIJZING BEDIENUNGSANLEITUNG ENGLISH Setup IP-Camviewer Lite on Android. 351.154 en 351.155. Start with searching the right app IP-camviewer
Magic Figures. We note that in the example magic square the numbers 1 9 are used. All three rows (columns) have equal sum, called the magic number.
 have equal sum, called the magic number.") Magic Figures Introduction: This lesson builds on ideas from Magic Squares. Students are introduced to a wider collection of Magic Figures and consider constraints on the Magic Number associated with such
Magic Figures Introduction: This lesson builds on ideas from Magic Squares. Students are introduced to a wider collection of Magic Figures and consider constraints on the Magic Number associated with such
Load balancing Router with / mit DMZ
 ALL7000 Load balancing Router with / mit DMZ Deutsch Seite 3 English Page 10 ALL7000 Quick Installation Guide / Express Setup ALL7000 Quick Installation Guide / Express Setup - 2 - Hardware Beschreibung
Order Ansicht Inhalt
 Order Ansicht Inhalt Order Ansicht... 1 Inhalt... 1 Scope... 2 Orderansicht... 3 Orderelemente... 4 P1_CHANG_CH1... 6 Function: fc_ins_order... 7 Plug In... 8 Quelle:... 8 Anleitung:... 8 Plug In Installation:...
VIDEO CALL CAMERA G-VCAM-01
 VIDEO CALL CAMERA G-VCAM-01 EN AUS GUTEM GRUND ENGLISH 07-10 2 SAFETY AND INFORMATION Safety 7 This camera is designed to transmit video and audio signals. All other uses are expressly prohibited. 7 Protect
Anleitung zur Verwendung des Update-Tools für
 English version see below (page 10) Anleitung zur Verwendung des Update-Tools für - KW DDC Steuergeräte - KW DDC WLAN Module - KW DLC Steuergeräte - KW DLC WLAN Module Bitte beachten Sie: jedes Steuergerät
Installation Guide WLAN Interface
 Installation Guide 7106 7206 7010 WLAN Interface EN Installation Guide This guide explains how to install the Ethernet LAN card in your label printer. You should conult your dealer or distributor for more
Setup Manual Anleitung zur Konfiguration
 Setup Manual Anleitung zur Konfiguration Tap your language 1 Introduction 1. The difference between the MusicCast Smart Home skill and the MusicCast skill MusicCast Smart Home skill The MusicCast Smart
Titelbild1 ANSYS. Customer Portal LogIn
 Titelbild1 ANSYS Customer Portal LogIn 1 Neuanmeldung Neuanmeldung: Bitte Not yet a member anklicken Adressen-Check Adressdaten eintragen Customer No. ist hier bereits erforderlich HERE - Button Hier nochmal
USB Treiber updaten unter Windows 7/Vista
 USB Treiber updaten unter Windows 7/Vista Hinweis: Für den Downloader ist momentan keine 64 Bit Version erhältlich. Der Downloader ist nur kompatibel mit 32 Bit Versionen von Windows 7/Vista. Für den Einsatz
Guidance Notes for the eservice 'Marketing Authorisation & Lifecycle Management of Medicines' Contents
 Guidance Notes for the eservice 'Marketing Authorisation & Lifecycle Management of Medicines' Contents Login... 2 No active procedure at the moment... 3 'Active' procedure... 4 New communication (procedure
Exercise (Part XI) Anastasia Mochalova, Lehrstuhl für ABWL und Wirtschaftsinformatik, Kath. Universität Eichstätt-Ingolstadt 1
 Anastasia Mochalova, Lehrstuhl für ABWL und Wirtschaftsinformatik, Kath. Universität Eichstätt-Ingolstadt 1") Exercise (Part XI) Notes: The exercise is based on Microsoft Dynamics CRM Online. For all screenshots: Copyright Microsoft Corporation. The sign ## is you personal number to be used in all exercises. All
Exercise (Part XI) Notes: The exercise is based on Microsoft Dynamics CRM Online. For all screenshots: Copyright Microsoft Corporation. The sign ## is you personal number to be used in all exercises. All
JTAGMaps Quick Installation Guide
 Index Index... 1 ENGLISH... 2 Introduction... 2 Requirements... 2 1. Installation... 3 2. Open JTAG Maps... 4 3. Request a free JTAG Maps license... 4 4. Pointing to the license file... 5 5. JTAG Maps
Installation/setup notes
 Installation/setup notes Notes applicable for the software: stute.x1d Loudspeaker Designer stute.x1a Audio Analyzer stute.scpi SCPI controller DCX.Server Install/Test our software for free (Demo) Download
USB -> Seriell Adapterkabel Benutzerhandbuch
 USB -> Seriell Adapterkabel Benutzerhandbuch 1. Produkt Eigenschaften 1 2. System Vorraussetzungen 1 3. Treiber Installation (Alle Windows Systeme) 1 4. Den COM Port ändern 2 5. Einstellen eines RS232
KURZANLEITUNG. Firmware-Upgrade: Wie geht das eigentlich?
 KURZANLEITUNG Firmware-Upgrade: Wie geht das eigentlich? Die Firmware ist eine Software, die auf der IP-Kamera installiert ist und alle Funktionen des Gerätes steuert. Nach dem Firmware-Update stehen Ihnen
DVR / QuickQuide Adroid
 DVR 351.154/351.155 QuickQuide Adroid INSTRUCTION MANUAL GEBRUIKSAANWIJZING BEDIENUNGSANLEITUNG ENGLISH Setup IP-Camviewer Lite on IOS. 351.154 and 351.155. Start with searching the right app IP-camviewer
Snom 3xx/7xx Serie. Manuelle Neukonfiguration. Dokumentenversion 1.0
 Snom 3xx/7xx Serie Manuelle Neukonfiguration Dokumentenversion 1.0 Snom 3xx/7xx Serie Mauelle Neukonfiguration Copyright Hinweis Copyright 2016 finocom AG Alle Rechte vorbehalten. Jegliche technische Dokumentation,
Cisco SSPA122. Installation und manuelle Rekonfiguration. Dokumentenversion 1
 Cisco SSPA122 Installation und manuelle Rekonfiguration Dokumentenversion 1 Placetel UC-One Cisco SPA122 Installation und manuelle Rekonfiguration Copyright Hinweis Copyright 2015 finocom AG Alle Rechte
vcdm im Wandel Vorstellung des neuen User Interfaces und Austausch zur Funktionalität V
 vcdm im Wandel Vorstellung des neuen User Interfaces und Austausch zur Funktionalität V0.1 2018-10-02 Agenda vcdm User Interface History Current state of User Interface User Interface X-mas 2018 Missing
Dexatek's Alexa Smart Home Skills Instruction Guide
 Dexatek's Alexa Smart Home Skills Instruction Guide Version 0.3 Author Esther Date 01/10/18 ~ 1 ~ Revision History Version Date Editor Remark 0.1 2017/04/05 Esther Initial version 0.2 2018/01/09 Esther
How to access licensed products from providers who are already operating productively in. General Information... 2. Shibboleth login...
 Shibboleth Tutorial How to access licensed products from providers who are already operating productively in the SWITCHaai federation. General Information... 2 Shibboleth login... 2 Separate registration
CABLE TESTER. Manual DN-14003
 CABLE TESTER Manual DN-14003 Note: Please read and learn safety instructions before use or maintain the equipment This cable tester can t test any electrified product. 9V reduplicated battery is used in
Walter Buchmayr Ges.m.b.H.
 Seite 1/10 Chapter Description Page 1 Advantages 3 2 Performance description 4 3 Settings 5 4 Options 6 5 Technical data 7 6 Pictures 8 http://members.aon.at/buchmayrgmbh e-mail: walter.buchmayr.gmbh@aon.at
SanStore: Kurzanleitung / SanStore: Quick reference guide
 SanStore Rekorder der Serie MM, MMX, HM und HMX Datenwiedergabe und Backup Datenwiedergabe 1. Drücken Sie die Time Search-Taste auf der Fernbedienung. Hinweis: Falls Sie nach einem Administrator-Passwort
Quick Installation Guide for 4 and 7-Port Broadband Router
 Quick Installation Guide for 4 and 7-Port Broadband Router A. Hardware Installation 1. Setup LAN connection: connect an Ethernet cable from your computer s Ethernet port to one of the LAN ports of this
Exercise (Part I) Anastasia Mochalova, Lehrstuhl für ABWL und Wirtschaftsinformatik, Kath. Universität Eichstätt-Ingolstadt 1
 Anastasia Mochalova, Lehrstuhl für ABWL und Wirtschaftsinformatik, Kath. Universität Eichstätt-Ingolstadt 1") Exercise (Part I) Notes: The exercise is based on Microsoft Dynamics CRM Online. For all screenshots: Copyright Microsoft Corporation. The sign ## is you personal number to be used in all exercises. All
Exercise (Part I) Notes: The exercise is based on Microsoft Dynamics CRM Online. For all screenshots: Copyright Microsoft Corporation. The sign ## is you personal number to be used in all exercises. All
Installation Manual. Driver Installation USB-to-Serial Adapter WE2111. A en/de
 Installation Manual English Deutsch Driver Installation USB-to-Serial Adapter WE2111 A4012-1.0 en/de USB-to-Serial Adapter English 2 A4012-1.0 en/de USB-to-Serial Adapter 1 Installation in Windows 7...
Monitor VIS 3xx Kurzanleitung
 Monitor VIS 3xx Kurzanleitung 19.08.08 Art. Nr. 22261 Inhalt: 1. Spezifikationen...2 2. Tastenfunktionen...2 3. Menüführung und Einstellungen...3 Technik nach Maß Wöhler Monitor VIS 3xx 1. Spezifikationen
Abteilung Internationales CampusCenter
 Abteilung Internationales CampusCenter Instructions for the STiNE Online Enrollment Application for Exchange Students 1. Please go to www.uni-hamburg.de/online-bewerbung and click on Bewerberaccount anlegen
NTP Synchronisierung NTP Synchronizer
 Q-App: NTP Synchronisierung NTP Synchronizer Q-App zur automatischen Datums und Zeitsynchronisierung Q-App for automatic date and time synchronization Beschreibung Der Workflow hat 2 Ebenen eine Administratoren-
LevelOne. Quick Installation Guide. EAP series Enterprise Access Point. Default Settings. IP Address
 LevelOne EAP series Enterprise Access Point Quick Installation Guide English Deutsch Default Settings IP Address 192.168.1.1 Username admin Password admin Figure 1-1 Figure 1-2 Figure 1-3 2 Figure 2-1
SmartClass Firmware-Update Vorgehensweise
 Benutzeranweisungen SmartClass Firmware-Update Vorgehensweise 2008.01 (V 1.x.x) Deutsch Please direct all enquiries to your local JDSU sales company. The addresses can be found at: www.jdsu.com/tm-contacts
Installation und Einrichtung unter Windows 7/8/10. Installation and configuration for Windows 7/8/10
 AFS-Client Installation und Einrichtung unter Windows 7/8/10 Installation and configuration for Windows 7/8/10 18.04.2018 kim.uni-hohenheim.de kim@uni-hohenheim.de Bitte sowohl diese Anleitung als auch
Instruktionen Mozilla Thunderbird Seite 1
 Instruktionen Mozilla Thunderbird Seite 1 Instruktionen Mozilla Thunderbird Dieses Handbuch wird für Benutzer geschrieben, die bereits ein E-Mail-Konto zusammenbauen lassen im Mozilla Thunderbird und wird
Umstellung eines Outlook Kontos von ActiveSync zu IMAP. Changing an Outlook account from ActiveSync to IMAP
 Outlook 2013/2016 Umstellung eines Outlook Kontos von ActiveSync zu IMAP Changing an Outlook account from ActiveSync to IMAP 18.04.2018 kim.uni-hohenheim.de kim@uni-hohenheim.de Diese Anleitung beschreibt
SETUP TOOL. Bedienungsanleitung User s Manual
 Bedienungsanleitung User s Manual Bitte lesen Sie diese Anleitung vor der Inbetriebnahme sorgfältig durch Please read the instructions carefully before use 1. Eigenschaften Das Setup Tool ist ein speziell
How-To-Do. Communication to Siemens OPC Server via Ethernet
 How-To-Do Communication to Siemens OPC Server via Content 1 General... 2 1.1 Information... 2 1.2 Reference... 2 2 Configuration of the PC Station... 3 2.1 Create a new Project... 3 2.2 Insert the PC Station...
Newest Generation of the BS2 Corrosion/Warning and Measurement System
 Newest Generation of the BS2 Corrosion/Warning and Measurement System BS2 System Description: BS2 CorroDec 2G is a cable and energyless system module range for detecting corrosion, humidity and prevailing
How-To-Do. Hardware Configuration of the CPU 317NET with external CPs on the SPEED Bus by SIMATIC Manager from Siemens
 How-To-Do Hardware Configuration of the CPU 317NET with external CPs on the SPEED Bus by SIMATIC Manager from Siemens Content Hardware Configuration of the CPU 317NET with external CPs on the SPEED Bus
CNC ZUR STEUERUNG VON WERKZEUGMASCHINEN (GERMAN EDITION) BY TIM ROHR
 BY TIM ROHR") (GERMAN EDITION) BY TIM ROHR READ ONLINE AND DOWNLOAD EBOOK : CNC ZUR STEUERUNG VON WERKZEUGMASCHINEN (GERMAN EDITION) BY TIM ROHR PDF Click button to download this ebook READ ONLINE AND DOWNLOAD CNC ZUR
(GERMAN EDITION) BY TIM ROHR READ ONLINE AND DOWNLOAD EBOOK : CNC ZUR STEUERUNG VON WERKZEUGMASCHINEN (GERMAN EDITION) BY TIM ROHR PDF Click button to download this ebook READ ONLINE AND DOWNLOAD CNC ZUR
yasxtouch Firmware Update
 Inhaltsverzeichnis /Content Inhalt Inhaltsverzeichnis /Content... 1 1. Funktionsweise / Functionality... 2 2. Speichern der Einstellungen / Backup Settings... 2 2.1 Anmelden am Serveradmin / Login Serveradmin...
Quick Start Guide. Wireless IP Camera. Technical Support EN/DE QG4_B
 EN/DE Technical Support Wireless IP Camera Quick Start Guide For Windows Client & Mac Client, please download the PC software: https://reolink.com/software-and-manual/ For advanced setup, please download
Parameter-Updatesoftware PF-12 Plus
 Parameter-Updatesoftware PF-12 Plus Mai / May 2015 Inhalt 1. Durchführung des Parameter-Updates... 2 2. Kontakt... 6 Content 1. Performance of the parameter-update... 4 2. Contact... 6 1. Durchführung
Application Note. Import Jinx! Scenes into the DMX-Configurator
 Application Note Import Jinx! Scenes into the DMX-Configurator Import Jinx! Scenen into the DMX-Configurator 2 The Freeware Jinx! is an user friendly, well understandable software and furthermore equipped
SensoDirect 150. Lovibond Water Testing. Data Retrieve Software SW E2005. Tintometer Group. ph/orp DO CD/TDS. Bedienungsanleitung. Instruction Manual
 Lovibond Water Testing Tintometer Group SensoDirect 150 Data Retrieve Software SW E2005 DE GB Bedienungsanleitung Seite 2 5 Instruction Manual Page 5 7 CD/TDS ph/orp DO www.lovibond.com DE Inhaltsverzeichnis
Anleitung zur Schnellinstallation TFM-561U
 Anleitung zur Schnellinstallation TFM-561U V1 Table of Contents Deutsch 1 1. Bevor Sie anfangen 1 2. Installation 2 Troubleshooting 5 Version 08.25.2010 1. Bevor Sie anfangen Packungsinhalt TFM-561U Treiber
v i r t u A L C O M P o r t s
 v i r t u A L C O M P o r t s (HO720 / HO730) Installieren und Einstellen Installation and Settings Deutsch / English Installieren und Einstellen des virtuellen COM Ports (HO720 / HO730) Einleitung Laden
Quick Installation Guide TU2-ET100
 Quick Installation Guide TU2-ET100 Table of of Contents Contents... 1. Bevor Sie anfangen... 2. Installation... 1 1 2 Troubleshooting... 6 Version 08.30.2006 1. Bevor Sie anfangen Packungsinhalt TU2-ET100
Analog GSM-Gateway TRF
 Analog GSM-Gateway TRF GSM gateway for voice- or fax transmission 1 2009 com.sat GmbH Kommunikationssysteme Schwetzinger Str. 19 D-68519 Viernheim www.comsat.de Tel: +49-(0)180-3-768837 The connecting
PONS DIE DREI??? FRAGEZEICHEN, ARCTIC ADVENTURE: ENGLISCH LERNEN MIT JUSTUS, PETER UND BOB
 Read Online and Download Ebook PONS DIE DREI??? FRAGEZEICHEN, ARCTIC ADVENTURE: ENGLISCH LERNEN MIT JUSTUS, PETER UND BOB DOWNLOAD EBOOK : PONS DIE DREI??? FRAGEZEICHEN, ARCTIC ADVENTURE: Click link bellow
Exercise (Part II) Anastasia Mochalova, Lehrstuhl für ABWL und Wirtschaftsinformatik, Kath. Universität Eichstätt-Ingolstadt 1
 Anastasia Mochalova, Lehrstuhl für ABWL und Wirtschaftsinformatik, Kath. Universität Eichstätt-Ingolstadt 1") Exercise (Part II) Notes: The exercise is based on Microsoft Dynamics CRM Online. For all screenshots: Copyright Microsoft Corporation. The sign ## is you personal number to be used in all exercises. All
Exercise (Part II) Notes: The exercise is based on Microsoft Dynamics CRM Online. For all screenshots: Copyright Microsoft Corporation. The sign ## is you personal number to be used in all exercises. All
Apex Series AN100 - Q&A
 EN Apex Series AN100 - Q&A Version:1.1 Q1: How do I connect the AN100 with my ios device? A1: To connect the AN100 with an ios device you need to use an App installed on the AN100. Users can download their
User Manual BB-anywhere
 User Manual BB-anywhere LOGIN PROCEDURE 1. Click the Start button, choose All Programs (right above the search box) and select BB-ANYWHERE from the Start menu: BB-anywhere in a nutshell Regardless whether
Kurzanleitung um Transponder mit einem scemtec TT Reader und der Software UniDemo zu lesen
 Kurzanleitung um Transponder mit einem scemtec TT Reader und der Software UniDemo zu lesen QuickStart Guide to read a transponder with a scemtec TT reader and software UniDemo Voraussetzung: - PC mit der
ALL2282. Pan-Tilt MPEG4/MJPEG Network Camera. Quick Installation Guide
 ALL2282 Pan-Tilt MPEG4/MJPEG Network Camera Quick Installation Guide 1 Getting Started Package Contents Check the items contained in the package carefully. You should have the following items. Once any
Readme-USB DIGSI V 4.82
 DIGSI V 4.82 Sehr geehrter Kunde, der USB-Treiber für SIPROTEC-Geräte erlaubt Ihnen, mit den SIPROTEC Geräten 7SJ80/7SK80 über USB zu kommunizieren. Zur Installation oder Aktualisierung des USB-Treibers
Panic Button Add-on Device Quickstart Guide
 Panic Button Add-on Device Quickstart Guide Model No. PNB1301 What s inside: 1x Panic Button 1x Lanyard All Home8 add-on devices have to work with Home8 systems. Deutsch Schritt 1: Setzen Sie Ihr Gerät
VN7640 FlexRay/CAN/LIN/Ethernet Interface Quick Start Guide. Version 1.1 English/Deutsch
 VN7640 FlexRay/CAN/LIN/Ethernet Interface Quick Start Guide Version 1.1 English/Deutsch Quick Start Guide VN7640 ENGLISH 1 ENGLISH 1.1 Installation Step by Step Procedure Please use the drivers from the
Where are we now? The administration building M 3. Voransicht
 Let me show you around 9 von 26 Where are we now? The administration building M 3 12 von 26 Let me show you around Presenting your company 2 I M 5 Prepositions of place and movement There are many prepositions
Anleitung zur Schnellinstallation TEW-623PI 3.02
 Anleitung zur Schnellinstallation TEW-623PI 3.02 Table of Contents Deutsch 1 1. Bevor Sie anfangen 2. Installation 1 2 3. Verwendung des drahtlosen Adapters 4 Troubleshooting 5 Version 02.05.2010 1. Bevor
Technische Information. Toolset Software und Cosworth Geräte
 Technische Information Technical Information 07/2014 911 GT3 Cup (991) Toolset Software und Cosworth Geräte Toolset software and Cosworth devices Fahrzeug / Vehicle: 911 GT3 Cup (991) Bauteil / Part: ICD
prorm Budget Planning promx GmbH Nordring Nuremberg
 prorm Budget Planning Budget Planning Business promx GmbH Nordring 100 909 Nuremberg E-Mail: support@promx.net Content WHAT IS THE prorm BUDGET PLANNING? prorm Budget Planning Overview THE ADVANTAGES OF
TVHD800x0. Port-Weiterleitung. Version 1.1
 TVHD800x0 Port-Weiterleitung Version 1.1 Inhalt: 1. Übersicht der Ports 2. Ein- / Umstellung der Ports 3. Sonstige Hinweise Haftungsausschluss Diese Bedienungsanleitung wurde mit größter Sorgfalt erstellt.
Can I use an older device with a new GSD file? It is always the best to use the latest GSD file since this is downward compatible to older versions.
 EUCHNER GmbH + Co. KG Postfach 10 01 52 D-70745 Leinfelden-Echterdingen MGB PROFINET You will require the corresponding GSD file in GSDML format in order to integrate the MGB system: GSDML-Vx.x-EUCHNER-MGB_xxxxxx-YYYYMMDD.xml
Produktinformation _147PNdeen
 Produktinformation 201105_147PNdeen Neue Software für die TOUCH PC Auswuchtmaschinen BM 35 Touch, BM 45 Touch, BM 55 Touch Mit der Einführung der BM 11 Touch in die Nussbaum Produktlinie der Rad Auswuchtmaschinen
Laser LightmaXX CLUB 2.0 / 4.0 SERIES
 Seite 1 von 8 Laser LightmaXX CLUB 2.0 / 4.0 SERIES ACHTUNG! Seite 2 von 8 Laserschutzbestimmungen: Durch die starke Bündelung des Laserstrahls ist die gesamte Lichtenergie auf eine geringe Fläche konzentriert.
BLK-2000. Quick Installation Guide. English. Deutsch
 BLK-2000 Quick Installation Guide English Deutsch This guide covers only the most common situations. All detail information is described in the user s manual. English BLK-2000 Quick Installation Guide
Release Notes BRICKware 7.5.4. Copyright 23. March 2010 Funkwerk Enterprise Communications GmbH Version 1.0
 Release Notes BRICKware 7.5.4 Copyright 23. March 2010 Funkwerk Enterprise Communications GmbH Version 1.0 Purpose This document describes new features, changes, and solved problems of BRICKware 7.5.4.
Effizienz im Vor-Ort-Service
 Installation: Anleitung SatWork Integrierte Auftragsabwicklung & -Disposition Februar 2012 Disposition & Auftragsabwicklung Effizienz im Vor-Ort-Service Disclaimer Vertraulichkeit Der Inhalt dieses Dokuments
Monitor & Camera Upgrading Procedure for Ctronics 9 Touch
 English VERSION: Monitor & Camera Upgrading Procedure for Ctronics 9 Touch Screen Home Surveillance System CTNK-W02C *LINK:http://www.ctronicssecuritycameras.com/shop/4ch-nvr-system/touch-screenctronics-
Quick Installation Guide TBW-101UB TBW-102UB
 Quick Installation Guide TBW-101UB TBW-102UB Table of Contents Deutsch... 1. Bevor Sie anfangen... 2. Installation... 3. Cómo usar el adaptador Bluetooth... 1 1 2 4 Troubleshooting... 5 (Version 01.06.2006)
Der Adapter Z250I / Z270I lässt sich auf folgenden Betriebssystemen installieren:
 Installationshinweise Z250I / Z270I Adapter IR USB Installation hints Z250I / Z270I Adapter IR USB 06/07 (Laden Sie den Treiber vom WEB, entpacken Sie ihn in ein leeres Verzeichnis und geben Sie dieses
Englisch-Grundwortschatz
 Englisch-Grundwortschatz Die 100 am häufigsten verwendeten Wörter also auch so so in in even sogar on an / bei / in like wie / mögen their with but first only and time find you get more its those because
150Mbps Micro Wireless N USB Adapter
 150Mbps Micro Wireless N USB Adapter TEW-648UBM ŸAnleitung zur Schnellinstallation (1) ŸTroubleshooting (6) 1.11 1. Bevor Sie anfangen Packungsinhalt ŸTEW-648UBM ŸCD-ROM (Dienstprogramm & Bedienungsanleitung)