ISO/IEC MPEG1,ISO/IEC MPEG MPEG4 compliant. HDMI 1.3(video format Auto), support HDCP
|
|
|
- Gretel Kurzmann
- vor 8 Jahren
- Abrufe
Transkript

1 können Sie dieses Element verlassen, ohne die Änderungen zu speichern. 12. Specifications. Tuner Demodulator Mode QPSK,8PSK,16APSK Frequency Range 950~2150MHz RF Input Connector F-Female SAB Nova 3600 FTASC Video Video Decoding ISO/IEC MPEG1,ISO/IEC MPEG MPEG4 compliant Video Output CVBS(video 576i or 480i) Support SP@L3 to ASP@L5,ISO/IEC AVC high profile@level 4.1 main profile@level 4.1 HDMI 1.3(video format Auto), support HDCP Video Resolution 1080p/i 720p/i 576p/i Aspect Ratio 4:3 16:9 480p/i Audio Audio Decoding MPEGI layer1/2, MPEGII Layer II, Audio mode Mono/Stereo/Left/Right Subtitle DVB Subtitle and Teletext Subtitle Teletext EBU Teletext Front Panel RS232 Serial Port for Software Upgrade AV out Used to connect any external any external video and audio. USB port USB 2.0 Port for Multimedia Player, and Software Upgrade/Backup Rear Panel Input Receives the Signal from Satellite Antenna AV out Used to connect any external any external video and audio. HDMI Connector High-Definition Multimedia Interface V1.3 Accessories RCU IR RC3 / Other on Request (38kHz)NEC Batteries 2 x AAA Type User Manual English, Dutch, German AV Cabl e 1 IR Extender Cable 1 Power DC Input Range 12V 1.5A Power Consumption Max.20W Physical Specification Operating Temperature 0ć-40ć Storage Temperature -10ć-65ć User Manual 10
, support HDCP Video Resolution 1080p/i 720p/i 576p/i Aspect Ratio 4:3 16:9 480p/i Audio Audio Decoding MPEGI layer1/2, MPEGII Layer II, Audio mode")
2 Safety Precaution CAUTION: The lightning flash with arrowhead symbol, within an equilateral triangle, is intended to alert the user to "dangerous voltage" and to prevent from a risk of electric shock. Warning: To reduce the risk of electric shock, don't open the cabinet. Refer servicing to qualified personnel only. The exclamation point within an equilateral triangle is intended to alert the user to important operating and maintenance (servicing). WARNING: Do not use this STB where contact with / or immersion in water is a possibility. Do not use near flower vase, washbowls, kitchen sinks, laundry tubs, swimming pools, etc. WARNING: Do not put the candle or lamp stand on the cabinet; otherwise, there is the danger of fire. WARNING: The unit should be connected to a power supply only of the type described in the operating instructions or as marked on the unit. If you are not sure of the type of power supply (for example, 120 or 230 V) to your home, consult your local dealer or local power company. WARNING: This product installs diodes. Do not open the cabinet or touch any parts in the inner mechanism. Consult your local dealer for technical service if the opening is required. Note: To ensure proper use of this product, please read this User manual carefully and retain for further reference. Unit Cleaning: After the unit power is turned off, you can clean the cabinet, panel and remote control with a soft cloth lightly moistened with a mild detergent solution. Attachments: Never add any attachments and/or equipment without the manufacturer consent; as such additions may result in the risk of fire, electric shock, or other personal injury. Locating: Slots and openings in the cabinet are provided for ventilation to protect it from overheating. Do not block these openings or allow them to be blocked by placing the STB on a bed, sofa, or other similar surface, nor should it be placed over a radiator or heat register. Power-Cord Protection: Place the power-supply cord out of the way, where it will not be walked on. Please take special attentions to cords at plugs, convenience receptacles, and the point where they exit from the unit. 1

3 Object and Liquid Entry: Never put objects of any kind into this STB through openings, as they may touch dangerous voltage points or short-out parts that could result in a fire or electric shock. Never spill any liquid on the STB. Note: Moisture may be formed on the lens In the following conditions: When the unit is suddenly moved from cold environment or an air-condition room to a warm place. Immediately after a heater has been turned on. In a steamy or very humid room. If the moisture forms inside the unit, it may not operate properly. To correct this problem, turn on the power and wait about two hours for the moisture to evaporate. Parts Replacement: When the unit parts need to be replaced, user should make sure the service technician use the replacement parts specified by the manufacturer or having the same characteristics as the original part. Unauthorized replacement may put the unit In the risk of fire, electric shock or other hazards. Safety Check: After all the maintenances and repairs are done, user is required to request the service technician to conduct the overall safety check to ensure the machine is In the proper condition. Environment protection ATTENTION! Your product is marked with this symbol. It means that the used electrical and electronic products should not be mixed with general household waste. There is a separate collection system for these products. 2

4 CONTENTS SAFETY PRECAUTION... 1 ENVIRONMENT PROTECTION FRONT PANEL REAR PANEL CONNECTING YOUR SYSTEM REMOTE CONTROLLER SATELLITE SETTING TV CHANNEL EDITOR SYSTEM INSTALLATION TV INSTALLATION PARENTAL CONTROL UPDATE & BACK-UP FACTORY SETTING SPECIFICATIONS

5 1. Front Panel 1 Remote Sensor: Detect infrared signal from remote control unit 2 RS232: To transfer the data to another STB or PC by RS-232 cable 3 USB Connector: USB 2.0 Host, connect to USB hard disk or flash disk 4 POWER: DC 12V 1.5A power supply. 2. Rear Panel Please refer to the diagram above for all possible connections of your receiver Do not connect the unit to the mains socket until all other connections have been made and checked. Your configuration may vary depending on model. 1. INPUT (LNB IN 13/18V 500mA MAX) : Connect the coaxial cable from LNB of your Dish. 2. AV OUT : Used to connect video and audio. 3. HDMI: Audio and Video output socket for TV set with HDMI Input Jack only. 4
 : Connect the coaxial cable from LNB of your Dish. 2.")

6 3. Connecting Your System There are some ways to connect the receiver to your existing TV system. We recommend using one of the following cases for the best result: 1. If you have a high definition television set, you should use a HDMI cable for best result. Plug one end of the cable into the HDMI socket on the receiver and the other end into the matching socket on your television. In this case, you do not have to make audio connections because the HDMI connector can output stereo audio or Dolby digital audio. 2. Connect one end of RCA cable to the RCA jack on the back of the receiver and the other end to a RCA jack on your TV. Finally connect the coaxial cable from the LNB to the Input on the receiver. TV with Motorized System (DiSEqC 1.2 / USALS) Connect one end of your coaxial cable to the LNB IN connector on the receiver and the other end to the Receiver connector on the DiSEqC 1.2 / USALS motor. Connect the coaxial cable from the LNB to the LNB connector on the DiSEqC 1.2 / USALS motor. All our receivers are designed to be DiSEqC 1.0 / DiSEqC 1.2 /USALS compatible. This allows multiple antennas to be connected to the receiver at the same time. If you have two or more fixed antennas or LNBs, we recommend you use a DiSEqC 1.0 switch. Connect the coaxial cable from the first LNB to the LNB 1 or LNB A input connector of the DiSEqC switch. Do the same for any other LNBs that you have. Connect one end of a coaxial cable to the RF output connector of the DiSEqC switch, Connect the other end to Input on the receiver. 5

7 4. Remote Controller 6
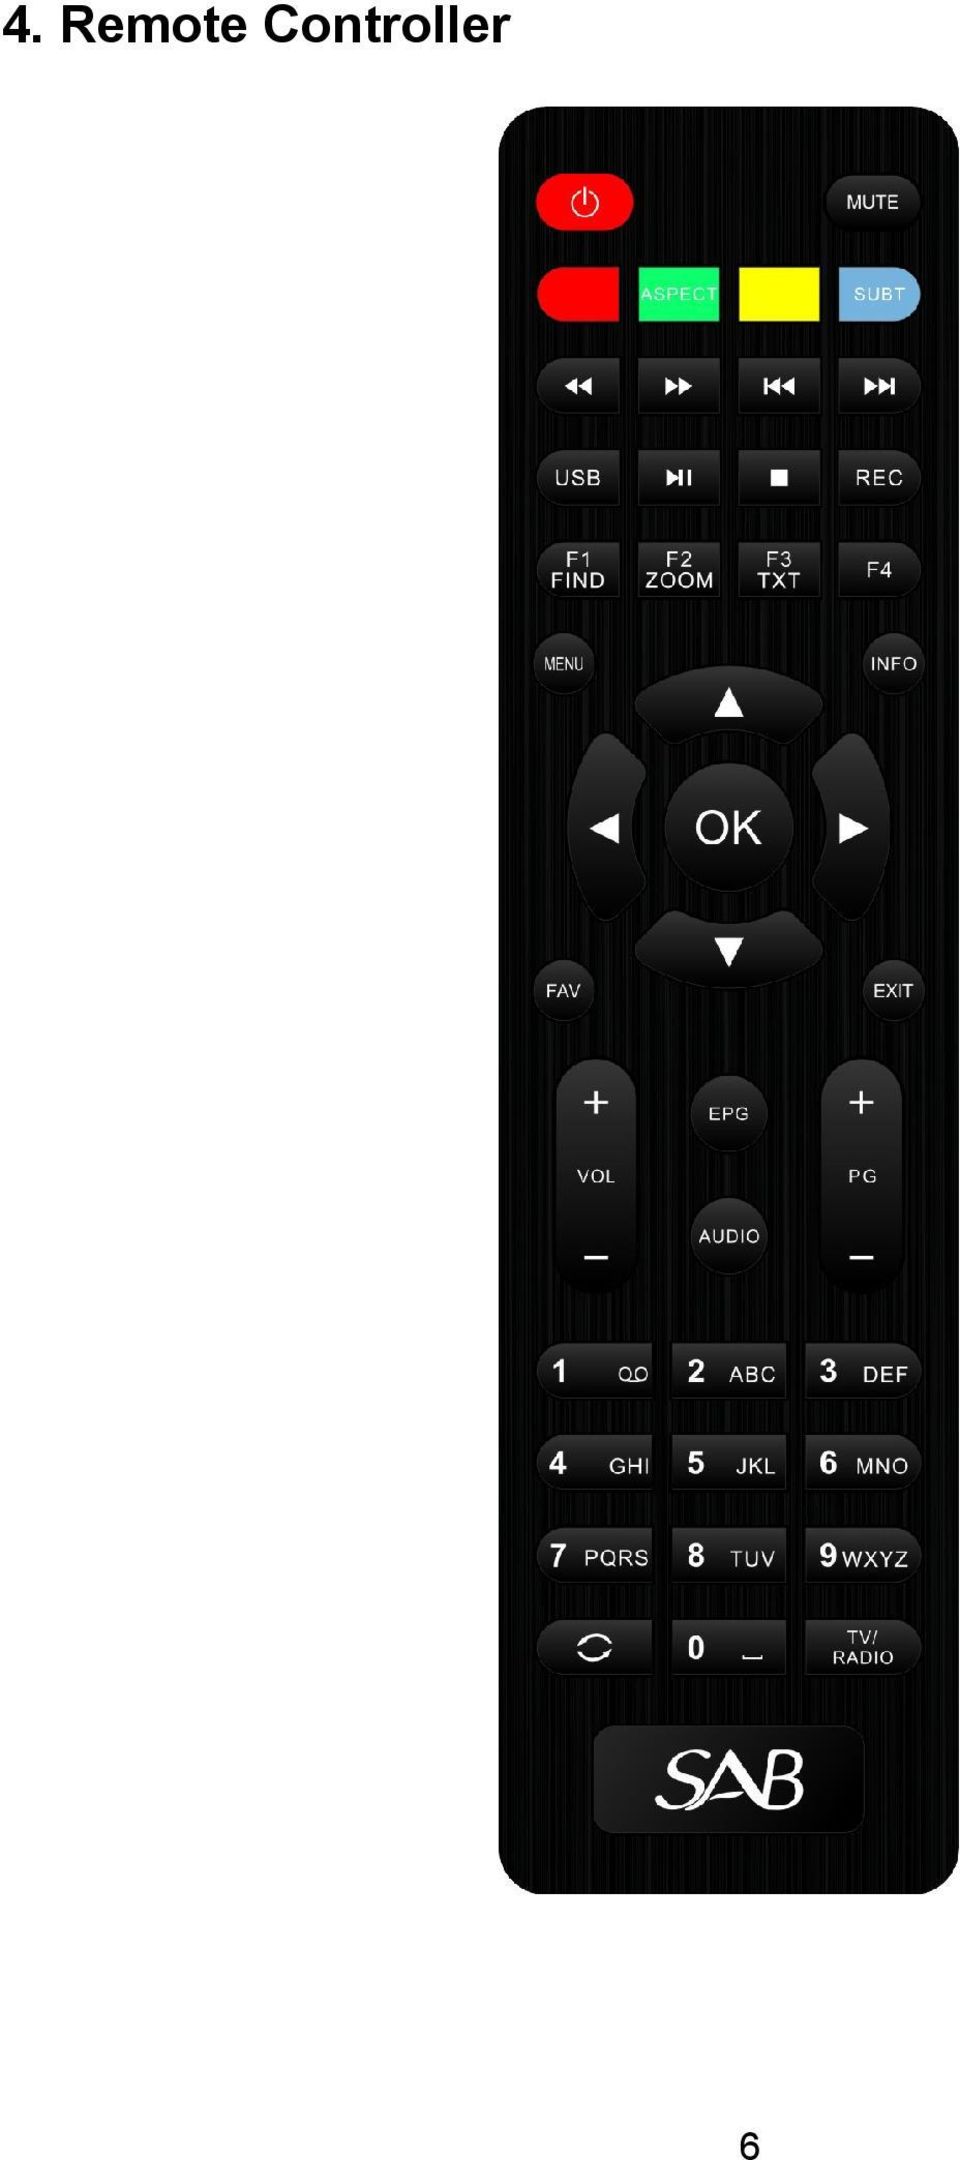
8 1. POWER: To switch ON/OFF the receiver power supply. 2. MUTE: To mute or restore the sound 3. RED, GREEN, YELLOW, BULE KEYS: Multi-function keys in menu mode. 4. SUB-T: To show subtitle on the channel which has subtitle information. 5. ASPECT:To switch the video output aspect ratio to 4:3 or 16:9. 6. FB/FF: To play back or forward faster. 7. PREV: To change into the previous play. 8. NEXT: To change into the next play. 9. PLAY/PAUSE: to pause and play the file when you press play / pause key. 10. STOP: To stop the current play or to stop the current record. 11. REC: To record of the channel. 12. USB: The shortcut key to the USB menu. 13. FIND: Enter into a menu to search the channel you want. 14. ZOOM: To magnify a certain area on the images 15. TXT: To open teletext page on the channel which has teletext information. 16. PIP; this is the fuction about picture in picture. 17. MENU: Display the main menu or return to the previous one. 18. INFO: The shortcut key to the information menu. 19. OK: To carry out the selection and enter into chosen menu. 20. CH Up/Dn: Turn to the next or previous channel and to move the highlight bar for selecting options to upward or downward on the menu. 21. VOL +/-: To adjust the sound volume up or down and to move the highlight bar for selecting options to right or left on the menu. 22. PAGE +/-: To move up the cursor to the next or previous page in the menu or channel list. 23. FAV: The shortcut key to favorite menu. 24. EXIT: To exit from the menu or pop-up window or cancel the present running functions. 25. EPG: The shortcut key to the EPG menu. 26. AUDIO : Selects the audio mode among Left / Right / Stereo / Mono 27. NUMBER KEYPAD: To select TV/Radio channel and enter to programming parameters by the numeric keys and to input the character by the alphabetical keys. 28. RECALL: To return to the previously viewed channel. 29. TV/RADIO: To switch between TV and RADIO. 7


![LNB Freq: In this item, press [Left/Right] key can select the parameter.](/docs-images/23/2018160/images/9-0.jpg "Option is 5150,5750,9750,10600,10750,11300,11475,17250,18250,19250,20250,21200,5150/5750, 9750/10600, 9750/107500 and MDU-1,MDU-2,MDU-3,MDU-4 3. DiSEqC1.0/1.1: You can use [Left/Right] key to switch options.")
9 5. Satellite Setting You can press Red key to set SAT/TP Manager. Press Green key to start channel search. 1. Satellite: In this item, press [Left/Right] key can switch Satellites and press [OK] key can enter satellite list for you to select directly 2. LNB Freq: In this item, press [Left/Right] key can select the parameter. Option is 5150,5750,9750,10600,10750,11300,11475,17250,18250,19250,20250,21200,5150/5750, 9750/10600, 9750/ and MDU-1,MDU-2,MDU-3,MDU-4 3. DiSEqC1.0/1.1: You can use [Left/Right] key to switch options. There are several options for your selection: DiSEqC1.0: NONE,1/4,2/4,3/4,4/4,ToneburstA, ToneburstB DiSEqC1.1: NONE,1/16,2/16,,16/ K: You can use [Left/Right] key to switch ON / OFF. When this item is switched to ON, receiver will receive TV and radio input signal from 22K port. If the item is switched to Off, the receiver will receive all signal from 0 K port Notice! When you choose LNB type ****/****, you can not modify 22K. 5. Polarity: In Polarity item, [Left/Right] key to switch OFF 18V 13V 13/18V functions 6. Motor:You can use [Left/Right] key to set Antenna type by Motor 7. Unicable:You can use [Left/Right] key to set unicable enable or none Motor Setting: When select Motor Type: USALS If you select DiSEqC1.2, Local Longitude / Local Latitude is not available. It will show the screen like left When the highlight on the mode item,you can use [Left/Right] key to set Motor function 8
![LNB Freq: In this item, press [Left/Right] key can select the parameter.](/docs-images/41/2018160/images/page_9.jpg "Option is 5150,5750,9750,10600,10750,11300,11475,17250,18250,19250,20250,21200,5150/5750, 9750/10600, 9750/107500 and MDU-1,MDU-2,MDU-3,MDU-4 3. DiSEqC1.0/1.1: You can use [Left/Right] key to switch options.")
10 6. TV Channel Editor By Moving the highlight on the Channel, you can use [Up/Down] key to select TV Channel Editor Radio channel editor EPG and Favorite. 1. RENAME [Red Key]: To edit the channels name 2. LOCK [Green Key]: To lock the channels which you want to lock. (1) It will display a dialogue to ask you to input password. The default password is If you input the correct password you can see a lock mark in the right side of the highlighted channel. (2) After save and exit menu, STB will request you to input the password while you want to watch the locked channel. 3. DEL [Yellow Key]: To delete the channel 4. SKIP [Blue Key]: Press blue key to select the channels you want to skip. 5. FAV [FAV Key]: To select the channel which you want to add in the Favorite List 6. Satellite [F1 Key]: Press F1 key to switch the channel list with the different satellite 7. MOVE [F2 Key]: To move the channel to the position you want to place. 8. SORT [F3 Key]: By pressing F3 key, you can list up the channels by 4 kinds of sorting ways. 7. System Installation By pressing [Menu] and selecting system item, and move the UP/Down key to select Language, OSD style, time, TV setup, Adv Timer Parental Lock, Update & Backup,Factory setting. 9
 After save and exit menu, STB will request you to input the password while you want to watch the locked channel. 3. DEL [Yellow Key]: To delete the channel 4.")
11 1. OSD Language: To select menu languages, the selections of languages include: English, French, German, Russian, Arabic, Portuguese, Turkish, Spanish, Polish, Italian and etc. 2. Audio Language: Some channels have more than one audio language for choosing; by this function you can set the first audio for this channel. If the playing channel has the same audio as the First Audio you set, system will play this audio language as default. If the channel hasn t the suited audio language, then the system will compare automatically with second audio language. 3. Subtitle Language: You can set the subtitle language When you entry to OSD Setting Menu, you can set Banner Display timer / OSD Transparency. Banner display timer: support always 1s~3s~5s~10s~30s and always OSD Transparency: There are 8 levels of transparency When you entry to Time Menu, you can see: Sleep time, Summer Time, Set Time, Set Date, Time Zone and GMT usage. Sleep time: When you set a sleep timer and the time arrive, the system will enter to standby automatically. It will switch the mode between Sleep Timer Off /15/30/45/60/90/120 minutes. 8. TV Installation GMT Usage: Select On or Off. 1. If you select GMT Off, you can adjust the current Date and time 2. If you select GMT On, you can adjust the Time Zone : To switch Time Zone value and the range are -12:00 ~ +12:00 increase each half hour progressively. When you enter to TV System menu, you can set TV Saturation, TV Contrast, TV Brightness, Auto Switch Off, Standby Mode, Digital Audio output, TV Resolution, Video Output, TV Mode and TV Format. 1. TV Saturation: Press [Left/Right] KEY to set TV saturation 2. TV Contrast: Press [Left/Right] KEY to set TV contrast 3. TV Brightness: Press [Left/Right] KEY to set TV brightness 4. Auto Switch Off: OFF/3 Hours/4 Hours/ 5 Hours 5. Standby Mode: Fake/Real 10

12 6. Digital audio output: To set the both SPDIF and HDMI s digital audio output mode. It has options: LPCM and RAW <->1080i_50Hz<->AUTO<->1080p_50Hz. 7. TV resolution: You can switch video resolution circularly by the sequence 576i <-> 576P <->720p_50Hz 8. Video Output: To set video output mode RCA (CVBS) / SCART(CVBS)/ SCART(RGB)/ YCbCr(YUV)/ HDMI 9. TV Mode: you can switch the TV output mode by NTSC /Auto/ PAL 10. TV Format: You can switch the screen aspect ratio mode. Now we provide below options: 4:3 LB/4:3 PS/16:9 LB/16:9 FIT 9. Parental control When first enter this menu, you should input the password. Default password is Change Password: To change password. You can input the new password in this item by using number keys directly. After you filled in 4 digital numbers, the highlight will auto skip to confirm Password and ask you to input the new password again. 2. Lock Type: No Block/Total Block/05/06/ /18 3. Channel Lock: In order to enter to the locked channels, you should input the password. The locked channels mark will show up a popup message on the screen and ask for the password. 4. Menu Lock: If set ON, in order to enter some certain menu, you should enter the password. 10. Update & Back-up By pressing [Menu] and selecting Setup item, and press OK key enter to update & backup menu when the highlight on the upgade & backup items Image upgrade:you can download new software to this receiver by external USB memory device(the upgrade file format support *ssu ) Image backup:store the software backup to USB memory device. When you enter to Backup by USB menu, you can store the changed parameters and searched channels and etc. 1. Insert the external USB memory device to USB slot of this receiver. 2. You can select the file or add the new file to backup 11

13 software 11. Factory setting When you press [OK] key in the Factory Setting item: 1. It will show a warning message to inquiry you Notice:This will delete all your data,are you agree?. 2. If you select Yes option, the all revised parameters of the receiver will reset to default value. Please carefully to using this function. 3. In step 1, select No or press [Exit] key can draw back from this item and without saving. 12

14 12. Specifications Tuner Demodulator Mode QPSK,8PSK,16APSK Frequency Range 950~2150MHz RF Input Connector F-Female Video Video Decoding ISO/IEC MPEG1,ISO/IEC MPEG MPEG4 compliant Support to AVC high 4.1 main 4.1 Video Output CVBS(video 576i or 480i) HDMI 1.3(video format Auto), support HDCP Video Resolution 1080p/i 720p/i 576p/i 480p/i Aspect Ratio 4:3 16:9 Audio Audio Decoding MPEGI layer1/2, MPEGII Layer II, Audio mode Mono/Stereo/Left/Right Subtitle DVB Subtitle and Teletext Subtitle Teletext EBU Teletext Front Panel RS232 Serial Port for Software Upgrade AV out Used to connect any external any external video and audio. USB port USB 2.0 Port for Multimedia Player, and Software Upgrade/Backup Rear Panel Input Receives the Signal from Satellite Antenna AV out Used to connect any external any external video and audio. HDMI Connector High-Definition Multimedia Interface V1.3 Accessories RCU IR RC3 / Other on Request (38kHz)NEC Batteries 2 x AAA Type User Manual English, Dutch, German AV Cable 1 IR Extender Cable 1 Power DC Input Range 12V 1.5A Power Consumption Max.20W Physical Specification Operating Temperature 0-40 Storage Temperature

15 Gebruikers- handleiding

16 WAARSCHUWING: Plaats deze STB niet op plaatsen waar contact met /of onderdompeling in water mogelijk is. Niet gebruiken in de buurt van bloemenvazen, wasbakken, gootstenen, (zwem)baden, etc. WAARSCHUWING: Plaats geen kaars of lamp op de receiver, dit kan tot bandgevaar leiden. WAARSCHUWING: Het apparaat moet worden aangesloten op de stroomvoorziening van het type dat in de handleiding of op de apparaat beschreven staat. Als u niet zeker bent van het type voeding (bijvoorbeeld 120 of 230 V) raadpleeg dan uw energieleverancier. WAARSCHUWING: Dit product bevat diodes. Maak de behuizing niet open of raak de onderdelen in het inwendige mechanisme niet aan. Raadpleeg de technische dienst van uw lokale dealer indien opening is vereist. Koppelingen: Maak nooit koppelingen aan het apparaat zonder toestemming van de fabrikant; koppelingen kunnen resulteren in risico s als brand, elektrische schokken of andere verwondingen. Lokaliseren: De sleuven en openingen in de behuizing zijn bedoeld voor ventilatie om oververhitting te voorkomen. Laat deze openingen niet blokkeren of toestaan dat ze worden geblokkeerd door het plaatsen van de STB op een bed, bank of ander soortgelijk oppervlak, noch zou het boven een radiator of andere warmtebron moeten worden geplaatst Bescherming van het netsnoer: Plaats het netsnoer uit de weg, waar niet zal worden gelopen. Let op snoeren en stekkers, stopcontacten en het punt waar ze uit het apparaat komen. Voorwerpen en vloeistof: Steek nooit voorwerpen van welke aard dan ook in de STB. Dit kan leiden tot gevaarlijke spanning of kortsluiting, wat kan resulteren in brand of een elektrische schok. Mors geen vloeistof op de STB. Onderdelen vervangen: Wanneer onderdelen moeten worden vervangen, moet de gebruiker ervoor zorgen dat de onderhoudstechnicus alleen gebruik maakt van de onderdelen van fabrikant of onderdelen die dezelfde kenmerken hebben als het originele onderdeel. Ongeautoriseerde vervanging kan leiden tot brand, elektrische schokken of andere gevaren. Veiligheidscontrole: Nadat onderhoud en reparaties zijn uitgevoerd is de gebruiker zelf verantwoordelijk om de servicemonteur te verzoeken een algehele veiligheidscontrole uit te voeren om ervoor te zorgen dat de apparaat in goede conditie verkeerd. bescherming van het milieu Dit apparaat mag niet bij uw algemeen huishoudelijk afval. De schadelijke stoffen uit klein chemisch afval (KCA) vormen een probleem als ze op de stortplaats of de afvalverbranding terecht komen. Omdat klein chemisch afval heel divers is (van schoonmaakmiddelen tot batterijen en verf) zijn er aparte stromen voor verwerking. Bewaar de verschillende producten dus apart, en lever ze apart in. Een deel van de materialen is geschikt voor hergebruik. De rest wordt onder speciale omstandigheden verbrand of gestort.
 raadpleeg dan uw energieleverancier. WAARSCHUWING: Dit product bevat diodes.")
17 Inhoud Gebruikers VERKLARING VAN OVEREENSTEMMING Voorpaneel Achterpaneel Aansluiten van uw Systeem Afstandbediening Satelliet Setting TV Kanalen bewerken Systeem Installatie TV Installatie Ouderlijke controle update & back-up Specifications... 13

18 VERKLARING VAN OVEREENSTEMMING De fabrikant verklaart hierbij de conformiteit van dit product met de geldende richtlijnen en normen. 1. Voorpaneel 1. Remote Sensor:Detecteert infraroodsignaal vanuit de afstandsbediening 2. RS 232 seriële aansluiting :Om gegevens te verplaatsen naar een andere ontvanger of computer via een RS-232 kabel 3. USB:USB 2.0, bedoeld voor usb stick of schijf 2. Achterpaneel 1. Invoer (LNB IN 13/18V 500mA MAX) : Verbindt de coaxiale kabel van uw lnb van uw schotel 2. AUDIO R/L :Bedoeld voor externe audio versterker of systeem. 3. HDMI :Audio en Video uitgang voor tv via een hdmi aansluiting
 : Verbindt de coaxiale kabel van uw lnb van uw schotel 2.")
19 3. Aansluiten van uw Systeem Er zijn 2 manieren om uw receiver aan te sluiten op uw tv. Wij adviseren u om een van de volgende manieren te hanteren: 1. Als u beschikt over een HD televisieset, wordt u geadviseerd om een hdmi kabel te gebruiken. Zorg ervoor dat de HDMI kabel is aangesloten van de ontvanger aan de uw televisie. In dit geval, hoeft u geen audio-aansluitingen te maken, dit omdat de HDMI-connector stereo audio of Dolby digital audio.2 aan kan. 2. Sluit het RCA-kabel aan op de RCA-aansluiting van uw ontvanger aan het RCAaansluiting van uw TV

20 4. Afstandbediening

21 1.Power: aan / uit schakelaar van de ontvanger. 2.MUTE: Om het geluid te dempen of weer aan te zetten 3.TV/RADIO: Om te schakelen tussen TV en radio. 4.NUMERIEKE TOETSENBLOK: Om TV / Radio kanaal te selecteren en om de programmering parameters in te voeren, voor de numerieke toetsen en voor de alfabetische toetsen. 5.Herroepen: Om terug te keren naar het eerder bekeken kanaal. 6.Rood, groen, geel, blauwe toetsen: Toetsen met meerdere functies in het menu. 7.MENU: Geef het hoofdmenu of terug te keren naar de vorige. 8.EXIT: Om het menu te verlaten of annuleert de huidige lopende functies. 9.PAGE +/-: Om naar de volgende of vorige pagina te verplaatsen van de cursor in het menu of de zenderlijst. 10.SUB: Om de ondertiteling te tonen. 11.TXT: Teletekst pagina op de zender die ook teletekst informatie moet openen. 12.FIND: Ga in het menu naar het kanaal dat u wilt zoeken. 13.ZOOM: Om een bepaald gebied op de afbeeldingen te vergroten 14.OK: Voor de selectie uit te voeren. 15.CH omhoog / omlaag: Om de vorige of volgende zender te kiezen en verplaats de balk voor het selectie van opties omhoog of omlaag in het menu. 16.VOL +/-: Het volume omhoog of omlaag aan te passen en om de balk te verplaatsen voor het selectie van opties links of rechts op het menu. 17.FAV: De sneltoets voor favoriete menu. 18.INFO: De sneltoets voor informatie menu. 19.EPG: De sneltoets voor EPG-menu. 20.AUDIO: Selecteert de audio-modus onder Links / Rechts / Stereo / Mono 21.USB: De sneltoets voor menu USB. 22.FB / FF: Voor het afspelen vooruit of sneller. 23.PLAY / PAUZE: om te pauzeren en/of verder te laten speel 24.STOP: Om de huidige afspelen te stoppen. 25.STEP: Sprong voorwaarts per hoofdstuk. 26.NEXT: Om te veranderen naar het volgende afspeel keuze. 27.PREV: Om te veranderen naar het vorige afspeel keuze
22 5. Satelliet Setting U kunt door middel van de rode toets de SAT / TP Manager starten. Gebruik de groene toets om zenders te zoeken op 1. Satelliet: In dit menu kunt u met behulp van de [Volume Omhoog / Volume Omlaag] toets schakelen tussen de Satellieten en bevestigen met de [OK] toets. 2. LNB Freq: In dit item, gebruikt u de [Volume Omhoog / Volume omlaag] toets om de parameter te selecteren. Opties zijn 5150 /5750/5950/9750/10000/ 10050/10450/10600/10700 /10750/11250/11300 / / / Universal ( ) 3. DiSEqC1.0 / 1.1: Gebruik de [Volume Omhoog / Volume Omlaag] toets om tussen de opties te schakelen. Er zijn verschillende opties voor uw selectie: Uitschakelen / LNB1 / LNB2 / LNB3 / LNB K: U kunt [Volume Omhoog / Volume Omlaag] toets gebruiken om te schakelen "Aan / Uit". Als deze optie is ingeschakeld op "ON", zal de ontvanger TV en radio signaal ontvangen van 22K-poort. Als het item wordt overgeschakeld naar "Uit", zal de ontvanger alle signalen ontvangen van 0K poort.! kennisgeving Wanneer u kiest voor LNB soort "Universal", kunt u geen 22K wijzigen. 5. Polariteit: In "Polariteit" punt, [Volume Omhoog / Volume Omlaag] om "Auto / H / V" functies schakelen. 6. Motor: U kunt [Volume Omhoog / Volume Omlaag] toets soort antenne instellen voor Motor 7. Unicable: U kunt [Volume Omhoog / Volume Omlaag] toets gebruiken voor unicable in- of geen Motor Antenne 1. Motor Type: DiSEqC1.2 / USALS 2. Motor Omgeving: Als "DiSEqC1.2", "lokaal Longitude / lokaal Latitude" selecteren niet beschikbaar is. Zal het onderstaande scherm weergegeven worden: Als geselecteerd item in de modus. U kunt de [Volume Omhoog / Volume Omlaag] toets gebruiken om de Motor functie in te stellen.
23 6. TV Kanalen bewerken U kunt op de kleur toets drukken om de kanalen te bewerken in het TV kanalen lijst Hernoemen [Rode toets]: Om de kanalen te hernoemen Verplaats [F2]: Om het kanaal naar de gewenste positie te verplaatsen SORTEREN [F3]: Door op F3 te drukken, kunt u een lijst van de kanalen met 4 soorten manieren sorteren. Transponder: Sorteren op basis van transponder CA / FTA: Om kanalen te sorteren op basis van vrije en gecodeerd kanalen Standaard: Voor een lijst van de standaard modus Vergrendel [Groene toets]: Hier kunt de gewenste kanalen laten vergrendelen. In een dialoog scherm wordt u gevraagd om wachtwoord in te geven. Het standaard wachtwoord is "0000". Als u het juiste wachtwoord geeft krijgt u een "vergrendel arcering" in de rechterkant van het gemarkeerde kanaal te zien. Na het opslaan en het verlaten van de menu, zal STB u vragen om het wachtwoord in te voeren, terwijl u naar het vergrendelde kanaal kijkt. 7. Systeem Installatie Door te drukken op [Menu] en het selecteren van "systeem" item.verplaats de op / neer toets om te selecteren Wanneer u het taal menu opent, kunt u de OSD-taal, Audio taal, Ondertiteling instellen 1. OSD Taal:Om het menu talen te selecteren, de selecties van talen zijn: Engels, Frans, Duits, Russisch, Arabisch, Portugees, Turks, Spaans, Pools, Italiaans en etc. 2. Audio Taal: Sommige kanalen hebben meer dan een audio-taal voor het kiezen; door deze functie kunt u de eerste audio voor dit kanaal instellen. Als de spelende kanaal dezelfde audio heeft als de "Eerste Audio" die u heeft ingesteld, zal het systeem de gekozen taal als standaard te spelen toewijzen. Als het kanaal geen geschikte audio-taal beschikt, dan zal het systeem automatisch de tweede taal instellen als audiotaal. 3. Taal voor ondertiteling: U kunt de taal van de ondertiteling instellen.
24 Wanneer u het OSD-menu stijlen menu opent, kunt u OSD instellen Wanneer u het Timer menu opent krijgt u te zien: slaaptijd, Time Zone en GMT gebruik kan voor u de slaaptimer instellen. Wanneer u een sleep timer heeft ingesteld en de tijd nadert, zal het systeem automatisch op stand-by gaan. U heeft de volgende keuzes voor de Sleeptime Timer Uit / 15/30/45/60/90/120 minuten. GMT Gebruik: Selecteer Aan of Uit - Bij keuze GMT Uit kunt u de huidige datum / uur / minuut instellen. - Bij keuze GMT Aan kunt u de volgende instellingen aanpassen De "GMT Offset": Om te schakelen "GMT Offset" waarde en het bereik zijn "-12:00 ~ +12:00" verhogen elk half uur geleidelijk. 8. TV Installatie Wanneer u het "TV-systeem" menu opent, kunt u de volgende items instellen : TV saturatie, Tv contrast, helderheid, Automatisch aan-uit zetten, digitale audio-uitgang, tv resolutie, TV Mode, TV Format TV Formaat: Hier kunt u de beeldverhouding instellen. 16:9 Aanpassen TV Mode: Hier kunt u de TV-uitgang schakelen tussen NTSC, PAL en AUTO (YUV) Video-uitgang: Hier kunt de video uitgangmodus kiezen tussen RCA (CVBS) / SCART (RGB) / YCBCR TV resolutie: Hier kunt de videoresolutie aanpassen door een opeenvolging 576P <-> 720P <-> 1080i. Dit effect is gelijk aan druk V.FORMAT toets, de instellingen die als laatst wordt opgeslagen heeft invloed op de ander.
25 Digitale audio-uitgang: Om de SPDIF en HDMI digitale audio-uitgang in te stellen. Heeft de volgende opties LPCM Uit. - LPCM Uit betekent systeem zal decoderen ongeacht AC3 of PCM audio track data of LPCM is, digitale audio decoder of HDMI TV zal LPCM digitale audio-gegevens ophalen. In de stand-by mode kunt u instellen of het menu of de tv-kanaal worden getoond bij het opstarten Automatisch uitschakelen. U kunt hier kiezen voor Automatische stand-by of niet. Bij keuze "Aan", zal het in de mode stand-by modus automatisch openen bij geen actie voor 3/4/5 uur TV Helderheid rechts / links toets om tv helderheid in te stellen TV Contrast rechts / links toets om tv contrast in te stellen TV Saturatie rechts /links toets om tv saturatie in te stellen 9. Ouderlijke controle 1. Wachtwoord wijzigen: Om het wachtwoord te wijzigen. U kunt direct het nieuwe wachtwoord invoeren in dit item met de cijfertoetsen. Na het invullen van 4 digitale nummers, zal het selectie automatisch doorgaan naar Wachtwoord bevestigen en u vragen om input Standaard wachtwoord is "0000". 2. kanaal vergrendelen: Om de vergrendelde zenders aan te gaan, zult u de wachtwoord moeten invoeren. De vergrendelde kanalen zal verschijnen met een pop-up bericht op het scherm met hierin de vraag om het wachtwoord. 3. Menu Vergrendelen: Om naar het menu te gaan, zult u de wachtwoord moeten invoeren
SanStore: Kurzanleitung / SanStore: Quick reference guide
 SanStore Rekorder der Serie MM, MMX, HM und HMX Datenwiedergabe und Backup Datenwiedergabe 1. Drücken Sie die Time Search-Taste auf der Fernbedienung. Hinweis: Falls Sie nach einem Administrator-Passwort
Softwareupdate-Anleitung // AC Porty L Netzteileinschub
 1 Softwareupdate-Anleitung // AC Porty L Netzteileinschub Softwareupdate-Anleitung // AC Porty L Netzteileinschub HENSEL-VISIT GmbH & Co. KG Robert-Bunsen-Str. 3 D-97076 Würzburg-Lengfeld GERMANY Tel./Phone:
UWC 8801 / 8802 / 8803
 Wandbedieneinheit Wall Panel UWC 8801 / 8802 / 8803 Bedienungsanleitung User Manual BDA V130601DE UWC 8801 Wandbedieneinheit Anschluss Vor dem Anschluss ist der UMM 8800 unbedingt auszuschalten. Die Übertragung
Kurzanleitung um Transponder mit einem scemtec TT Reader und der Software UniDemo zu lesen
 Kurzanleitung um Transponder mit einem scemtec TT Reader und der Software UniDemo zu lesen QuickStart Guide to read a transponder with a scemtec TT reader and software UniDemo Voraussetzung: - PC mit der
Therefore the respective option of the password-protected menu ("UPDATE TUBE DATA BASE") has to be selected:
 has to be selected:") ENGLISH Version Update Dräger X-act 5000 ("UPDATE TUBE DATA BASE") The "BARCODE OPERATION AIR" mode is used to automatically transfer the needed measurement parameters to the instrument. The Dräger X-act
ENGLISH Version Update Dräger X-act 5000 ("UPDATE TUBE DATA BASE") The "BARCODE OPERATION AIR" mode is used to automatically transfer the needed measurement parameters to the instrument. The Dräger X-act
EMCO Installationsanleitung Installation instructions
 EMCO Installationsanleitung Installation instructions Installationsanleitung Installation instructions Digitalanzeige digital display C40, FB450 L, FB600 L, EM 14D/17D/20D Ausgabe Edition A 2009-12 Deutsch...2
https://portal.microsoftonline.com
 Sie haben nun Office über Office365 bezogen. Ihr Account wird in Kürze in dem Office365 Portal angelegt. Anschließend können Sie, wie unten beschrieben, die Software beziehen. Congratulations, you have
DVR / QuickQuide Adroid
 DVR 351.154/351.155 QuickQuide Adroid INSTRUCTION MANUAL GEBRUIKSAANWIJZING BEDIENUNGSANLEITUNG ENGLISH Setup IP-Camviewer Lite on Android. 351.154 en 351.155. Start with searching the right app IP-camviewer
PS3 / PS4 / PC XBOX 360 GAMING HEADSET LX16
 PS / PS / PC XBOX 60 GAMING HEADSET LX6 CHAT GAME Content Inhalt Lioncast LX6 gaming headset Lioncast LX6 Gaming Headset Inline remote kabelgebundene Fernbedienung MUTE - MIC - ON XBOX PS PS PC RCA splitter
GAMING HEADSET LX16 PRO
 GAMING HEADSET LX6 PRO CHAT GAME Content Inhalt Lioncast LX6 Pro gaming headset Lioncast LX6 Pro Gaming Headset Inline remote kabelgebundene Fernbedienung MUTE - MIC - ON XBOX PS PS PC RCA splitter cable
Der Adapter Z250I / Z270I lässt sich auf folgenden Betriebssystemen installieren:
 Installationshinweise Z250I / Z270I Adapter IR USB Installation hints Z250I / Z270I Adapter IR USB 06/07 (Laden Sie den Treiber vom WEB, entpacken Sie ihn in ein leeres Verzeichnis und geben Sie dieses
MobiDM-App Handbuch für Windows Mobile
 MobiDM-App Handbuch für Windows Mobile Dieses Handbuch beschreibt die Installation und Nutzung der MobiDM-App für Windows Mobile Version: x.x MobiDM-App Handbuch für Windows Mobile Seite 1 Inhalt 1. WILLKOMMEN
Live Streaming => Netzwerk ( Streaming Server )
") Live Streaming => Netzwerk ( Streaming Server ) Verbinden Sie den HDR / IRD-HD Decoder mit dem Netzwerk. Stellen Sie sicher, dass der HDR / IRD-HD Decoder mit ihrem Computer kommuniziert. ( Bild 1 ) Wichtig:
Live Streaming => Netzwerk ( Streaming Server ) Verbinden Sie den HDR / IRD-HD Decoder mit dem Netzwerk. Stellen Sie sicher, dass der HDR / IRD-HD Decoder mit ihrem Computer kommuniziert. ( Bild 1 ) Wichtig:
USB Treiber updaten unter Windows 7/Vista
 USB Treiber updaten unter Windows 7/Vista Hinweis: Für den Downloader ist momentan keine 64 Bit Version erhältlich. Der Downloader ist nur kompatibel mit 32 Bit Versionen von Windows 7/Vista. Für den Einsatz
Contact 1600 QUICK REFERENCE GUIDE GUIDE D UTILISATION BEDIENUNGSANLEITUNG GUÍA DE REFERENCIA RÁPIDA GUIDA RAPIDA. www.sonybiz.net CHANGING THE WAY
 Contact 1600 CHANGING THE WAY QUICK REFERENCE GUIDE GUIDE D UTILISATION BEDIENUNGSANLEITUNG BUSINESS GUÍA DE REFERENCIA RÁPIDA GUIDA RAPIDA COMMUNICATES www.sonybiz.net GB Getting started STEP 1 Turning
DVR / QuickQuide Adroid
 DVR 351.154/351.155 QuickQuide Adroid INSTRUCTION MANUAL GEBRUIKSAANWIJZING BEDIENUNGSANLEITUNG ENGLISH Setup IP-Camviewer Lite on IOS. 351.154 and 351.155. Start with searching the right app IP-camviewer
Quick guide 360-45011
 Quick guide A. KEUZE VAN DE TOEPASSING EN: SELECTION OF APPLICATION CHOIX D UNE APPLICATION DE: AUSWAHL DER ANWENDUNGSPROGRAMME DIM Memory Off DIM Memory = Off User: Display: 1. EXIT Press Niko (Back light)
ODYS 19 LCD-TV VIEW ODYS 19 LCD-TV VIEW
 Anschlusskabel POWER Einschalten des Fernsehers MUTE Stummschaltung NICAM Umschalten des Soundsystems SLEEP Sleep-Timer einschalten ASPECT Umschalten des Bildseitenverhältnisses zwischen 4:3, 16:9,
KURZANLEITUNG. Firmware-Upgrade: Wie geht das eigentlich?
 KURZANLEITUNG Firmware-Upgrade: Wie geht das eigentlich? Die Firmware ist eine Software, die auf der IP-Kamera installiert ist und alle Funktionen des Gerätes steuert. Nach dem Firmware-Update stehen Ihnen
Readme-USB DIGSI V 4.82
 DIGSI V 4.82 Sehr geehrter Kunde, der USB-Treiber für SIPROTEC-Geräte erlaubt Ihnen, mit den SIPROTEC Geräten 7SJ80/7SK80 über USB zu kommunizieren. Zur Installation oder Aktualisierung des USB-Treibers
CABLE TESTER. Manual DN-14003
 CABLE TESTER Manual DN-14003 Note: Please read and learn safety instructions before use or maintain the equipment This cable tester can t test any electrified product. 9V reduplicated battery is used in
Kurzanleitung. Hotel Modus. Version 1.0.1 / MB82 / MB82S<, Stand 29.04.2013. Vestel Germany GmbH Parkring 6 85748 Garching bei München
 Kurzanleitung Hotel Modus Version 1.0.1 / MB82 / MB82S
Formatting the TrekStor i.beat run
 DE EN Formatting the TrekStor i.beat run Formatierung des TrekStor i.beat run a Beim Formatieren werden ALLE Daten auf dem MP3-Player gelöscht. In diesem Abschnitt wird Ihnen erläutert, wie Sie Ihren MP3-Player
SETUP TOOL. Bedienungsanleitung User s Manual
 Bedienungsanleitung User s Manual Bitte lesen Sie diese Anleitung vor der Inbetriebnahme sorgfältig durch Please read the instructions carefully before use 1. Eigenschaften Das Setup Tool ist ein speziell
Monitor VIS 3xx Kurzanleitung
 Monitor VIS 3xx Kurzanleitung 19.08.08 Art. Nr. 22261 Inhalt: 1. Spezifikationen...2 2. Tastenfunktionen...2 3. Menüführung und Einstellungen...3 Technik nach Maß Wöhler Monitor VIS 3xx 1. Spezifikationen
miditech 4merge 4-fach MIDI Merger mit :
 miditech 4merge 4-fach MIDI Merger mit : 4 x MIDI Input Port, 4 LEDs für MIDI In Signale 1 x MIDI Output Port MIDI USB Port, auch für USB Power Adapter Power LED und LOGO LEDs Hochwertiges Aluminium Gehäuse
Parameter-Updatesoftware PF-12 Plus
 Parameter-Updatesoftware PF-12 Plus Mai / May 2015 Inhalt 1. Durchführung des Parameter-Updates... 2 2. Kontakt... 6 Content 1. Performance of the parameter-update... 4 2. Contact... 6 1. Durchführung
USB -> Seriell Adapterkabel Benutzerhandbuch
 USB -> Seriell Adapterkabel Benutzerhandbuch 1. Produkt Eigenschaften 1 2. System Vorraussetzungen 1 3. Treiber Installation (Alle Windows Systeme) 1 4. Den COM Port ändern 2 5. Einstellen eines RS232
FIRMWARE UPDATE TAPMOTION TD
 FIRMWARE UPDATE TAPMOTION TD CMP-SPF TO WHOM IT MAY CONCERN Seite 1 von 9 Inhalt / Overview 1. Firmware überprüfen und Update-file auswählen / Firmware check and selection of update file 2. Update File
MMOne.tv Installationsanleitung der Set-Top Box 05/2008 Version 1.1. Seite 1 von 10
 MMOne.tv Installationsanleitung der Set-Top Box 05/2008 Version 1.1 Seite 1 von 10 Inhalt Inhalt des MMOne.tv Pakets Seite 3 Zusatzinformationen Seite 3 Installation Ihrer Set-Top Box Seite 3 Der richtige
Installation und Start der Software AQ2sp Installation and Start of the software AQ2sp
 Installation and Start of the software Abhängig von Ihrer WINDOWS-Version benötigen Sie Administrator-Rechte zur Installation dieser Software. Geeignet für folgende WINDOWS-Versionen: Windows 98 SE Windows
Update V2.3 B4000+ Firmware
 Update V2.3 B4000+ Firmware Einspielen des Updates Zum Einspielen des Firmware Updates gehen Sie bitte wie folgt vor: Verbinden Sie Ihre B4000+ per USB Kabel mit dem PC, und schalten Sie die B4000+ ein.
EMCO Installationsanleitung / Installation instructions
 EMCO Installationsanleitung / Installation instructions Installationsanleitung Installation instructions Digitalanzeige digital display C40, FB450 L, FB600 L, EM 14D/17D/20D Ausgabe / Edition B 2012-03
p^db=`oj===pìééçêíáåñçêã~íáçå=
 p^db=`oj===pìééçêíáåñçêã~íáçå= Error: "Could not connect to the SQL Server Instance" or "Failed to open a connection to the database." When you attempt to launch ACT! by Sage or ACT by Sage Premium for
Installationsanleitung unter Windows
 Installationsanleitung unter Windows Verwenden Sie zur Installation ein Benutzerkonto mit Administratorberechtigung! 1. Download des aktuellen Backup-Client und des Sprachpakets: 1.1 Windows: ftp://ftp.software.ibm.com/storage/tivoli-storage-management/maintenance/client/v6r2/windows/
UM ALLE DATEN ZU KOPIEREN. ZUNÄCHST die Daten des alten Telefons auf einen Computer kopieren
 IPHONE UM ALLE DATEN des alten Telefons auf einen Computer Software von welcomehome.to/nokia auf Ihrem PC oder Mac. verbinden Sie Ihr altes Telefon über 3. Wenn Sie Outlook nutzen, öffnen Sie itunes, um
Tube Analyzer LogViewer 2.3
 Tube Analyzer LogViewer 2.3 User Manual Stand: 25.9.2015 Seite 1 von 11 Name Company Date Designed by WKS 28.02.2013 1 st Checker 2 nd Checker Version history Version Author Changes Date 1.0 Created 19.06.2015
4.) Geben Sie im Feld Adresse die IP Adresse des TDC Controllers ein. Die Standard Adresse lautet 192.168.1.50.
 Geben Sie im Feld Adresse die IP Adresse des TDC Controllers ein. Die Standard Adresse lautet 192.168.1.50.") Netzwerk: 1.) Kopieren Sie die Datei C30remote.exe von der Installations CD auf ihre Festplatte. 2.) Starten Sie die Datei C30remote.exe auf ihrer Festplatte. 3.) Wählen Sie aus dem Menü Verbindung den
Netzwerk: 1.) Kopieren Sie die Datei C30remote.exe von der Installations CD auf ihre Festplatte. 2.) Starten Sie die Datei C30remote.exe auf ihrer Festplatte. 3.) Wählen Sie aus dem Menü Verbindung den
User Manual Bedienungsanleitung. www.snom.com. snom Wireless Headset Adapter snom Schnurlos-Headset-Adapter. English. Deutsch
 English snom Wireless Headset Adapter snom Schnurlos-Headset-Adapter Deutsch User Manual Bedienungsanleitung 2007 snom technology AG All rights reserved. Version 1.00 www.snom.com English snom Wireless
AKTIVE DVB-T ZIMMERANTENNE ANSCHLUSSHINWEISE ACTIVE DVB-T INDOOR ANTENNA CONNECTION INSTRUCTIONS
 K la vi er l ac ko p tik AKTIVE DVB-T ZIMMERANTENNE ANSCHLUSSHINWEISE ACTIVE DVB-T INDOOR ANTENNA CONNECTION INSTRUCTIONS ZA 8970 DRUCKS0682.indd 1 05.09.12 15:15 VerpAckunGsinhAlT UKW / UHF / VHF Flachantenne
IVE-W530BT. Bluetooth Software Update Manual mit Android Telefonen 09.03.2015
 Bluetooth Software Update Manual mit Android Telefonen IVE-W530BT 1 Einleitung In der Anleitung wird die Vorgehensweise zum aktualisieren der Radio Bluetooth Firmware beschrieben. Bitte beachten Sie alle
Handbuch : CTFPND-1 V4
 Handbuch : CTFPND-1 V4 - Navigation starten (Seite 1) - Einstellungen (Seite 2-17) - WindowsCE Modus (Seite 18-19) - Bluetooth (Seite 21-24) - Anschlussmöglichkeiten (Seite 25-26) Navigation Um die installierte
Bedienungsanleitung. 1 S eite
 Bedienungsanleitung 1 S eite Bedienungsanleitung OPTIMUSS underline Fernbedienung Grundfunktionen Informationsleiste / InfoBar EPG Senderliste Hauptmenü Funktionen Programm Installation System Einstellungen
Das neue Volume-Flag S (Scannen erforderlich)
") NetWorker 7.4.2 - Allgemein Tip 2, Seite 1/5 Das neue Volume-Flag S (Scannen erforderlich) Nach der Wiederherstellung des Bootstraps ist es sehr wahrscheinlich, daß die in ihm enthaltenen Informationen
NetWorker 7.4.2 - Allgemein Tip 2, Seite 1/5 Das neue Volume-Flag S (Scannen erforderlich) Nach der Wiederherstellung des Bootstraps ist es sehr wahrscheinlich, daß die in ihm enthaltenen Informationen
Quick Guide Home Network Mode
 Quick Guide Home Network Mode English > 1 German > 3 About the Home Network Mode EN Tivizen Nano & iplug normally work on their own created networks (whose SSID starts with tivizentv or iplug ) in which
Tech Tips. Language selection. DVA-5205P Setup
 Tech Tips DVA-5205P Setup Einige Werkseinstellungen des DVA-5205 können evtl. nicht kompatibel zu Ihrer Systemkonfiguration sein. Wenn Sie keinen Ton mehr nach der Installation des DVA- 5205P haben (zb.
Zunächst empfehlen wir Ihnen die bestehenden Daten Ihres Gerätes auf USB oder im internen Speicher des Gerätes zu sichern.
 Anleitung zum Softwareupdate Eycos S 75.15 HD+ Eine falsche Vorgehensweise während des Updates kann schwere Folgen haben. Sie sollten auf jeden Fall vermeiden, während des laufenden Updates die Stromversorgung
Word-CRM-Upload-Button. User manual
 Word-CRM-Upload-Button User manual Word-CRM-Upload for MS CRM 2011 Content 1. Preface... 3 2. Installation... 4 2.1. Requirements... 4 2.1.1. Clients... 4 2.2. Installation guidelines... 5 2.2.1. Client...
Bedienungsanleitung Version 1.0
 Botex DMX Operator (DC-1216) Bedienungsanleitung Version 1.0 - Inhalt - 1 KENNZEICHEN UND MERKMALE...4 2 TECHNISCHE ANGABEN...4 3 BEDIENUNG...4 3.1 ALLGEMEINES:...4 3.2 BEDIENUNG UND FUNKTIONEN...5 4 SZENEN
PeakTech Zeitprogramm erstellen über Excel - Beispiel / Timed programs with Excel Example
 PeakTech 6180 Zeitprogramm erstellen über Excel - Beispiel / Timed programs with Excel Example 1. Excel Datei erstellen / Create Excel file Öffnen Sie Excel und erstellen eine xls-datei unter einem beliebigen
Nachdem Sie die Datei (z.b. t330usbflashupdate.exe) heruntergeladen haben, führen Sie bitte einen Doppelklick mit der linken Maustaste darauf aus:
 heruntergeladen haben, führen Sie bitte einen Doppelklick mit der linken Maustaste darauf aus:") Deutsch 1.0 Vorbereitung für das Firmwareupdate Vergewissern Sie sich, dass Sie den USB-Treiber für Ihr Gerät installiert haben. Diesen können Sie auf unserer Internetseite unter www.testo.de downloaden.
Deutsch 1.0 Vorbereitung für das Firmwareupdate Vergewissern Sie sich, dass Sie den USB-Treiber für Ihr Gerät installiert haben. Diesen können Sie auf unserer Internetseite unter www.testo.de downloaden.
p^db=`oj===pìééçêíáåñçêã~íáçå=
 p^db=`oj===pìééçêíáåñçêã~íáçå= How to Disable User Account Control (UAC) in Windows Vista You are attempting to install or uninstall ACT! when Windows does not allow you access to needed files or folders.
Anleitung zur Inbetriebnahme eines SQ-Robotersystems
 Anleitung zur Inbetriebnahme eines SQ-Robotersystems - 1 - Mitsubishi Electric Europe B.V. In dieser Anleitung wird die Anbindung einer Roboter CPU an das iq System beschrieben. SPS-CPU + Roboter-CPU +
Programmliste bearbeiten
 Alle im folgenden Kapitel erklärten und von Ihnen durchführbaren Änderungen an den Programmund Favoritenlisten werden nur dann vom Receiver gespeichert, wenn Sie beim Verlassen des Menüs durch die -Taste
ZeppelinAir AirPlay -Konfiguration wireless
 ZeppelinAir AirPlay -Konfiguration wireless Um das AirPlay-Feature nutzen zu können, muss der Zeppelin Air an Ihr bestehendes Heimnetzwerk (im folgenden Text als Ihr Heimnetzwerk bezeichnet) angeschlossen
INDEX. 3. Package Contents Connection and Operation...4
 3 - P O R T H D M I S w i t c h V i s i o n 3 3 2 7 0 3 INDEX 1. I n t r o d u c t i o n... 2 2. S p e c i f i c a t i o n s... 3 3. Package Contents...3 4. P a n e l D e s c r i p t i o n s.. 4 5. Connection
Bedienungsanleitung / Manual : LED-Nixie
 Bedienungsanleitung / Manual : LED-Nixie English please see below. Bei Neustart und gleichzeitig gedrückter Taste während der Versionsanzeige (halten bis Beep hörbar), erfolgt eine Zurücksetzung auf (Standard)
How-To-Do. Hardware Configuration of the CC03 via SIMATIC Manager from Siemens
 How-To-Do Hardware Configuration of the CC03 via SIMATIC Manager from Siemens Content Hardware Configuration of the CC03 via SIMATIC Manager from Siemens... 1 1 General... 2 1.1 Information... 2 1.2 Reference...
English. Deutsch. niwis consulting gmbh (https://www.niwis.com), manual NSEPEM Version 1.0
, manual NSEPEM Version 1.0") English Deutsch English After a configuration change in the windows registry, you have to restart the service. Requirements: Windows XP, Windows 7, SEP 12.1x With the default settings an event is triggered
English Deutsch English After a configuration change in the windows registry, you have to restart the service. Requirements: Windows XP, Windows 7, SEP 12.1x With the default settings an event is triggered
CarMedia. Bedienungsanleitung Instruction manual. AC-Services Albert-Schweitzer-Str.4 68766 Hockenheim www.ac-services.eu info@ac-services.
 CarMedia Bedienungsanleitung Instruction manual AC-Services Albert-Schweitzer-Str.4 68766 Hockenheim www.ac-services.eu info@ac-services.eu DE Inhaltsverzeichnis 1. Allgemeine Hinweise... 3 2. CarMedia...
Version/Datum: 1.5 13-Dezember-2006
 TIC Antispam: Limitierung SMTP Inbound Kunde/Projekt: TIC The Internet Company AG Version/Datum: 1.5 13-Dezember-2006 Autor/Autoren: Aldo Britschgi aldo.britschgi@tic.ch i:\products\antispam antivirus\smtp
Artikelnummer / Part No.: 42spg007 42spg007-0
 Artikelnummer / Part No.: 42spg007 42spg007-0 Lenkradfernbedienungsadapter / Stalk Adapter Fahrzeugkompatibilität / Vehicle Compatibility: Quadlock, CAN-Bus,Radio RD4 und RT4, kein/no CONTINENTAL,, kein/no
USB-Stick (USB-Stick größer 4G. Es ist eine größere Partition notwendig als die eines 4GB Rohlings, der mit NTFS formatiert wurde)
") Colorfly i106 Q1 System-Installations-Tutorial Hinweise vor der Installation / Hit for preparation: 准 备 事 项 : 外 接 键 盘 ( 配 套 的 磁 吸 式 键 盘 USB 键 盘 通 过 OTG 插 发 射 器 的 无 线 键 盘 都 可 ); U 盘 ( 大 于 4G 的 空 白 U 盘,
Colorfly i106 Q1 System-Installations-Tutorial Hinweise vor der Installation / Hit for preparation: 准 备 事 项 : 外 接 键 盘 ( 配 套 的 磁 吸 式 键 盘 USB 键 盘 通 过 OTG 插 发 射 器 的 无 线 键 盘 都 可 ); U 盘 ( 大 于 4G 的 空 白 U 盘,
DVD MAKER USB2.0 Installation Anleitung
 DVD MAKER USB2.0 Installation Anleitung Inhalt V1.0 Kapitel 1: DVD MAKER USB2.0 Hardware Montage...2 1.1 Inhalt der DVD MAKER USB2.0 Paket...2 1.2 Systemanforderungen...2 1.3 Hardware Montage...2 Kapitel
EL-21SY. 2 in, 1 out v1.3 HDMI Switcher OPERATION MANUAL
 EL-21SY 2 in, 1 out v1.3 HDMI Switcher OPERATION MANUAL Table of Contents 1. Introduction 1 2. Features 1 3. Package Contents 1 4. Operation Controls and Functions 2 4.1 Front Panel Diagram 2 4.2 Rear
CONTROLLER RECEIVER REPEATER PAIRING SLIM CLIP
 ANLEITUNGEN // INSTRUCTIONS CONTROLLER RECEIVER REPEATER PAIRING SLIM CLIP BEDIENUNGSANLEITUNG // INSTRUCTION MANUAL MONTAGEANLEITUNG // ASSEMBLY INSTRUCTION MONTAGEANLEITUNG // ASSEMBLY INSTRUCTION KOPPLUNG
Worx Landroid - Software Update
 Worx Landroid - Software Update WORX Landroid Software Update für Anwender 30.04.2015 Website: www.worxlandroid.com Direct Direkter Link Link for auf the Update: Update: https://www.worxlandroid.com/en/software-update
Cameraserver mini. commissioning. Ihre Vision ist unsere Aufgabe
 Cameraserver mini commissioning Page 1 Cameraserver - commissioning Contents 1. Plug IN... 3 2. Turn ON... 3 3. Network configuration... 4 4. Client-Installation... 6 4.1 Desktop Client... 6 4.2 Silverlight
CB RADIO Service Manual AE 6890
 CB RADIO Service Manual AE 6890 Downloaded from www.cbradio.nl Technische Mitteilung zu AE 6890 Problem: Bei Montage einer schlecht geerdeten Antenne oder einer Antenne mit schlechtem SWR sehr nahe am
5.2.3.4 Übung - Sicherung der Registry und Wiederherstellung von Windows XP
 5.0 5.2.3.4 Übung - Sicherung der Registry und Wiederherstellung von Windows XP Einführung Drucken Sie diese Übung aus und führen Sie sie durch. In dieser Übung erstellen Sie eine Sicherung einer Computer-Registrierung.
Daten Sichern mit dem QNAP NetBak Replicator 4.0
 Daten Sichern mit dem QNAP NetBak Replicator 4.0 Was ist NetBak Replicator: Der NetBak Replicator ist ein Backup-Programm von QNAP für Windows, mit dem sich eine Sicherung von Daten in die Giri-Cloud vornehmen
Bedienungsanleitung DOK App
 Bedienungsanleitung DOK App Auf den folgenden Seiten finden Sie eine Erklärung der Funktionen der Steuerungs App DOK. Sie können die App auf Ihrem Smartphone oder Tablet einrichten und benutzen. Bitte
microkontrol/kontrol49 System Firmware Update
 microkontrol/kontrol49 System Firmware Update Update Anleitung (für Windows) Dieses Update ist lediglich mit Windows XP kompatibel, versuchen Sie dieses nicht mit Windows 98/ME und 2000 auszuführen. 1.
Bedienungsanleitung Digital TV
 Bedienungsanleitung Digital TV Inhalt Ihrer Lieferung 1. Empfangsbox einrichten 1. Plazierung 1. Empfangsbox 2. Ethernet Kabel anschliessen 3. Fernseher anschliessen 4. Netzteil anschliessen 5. Empfangsbox
RS-232 SERIAL EXPRESS CARD 1-PORT. Expansion 111829
 RS-232 SERIAL EXPRESS CARD 1-PORT Expansion 111829 1. Introduction equip RS-232 Serial Express Card works with various types of RS-232 serial devices including modems, switches, PDAs, label printers, bar
SERVICEMANUAL MB95 SCHAUB LORENZ. Produkte: 26LE-E4900 32LE-E6900. Inhaltsangabe: 2) Welcome Screen einspielen Seite 4. 1) Hotel-Modus Seite 2
 Welcome Screen einspielen Seite 4. 1) Hotel-Modus Seite 2") SERVICEMANUAL MB95 Produkte: SCHAUB LORENZ 22LE-E5900 26LE-E4900 32LE-E6900 Inhaltsangabe: 1) Hotel-Modus Seite 2 2) Welcome Screen einspielen Seite 4 3) TV-Einstellungen clonen (inkl. aller Senderlisten)
SERVICEMANUAL MB95 Produkte: SCHAUB LORENZ 22LE-E5900 26LE-E4900 32LE-E6900 Inhaltsangabe: 1) Hotel-Modus Seite 2 2) Welcome Screen einspielen Seite 4 3) TV-Einstellungen clonen (inkl. aller Senderlisten)
Amino A140 Die nächste Generation der MPEG-2 und MPEG-4 HD IPTV Set-Top-Box (STB)
") AMINO A140 Amino A140 Die nächste Generation der MPEG-2 und MPEG-4 HD IPTV Set-Top-Box (STB) Teracue eyevis GmbH Schlossstr. 18 85235 Odelzhausen Germany Tel: +49 (0)8134-555-10 Fax: +49 (0)8134-555-199
AMINO A140 Amino A140 Die nächste Generation der MPEG-2 und MPEG-4 HD IPTV Set-Top-Box (STB) Teracue eyevis GmbH Schlossstr. 18 85235 Odelzhausen Germany Tel: +49 (0)8134-555-10 Fax: +49 (0)8134-555-199
Anleitung zur Installation von Windows XP Professional und dem Multilanguage Interface
 Anleitung zur Installation von Windows XP Professional und dem Multilanguage Interface Installation Windows XP Professional Den Computer / Laptop einschalten und Windows XP Professional Installations CD
Memeo Instant Backup Kurzleitfaden. Schritt 1: Richten Sie Ihr kostenloses Memeo-Konto ein
 Einleitung Memeo Instant Backup ist eine einfache Backup-Lösung für eine komplexe digitale Welt. Durch automatisch und fortlaufende Sicherung Ihrer wertvollen Dateien auf Ihrem Laufwerk C:, schützt Memeo
VIDEO CALL CAMERA G-VCAM-01
 VIDEO CALL CAMERA G-VCAM-01 EN AUS GUTEM GRUND ENGLISH 07-10 2 SAFETY AND INFORMATION Safety 7 This camera is designed to transmit video and audio signals. All other uses are expressly prohibited. 7 Protect
Ein neues Outlook Konto können Sie im Control Panel über den Eintrag Mail erstellen.
 Ein neues Outlook Konto können Sie im Control Panel über den Eintrag Mail erstellen. Wählen Sie nun Show Profiles und danach Add. Sie können einen beliebigen Namen für das neue Outlook Profil einsetzen.
Daten fu r Navigator Mobile (ipad)
") [Kommentare] Inhalte Navigator Mobile für das ipad... 3 Programme und Dateien... 4 Folgende Installationen sind erforderlich:... 4 Es gibt verschiedene Dateiformate.... 4 Die Installationen... 5 Installation
[Kommentare] Inhalte Navigator Mobile für das ipad... 3 Programme und Dateien... 4 Folgende Installationen sind erforderlich:... 4 Es gibt verschiedene Dateiformate.... 4 Die Installationen... 5 Installation
Zum Download von ArcGIS 10, 10.1 oder 10.2 die folgende Webseite aufrufen (Serviceportal der TU):
:") Anleitung zum Download von ArcGIS 10.x Zum Download von ArcGIS 10, 10.1 oder 10.2 die folgende Webseite aufrufen (Serviceportal der TU): https://service.tu-dortmund.de/home Danach müssen Sie sich mit Ihrem
Anleitung zum Download von ArcGIS 10.x Zum Download von ArcGIS 10, 10.1 oder 10.2 die folgende Webseite aufrufen (Serviceportal der TU): https://service.tu-dortmund.de/home Danach müssen Sie sich mit Ihrem
Karten aktualisieren Don t Panik
 Karten aktualisieren Don t Panik 1. Starten Sie Ihr Gerät und schalten Sie das Navigationsprogramm ein. 2. Klicken Sie auf das "Menü": 3. Klicken Sie anschließend auf "Einstellungen": 4. Bewegen Sie den
Hama GmbH & Co KG Postfach Monheim/Germany Tel. +49 (0)9091/502-0 Fax +49 (0)9091/
9091/502-0 Fax +49 (0)9091/") www.hama.de Hama GmbH & Co KG Postfach 80 86651 Monheim/Germany Tel. +49 (0)9091/502-0 Fax +49 (0)9091/502-274 hama@hama.de www.hama.de 00062249-05.05 Multimedia Kit für/for Mercedes Command 2.0 00062249
www.hama.de Hama GmbH & Co KG Postfach 80 86651 Monheim/Germany Tel. +49 (0)9091/502-0 Fax +49 (0)9091/502-274 hama@hama.de www.hama.de 00062249-05.05 Multimedia Kit für/for Mercedes Command 2.0 00062249
Einfach A1. Anleitung A1 TV aufnehmen. A1.net. Bitte beachten Sie: Aufnahmen sind nur mit dem A1 Mediabox Recorder möglich.
 Anleitung A1 TV aufnehmen A1.net Einfach A1. Bitte beachten Sie: Aufnahmen sind nur mit dem A1 Mediabox Recorder möglich. Stand: November 2012 Der A1 Mediabox Recorder bietet Ihnen mehr Möglichkeiten.
Digi Vox Ultimate Pro
 Digi Vox Ultimate Pro Bedienungsanleitung Ver. 1.0 Kapitel 1 Wichtiger Hinweis 1.1 Alle Kanale sind vom Empfangsradius abhängig und können von Zeit zu Zeit geändert werden. Die Aufnahme hängt von der Art
Anleitung zur Installation und Nutzung des Sony PRS-T1 ebook Readers
 Anleitung zur Installation und Nutzung des Sony PRS-T1 ebook Readers Der neue Sony PRS-T1 ebook-reader ist nicht mehr mit dem Programm Adobe Digital Editions zu bedienen. Es sind daher einige Schritte
Anleitung zur Installation und Nutzung des Sony PRS-T1 ebook Readers
 Anleitung zur Installation und Nutzung des Sony PRS-T1 ebook Readers Der neue Sony PRS-T1 ebook-reader ist nicht mehr mit dem Programm Adobe Digital Editions zu bedienen. Es sind daher einige Schritte
EKG Gerät. Softwareanleitung. 1. Gerät mit dem PC verbinden und suchen. 2. Gespeicherte Daten herunterladen und löschen.
 Softwareanleitung PM10 EKG Gerät 1. Gerät mit dem PC verbinden und suchen. 2. Gespeicherte Daten herunterladen und löschen. 3. Aktualisierung des Geräts und Einstellungen. 4. Verwaltung der heruntergeladenen
ReadMe zur Installation der BRICKware for Windows, Version 6.1.2. ReadMe on Installing BRICKware for Windows, Version 6.1.2
 ReadMe zur Installation der BRICKware for Windows, Version 6.1.2 Seiten 2-4 ReadMe on Installing BRICKware for Windows, Version 6.1.2 Pages 5/6 BRICKware for Windows ReadMe 1 1 BRICKware for Windows, Version
Installation mit Lizenz-Server verbinden
 Einsteiger Fortgeschrittene Profis markus.meinl@m-quest.ch Version 1.0 Voraussetzungen für diesen Workshop 1. Die M-Quest Suite 2005-M oder höher ist auf diesem Rechner installiert 2. Der M-Lock 2005 Lizenzserver
Mit der Maus im Menü links auf den Menüpunkt 'Seiten' gehen und auf 'Erstellen klicken.
 Seite erstellen Mit der Maus im Menü links auf den Menüpunkt 'Seiten' gehen und auf 'Erstellen klicken. Es öffnet sich die Eingabe Seite um eine neue Seite zu erstellen. Seiten Titel festlegen Den neuen
UCON UCON Kurzanleitung Inbetriebnahme
 UCON UCON Kurzanleitung Inbetriebnahme copyright G&D 24/08/2005 Irrum und techn. Änderungen vorbehalten 1. Was Sie zur Installation benötigen - UCON - 1:1 belegtes CAT-x Patchkabel - Kaltgerätekabel -
Firmware-Installationsanleitung für AVIC-F60DAB, AVIC-F960BT, AVIC-F960DAB und AVIC-F860BT
 Firmware-Installationsanleitung für AVIC-F60DAB, AVIC-F960BT, AVIC-F960DAB und AVIC-F860BT Firmware-Version 1.04 HINWEISE: ü Firmware-Updates werden nur vom USB-Anschluss 1 unterstützt. Sie können aber
Wireless LAN Installation Windows XP
 Wireless LAN Installation Windows XP Vergewissern Sie sich bitte zuerst, ob Ihre Hardware kompatibel ist und das Betriebssystem mit den aktuellen Service Packs und Patches installiert ist. Installieren
Installation Manual. Driver Installation USB-to-Serial Adapter WE2111. A en/de
 Installation Manual English Deutsch Driver Installation USB-to-Serial Adapter WE2111 A4012-1.0 en/de USB-to-Serial Adapter English 2 A4012-1.0 en/de USB-to-Serial Adapter 1 Installation in Windows 7...
How to install freesshd
 Enthaltene Funktionen - Installation - Benutzer anlegen - Verbindung testen How to install freesshd 1. Installation von freesshd - Falls noch nicht vorhanden, können Sie das Freeware Programm unter folgendem