Install Guide. Version 2.20 DWL-2700AP. Wireless G Outdoor AP/Bridge
|
|
|
- Lennart Hofmeister
- vor 7 Jahren
- Abrufe
Transkript

1 Install Guide Version 2.20 DWL-2700AP Wireless G Outdoor AP/Bridge
 PoE Base Unit Two Dipole Antennas RF Jumper Cable")

2 Package Contents DWL-2700AP G Outdoor Wireless AP/ Bridge CD-ROM (with Product Documentation) PoE Base Unit Two Dipole Antennas RF Jumper Cable Surge Arrestor 30m Ethernet Cable Grounding Wire Power Cord Power Adapter 8 Screws and Rubber Ring 2 Mounting Kits Console Cable System Requirements Computer with Windows, Macintosh, or Linux-based operating system with an Ethernet adapter installed Internet Explorer version 7.0 or Mozilla Firefox version 3.0 and above 2
3 Before You Begin It s best to use a computer (with an Ethernet adapter) connected to a switch to configure the DWL-2700AP. The default IP address for the DWL-2700AP is with a subnet mask of on the wired Ethernet side. You will need to assign your computer a static IP address within the same range as the DWL-2700AP s IP address for the purpose of configuring the DWL-2700AP. If you need assistance assigning a static IP address to your network adapter, please refer to the manual on the CD-ROM. Important Information This product should ONLY be installed by an experienced installer who is familliar with local building and safety codes and where ever applicable, is licensed by the appropriate authorities. Failure to do so may void the D-Link product warranty and may expose the end user or the service provider to legal and financial liabilities. D-Link and its resellers or distributors are not liable for injury, damage, or violation of regulations associated with the installation of outdoor units or antennas. A safety grounding system is necessary to protect your outdoor installation from lightning strikes and the build-up of static electricity. Direct grounding of the antenna mast, Outdoor AP, and Surge Arrester is very important. When mounting the Outdoor AP on the antenna mast, you have to connect the Outdoor AP to the same grounding system with the AC wall outlet. The grounding system must comply with the National Electrical Code and safety standards that apply in your country. Always check with a qualified electrician if you are in doubt as to whether your outdoor installation is properly grounded. 3


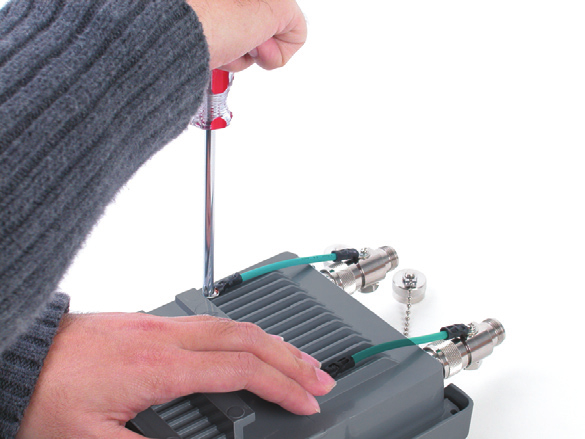
4 Physical Installation Step 1: Connect the supplied Ethernet cable with the waterproof enclosure to the Ethernet port on the DWL-2700AP and attach the grounding wire. 4


5 Physical Installation (continued) Step 2: Install the two dipole antennas to the antenna connector and attach the grounding wires. 5


6 Physical Installation (continued) 6
7 Physical Installation (continued) Step 3: Install the mounting kits. You can select between two mounting options. Mounting Option A: 7
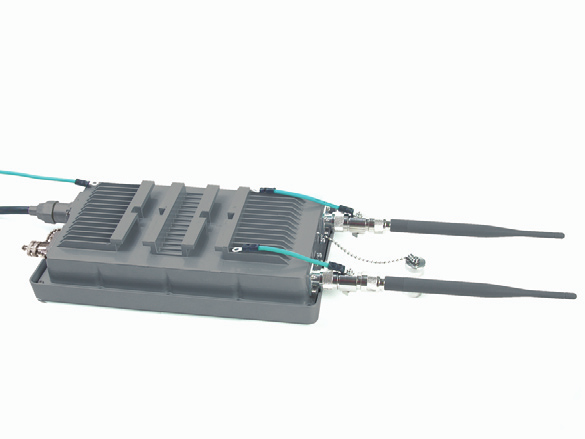
8 Physical Installation (continued) A complete DWL-2700AP with Mounting Option A should look like this. 8
9 Physical Installation (continued) Mounting Option B: A complete DWL-2700AP with Mounting Option B should look like this. 9
10 Connecting the DWL-2700AP Wireless Access Point to Your Network Hardware Installation Overview Step 1: Complete the Physical Installation first. Step 2: Connect the remaining end of the supplied Ethernet cable (connected to the DWL-2700AP in Step 1 on page 4) to the P+ DATA OUT port on the PoE base unit. Step 3: Connect an Ethernet cable from a router/switch or PC to the DATA IN port on the PoE base unit. Step 4: Attach the power adapter to the connector labeled POWER IN on the PoE base unit. Attach the power cord to the power adapter and into an electrical outlet. 10
11 Your Setup is Complete! AP Mode: Bridging Mode: 11
12 Technical Support D-Link UK Technical Support over the Telephone: (United Kingdom) BT 10ppm (UK Pence per minute), other carriers may vary. Times Mon-Fri 9.00am pm Sat 10.00am pm (Ireland) 0.05ppm peak, 0.045ppm off peak Times Mon-Fri 9.00am pm Sat 10.00am pm D-Link UK & Ireland Technical Support over the Internet: ftp://ftp.dlink.co.uk
13 Installationsanleitung Version 2.20 DWL-2700AP Wireless G Outdoor AP/Bridge
14 Lieferumfang DWL-2700AP G Outdoor Wireless AP/Bridge CD-ROM mit Produktdokumentation PoE-Grundgerät (Stromversorgung über Netzwerk) Zwei Dipolantennen Jumperkabel mit RF-Stecker Überspannungsschutz Ethernet-Kabel (30 m) Erdungskabel Stromkabel Netzteil 8 Schrauben und Gummiring 2 Montagesätze Konsole Kabel Systemanforderungen Computer mit dem Betriebssystem Windows, Macintosh oder Linux und installiertem Ethernet-Adapter Internet Explorer 7.0 oder Mozilla Firefox Version 3.0 oder höher 14
15 Vor dem Start Es empfiehlt sich, zur Konfiguration des DWL-2700AP einen (über Ethernet-Adapter) mit einem Switch verbundenen Computer zu verwenden. Die Standard-IP-Adresse des DWL-2700AP ist , und die Subnetz-Maske für die über Ethernetkabel angeschlossenen Geräte ist Zur Konfiguration des DWL-2700AP muss dem Computer eine statische IP-Adresse zugewiesen werden, die sich im selben Adressbereich wie die IP-Adresse des DWL-2700AP befindet. Eine Anleitung zur Zuweisung einer statischen IP-Adresse für die Netzwerkkarte finden Sie im Handbuch auf der CD-ROM. Wichtige Hinweise Dieses Produkt darf NUR von einer sachkundigen Person installiert werden, die mit dem betreffenden Gebäude und dessen Sicherheitsvorschriften vertraut ist. Die Person muss, sofern dies für die Installation vorgeschrieben ist, von der zuständigen Behörde autorisiert sein. Zuwiderhandeln kann zum Erlöschen der D-Link-Produktgarantie führen und gesetzliche und finanzielle Haftungsansprüche gegen den Endbenutzer oder Dienstanbieter nach sich ziehen. Die Firma D-Link und die Fachhändler oder Distributoren für D-Link-Produkte haften nicht für Personen- und Sachschäden oder Verletzungen von Vorschriften im Zusammenhang mit der Installation von Außenanlagen oder Antennen. Zum Schutz Ihrer Außeninstallation vor Blitzschlag und statischer Aufladung ist ein Sicherheitserdungssystem erforderlich. Antennenmast, Außen-AP und Überspannungsschutz müssen unbedingt direkt geerdet werden. Außerdem müssen Sie den Access Point bei Außenmontage am Antennenmast an das Erdungssystem der Steckdose anschließen. Das Erdungssystem muss den Sicherheitsnormen Ihres Landes entsprechen. Lassen Sie im Zweifelsfall von einem qualifizierten Elektriker prüfen, ob Ihre Außenanlage ordnungsgemäß geerdet ist. 15
16 Physische Installation Schritt 1: Schließen Sie das mitgelieferte Ethernetkabel mit dem wasserdichten Gehäuse an den Ethernetanschluss des DWL-2700AP an, und befestigen Sie das Erdungskabel. 16
17 Physische Installation (Fortsetzung) Schritt 2: Schließen Sie die zwei Dipolantennen an den Antennenanschluss an, und befestigen Sie die Erdungskabel. 17
18 Physische Installation (Fortsetzung) 18
19 Physische Installation (Fortsetzung) Schritt 3: Installieren Sie die Montagesätze. Sie können zwischen zwei Montagemöglichkeiten wählen. Montagemöglichkeit A: 19
20 Physische Installation (Fortsetzung) Der komplette DWL-2700AP sollte bei der Montagemöglichkeit A folgendermaßen aussehen. 20
21 Physische Installation (Fortsetzung) Montagemöglichkeit B: Der komplette DWL-2700AP sollte bei der Montagemöglichkeit B folgendermaßen aussehen. 21
22 Drahtlosen Access Point DWL-2700AP mit Netzwerk verbinden Übersicht zur Geräteinstallation Schritt 1: Schließen Sie zuerst die physische Installation ab. Schritt 2: Verbinden Sie das freie Ende des Ethernetkabels (das in Schritt 1 auf Seite 4 an den DWL-2700AP angeschlossen wurde) mit dem Anschluss P+ DATA OUT der PoE-Basiseinheit. Schritt 3: Verbinden Sie den Router/Switch über ein Ethernetkabel mit dem DATA IN-Anschluss der PoE-Basiseinheit. Schritt 4: Verbinden Sie das Netzteil mit dem Anschluss POWER IN an der PoE-Basiseinheit. Verbinden Sie das Netzteil über das Stromkabel mit einer Steckdose. 22
23 Die Installation ist abgeschlossen! AP-Modus: Überbrückungsmodus: 23
24 Technische Unterstützung Deutschland: Web: Telefon: +49(0) ,14 pro Minute Zeiten: Mo. Fr. 09:00 17:30 Uhr Österreich: Web: Telefon: +43(0) ,116 pro Minute Zeiten: Mo. Fr. 09:00 17:30 Uhr Schweiz: Web: Telefon: +41(0) ,08 CHF pro Minute Zeiten: Mo. Fr. 09:00 17:30 Uhr * Gebühren aus Mobilnetzen und von anderen Providern können abweichen.
25 Guide d installation Version 2.20 DWL-2700AP AP/ Pont extérieur sans fil G
26 Contenu de l emballage DWL-2700AP, AP/ Pont extérieur sans fil G CD-ROM (avec documentation produit) Adaptateur PoE Deux antennes dipôles Câble de liaison RF Parafoudre Câble Ethernet 30m Fil de masse Câble d alimentation Adaptateur d alimentation 8 visses et anneau en caoutchouc 2 kits de montage Câble console Pré-requis système Ordinateur avec un système d exploitation Windows, Macintosh, ou basé sur Linux et un adaptateur Ethernet installé Internet Explorer version 7.0 ou Mozilla Firefox version 3.0 et supérieurs 26
27 Avant de commencer Il est préférable d utiliser un ordinateur (avec une carte Ethernet) connecté sur un switch pour configurer le DWL-2700AP. L adresse IP par défaut du DWL-2700AP sur son interface filaire Ethernet est avec un masque de sous réseau de Vous devrez configurer votre ordinateur avec une adresse IP statique dans le même masque que celle de l adresse IP du DWL-2700AP afin de pouvoir le configurer. Si vous avez besoin d une aide pour assigner cette adresse IP statique à votre adaptateur réseau, merci de consulter le manuel sur le CD-ROM. Information importante Ce produit devrait SEULEMENT être installé par un installateur expérimenté ayant connaissance des codes de sécurité des bâtiments et si nécessaire, autorisé par les autorités compétentes. Le non respect de ceci peut annuler la garantie produit D-Link et peut exposer l'utilisateur ou le fournisseur de service à des responsabilités légales et financières. D-Link et ses revendeurs ou distributeurs ne sont pas responsables des blessures, des dommages, ou de la violation de la règlementation liés à l'installation des unités ou des antennes extérieures. Un système de mise à la terre est nécessaire afin de protéger votre installation externe des éclairs et de l électricité statique environnante. Une mise à la terre directe du mât de l antenne, de l AP externe ainsi que du parafoudre est très importante. Lors de l installation de l AP externe sur le mât de l antenne vous devez le relier sur la même terre que celle de son alimentation électrique. Le système de mise à la terre doit être conforme aux codes et aux normes de sûreté électrique nationale qui s'appliquent dans votre pays. En cas de doute, vérifiez toujours avec un électricien qualifié si votre installation externe est correctement connectée à la terre. 27
28 Installation physique Etape 1: Connecter le câble Ethernet fourni avec l adaptateur étanche sur le port Ethernet du DWL-2700AP et attacher le fil de masse. 28
29 Installation physique (suite) Etape 2: Fixer les deux antennes dipôles aux deux connecteurs d antenne et fixer les fils de masse. 29
30 Installation physique (suite) 30
31 Installation physique (suite) Etape 3: Installer les kits de montage. Vous pouvez choisir entre deux options de montage. Option de montage A: 31
32 Installation physique (suite) Une installation complète du DWL-2700AP avec l option de montage A doit ressembler à ceci. 32
33 Installation physique (suite) Option de montage B: Une installation complète du DWL-2700AP avec l option de montage B doit ressembler à ceci. 33
34 Connecter le point d accès sans fil DWL-2700AP à votre réseau Vue d ensemble de l installation Etape 1: Terminer d abord l installation physique. Etape 2: Connecter l autre extrémité du câble Ethernet fourni (connecté au DWL-2700AP lors de l Etape 1 en page 4) au port P+ DATA OUT de l adaptateur PoE. Etape 3: Connecter le câble Ethernet provenant d un router/switch ou PC au port DATA IN de l adaptateur PoE. Etape 4: Brancher l adaptateur d alimentation au connecteur marqué POWER IN sur l adaptateur PoE. Brancher le câble d alimentation sur l adaptateur électrique et sur la prise électrique. 34
35 Votre installation est terminée! Mode AP: Mode pont: 35
36 Assistance technique Assistance technique D-Link par téléphone : ,12 /min la minute : Lundi Vendredi de 9h à 13h et de 14h à 19h Samedi 9h à 13h et de 14h à 16h Assistance technique D-Link sur internet :
37 Guía rápida de instalación Version 2.20 DWL-2700AP Wireless G AP/ Bridge para Exterior
38 Contenido del paquete Punto de acceso/bridge exterior inalámbrico DWL-2700AP G CD-ROM (con el Manual) Unidad base PoE Dos antenas dipolo Cable de puente RF Regulador de sobretensión Cable Ethernet de 30 m Cable de tierra Cable de alimentación Adaptador de alimentación 8 tornillos y junta de goma 2 kits de montaje Cable de consola Requisitos del sistema Ordenador con sistema operativo Windows, Macintosh o basado en Linux, con adaptador Ethernet instalado Versión 7.0 de Internet Explorer o versión 3.0 de Mozilla Firefox y superiores 38
39 Antes de empezar Para configurar el DWL-2700AP, se recomienda utilizar un ordenador (con un adaptador Ethernet) que se encuentre conectado a un conmutador. La dirección IP por defecto para el DWL-2700AP es con una máscara de subred de en el extremo cableado Ethernet. A fin de configurar el DWL-2700AP, será necesario asignar al ordenador una dirección IP estática que se encuentre en el mismo rango que la dirección IP del DWL-2700AP. Si se necesita más información sobre cómo asignar una dirección IP estática al adaptador de red, consulte el Manual que se encuentra en el CD-ROM. Información importante Este producto debe ser instalado SÓLO por un instalador con experiencia y familiarizado con las normas locales en materia de construcción y seguridad, y donde sea de aplicación, autorizado por las autoridades competentes. El incumplimiento de este requisito podría anular la garantía del producto D-Link y penalizar al usuario final o al proveedor del servicio, que deberán asumir responsabilidades civiles y económicas. Ni D-Link ni sus distribuidores son responsables de los daños, ni del incumplimiento de los reglamentos relacionados con la instalación de antenas o unidades exteriores. Es necesario contar con un sistema seguro de puesta a tierra que proteja la instalación exterior de la caída de los rayos y de la acumulación de electricidad estática. Por ello, es muy importante poner directamente a tierra el mástil de la antena, el punto de acceso exterior y el regulador de sobretensión, y que, al montar el punto de acceso exterior en el mástil de la antena, se conecte el punto de acceso exterior a la misma toma de tierra que la base eléctrica de pared. La toma de tierra debe cumplir las normativas eléctricas nacionales y los estándares de seguridad correspondientes a cada país. Si existen dudas acerca de la correcta toma de tierra de una instalación exterior, debe solicitarse la opinión de un electricista cualificado. 39
40 Instalación física Paso 1: Conecte el cable Ethernet suministrado, con el protector impermeable, al puerto Ethernet del DWL-2700AP y fije el cable de tierra. 40
41 Instalación física (continuación) Paso 2: Introduzca las dos antenas dipolo en el conector de la antena y fije los cables de tierra. 41
42 Instalación física (continuación) 42
43 Instalación física (continuación) Paso 3: Instale los kits de montaje. Existen dos posibilidades de montaje. Opción de montaje A: 43
44 Instalación física (continuación) El DWL-2700AP montado según la opción A tendrá el aspecto que se muestra en la imagen. 44
45 Instalación física (continuación) Opción de montaje B: El DWL-2700AP montado según la opción B tendrá el aspecto que se muestra en la imagen. 45
46 Conexión del punto de acceso inalámbrico DWL-2700AP a la red Esquema de instalación del hardware Paso 1: Primero realice la instalación física. Paso 2: Conecte el extremo libre del cable Ethernet suministrado (el otro extremo se conectó al DWL-2700AP en el paso 1 de la página 4) al puerto P+ DATA OUT, que se encuentra en la unidad base PoE. Paso 3: Conecte un cable Ethernet desde un router/conmutador o PC al puerto DATA IN de la unidad base PoE. Paso 4: Conecte el adaptador de alimentación al conector de la unidad base rotulado POWER IN. Enchufe el cable de alimentación al adaptador de alimentación y a una toma eléctrica. 46
47 La instalación ha finalizado! Modo AP: Modo Bridging: 47
48 Asistencia Técnica Asistencia Técnica Telefónica de D-Link: ,067 /min De Lunes a Viernes de 9:00 a 14:00 y de 15:00 a 18:00
49 Guida di Installazione Version 2.20 DWL-2700AP Wireless G AP/ Bridge per ambiente esterno
50 Contenuto della confezione DWL-2700AP Wireless G AP/ Bridge per ambiente esterno CD-ROM (con documentazione del prodotto) Unità Base PoE Due Antenne a Dipolo Cavo RF Jumper Dispositivo di protezione di messa a terra Cavo Ethernet 30m Cavo per connessione messa a terra Cavo di Alimentazione Alimentatore esterno 8 viti e rondelle di gomma 2 kit di montaggio a muro Cavo console Requisiti di Sistema Computer con sistema operativo Windows, Macintosh, o Linux con scheda Ethernet installata Internet Explorer versione 7.0 o Mozilla Firefox versione 3.0 e superiore 50
51 Prima di Cominciare Per configurare il DWL-2700AP si consiglia di utilizzare un computer (con scheda Ethernet) collegato ad uno switch. L indirizzo IP di default dell interfaccia Ethernet RJ45 (via cavo cablato) del DWL-2700AP è con subnet mask Per entrare nel menu di configurazione del DWL-2770AP occorre assegnare al proprio computer un indirizzo IP statico della stessa classe del DWL-2700AP stesso. Se si necessita assistenza per assegnare l indirizzo IP statico alla scheda di rete del vostro computer, prego fare riferimento al manuale contenuto sul CD-ROM. Informazione Importante Questo prodotto deve essere installato SOLO da personale altamente specializzato che abbia la necessaria esperienza con le regole di sicurezza e che abbia il regolare permesso di installazione fornito dagli enti competenti. Guasti causati da una errata installazione possono invalidare la garanzia prodotto D-Link ed esporre l utente finale a sanzioni legali e pecuniarie. D-Link e I propri rivenditori e distributori non sono responsabili per lesioni, danni, o violazione delle regole associate all installazione di unità esterne o antenne. Ad installazione in esterno completata, per proteggere il vostro dispositivo da eventuali scariche elettrostatiche o sbalzi di corrente, occorre collegare il dispositivo stesso al sistema di messa a terra. E molto importante collegare al sistema di messa a terra l AP, le antenne e il dispositivo di protezione fornito nella confezione. Quando si monta l AP da esterno su di un palo, occorre connettere il dispositivo allo stesso sistema di messa a terra della presa di corrente AC a muro. Il sistema di messa a terra deve essere conforme con le regolamentazioni e gli standard di sicurezza elettrici della nazione. Eseguire sempre una verifica con un elettricista qualificato in caso di dubbi sull installazione della messa a terra del vostro dispositivo. 51
52 Installazione fisica Fase 1: Connettere il cavo fornito nella confezione e dotato di supporto protettivo all acqua, nella porta Ethernet del DWL-2700AP. Di seguito attaccare il cavo di messa a terra. 52
53 Installazione fisica (continua) Fase 2: Installare le due antenne a dipolo nei rispettivi connettori antenna e attaccare i cavi di messa a terra. 53
54 Installazione fisica (continua) 54
")


55 Installazione fisica (continua) Fase 3: Installare il kit di montaggio. E possibile scegliere due opzioni di montaggio. Opzione di montaggio A: 55


56 Installazione fisica (continua) Ad installazione completata, con opzione di Montaggio A, il DWL-2700AP dovrebbe cosi apparire. 56


57 Installazione fisica (continua) Opzione di montaggio B: Ad installazione completata, con opzione di Montaggio B, il DWL-2700AP dovrebbe cosi apparire. 57
58 Connessione dell Access Point Wireless DWL-2700AP alla vostra rete Panoramica dell installazione Hardware Fase 1: Completare l installazione fisica del dispositivo Fase 2: Connettere l altro capo del cavo Ethernet (precedentemente connesso alla porta del DWL-2700AP come descritto nella fase 1 a pagina 4) alla porta P+ DATA OUT dell unità base PoE Fase 3: Connettere un cavo Ethernet dal router/switch o dal PC alla porta DATA IN dell unità base PoE Fase 4: Attaccare l alimentatore esterno al connettore chiamato POWER IN dell unità base PoE. Connettere il cavo alimentazione all alimentatore e alla presa di corrente a muro. 58


59 L installazione è completata! Modalità AP: Modalità Bridging: 59

60 Supporto tecnico Supporto Tecnico dal lunedì al venerdì dalle ore 9.00 alle ore con orario continuato Telefono: URL :
61
62
63
64 Ver. 2.20(E) 2008/10/07 6WL2700B1QE2G
1. UPS FIRMWARE UPGRADE. Step 1. Step 2. Eaton /6000
 Page 2 1. UPS FIRMWARE UPGRADE Step 1 Eaton 9135 5000/6000 Connect the RS232 cable to the UPS and serial port of the computer. Brancher le câble RS232 sur l ASI et sur le port série de l ordinateur. Schließen
ALL1681 Wireless 802.11g Powerline Router Quick Installation Guide
 ALL1681 Wireless 802.11g Powerline Router Quick Installation Guide 1 SET ALL1681 Upon you receive your wireless Router, please check that the following contents are packaged: - Powerline Wireless Router
300Mbps Wireless Outdoor PoE Access Point/Bridge Quick Installation Guide
 LevelOne WAB-5120 300Mbps Wireless Outdoor PoE Access Point/Bridge Quick Installation Guide English Deutsch - 1 - Table of Content English... - 3 - Deutsch... - 9 - This guide covers only the most common
L Montageanleitung Assembly instructions Instruction de montage EASYHOMESYSTEM TH-EHS. Änderungen vorbehalten Alle Rechte vorbehalten
 L-09-1-50 Montageanleitung Assembly instructions Instruction de montage EASYHOMESYSTEM TH-EHS Änderungen vorbehalten Alle Rechte vorbehalten Komponenten / Components / Composants / Componenti PGD Touch
Hama GmbH & Co KG D Monheim/Germany
 Hama GmbH & Co KG D-86651 Monheim/Germany www.hama.com All listed brands are trademarks of the corresponding companies. Errors and omissions excepted, and subject to technical changes. Our general terms
Quick Installation Guide
 Quick Installation Guide AirPremier N Exterior Access Point w/poe This document will guide you through the basic installation process for your new D-Link Dual Band Outdoor Access Point. DAP-3520 Quick
AirPremier N DUAL BAND PoE ACCESS POINT DAP-2690
 AirPremier N DUAL BAND PoE ACCESS POINT DAP-2690 Quick Install Guide+ Installations-Anleitung+ Guide d installation+ Guía de instalación+ Guida di Installazione+ ENGLISH Package Contents DAP-2690 802.11n
150-in-1. Handbuch / Manual / Manuel. Externer Card Reader USB 2.0
 Handbuch / Manual / Manuel Vielen Dank, dass Sie sich für ein Produkt von ultron entschieden haben. Wir wünschen Ihnen viel Freude mit Ihrem neuen Gerät! CE-Erklärung und Hinweise Hiermit erklärt die
Installation Guide WLAN Interface
 Installation Guide 7106 7206 7010 WLAN Interface EN Installation Guide This guide explains how to install the Ethernet LAN card in your label printer. You should conult your dealer or distributor for more
Neue Fahrzeugauswahl (KW/CV)
") Update Software Rel.: 9,23 Nuova selezione del veicolo (KW/CV) New vehicle selection (KW/CV) Nouvelle selection du vehicule (KW/CV) Nueva selecion del vehiculo (KW/CV) Neue Fahrzeugauswahl (KW/CV) 1 Update
Update Software Rel.: 9,23 Nuova selezione del veicolo (KW/CV) New vehicle selection (KW/CV) Nouvelle selection du vehicule (KW/CV) Nueva selecion del vehiculo (KW/CV) Neue Fahrzeugauswahl (KW/CV) 1 Update
PoE Kit Mounting Instructions SG/XG 210/230/310/330/430/450
 PoE Kit Mounting Instructions PoE Kit Mounting Instructions Please note ÌÌ Before installing/removing any LAN module please make sure that the appliance is powered off and power cables are removed. ÌÌ
KIT LUCI PER BARRIERE / KIT LIGHTS FOR BARRIERS / KIT LUMIÈRES POUR BARRIÈRES / KIT LUCES PARA BARRERAS / LICHTERKIT FÜR SCHRANKE
 KIT LUCI PER BARRIERE / KIT LIGHTS FOR BARRIERS / KIT LUMIÈRES POUR BARRIÈRES / KIT LUCES PARA BARRERAS / LICHTERKIT FÜR SCHRANKE Tubo luci led / Led light hose / Tuyau lumières led / Tubo luces led /
CONNECTION DIAGRAM - LA36. English. Deutsch. Italiano
 CONNECTION DIAGRA - LA36 English Deutsch Italiano CONNECTION DIAGRA - LA36 LA36 ACTUATOR Actuator with Parallel Actuator 8 Actuator 7 Actuator 6 Actuator 5 Actuator 4 Actuator 3 Actuator 2 Actuator 1 WARDS
Quick Installation Guide Wireless N Exterior Access Point
 Building Networks for People Quick Installation Guide Wireless N Exterior Access Point This document will guide you through the basic installation process for your new D-Link Unified Wireless Access Point.
EBA 4370 / EBA 4470 EBA 4376 / EBA 4476
 EBA 4370 / EBA 4470 EBA 4376 / EBA 4476 UVsWOG M.-Nr. 06 560 560 EBA 4370 / EBA 4470 (70 cm) 2 EBA 4376 / EBA 4476 (30'') 3 EBA 4376 / EBA 4476 (30'') D Achtung: EBA 4376 / EBA 4476 Ist der Frontausschnitt
LUPUSNET - LE930/940 Kurzanleitung User manual Guide Rapide
 LUPUSNET - LE930/940 Kurzanleitung User manual Guide Rapide 1/16 A. Monitor Einstellungen 1. Klicken Sie mit der rechten Maustaste auf die Desktopoberfläche. Wählen Sie Eigenschaften aus dem Menu und setzen
Kurzanleitung Ersatzgerät Guide succinct de l appareil de remplacement Breve guida all dispositivo di sostituzione
 Kurzanleitung Ersatzgerät Guide succinct de l appareil de remplacement Breve guida all dispositivo di sostituzione Das Ersatzgerät kann als zweites Gerät für die Nutzung des E-Bankings eingesetzt werden
Drahtloser Access Point DWL-900AP+ CD-ROM (mit Handbuch und Garantiekarte) Ethernetkabel (CAT5 UTP, ungekreuzt) Netzteil 5 V, 2 A (Gleichstrom)
 Ethernetkabel (CAT5 UTP, ungekreuzt) Netzteil 5 V, 2 A (Gleichstrom)") Dieses Produkt kann mit jedem aktuellen Webbrowser eingerichtet werden (Internet Explorer 5.x, Netscape Navigator DWL-900AP+ D-Link AirPlus Vor dem Start 1. Es empfiehlt sich, zum Konfigurieren des DWL-900AP+
Dieses Produkt kann mit jedem aktuellen Webbrowser eingerichtet werden (Internet Explorer 5.x, Netscape Navigator DWL-900AP+ D-Link AirPlus Vor dem Start 1. Es empfiehlt sich, zum Konfigurieren des DWL-900AP+
Attention :Installez le logiciel fourni avant d'installer le lecteur de carte multislot!
 Manuel d utilisation Lecteur de carte 3,5 9 en 1, USB 2.0 Attention :Installez le logiciel fourni avant d'installer le lecteur de carte multislot! Installation du logiciel Insérez le CD-ROM fourni dans
Acer. WLAN 11g Broadband Router. Quick Start Guide
 Acer WLAN 11g Broadband Router Quick Start Guide 1 This product is in compliance with the essential requirements and other relevant provisions of the R&TTE directive 1999/5/EC. Product Name: Model Name
E. Start Browser Finished! Access the current ALL-NAS200 administrator web user interface by pressing the Start Browser button.
 E. Start Browser Finished! Access the current ALL-NAS200 administrator web user interface by pressing the Start Browser button. E. Démarrage du navigateur Terminé! Accédez à la page Web administrateur
Quick Installation Guide
 Quick Installation Guide AirPremier N Concurrent Dual Band Outdoor PoE Access Point This document will guide you through the basic installation process for your new D-Link Dual Band Outdoor Access Point.
Powerline ECO LAN Adapter 500 Mbps
 Powerline ECO LAN Adapter 500 Mbps Wichtige Information Der Powerline ECO LAN Adapter ist eine Erweiterung eines bestehenden Powerline ECO LAN oder ECO Control Netzwerkes. Bitte zuerst die beiden Adapter
Load balancing Router with / mit DMZ
 ALL7000 Load balancing Router with / mit DMZ Deutsch Seite 3 English Page 10 ALL7000 Quick Installation Guide / Express Setup ALL7000 Quick Installation Guide / Express Setup - 2 - Hardware Beschreibung
iid software tools QuickStartGuide iid USB base driver installation
 iid software tools QuickStartGuide iid software tools USB base driver installation microsensys Nov 2016 Introduction / Einleitung This document describes in short form installation of the microsensys USB
ISTRUZIONI PER COLLEGAMENTO ECU MERCEDES TEMIC ACTROS ATEGO UNIMOG ECONIC ecc.
 ISTRUZIONI PER COLLEGAMENTO ECU MERCEDES TEMIC ACTROS ATEGO UNIMOG ECONIC ecc. ISTRUCTIONS FOR THE ECU MERCEDES TEMIC ACTROS ATEGO UNIMOG ecc. CONNECTION FG Technology 1/11 Smontare la Ecu dal camion,
NASdeluxe NDL-2700T+ iscsi/nas System
 NASdeluxe NDL-2700T+ iscsi/nas System Quick Installation Guide Guide d Installation Rapide Kurzanleitung Guida rapida all installazione Guía de instalación rápida V1.0 1 Hard disk drive installation, Network
Effizienz im Vor-Ort-Service
 Installation: Anleitung SatWork Integrierte Auftragsabwicklung & -Disposition Februar 2012 Disposition & Auftragsabwicklung Effizienz im Vor-Ort-Service Disclaimer Vertraulichkeit Der Inhalt dieses Dokuments
CDPX-F-CO. Abmessungen. SPS-Schnittstelle. 1303NH de/en. Montage des Moduls. Beschreibung
 SPS-Schnittstelle Abmessungen Kurzbeschreibung Phone: 1303NH de/en 800 4845 Beschreibung Montage des Moduls Das Kommunikationsmodul ist eine Schnittstelle, die so konzipiert ist, dass das Bediengerät mit
TCO REFERENCE: CAMERA ELEMENTS CODIC:
 TCO MARQUE: GIGASET REFERENCE: CAMERA ELEMENTS CODIC: 4033426 Erste Schritte First Steps Premiers pas camera Hallo! Hello! Bonjour! Wir freuen uns, dass Du Dich für die Gigaset elements camera entschieden
Anleitung zur Schnellinstallation TFM-560X YO.13
 Anleitung zur Schnellinstallation TFM-560X YO.13 Table of Contents Deutsch 1 1. Bevor Sie anfangen 1 2. Installation 2 Troubleshooting 6 Version 06.08.2011 1. Bevor Sie anfangen Packungsinhalt ŸTFM-560X
BEDIENUNGSANLEITUNG Internes 5.25'' Multi Panel 6 in 1 Card Reader mit USB Hub USB 2 Port Port + Audio
 BEDIENUNGSANLEITUNG Internes 5.25'' Multi Panel 6 in 1 Card Reader mit USB Hub USB 2 Port + 1394 1 Port + Audio Kapitel 1 Installation Hardware: Anschlüsse: 1. IEEE 1394 2. USB 1.1 (2Ports) 3. Karteneinschub
Thecus N3200PRO IP Storage Appliance
 Thecus Technology Corporation Thecus N3200PRO IP Storage Appliance Quick Installation Guide Guide d Installation Rapide Kurzanleitung Guida rapida all installazione Guía de instalación rápida V1.0 1 Hard
ALL6400PRO IP Storage Appliance
 ALL6400PRO IP Storage Appliance Quick Installation Guide Guide d Installation Rapide Kurzanleitung Guida rapida all installazione Guía de instalación rápida 1 Hard disk drive installation, Network cable
2 IP X4 WLS/FL IP24. Montage-Anleitung Instructions de montage Assembling instructions. 225 cm. 60 cm 0
 WLS/FL IP Arbeiten an den elektrischen Anlagen dürfen nur von autorisierten Fachleuten nach den örtlichen Vorschriften ausgeführt werden. Für nicht fachgerechte Installation wird jegliche Haftung abgelehnt.
24-Port 10/100Mbps Web Smart PoE Switch with 4 Gigabit Ports and 2 Mini-GBIC Slots TPE-224WS
 24-Port 10/100Mbps Web Smart PoE Switch with 4 Gigabit Ports and 2 Mini-GBIC Slots TPE-224WS ŸAnleitung zur Schnellinstallation (1) ŸTroubleshooting (3) 1.12 1. Bevor Sie anfangen Packungsinhalt ŸTPE-224WS
Installation Instructions
 EN DE Installation Instructions WLAN Installation Kit, 300 Mbps, 5 GHz, 16 dbi AK-4 Wireless Kit Scope of delivery Junction box AK-4 (1x) 1 Connection board AK-4 CB with 12VDC power supply unit (1x) 2
AKTIVE DVB-T ZIMMERANTENNE ANSCHLUSSHINWEISE ACTIVE DVB-T INDOOR ANTENNA CONNECTION INSTRUCTIONS
 K la vi er l ac ko p tik AKTIVE DVB-T ZIMMERANTENNE ANSCHLUSSHINWEISE ACTIVE DVB-T INDOOR ANTENNA CONNECTION INSTRUCTIONS ZA 8970 DRUCKS0682.indd 1 05.09.12 15:15 VerpAckunGsinhAlT UKW / UHF / VHF Flachantenne
AirPremier N Access Point DAP-2553
 AirPremier N Access Point DAP-2553 Quick Installation Guide+ Installations-Anleitung+ Guide d installation+ Guía de instalación+ Guida di Installazione+ System Requirements Computers with Windows, Macintosh,
Sage 30 (Winway Z) Update-Installationsanleitung Installation de l update Installazione per l update
 Update-Installationsanleitung Installation de l update Installazione per l update") Sage 30 (Winway Z) Update-Installationsanleitung Installation de l update Installazione per l update Betriebswirtschaftliche Gesamtlösungen für Selbständige und kleine Unternehmen Logiciels de gestion
Sage 30 (Winway Z) Update-Installationsanleitung Installation de l update Installazione per l update Betriebswirtschaftliche Gesamtlösungen für Selbständige und kleine Unternehmen Logiciels de gestion
Installation Instructions Instructions d assemblage Montageanleitungen Instrucciones de montaje
 Installation Instructions Instructions d assemblage Montageanleitungen Instrucciones de montaje General Instructions Instructions générales Allgemeine Anweisungen Instrucciones generales En It is recommended
BLK-2000. Quick Installation Guide. English. Deutsch
 BLK-2000 Quick Installation Guide English Deutsch This guide covers only the most common situations. All detail information is described in the user s manual. English BLK-2000 Quick Installation Guide
11 EN 81-70 Page 1 of 2 Standard: INTERPRETATION RELATED TO. Clause(s): 5.4.2.3
: 5.4.2.3") CEN RELATED TO 11 Page 1 of 2 Standard: Edition: 2003 Clause(s): 5.4.2.3 Valid from: 15/09/2010 Date of modification: Key-word(s): Car operating panel, Two entrance lift Replacing interpretation No.: QUESTION
CEN RELATED TO 11 Page 1 of 2 Standard: Edition: 2003 Clause(s): 5.4.2.3 Valid from: 15/09/2010 Date of modification: Key-word(s): Car operating panel, Two entrance lift Replacing interpretation No.: QUESTION
Anleitung zur Schnellinstallation TFM-561U
 Anleitung zur Schnellinstallation TFM-561U V1 Table of Contents Deutsch 1 1. Bevor Sie anfangen 1 2. Installation 2 Troubleshooting 5 Version 08.25.2010 1. Bevor Sie anfangen Packungsinhalt TFM-561U Treiber
GmbH, Stettiner Str. 38, D-33106 Paderborn
 Serial Device Server Der Serial Device Server konvertiert die physikalische Schnittstelle Ethernet 10BaseT zu RS232C und das Protokoll TCP/IP zu dem seriellen V24-Protokoll. Damit können auf einfachste
USB -> Seriell Adapterkabel Benutzerhandbuch
 USB -> Seriell Adapterkabel Benutzerhandbuch 1. Produkt Eigenschaften 1 2. System Vorraussetzungen 1 3. Treiber Installation (Alle Windows Systeme) 1 4. Den COM Port ändern 2 5. Einstellen eines RS232
Einbausatz Hub montieren
 Einbausatz Hub montieren Die Hub-Halterung bietet Platz für zwei Hubs. Es können nur Hubs eingebaut werden, die über den Konfigurator bzw. Rack-Architekt bestellbar sind. Der Lieferumfang besteht im Grundausbau
Anleitung zur Schnellinstallation TFM-PCIV92A B1.21
 Anleitung zur Schnellinstallation TFM-PCIV92A B1.21 Table of Contents Deutsch 1 1. Bevor Sie anfangen 1 2. Installation 2 Troubleshooting 6 Version 05.11.2011 1. Bevor Sie anfangen Packungsinhalt ŸTFM-PCIV92A
AVANTEK. Indoor HDTV Antenna DVB-T Zimmerantenne. Instruction Manual Bedienungsanleitung
 AVANTEK Indoor HDTV Antenna DVB-T Zimmerantenne Instruction Manual Bedienungsanleitung EN 1 Illustration AC Adapter Connecting Box EN 2 Product Introduction This indoor antenna brings you access to free
AP Aufputz-Montage Montage en applique Surface mounting
 PAL/LED IP44, CH IP4 AP Aufputz-Montage Montage en applique Surface mounting Arbeiten an den elektrischen Anlagen dürfen nur von autorisierten Fachleuten nach den örtlichen Vorschriften ausgeführt werden.
Montageanleitung Installation Instructions Notice de Montage
 Montageanleitung Installation Instructions Notice de Montage R Reflexlichtschranke / Reflexlichttaster Retro-reflective sensor / Diffuse reflection sensor Système réflex / Système réflexion directe OE
08/12. Gebrauchsanleitung Trekkingrucksäcke Trekking rucksacks Instructions for use Notice d'emploi pour sacs à dos de trek
 08/12 Gebrauchsanleitung Trekkingrucksäcke Trekking rucksacks Instructions for use Notice d'emploi pour sacs à dos de trek X-TRANSITION Bedingungen der JACK WOLFSKIN 3-Jahres-Gewährleistung Terms and
4CH AHD Digital Video Recorder kit
 4CH AHD Digital Video Recorder kit with 4x 720P outdoor fixed Lens cameras Quick Installation Guide DN-16120 Connect directly to your DVR Connecting your cameras to your DVR: 1. Find the 60ft. BNC cable,
Der Adapter Z250I / Z270I lässt sich auf folgenden Betriebssystemen installieren:
 Installationshinweise Z250I / Z270I Adapter IR USB Installation hints Z250I / Z270I Adapter IR USB 06/07 (Laden Sie den Treiber vom WEB, entpacken Sie ihn in ein leeres Verzeichnis und geben Sie dieses
Bedienungsanleitung User Manual. PCMCIA Reader B1
 Bedienungsanleitung User Manual PCMCIA Reader B1 Einführung Introduction Vielen Dank, dass Sie sich für ein KOBIL Smart Card Terminal entschieden haben. Mit dem KOBIL PCMCIA Reader B1 haben Sie ein leistungsfähiges
Internet. SoftRemoteLT-VPN-Software ZyWALL Static IP Adresse
 192.168.1.1 LAN: 192.168.1.0/24 Internet SoftRemoteLT-VPN-Software ZyWALL Static IP Adresse 20.1.1.1 Prestige ZyWALL Im Menu VPN «Summary» erste Rule editieren. Editez le premier rule sur le menu VPN «Summary».
miditech midiface 4x4
 miditech midiface 4x4 4In-/4 Out USB MIDI Interface 4 x MIDI In / 4 x MIDI Out USB MIDI Interface 64 MIDI Kanäle 4 LEDs für MIDI Input 4 LEDs für MIDI Output Power LED USB Powered, USB 1, 2 und 3 kompatibel
Muster. DVB-T Antenne, aktiv DVB-T Antenna, active Antenne DVB-T active
 00062712 Muster DVB-T Antenne, aktiv DVB-T Antenna, active Antenne DVB-T active l Bedienungsanleitung DVB-T Antenne, aktiv Verpackungsinhalt: aktive DVB-T Antenne USB-Powerkabel für Stromversorgung Bedienungsanleitung
2100 PLAFONIERA INCASSO
 00 PLAONRA NCASSO struzioni di montaggio nstallation instructions nstructions de montage Montageanleitung nstrucciones de montaje www.platek.eu 8 max. 30 Sicurezza e avvertenze per l installazione: L installazione
Handbuch. Wir freuen uns, dass Sie sich für ein ultron Produkt entschieden haben und wünschen Ihnen viel Freude mit Ihrem neuen Gerät.
 Handbuch Wir freuen uns, dass Sie sich für ein ultron Produkt entschieden haben und wünschen Ihnen viel Freude mit Ihrem neuen Gerät. CE-Erklärung und Hinweise Hiermit erklärt die ultron AG, dass sich
11 kw** E82MV222_4B kw**
 EDK82ZWKN4 00459189 10/02 Netzschleifklemme Typ E82ZWKN4 Diese Anleitung enthält wichtige Hinweise für den Einsatz der Netzschleifklemme E82ZWKN4 und beschreibt deren Montage. ist nur gültig - für Netzschleifklemmen
AC1750 DUAL BAND PoE ACCESS POINT DAP-2695
 AC1750 DUAL BAND PoE ACCESS POINT DAP-2695 Quick Install Guide+ Installations-Anleitung+ Guide d installation+ Guía de instalación+ Guida di Installazione+ 2ENGLISH DAP-2695 802.11ac Access Point Minimum
A VGA monitor of the highest resolution that you will be using on any computer in the installation A PS/2 Keyboard A PS/2 Mouse
 PS/2 KVM SWITCH 2-PORT Vision 331217 Requirements Console A VGA monitor of the highest resolution that you will be using on any computer in the installation A PS/2 Keyboard A PS/2 Mouse Computers The following
Anleitung zur Schnellinstallation TEW-623PI 3.02
 Anleitung zur Schnellinstallation TEW-623PI 3.02 Table of Contents Deutsch 1 1. Bevor Sie anfangen 2. Installation 1 2 3. Verwendung des drahtlosen Adapters 4 Troubleshooting 5 Version 02.05.2010 1. Bevor
Thecus N8800 IP Storage Server
 Thecus Technology Corporation Thecus N8800 IP Storage Server Quick Installation Guide Guide d Installation Rapide Kurzanleitung Guida rapida all installazione Guía de instalación rápida V1.0 3 4 Start
Programmieranleitung CADAS 100 LPG 210
 Programmieranleitung CADAS 100 LPG 210 Küvetten-Test LCK 555 Seite 1 BSB 5 BSB [n] Ausgabe 9804 Achtung! Das Ausgabedatum dieser Programmieranleitung muß mit dem Ausgabedatum der Arbeitsvorschrift der
Quick Installation Guide TU2-ET100
 Quick Installation Guide TU2-ET100 Table of of Contents Contents... 1. Bevor Sie anfangen... 2. Installation... 1 1 2 Troubleshooting... 6 Version 08.30.2006 1. Bevor Sie anfangen Packungsinhalt TU2-ET100
Programmieranleitung CADAS 100 LPG 158
 Wasserhärte Programmieranleitung CADAS 100 LPG 158 Küvetten-Test LCK 327 Seite 1 Ausgabe 97/06 Achtung! Das Ausgabedatum dieser Programmieranleitung muß mit dem Ausgabedatum der Arbeitsvorschrift der Reagenzien
RS232-Verbindung, RXU10 Herstellen einer RS232-Verbindung zwischen PC und Messgerät oder Modem und Messgerät
 Betriebsanleitung RS232-Verbindung, RXU10 Herstellen einer RS232-Verbindung zwischen PC und Messgerät oder Modem und Messgerät ä 2 Operating Instructions RS232 Connection, RXU10 Setting up an RS232 connection
Montageanleitung Installation instructions Notice de montage. AS-i Modul AS-i module Module AS-i AC2480
 Montageanleitung Installation instructions Notice de montage AS-i Modul AS-i module Module AS-i AC2480 Sachnr. 701509/02 01/2005 Bestimmungsgemäße Verwendung AS-i-Profil S-0.A.E maximale Anzahl von Modulen
FlightSim Commander Database Manager 9.5
 FlightSim Commander Database Manager 9.5 Compatible with Lookheed Martin Prepar3D 1.0, 1.4 and Prepar3D v 2.0 The most recently updated database of the Prepar3D version is at the start of FlightSim Commander
Trouble Shooting Guide
 Trouble Shooting Guide Post-Installation Check List YES NO 1. Visual check if the wiring matches with the installation manual. (3.2 Cable connection) 2. Check if both the Auxilliary Power Switch and Circuit
p^db=`oj===pìééçêíáåñçêã~íáçå=
 p^db=`oj===pìééçêíáåñçêã~íáçå= Error: "Could not connect to the SQL Server Instance" or "Failed to open a connection to the database." When you attempt to launch ACT! by Sage or ACT by Sage Premium for
Power cable connection & Power on If you are using 1U4500R, please connect power cables to both power modules.
 3 4 Power cable connection & Power on If you are using 1U4500R, please connect power cables to both power modules. Branchement du câble d alimentation et mise sous tension Si vous utilisez le 1U4500R,
Anleitung zur Schnellinstallation TU3-SA 1.01
 Anleitung zur Schnellinstallation TU3-SA 1.01 Table of Contents Deutsch 1 1. Bevor Sie anfangen 1 2. Installation der Hardware 2 3. Zugriff auf die Festplatten des TU3-SA 4 Troubleshooting 5 Version 02.15.2011
Cameraserver mini. commissioning. Ihre Vision ist unsere Aufgabe
 Cameraserver mini commissioning Page 1 Cameraserver - commissioning Contents 1. Plug IN... 3 2. Turn ON... 3 3. Network configuration... 4 4. Client-Installation... 6 4.1 Desktop Client... 6 4.2 Silverlight
Installation. Memory Card Retainer for PanelView Terminals. Fixation de carte mémoire pour terminaux PanelView
 Installation Memory Card Retainer for PanelView Terminals English....................................... Page 2 Fixation de carte mémoire pour terminaux PanelView Français.......................................
IP X4 MOA/SL/FL IP44, CH IP24. Montage-Anleitung Instructions de montage Assembling instructions. 225 cm. 60 cm 0
 MOA/SL/FL IP44, CH IP4 Arbeiten an den elektrischen Anlagen dürfen nur von autorisierten Fachleuten nach den örtlichen Vorschriften ausgeführt werden. Für nicht fachgerechte Installation wird jegliche
QUICK INSTALLATION GUIDE
 Wireless AC1200 Dual Band ACCess Point QUICK INSTALLATION GUIDE INSTALLATIONSANLEITUNG PACKUNGSINHALT Wireless AC1200 Dual Band Access Point Hinweis: Mit zwei abnehmbaren Antennen. DEUTSCH 12V 1A NETZTEIL
Exemple de configuration
 ZyWALL VPN DynDNS-SoftRemoteLT 192.168.1.1 LAN: 192.168.1.0/24 Internet SoftRemoteLT-VPN-Software ZyWALL Dynamic IP Adresse DynDNS: zywall.dyndns.org Account bei Dyndns Server herstellen: https://www.dyndns.org/account/create.html
LAN-Mini/R-485 Handbuch Manual
 LAN-Mini/R-485 Handbuch Manual - Konverter - steckbare Schraubklemme - LAN-Kabel - CD - Hutschienenclip Lieferumfang Shipment - converter - pluggable locking ring - LAN-cord - CD - DIN rail clip Optionales
Table of Cont 6. 2 General Information... 4 Purpose...4 Documentation...4 Scope of Supply...5 Technical Data Safety Regulations...
 2 General Information........................ 4 Purpose........................................4 Documentation................................4 Scope of Supply................................5 Technical
Installing a thermal imager into the Powerhouse horizontally
 Powerhouse Thermal Imager Installation Manual Please follow these instructions to prepare your Powerhouse unit for a thermal imager installation. 3 Correct Press down on the Bullard button. The arms will
VLT REAL TIME CLOCK OPTION. VLT Series Bookstyle... page 2. Compact IP page 6. Compact IP page 16. Instruction
 VLT Instruction Drives and Controls REAL TIME CLOCK OPTION VLT Series 6000 Montering, Mounting, Montage, Installation Bookstyle... page 2 Compact IP 20... page 6 Compact IP 54... page 16 Advarsel! Real
DWL-810+ D-Link AirPlus Ethernet-Wireless-Bridge
 Dieses Produkt kann mit jedem aktuellen Webbrowser eingerichtet werden (Internet Explorer 6 oder Netscape Navigator ab Version 6.2.3). DWL-810+ D-Link AirPlus Ethernet-Wireless-Bridge Vor dem Start Als
Quick Installation Guide TBW-101UB TBW-102UB
 Quick Installation Guide TBW-101UB TBW-102UB Table of Contents Deutsch... 1. Bevor Sie anfangen... 2. Installation... 3. Cómo usar el adaptador Bluetooth... 1 1 2 4 Troubleshooting... 5 (Version 01.06.2006)
ALL2282. Pan-Tilt MPEG4/MJPEG Network Camera. Quick Installation Guide
 ALL2282 Pan-Tilt MPEG4/MJPEG Network Camera Quick Installation Guide 1 Getting Started Package Contents Check the items contained in the package carefully. You should have the following items. Once any
AC1750 DUAL BAND PoE ACCESS POINT DAP-2695
 AC1750 DUAL BAND PoE ACCESS POINT DAP-2695 Quick Install Guide+ Installations-Anleitung+ Guide d installation+ Guía de instalación+ Guida di Installazione+ 2ENGLISH Minimum System Requirements: CD-ROM
MANUAL_EN ANLEITUNG_DE PHONE SUITE SYNCHRONISATION SOFTWARE
 MANUAL_EN ANLEITUNG_DE PHONE SUITE SYNCHRONISATION SOFTWARE 2 PHONE SUITE MANUAL PHONE SUITE MANUAL 3 RESERVATION Technical Data is subject to change without notice. Changes, errors and misprints may not
Quick Installation Guide for 4 and 7-Port Broadband Router
 Quick Installation Guide for 4 and 7-Port Broadband Router A. Hardware Installation 1. Setup LAN connection: connect an Ethernet cable from your computer s Ethernet port to one of the LAN ports of this
Anleitung zur Schnellinstallation TBW-107UB 1.01
 Anleitung zur Schnellinstallation TBW-107UB 1.01 Table of Contents Deutsch 1 1. Bevor Sie anfangen 1 2. Installation 2 3. Konfiguration des Bluetooth-Adapters 5 Troubleshooting 7 Version 02.25.2010 1.
Programmieranleitung CADAS 100 LPG 210
 Phosphat-Phosphor Programmieranleitung CADAS 100 PG 210 Küvetten-Test Seite 1 CK 350 Ausgabe 91/03 Achtung! Das Ausgabedatum dieser Programmieranleitung muß mit dem Ausgabedatum der Arbeitsvorschrift der
How to access licensed products from providers who are already operating productively in. General Information... 2. Shibboleth login...
 Shibboleth Tutorial How to access licensed products from providers who are already operating productively in the SWITCHaai federation. General Information... 2 Shibboleth login... 2 Separate registration
miditech 4merge 4-fach MIDI Merger mit :
 miditech 4merge 4-fach MIDI Merger mit : 4 x MIDI Input Port, 4 LEDs für MIDI In Signale 1 x MIDI Output Port MIDI USB Port, auch für USB Power Adapter Power LED und LOGO LEDs Hochwertiges Aluminium Gehäuse
AC1750 DUAL BAND PoE ACCESS POINT DAP-2695
 AC1750 DUAL BAND PoE ACCESS POINT DAP-2695 Quick Install Guide+ Installations-Anleitung+ Guide d installation+ Guía de instalación+ Guida di Installazione+ 2ENGLISH DAP-2695 802.11ac Access Point Minimum
Quick Installation Guide
 LevelOne WHG-1000 300Mbps Wireless PoE Hotspot Gateway Quick Installation Guide English Deutsch Table of Contents English... 3 Deutsch... 13 Default Settings IP Address-LAN1 192.168.1.254 IP Address-LAN2
DWL-P50 PoE-Adapter. Ethernetkabel (CAT5 UTP, ungekreuzt) Stromkabel Buchse zu Buchse
 Stromkabel Buchse zu Buchse") Warnung: Bitte beachten Sie der Anweisungen in dieser Kurzanleitung sorgfältig. Wenn die Adapter nicht korrekt angeschlossen wird, können Netzwerkgeräte beschädigt werden. DWL-P50 PoE-Adapter (Power-over-
Warnung: Bitte beachten Sie der Anweisungen in dieser Kurzanleitung sorgfältig. Wenn die Adapter nicht korrekt angeschlossen wird, können Netzwerkgeräte beschädigt werden. DWL-P50 PoE-Adapter (Power-over-
German ab initio Standard level Paper 2 Allemand ab initio Niveau moyen Épreuve 2 Alemán ab initio Nivel medio Prueba 2
 German ab initio Standard level Paper 2 Allemand ab initio Niveau moyen Épreuve 2 Alemán ab initio Nivel medio Prueba 2 Friday 20 May 2016 (afternoon) Vendredi 20 mai 2016 (après-midi) Viernes 20 de mayo