GENERAL ADVICE ON THE USE OF THE MACHINE REGOLE GENERALI PER L USO DELLA MACCHINA ALLGEMEINE REGELN FÜR DEN MASCHINENGEBRAUCH
|
|
|
- Pia Förstner
- vor 8 Jahren
- Abrufe
Transkript
1

2
3 REGOLE GENERALI PER L USO DELLA MACCHINA Leggere attentamente il libretto di istruzioni e le limitazioni sulla garanzia. La macchina deve essere allacciata ad una regolare presa di corrente fornita di messa a terra. La macchina deve essere mantenuta pulita lavando frequentemente la griglia (12), il cassetto (13), il porta filtro (7), il serbatoio (18), il tubo di uscita vapore (10) e il foro di aspirazione aria (11). IMPORTANTISSIMO: mai immergere la macchina in acqua o introdurla in lavastoviglie. L acqua contenuta nel serbatoio (18) deve essere regolarmente sostituita. Non usate la macchina senza acqua nel serbatoio. Dopo aver cambiato acqua controllate che il tubo di aspirazione dell acqua (17) sia all interno del serbatoio. Si consiglia di utilizzare almeno ogni 3 mesi, una miscela per la rimozione del calcare appositamente studiata per le macchine per espresso (vedi menù manutenzione). La caldaia ha una valvola che permette il mantenimento costante della pressione, per questo motivo potrete notare la perdita di gocce d acqua dal porta-filtro (7). GENERAL ADVICE ON THE USE OF THE MACHINE Read the instruction manual and guarantee limitations carefully. The machine must be plugged into an earthed socket. Keep the machine clean at all times and wash out the grille (12), tray (13), filterholder (7), water tank (18), steam discharge pipe (10) and air intake hole (11) regularly. EXTREMELY IMPORTANT: never immerse the machine in water or put it in the dishwasher. The water in the tank (18) should be changed regularly. Do not use the machine without first making sure there is water in the tank. After changing the water, check that the water intake pipe (17) is in the tank. We recommend you use a special calcium-removing mixture for espresso machines at least every three months (see maintenance menu). A valve on the boiler keeps the pressure constant and may cause water to drip out of the filter-holder (7). ALLGEMEINE REGELN FÜR DEN MASCHINENGEBRAUCH Aufmerksam die Gebrauchsanweisung und Garantieeinschränkungen lesen. Die Maschine muss an eine ordentliche Steckdose mit Erdung angeschlossen werden. Die Maschine muss sauber gehalten werden, das Gitter (12), die Auffangschale (13), der Filterträger (7), der Wassertank (18), die Dampfdüse (10) und das Luftansaugrohr (11) sind regelmäßig zu reinigen. SEHR WICHTIG: Die Maschine niemals in Wasser tauchen oder in der Geschirrspülmaschine waschen. Das Wasser im Tank (18) muss regelmäßig erneuert werden. Die Maschine nicht ohne Wasser im Tank benutzen. Nach dem Wasseraustausch kontrollieren, ob das Wasseransaugrohr (17) im Behälter steckt. Es wird empfohlen, mindestens alle 3 Monate einen Entkalker für die Entkalkung von Espressomaschinen zu verwenden (siehe Reinigung und Pflege). Der Boiler hat ein Ventil, mit dem der Druck konstant gehalten wird, weshalb Wassertropfen aus dem Filterträger (7) austreten können. 2
. IMPORTANTISSIMO: mai immergere la macchina in acqua o introdurla in lavastoviglie. L acqua contenuta nel serbatoio (18) deve essere regolarmente sostituita.")
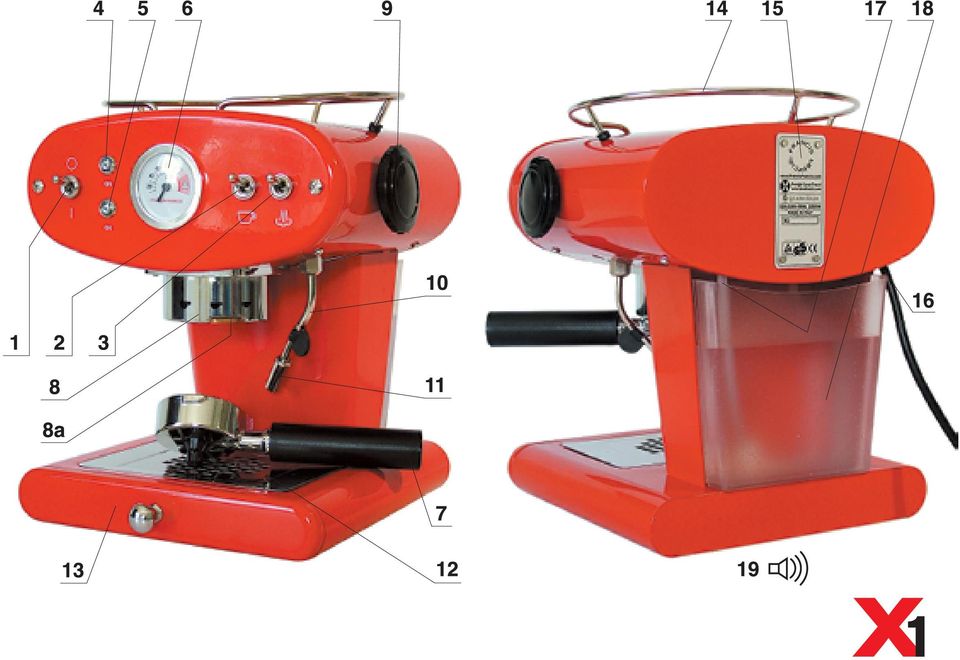
4 Parti della macchina 1. Interruttore generale alto=off basso = ON 2. Interruttore caffè/acqua calda alto=nessuna operazione basso=erogazione caffè/ acqua calda 3. Selettore vapore/caffè alto = caffè/acqua calda basso=vapore 4. Spia macchina accesa spento=macchina spenta acceso (rossa)=macchina accesa 5. Spia macchina pronta spento=macchina non pronta acceso (verde) =macchina pronta 6. Termometro caldaia 7. Portafiltro 8. Alloggiamento portafiltro 8a. Sottocaldaia 9. Manopola vapore/acqua calda 10. Lancia erogazione vapore 11. Foro aspirazione aria 12. Griglia appoggio tazza 13. Cassetto raccogligocce 14. Porta tazze 15. Targa dati 16. Cavo alimentazione 17. Tubo aspirazione acqua 18. Serbatoio acqua 19. Cicalino interno: se attivo indica macchina pronta o anomalia Parts of the machine: 1. Master switch up = OFF down = ON 2. Coffee/hot water switch up = no effect down = providing coffee/ hot water 3. Steam/coffee selector up = coffee/hot water down = steam 4. On/off light off = machine off on (red) = machine on 5. Machine ready light off = machine not ready on (green) = machine ready 6. Boiler thermometer 7. Filter-holder 8. Filter-holder housing 8a Brewing head 9. Steam/hot water valve 10.Steam discharge pipe 11.Air intake hole 12.Cup positioning grille 13.Drip collecting tray 14.Cup holder 15.Data panel 16.Flex 17.Water intake pipe 18.Water tank 19.Internal buzzer: if sounding it indicates machine is ready or malfunction Maschinenteile: 1. Hauptschalter oben = AUS unten = EIN 2. Espresso-/ Warmwasserschalter oben=kein Arbeitsgang unten=espresso-/ Warmwasserauslauf 3. Dampf-/ Espressowahlschalter oben = Espresso/Warmwasser unten = Dampf 4. Einschaltkontrollleuchte aus = Maschine ausgeschaltet an (rot) = Maschine eingeschaltet 5. Betriebskontrollleuchte aus = Maschine nicht betriebsbereit an (grün) = Maschine betriebsbereit 6. Boilerthermometer 7. Filterträger 8. Filterträgerhalterung 8a.Boilerunterteil 9. Dampf-/Warmwasserdrehknopf 10.Dampfdüse 11.Luftansaugloch 12.Tassenabstellgitter 13.Tropfenauffangschale 14.Tassenhalterung 15.Schild mit Kenndaten 16.Versorgungskabel 17.Wasseransaugrohr 18.Wassertank 19.Eingebauter Summer: bei Aktivierung wird die Betriebsbereitschaft der Maschine bzw. eine Störung angezeigt 4

5 La macchina per espresso X1 impiega il sistema EASY SERVING ESPRESSO (E.S.E) Per un corretto funzionamento è necessario utilizzare i serving E.S.E, facilmente riconoscibili dal marchio impresso sulle confezioni, lo stesso che si ritrova anche sulle macchine per espresso. Il sistema E.S.E garantisce una serie di vantaggi: la qualità del caffè espresso rimane sempre costantemente indipendente dall esperienza del consumatore nel prepararlo, l impiego è facile e molto veloce, la pulizia del sistema è estremamente semplice. The X1 espresso machine uses the EASY SERVING ES- PRESSO (E.S.E.) system. For best results from your machine use only E.S.E. servings, easily recognized from the brand mark on the packets, the same found on the espresso machines. The E.S.E. system provides a number of advantages: a high quality espresso coffee is always assured irrespective of the consumer s experience in making it; it is quick and simple to use and the machine is extremely easy to clean. D i e Espressomaschine X1 verwendet das System EASY SERVING ESPRESSO (E.S.E). Für einen richtigen Betrieb müssen E.S.E- Servings verwendet werden, die leicht an ihrem Markenzeichen auf den Verpackungen zu erkennen sind. Dasselbe Markenzeichen befindet sich auch auf den Espressomaschinen. Das E.S.E-System bietet mehrere Vorteile: Die Espressoqualität bleibt immer gleich, unabhängig von der Zubereitungserfahrung des Benutzers, die Verwendung ist einfach und sehr schnell, die Systemreinigung ist äußerst einfach. 5
 system. For best results from your machine use only E.S.E. servings, easily recognized from the brand mark on the packets, the same found on the espresso machines.")
6 IMPORTANTI MISURE DI SICUREZZA IMPORTANT SAFETY MEASURES WICHTIGE SICHERHEITS- HINWEISE Nell utilizzo di apparecchiature elettriche devono essere sempre osservate le seguenti misure di sicurezza: 1. Leggere attentamente le istruzioni. 2. Non toccare mai una superficie calda. Usare manici e pulsanti. 3. Per proteggersi dal fuoco, scosse elettriche o lesioni non immergere il cavo, la spina o in acqua o altro liquido. 4. L apparecchio non deve essere utilizzato da bambini. 5. Disinserire la spina dall impianto elettrico quando: - l apparecchio non viene utilizzato; - se ne esegue la pulizia; - si riempie il serbatoio d acqua. Prima di disinserire la spina accertarsi che l interruttore generale (1) sia chiuso. Lasciar raffreddare prima di aggiungere o levare parti accessorie e prima della pulizia. 6. Non utilizzare un apparecchio se il cavo o la spina sono danneggiati o se l apparecchio mostra segni di cattivo funzionamento oppure se ha subito qualche danno. Riportare l apparecchio al concessionario autorizzato più vicino per controlli o riparazioni. 7. L utilizzo di accessori non raccomandati dal produttore può provocare incendi, scosse elettriche o lesioni alle persone. 8. Non utilizzare all esterno. 9. Non lasciare penzolare il cavo da tavoli o banconi. 10. Non appoggiate l apparecchio su fornelli elettrici o a gas,o dentro un forno caldo. 11. Non utilizzare l apparecchio per scopi diversi da quelli previsti. 12. Questa macchina è costruita per fare il caffè espresso e per riscaldare bevande : fate attenzione a non scottarvi con getti d acqua o di vapore o con uso improprio della stessa. 13. Dopo aver tolto l imballaggio, assicurarsi dell integrità dell apparecchio. In caso di dubbio, non utilizzare l apparecchio e rivolgersi a personale pro- The safety measures listed below should always be followed when using electrical appliances: 1. Read the instructions carefully. 2. Never touch a hot surface. Use handles and switches. 3. To safeguard against burns, electric shocks or other injuries do not place the cord, plug or appliance itself in contact with water or any other liquid. 4. The appliance is not designed for use by children. 5. Unplug the appliance and the mains socket when: - the appliance is not in use; - it is being cleaned; - the water tank is being refilled. Ensure the master switch (1) is turned off before unplugging. Let the appliance cool before adding or removing accessories or cleaning. 6. Do not use the appliance if the cord or plug is damaged, or if the appliance malfunctions or has been damaged. Take the appliance to the nearest authorized dealer to be checked or repaired. 7. Using accessories not recommended by the manufacturer may cause fires, electric shocks or other injuries. 8. Do not use outdoors. 9. Do not leave the cord dangling from tables or work-tops. 10. Do not place the appliance near electric or gas rings or in a hot oven. 11. Do not use the appliance for purposes for which it is not designed. 12. This appliance is designed to make espresso coffee and to make hot drinks : be careful not to cause burns with jets of hot water or steam or through improper use of the machine. 13. After unpacking the appliance, ensure it is undamaged. If in doubt, do not use the appliance and have it checked by a qualified technician. 6 Bei der Benutzung von Elektrogeräten müssen immer folgende Sicherheitsvorkehrungen beachtet werden: 1. Aufmerksam die Gebrauchsanleitung lesen. 2. Niemals eine heiße Oberfläche anfassen. Griffe und Knöpfe benutzen. 3. Zum Schutz vor Feuer, Stromschlägen oder Verletzungen das Kabel und den Stecker weder in Wasser noch in eine andere Flüssigkeit tauchen. 4. Das Gerät darf nicht von Kindern benutzt werden. 5. Den Netzstecker aus der Steckdose ziehen, wenn: - das Gerät nicht benutzt wird, - wenn das Gerät gereinigt wird, - wenn der Wassertank aufgefüllt wird. Vor dem Herausziehen des Netzsteckers sich vergewissern, dass der Hauptschalter (1) ausgeschaltet ist. Erst das Gerät abkühlen lassen, bevor Zubehörteile entfernt oder montiert werden und bevor die Maschine gereinigt wird. 6. Das Gerät nicht benutzen, wenn Kabel oder Stecker beschädigt sind oder wenn das Gerät Betriebsstörungen aufweist bzw. wenn es irgendwie be- schädigt wurde. Das Gerät für Kontrollen oder Reparaturen zum nächsten Vertragshändler bringen. 7. Die Benutzung von nicht vom Hersteller empfohlenem Zubehör kann zu Brand, Stromschlägen oder Körperverletzungen führen. 8. Nicht draußen verwenden. 9. Das Kabel nicht frei von Tischen oder Tresen herunterhängen lassen. 10. Das Gerät nicht auf Elektro- oder Gasherde oder in den heißen Ofen stellen. 11. Das Gerät nicht unsachgemäß benutzen. 12. Diese Maschine wurde entwickelt, um Espresso zu brühen bzw. Getränke aufzuwärmen : Achten Sie darauf, sich durch den Heißwasserstrahl oder den Dampf bzw. durch unsachgemäßen Gebrauch nicht zu verbrennen. 13. Nach Entfernung der Verpackung vergewissern Sie sich, dass das Gerät unversehrt ist. Im Zweifelsfall das Gerät nicht benutzen und sich an qualifiziertes Fachpersonal wenden.

7 IMPORTANTI MISURE DI SICUREZZA IMPORTANT SAFETY MEASURES WICHTIGE SICHERHEITS- HINWEISE fessionalmente qualificato. 14. Quest apparecchio deve essere impiegato solo per uso domestico. Ogni altro uso è da considerarsi improprio e quindi pericoloso. 15. Il costruttore non può essere considerato responsabile per eventuali danni derivanti da usi impropri, erronei ed irragionevoli. 16. In caso di guasto o di cattivo funzionamento dell apparecchio, spegnerlo e non manometterlo. Per eventuali riparazioni, rivolgersi solamente ad un Centro di Assistenza Tecnica autorizzato dal costruttore e richiedere l utilizzo di ricambi originali. Il mancato rispetto di quanto sopra può compromettere la sicurezza dell apparecchio. 17. Posizionare l apparecchio sopra un piano di lavoro lontano da rubinetti dell acqua e lavelli. 18. Verificare che la tensione della rete elettrica corrisponda a quella indicata nella targa dati dell apparecchio. Collegare l apparecchio solo ad una presa di corrente avente una portata minima di 6A se alimentata a 230Vac e 12A se alimentata a 110Vac e dotata di un efficiente messa a terra. 19. Il costruttore non può essere considerato responsabile per eventuali incidenti causati dalla mancanza o dalla non conformità alle leggi vigenti, dell impianto di messa a terra. 20. In caso di incompatibilità tra la presa e la spina dell apparecchio, fare sostituire la presa con un altra di tipo adatto, da personale qualificato 21. Non installare mai la macchina in un ambiente che può raggiungere una temperatura inferiore o uguale a 0 C (se l acqua si ghiaccia, l apparecchio può danneggiarsi) e superiore a 40 C. 22. CONSERVARE QUE- STE ISTRUZIONI. Attenzione: Se la decalcificazione non viene effettuata regolarmente (vedi pag. 33) è indispensabile farla eseguire in un centro di assistenza. 14. This appliance is designed exclusively for domestic use. Any other use is to be considered improper and therefore dangerous. 15. The manufacturer cannot be held responsible for any damage as a result of improper, unsuitable or unreasonable use. I6. In case of breakdown or malfunction, switch off the appliance and do not attempt to repair it. Contact only a Technical Service Centre authorized by the manufacturer if any repairs are necessary, ensuring original spare parts are used. Failure to observe the above may jeopardize the safety of the appliance. 17. When placing the appliance on a work-top ensure it is not near taps or sinks. 18. Ensure the mains voltage matches the voltage marked on the technical data panel on the appliance. Plug into a properly earthed socket with a minimum capacity of 6A with a 230V current and 12A with a 110 V current. 19. The manufacturer cannot be held responsible for any accidents caused by the use of an unearthed socket or one not conforming to legal requirements. 20. Should the plug and the socket be incompatible, have the plug replaced with a suitable one by a qualified technician. 21. Never place the machine where the temperature can drop to or below O C (the appliance could be damaged if the water freezes) or over 40 C. 22. KEEP THESE IN- STRUCTIONS Warning: If descaling is not carried out regularly (see p. 33) it is essential that this operation be performed by a service centre Dieses Gerät ist nur für den Hausgebrauch zu verwenden. Jede anderweitige Verwendung ist unsachgemäß und somit gefährlich. 15. Der Hersteller kann nicht für eventuelle Schäden aufgrund unsachgemäßer, unrichtiger oder unangemessener Verwendung haftbar gemacht werden. 16. Im Fall von Schäden oder Störungen das Gerät ausschalten und nicht auseinander nehmen. Für Reparaturen wenden Sie sich an eine zugelassene Kundendienststelle und beantragen Sie nur die Verwendung von Originalersatzteilen. Bei Nichteinhaltung dieser Hinweise kann die Sicherheit des Gerätes beeinträchtigt werden. 17. Das Gerät auf eine Arbeitsfläche nicht in der Nähe von Wasserhähnen oder Spülbecken aufstellen. 18. Überprüfen, dass die auf dem Schild angegebene Betriebsspannung des Gerätes mit der Spannung Ihres Stromnetzes übereinstimmt. Das Gerät nur an eine Steckdose anschließen, die eine Mindestleistung von 6 A bei einer Versorgung mit 230 Vac und von 12 A bei einer Versorgung mit 110 Vac und eine wirksame Erdung hat. 19. Der Hersteller kann für eventuelle Schäden aufgrund der Nichteinhaltung der geltenden gesetzlichen Vorschriften für die Erdungsanlage nicht haftbar gemacht werden. 20. Falls Steckdose und Stecker nicht kompatibel sein sollten, lassen Sie die Steckdose durch Fachpersonal austauschen. 21. Das Gerät niemals in Räumlichkeiten aufstellen, wo die Temperatur auf 0 C oder noch tiefer sinken (wenn das Wasser gefriert, kann die Maschine beschädigt werden) und auf über 40 C steigen kann. 22. DIESE GEBRAUCHSHIN- WEISE AUFHEBEN Achtung: Wenn die Maschine nicht regelmäßig entkalkt wird (siehe S. 33), muss die Entkalkung in einer Kundendienststelle vorgenommen werden.

8

9 INSTALLAZIONE E MESSA IN FUNZIONE DELL APPARECCHIO INSTALLING AND OPERATING THE APPLIANCE INSTALLATION UND INBETRIEB- NAHME Prima di collegare la macchina alla rete elettrica, leggere con attenzione le norme di sicurezza riportate nel capitolo precedente. Accertarsi che gli interruttori (1), (2) e (3) siano in posizione alta, che la manopola vapore (9) sia chiusa (fig.1) e che la macchina sia scollegata dalla rete elettrica. Agganciare il portafiltro (7) (fig. 2). Estrarre il serbatoio (18) lavarlo, riempirlo con acqua fredda e riposizionarlo nel suo alloggiamento (fig. 3); assicurarsi che il tubo di aspirazione (17) sia immerso nell acqua. Collegare elettricamente la macchina. (fig. 4) Before plugging in the machine, read the safety instructions in the previous section carefully. Ensure that the switches (1), (2) and (3) are up, the steam valve (9) is closed (Fig. 1) and that the machine is unplugged. Attach the filter-holder (7) (Fig. 2). Remove the water tank (18), wash it, fill it with cold water and put it back in position (Fig. 3). Now you can plug in the machine (Fig. 4) Bevor die Maschine an das Stromnetz angeschlossen wird, lesen Sie bitte aufmerksam die Sicherheitshinweise im vorstehenden Kapitel durch. Vergewissern Sie sich, dass die Schalter (1), (2) und (3) oben stehen und dass der Dampfdrehknopf (9) geschlossen ist. (Abb. 1) Setzen Sie den Filterträger (7) ein. (Abb. 2) Nehmen Sie den Wassertank (18) heraus, spülen Sie ihn aus, füllen Sie ihn mit kaltem Wasser und setzen Sie ihn wieder ein. (Abb. 3) Vergewissern Sie sich, dass das Ansaugrohr (17) im Wasser steckt. Die Maschine ans Stromnetz anschließen. (Abb. 4) 11
 lavarlo, riempirlo con acqua fredda e riposizionarlo nel suo alloggiamento (fig. 3); assicurarsi che il tubo di aspirazione (17) sia immerso nell acqua.")
10

11 ACCENSIONE SWITCHING ON EINSCHALTEN Verificare la presenza di acqua in serbatoio. Accendere la macchina abbassando l interruttore (1). Verificare l accensione della spia rossa (4) (fig. 5). Se la macchina emette un segnale acustico ripetuto ogni secondo riportare in posizione alta gli interrutori caffè e vapore. Dopo alcuni minuti la macchina segnala il raggiungimento della temperatura di funzionamento con l accensione della spia verde (5) (fig. 6) ed un breve segnale acustico. In caso di mancata accensione delle spie o di un segnale acustico veloce (5 impulsi al secondo) consultare la tabella Problemi e soluzioni. NOTA: In caso di primo utilizzo o dopo prolungato periodo di inattività si suggerisce di erogare attraverso il portafiltro alcune tazze d acqua (fig. 7). Insure there is water in the tank. Switch the machine on by pressing the master switch (1) down. Ensure that the red on/off light (4) is on (Fig 5). If the machine emits a sound repeated at one second intervals press the coffee and steam switches up. After a few minutes a green light (5) will come on and a short sound signal will be heard indicating that the machine has reached operating temperature (Fig. 6). If the lights do not come on or a series of short sounds (five a second) are heard refer to the Troubleshooting table. Note: When the machine is used for the first time, or if it has not been used for a long period, we advise you to pour a few cups of water through the filter-holder (Fig. 7). Überprüfen Sie, dass sich Wasser im Wassertank befindet. Stellen Sie die Maschine an, indem Sie den Schalter (1) nach unten stellen. Vergewissern Sie sich, dass die rote Kontrollleuchte (4) aufleuchtet. (Abb. 5) Wenn im Sekundentakt wiederholt ein Warnsignal ertönt, den Espresso- und Dampfschalter wieder nach oben stellen. Nach einigen Minuten erreicht die Maschine ihre Betriebstemperatur, die grüne Kontrollleuchte (5) leuchtet auf (Abb. 6) und ein kurzes Warnsignal ertönt. Falls die Kontrollleuchten nicht aufleuchten bzw. wenn ein schnelles Warnsignal (5 Töne pro Sekunde) ertönt, die Tabelle Probleme und Lösungen konsultieren. HINWEIS: Bei der ersten Inbetriebnahme oder nach einer längeren Betriebspause wird empfohlen, einige Tassen warmes Wasser durch den Filterträger laufen zu lassen. (Abb. 7) 13
 consultare la tabella Problemi e soluzioni.")
12

13 PREPARAZIONE DI UN CAFFÈ MAKING A COFFEE ESPRESSOZUBEREITUNG Premessa: la macchina X1 è stata concepita per fornire il massimo risultato con serving E.S.E. illy fustellati secondo la figura 8A. In caso di utilizzo di serving fustellato diversamente (esempio: fig. 8B e fig. 8C) occorre eliminare la carta in eccesso lasciando attorno al serving un bordo di circa 5 mm; altrimenti si possono verificare inconvenienti tecnici e perdite di acqua dal gruppo di estrazione. Accertarsi che la spia di macchina pronta (5) sia accesa e l interruttore (3) sia in posizione caffè (alto) (fig. 9). Sganciare il portafiltro (7), appoggiare il serving sul portafiltro (fig. 10 e fig. 11) in corrispondenza del foro centrale, agganciare il portafiltro all alloggiamento facendolo ruotare verso destra fino a portarlo alla posizione corrispondente al tipo di caffè che si intende preparare. Infatti la macchina è dotata di un sistema speciale che permette di preparare in modo ottimale, a seconda della posizione di chiusura del portafiltro, un caffè lungo (fig.12a), un espresso normale (fig.12b) ed un espresso ristretto (fig. 12C). Azionare verso il basso l interruttore di erogazione (2), al raggiungimento della quantità desiderata riportare l interruttore (2) in posizione alta. Ad operazione ultimata, sganciare il portafiltro ed estrarre il serving esausto. Per preparare altri caffè, ripetere la sequenza dall inizio battendo il bordo della manetta portafiltro rovesciata sulla gomma dello scarica serving (fig. 13). Si raccomanda, prima di spegnere la macchina o alla fine di ogni utilizzo, di vuotare e riagganciare il portafiltro e di far scorrere acqua calda, in modo da rimuovere i residui di bevanda presenti. Attenzione: in caso si dimentichi di interrompere l erogazione, la macchina spegne automaticamente la pompa dopo circa un minuto ed emette un segnale acustico ogni secondo; per ripristinare il funzionamento, è sufficiente riportare l interruttore caffè (2) in posizione alta. Non usate l acqua distillata o demineralizzata per la preparazione del caffè. Foreword: the X1 machine has been designed to provide best results with the E.S.E. Illy servings perforated as illustrated in Fig. 8A. If using a serving with different perforations (e.g. Fig. 8B and Fig. 8C) the excess paper should be eliminated leaving about 5mm around the edge of the serving, otherwise the machine might experience technical problems and loss of water from the extraction unit. Ensure that the machine ready light (5) is on and that the switch (3) is in the coffee position (up) (Fig. 9). Detach the filter-holder (7) and put in a serving (Figs. 10 & 11) over the hole in the middle. Attach the filter-holder to its housing by twisting it to the right until it is in the position for the type of coffee desired. The machine is equipped with a special system enabling you to make the type of coffee you like according to the position of the filter-holder: weak coffee Fig. 12A), normal espresso (Fig. 12B) and strong coffee (fig. 12C). Press the coffee switch (2) down and when the required amount of coffee has been obtained press it back up. When you have completed the operation, detach the filter-holder and remove the spent serving. Repeat the sequence from the beginning every time you make another cup of coffee, first knocking the edge of the filter-holder handle upside-down against the rubber serving-remover (Fig. 13). We recommend that you empty the filterholder and return it to its housing after each use and when switching the machine off and rinse it out with hot water to remove coffee residues. Note: if you should forget to stop drawing out coffee, the pump cuts out automatically after about one minute and lets out a sound every second; to restart the machine just press the coffee switch (2) up once again. Do not use distilled or demineralized water to make coffee. 15 Hinweis: Die Espressomaschine X1 wurde entwickelt, damit mit den wie in Abbildung 8A gestanzten E.S.E. Illy-Servings das beste Ergebnis erzielt werden kann. Bei einer Verwendung anders gestanzter Servings (Beispiel: Abb. 8B und Abb. 8C) muss das überstehende Papier entfernt werden, so dass um das Serving herum ein etwa 5 mm breiter Rand bleibt. Ansonsten können technische Probleme auftreten bzw. aus der Brühgruppe kann Wasser austreten. Vergewissern Sie sich, dass die Betriebskontrollleuchte (5) aufleuchtet und der Schalter (3) auf der Espressoposition (oben) steht. (Abb. 9) Den Filterträger (7) abnehmen, das Serving in den Filterträger (Abb. 10 und Abb. 11) auf das Mittelloch legen, den Filterträger wieder einsetzen und ihn dabei so weit nach rechts drehen, bis er auf der Position steht, die der Espressoart entspricht, die zubereitet werden soll. Die Maschine ist mit einem speziellen System ausgestattet, mit dem je nach Filterträgerposition ein verlängerter Espresso (Abb. 12A), ein normaler Espresso (Abb. 12B) und ein extra starker Espresso (Abb. 12C) zubereitet werden kann. Betätigen Sie den Espressoschalter (2) und wenn die gewünschte Menge in der Tasse ist, stellen Sie den Schalter wieder nach oben. Am Ende nehmen Sie den Filterträger heraus und entfernen Sie das benutzte Serving. Für die Zubereitung eines neuen Espressos wiederholen Sie die einzelnen Schritte, indem Sie mit dem Rand des umgedrehten Filterträgers auf das Gummi des Servingentsorgers klopfen. (Abb. 13) Vor dem Ausschalten der Maschine und nach jedem Gebrauch wird empfohlen, den Filterträger zu leeren, wieder einzustecken und Warmwasser durchlaufen zu lassen, um eventuell vorhandene Kaffeereste zu entfernen. Achtung: Falls vergessen werden sollte, den Espressoschalter wieder hochzustellen, schaltet die Maschine die Pumpe nach ungefähr einer Minute automatisch ab und stößt im Sekundentakt ein Warnsignal aus. Um den Betrieb wieder herzustellen, reicht es aus, den Espressoschalter (2) wieder hoch zu stellen. Für die Espressozubereitung kein destilliertes oder entmineralisiertes Wasser verwenden.
 sia accesa e l interruttore (3) sia in posizione caffè (alto) (fig. 9). Sganciare il portafiltro (7), appoggiare il serving sul portafiltro (fig.")
14

15 EROGAZIONE VAPORE PER CAPPUCCINO STEAM SUPPLY FOR CAPPUCCINO DAMPFERZEUGUNG FÜR CAPPUCCINO Per preparare un cappuccino, dopo aver preparato il caffè, versare latte freddo in un contenitore metallico ed seguire le seguenti istruzioni. Accertarsi che il portafiltro sia privo di serving. Abbassare l interruttore (3) in posizione vapore; la spia di macchina pronta (5) si spegne e l indicatore di temperatura sul termometro (6) inizia a salire (fig. 14). Quando la macchina è pronta emette un breve segnale acustico e la spia verde si riaccende; ruotare la manopola vapore (9) in senso antiorario, fare uscire l acqua residua dal tubo fino all ottenimento del vapore e richiudere la valvola vapore. Immergere la lancia vapore (10) nel contenitore del latte (fig.15) e ruotare la manopola vapore (9) in senso antiorario. Il piccolo foro (11) presente sulla lancia vapore (fig.16) rende possibile l assorbimento dell aria necessaria alla formazione della schiuma per il cappuccino; evitare pertanto di immergerlo nel latte. Raggiunto il volume di schiuma desiderato, chiudere la valvola vapore e riportare in posizione alta (per caffè, fig.17) l interruttore (3). Versare la schiuma e il latte nella tazza contenente il caffè (fig. 18). Si consiglia di pulire accuratamente il cappuccinatore (11) dai residui di latte (fig. 19) evitando sempre il contatto diretto con le dita. ATTENZIONE: Il contatto con la lancia vapore (10) può provocare ustioni gravi. In order to make a cappuccino, first make a normal espresso, pour some cold milk into a metal container, then follow the instructions below. Ensure the filter-holder does not have a serving in it and press the steam/ coffee selector (3) down into the steam position; the machine ready light (5) will go off and the temperature indicated on the thermometer (6) will start to rise (Fig. 14). When the machine is ready it will make a short sound and the green light will come on again; turn the steam valve (9) anticlockwise, let out the water remaining in the pipe until steam starts to flow and close the valve. Put the nozzle of the steam pipe (10) into the container with the milk (Fig. 15) and turn the steam valve (9) anticlockwise. A tiny hole (11) in the pipe (Fig. 16) enables a small amount of air to be drawn in and mixed with the milk to create the froth for the cappuccino, so avoid immersing it in the milk. Once you have produced the amount of froth desired, close the steam valve and return the switch (3) to the coffee position (up) (Fig. 17). Pour the milk and froth into the coffee in the cup (Fig. 18). We advise you carefully to remove milk residues from the cappuccinomaker (11) (Fig. 19), avoiding contact with the fingers. WARNING: touching the steam pipe (10) can cause severe burns. 19 Nachdem Sie den Espresso zubereitet haben gießen Sie für die Zubereitung eines Cappuccinos kalte Milch in einen Metallbehälter und befolgen Sie folgende Schritte. Vergewissern Sie sich, dass im Filterträger kein Serving liegt. Den Schalter (3) auf die Dampfposition umstellen. Die Betriebskontrollleuchte (5) geht aus, und der Temperaturanzeiger auf dem Thermometer (6) beginnt zu steigen. (Abb. 14) Wenn die Maschine betriebsbereit ist, ertönt ein kurzes Signal und die grüne Kontrollleuchte (5) geht wieder an. Drehen Sie den Dampfdrehknopf (9) gegen den Uhrzeigersinn und lassen Sie das Restwasser aus der Düse ab, bis nur noch Dampf austritt. Dann schließen Sie das Ventil wieder. Tauchen Sie die Dampfdüse (10) in den Milchbehälter (Abb. 15) und drehen Sie den Dampfdrehknopf (9) gegen den Uhrzeigersinn. Durch ein kleines Loch (11) in der Dampfdüse (Abb. 16) kann die für den Cappuccinoschaum erforderliche Luft angesaugt werden. Das Loch deshalb nicht in die Milch tauchen. Wenn die gewünschte Schaummenge erreicht ist, schließen Sie das Dampfventil und stellen Sie den Schalter (3) wieder nach oben (für Espresso, Abb. 17). Gießen Sie den Schaum und die Milch in die Tasse zu Ihrem Espresso. (Abb. 18) Es wird empfohlen, das Loch (11) sorgfältig von allen Milchresten zu reinigen (Abb. 19). Dabei direkten Kontakt mit den Händen vermeiden. ACHTUNG: Beim Berühren der Dampfdüse (10) besteht schwere Verbrennungsgefahr!
 in senso antiorario, fare uscire l acqua residua dal tubo fino all")
16

17

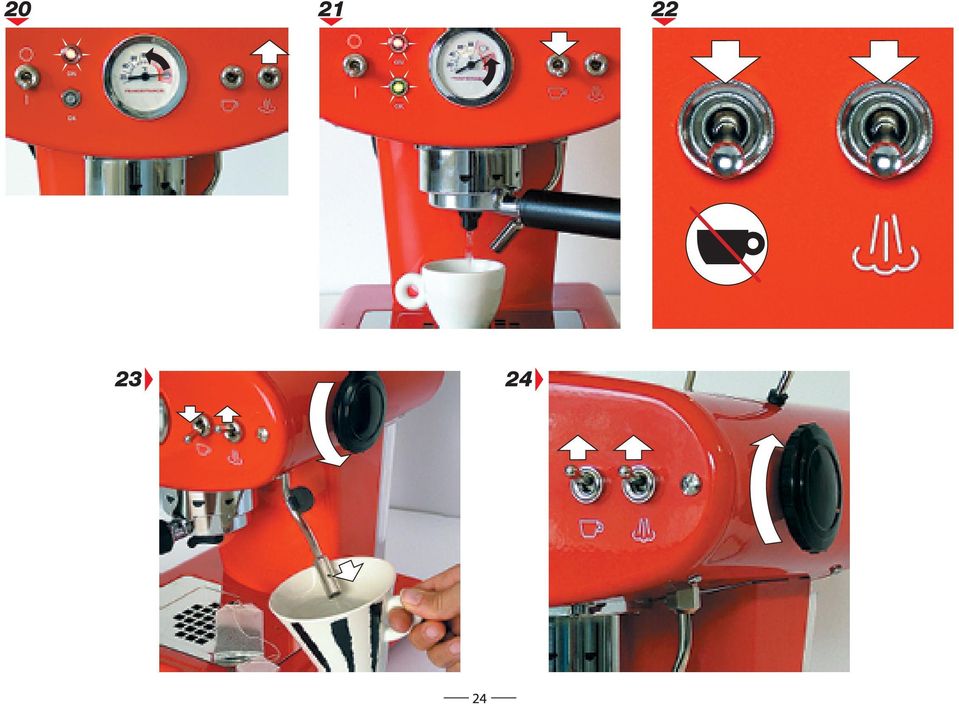
18 PREPARAZIONE DI UN CAFFÈ DOPO L EROGAZIONE DI VAPORE MAKING A COFFEE AFTER STEAM HAS BEEN SUPPLIED ESPRESSOZUBEREITUNG NACH DER DAMPFERZEUGUNG È molto importante evitare di preparare un espresso subito dopo aver erogato vapore perché la caldaia è troppo calda e il gusto risulta compromesso. Portando il selettore (3) dalla posizione vapore (bassa) a quella caffè (alta) la spia (5) si spegne per qualche minuto dando tempo alla macchina di raffreddarsi; quando la caldaia raggiunge la temperatura idonea, la spia si riaccende e si può procedere alla preparazione del caffè. Se si vuole riportare più velocemente la macchina alla temperatura ideale per il caffè operare come segue: 1. Assicurarsi che il portafiltro sia agganciato e vuoto e la leva dell interruttore (3) sia in posizione caffè (alta). (fig.20) 2. Erogare acqua, azionando l interruttore caffè (2), in un recipiente fino a quando la macchina emette un breve segnale acustico e la spia verde si riaccende. (fig. 21) 3. La caldaia è di nuovo alla temperatura idonea per preparare un espresso. ATTENZIONE: Se la leva dell interruttore (3) è in posizione vapore (bassa), l interruttore caffè (2) non funziona. (fig. 22) EROGAZIONE DI ACQUA CALDA L erogazione dell acqua calda avviene attraverso la lancia vapore (10); operare come segue: 1. accertarsi che le leve degli interruttori caffè (2) e vapore (3) siano in posizione alta e la spia (5) di macchina pronta sia accesa; 2. collocare il recipiente sotto la lancia vapore; 3. ruotare in senso antiorario la manopola del vapore (9) e abbassare l interruttore acqua/ caffè (2) (fig. 23); 4. erogare la quantità di acqua calda desiderata; 5. alzare la leva dell interruttore acqua/caffè (2) e quindi ruotare in senso orario (fig. 24) la manopola del vapore (9). It is very important to avoid making a coffee immediately after the emission of steam, as the boiler is too hot and and the flavour will be impaired. Select the coffee position (switch up) on the selector (3). The light (5) will go out for a few minutes, giving the machine time to cool. When the boiler has reached the appropriate temperature, the light will come on again and the machine is ready to make another coffee. If you want to the machine to reach the ideal temperature for making a coffee more quickly, proceed as follows: 1. Ensure the filter-holder is attached and empty and the switch (3) is in the coffee position (up). (Fig. 20) 2. Pour water into a container by pressing the coffee switch (2) until the machine emits a short sound and the green light comes on again. (Fig. 21) 3. The boiler is again at the right temperature to make another espresso. WARNING: If the switch (3) is in the steam position (down), the coffee switch (2) will not work. (Fig. 22) HOT WATER SUPPLY Hot water is supplied through the steam discharge pipe (10); proceed as follows: 1. ensure that the coffee (2) and steam (3) switches are up and that the machine ready light (5) is on; 2. place the container under the steam discharge pipe; 3. turn the steam valve (9) anti-clockwise and press the water/ coffee switch (2) (Fig. 23); 4. pour the amount of hot water desired; 5. press the water/coffee switch (2) up and turn the steam valve (9) clockwise (Fig. 24). 23 Es ist sehr wichtig zu vermeiden, einen Espresso direkt nach der Dampferzeugung zuzubereiten, weil das Wasser zu heiß ist und der Geschmack beeinträchtigt wird. Wenn der Wahlschalter (3) wieder von der Dampfposition (unten) in die Espressoposition (oben) gestellt wird, geht die Kontrollleuchte (5) einige Minuten lang aus und gibt der Maschine Zeit zum Abkühlen. Wenn der Boiler wieder die Normaltemperatur erreicht hat, leuchtet die Kontrollleuchte wieder auf und man kann mit der Espressozubereitung beginnen. Wenn die Maschine schneller ihre Idealtemperatur für die Espressozubereitung erreichen soll, gehen Sie folgendermaßen vor: 1. Vergewissern Sie sich, dass der Filterträger eingesetzt und leer ist und dass der Wahlschalter (3) in der Espresso-position (oben) steht. (Abb. 20) 2. Durch Betätigung des Espressoschalters (2) Wasser in einen Behälter laufen lassen, bis ein kurzes Signal ertönt und die grüne Kontrollleuchte (5) wieder aufleuchtet. (Abb. 21) 3. Der Boiler hat wieder seine Idealtemperatur für die Espresso-zubereitung erreicht. ACHTUNG: Wenn der Wahlschalter (3) auf der Dampfposition steht, funktioniert der Espresso-schalter (2) nicht (Abb. 22). WARMWASSERER- ZEUGUNG Die Warmwassererzeugung erfolgt über die Dampfdüse (10). Gehen Sie folgendermaßen vor: 1. Vergewissern Sie sich, dass der Espressoschalter (2) und der Dampfschalter (3) oben stehen und dass die Betriebskontrollleuchte (5) aufleuchtet. 2. Stellen Sie den Behälter unter die Dampfdüse. 3. Drehen Sie den Dampfdrehknopf (9) gegen den Uhrzeigersinn und stellen Sie den Espresso-/Wasserschalter (2) nach unten. (Abb. 23) 4. Lassen Sie die gewünschte Wassermenge durchlaufen. 5. Stellen Sie den Espresso-/Wasserschalter (2) nach oben und drehen Sie dann den Dampfdrehknopf (9) im Uhrzeigersinn. (Abb. 24)

19
20

21 PULIZIA E MANUTENZIONE Per il corretto funzionamento e un elevato standard di qualità della bevanda si consiglia di eseguire regolarmente e scrupolosamente la pulizia della macchina. Alla fig. 25 trovate un anello O-R di tenuta di ricambio e un porta serving usate. Operazioni da eseguire a macchina fredda e scollegata: 1. pulizia del serbatoio dell acqua; 2. per la pulizia e rimozione di eventuali residui solidi risulta più accurata se si rimuove il filtro mediante l apposita vite (fig. 26); 3. lancia vapore: rimozione di eventuali residui di latte sulla lancia, nel foro di aspirazione aria e nel foro di fuoriuscita vapore; 4. pulizia del cassetto raccogligocce, della griglia d appoggio. Operazioni da eseguire a macchina accesa Per eliminare dalla camera di estrazione i residui grassi del caffè, che depositandosi e invecchiando possono creare alterazioni spiacevoli all aroma e al gusto CLEANING AND MAINTENANCE In order to ensure the machine works properly and to obtain the best flavour from your coffee, we advise you to clean the machine with great care and regularly. Fig. 25 illustrates a spare O-R sealing ring and a used serving container. Operations to be carried out with the machine unplugged and cold: 1. clean the water tank; 2. it easier to clean the parts and remove residues if the filter is first removed by turning the screw (Fig. 26); 3. steam discharge pipe: remove any milk residues on the pipe, in the air intake and steam discharge holes; 4. clean the drip tray and housing. Operations to be carried out with the machine switched on In order to remove greasy coffee residues from the extraction chamber, which could affect the aroma and flavour of your espresso as they build up and deterio- REINIGUNG UND PFLEGE Für einen einwandfreien Betrieb und einen hohen Qualitätsstandard des zubereiteten Espressos wird empfohlen, die Maschine regelmäßig und sorgfältig zu reinigen. In Abb. 25 ist ein Ersatzdichtungsring und ein Behälter für gebrauchte Servings zu sehen Folgende Schritte sind auszuführen, wenn die Maschine kalt und nicht angeschlossen ist: 1. Reinigung des Wassertanks 2. Für die Reinigung und Entfernung eventueller fester Rückstände wird empfohlen, den Filter mit der entsprechenden Schraube abzuschrauben. (Abb. 26) 3. Dampfdüse: Entfernung eventueller Milchrückstände von der Düse, vom Luftansaugloch und vom Dampfaustrittsloch 4. Reinigung der Tropfenauffangschale und des Tassenabstellgitters Folgende Schritte sind bei angestellter Maschine auszuführen: Zur Entfernung von Kaffeefettrückständen in der Brühkammer, die durch ihre Ab- 27
22
23 PULIZIA E MANUTENZIONE CLEANING AND MAINTENANCE REINIGUNG UND PFLEGE del vostro espresso, è consigliabile ogni 15 giorni fare un lavaggio con una pastiglia adatta per sciogliere questi residui. Modo d uso: 1. Sganciare la manetta portafiltro (7) dalla macchina. 2. Collocare sul filtro una pastiglia. 3. Riagganciare la manetta (7) con la pastiglia nella macchina. 4. Posizionare un recipiente sotto il portafiltro, azionare l interruttore caffè (2) per 30 secondi ed attendere 60 secondi prima di azionare nuovamente l interruttore del caffè. 5. Eseguire 6 cicli dell operazione del punto Terminati i 6 cicli accertarsi che nel portafiltro non vi siano residui della pastiglia. 7. Nel caso si rilevino dei residui aver cura di rimuoverli togliendo la manetta della macchina, erogando acqua calda azionando l interruttore del caffè (2) e lavando il portafiltro sotto l acqua. 8. Chiudere l interruttore del caffè (2). 9. Riposizionare la manetta portafiltro (7) nella macchina. Nel caso si presentino degli spandimenti dal portafiltro durante l erogazione del caffè, bisogna sostituire l anello di guarnizione O- R sfilandolo dalla sua sede (fig ) e sostituendolo con quello nuovo in dotazione (fig. 29). Effettuare questa procedura esclusivamente a macchina fredda. Se si vuole pulire il portafiltro in plastica bisogna sganciarlo dalla manetta. Per fare questa operazione girare lo scarica serving e premere il beccuccio nel foro, il filtro si sgancerà automaticamente (fig. 30 e fig. 31). Ricordatevi di tenere sempre il tubo del vapore privo di residui di latte sia esternamente che internamente ai fori di erogazione. Pulire tempestivamente il cappuccinatore ad ogni uso mediante una spugnetta. Per i fori la pulizia può essere fatta con uno spillo (fig. 32). Di notte immergere il portafiltro in un recipiente con acqua per mantenerlo pulito. rate, we advise you to clean the apparatus every 15 days with a tablet specially designed to dissolve these residues. Procedure: 1. Remove the filter-holder handle (7) from the machine. 2. Place a tablet on the filter. 3. Replace the handle (7) with the tablet in the machine. 4. Place a basin under the filter-holder, press the coffee switch (2) for 30 seconds and wait 60 seconds before pressing the coffee switch again. 5. Perform the operation described in point 4 six times. 6. After the six operations have been completed, ensure there are no tablet remains in the filterholder. 7. If the tablet has not been completely used up wash out the remains by removing the handle from the machine, pressing the coffee switch (2) and rinsing the filter-holder under the hot water which pours out. 8. Press the coffee switch up. 9. Replace the filter-holder (7) in the machine. Should there be any leakage from the filter-holder when coffee is being made, the O-R sealing ring should be removed (Figs 27 & 28) and replaced by the new one provided (Fig. 29). This operaton should be performed only when the machine is cold. If the plastic filter-holder needs cleaning, it should first be removed from the handle. In order to do this, turn the serving remover and press the button in the hole; the filter will be jettisoned automatically (Figs. 30 & 31). Remember to keep the steam pipe holes free from milk residues, both inside and out. Clean the cappuccinomaker with a small sponge after each use. A pin can be used to keep the holes clear (Fig. 32). Soak the filter-holder in a container filled with water overnight to keep it clean. 29 lagerung und Alterung unangenehme Veränderungen des Aromas und des Geschmacks Ihres Espressos verursachen können, ist es ratsam, mit einer geeigneten Tablette alle 15 Tage eine Spülung vorzunehmen, um diese Rückstände zu lösen. Gebrauchsanleitung: 1. Den Filterträger (7) aus der Maschine aushaken. 2. Eine Tablette in den Filter legen. 3. Den Filterträger (7) mit der Tablette wieder in die Maschine einsetzen. 4. Einen Behälter unter den Filterträger stellen, den Espressoschalter (2) 30 Sekunden lang betätigen und 60 Sekunden warten, bevor der Espressoschalter erneut betätigt wird. 5. Den Schritt von Punkt 4 sechsmal ausführen. 6. Nach diesen 6 Zyklen sich vergewissern, dass sich im Filterträger keine Tablettenrückstände mehr befinden. 7. Falls es doch noch Rückstände geben sollte, diese sorgfältig beseitigen. Dafür den Filterträger aus der Maschine nehmen, Warmwasser durchlaufen lassen, indem der Espressoschalter (2) betätigt wird, und den Filterträger unter Wasser ausspülen. 8. Den Espressoschalter (2) ausschalten. 9. Den Filterträger (7) wieder in die Maschine setzen. Falls während der Espressozubereitung Wasser aus dem Filterträger austritt, muss der Dichtungsring ausgewechselt werden, indem er aus seiner Halterung genommen (Abb ) und durch den neuen, mitgelieferten ersetzt wird (Abb. 29). Diesen Schritt nur ausführen, wenn die Maschine kalt ist. Wenn der Plastikfilterhalter gereinigt werden soll, muss er aus dem Filterträger genommen werden. Dafür den Servingentsorger drehen und die Tülle ins Loch drücken. Der Filter löst sich automatisch. (Abb. 30 und Abb. 31) Denken Sie immer daran, die Dampfdüse sowohl von außen als auch in den Löchern frei von Milchresten zu halten. Die Dampfdüse nach jedem Gebrauch schnell mit einem Schwamm reinigen. Die Löcher können mit einer Nadel gereinigt werden (Abb. 32). Nachts den Filterträger in einen Behälter mit Wasser legen, damit er sauber bleibt.
 or longer in length shall be provided with specific instructions, which are not part of important Safeguards, that state: To reduce the risk of injury, do not drape cord over the counter top or")
24 Household use only SHORT CORD INSTRUCTIONS An appliance with an attached cord or detachable power supply cord 4 1/2 ft. (1.4m) or longer in length shall be provided with specific instructions, which are not part of important Safeguards, that state: To reduce the risk of injury, do not drape cord over the counter top or tabletop where it can be pulled on by children or tripped over unintentionally or an equivalent wording. An appliance with an attached cord or detachable power supply cord less than 4 1/ 2 ft. (1.4m) in length shall be provided with instructions, which are not part of important Safeguards, that include the following information: A. A short power supply cord (or detachable power supply cord) is to be provided to reduce risks resulting from becoming entangled in or tripping over a longer cord. B. Longer detachable power supply cords or extension cords are available and may be used if care is exercised in their use. C. If a longer detachable power supply or extension cord is used, 1) the marked electrical rating of the detachable power supply cord or extension cord should be at least as great as the electrical rating of the appliance, 2) if the appliance is of the grounding type, the extension cord should be a grounding type 3-wire cord, and 3) the longer cord should be arranged so that it will not drape over the counter top or tabletop where it can be pulled on by children or tripped over
25 DECALCIFICAZIONE La necessità di eseguire la decalcificazione dipende dall acqua usata, dalle ore di funzionamento della macchina e dal numero di caffè fatti. La tabella seguente contiene alcuni valori orientativi in caso di uso giornaliero. Contenuto di calcare Decalcificazione Da alto a molto alto ogni mese Medio ogni 2 mesi Basso ogni 3 mesi Non usate l acqua distillata o demineralizzata per la preparazione del caffè. ATTENZIONE: Si consiglia di usare il nostro prodotto per la decalcificazione (fig. 33). Se le procedure di decalcificazione non vengono eseguite il calcare può provocare difetti di funzionamento non coperti da garanzia. Aceto, lisciva, sale, acido formico, danneggiano la macchina! Procedura di decalcificazione: Diluire il contenuto della bustina in 1 litro d acqua. Versare la soluzione nel serbatoio. Accendere la macchina e lasciare erogare in quantità pari a 2 o 3 tazze. Attendere 15 minuti e far erogare ad intervalli regolari 2 o 3 tazzine di soluzione fino ad esaurimento. Ripetere l operazione fino al consumo della soluzione. Infine lavare il serbatoio, riempirlo di acqua fresca e compiere una decina di erogazioni d acqua,in modo da pulire completamente la caldaia da eventuali residui. Attenzione: Se la decalcificazione non viene effettuata regolarmente è indispensabile farla eseguire in un centro di assistenza. DESCALING How often the machine needs to be descaled will depend on the water used, the number of hours the machine has been in use and the number of coffees made. The table below gives a rough guide for a machine in daily use. Limescale deposit Descaling high to very high every month average every two months low every three months Do not use distilled water or demineralized water to make coffee. WARNING: We recommend you use the descaler produced by our company (Fig. 33). Failure to remove limescale deposits from your appliance may lead to faults in the machine s performance not covered by guarantee. Vinegar, detergents, salt and formic acid damage the machine! Descaling procedure: Dissolve the contents of one sachet into 1 litre of water. Pour the solution into the tank. Switch the machine on and let the equivalent of 2 or 3 cups of liquid flow out. Repeat at regular 15-minute intervals until there is no liquid left. Finally, wash out the tank, fill it with fresh water and draw water out a dozen times or so, to ensure that the boiler is entirely free of residues. Warning: If descaling is not carried out regularly (see p. 33) it is essential that this operation be performed by a service centre. ENTKALKUNG Wie oft die Maschine entkalkt werden muss, hängt von der Wasserhärte, den Betriebsstunden der Maschine und der Anzahl der zubereiteten Espressos ab. In der folgenden Tabelle stehen einige Orientierungswerte, die bei täglichem Gebrauch gelten. Kalkgehalt Entkalkung Hoch bis sehr hoch jeden Monat mittel alle 2 Monate niedrig alle 3 Monate Kein destilliertes oder entmineralisiertes Wasser für die Espressozubereitung verwenden. ACHTUNG: Es wird empfohlen, unseren Entkalker zu verwenden (Abb. 33). Wenn die Maschine nicht entkalkt wird, können Betriebsstörungen auftreten, für die kein Garantieanspruch besteht. Essig, Lauge, Salz und Ameisensäure beschädigen die Maschine! Entkalkung: Den Tüteninhalt in 1 Liter Wasser auflösen. Die Lösung in den Wassertank gießen. Die Maschine anstellen und eine 2 oder 3 Tassen entsprechende Menge durchlaufen lassen. 15 Minuten warten und in regelmäßigen Abständen 2 oder 3 Espressotassen Lösung durchlaufen lassen, bis die Lösung aufgebraucht ist. Am Ende den Tank abwaschen, mit frischem Wasser auffüllen und rund zehnmal Wasser erzeugen, so dass der Boiler komplett von allen möglichen Rückständen gereinigt wird. Achtung: Wenn die Maschine nicht regelmäßig entkalkt wird, muss die Entkalkung in einer Kundendienststelle vorgenommen werden. 33
26 CARATTERISTICHE TECNICHE TECHNICAL SPECIFICATIONS TECHNISCHE ANGABEN Materiale carrozzeria: Acciaio verniciato; Materiale caldaia interna: Ottone; Pompa: 18 bar; Peso senza imballo: 8.40 Kg; Voltaggio: Europa - 230V 50Hz Potenza: 1050W Usa-120V 60Hz Potenza: 1100W Serbatoio: 1,2 litri. Termostato elettronico ad alta precisione; Scalda tazze; Funzione vapore e acqua calda. Caricamento automatico della caldaia. IL PRODUTTORE SI RI- SERVA IL DIRITTO DI APPORTARE MODIFI- CHE O MIGLIORAMEN- TI SENZA PREAVVISO. Bodywork: Painted steel Interior of boiler: Brass Pump: 18 bar Weight excluding packing: 8.40 Kg Voltage: Europe-230V 50Hz USA - 120V 60Hz Power: Europe -1050W USA W Tank capacity: 1.2 litres High precision electronic thermostat Cup heater Steam function for heating water Automatic boiler loading THE MANUFACTURER RESERVES THE RIGHT TO ALTER OR IMPROVE THE DESIGN WITHOUT PRIOR NOTICE. Gehäusematerial: Lackierter Stahl Innenmaterial des Boilers: Messing Pumpe: 18 Bar Gewicht ohne Verpakkung: 8,40 kg Spannung: Europa-230 V 50 Hz Leistung: 1050 W Usa-120 V 60 Hz Leistung: 1100 W Wassertank: 1,2 Liter Elektronisches Hochpräzisionsthermostat Tassenwärmplatte Dampf-/Warmwasserfunktion Automatische Boilerladung DER HERSTELLER BE- HÄLT SICH DAS RECHT VOR, OHNE VORAN- KÜNDIGUNG ÄNDE- RUNGEN ODER VER- BESSERUNGEN AM GE- RÄT VORZUNEHMEN. 34
Softwareupdate-Anleitung // AC Porty L Netzteileinschub
 1 Softwareupdate-Anleitung // AC Porty L Netzteileinschub Softwareupdate-Anleitung // AC Porty L Netzteileinschub HENSEL-VISIT GmbH & Co. KG Robert-Bunsen-Str. 3 D-97076 Würzburg-Lengfeld GERMANY Tel./Phone:
ISTRUZIONI PER COLLEGAMENTO ECU MERCEDES TEMIC ACTROS ATEGO UNIMOG ECONIC ecc.
 ISTRUZIONI PER COLLEGAMENTO ECU MERCEDES TEMIC ACTROS ATEGO UNIMOG ECONIC ecc. ISTRUCTIONS FOR THE ECU MERCEDES TEMIC ACTROS ATEGO UNIMOG ecc. CONNECTION FG Technology 1/11 Smontare la Ecu dal camion,
KURZANLEITUNG. Firmware-Upgrade: Wie geht das eigentlich?
 KURZANLEITUNG Firmware-Upgrade: Wie geht das eigentlich? Die Firmware ist eine Software, die auf der IP-Kamera installiert ist und alle Funktionen des Gerätes steuert. Nach dem Firmware-Update stehen Ihnen
Honeywell AG Hardhofweg. D-74821 Mosbach MU1H-1220GE23 R1001
 BA 95 Einbau-Anleitung Installation Instructions Einbau Installation Einbaubeispiel Installation example Ablaufleitung vorsehen Install discharge pipework Durchflussrichtung beachten! Consider direction
CABLE TESTER. Manual DN-14003
 CABLE TESTER Manual DN-14003 Note: Please read and learn safety instructions before use or maintain the equipment This cable tester can t test any electrified product. 9V reduplicated battery is used in
Outdoor-Tasche. Operating Instructions Bedienungsanleitung GB D
 00 181243 Outdoor Case Outdoor-Tasche Splish Splash Operating Instructions Bedienungsanleitung GB D A B C D OPEN G Operating instruction 1. Important Notes Children are not permitted to play with the device.
https://portal.microsoftonline.com
 Sie haben nun Office über Office365 bezogen. Ihr Account wird in Kürze in dem Office365 Portal angelegt. Anschließend können Sie, wie unten beschrieben, die Software beziehen. Congratulations, you have
CarMedia. Bedienungsanleitung Instruction manual. AC-Services Albert-Schweitzer-Str.4 68766 Hockenheim www.ac-services.eu info@ac-services.
 CarMedia Bedienungsanleitung Instruction manual AC-Services Albert-Schweitzer-Str.4 68766 Hockenheim www.ac-services.eu info@ac-services.eu DE Inhaltsverzeichnis 1. Allgemeine Hinweise... 3 2. CarMedia...
Electrical tests on Bosch unit injectors
 Valid for Bosch unit injectors with order numbers 0 414 700 / 0 414 701 / 0 414 702 Parts Kit Magnet*: - F00H.N37.925 - F00H.N37.933 - F00H.N37.934 * For allocation to the 10-place Bosch order number,
QUICK Inbetriebnahme. Pr ma. Inbetriebnahme Kurzanleitung Use quick instruction Uso guida rapida. primap15quv4. welcome to the world of Prima
 Pr ma i heat pellet heating systems Der Plug & Play Pelletskessel mit dem Selfservice Faktor QUICK Inbetriebnahme Inbetriebnahme Kurzanleitung Use quick instruction Uso guida rapida primap15quv4 Technische
Bedienungsanleitung User Manual
 Bedienungsanleitung User Manual Einführung Introduction Vielen Dank, dass Sie sich für das KOBIL SecOVID Token entschieden haben. Mit dem SecOVID Token haben Sie ein handliches, einfach zu bedienendes
Westfalia Bedienungsanleitung. Nr
 Westfalia Bedienungsanleitung Nr. 108610 Bedienungsanleitung Edelstahl Sicherheits-Brennbehälter Artikel Nr. 10 99 83 Sicherheitshinweise Der Sicherheits-Brennbehälter ist zur Verwendung in dem Westfalia
Listening Comprehension: Talking about language learning
 Talking about language learning Two Swiss teenagers, Ralf and Bettina, are both studying English at a language school in Bristo and are talking about language learning. Remember that Swiss German is quite
p^db=`oj===pìééçêíáåñçêã~íáçå=
 p^db=`oj===pìééçêíáåñçêã~íáçå= Error: "Could not connect to the SQL Server Instance" or "Failed to open a connection to the database." When you attempt to launch ACT! by Sage or ACT by Sage Premium for
Einkommensaufbau mit FFI:
 For English Explanation, go to page 4. Einkommensaufbau mit FFI: 1) Binäre Cycle: Eine Position ist wie ein Business-Center. Ihr Business-Center hat zwei Teams. Jedes mal, wenn eines der Teams 300 Punkte
Macchine per caffé espresso
 Macchine per caffé espresso A Catalogo prodotti Products catalogue Produkt katalóg gruppi groups gruppig A gruppi k groups ^ gruppig H (mm) P (mm) Dimensioni Dimensions Abmessungen Peso Weight Gewicht
BRUUDT Kennzeichenhalter für die Honda NC750X ab 2016 BRUUDT Tail Tidy for the Honda NC750X 2016 and onwards.
 Montageanleitung Mounting instructions BRUUDT Kennzeichenhalter für die Honda NC750X ab 2016 BRUUDT Tail Tidy for the Honda NC750X 2016 and onwards. Noch einmal vielen Dank, dass Sie sich für unsere Produkte
VGM. VGM information. HAMBURG SÜD VGM WEB PORTAL USER GUIDE June 2016
 Overview The Hamburg Süd VGM Web portal is an application that enables you to submit VGM information directly to Hamburg Süd via our e-portal Web page. You can choose to enter VGM information directly,
Kurzanleitung um Transponder mit einem scemtec TT Reader und der Software UniDemo zu lesen
 Kurzanleitung um Transponder mit einem scemtec TT Reader und der Software UniDemo zu lesen QuickStart Guide to read a transponder with a scemtec TT reader and software UniDemo Voraussetzung: - PC mit der
Aufbaudose mit Schalter Spacing box with switch. Montageanleitung mounting instructions
 Aufbaudose mit Schalter Spacing box with switch Montageanleitung mounting instructions body head Aufbaudose mit Schalter Montageanleitung S. 2 mounting instructions p. 9 $ 0.2m Sicherheitshinweise Die
Worx Landroid - Software Update
 Worx Landroid - Software Update WORX Landroid Software Update für Anwender 30.04.2015 Website: www.worxlandroid.com Direct Direkter Link Link for auf the Update: Update: https://www.worxlandroid.com/en/software-update
FIRMWARE UPDATE TAPMOTION TD
 FIRMWARE UPDATE TAPMOTION TD CMP-SPF TO WHOM IT MAY CONCERN Seite 1 von 9 Inhalt / Overview 1. Firmware überprüfen und Update-file auswählen / Firmware check and selection of update file 2. Update File
KOBIL SecOVID Token III Manual
 KOBIL SecOVID Token III Manual Einführung Vielen Dank, dass Sie sich für das KOBIL SecOVID Token entschieden haben. Mit dem SecOVID Token haben Sie ein handliches, einfach zu bedienendes Gerät zur universellen
Parameter-Updatesoftware PF-12 Plus
 Parameter-Updatesoftware PF-12 Plus Mai / May 2015 Inhalt 1. Durchführung des Parameter-Updates... 2 2. Kontakt... 6 Content 1. Performance of the parameter-update... 4 2. Contact... 6 1. Durchführung
Therefore the respective option of the password-protected menu ("UPDATE TUBE DATA BASE") has to be selected:
 has to be selected:") ENGLISH Version Update Dräger X-act 5000 ("UPDATE TUBE DATA BASE") The "BARCODE OPERATION AIR" mode is used to automatically transfer the needed measurement parameters to the instrument. The Dräger X-act
ENGLISH Version Update Dräger X-act 5000 ("UPDATE TUBE DATA BASE") The "BARCODE OPERATION AIR" mode is used to automatically transfer the needed measurement parameters to the instrument. The Dräger X-act
Das neue Volume-Flag S (Scannen erforderlich)
") NetWorker 7.4.2 - Allgemein Tip 2, Seite 1/5 Das neue Volume-Flag S (Scannen erforderlich) Nach der Wiederherstellung des Bootstraps ist es sehr wahrscheinlich, daß die in ihm enthaltenen Informationen
NetWorker 7.4.2 - Allgemein Tip 2, Seite 1/5 Das neue Volume-Flag S (Scannen erforderlich) Nach der Wiederherstellung des Bootstraps ist es sehr wahrscheinlich, daß die in ihm enthaltenen Informationen
MQ964..GB MQ965..GB. en Operating instructions ar
 MQ964..GB MQ965..GB en Operating instructions ar MQ964-965GB-Uniklein_en-ar.book Seite 2 Donnerstag, 4. Dezember 2014 4:39 16 en English...........................................................3 ar...........................................................6.................................................
MobiDM-App Handbuch für Windows Mobile
 MobiDM-App Handbuch für Windows Mobile Dieses Handbuch beschreibt die Installation und Nutzung der MobiDM-App für Windows Mobile Version: x.x MobiDM-App Handbuch für Windows Mobile Seite 1 Inhalt 1. WILLKOMMEN
B/S/H/ Startfolie. B/S/H Bosch und Siemens Hausgeräte GmbH - KDT-T B/S/H Bosch und Siemens Hausgeräte GmbH KDT-T
 Startfolie B/S/H/ 1 Product division Event Location Refrigeration Side by Side USA B/S/H Bosch und Siemens Hausgeräte GmbH KDT-T 2 Side-by-Side Appliances Models: Bosch Siemens KAN 56V** KAN58A** KA58NA**with
Was heißt Denken?: Vorlesung Wintersemester 1951/52. [Was bedeutet das alles?] (Reclams Universal-Bibliothek) (German Edition)
![Was heißt Denken?: Vorlesung Wintersemester 1951/52. [Was bedeutet das alles?] (Reclams Universal-Bibliothek) (German Edition)](/thumbs/68/59244907.jpg "Was heißt Denken?: Vorlesung Wintersemester 1951/52. [Was bedeutet das alles?] (Reclams Universal-Bibliothek) (German Edition)") Was heißt Denken?: Vorlesung Wintersemester 1951/52. [Was bedeutet das alles?] (Reclams Universal-Bibliothek) (German Edition) Martin Heidegger Click here if your download doesn"t start automatically Was
Was heißt Denken?: Vorlesung Wintersemester 1951/52. [Was bedeutet das alles?] (Reclams Universal-Bibliothek) (German Edition) Martin Heidegger Click here if your download doesn"t start automatically Was
SERVICESÄTZE O&K WARTUNGSSÄTZE. Lieferumfang Im Wartungssatz enthalten sind alle Filter alle Dichtungen alle O-Ringe für die anstehende Wartung.
 SERVICESÄTZE O&K WARTUNGSSÄTZE Gut gewartete Geräte arbeiten ausfallsfrei und effektiv. Sie sichern das Einkommen und die termingerechte Fertigstellung der Maschinenarbeiten. Fertig konfigurierte Wartungssätze
Electrical testing of Bosch common rail piezo injectors
 Applies to generation CRI 3: Bosch 10-position order number 0 445 115 = CRI 3-16 (CRI 3.0) 1600 bar 0 445 116 = CRI 3-18 (CRI 3.2) 1800 bar 0 445 117 = CRI 3-20 (CRI 3.3) 2000 bar Tools required: Hybrid
Benutzerhandbuch THERMOS OFFICE
 Benutzerhandbuch THERMOS OFFICE DE Energiesparende Kaffeemaschine Füllmenge 1,9 Liter Einfache Installation und Anwendung Ihr Fachhändler......... Rev: 120410 1. Inhaltsverzeichnis Thermos Office 1. Inhaltsverzeichnis
Bedienungsanleitung Operation Manual
 Bedienungsanleitung Operation Manual Laminatcutter XP-215 Laminate cutter XP-215 www.cutinator.com 1. Anschlag auf der Ablage Auf der Ablage der Stanze befinden sich drei Arretierungen für den Anschlag.
SanStore: Kurzanleitung / SanStore: Quick reference guide
 SanStore Rekorder der Serie MM, MMX, HM und HMX Datenwiedergabe und Backup Datenwiedergabe 1. Drücken Sie die Time Search-Taste auf der Fernbedienung. Hinweis: Falls Sie nach einem Administrator-Passwort
EMCO Installationsanleitung Installation instructions
 EMCO Installationsanleitung Installation instructions Installationsanleitung Installation instructions Digitalanzeige digital display C40, FB450 L, FB600 L, EM 14D/17D/20D Ausgabe Edition A 2009-12 Deutsch...2
BRUUDT Kennzeichenhalter für die Kawasaki Z800 BRUUDT Tail Tidy fort the Kawasaki Z800
 Montageanleitung Mounting instructions BRUUDT Kennzeichenhalter für die Kawasaki Z800 BRUUDT Tail Tidy fort the Kawasaki Z800 Noch einmal vielen Dank, dass Sie sich für unsere Produkte entschieden haben!
VGM. VGM information. HAMBURG SÜD VGM WEB PORTAL - USER GUIDE June 2016
 Overview The Hamburg Süd VGM-Portal is an application which enables to submit VGM information directly to Hamburg Süd via our e-portal web page. You can choose to insert VGM information directly, or download
Monitor VIS 3xx Kurzanleitung
 Monitor VIS 3xx Kurzanleitung 19.08.08 Art. Nr. 22261 Inhalt: 1. Spezifikationen...2 2. Tastenfunktionen...2 3. Menüführung und Einstellungen...3 Technik nach Maß Wöhler Monitor VIS 3xx 1. Spezifikationen
Installation manual / Montageanleitung WBC2 splice patch with Fibertray Spleissung/Rangierung mit Fibertray
 Content of Assembly Instruction I. Required tools II. Required parts III. Installation Inhalt der Montageanleitung I. Benötigte Werkzeuge II. Benötigte Teile III. Installation I. Required tools: I. Benötigtes
Bedienungsanleitung für Verbraucher CUISIMAT COFFEE QUEEN *320.000
 Bedienungsanleitung für Verbraucher COFFEE QUEEN *320.000 Kaffeemaschine mit geringem Energieverbrauch Kapazität 1,8 Liter Einfache Bedienung und Installation 1. Inhaltsverzeichnis. 1. Inhaltsverzeichnis.
HF310 KAFFEEAUTOMAT GEBRAUCHSANLEITUNG
 HF310 KAFFEEAUTOMAT SICHERHEITSANWEISUNGEN Bitte lesen Sie die Gebrauchsanweisung aufmerksam durch. Verwenden Sie das Gerät nicht im Freien. Der Kaffeeautomat ist nur für den privaten Gebrauch im Haushalt
USB Treiber updaten unter Windows 7/Vista
 USB Treiber updaten unter Windows 7/Vista Hinweis: Für den Downloader ist momentan keine 64 Bit Version erhältlich. Der Downloader ist nur kompatibel mit 32 Bit Versionen von Windows 7/Vista. Für den Einsatz
Wenn Russland kein Gas mehr liefert
 Ergänzen Sie die fehlenden Begriffe aus der Liste. abhängig Abhängigkeit bekommen betroffen bezahlen Gasspeicher Gasverbrauch gering hätte helfen importieren liefert 0:02 Pläne politischen Projekte Prozent
WAS IST DER KOMPARATIV: = The comparative
 DER KOMPATATIV VON ADJEKTIVEN UND ADVERBEN WAS IST DER KOMPARATIV: = The comparative Der Komparativ vergleicht zwei Sachen (durch ein Adjektiv oder ein Adverb) The comparative is exactly what it sounds
Electrical testing of Bosch common rail Injectors
 Electrical testing of Bosch common rail Injectors Contents: 1. Adapter cable for Hybridtester FSA 050 (article number 0 684 010 050 / 1 687 023 571) 2. Electrical testing of Bosch common rail solenoid
FÜR NUTZER MIT EINER ITALIENISCHEN SIM-KARTE: 1. 2. 3. HOTSPOT-PUNKTE IN BRUNECK:
 FÜR NUTZER MIT EINER ITALIENISCHEN SIM-KARTE: WLAN auf Ihrem Handy, PC oder Tablet PC einschalten @FREE_LUNA Netzwerk auswählen Browser starten (Opera funktioniert nicht) es öffnet sich automatisch die
Bedienungsanleitung 1
 Bedienungsanleitung 1 Deutsch 1. Sicherheitshinweise 2. Installation 3. Fehlersuche 8 9 9-10 2 Bedienungsanleitung 1. Sicherheitshinweise Bitte lesen Sie dieses Handbuch sorgfältig bevor Sie das Netzteil
miditech 4merge 4-fach MIDI Merger mit :
 miditech 4merge 4-fach MIDI Merger mit : 4 x MIDI Input Port, 4 LEDs für MIDI In Signale 1 x MIDI Output Port MIDI USB Port, auch für USB Power Adapter Power LED und LOGO LEDs Hochwertiges Aluminium Gehäuse
UWC 8801 / 8802 / 8803
 Wandbedieneinheit Wall Panel UWC 8801 / 8802 / 8803 Bedienungsanleitung User Manual BDA V130601DE UWC 8801 Wandbedieneinheit Anschluss Vor dem Anschluss ist der UMM 8800 unbedingt auszuschalten. Die Übertragung
DOWNLOAD. Englisch in Bewegung. Spiele für den Englischunterricht. Britta Buschmann. Downloadauszug aus dem Originaltitel:
 DOWNLOAD Britta Buschmann Englisch in Bewegung Spiele für den Englischunterricht auszug aus dem Originaltitel: Freeze Hör-/ und Sehverstehen Folgende Bewegungen werden eingeführt: run: auf der Stelle rennen
Service Manual Service Anleitung U 58/7 KIT
 Service Manual Service Anleitung U 58/7 KIT Service manual for changing the main filter on a supply unit Serviceanleitung zum Austausch des Hauptfilters an der Versorgungseinheit Exemplary, only the type
Magic Figures. We note that in the example magic square the numbers 1 9 are used. All three rows (columns) have equal sum, called the magic number.
 have equal sum, called the magic number.") Magic Figures Introduction: This lesson builds on ideas from Magic Squares. Students are introduced to a wider collection of Magic Figures and consider constraints on the Magic Number associated with such
Magic Figures Introduction: This lesson builds on ideas from Magic Squares. Students are introduced to a wider collection of Magic Figures and consider constraints on the Magic Number associated with such
Titelbild1 ANSYS. Customer Portal LogIn
 Titelbild1 ANSYS Customer Portal LogIn 1 Neuanmeldung Neuanmeldung: Bitte Not yet a member anklicken Adressen-Check Adressdaten eintragen Customer No. ist hier bereits erforderlich HERE - Button Hier nochmal
Readme-USB DIGSI V 4.82
 DIGSI V 4.82 Sehr geehrter Kunde, der USB-Treiber für SIPROTEC-Geräte erlaubt Ihnen, mit den SIPROTEC Geräten 7SJ80/7SK80 über USB zu kommunizieren. Zur Installation oder Aktualisierung des USB-Treibers
Bedienungsanleitung SUNNYHEAT Standfuß (Art. Nr )
") Bedienungsanleitung SUNNYHEAT Standfuß (Art. Nr. 221012) Der SUNNYHEAT Standfuß ist zur Positionierung Ihres Heizpaneels auf dem Standfuß gedacht. Anwendung findet der Standfuß bei allen Paneelen außer
Bedienungsanleitung SUNNYHEAT Standfuß (Art. Nr. 221012) Der SUNNYHEAT Standfuß ist zur Positionierung Ihres Heizpaneels auf dem Standfuß gedacht. Anwendung findet der Standfuß bei allen Paneelen außer
Technical Support Information No. 123 Revision 2 June 2008
 I IA Sensors and Communication - Process Analytics - Karlsruhe, Germany Page 6 of 10 Out Baking Of The MicroSAM Analytical Modules Preparatory Works The pre-adjustments and the following operations are
DENTAL IMPLANTS BY CAMLOG medical
 IMPLANT PASS DENTAL IMPLANTS BY CAMLOG medical devices made in germany for your well-being and a natural appearance. Personal data Surname First name Address ZIP code City Date of birth Health insurance
Programm-Update Coolfire II Geräte der Bauarten ADM 301, ADM 302 und ADM 303
 Seite 1 von 8 Programm-Update Coolfire II Geräte der Bauarten ADM 301, ADM 302 und ADM 303 (Sach-Nr. 914036-00) Benötigtes Werkzeug: keins Verwendungszweck: Softwareupdate Coolfire II Geräte der Bauarten
Serviceinformation Nr. 02/11
 Serviceinformation Nr. 02/11 vom: 06.10.2011 von: BAM 1. Software Navigator und Release Notes Auf unserer Homepage unter www.idm-energie.at/de/navigator-software.html steht ab sofort eine neue Version
A TASTE OF THE FUTURE. Bedienungsanleitung für Verbraucher COFFEE QUEEN. MEGA - M manuelle Kaffeemaschine mit 2,5 Liter Thermosbehälter
 A TASTE OF THE FUTURE Bedienungsanleitung für Verbraucher COFFEE QUEEN MEGA - M manuelle Kaffeemaschine mit 2,5 Liter Thermosbehälter Kaffeemaschine mit geringem Energieverbrauch. Kapazität 1,8 Liter Einfache
 PATENT PENDING T4 9380198-8580198 - 8880198-2080198 INDICE / INDEX / INHALTSVERZEICHNIS Contenuto della scatola / Box contents / Verpackungsinhalt... 3 Informazioni tecniche / Technical information / Technische
Walter Buchmayr Ges.m.b.H.
 Seite 1/10 Chapter Description Page 1 Advantages 3 2 Performance description 4 3 Settings 5 4 Options 6 5 Technical data 7 6 Pictures 8 http://members.aon.at/buchmayrgmbh e-mail: walter.buchmayr.gmbh@aon.at
Newest Generation of the BS2 Corrosion/Warning and Measurement System
 Newest Generation of the BS2 Corrosion/Warning and Measurement System BS2 System Description: BS2 CorroDec 2G is a cable and energyless system module range for detecting corrosion, humidity and prevailing
UM ALLE DATEN ZU KOPIEREN. ZUNÄCHST die Daten des alten Telefons auf einen Computer kopieren
 IPHONE UM ALLE DATEN des alten Telefons auf einen Computer Software von welcomehome.to/nokia auf Ihrem PC oder Mac. verbinden Sie Ihr altes Telefon über 3. Wenn Sie Outlook nutzen, öffnen Sie itunes, um
Cleaning & Disinfection of Eickview Videoendoscopes
 Cleaning & Disinfection of Eickview Videoendoscopes EICKEMEYER KG Eltastrasse 8 78532 Tuttlingen T +497461 96 580 0 F +497461 96 580 90 E info@eickemeyer.de www.eickemeyer.de Preparation Cleaning should
Electrical testing of Bosch common rail solenoid valve (MV) injectors
 injectors") Applies to MV injector, generation: -CRI 1.0 / 2.0 / 2.1 / 2.2 -CRIN 1 / 2 / 3, with K oder AK plug Bosch 10-position order number Bosch-Bestellnummer CRI: 0 445 110 xxx Bosch-Bestellnummer CRIN: 0 445
Applies to MV injector, generation: -CRI 1.0 / 2.0 / 2.1 / 2.2 -CRIN 1 / 2 / 3, with K oder AK plug Bosch 10-position order number Bosch-Bestellnummer CRI: 0 445 110 xxx Bosch-Bestellnummer CRIN: 0 445
Architekturen. Aufbau von Systemen Direkte Systeme Transfersysteme Interlinguasysteme
 Architekturen Aufbau von Systemen Direkte Systeme Transfersysteme Interlinguasysteme Architekturen von Übersetzungssystemen: automatisch Eingabe Übersetzung Ausgabe Architekturen von Übersetzungssystemen:
Produktinformation 201407_182PNdeen
 Produktinformation 201407_182PNdeen Deutsch Seite 1-2 English page 3 4 Produkt Information POWER LIFT HL 2.35 NT DT Fahrzeuge und Transporter werden immer schwerer, von der Automobilindustrie und den Autohäusern
OPERATING INSTRUCTIONS Test pump ZG 5.1. and ZG 5.2.
 Elektromotoren und Gerätebau Barleben GmbH OPERATING INSTRUCTIONS Test pump ZG 5.1. and ZG 5.2. Elektromotoren und Gerätebau Barleben GmbH 2 Inhaltsverzeichnis Page 1 Use 4 2 Design features 4 2.1 Test
Funktionsbeschreibung/ Montageanweisung Steuermodul DSM 400 für Dunstabzugshaube DA 6000 W
 Funktionsbeschreibung/ Montageanweisung Steuermodul DSM 400 für Dunstabzugshaube DA 6000 W Operation/Installation Control module DSM 400 for Cooker Hood DA 6000 W de, en M.-Nr. 09 165 660 Inhalt/Contents
Englisch-Grundwortschatz
 Englisch-Grundwortschatz Die 100 am häufigsten verwendeten Wörter also auch so so in in even sogar on an / bei / in like wie / mögen their with but first only and time find you get more its those because
E asyline by Hama GmbH & Co KG Postfach 80 86651 Monheim/Germany Tel. +49 (0)9091/502-0 Fax +49 (0)9091/502-274 hama@hama.de www.hama.
9091/502-0 Fax +49 (0)9091/502-274 hama@hama.de www.hama.") 00021024-10.06 E asyline by Hama GmbH & Co KG Postfach 80 86651 Monheim/Germany Tel. +49 (0)9091/502-0 Fax +49 (0)9091/502-274 hama@hama.de www.hama.com Gamepad Thunderstorm II 0021024 l Bedienungsanleitung
00021024-10.06 E asyline by Hama GmbH & Co KG Postfach 80 86651 Monheim/Germany Tel. +49 (0)9091/502-0 Fax +49 (0)9091/502-274 hama@hama.de www.hama.com Gamepad Thunderstorm II 0021024 l Bedienungsanleitung
Kurzanleitung für das addiei Short tutorial for the addiegg
 Luxus für die Hände Indulge your hands Kurzanleitung für das addiei Short tutorial for the addiegg 1 / Zuerst alle Teile zurechtlegen. Deckel, addiei, Kurbel und Gewicht sowie Garn in der Stärke 3-5. First
Wireless Earbuds. D39 Trouble Shooting
 Wireless Earbuds D39 Trouble Shooting Q: Pairing failed. A:1) Put the earbuds back to the charging case and make sure that they are off. 2) Take the earbuds out of the case and they are automatically on.
1. General information... 2 2. Login... 2 3. Home... 3 4. Current applications... 3
 User Manual for Marketing Authorisation and Lifecycle Management of Medicines Inhalt: User Manual for Marketing Authorisation and Lifecycle Management of Medicines... 1 1. General information... 2 2. Login...
1.1 Software-Update vorbereiten
 Art.Nr. 9755574_00 version deu, eng 02/15 Änderungen vorbehalten! changes excepted! Software-Update Software-Update 1.1 Software-Update vorbereiten Der Update Vorgang Beim Update der Steuerungssoftware
Cameraserver mini. commissioning. Ihre Vision ist unsere Aufgabe
 Cameraserver mini commissioning Page 1 Cameraserver - commissioning Contents 1. Plug IN... 3 2. Turn ON... 3 3. Network configuration... 4 4. Client-Installation... 6 4.1 Desktop Client... 6 4.2 Silverlight
Where are we now? The administration building M 3. Voransicht
 Let me show you around 9 von 26 Where are we now? The administration building M 3 12 von 26 Let me show you around Presenting your company 2 I M 5 Prepositions of place and movement There are many prepositions
Gartenbrunnen
 Gartenbrunnen 10029934 10029935 10029932 10030994 10029932 10029934 10029935 Sehr geehrter Kunde, wir gratulieren Ihnen zum Erwerb Ihres Gerätes. Lesen Sie die folgenden Hinweise sorgfältig durch und befolgen
Wie man heute die Liebe fürs Leben findet
 Wie man heute die Liebe fürs Leben findet Sherrie Schneider Ellen Fein Click here if your download doesn"t start automatically Wie man heute die Liebe fürs Leben findet Sherrie Schneider Ellen Fein Wie
Level 1 German, 2014
 90886 908860 1SUPERVISOR S Level 1 German, 2014 90886 Demonstrate understanding of a variety of German texts on areas of most immediate relevance 9.30 am Wednesday 26 November 2014 Credits: Five Achievement
Packard Bell Easy Repair
 Packard Bell Easy Repair EasyNote Serie MX Anleitung zur Reparatur des Speichers 7420210003 7420210003 Dokument Version: 1.0 - November 2007 www.packardbell.com Wichtige Sicherheitshinweise Bitte lesen
intec Istruzioni di montaggio e regolazione Just 3D per telai in acciaio Montage und Verstellanleitung Einfräsband Just 3D für Stahlzarge
 intec Istruzioni di montaggio e regolazione Just 3D per telai in acciaio Montage und Verstellanleitung Einfräsband Just 3D für Stahlzarge Fitting and adjustment instructions Just 3D for steel frames Istruzioni
Contact 1600 QUICK REFERENCE GUIDE GUIDE D UTILISATION BEDIENUNGSANLEITUNG GUÍA DE REFERENCIA RÁPIDA GUIDA RAPIDA. www.sonybiz.net CHANGING THE WAY
 Contact 1600 CHANGING THE WAY QUICK REFERENCE GUIDE GUIDE D UTILISATION BEDIENUNGSANLEITUNG BUSINESS GUÍA DE REFERENCIA RÁPIDA GUIDA RAPIDA COMMUNICATES www.sonybiz.net GB Getting started STEP 1 Turning
Smartphone Benutzung. Sprache: Deutsch. Letzte Überarbeitung: 25. April 2012. www.av-comparatives.org - 1 -
 Smartphone Benutzung Sprache: Deutsch Letzte Überarbeitung: 25. April 2012-1 - Überblick Smartphones haben unser Leben zweifelsohne verändert. Viele verwenden inzwischen Ihr Smartphone als täglichen Begleiter
SAMPLE EXAMINATION BOOKLET
 S SAMPLE EXAMINATION BOOKLET New Zealand Scholarship German Time allowed: Three hours Total marks: 24 EXAMINATION BOOKLET Question ONE TWO Mark There are three questions. You should answer Question One
COFFEE QUEEN CQ THERMOS M
 Bedienungsanleitung COFFEE QUEEN CQ THERMOS M Kaffeemaschine Brüht in Thermoskrug mit manueller Wasserbefüllung Ihre Servicestelle für die Schweiz: Tel: +41 62 958 10 00 1. Inhaltsverzeichnis THERMOS M
Flexibler Gartenschlauch
 Flexibler Gartenschlauch 10031250 10031251 10031252 10031264 10031311 10031312 10031313 10031314 10031364 10031538 Sehr geehrter Kunde, wir gratulieren Ihnen zum Erwerb Ihres Gerätes. Lesen Sie die folgenden
Preisliste für The Unscrambler X
 Preisliste für The Unscrambler X english version Alle Preise verstehen sich netto zuzüglich gesetzlicher Mehrwertsteuer (19%). Irrtümer, Änderungen und Fehler sind vorbehalten. The Unscrambler wird mit
roll-up SONJA powerdisplays Aufbauanleitung Assemble instructions
 powerdisplay SONJA Mit Rollfunktion! Die Werbefläche rollt sich vollständig in das Display. So ist Ihre Werbung geschützt und in Sekunden wieder aufgebaut. Farbe: chrom/silber inkl. Tasche With rolling
Handbuch der therapeutischen Seelsorge: Die Seelsorge-Praxis / Gesprächsführung in der Seelsorge (German Edition)
") Handbuch der therapeutischen Seelsorge: Die Seelsorge-Praxis / Gesprächsführung in der Seelsorge (German Edition) Reinhold Ruthe Click here if your download doesn"t start automatically Handbuch der therapeutischen
Handbuch der therapeutischen Seelsorge: Die Seelsorge-Praxis / Gesprächsführung in der Seelsorge (German Edition) Reinhold Ruthe Click here if your download doesn"t start automatically Handbuch der therapeutischen
Cable Tester NS-468. Safety instructions
 Cable Tester NS-468 Safety instructions Do not use the cable tester NS-468 if it is damaged. This device is only for use inside dry and clean rooms. This device must be protected from moisture, splash
Quick Guide Home Network Mode
 Quick Guide Home Network Mode English > 1 German > 3 About the Home Network Mode EN Tivizen Nano & iplug normally work on their own created networks (whose SSID starts with tivizentv or iplug ) in which
5M Economy INSTRUCTION MANUAL
 5M Economy INSTRUCTION MANUAL Part List Part no. Qty 5x6 5x8 5x10 5x12 No.1 16 20 24 28 No.2 9 12 15 18 No.3 8 10 12 14 No.4 8 10 12 14 No.5 2 2 2 2 No.6 4 4 4 4 No.7 2 3 4 5 No.8 4 6 8 10 No.9 56 64 72
Weather forecast in Accra
 Weather forecast in Accra Thursday Friday Saturday Sunday 30 C 31 C 29 C 28 C f = 9 5 c + 32 Temperature in Fahrenheit Temperature in Celsius 2 Converting Celsius to Fahrenheit f = 9 5 c + 32 tempc = 21
1 Allgemeine Information
 1 Allgemeine Information ACHTUNG! Der Betriebsdruck der Klasse 867 ist 6 bar. Sollte der Druck Ihrer Versorgungsleitung höher als 6 bar sein, muss der Druck an der Versorgungseinheit der Nähmaschine auf
Handbuch. Artologik EZ-Equip. Plug-in für EZbooking version 3.2. Artisan Global Software
 Artologik EZ-Equip Plug-in für EZbooking version 3.2 Artologik EZbooking und EZ-Equip EZbooking, Ihre webbasierte Software zum Reservieren von Räumen und Objekten, kann nun durch die Ergänzung um ein oder