Enterprise Computing Einführung in das Betriebssystem z/os
|
|
|
- Ludo Otto
- vor 6 Jahren
- Abrufe
Transkript
1 Enterprise Computing Einführung in das Betriebssystem z/os Prof. Dr. Martin Bogdan Dr. rer. nat. Paul Herrmannn Prof. Dr.-Ing. Wilhelm G. Spruth WS 2009/2010 Teil 6 ISPF es 0101 ww6 wgs 09-99
2 This part contains basic Information how to use the ISPF editor. After finishing it the student should be able to use the ISPF editor to write individual programs in one of several languages. In this example we work with a member MFM3984.PAYROLL.COBOL(PAY2) of an existing partitioned data set (PDS) which has already a large number of members. In the ISPF Primary Option Menu we enter 2 to go to the Edit Entry Panel. Since you have not created a dataset MFM3984.PAYROLL.COBOL with a member MFM3984.PAYROLL.COBOL(PAY2), use your existing dataset PRAK004.TEST.DATASET instead and create a new member PRAK004.TEST.DATASET(MEMBER2). Enter some text in this member, for example a short poem which you remember from your high school days (or anything else).

3
4 For a partitioned data set, the member list appears, as it does with the View Panel, except the upper left corner says EDIT followed by the name of the data set. Each member of the data set is listed along with its statistics such as the created and changed dates. You can select a certain member by positioning the cursor on the dot next to the member name, or by typing S in the left column of the line that has the name of the member. If the list exceeds the room available on a single screen, it may be scrolled using F7 and F8.
5
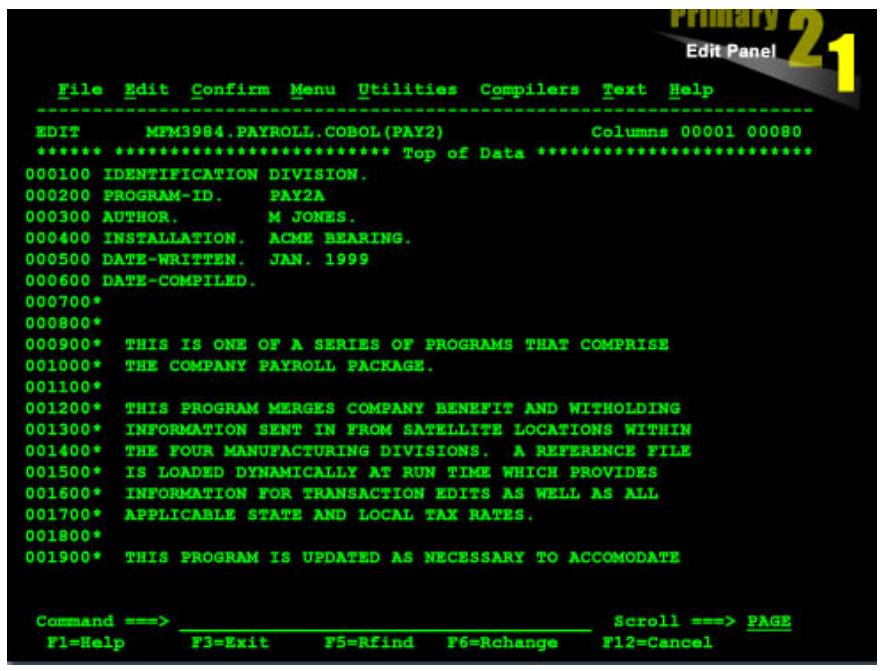
6 The ISPF Edit Panel is shown above. It shows a sample data set member, and a COBOL program, called PAY2. The first six columns of the lines containing COBOL source code represent the line command area. If specified in the profile setting, the editor displays the line number in this area. The remaining portion of the lines represents the screen window. You can use the same scrolling functions used in the View Panel. F11 moves the window right and F10 moves it to the left. F7 moves the window up, and F8 moves it down. Remember, the F7 or F8 keys are sometimes named PF7 or PF8. The Scrolling amount is subject to the scroll function that appears at the lower right part of the panel. It is shown here as PAGE, meaning F8 scrolls down a full screen. You could use another setting. Once you are more familiar with the ISPF editor, you will probably personaize it to suit your own taste. For the time being we will work with the default settings.

7
8 The editor assigns a line number to each line of the source member, and it maintains the numbers in sequence at all times. Line numbers are shown in the Line Command Area, which is highlighted in the above screenn shot. COBOL source files have COBOL format numbers. These are six digits long and placed in the first six digits of the record. On other files, the editor can use standard format numbers which are eight digits long and stored at the end of the record, even though the editor displays only 6 digits, and places those in the line command area. Unnumbered data sets have no line numbers. The editor still displays line numbers in the line command area, but these are discarded when you exit the editor session. In the ISPF editor, there are two different types of commands: primary commands line commands (also called prefix commands) The primary commands are typed (entered) in the Command Input Area behind the ==> command prompt symbol. They apply to the entire source member. Line commands (prefix commands) are entered over the numbers in the Line Command Area and they affect individual lines Lines can be inserted by the I command, which is typed in the line command area at the spot where the lines are to be inserted. The I command creates blank lines which can subsequently be entered. It shifts existing lines which follows further down in the file. The inserted lines contain apostrophes in the line number area until you type the source data. When you press the Enter key, the editor deletes any inserted lines that do not contain data. There are two forms of this command I Inserts a single line following this line
9 In Inserts n lines following this line

10 The single line command: I Inserts a single line following this line deleted using the D command, typed into the line command area at the line when Lines can be
11 deletion is to begin. There are three forms of this command D Deletes this line Dn Deletes n lines starting with this line DD Delete the block of lines beginning with the first DD command and ending with the second DD command. The R command has several forms R Repeat this line Rn Repeat this line n times RR Repeat a block of lines When you use the RR command, the first RR marks the start of the block. The second RR command indicates the end of the block, and, if you so choose, the number of times to repeat the block. The C command has several forms C Copies one line Cn Copies n lines CC Marks a block of lines for copying Then you move elsewhere in the member and type either an A or a B. If you type an A, the source lines are copied after the destination line. If you type a B, they are placed before the destination line. Copying lines is similar to repeating them, except that you are able to specify a destination. The C command has several forms C Copies one line Cn Copies n lines CC Marks a block of lines for copying Then you move elsewhere in the member and type either an A or a B. If you type an A, the source lines are copied after the destination line. If you type a B, they are placed before the destination line. CC Marks a block of lines for copying Then you move elsewhere in the member and type either an A or a B. If you type an A, the source lines are copied after the destination line. If you type a B, they are placed before the destination line. Moving lines is similar to copying them except that the source lines are deleted from their original location after they are moved. The M command has several forms
12 M Moves a single line Mn Moves n lines MM Marks a block of lines to move Then you move elsewhere in the member and type either an A or B. If you type an A, the source lines are copied after the destination line. If you type a B, they are placed before the destination line. MM Marks a block of lines to move Then you move elsewhere in the member and type either an A or B. If you type an A, the source lines are copied after the destination line. If you type a B, they are placed before the destination line. When you have completed all editing in the ISPF Edit Panel, press the End key, PF3. When you do this ISPF saves your changed member to the primary library. You are returned to the Edit Entry Panel. If you press PF3 again, ISPF returns to the ISPF Primary Option Panel. In the Edit Entry Panel, you can skip some steps and return directly to the ISPF Primary Option Panel by pressing PF4. ISPF saves the changed member in the process. Still another alternative is to enter SAVE at the Command line to cause the member to be saved. Entering CANCEL causes the changes to be discarded, and you are returned to the Edit Entry Panel. Whenever you have forgotten something, press the HELP key (PF1) while in EDIT to refresh your memory whenever you wish. Sequence numbers are automatically created (and renumbered when the data set is saved) unless you set the profile to NUMBERS OFF. The numbers are placed in the last eight positions for fixed length records; the first eight positions for variable length records. APPENDIX A -- COMMON EDIT "PREFIX" COMMANDS (line commands) To try out some of the following prefix commands, position the cursor in the line number (prefix) area on the left side of the screen while you are in SPF option 2 (EDIT), type the command and press <enter>. I I3 D Insert one line. Insert 3 lines. Delete one line.
13 D3 Delete 3 lines. DD Delete a group of lines ending with the next line also marked with DD. C Copy one line before (B) or after (A) another line marked with an A or a B line command. C2 Copy 2 lines (this line and the next line) before or after another line marked with an A or a B line command. CC Copy a group of lines beginning with this line and ending with the next line also Marked with CC before or after another line marked with an A or a B line command. M Same as C, except it moves the line rather than copying it. M2 Same as C2, except it moves the lines instead of copying them. MM Same as CC, except it moves the group of lines. R Repeat a line. R4 Repeat a line 4 times. RR Repeat a series of lines ending with the next line marked with RR. RR2 Same as RR, but repeat the series of lines twice. TE Set up the screen for text entry. Press "new line" to move to the next line. Press <enter> to end text entry mode. TS Split the line at the point where the cursor is positioned when <enter> is pressed. Flow the text TF evenly to the line length of the data set. TF70 Same as TF, but end each line at column 70 or before. COLS Display a line indicating column positions. Delete the COLS line with the D prefix area command. BNDS Display and allow changes to bounds. TABS Display and allow changes to tab settings. )10 (10 Shift the data on the line to the right 10 columns. Shift the data on the line to the left 10 columns. ))5 Shift the data on the group of lines ending in the next line marked with )) to the right 5columns. ((5 Shift the data on the group of lines ending in the next line marked with (( to the left 5 columns. >5 Shift the data - after the first blank - on the line to the right 5 columns. <5 Shift the data - after the first blank - on the line to the left 5 columns. >>5 Shift the data - after the first blank - on the group of lines ending in the next line marked with a >> to the right 5 columns. <<5 Shift the data - after the first blank - on the group of lines ending in the next line marked with a << to the left 5 columns.
14 APPENDIX B -- COMMON EDIT "PRIMARY" COMMANDS The following list of commands are entered on the primary COMMAND line while in EDIT. (Some of the commands may also be used on the COMMAND line elsewhere in SPF, such as in BROWSE.) SAVE CANCEL PROFILE Save the data set (or data set member) and remain in EDIT mode. Exit EDIT, but do not save any changes made to the data set during the current EDIT session. (Note: You are actually editing a copy of the data set.) Display the profile, or characteristics, of this data set. Once displayed, the characteristics may be changed by typing over them. CAPS OFF Change the profile for this data set so that subsequent characters are not converted to uppercase. The profile CAPS ON/OFF is automatically set depending on the ontents of a new data set. NULLS ON Modify the profile for this data set so that the end of every line is filled with nulls instead of blanks. This makes it much easier to insert characters within lines. Especially useful if data set includes text. HEX ON/OFF Change the profile for this data set to display/not display the hexadecimal characters for each character as well. RESET Remove extraneous information lines, such as the three lines of profile display or a column positions line. FIND string Find and display the next occurrence of the string. Surrounding apostrophes are necessary if the string contains any blanks or certain special characters (such as * or "). As is, the FIND does not distinguish capital letters (i.e., 'Xxx', 'X)X', and 'xxx' are the considered the same string). The FIND can be repeated by pressing the RFIND (repeat find) key (PF5). F c'xxx' Find the next occurrence of the string 'Xxx'. Specifying a string as a character string enables FIND to distinguish between uppercase and lowercase letters (i.e., 'Xxx', 'XXX', 'xxx' are not considered the same string). F xxx WORD Find the next occurrence of the string 'xxx' that is not part of another word. F xxx PREV Find the previous occurrence of the string 'xxx'. F xxx 1 7 Find the next occurrence of the string 'xxx' in columns 1 through 7. The string must be completely contained within these columns. CHANGE xxx yyy Change the next occurrence of the string 'xxx' to 'yyy'. Special characters are handled the same as for FIND. The CHANGE can be repeated by pressing the RCHANGE (repeat change) key (PF6). C xx yy ALL Change all occurrences of 'xx' to 'yy'. Be careful when doing this. (You might want to SAVE the data set before using this command.) COPY mem Copy a member of the same partitioned data set into this member. Use an A or a B line command (in prefix area) to indicate where the member should be placed. COPY Copy a part of another member within the same partitioned data set or copy all or part of a member of another partitioned data set or copy all or part of a sequential data set. When you press <enter> a "copy from" menu will be displayed for you to enter the name of the data set and possibly the member you want to copy and, optionally, the lines you want to copy from that data set or member. First, use an A or a B line command to indicate where the copied lines should be placed. CREATE mem Create a new member of this partitioned data set. Use the C (or CC) line command to indicate what to copy into the other member. CREATE Create a new member of this partitioned data set, copy into an existing member of any partitioned data set, or copy into a sequential data set. Use the C (or CC) line command to indicate what to copy into the other member or data set. When you press <enter> a menu will be displayed for you to enter the name of the data set and/or member you want to copy into. (The data set must already exist.) SUBMIT Submit a background job. The data set must contain appropriate Job Control Language. You will want to have NOTIFY=logonid on your JOB statement so that you will be notified when your job ends. You may also want to have MSGCLASS=S on your JOB statement. MSGCLASS=S will cause the output of your job to be placed in the held output queue so that you can view it from IOF (SPF option I) TABS ALL/OFF Turns on/off hardware tabbing so that the tabs you set via the TABS line command will/will not be in effect.
15 Appendix C Dieser Teil enthält weitere Information und nützliche Tips zur Benutzung von ISPF.
16 Übersicht Appendix C: 1. Benutzung der ISPF-Hilfe 2. Benutzung der Tasten F1 bis F12 3. Die wichtigsten ISPF-Kommandos, die standardmäßig per Funktionstaste aufgerufen werden können 4. Alternative Navigation 5. Data Set List Utitility 5.1 Eine Liste von Datasets anzeigen 5.2 Die existierenden Member eines Datasets anzeigen 5.3 Member zur Ansicht oder Modifikation öffnen 5.4 Einen Member von einem Dataset in einen anderen kopieren 5.5 Eine Kopie eines Members innerhalb eines Datasets erstellen 5.6 Einen Member in einen zweiteiligen Dataset kopieren 5.7 Mehrere Member aus dem gleichen Dataset an das gleiche Ziel kopieren 5.8 Verschieben von Membern 5.9 Member und ganze Datasets löschen 5.10 Ganze Datasets löschen 5.11 Die Eigenschaften von Datasets sich anzeigen lassen Auf einen Dataset einen Compress anwenden 6. Download mit FTP 7. COMMON TSO COMMANDS
17 1. Benutzung der ISPF-Hilfe Sehr nützlich für die Arbeit mit ISPF ist dessen Hilfefunktionalität. Vorteilhaft ist das Aufrufen passender Hilfen zu den verschiedenen ISPF-Funktionen aus den entsprechenden ISPF-Panels heraus. Möchte man in einem beliebigen Panel die passende Hilfe öffnen, so ist von diesem Panel aus auf der Kommandozeile "HELP" einzugeben oder alternativ dazu einfach die Funktionstaste F1 zu betätigen. Dass diese Funktionstaste mit "Help" belegt ist, darauf wird in den meisten Panels auch dadurch hingewiesen, dass in der linken unteren Ecke "F1=Help" steht. Eine Kommandozeile erkennt man an "Command ===>" oder an "Option ===>". Als Panel bezeichnet man das standardmäßig schwarz aussehende Mainframe-Text-Fenster mit seinen 24 (oder 32) Zeilen sowie 80 Spalten. Zu der Hilfefunktion gehört ein Tutorial, welches Bestandteil von ISPF ist. Wie kann mann das ISPF Tutorial aufrufen?
18 Menu Utilities Compilers Options Status Help ISPF Primary Option Menu 0 Settings Terminal and user parameters User ID. : PRAK004 1 View Display source data or listings Time... : 17:07 2 Edit Create or change source data Terminal. : Utilities Perform utility functions Screen.. : 1 4 Foreground Interactive language processing Language. : ENGLISH 5 Batch Submit job for language processing Appl ID. : ISR 6 Command Enter TSO or Workstation commands TSO logon : DBSPROC 7 Dialog Test Perform dialog testing TSO prefix: PRAK004 9 IBM Products IBM program development products System ID : ADCD 10 SCLM SW Configuration Library Manager MVS acct. : ACCT# 11 Workplace ISPF Object/Action Workplace Release. : ISPF 5.8 M More Additional IBM Products Enter X to Terminate using log/list defaults Option ===> TUTOR F1=Help F2=Split F3=Exit F7=Backward F8=Forward F9=Swap F10=Actions F12=Cancel Das zu ISPF dazugehörige Tutorial läßt sich auf zwei unterschiedliche Arten aufrufen: 1. In die Kommandozeile "TUTOR" oder "tutor", gefolgt von der Eingabetaste, eingeben 2. Den Cursor in die erste Zeile genau auf "Help" stellen, mittels Eingabetaste das Pull Down-Menü öffnen, nun "18" eintippen, Eingabetaste betätigen Siehe unten.
19 Menu Utilities Compilers Options Status Help ISPF Primary Opti General 2. Settings 0 Settings Terminal and user parameter 3. View 1 View Display source data or list 4. Edit 2 Edit Create or change source dat 5. Utilities 3 Utilities Perform utility functions 6. Foreground 4 Foreground Interactive language proces 7. Batch 5 Batch Submit job for language pro 8. Command 6 Command Enter TSO or Workstation co 9. Dialog Test 7 Dialog Test Perform dialog testing 10. LM Facility 9 IBM Products IBM program development pro 11. IBM Products 10 SCLM SW Configuration Library Ma 12. SCLM 11 Workplace ISPF Object/Action Workplac 13. Workplace M More Additional IBM Products 14. Exit 15. Status Area 16. About... Enter X to Terminate using log/list def 17. Changes for this Release 18. Tutorial 19. Appendices Option ===> 20. Index F1=Help F2=Split F3=Exit F7=B F10=Actions F12=Cancel Beide Alternativen bewirken den Aufruf des ISPF internen Tutorials.
20 Tutorial ISPF Tutorial Tutorial ISPF Tutorial This tutorial provides on-line information about the features and operations of ISPF. You may view the tutorial sequentially, or you may choose selected topics from lists displayed on many of the tutorial pages. The table of contents lists major topics. Subsequent pages contain additional lists that lead you to more specific levels of detail. You can also select topics from the tutorial index. The following panel describes how to use this tutorial. Press ENTER to proceed to the next page, or Enter the UP command to go directly to the table of contents, or Enter the END command to return to the primary option menu. Command ===> F1=Help F2=Split F3=Exit F4=Resize F5=Exhelp F6=Keyshelp F7=PrvTopic F8=NxtTopic F9=Swap F10=PrvPage F11=NxtPage F12=Cancel Gezeigt ist der ISPF Tutorial Eingangsscreen. Die Enter Taste blättert zur nächsten Seite.
21 TUTORIAL MOVE/COPY UTILITY - "FROM" DATA SET PANEL TUTORIAL To perform a move or copy operation, fill in the following fields on the first move/copy utility panel and press the ENTER key: - Enter the move/copy option in the option field: - C to copy - CP to copy and print - M to move - MP to move and print - L to copy and LMF lock - LP to copy, LMF lock, and print - P to LMF promote - PP to LMF promote and print - Enter the "from" library information in the appropriate fields. - If the "from" data set is partitioned, enter a member name as follows: - to move,copy or promote a single member, enter the member name. - to move, copy or promote all members, enter * (asterisk). - to request a member selection list, leave member name blank or specify a pattern. The following topics will be presented only if selected by number: 1 - How to enter the library or data set information 2 - Member name patterns OPTION ===> F1=Help F3=Exit F5=Exhelp F6=Keyshelp F7=PrvTopic F8=NxtTopic F10=PrvPage F11=NxtPage F12=Cancel Die letzten beiden Zeilen des Panels weisen den Nutzer auf hier aktive Funktionstasten und deren Belegung hin. Der Anwender kann beispielsweise F3 betätigen, um so das Hilfe-Tutorial zu verlassen (="Exit"). Er kann aber auch F11 drücken, um so zur nächsten Tutorial-Seite zu blättern (="NxtPage") oder F10 betätigen, um eine Seite zurückzublättern (="PrvPage").
22 2. Benutzung der Tasten F1 bis F12 Heutige Tastaturen haben sogenannte Funktionstasten (Function Keys) F1 bis F12. Bei der Betätigung einer solchen Taste wird ein bestimmtes ISPF-Kommando ausgeführt. Der Benutzer kann die Funktionstasten umprogrammieren, also einer jeden Taste ein neues ISPF-Kommando zuweisen. Doch ist dies meist nicht notwendig. Systemseitig sind die Funktionstasten F1 bis F12 in der Regel mit den folgenden ISPF-Kommandos belegt: Tast e ISPF- Kommando Beschreibung der Funktionsweise des ISPF-Kommandos F1 HELP Die Hilfe-Funktion wird aufgerufen. Es erscheint ein Hilfetext zum Panel, von dem aus HELP aufgerufen wurde. F2 SPLIT Das aktive Panel wird in zwei voneinander unabhängige Panels aufgeteilt. F3 END Beenden der aktiven Funktion und Rückkehr in das nächsthöhere Panel. F4 RETURN Beenden der aktiven Funktion und Sprung ins ISPF Primary Option-Menü. F5 RFIND Repeat FIND. Es wird ein Find-Kommando wiederholt, also z.b. die nächste Zeichenkette "exec" im angezeigten Text gesucht.
23 F6 RCHANGE Repeat CHANGE. Es wird das Change-Kommando wiederholt, also z.b. die nächste Zcichenkette "020" gesucht und durch "127" ersetzt. F7 UP Scrolling eines Textes nach oben. F8 DOWN Scrolling eines Textes nach unten. F9 SWAP Nachdem (z.b. durch Betätigung von F2) aus einem Panel zwei voneinander unabhängige Panels erzeugt wurden, kann man per F9 zwischen den beiden Panels wechseln. F10 LEFT Scrolling eines Textes nach links. F11 RIGHT Scrolling eines Textes nach rechts. F12 RETRIEVE Anzeige des vorigen Panels, um in diesem eventuell fehlerhafte Eingabewerte korrigieren zu können und um anschließend per Eingabetaste die zuletzt ausgeführte Funktion zu wiederholen. Die den Funktionstasten zugeordneten ISPF-Kommandos Nicht in jedem Panel sind alle Funktionstasten benutzbar. Sollte einmal eine Funktionstaste nicht benutzbar sein, erscheint links oben im Panel "Command is not active" (siehe unten).
24 File Edit Confirm Menu Utilities Compilers Test Help VIEW PRAK004.TEMP.TEMP(COBMAP5) Command is not active ****** ***************************** Top of Data ****************************** ==MSG> -Warning- The UNDO command is not available until you change ==MSG> your edit profile using the command RECOVERY ON //PRAK004M JOB (),CLASS=A,MSGCLASS=H,MSGLEVEL=(1,1),NOTIFY=&SYSUID, // REGION=4M //ASSEM EXEC DFHMAPS,MAPNAME='MSET020',RMODE= //COPY.SYSUT1 DD * MSET020 DFHMSD TYPE=MAP,MODE=INOUT,LANG=COBOL2,STORAGE=AUTO, * TIOAPFX=YES * MENU MAP MAP020 DFHMDI SIZE=(24,80),CTRL=(PRINT,FREEKB) DFHMDF POS=(9,13),ATTRB=(ASKIP,NORM),LENGTH=20, * INITIAL='VORNAME ' DFHMDF POS=(9,34),ATTRB=(ASKIP,NORM),LENGTH=20, * INITIAL='NACHNAME ' VNAM1 DFHMDF POS=(11,13),ATTRB=(ASKIP,NORM),LENGTH= NNAM1 DFHMDF POS=(11,34),ATTRB=(ASKIP,NORM),LENGTH= VNAM2 DFHMDF POS=(12,13),ATTRB=(ASKIP,NORM),LENGTH= NNAM2 DFHMDF POS=(12,34),ATTRB=(ASKIP,NORM),LENGTH=20 Command ===> Scroll ===> HALF F1=Help F3=Exit F5=Rfind F6=Rchange F12=Cancel Auf einige der gerade benutzbaren Funktionstasten wird in der letzten Zeile oder den letzten Zeilen eines Panels hingewiesen. Doch gibt es häufig auch benutzbare Funktionstasten, auf die dort nicht hingewiesen wird.
25 3. Die wichtigsten ISPF-Kommandos, die standardmäßig per Funktionstaste aufgerufen werden können F2 (SPLIT) und F9 (SWAP) Möchte man mit zwei voneinander unabhängigen Panels arbeiten, so stellt man den Cursor in die Zeile, oberhalb derer das erste und unterhalb derer das zweite Panel entstehen soll. Die Taste F2 teilt den Screen entsprechend. Mit der Taste F9 kann man nun beliebig oft zwischen den beiden Panels wechseln. Möchte man beide Panel in maximaler Größe nutzen, dann ist der Cursor auf die erste Zeile des Panels zu stellen und anschließend F2 zu betätigen. Es erscheint ein neues unabhängiges Panel. Ein Wechsel zwischen diesem und dem alten Panel ist auch hier jederzeit per Taste F9 möglich. F5 (RFIND) Möchte man in einem (z.b. im ISPF-Editor) geöffneten Text oder in einer angezeigten Logfile eine bestimmte Zeichenkette mehrfach finden, ist F5 sehr nützlich. Man gibt in die Kommandozeile "find exec" oder abgekürzt "f exec" ein. Das anschließende Betätigen der Eingabetaste findet die erste Zeichenkette "exec" im Text. An der Fundstelle steht der Cursor. Möchte man das nächste "exec" im Text finden, reicht es jetzt, die Taste F5 zu betätigen. Der Cursor steht anschließend über dem zweiten gefundenen "exec" und rechts oben steht im Panel "CHARS 'EXEC' FOUND". Nach jedem F5 wird das nächste "exec" gesucht und der Cursor zeigt auf die Fundstelle. Erst wenn sich kein "exec" mehr findet, erscheint rechts oben im Panel *BOTTOM OF DATA REACHED*.
26 F6 (RCHANGE) Die Anwendung der Taste F6 erfolgt ähnlich der Anwendung von F5. F6 wiederholt einen Zeichenketten-Ersetzungsvorgang (Repeat CHANGE). Z.B. kann die erste gefundene Zeichenkette "127" durch "020" mittels "change " oder kurz "c " ersetzt werden. Der Cursor steht anschließend an der Ersetzungsstelle und rechts oben erscheint im Panel die Meldung "CHARS '127' changed". Um die zweite Zeichenkette "127" durch "020" zu ersetzen, reicht nun die Taste F6 aus! Wieder steht der Cursor neben der ersetzten Zeichenkette. So läßt sich mit jedem F6-Tastendruck eine "127" ersetzen. Wird keine "127" mehr gefunden, wird rechts oben im Panel *Bottom of data reached* ausgegeben. F7, F8, F10, F11 (Scrolling) Mit diesen Tasten ist ein Scrollen in einem Text, der größer als ein Panel ist, möglich: F7 scrollt hoch, F8 herunter, F10 nach links und F11 nach rechts. Folgende Werte sind möglich: PAGE = Ein Tastendruck ersetzt die komplette angezeigte Seite. HALF = Die halbe Seite des Textes wird hinausgescrollt, eine neue halbe Seite Text erscheint. DATA = Fast die ganze alte Seite wird hinausgescrollt, lediglich eine alte Zeile / alte Spalte bleibt nach dem Tastendruck noch auf dem Panel sichtbar. <zahl> = <zahl> steht für eine konkrete Zahl, die ebenfalls in das Feld "Scroll" eingetragen werden kann. Um <zahl> Zeilen oder Spalten wird dann der Text pro Tastendruck gescrollt. Eine "3" in diesem Feld bewirkt z.b., dass drei alte Zeilen oder Spalten heraus und drei neue Zeilen oder Spalten hineingescrollt werden.
27 Rechts unten befindet sich in den meisten ISPF-Panels ein Feld "Scroll". Hier läßt sich einstellen, um wieviele Zeilen oder Spalten je Tastendruck gescrollt werden soll. Folgende Werte sind möglich: PAGE = Ein Tastendruck ersetzt die komplette angezeigte Seite. HALF = Die halbe Seite des Textes wird hinausgescrollt, eine neue halbe Seite Text erscheint. DATA = Fast die ganze alte Seite wird hinausgescrollt, lediglich eine alte Zeile / alte Spalte bleibt nach dem Tastendruck noch auf dem Panel sichtbar. <zahl> = <zahl> steht für eine konkrete Zahl, die ebenfalls in das Feld "Scroll" eingetragen werden kann. Um <zahl> Zeilen oder Spalten wird dann der Text pro Tastendruck gescrollt. Eine "3" in diesem Feld bewirkt z.b., dass drei alte Zeilen oder Spalten heraus und drei neue Zeilen oder Spalten hineingescrollt werden. In using edit, sequence numbers are never required. They are supported, however, during editing and may be automatically renumbered when the data is saved. The three commands that control whether NUMBER mode is on or off are NUMBER, RENUM, and UNNUM. NUMBER - to set NUMBER mode on or off. RENUM- to set NUMBER mode on and renumber the data. UNNUM- to set NUMBER mode off and blank out sequence numbers.
28 4. Alternative Navigation Menu Utilities Compilers Options Status Help ISPF Primary Option Menu 0 Settings Terminal and user parameters User ID. : PRAK004 1 View Display source data or listings Time... : 13:19 2 Edit Create or change source data Terminal. : Utilities Perform utility functions Screen.. : 1 4 Foreground Interactive language processing Language. : ENGLISH 5 Batch Submit job for language processing Appl ID. : ISR 6 Command Enter TSO or Workstation commands TSO logon : DBSPROC 7 Dialog Test Perform dialog testing TSO prefix: PRAK004 9 IBM Products IBM program development products System ID : ADCD 10 SCLM SW Configuration Library Manager MVS acct. : ACCT# 11 Workplace ISPF Object/Action Workplace Release. : ISPF 5.8 M More Additional IBM Products Enter X to Terminate using log/list defaults Option ===> F1=Help F2=Split F3=Exit F7=Backward F8=Forward F9=Swap F10=Actions F12=Cancel Es gibt noch einen alternativen Weg, wie man vom Hauptpanel des ISPF (ISPF Primary Option-Menü) ins Data Set Utility gelangen kann: Dabei kann man die erste Zeile des ISPF Primary Option Menu-Panels, die Action Bar, benutzen. Dazu stellt man den Cursor mit der Maus auf "Utilities" in diese Action Bar. Die Eingabetaste öffnet ein Pull Down-Menü.
29 Menu Utilities Compilers Options Status Help Library rimary Option Menu 2. Data set 0 Se 3. Move/Copy r parameters User ID. : PRAK004 1 Vi 4. Data Set List ata or listings Time... : 17:28 2 Ed 5. Reset Statistics source data Terminal. : Ut 6. Hardcopy functions Screen.. : 1 4 Fo 7. Download... uage processing Language. : ENGLISH 5 Ba 8. Outlist anguage processing Appl ID. : PDF 6 Co 9. Commands... kstation commands TSO logon : IKJACCNT 7 Di *0. Reserved esting TSO prefix: PRAK004 8 LM 11. Format rator functions System ID : DAVI 9 IB 12. SuperC lopment products MVS acct. : ACCT# 10 SC 13. SuperCE Library Manager Release. : ISPF Wo 14. Search-For on Workplace 15. Search-ForE ' ' Enter X to Terminate using log/list defaults Option ===> F1=Help F3=Exit F10=Actions F12=Cancel Hier gibt man eine "2", gefolgt von der Eingabetaste, ein Dies ist ein Beispiel dafür, dass es im ISPF oft viele Wege gibt, um in ein bestimmtes Tool / Panel zu gelangen.
30 5. Data Set List Utitility Das Data Set List Utility ist nützlich, um 1. sich eine Liste von Datasets anzeigen zu lassen, 2. sich die existierenden Member eines Datasets anzeigen zu lassen, 3. Member zum Zwecke der Ansicht oder Modifikation zu öffnen, 4. Member zu kopieren oder zu verschieben, 5. sich die Eigenschaften eines Datasets anzusehen. Um das Dataset List Utility vom ISPF Primary Option-Menü aus zu starten, wählt man vom ISPF Primary Option-Menü zuerst "3" (Utilities) und im sich anschließend öffnenden Utility Selection Panel "4" (Dslist) aus. Abkürzend kann man auch hier auf der Kommandozeile des ISPF Primary Option-Menüs "3.4" eingeben. Das gestartete Dataset List Utility meldet sich mit dem unten gezeigten Panel.
31 Menu RefList RefMode Utilities Help Data Set List Utility blank Display data set list P Print data set list V Display VTOC information PV Print VTOC information Enter one or both of the parameters below: Dsname Level... PRAK004 Volume serial.. Data set list options Initial View Volume Enter "/" to select option 2. Space / Confirm Data Set Delete 3. Attrib / Confirm Member Delete 4. Total When the data set list is displayed, enter either: "/" on the data set list command field for the command prompt pop-up, an ISPF line command, the name of a TSO command, CLIST, or REXX exec, or "=" to execute the previous command. Option ===> F1=Help F3=Exit F10=Actions F12=Cancel Haupt Panel der Data Set List Utility Hier sind eine ganze Reihe von Funktionen möglich.
32 5.1 Eine Liste von Datasets anzeigen Um nun eine Liste aller eigenen Datasets oder eine Liste einer bestimmten Auswahl seiner eigenen Datasets anzeigen zu können, ist ein passender Wert in das Feld "Dsname Level" einzutragen. Möchten Sie alle Ihre Datasets Ihres PRAKxxx-Accounts anzeigen lassen, so ist in das Feld "Dsname Level" der erste Teil Ihrer Dataset- Namen, z.b. "PRAK004", einzutragen (siehe unten). Möchten Sie einen Teil Ihrer Datasets anzeigen, z.b. alle "PRAK004.CICSDB2"-Datasets, so ist in das Feld "Dsname Level" der Wert "PRAK004.CICSDB2" einzutragen. Eine Dataset-Liste kann in 4 verschiedenen Varianten ausgegeben werden. Je nach gewünschter Variante kann man eine Zahl von 1 bis 4 in das Feld "Initial View" eingeben. Dies ist aber nicht zwingend notwendig. Mögliche Varianten: 1. Zum jeweiligen Dataset seine Platte (Volume), auf der er sich befindet, anzeigen 2. Zum Dataset seinen allocierten Festplattenspeicher (in Spuren / Tracks) anzeigen 3. Zum Dataset u.a. Rekord-Format, Rekord-Größe und Blockgröße anzeigen 4. Umfassende Angaben zum Dataset anzeigen, einschließlich der Punkte 1. bis 3. Betätigt man die Eingabetaste, erscheint die Liste der gewünschten Datasets auf dem Bildschirm (siehe unten). Passen nicht alle Datasets auf den Panel, so kann man mit den Funktionstasten F7 und F8 nach oben sowie nach unten scrollen. Eine auf dem Bildschirm angezeigte Dataset-Liste kann durch Druck der Tasten F10 oder F11 in eine andere Variante umgewandelt werden.
33 Menu Options View Utilities Compilers Help DSLIST - Data Sets Matching PRAK004 Row 1 of 36 Command - Enter "/" to select action Tracks %Used XT Device PRAK004 PRAK004.C.LOAD PRAK004.CICS.ASSEM PRAK004.CICS.BMS PRAK004.CICS.BMS#ALT PRAK004.CICS.COBOL PRAK004.CICS.PLI PRAK004.CICS.TEST PRAK004.CICSDB2.ASSEM PRAK004.CICSDB2.COBOL PRAK004.CICSDB2.PLI PRAK004.CICSDB2.TEST PRAK004.DBRMLIB.DATA PRAK004.ISPF.ISPPROF PRAK004.TEST.DATASET PRAK004.LIB Command ===> Scroll ===> HALF F1=Help F3=Exit F5=Rfind F12=Cancel
34 5.2 Die existierenden Member eines Datasets anzeigen Möchte man die Member des Datasets "PRAK004.CICSDB2.ASSEM" anzeigen, so erzeugt man eine Dataset-Liste ähnlich wie im obigen Panel gezeigt, die diesen Dataset enthält und man scrollt gegebenenfalls, so dass dieser Dataset-Name auch auf dem Bildschirm erscheint. Anschließend platziert man den Cursor links neben "PRAK004.CICSDB2.ASSEM" und bestätigt mit der Eingabetaste. Unter "Data Set List Actions" wählt man "4" (Member List) aus. Die Eingabetaste läßt alle Member von PRAK004.CICSDB2.ASSEM auf dem Bildschirm erscheinen (siehe unten).
35 Menu Functions Confirm Utilities Help DSLIST PRAK004.CICSDB2.ASSEM Row of Name Prompt VV MM Changed Size Init Mod ID v ASSMAP /03/03 15: PRAK004 ASSSTA /03/03 15: PRAK004 **End** Command ===> Scroll ===> PAGE F1=Help F3=Exit F10=Actions F12=Cancel
36 5.3 Member zur Ansicht oder Modifikation öffnen Möchte man einen Member, der lesbaren Text enthält, zur Ansicht öffnen, so ist in der Member-Liste dieser Member auszuwählen. Dazu gibt man links neben den Member-Namen "v" (view), gefolgt von der Eingabetaste, ein (siehe oben). Der so geöffnete Member läßt sich nicht modifizieren. Soll eine Modifikation erlaubt sein, dann ist in der Member-Liste links neben den Member anstatt von "v" der Buchstabe "e" (edit) einzugeben. Die Eingabetaste öffnet den nun modifizierbaren Text.
37 5.4 Einen Member von einem Dataset in einen anderen kopieren Möchte man einen Member aus der Liste der Member kopieren, so ist "c" (copy) links neben dessen Member-Namen einzutragen Menu Functions Confirm Utilities Help DSLIST PRAK004.TEST.DATASET Row of Name Prompt VV MM Changed Size Init Mod ID c MEMBER /05/30 16: PRAK004 MEMBER /05/30 16: PRAK004 **End** Command ===> Scroll ===> PAGE F1=Help F2=Split F3=Exit F5=Rfind F7=Up F8=Down F9=Swap F10=Left F11=Right F12=Cancel Die Eingabetaste führt in das Panel, in welchem das Ziel des Kopiervorganges festgelegt wird. Soll der Member in einen anderen Dataset mit dreiteiligem Namen hineinkopiert werden, so sind die drei Teile des Ziel-Dataset-Namens in die dafür vorgesehenen drei Felder "To Library" einzutragen. Das Feld "To Other Data Set Name, Data Set Name" muß unbedingt leer bleiben.
38 Soll die Member-Kopie noch einen anderen Namen erhalten als das Member-Original, so ist in das Feld "NEW member name" noch der andere Name einzutragen. Soll der Name der Kopie zum Namen des Originals identisch sein, so kann das Feld "NEW member name" leer bleiben. Als konkretes Ziel für den Kopiervorgang soll der in der letzten Aufgabe angelegte Dataset "PRAK004.ISPF.$3TEILIG" dienen. Der Membername "MEMBER1" soll nicht umbenannt werden, somit muß das "NEW member name"-feld leer bleiben. In die drei "To Library"- Felder sind nun die entsprechenden Werte, die den Ziel-Dataset spezifizieren, einzutragen
39 RefList Help COPY Entry Panel More: + CURRENT from data set: 'PRAK004.TEST.DATASET(MEMBER1)' To Library Replace option: Project... PRAK004 Enter "/" to select option Group.... ISPF Replace like-named members Type.... $3TEILIG To Other Data Set Name Data Set Name... Volume Serial... (If not cataloged) NEW member name... (Blank unless member to be renamed) Options Sequential Disposition Pack Option SCLM Setting 2 1. Mod 1 1. Default 3 1. SCLM 2. Old 2. Pack 2. Non-SCLM Command ===> F1=Help F3=Exit F12=Cancel Die Eingabetaste schließt den Kopier-Vorgang ab. Als Bestätigung erscheint "*Copied".
40 5.5 Eine Kopie eines Members innerhalb eines Datasets erstellen Wir möchten den Member "MEMBER1" innerhalb des Datasets "PRAK004.ISPF.$3TEILIG" kopieren. Der neue Member soll "MEMBER3" heißen. Unter Nutzung des Data Set List-Utilitys lassen wir uns den Member des Datasets "PRAK004.ISPF.$3TEILIG", auflisten. Wir stellen den Cursor links neben "MEMBER1", tippen ein "c" und schließen mit der Eingabetaste ab. Im sich öffnenden "COPY Entry Panel" müssen in die "To Library"-Felder wieder die drei Teile des Ziel-Datasets eingetragen werden. Wir tragen ins Project-Feld "PRAK004", ins Group-Feld "ISPF" sowie ins Type-Feld "$3TEILIG" ein. Diesmal muß ebenfalls der neue Member- Name, also "MEMBER3", in das "NEW member name"-feld eingetragen werden. Die Eingabetaste startet den Kopiervorgang, dessen Ende wird wieder mit "*Copied" quittiert. Um uns nun die beiden Member des Datasets "PRAK004.ISPF.$3TEILIG" anzusehen, müssen wir dieses Panel auf folgendem Weg aktualisieren: Funktionstaste F3 Eingabetaste "4" (="Member List" auswählen) Eingabetaste Funktionstaste F3 Eingabetaste "4" (="Member List" auswählen) Eingabetaste zeigt uns nun alle 5 Member des Datasets "PRAK004.ISPF.$3TEILIG" (siehe unten).
41 Menu Functions Confirm Utilities Help DSLIST PRAK004.ISPF.$3TEILIG Row of Name Prompt VV MM Changed Size Init Mod ID c MEMBER /05/30 16: PRAK004 MEMBER /05/30 16: PRAK004 MEMBER /05/30 16: PRAK004 MEMBER /05/30 16: PRAK004 MEMBER /05/30 16: PRAK004 **End** Command ===> Scroll ===> PAGE F1=Help F3=Exit F10=Actions F12=Cancel
42 5.6 Einen Member in einen zweiteiligen Dataset kopieren Wir möchten den Member "MEMBER1" des Datasets "PRAK004.ISPF.$3TEILIG" in den zweiteiligen Dataset "PRAK004.$2TEILIG" kopieren. Dazu geben wir wieder links neben "MEMBER1" den Buchstaben "c" ein (siehe unten). Die Eingabetaste führt wieder in das "COPY Entry Panel". Hier ist nun ins Feld "To Other Data Set Name, Data Set Name" der Dataset-Name 'PRAK004.$2TEILIG', in die richtigen Hochkommas eingeschlossen (!), einzutragen (siehe unten). Dieser Eintrag überschreibt einen möglichen nicht relevanten Eintrag in den drei "To Library"-Feldern. Die Eingabetaste löst den Kopiervorgang aus.
43 RefList Help COPY Entry Panel More: + CURRENT from data set: 'PRAK004.ISPF.$3TEILIG(MEMBER2)' To Library Replace option: Project... Enter "/" to select option Group.... Replace like-named members Type.... To Other Data Set Name Data Set Name... 'PRAK004.$2TEILIG' Volume Serial... (If not cataloged) NEW member name... (Blank unless member to be renamed) Options Sequential Disposition Pack Option SCLM Setting 2 1. Mod 1 1. Default 3 1. SCLM 2. Old 2. Pack 2. Non-SCLM Command ===> F1=Help F3=Exit F12=Cancel
44 5.7 Mehrere Member aus dem gleichen Dataset an das gleiche Ziel kopieren Nach einem erfolgreichen Kopieren eines Members unterstützt das Data Set List-Utility, dass weitere Member aus der gleichen Quelle an das gleiche Ziel kopiert werden können, ohne dass das Ziel noch einmal explizit angegeben werden muß. Möchten wir im direkten Anschluß an obigen erfolgreichen Kopiervorgang "PRAK004.ISPF.$3TEILIG(MEMBER1) PRAK004.$2TEILIG" z.b. noch den Kopiervorgang "PRAK004.ISPF.$3TEILIG(MEMBER2) PRAK004.$2TEILIG" durchführen, so ist in die Liste der 5 Member (siehe unten) wieder ein "c" links neben "MEMBER3" einzutragen und anschließend die Eingabetaste zu betätigen. Das Ziel des Kopiervorganges wird nicht noch einmal abgefragt (!), der Member wird statt dessen sofort kopiert. Nicht nur ein Member, sondern mehrere Member lassen sich auf diese Weise in einem Vorgang kopieren. Wollen wir die Member "MEMBER4", "MEMBER5" sowie "MEMBER6" in einem Vorgang kopieren, so ist das "c" links neben alle drei Member-Namen einzutragen und anschließend die Eingabetaste zu betätigen. Alle drei Member werden anschließend kopiert.
45 Menu Functions Confirm Utilities Help DSLIST PRAK004.ISPF.$3TEILIG Row of Name Prompt VV MM Changed Size Init Mod ID MEMBER /05/30 16: PRAK004 C MEMBER /05/30 16: PRAK004 MEMBER /05/30 16: PRAK004 MEMBER /05/30 16: PRAK004 MEMBER /05/30 16: PRAK004 **End** Command ===> Scroll ===> PAGE F1=Help F3=Exit F10=Actions F12=Cancel
46 5.8 Verschieben von Membern Das Verschieben von Membern läßt sich völlig analog zu den gerade vorgestellten Varianten des Kopierens von Membern durchführen. Es ist lediglich ein "m" (move) anstatt des "c" (copy) zu verwenden (siehe unten). Neben der hier ausführlich behandelten Möglichkeit, Member unter Nutzung des "Data Set List"-Utility zu kopieren oder zu verschieben, kann man dies natürlich auch unter Nutzung des "Move/Copy"-Utilities tun. Man startet dieses Utility, indem man im "ISPF Primary Option"-Menü auf der Kommandozeile "3.3", gefolgt von der Eingabetaste, eingibt.
47 Menu Functions Confirm Utilities Help DSLIST PRAK004.ISPF.$3TEILIG Row of Name Prompt VV MM Changed Size Init Mod ID MEMBER /06/17 22: PRAK004 MEMBER /06/17 22: PRAK004 m MEMBER /06/17 22: PRAK004 MEMBER /06/17 22: PRAK004 MEMBER /06/17 22: PRAK004 **End** Command ===> Scroll ===> PAGE F1=Help F3=Exit F10=Actions F12=Cancel
48 5.9 Member und ganze Datasets löschen Das Data Set List Utility kann natürlich auch verwendet werden, um Member oder ganze Datasets (einschließlich mehrerer Member) zu löschen. Wir behandeln zunächst den Fall Member löschen. Um einen oder mehrere Member eines Datasets löschen zu können, zeigt man sich wieder eine Member-Liste an, die den oder die zu löschenden Member enthält. Links neben jedem Member, der gelöscht werden soll, trägt man ein "d" (=delete) ein. Dieser Buchstabe kann, wie so oft im ISPF, groß oder kleingeschrieben werden (siehe unten). Die Eingabetaste beginnt den Löschvorgang. Doch muß man das endgültige Löschen eines jeden Members standardmäßig noch einmal per Eingabetaste bestätigen. Man kann diese Bestätigung ausstellen, indem man "Set member delete confirmation off" durch Eintrag eines "/" markiert. Letzteres erhöht die Gefahr von Datenverlust und sollte wohlüberlegt eingesetzt werden. Diese Bestätigung läßt sich mittels Eingabe von "confirm" auf der Kommandozeile wieder einschalten. ISPF kennt noch eine alternative Möglichkeit, Member zu löschen: Die über das Library Utility. Diese wird hier nicht näher behandelt.
49 Menu Functions Confirm Utilities Help DSLIST PRAK004.TEST.DATASET Row of Name Prompt VV MM Changed Size Init Mod ID MEMBER /06/17 22: PRAK004 d MEMBER /06/17 22: PRAK004 MEMBER /06/17 22: PRAK004 D MEMBER /06/17 22: PRAK004 MEMBER /06/17 22: PRAK004 **End** Command ===> Scroll ===> PAGE F1=Help F3=Exit F10=Actions F12=Cancel
50 5.10 Ganze Datasets löschen Diese Option sollte man sehr sorgfältig einsetzen, weil mit einem ganzen Dataset sämtliche Member einschließlich derem Inhalt gelöscht werden. Der per Allocate reservierte Plattenspeicherplatz wird wieder freigegeben. Öffnen Sie ein Panel mit einer Dataset-Liste, die den zu löschenden Dataset enthält. Das Kapitel "5.1 Eine Liste von Datasets anzeigen" behandelt dies. Tragen Sie neben dem Dataset, den Sie löschen möchten, "d" (delete) ein (siehe unten). Betätigen Sie die Eingabetaste. Anschließend werden Sie aufgefordert, Ihre Löschanforderung durch erneute Betätigung der Eingabetaste zu bekräftigen: "Press ENTER key to confirm the delete request". Tut man das, wird der Dataset einschließlich aller seiner Member gelöscht. Danach erscheint in der rechten oberen Panel-Ecke "Data set deleted".
51 Menu Options View Utilities Compilers Help DSLIST - Data Sets Matching PRAK004 0 Members processed Command - Enter "/" to select action Tracks %Used XT Device PRAK004.CICS.TEST PRAK004.CICSDB2.ASSEM PRAK004.CICSDB2.COBOL PRAK004.CICSDB2.PLI PRAK004.CICSDB2.TEST PRAK004.DBRMLIB.DATA PRAK004.ISPF.$3TEILIG PRAK004.ISPF.ISPPROF PRAK004.TEST.DATASET d PRAK004.ISPF.TEST PRAK004.LIB PRAK004.MAPS.C PRAK004.MAPS.COBOL PRAK004.MAPS.LOAD PRAK004.REXX.EXEC PRAK004.SPFLOG3.LIST Command ===> Scroll ===> HALF F1=Help F3=Exit F5=Rfind F12=Cancel
52 5.11 Die Eigenschaften von Datasets sich anzeigen lassen Beim Anlegen (allocate) eines Datasets wurde dieser mit bestimmten Eigenschaften angelegt. Beispiele Typ des anzulegenden Datasets, z.b. "PDS" Record Frmat den Parameter, z.b. FB (Fixed Blocks) Record length Block size usw. Es existieren zwei unterschiedliche Alternativen, um diese Eigenschaften mittels der Dataset List Utility anzuzeigen: Alternative 1: Man erzeugt eine Liste mit Datasets, die die Namen der Datasets, deren Eigenschaften man wissen will, enthält (siehe unten). Im rechten Teil dieser Liste befinden sich entsprechende Eigenschaften. Die untere Abbildung zeigt die Anzahl der reservierten Spuren (Tracks) und wie viele von diesen (in Prozent) z.b. durch angelegte Member schon in Benutzung sind. Alternativ dazu können im rechten Teil der Dataset-Liste angezeigt werden: 1. Die Platten (Volumes), auf denen sich die Datasets befinden 2. Rekord-Format, Rekord-Größe und Blockgröße der Datasets 3. Umfassende Eigenschaften; u.a. Anzahl der reservierten und benutzten Tracks, Datum der Datasetanlage (allocate), Datum des letzten Dataset-Zugriffs sowie die Eigenschaften der Punkte 1. und 2. Mit den Funktionstasten F10 oder F11 kann man zwischen den angezeigten Eigenschaften wechseln.
53 Menu Options View Utilities Compilers Help DSLIST - Data Sets Matching PRAK004.CICSDB2 Row 1 of 4 Command - Enter "/" to select action Tracks %Used XT Device PRAK004.CICSDB2.ASSEM PRAK004.CICSDB2.COBOL PRAK004.CICSDB2.PLI PRAK004.CICSDB2.TEST ***************************** End of Data Set list **************************** Command ===> Scroll ===> HALF F1=Help F3=Exit F5=Rfind F12=Cancel Liste aller Datasets "PRAK004.CICSDB2
54 Alternative 2: Man erzeugt eine Liste mit Datasets, die den Namen des Datasets, dessen Eigenschaften man wissen will, enthält (siehe unten). Anschließend plaziert man den Cursor links neben den entsprechenden Dataset und betätigt die Eingabetaste. Im sich geöffneten "Data Set List Actions"-Panel wählt man "7" (="Info") aus. Die Eingabetaste erzeugt ein Panel mit den gewünschten Eigenschaften. In einem konkreten Beispiel wird der Cursor links neben "PRAK004.TEST.DATASET" gestellt, die Eingabetaste betätigt, mit "7" der Menüpunkt "Info" ausgewählt und mit der Eingabetaste das "Data Set Information"-Panel geöffnet, welches die gewünschten Eigenschaften enthält (siehe unten).
55 Data Set Information Data Set Name.... : PRAK004.TEST.DATASET General Data Current Allocation Management class.. : DEFAULT Allocated kilobytes : 18 Storage class... : PRIM90 Allocated extents. : 1 Volume serial... : SMS006 Maximum dir. blocks : 2 Device type.... : 3390 Data class..... : Organization... : PO Current Utilization Record format... : FB Used kilobytes.. : 3 Record length... : 80 Used extents... : 1 Block size.... : 320 Used dir. blocks. : 1 1st extent kilobytes: 18 Number of members. : 3 Secondary kilobytes : 1 Data set name type : PDS Creation date... : 2005/06/17 Referenced date.. : 2005/06/18 Expiration date.. : ***None*** Command ===> F1=Help F3=Exit F12=Cancel Eigenschaften des Datasets "PRAK004.TEST.DATASET"
56 5.12. Auf einen Dataset einen Compress anwenden Arbeitet man mit Partitioned Datasets und werden diese sehr oft derart modifiziert, dass man ständig neue Member anlegt und löscht, wird unter Umständen ein Komprimieren (Compress) der Datasets erforderlich, damit die Datasets auch weiterhin neue Member aufnehmen können. Der Grund dafür ist, dass beim Löschen von Membern deren ehemaliger Speicherplatz nicht automatisch zur Wiederverwendung freigegeben wird. Diese Speicherplatzfreigabe muß man explizit durch einen Compress herbeiführen. Man sollte die Notwendigkeit eines Compresses in den folgenden Fällen prüfen: 1) Es läßt sich kein neuer Member anlegen 2) Ein Member läßt sich nicht mehr editieren 3) Die Ausführung eines JCL-Scriptes erzeugt die folgende Fehlermeldung: JOB15798 $HASP165 PRAKT37B ENDED AT N1 - ABENDED SE37 U0000 CN(INTERNAL) *** Um einen Compress auf einen Dataset anzuwenden, ist zuerst ein Panel mit einer Dataset-Liste, die diesen Dataset enthält, zu erstellen. Der Abschnitt 5.1 Eine Liste von Datasets anzeigen behandelt dieses Thema. Einen Hinweis auf eine eventuell notwendige oder sinnvolle Komprimierung liefert auch eine Angabe von "%Used"="100" in der Dataset-Liste, insbesondere dann, wenn die Anzahl der angelegten Tracks erheblich größer ist als 1. Dies ist beispielsweise bei dem in dem unten dargestellten Partitioned Dataset "PRAK004.CICSDB2.COBOL" der Fall.
57 Menu Options View Utilities Compilers Help DSLIST - Data Sets Matching PRAK004 Row 1 of 38 Command - Enter "/" to select action Tracks %Used XT Device PRAK004 PRAK004.$2TEILIG PRAK004.C.LOAD PRAK004.CICS.ASSEM PRAK004.CICS.BMS PRAK004.CICS.BMS#ALT PRAK004.CICS.COBOL PRAK004.CICS.PLI PRAK004.CICS.TEST PRAK004.CICSDB2.ASSEM z PRAK004.CICSDB2.COBOL PRAK004.CICSDB2.PLI PRAK004.CICSDB2.TEST PRAK004.DBRMLIB.DATA PRAK004.ISPF.$3TEILIG PRAK004.ISPF.ISPPROF Command ===> Scroll ===> HALF F1=Help F3=Exit F5=Rfind F12=Cancel Den zu komprimierenden Dataset wählt man durch ein "z", welches man links neben den Dataset-Namen einträgt, aus. Eine anschließende Betätigung der Eingabetaste startet die Komprimierung. Eine erfolgreiches Ende der Komprimierung wird durch "Compress successful" (siehe unten) bestätigt.
58 Menu Options View Utilities Compilers Help DSLIST - Data Sets Matching PRAK004 Compress successful Command - Enter "/" to select action Tracks %Used XT Device PRAK004 PRAK004.$2TEILIG PRAK004.C.LOAD PRAK004.CICS.ASSEM PRAK004.CICS.BMS PRAK004.CICS.BMS#ALT PRAK004.CICS.COBOL PRAK004.CICS.PLI PRAK004.CICS.TEST PRAK004.CICSDB2.ASSEM PRAK004.CICSDB2.COBOL PRAK004.CICSDB2.PLI PRAK004.CICSDB2.TEST PRAK004.DBRMLIB.DATA PRAK004.ISPF.$3TEILIG PRAK004.ISPF.ISPPROF Command ===> Scroll ===> HALF F1=Help F3=Exit F5=Rfind F12=Cancel Wie effektiv die Komprimierung war, kann man an der Veränderung des Wertes "%Used" ablesen. Vor der Komprimierung betrug dieser 100% (siehe oben). Die Komprimierung veränderte diesen Wert auf 25%. Die 100% bedeuteten, dass alle 8 für den Dataset reservierten Tracks benutzt waren. Die 25% bedeuten, dass 6 von 8 Tracks vom Dataset "PRAK004.CICSDB2.COBOL" nicht mehr benutzt wurden und deshalb für neue Member als neu verfügbarer Plattenspeicher freigegeben wurden.

59 6. Download mit FTP Vielfach ist es nützlich, Daten zwischen ihrem PC und Ihrem z/os User account auszutauschen. Hierzu gibt es mehrere Möglichkeiten. Sie können z.b. unter Windows mit Start Ausführen FTP im Zeilenmodus aufrufen. Am Einfachsten ist jedoch die Nutzung von ws_ftple, welches Sie im Internet kostenlos herunterladen können. ws_ftple ist ein kostenloses FTP Programm, welches problemlos eingesetzt werden kann, um Daten zwischen Ihrer TSO User ID und Ihrem PC zu transferieren. Hierzu rufen Sie ws_ftple auf Ihrem PC auf und loggen Sie sich ein wie hier gezeigt.
 den Binary Radio Butto aktivieren. Jetzt ist eine Übertragung nach TSO möglich")
60 Jetzt kann von dem linken Fenster in das rechte Fenster kopiert werden und umgekehrt. Vorsicht: z/os stellt Daten im EBCDIC Format dar. Für die Übertragung von ASCII DAten (z.b. Textfiles) den ASCII Radio Button aktivieren. Dann funktioniert die Konvertierung automatisch. Für die Übertragung von Binärdaten (Beispiel pdf Files) den Binary Radio Butto aktivieren. Jetzt ist eine Übertragung nach TSO möglich

61 Für WebSphere gelten andere Regeln. WebSphere braucht Unix System Services. Deswegen diese Einstellung
Tutorial 15: "DB2 und QMF" (z/os 1.5) - v01-2005-11-03. Tutorial 15. DB2 und QMF
 - v01-2005-11-03. Tutorial 15. DB2 und QMF") Tutorial 15 DB2 und QMF Copyright Abt. Computersysteme, Institut für Informatik, Universität Leipzig Ziel dieses Tutorials ist es, auf eine z/os - DB2 relationale Datenbank über die DB2 Query Management
Tutorial 15 DB2 und QMF Copyright Abt. Computersysteme, Institut für Informatik, Universität Leipzig Ziel dieses Tutorials ist es, auf eine z/os - DB2 relationale Datenbank über die DB2 Query Management
Tutorial 1c ISPF Subsystem
 Tutorial 1c ISPF Subsystem Abteilung Technische Informatik, Institut für Informatik, Universität Leipzig Abteilung Technische Informatik, Wilhelm Schickard Institut für Informatik, Universität Tübingen
Benutzung von ISPF. Abteilung Technische Informatik, Fakultät für Informations- und Kognitionswissenschaften, Universität Tübingen
 Benutzung von ISPF Abteilung Technische Informatik, Fakultät für Informations- und Kognitionswissenschaften, Universität Tübingen ISPF steht für Interactive System Productivity Facility. Es ist ein auf
Tutorial 1b ISPF Editor. Inhalt
 Tutorial 1b ISPF Editor Abteilung Technische Informatik, Institut für Informatik, Universität Leipzig Abteilung Technische Informatik, Wilhelm Schickard Institut für Informatik, Universität Tübingen Version
Tutorial 1.4 ISPF Funktionen
 Tutorial 1.4 ISPF Funktionen Dieser Teil enthält weitere Information und nützliche Tips zur Benutzung von ISPF. Übersicht: 1. Benutzung der ISPF-Hilfe 2. Benutzung der Tasten F1 bis F12 3. Die wichtigsten
VGM. VGM information. HAMBURG SÜD VGM WEB PORTAL USER GUIDE June 2016
 Overview The Hamburg Süd VGM Web portal is an application that enables you to submit VGM information directly to Hamburg Süd via our e-portal Web page. You can choose to enter VGM information directly,
VGM. VGM information. HAMBURG SÜD VGM WEB PORTAL - USER GUIDE June 2016
 Overview The Hamburg Süd VGM-Portal is an application which enables to submit VGM information directly to Hamburg Süd via our e-portal web page. You can choose to insert VGM information directly, or download
p^db=`oj===pìééçêíáåñçêã~íáçå=
 p^db=`oj===pìééçêíáåñçêã~íáçå= How to Disable User Account Control (UAC) in Windows Vista You are attempting to install or uninstall ACT! when Windows does not allow you access to needed files or folders.
Tutorial 2. Erstellen, Kompilieren und Ausführen eines C-Programms
 Tutorial 2 Erstellen, Kompilieren und Ausführen eines C-Programms Abteilung Technische Informatik, Fakultät für Informations- und Kognitionswissenschaften, Universität Tübingen In dieser Aufgabe wiederholen
ONLINE LICENCE GENERATOR
 Index Introduction... 2 Change language of the User Interface... 3 Menubar... 4 Sold Software... 5 Explanations of the choices:... 5 Call of a licence:... 7 Last query step... 9 Call multiple licenses:...
Aufgabe 1b Erstellen, Kompilieren und Ausführen eines COBOL-Programms
 Aufgabe 1b Erstellen, Kompilieren und Ausführen eines COBOL-Programms Abteilung Technische Informatik, Fakultät für Informations- und Kognitionswissenschaften, Universität Tübingen In dieser Aufgabe wiederholen
NEWSLETTER. FileDirector Version 2.5 Novelties. Filing system designer. Filing system in WinClient
 Filing system designer FileDirector Version 2.5 Novelties FileDirector offers an easy way to design the filing system in WinClient. The filing system provides an Explorer-like structure in WinClient. The
Tutorial 2 - COBOL Erstellen, Kompilieren und Ausführen eines
 Tutorial 2 - COBOL Erstellen, Kompilieren und Ausführen eines COBOL-Programms Abt. Techn. Inf., Fakultät für Informations- und Kognitionswissenschaften, Uni Tübingen In dieser Aufgabe wiederholen wir das
Ingenics Project Portal
 Version: 00; Status: E Seite: 1/6 This document is drawn to show the functions of the project portal developed by Ingenics AG. To use the portal enter the following URL in your Browser: https://projectportal.ingenics.de
Produktinformation _147PNdeen
 Produktinformation 201105_147PNdeen Neue Software für die TOUCH PC Auswuchtmaschinen BM 35 Touch, BM 45 Touch, BM 55 Touch Mit der Einführung der BM 11 Touch in die Nussbaum Produktlinie der Rad Auswuchtmaschinen
1. General information... 2 2. Login... 2 3. Home... 3 4. Current applications... 3
 User Manual for Marketing Authorisation and Lifecycle Management of Medicines Inhalt: User Manual for Marketing Authorisation and Lifecycle Management of Medicines... 1 1. General information... 2 2. Login...
Quick Guide Home Network Mode
 Quick Guide Home Network Mode English > 1 German > 3 About the Home Network Mode EN Tivizen Nano & iplug normally work on their own created networks (whose SSID starts with tivizentv or iplug ) in which
p^db=`oj===pìééçêíáåñçêã~íáçå=
 p^db=`oj===pìééçêíáåñçêã~íáçå= Error: "Could not connect to the SQL Server Instance" or "Failed to open a connection to the database." When you attempt to launch ACT! by Sage or ACT by Sage Premium for
Aufgabe 1a Dateiverwaltung unter z/os und TSO/ISPF
 Aufgabe 1a Dateiverwaltung unter z/os und TSO/ISPF Abteilung Technische Informatik, Fakultät für Informations- und Kognitionswissenschaften, Universität Tübingen In diesem Tutorial lernen Sie, wie man
ReadMe zur Installation der BRICKware for Windows, Version 6.1.2. ReadMe on Installing BRICKware for Windows, Version 6.1.2
 ReadMe zur Installation der BRICKware for Windows, Version 6.1.2 Seiten 2-4 ReadMe on Installing BRICKware for Windows, Version 6.1.2 Pages 5/6 BRICKware for Windows ReadMe 1 1 BRICKware for Windows, Version
Getting started with MillPlus IT V530 Winshape
 Getting started with MillPlus IT V530 Winshape Table of contents: Deutsche Bedienungshinweise zur MillPlus IT V530 Programmierplatz... 3 English user directions to the MillPlus IT V530 Programming Station...
Abteilung Internationales CampusCenter
 Abteilung Internationales CampusCenter Instructions for the STiNE Online Enrollment Application for Exchange Students 1. Please go to www.uni-hamburg.de/online-bewerbung and click on Bewerberaccount anlegen
Level 1 German, 2014
 90886 908860 1SUPERVISOR S Level 1 German, 2014 90886 Demonstrate understanding of a variety of German texts on areas of most immediate relevance 9.30 am Wednesday 26 November 2014 Credits: Five Achievement
How to use the large-capacity computer Lilli? IMPORTANT: Access only on JKU Campus!! Using Windows:
 How to use the large-capacity computer Lilli? IMPORTANT: Access only on JKU Campus!! Using Windows: In order to connect to Lilli you need to install the program PUTTY. The program enables you to create
How-To-Do. Hardware Configuration of the CC03 via SIMATIC Manager from Siemens
 How-To-Do Hardware Configuration of the CC03 via SIMATIC Manager from Siemens Content Hardware Configuration of the CC03 via SIMATIC Manager from Siemens... 1 1 General... 2 1.1 Information... 2 1.2 Reference...
Anleitung für Vermieter. Directions for Landlord/Landlady. zum Erstellen eines Accounts und zum Anlegen von Angeboten
 Anleitung für Vermieter zum Erstellen eines Accounts und zum Anlegen von Angeboten Stand: August 2016 Directions for Landlord/Landlady for setting up an account and uploading offers Status: August 2016
Level 1 German, 2016
 90886 908860 1SUPERVISOR S Level 1 German, 2016 90886 Demonstrate understanding of a variety of German texts on areas of most immediate relevance 2.00 p.m. Wednesday 23 November 2016 Credits: Five Achievement
Restschmutzanalyse Residual Dirt Analysis
 Q-App: Restschmutzanalyse Residual Dirt Analysis Differenzwägeapplikation, mit individueller Proben ID Differential weighing application with individual Sample ID Beschreibung Gravimetrische Bestimmung
Die Datenmanipulationssprache SQL
 Die Datenmanipulationssprache SQL Daten eingeben Daten ändern Datenbank-Inhalte aus Dateien laden Seite 1 Data Manipulation Language A DML statement is executed when you Add new rows to a table Modify
Exercise (Part XI) Anastasia Mochalova, Lehrstuhl für ABWL und Wirtschaftsinformatik, Kath. Universität Eichstätt-Ingolstadt 1
 Anastasia Mochalova, Lehrstuhl für ABWL und Wirtschaftsinformatik, Kath. Universität Eichstätt-Ingolstadt 1") Exercise (Part XI) Notes: The exercise is based on Microsoft Dynamics CRM Online. For all screenshots: Copyright Microsoft Corporation. The sign ## is you personal number to be used in all exercises. All
Exercise (Part XI) Notes: The exercise is based on Microsoft Dynamics CRM Online. For all screenshots: Copyright Microsoft Corporation. The sign ## is you personal number to be used in all exercises. All
NVR Mobile Viewer for iphone/ipad/ipod Touch
 NVR Mobile Viewer for iphone/ipad/ipod Touch Quick Installation Guide DN-16111 DN-16112 DN16113 2 DN-16111, DN-16112, DN-16113 for Mobile ios Quick Guide Table of Contents Download and Install the App...
Die Dokumentation kann auf einem angeschlossenen Sartorius Messwertdrucker erfolgen.
 Q-App: USP V2 Bestimmung des Arbeitsbereiches von Waagen gem. USP Kapitel 41. Determination of the operating range of balances acc. USP Chapter 41. Beschreibung Diese Q-App ist zur Bestimmung des Arbeitsbereiches
iid software tools QuickStartGuide iid USB base driver installation
 iid software tools QuickStartGuide iid software tools USB base driver installation microsensys Nov 2016 Introduction / Einleitung This document describes in short form installation of the microsensys USB
Cameraserver mini. commissioning. Ihre Vision ist unsere Aufgabe
 Cameraserver mini commissioning Page 1 Cameraserver - commissioning Contents 1. Plug IN... 3 2. Turn ON... 3 3. Network configuration... 4 4. Client-Installation... 6 4.1 Desktop Client... 6 4.2 Silverlight
Tutorial 1a Dateiverwaltung und Editieren von Dateien unter TSO
 Tutorial 1a Dateiverwaltung und Editieren von Dateien unter TSO und ISPF Abteilung Technische Informatik, Fakultät für Informations- und Kognitionswissenschaften, Universität Tübingen In dieser Aufgabe
KOBIL SecOVID Token III Manual
 KOBIL SecOVID Token III Manual Einführung Vielen Dank, dass Sie sich für das KOBIL SecOVID Token entschieden haben. Mit dem SecOVID Token haben Sie ein handliches, einfach zu bedienendes Gerät zur universellen
Wählen Sie das MySQL Symbol und erstellen Sie eine Datenbank und einen dazugehörigen User.
 1 English Description on Page 5! German: Viele Dank für den Kauf dieses Produktes. Im nachfolgenden wird ausführlich die Einrichtung des Produktes beschrieben. Für weitere Fragen bitte IM an Hotmausi Congrejo.
Harry gefangen in der Zeit Begleitmaterialien
 Episode 011 Grammar 1. Plural forms of nouns Most nouns can be either singular or plural. The plural indicates that you're talking about several units of the same thing. Ist das Bett zu hart? Sind die
System z Assembler z/os Lehrgang 2008/09 Prof. Dr.-Ing. Wilhelm G. Spruth Teil 3 Arbeiten mit z/os
 System z Assembler z/os Lehrgang 2008/09 Prof. Dr.-Ing. Wilhelm G. Spruth Teil 3 Arbeiten mit z/os Arbeiten mit z/os 1. Voraussetzungen Das Arbeiten mit einem z/os Rechner ist ein wesentlicher und wichtiger
SanStore: Kurzanleitung / SanStore: Quick reference guide
 SanStore Rekorder der Serie MM, MMX, HM und HMX Datenwiedergabe und Backup Datenwiedergabe 1. Drücken Sie die Time Search-Taste auf der Fernbedienung. Hinweis: Falls Sie nach einem Administrator-Passwort
Parameter-Updatesoftware PF-12 Plus
 Parameter-Updatesoftware PF-12 Plus Mai / May 2015 Inhalt 1. Durchführung des Parameter-Updates... 2 2. Kontakt... 6 Content 1. Performance of the parameter-update... 4 2. Contact... 6 1. Durchführung
How to access licensed products from providers who are already operating productively in. General Information... 2. Shibboleth login...
 Shibboleth Tutorial How to access licensed products from providers who are already operating productively in the SWITCHaai federation. General Information... 2 Shibboleth login... 2 Separate registration
General info on using shopping carts with Ogone
 Inhaltsverzeichnisses 1. Disclaimer 2. What is a PSPID? 3. What is an API user? How is it different from other users? 4. What is an operation code? And should I choose "Authorisation" or "Sale"? 5. What
USB Treiber updaten unter Windows 7/Vista
 USB Treiber updaten unter Windows 7/Vista Hinweis: Für den Downloader ist momentan keine 64 Bit Version erhältlich. Der Downloader ist nur kompatibel mit 32 Bit Versionen von Windows 7/Vista. Für den Einsatz
Exercise (Part II) Anastasia Mochalova, Lehrstuhl für ABWL und Wirtschaftsinformatik, Kath. Universität Eichstätt-Ingolstadt 1
 Anastasia Mochalova, Lehrstuhl für ABWL und Wirtschaftsinformatik, Kath. Universität Eichstätt-Ingolstadt 1") Exercise (Part II) Notes: The exercise is based on Microsoft Dynamics CRM Online. For all screenshots: Copyright Microsoft Corporation. The sign ## is you personal number to be used in all exercises. All
Exercise (Part II) Notes: The exercise is based on Microsoft Dynamics CRM Online. For all screenshots: Copyright Microsoft Corporation. The sign ## is you personal number to be used in all exercises. All
KURZANLEITUNG. Firmware-Upgrade: Wie geht das eigentlich?
 KURZANLEITUNG Firmware-Upgrade: Wie geht das eigentlich? Die Firmware ist eine Software, die auf der IP-Kamera installiert ist und alle Funktionen des Gerätes steuert. Nach dem Firmware-Update stehen Ihnen
Tutorial 1.1. Rechnerzgriff
 Tutorial 1.1 Rechnerzgriff Tutorials sind Anweisungen, mit deren Hilfe sie praktische Übungsaufgaben auf unserem Mainframe Rechner durchführen können. Tutorial 1.1 beschreibt, wie sie auf den Rechner zugreifen
Exercise (Part I) Anastasia Mochalova, Lehrstuhl für ABWL und Wirtschaftsinformatik, Kath. Universität Eichstätt-Ingolstadt 1
 Anastasia Mochalova, Lehrstuhl für ABWL und Wirtschaftsinformatik, Kath. Universität Eichstätt-Ingolstadt 1") Exercise (Part I) Notes: The exercise is based on Microsoft Dynamics CRM Online. For all screenshots: Copyright Microsoft Corporation. The sign ## is you personal number to be used in all exercises. All
Exercise (Part I) Notes: The exercise is based on Microsoft Dynamics CRM Online. For all screenshots: Copyright Microsoft Corporation. The sign ## is you personal number to be used in all exercises. All
How-To-Do. Communication to Siemens OPC Server via Ethernet
 How-To-Do Communication to Siemens OPC Server via Content 1 General... 2 1.1 Information... 2 1.2 Reference... 2 2 Configuration of the PC Station... 3 2.1 Create a new Project... 3 2.2 Insert the PC Station...
Titelbild1 ANSYS. Customer Portal LogIn
 Titelbild1 ANSYS Customer Portal LogIn 1 Neuanmeldung Neuanmeldung: Bitte Not yet a member anklicken Adressen-Check Adressdaten eintragen Customer No. ist hier bereits erforderlich HERE - Button Hier nochmal
STRATEGISCHES BETEILIGUNGSCONTROLLING BEI KOMMUNALEN UNTERNEHMEN DER FFENTLICHE ZWECK ALS RICHTSCHNUR FR EIN ZIELGERICHTETE
 BETEILIGUNGSCONTROLLING BEI KOMMUNALEN UNTERNEHMEN DER FFENTLICHE ZWECK ALS RICHTSCHNUR FR EIN ZIELGERICHTETE PDF-SBBKUDFZARFEZ41-APOM3 123 Page File Size 5,348 KB 3 Feb, 2002 TABLE OF CONTENT Introduction
J RG IMMENDORFF STANDORT F R KRITIK MALEREI UND INSPIRATION ERSCHEINT ZUR AUSSTELLUNG IM MUSEUM LU
 J RG IMMENDORFF STANDORT F R KRITIK MALEREI UND INSPIRATION ERSCHEINT ZUR AUSSTELLUNG IM MUSEUM LU 8 Feb, 2016 JRISFRKMUIEZAIMLAPOM-PDF33-0 File 4,455 KB 96 Page If you want to possess a one-stop search
tutor06_2003-03-14netz.doc Tutorial 6 Erstellen eines WebSphere Webapplication Server Servlets unter Unix System Services (USS)
") Tutorial 6 Erstellen eines WebSphere Webapplication Server Servlets unter Unix System Services (USS) Ziel dieses Tutorials ist es, ein Java-Servlet zu erstellen. Aufgabe: Arbeiten Sie das nachfolgende
Tutorial 6 Erstellen eines WebSphere Webapplication Server Servlets unter Unix System Services (USS) Ziel dieses Tutorials ist es, ein Java-Servlet zu erstellen. Aufgabe: Arbeiten Sie das nachfolgende
v i r t u A L C O M P o r t s
 v i r t u A L C O M P o r t s (HO720 / HO730) Installieren und Einstellen Installation and Settings Deutsch / English Installieren und Einstellen des virtuellen COM Ports (HO720 / HO730) Einleitung Laden
DIE NEUORGANISATION IM BEREICH DES SGB II AUSWIRKUNGEN AUF DIE ZUSAMMENARBEIT VON BUND LNDERN UND KOMMUNEN
 DIE NEUORGANISATION IM BEREICH DES SGB II AUSWIRKUNGEN AUF DIE ZUSAMMENARBEIT VON BUND LNDERN UND KOMMUNEN WWOM537-PDFDNIBDSIAADZVBLUK 106 Page File Size 4,077 KB 16 Feb, 2002 COPYRIGHT 2002, ALL RIGHT
USB -> Seriell Adapterkabel Benutzerhandbuch
 USB -> Seriell Adapterkabel Benutzerhandbuch 1. Produkt Eigenschaften 1 2. System Vorraussetzungen 1 3. Treiber Installation (Alle Windows Systeme) 1 4. Den COM Port ändern 2 5. Einstellen eines RS232
microkontrol/kontrol49 System Firmware Update
 microkontrol/kontrol49 System Firmware Update Update Anleitung (für Windows) Dieses Update ist lediglich mit Windows XP kompatibel, versuchen Sie dieses nicht mit Windows 98/ME und 2000 auszuführen. 1.
RailMaster New Version 7.00.p26.01 / 01.08.2014
 RailMaster New Version 7.00.p26.01 / 01.08.2014 English Version Bahnbuchungen so einfach und effizient wie noch nie! Copyright Copyright 2014 Travelport und/oder Tochtergesellschaften. Alle Rechte vorbehalten.
JAVA Look & Feel Design Guidelines
 JAVA Look & Feel Design Guidelines Stefan Diener / Jul 24, 2007 / Page 1 Überblick Motivation Abstände Labels Allgemeine Regeln für Dialoge Toolbar & Menüs Shortcuts & Mnemonics Texte im GUI Weitere interessante
Yealink W52 DECT IP Telefon
 Yealink W52 DECT IP Telefon Manuelle Neukonfiguration Dokumentenversion 1.0 Yealink W52 DECT IP Telefon Mauelle Neukonfiguration Copyright Hinweis Copyright 2016 finocom AG Alle Rechte vorbehalten. Jegliche
Der Adapter Z250I / Z270I lässt sich auf folgenden Betriebssystemen installieren:
 Installationshinweise Z250I / Z270I Adapter IR USB Installation hints Z250I / Z270I Adapter IR USB 06/07 (Laden Sie den Treiber vom WEB, entpacken Sie ihn in ein leeres Verzeichnis und geben Sie dieses
BA63 Zeichensätze/ Character sets
 BA63 Zeichensätze/ Character sets Anhang/ Appendix We would like to know your opinion on this publication. Ihre Meinung/ Your opinion: Please send us a copy of this page if you have any contructive criticism.
Snom 3xx/7xx Serie. Manuelle Neukonfiguration. Dokumentenversion 1.0
 Snom 3xx/7xx Serie Manuelle Neukonfiguration Dokumentenversion 1.0 Snom 3xx/7xx Serie Mauelle Neukonfiguration Copyright Hinweis Copyright 2016 finocom AG Alle Rechte vorbehalten. Jegliche technische Dokumentation,
Level 1 German, 2012
 90886 908860 1SUPERVISOR S Level 1 German, 2012 90886 Demonstrate understanding of a variety of German texts on areas of most immediate relevance 9.30 am Tuesday 13 November 2012 Credits: Five Achievement
Mitglied der Leibniz-Gemeinschaft
 Methods of research into dictionary use: online questionnaires Annette Klosa (Institut für Deutsche Sprache, Mannheim) 5. Arbeitstreffen Netzwerk Internetlexikografie, Leiden, 25./26. März 2013 Content
SmartClass Firmware-Update Vorgehensweise
 Benutzeranweisungen SmartClass Firmware-Update Vorgehensweise 2008.01 (V 1.x.x) Deutsch Please direct all enquiries to your local JDSU sales company. The addresses can be found at: www.jdsu.com/tm-contacts
Frequently asked Questions for Kaercher Citrix (apps.kaercher.com)
") Frequently asked Questions for Kaercher Citrix (apps.kaercher.com) Inhalt Content Citrix-Anmeldung Login to Citrix Was bedeutet PIN und Token (bei Anmeldungen aus dem Internet)? What does PIN and Token
Frequently asked Questions for Kaercher Citrix (apps.kaercher.com) Inhalt Content Citrix-Anmeldung Login to Citrix Was bedeutet PIN und Token (bei Anmeldungen aus dem Internet)? What does PIN and Token
Therefore the respective option of the password-protected menu ("UPDATE TUBE DATA BASE") has to be selected:
 has to be selected:") ENGLISH Version Update Dräger X-act 5000 ("UPDATE TUBE DATA BASE") The "BARCODE OPERATION AIR" mode is used to automatically transfer the needed measurement parameters to the instrument. The Dräger X-act
ENGLISH Version Update Dräger X-act 5000 ("UPDATE TUBE DATA BASE") The "BARCODE OPERATION AIR" mode is used to automatically transfer the needed measurement parameters to the instrument. The Dräger X-act
Beschreibung. Process Description: Sartorius Bestellnummer / Order No.:
 Q-App: USP Advanced Bestimmung des Arbeitsbereiches von Waagen gem. USP Kapitel 41 mit Auswertung über HTML (Q-Web) Determination of the operating range of balances acc. USP Chapter 41 with evaluation
!! Um!in!ADITION!ein!HTML51Werbemittel!anzulegen,!erstellen!Sie!zunächst!ein!neues! Werbemittel!des!Typs!RichMedia.!!!!!!
 HTML5&Werbemittel/erstellen/ Stand:/06/2015/ UminADITIONeinHTML51Werbemittelanzulegen,erstellenSiezunächsteinneues WerbemitteldesTypsRichMedia. Hinweis:// DasinADITIONzuhinterlegende RichMedia1Werbemittelbestehtimmer
Exercise (Part VIII) Anastasia Mochalova, Lehrstuhl für ABWL und Wirtschaftsinformatik, Kath. Universität Eichstätt-Ingolstadt 1
 Anastasia Mochalova, Lehrstuhl für ABWL und Wirtschaftsinformatik, Kath. Universität Eichstätt-Ingolstadt 1") Exercise (Part VIII) Notes: The exercise is based on Microsoft Dynamics CRM Online. For all screenshots: Copyright Microsoft Corporation. The sign ## is you personal number to be used in all exercises.
Exercise (Part VIII) Notes: The exercise is based on Microsoft Dynamics CRM Online. For all screenshots: Copyright Microsoft Corporation. The sign ## is you personal number to be used in all exercises.
EMCO Installationsanleitung Installation instructions
 EMCO Installationsanleitung Installation instructions Installationsanleitung Installation instructions Digitalanzeige digital display C40, FB450 L, FB600 L, EM 14D/17D/20D Ausgabe Edition A 2009-12 Deutsch...2
Level 2 German, 2015
 91126 911260 2SUPERVISOR S Level 2 German, 2015 91126 Demonstrate understanding of a variety of written and / or visual German text(s) on familiar matters 2.00 p.m. Friday 4 December 2015 Credits: Five
Aufgabe 2 b) DB2. Copyright Abt. Computersysteme, Institut für Informatik, Universität Leipzig
 DB2. Copyright Abt. Computersysteme, Institut für Informatik, Universität Leipzig") Aufgabe 2 b) DB2 Copyright Abt. Computersysteme, Institut für Informatik, Universität Leipzig Übersicht Ziel dieses Tutorials ist es, eine z/os - DB2 relationale Datenbank zu erzeugen und auszulesen. In
Aufgabe 2 b) DB2 Copyright Abt. Computersysteme, Institut für Informatik, Universität Leipzig Übersicht Ziel dieses Tutorials ist es, eine z/os - DB2 relationale Datenbank zu erzeugen und auszulesen. In
PONS DIE DREI??? FRAGEZEICHEN, ARCTIC ADVENTURE: ENGLISCH LERNEN MIT JUSTUS, PETER UND BOB
 Read Online and Download Ebook PONS DIE DREI??? FRAGEZEICHEN, ARCTIC ADVENTURE: ENGLISCH LERNEN MIT JUSTUS, PETER UND BOB DOWNLOAD EBOOK : PONS DIE DREI??? FRAGEZEICHEN, ARCTIC ADVENTURE: Click link bellow
Effizientes Arbeiten mit dem Emacs. Suchen und Ersetzen.
 Effizientes Arbeiten mit dem Emacs Suchen und Ersetzen Rainer Orth Alexander Sczyrba {ro,asczyrba}@techfak.uni-bielefeld.de Suchmethoden Simple Search Emacs springt an das nächste Vorkommen des angegebenen
Tutorial 6 REXX Scripting Language
 Tutorial 6 REXX Scripting Language Copyright Abt. Computersysteme, Institut für Informatik, Universität Leipzig PHP, Python (beliebt bei Linux Benutzern), Perl und Tcl/Tk sind weit verbreitete Scripting
CICS Zugriff auf DB2
 CICS Zugriff auf DB2 Abteilung Technische Informatik, Fakultät für Informations- und Kognitionswissenschaften Universität Tübingen Lernziel Sie lernen wie man mit SPUFI eine z/os - DB2 relationale Datenbank
How-To-Do. Hardware Configuration of the CPU 317NET with external CPs on the SPEED Bus by SIMATIC Manager from Siemens
 How-To-Do Hardware Configuration of the CPU 317NET with external CPs on the SPEED Bus by SIMATIC Manager from Siemens Content Hardware Configuration of the CPU 317NET with external CPs on the SPEED Bus
Anbindung DA-PROFINET-Geräte an S7 Connecting DA-PROFINET-Devices to S7
 Anbindung DA-PROFINET-Geräte an S7 - Connecting DA-PROFINET-Devices to S7 Art.-Nr.: V3929 Deutschmann Automation GmbH & Co. KG Carl-Zeiss-Str. 8 D-65520 Bad Camberg Phone: +49-(0)6434-9433-0 Hotline: +49-(0)6434-9433-33
SELF-STUDY DIARY (or Lerntagebuch) GER102
 GER102") SELF-STUDY DIARY (or Lerntagebuch) GER102 This diary has several aims: To show evidence of your independent work by using an electronic Portfolio (i.e. the Mahara e-portfolio) To motivate you to work regularly
SELF-STUDY DIARY (or Lerntagebuch) GER102 This diary has several aims: To show evidence of your independent work by using an electronic Portfolio (i.e. the Mahara e-portfolio) To motivate you to work regularly
1. Einführung. 1.a Dateiverwaltung unter TSO
 1. Einführung 1.a Dateiverwaltung unter TSO Abteilung Technische Informatik, Institut für Informatik, Universität Leipzig Abteilung Technische Informatik, Wilhelm Schickard Institut für Informatik, Universität
Tutorial 1a Dateiverwaltung unter TSO
 Tutorial 1a Dateiverwaltung unter TSO Abteilung Technische Informatik, Institut für Informatik, Universität Leipzig Abteilung Technische Informatik, Wilhelm Schickard Institut für Informatik, Universität
The process runs automatically and the user is guided through it. Data acquisition and the evaluation are done automatically.
 Q-App: UserCal Advanced Benutzerdefinierte Kalibrierroutine mit Auswertung über HTML (Q-Web) User defined calibration routine with evaluation over HTML (Q-Web) Beschreibung Der Workflow hat 2 Ebenen eine
Kurzanleitung um Transponder mit einem scemtec TT Reader und der Software UniDemo zu lesen
 Kurzanleitung um Transponder mit einem scemtec TT Reader und der Software UniDemo zu lesen QuickStart Guide to read a transponder with a scemtec TT reader and software UniDemo Voraussetzung: - PC mit der
Funktionen. Überblick über Stored Functions. Syntax zum Schreiben einer Funktion. Schreiben einer Funktion
 Überblick über Stored Functions Funktionen Eine Funktion ist ein benannter PL/SQL- Block, der einen Wert zurückgibt. Eine Funktion kann in der Datenbank als Objekt zur wiederholbaren Ausführung gespeichert
Instruktionen Mozilla Thunderbird Seite 1
 Instruktionen Mozilla Thunderbird Seite 1 Instruktionen Mozilla Thunderbird Dieses Handbuch wird für Benutzer geschrieben, die bereits ein E-Mail-Konto zusammenbauen lassen im Mozilla Thunderbird und wird
Level 2 German, 2013
 91126 911260 2SUPERVISOR S Level 2 German, 2013 91126 Demonstrate understanding of a variety of written and / or visual German text(s) on familiar matters 9.30 am Monday 11 November 2013 Credits: Five
USB-Stick (USB-Stick größer 4G. Es ist eine größere Partition notwendig als die eines 4GB Rohlings, der mit NTFS formatiert wurde)
") Colorfly i106 Q1 System-Installations-Tutorial Hinweise vor der Installation / Hit for preparation: 准 备 事 项 : 外 接 键 盘 ( 配 套 的 磁 吸 式 键 盘 USB 键 盘 通 过 OTG 插 发 射 器 的 无 线 键 盘 都 可 ); U 盘 ( 大 于 4G 的 空 白 U 盘,
Colorfly i106 Q1 System-Installations-Tutorial Hinweise vor der Installation / Hit for preparation: 准 备 事 项 : 外 接 键 盘 ( 配 套 的 磁 吸 式 键 盘 USB 键 盘 通 过 OTG 插 发 射 器 的 无 线 键 盘 都 可 ); U 盘 ( 大 于 4G 的 空 白 U 盘,
Algorithms for graph visualization
 Algorithms for graph visualization Project - Orthogonal Grid Layout with Small Area W INTER SEMESTER 2013/2014 Martin No llenburg KIT Universita t des Landes Baden-Wu rttemberg und nationales Forschungszentrum
Rätsel 1: Buchstabensalat klassisch, 5 5, A C (10 Punkte) Puzzle 1: Standard As Easy As, 5 5, A C (10 points)
 Puzzle 1: Standard As Easy As, 5 5, A C (10 points)") Rätsel 1: uchstabensalat klassisch, 5 5, (10 Punkte) Puzzle 1: Standard s Easy s, 5 5, (10 points) Rätsel 2: uchstabensalat klassisch, 5 5, (5 Punkte) Puzzle 2: Standard s Easy s, 5 5, (5 points) Rätsel
Rätsel 1: uchstabensalat klassisch, 5 5, (10 Punkte) Puzzle 1: Standard s Easy s, 5 5, (10 points) Rätsel 2: uchstabensalat klassisch, 5 5, (5 Punkte) Puzzle 2: Standard s Easy s, 5 5, (5 points) Rätsel
Bedienungsanleitung User Manual
 Bedienungsanleitung User Manual Einführung Introduction Vielen Dank, dass Sie sich für das KOBIL SecOVID Token entschieden haben. Mit dem SecOVID Token haben Sie ein handliches, einfach zu bedienendes
Readme-USB DIGSI V 4.82
 DIGSI V 4.82 Sehr geehrter Kunde, der USB-Treiber für SIPROTEC-Geräte erlaubt Ihnen, mit den SIPROTEC Geräten 7SJ80/7SK80 über USB zu kommunizieren. Zur Installation oder Aktualisierung des USB-Treibers
Brief instruction on BZStOnline-Portal
 1 Brief instruction on BZStOnline-Portal Start your registration on the website https://www.elsteronline.de/bportal/oeffentlich.tax Recommendation: Print out the Checklist for the registration process
HiOPC Hirschmann Netzmanagement. Anforderungsformular für eine Lizenz. Order form for a license
 HiOPC Hirschmann Netzmanagement Anforderungsformular für eine Lizenz Order form for a license Anforderungsformular für eine Lizenz Vielen Dank für Ihr Interesse an HiOPC, dem SNMP/OPC Gateway von Hirschmann
How-To-Do. OPC-Server with MPI and ISO over TCP/IP Communication. Content. How-To-Do OPC-Server with MPI- und ISO over TCP/IP Communication
 How-To-Do OPC-Server with MPI and ISO over TCP/IP Content OPC-Server with MPI and ISO over TCP/IP... 1 1 General... 2 1.1 Information... 2 1.2 Reference... 2 2 Procedure for the Setup of the OPC Server...
Q-App: Backweigher light V3.0
 Q-App: Backweigher light V3.0 Differenzwägeapplikation, mit individueller Proben ID Differential weighing application with individual Sample ID Beschreibung Einfache Differenzwäge-Applikation mit individueller
Top Tipp. Ref. 08.05.23 DE. Verwenden externer Dateiinhalte in Disclaimern. (sowie: Verwenden von Images in RTF Disclaimern)
") in Disclaimern (sowie: Verwenden von Images in RTF Disclaimern) Ref. 08.05.23 DE Exclaimer UK +44 (0) 845 050 2300 DE +49 2421 5919572 sales@exclaimer.de Das Problem Wir möchten in unseren Emails Werbung
in Disclaimern (sowie: Verwenden von Images in RTF Disclaimern) Ref. 08.05.23 DE Exclaimer UK +44 (0) 845 050 2300 DE +49 2421 5919572 sales@exclaimer.de Das Problem Wir möchten in unseren Emails Werbung
MobiDM-App Handbuch für Windows Mobile
 MobiDM-App Handbuch für Windows Mobile Dieses Handbuch beschreibt die Installation und Nutzung der MobiDM-App für Windows Mobile Version: x.x MobiDM-App Handbuch für Windows Mobile Seite 1 Inhalt 1. WILLKOMMEN
1 xxx. REXX Scripting Language
 1 xxx REXX Scripting Language Abteilung Technische Informatik, Institut für Informatik, Universität Leipzig Abteilung Technische Informatik, Wilhelm Schickard Institut für Informatik,Universität Tübingen