Montageanleitung / Mounting Instruction
|
|
|
- Benjamin Dittmar
- vor 6 Jahren
- Abrufe
Transkript

1 Montageanleitung / Mounting Instruction FR 771, Differential-Kulissenauszug Bodenmontage, 125 kg Tragkraft, mit Gegenführung FR 771, Progressive-Action Pantry Pullout, Bottom Mount 275 LBS. Capacity, with matching Top Guide Ausgabe vom / date: Änderungsstand / revision: 1.2 Artikelnummer / article number: /8

2 1 2 2/8
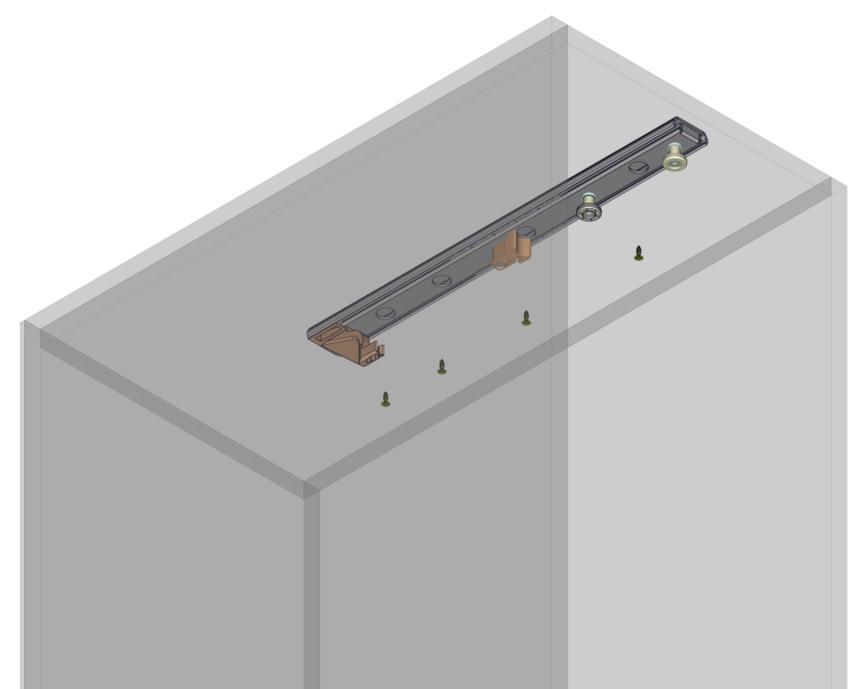
3 1a Ø4/#6 Befestigung / Mounting U-Profil + Gegenführung am Korpus lt. Einbauzeichnung 1 und Bohrbildtabelle Seite 4 entsprechend mit Ø4 Spax-Schraube befestigen. Ø4/#6 + The Top Guide mounts as shown in drawing 1 and the hole location drawing on page 4 using #6 flat head screws. Adapter Ø4/#6 Befestigung / Mounting Ø5/#10 M6/¼-20 + FR 771 Differential-Kulissenauszug am Korpus lt. Einbauzeichnung 2 und Bohrbildtabelle Seite 4 entsprechend mit Ø5 Spax-Schraube und M6 Schraube befestigen. + FR 771 Progressive-Action Pantry-Pullout Drawer slide mounts in cabinet as shown in drawing 2 and according to the hole location drawing on page 4 using #10 flat head screws and M6/¼-20 bolts. 2a 3/8
4 Hole locations 4/8

5 + oberes U-Profil am Auszugmodul lt. Einbauzeichnung 3, 1a und Bohrbildtabelle Seite 4 entsprechend mit Ø4 Spax-Schraube befestigen. + the U-Profile of the Top Guide mounts as shown in drawing 3, 1a and the hole location drawing on page 4 using #6 flat head screws. U-Profil 3 Adapter 4 + unterer Adapter am Auszugmodul lt. Einbauzeichnung 4, 2a und Bohrbildtabelle Seite 4 entsprechend mit Ø4 Spax-Schraube befestigen. + the lower adapter mounts as shown in drawing 4, 2a and the hole location drawing on page 4 using #6 flat head screws. 5a 5b 5/8
.")
.")
.")

6 6a CLICK!! A 6b drücken push + Auszugmodul einsetzen und lt. Einbauzeichnung 5a/b und 6a/b bis zum Anschlag aufschieben. Während des Einschiebens rastet der obere Anschlag drei mal ein und drei deutliche Clicks sollten zu hören sein (Fig. A). Der untere Adapter muss in die Haken der Führung einrasten. + Die Seitenverstellung an der Gegenführung lt. Einbauzeichnung 7 erfolgt über ein im U-Profil angebrachtes Langloch (Fig. B). + Insert the pull-out as shown in drawing 5a/b and 6a/b and push it to the end stop. While sliding-in, the stop piece at the top snaps in three times and it should Click three times (Fig. A). The adapter at the bottom should click into the black hooks on the slide. + Use the slotted holes in the U-profile of the top guide to make the upper lateral adjustment of the pull-out as shown in drawing 8 and Figure. B. B L R C 7 L R + Inbusschrauben für die Adapter-Fixierung (Fig. C) vorsichtig bis zum Anschlag eindrehen. + Die Seitenverstellung an der Bodenführung lt. Einbauzeichnung 7 erfolgt über das Verdrehen der linken und rechten Inbusschraube (Fig. C) im Bereich ±2mm + Close Allen screws carefully to secure the adapter (Fig. C). + Use the Allen screws in the bottom slide as shown in drawing 7 for the lateral adjustment of the pull-out (Fig. C). 6/8
. Nach fertiger Einstellung die seitlichen Inbusschrauben wieder anziehen.")

7 8 Einstellung des Blendenwinkels adjustment of the front tilt D + Die Inbusschrauben der Seitenverstellung müssen gelöst werden um die vertikale Einstellung der Blende lt. Einbauzeichnung 8 zu ermöglichen. Sie erfolgt über das Verdrehen der unteren Inbusschraube (Fig. D). Nach fertiger Einstellung die seitlichen Inbusschrauben wieder anziehen. + Achtung: Schrauben vorsichtig anziehen. + Loosen the lateral adjustment screws prior to making tilt adjustment. Tighten lateral adjustment screws to lock guide in place when finished. + Note: tighten screws firmly. a 9 20mm E + Der Anschlag der Gegenführung lt. Einbauzeichnung 9 hat vier zuladungsabhängige Einstellmöglichkeiten, die auf der richtigen Stellung eingerastet werden muss (Fig. E). + Um die Verstellung zu ermöglichen, muss der Schubkasten 20mm eingefahren werden. Dabei muss die Gegenführung (Index a) ausgefahren bleiben. Sollte sie schließen, muss sie vor der Verstellung wieder ausgefahren werden. + The stop piece at the Top Guide as shown in drawing 9 has to be adjusted to the load by snapping in at the proper position (Fig. E). There are 4 position possibilities. + The top slide has to stay extended while pushing the pull-out 20mm in (the part where the arrow a is pointing). If the slide closes, pull the slide open before attempting adjustment. 7/8

.")
8 1mm 9 F 10 Allen key Inbusschlüssel + Der Mitnehmer für die Einzugsmechanik lt. Einbauzeichnung 10 hat eine zuladungsabhängige Einstellmöglichkeit (Fig. F) die auf 1mm Abstand eingestellt werden muss. + Achtung: Die Laufbahnen der Führung FR 771 dürfen nicht geschmiert werden. Demontage / Disassembly + Im ausgezogenen Zustand müssen die Schrauben für die horizontale und vertikale Blendeneinstellung gelöst werden (Fig. C+D). + Der Schubkasten muss 20mm eingefahren werden. Dabei muss die Gegenführung ausgefahren bleiben. + Der Anschlag der Gegenführung muss nach unten gedrückt und die Gegenführung eingeschoben werden (Fig. G). Danach kann der Schubkasten laut Zeichnung 11 ausgezogen werden, von den Haken ausrasten und herausgehoben werden. + Adjust the catch of the easy close with the loaded pull-out as shown in drawing 10 and Figure F. The black catch block must be set 1mm over the latch/ecd housing as shown using an Allen wrench. + Note: Do not lubricate any part of the FR While extended, loosen the lateral and the tilt adjustment screws (Fig. C+D). + Close the pull out approximately 20mm (3/4 ). The top guide slide should be fully open. If it is not, it will be difficult to push down the stop in the next step. + Push the stop piece down and push the top guide slide completely in to clear the adapter (Fig. G). Pull the pull out forward and up to release from the black hooks as shown in drawing G 8/8
Montageanleitung / Mounting Instruction
 Montageanleitung / Mounting Instruction FR 771, Differential-Kulissenauszug Bodenmontage, 125 kg Tragkraft, mit GegenfÄhrung FR 771, Progressive-Action Pantry Pullout, Bottom Mount 275 LBS. capacity, with
FR777 Differenzial-Kulissenauszug Bodenmontage, 200 kg Tragkraft, mit Gegenführung
 http://www.fulterer.com http://www.fultererusa.com Instructions F777 Differenzial-Kulissenauszug Bodenmontage, 00 kg Tragkraft, mit Gegenführung F777 Progressive-Action Pantry Pull-out, Bottom Mount 450
TriASS Schreibtische. TriASS Schreibtischsystem Montageanleitung. TriASS Desking System Assembly Instructions. Das Assmann Prinzip. Gute Arbeit.
 Das Assmann Prinzip. Gute Arbeit. TriASS Schreibtischsystem Montageanleitung TriASS Desking System Assembly Instructions The Assmann principle. Designed to work well. TriASS Desks Schreibtisch, Typ ST16
Montageanleitung Assembly Instruction Werkbank mit 6 Schubladen/ 2 Türen
 1 Montageanleitung Assembly Instruction Werkbank mit 6 Schubladen/ 2 Türen Art. 25733 Art. 45700 Allgemeine Hinweise: Prüfen Sie bitte vor Zusammenbau, ob alle Teile vorhanden und unbeschädigt sind. Sollte
Produktinformation Access Upgrade Video. Product information Access licence for video upgrade AUV 870-0 T AUV 870-0 F
 Produktinformation Access Upgrade Video Product information Access licence for video upgrade AUV 870-0 T AUV 870-0 F 1+2 100-1216 V1.1.2 1216-11-1159 MAC-Adresse D4-E3-2C-XX-XX-XX 3+4 press click 2 5 6
Montageanleitung DORMA MANET Concept Schiebetür an Wand / an Glas Installation DORMA MANET Concept Sliding door onto wall / onto glass
 Montageanleitung DORMA MANET Concept Schiebetür an Wand / an Glas Installation DORMA MANET Concept Sliding door onto wall / onto glass DORMA-Glas Seite / Page 1 /14 800.52.242.6.32 3n26 Wichtige Informationen:
Montageanleitung DORMA MANET Schiebetür an Wand/an Glas Installation DORMA MANET Sliding door onto wall/onto glass
 Montageanleitung DORMA MANET Schiebetür an Wand/an Glas Installation DORMA MANET Sliding door onto wall/onto glass DORMA-Glas Seite / Page 1 /14 800.52.233.6.32 Wichtige Informationen: Important information:
1: Descrew the org device of the E53 (non navi model) and cutout the plastic frame till vertical side plates (next pic), best use a dremel like tool
 and cutout the plastic frame till vertical side plates (next pic), best use a dremel like tool") Mounting- Instruction BMW E53 Doppel-DIN 31.6.2009 This mounting instruction shows you the best way for an exclusive installation for the double- DIN device, good luck!!! 1 1: Descrew the org device of
Mounting- Instruction BMW E53 Doppel-DIN 31.6.2009 This mounting instruction shows you the best way for an exclusive installation for the double- DIN device, good luck!!! 1 1: Descrew the org device of
Hör auf zu ziehen! Erziehungsleine Training Leash
 Hör auf zu ziehen! Erziehungsleine Training Leash 1 2 3 4 5 6 7 Erziehungsleine Hör auf zu ziehen Ihr Hund zieht an der Leine, und Sie können ihm dieses Verhalten einfach nicht abgewöhnen? Die Erziehungsleine
Zuladung: max. 100kg Load rating: 100kg
 Montageanleitung zum Vollauszugbeschlag Dispensa-VVS für feste und höhenverstellbare Tragrahmen Art.-Nr.: 04235 mit Schnellmontagetechnik Mounting instructions for full-extension top- and bottom runner
Anbauanleitung Seilwindenanbausatz Fitting instruction winch mounting kit Nissan Navara 2,5L D401 D40 - R51
 Am Schwimmbad 8 95326 Kulmbach Tel. 09221 / 95620 Fax 09221 / 956222 e-mail: verkauf@taubenreuther.de Anbauanleitung Seilwindenanbausatz Fitting instruction winch mounting kit Nissan Navara 2,5L D401 D40
Produktinformation _185PNdeen
 Produktinformation 201407_185PNdeen Solldaten-UPGRADE Juli 2014 WA 900 / 920 / 020 / 950 / 970 CURA S 800 / 860 / 060 / 900 / 960 WAB01 / WAB 02 CCT CURA R1200 / CURA R2000/ API R2000 BOSCH FWA 51x Auf
Installation guide for Cloud and Square
 Installation guide for Cloud and Square 1. Scope of delivery 1.1 Baffle tile package and ceiling construction - 13 pcs. of baffles - Sub construction - 4 pcs. of distance tubes white (for direct mounting)
i 90 -Adapter als Zubehör erhältlich 90 adapter Available as accessory Montageanleitung RJ45-Buchse Installation instruction RJ45-Jack 1/8
 RJ-uchse RJ-Jack RJ-uchse ohne 90 -dapter RJ-Jack without 90 adapter Seite & Mounting instruction page & Demontageanleitung Seite Disassembling instruction page RJ-uchse mit 90 -dapter RJ-Jack with 90
Monteringsanvisning. Assembly instructions. Aufbauanleitung
 Monteringsanvisning Assembly instructions Aufbauanleitung 11 600-0 Viktig säkerhetsinformation Pallstället måste vara fastbultat i golvet (se tillverkarens instruktioner) Bakre bärbalk måste vara fastbultad
1 Allgemeine Information
 1 Allgemeine Information ACHTUNG! Der Betriebsdruck der Klasse 867 ist 6 bar. Sollte der Druck Ihrer Versorgungsleitung höher als 6 bar sein, muss der Druck an der Versorgungseinheit der Nähmaschine auf
Einbauanleitung & Radioblende Doppel-/1-DIN Honda Civic
 Einbauanleitung 14070 & 14120 Radioblende Doppel-/1-DIN Honda Civic 2006-2010 Mounting instructions 14070 & 14120 Radio frame double/1-din Honda Civic 2006-2010 Lieferumfang / Kit components A) Radiorahmen,
roll-up SONJA powerdisplays Aufbauanleitung Assemble instructions
 powerdisplay SONJA Mit Rollfunktion! Die Werbefläche rollt sich vollständig in das Display. So ist Ihre Werbung geschützt und in Sekunden wieder aufgebaut. Farbe: chrom/silber inkl. Tasche With rolling
MONTAGEANLEITUNG / SHORT INSTRUCTION MANUAL
 1. Sichere Position des Statives / Secure position of tripod 2. Montage der Kranstütze/ Assembling of column on the stand 3. Sternschraube mit Beilagscheibe sicher befestigen / Fix screw with shim 4. Sternschraube
MONTAGEANLEITUNG / SHORT INSTRUCTION MANUAL
 1. Sichere Position des Statives / Secure position of tripod 2. Bestandteile für Montage der Kranstütze / Parts for assembling of column 3. 2 Teflonscheiben auflegen / Assembling of two teflon-coated discs
Directions. Trouble shooting
 Betriebsanleitung 1. Legen Sie die Uhr mit der Vorderwand auf den Tisch und öffnen Sie die Rückwand des Uhrengehäuses (A). 2. Entfernen Sie das Papier welches zwischen die Rückwand und Tonfeder geklemmt
1. Verwendung des Teilesatzes. 2. Komponenten des Teilesatzes
 1. Verwendung des Teilesatzes Der Teilesatz Bandzuführung ist für Kettenstichmaschinen der Klasse 176 vorgesehen. 2. Komponenten des Teilesatzes Der Teilesatz besteht aus folgenden Bauteilen: 1 x Armdeckel
Ausgleichshalter / Compensation Holder
 usgleichshalter / Compensation Holder usgleichshalter Produkt-Eigenschaften: usgleichshalter für HSK und SK Für Werkzeuge mit Weldon Spanfläche Produkt-Vorteile: Korrektur von Rundlauffehler und chsfehler
Montageanleitung/ Fitting manual KIT.RWU..-E-OS-100, 120, 130, 140, 300, 340, 350
 Seite Lieferausführung kontrollieren... 2 Führungswagen demontieren... 6 Vorbereitungen für den KIT-Einbau... 7 Dichtungs-KIT einbauen... 9 Führungswagen aufschieben, KIT fertig montieren... Verschluss-
BMW F 800 GS Motorschutzbügel Nr.: schwarz Nr.: titan
 Motorschutzbügel Nr.: 50.65 00 0 schwarz Nr.: 50.65 00 99 titan Der Bausatz umfaßt die folgenden Teile: Stück Bestellnr. Bezeichnung 705.50 Motorschutzbügel links 705.5 Motorschutzbügel rechts Schraubensatz:
!!! UNBEDINGT BEACHTEN!!!
 Produktinformation 201501_197PAdeen Deutsch Seite 1 5 English page 6 10 Solldaten-Update Achsvermessung 2015 WA 900 / 920 / 020 / 950 / 970 CURA S 800 / 860 / 060 / 900 / 960 WAB01 / WAB 02 CCT / RoboLigner
Kurzanleitung / Instructions Auswechseln des Kupplungsystems / Exchange of the clutch system
 Kurzanleitung / Instructions Auswechseln des Kupplungsystems / Exchange of the clutch system Kupplungssystem Version 2 / Clutch System - Version 2 Bitte beachten Sie, dass diese Anleitung zum austauschen
FOX EXHAUST SYSTEMS//
 FOX EXHAUST SYSTEMS// MONTAGEANLEITUNG V2397/ V2398 Opel Adam ENDSCHALLDÄMPFER/ VORSCHALLDÄMPFER Artikelnummer: OP210005-xxx / OP210000-VSD 1. Lieferumfang: 1x 1x 1x 1xVerbindungsrohr 2 1xVerbindungsrohr
Steckdosenleiste Wand/ Ecke (923.0XX)
") Übersicht Overview Vue d ensemble Visión general Privire de ansamblu Overzicht -70565 Stuttgart Seite 1 von 2 Übersicht Overview Vue d ensemble Visión general Privire de ansamblu Overzicht Nr. Beschreibung
Übersicht Overview Vue d ensemble Visión general Privire de ansamblu Overzicht -70565 Stuttgart Seite 1 von 2 Übersicht Overview Vue d ensemble Visión general Privire de ansamblu Overzicht Nr. Beschreibung
Krauser GmbH An der Steinmauer 6 D Pirmasens Tel.:
 Motorschutzbügel 50.544 00 0 chrom 3008.007.0 chrom Montage Der Bausatz umfaßt die folgenden Teile: Stück Bestellnr. Bezeichnung 70000849 Motorschutzbügel links 700008430 Motorschutzbügel rechts 4 50.930
Westfalia Bedienungsanleitung. Nr
 Westfalia Bedienungsanleitung Nr. 108610 Bedienungsanleitung Edelstahl Sicherheits-Brennbehälter Artikel Nr. 10 99 83 Sicherheitshinweise Der Sicherheits-Brennbehälter ist zur Verwendung in dem Westfalia
Bilderschienen picture rails. Bilderschienen
 Bilderschienen Bilderschienen möller deco-technik möller deco-technique Bilderschienen Der Einsatz von Bilderschienen, im Wohn- und Objektbereich, findet immer mehr Anklang. Diese Schienen werden mittels
66825 Freilichtbühne mit micro-sound Rock-Band und LED-Light-Show H0
 66825 Freilichtbühne mit micro-sound Rock-Band und LED-Light-Show H0 Open-Air Stage with micro-sound Rock Band and LED Light Show H0 Théâtre en plein air+ micro-sound groupe de rock et LED console lumière
Installation manual for Conen height adjustable pylon systems for interactive whiteboards Montageanleitung für Conen höhenverstellbare Pylonensysteme
 Installation manual for Conen height adjustable pylon systems for interactive whiteboards Montageanleitung für Conen höhenverstellbare Pylonensysteme für interaktive Whiteboards 1. Introduction Einleitung
Installation manual / Montageanleitung WBC2 splice patch with Fibertray Spleissung/Rangierung mit Fibertray
 Content of Assembly Instruction I. Required tools II. Required parts III. Installation Inhalt der Montageanleitung I. Benötigte Werkzeuge II. Benötigte Teile III. Installation I. Required tools: I. Benötigtes
1. Verwendung des Teilesatzes. 2. Komponenten des Teilesatzes
 1. Verwendung des Teilesatzes Der Teilesatz Elektropneumatische Mehrweite ist für Kettenstichmaschinen der Klasse 175 und 176 vorgesehen. 2. Komponenten des Teilesatzes Der Teilesatz besteht aus folgenden
114-18131 30-SEP-15 Rev F
 Application Specification Verarbeitungsspezifikation 114-18131 30-SEP-15 Flachsteckergehäuse, 1-10polig, radialdicht, 2.8mm 1 GELTUNGSBEREICH 1.1 INHALT 1.2 PRODUKTÜBERSICHT 2 ANZUWENDENDE UNTERLAGEN 2.1
HPS.04.696.10000/B Revision: 01. Hauptständer KTM 990 SM-T / SM-R '09 Center Stand KTM 990 SM-T / SM-R '09
 Hauptständer KTM 0 SM-T / SM-R '0 Center Stand KTM 0 SM-T / SM-R '0 Montagehinweise Revision: 01 Mounting Instruction Achtung: Die Kurven- und Bodenfreiheit kann durch einen Hauptständer eingeschränkt
Cloud Square. Montageanleitung Installation guide. OWAconsult collection
 Cloud Square Montageanleitung Installation guide OWAconsult collection 2 Montageanleitung für Cloud und Square 1. Lieferumfang 1. Scope of delivery 1.1 Lamellen- und Konstruktionspaket Tile package and
SW-MOTECH GmbH & Co. KG Ernteweg 8/ Rauschenberg Germany. Tel. +49 (0) 64 25/ Fax +49 (0) 64 25/
 64 25/ Fax +49 (0) 64 25/") ATTENTION: The assembly of this product can be complicated and requires a good technical understanding. If you are not sure of how to do this, have a s pecialty garage perform the mounting and service.
ATTENTION: The assembly of this product can be complicated and requires a good technical understanding. If you are not sure of how to do this, have a s pecialty garage perform the mounting and service.
FOX-150/E... FOX-350/E Solar Laderegler
 FOX-150/E... FOX-350/E Solar Laderegler Solar Charge Regulator Einbauanleitung mounting guidelines Einbauanleitung Diese Anleitung ist eine Ergänzung zu folgenden Installationsanleitungen: D "FOX-150
Montageanleitung DORMA MANET. Drehflügeltürsystem. Mounting instruction DORMA MANET. Pivoting door system. Stand/Issue /
 Montageanleitung DORMA MANET Drehflügeltürsystem Mounting instruction DORMA MANET Pivoting door system Stand/Issue 10.08 / 003456 800.52.318.6.32 Wichtige Informationen: Important information: 1 = Bauteil/Baugruppe
Montageanleitung Racing Lenkerstummelsatz
 Montageanleitung Racing Lenkerstummelsatz Bei Verwendung der Racing Lenkerstummel muss erst ein Loch (Bild 2) zur Befestigung der Armaturen gebohrt werden. Durchmesser = 3,5 mm / Abstand vom Lenkerende
Level 1 German, 2012
 90886 908860 1SUPERVISOR S Level 1 German, 2012 90886 Demonstrate understanding of a variety of German texts on areas of most immediate relevance 9.30 am Tuesday 13 November 2012 Credits: Five Achievement
Level 1 German, 2014
 90886 908860 1SUPERVISOR S Level 1 German, 2014 90886 Demonstrate understanding of a variety of German texts on areas of most immediate relevance 9.30 am Wednesday 26 November 2014 Credits: Five Achievement
Coverstitch Binder 3. / 8 " (10mm)
") 1 PFAFF coverlock.0, coverlock 4.0 HUSQVARNA VIKING HUSKYLOCK S21, HUSKYLOCK S25, SINGER 14T970 CoverStitch machine Contents: 1. 10mm ( /8") Binder 2. Presser foot. Mounting Plate and screws 4. Thumb screws
1 PFAFF coverlock.0, coverlock 4.0 HUSQVARNA VIKING HUSKYLOCK S21, HUSKYLOCK S25, SINGER 14T970 CoverStitch machine Contents: 1. 10mm ( /8") Binder 2. Presser foot. Mounting Plate and screws 4. Thumb screws
Montageanleitung DORMA PT 10 Unterer Eckbeschlag DORMA PT 20 Oberer Eckbeschlag
 Montageanleitung DORMA PT 10 Unterer Eckbeschlag DORMA PT 20 Oberer Eckbeschlag Installation instruction DORMA PT 10 Bottom patch fitting DORMA PT 20 Top patch fitting / 003620 800.2.368.6.32 Wichtige
MACO RUSTICO. Vario-Lamellenbeschlag Lamellenstück eingefräst Vario-louvre fittings Louvre end piece routed-in LADENBESCHLÄGE SHUTTER HARDWARE
 TECHNIK DIE BEWEGT TECHNOLOGY IN MOTION MACO RUSTICO LADENBESCHLÄGE SHUTTER HARDWARE MONTAGEHINWEISE INSTALLATION INSTRUCTIONS Ablängen der Profilstangen Ablänghilfe bis zum Anschlag drehen. Verschluss-
Manual Positioning Systems
 M anue l l e Po si tio n iers y s t e me Manual Positioning Systems Linearversteller LT...4-4 linear translation stages LT Kreuztische MT...4-5 XY translation stages MT Hubtische HT...4-6 vertical translation
Level 2 German, 2015
 91126 911260 2SUPERVISOR S Level 2 German, 2015 91126 Demonstrate understanding of a variety of written and / or visual German text(s) on familiar matters 2.00 p.m. Friday 4 December 2015 Credits: Five
schwarz schwarz Montage 1 Vorbereitung: Soziussitzbank abnehmen. Zündspule herausnehmen, um die darunterliegenden Muttern der Kenn
 60.7501 schwarz 4007.006.11 schwarz Montage Der Bausatz umfaßt die folgenden Teile: Stück Bestellnr. Bezeichnung 70000706 C-Bow schwarz 1 70000771 C-Bow Halteadapter vorne links 1 7000077 C-Bow Halteadapter
Mast- / Wandmontage Kit Einbauanleitung Pole- / Wallmount Kit Installation Guide
 Alpha ATROX Mast- / Wandmontage Kit Einbauanleitung Pole- / Wallmount Kit Installation Guide Ihr Partner für Energieversorgungslösungen Mast- und Wandmontage Kit Alpha ATROX Pole- and Wall Mount Kit Alpha
How to change the Mechanical Seal
 How to change the Mechanical Seal. Remove the 3 screws form the Endcover (pos.0) on the opposite side of the leaking seal. If this is the drive end remove Key (pos.00) first. 2. Keep the shims (pos.90)
Montageanweisung Mounting Instructions. ADSL/VDSL2 Splitter ADSL/VDSL2 Splitter
 Montageanweisung Mounting Instructions ADSL/VDSL2 Splitter ADSL/VDSL2 Splitter für 12 Teilnehmer for 12 subscribers Inhaltsverzeichnis Contents Seite / page 1 Anwendungsbereich Application area 3 2 Notwendige
Seitenkoffer Topcases Gepäckträger Lock it System Softbags Aluminiumkoffer Lederkoffer Schutzbügel Hauptständer Chopper-Parts Accessoires
 Gepäckbrückenplatte Art.-Nr.: 650.974 0 0 schwarz Montage Seitenkoffer Topcases Gepäckträger Lock it System Aluminiumkoffer Lederkoffer Schutzbügel Hauptständer Chopper-Parts Accessoires Der Bausatz umfaßt
M1.2 x 8 mm M1.4 x 10 mm M0.5 - M1.2 mm
 NORMTEILE / HARDWARE 0 Muttern / 0 nuts 0 Muttern / 0 nuts 0 Muttern / 0 nuts Edelstahl VA / stainless steel Edelstahl VA / stainless steel Edelstahl VA / stainless steel M M.8 mm M.0 mm M. mm SW. mm SW.
Hohner Service Team - Diatonisch/ Diatonic - Mundharmonika Reparaturen, Stimmungen, Einstellungen Harmonica repairs, adjustments and tuning
 Hohner Service Team - Diatonisch/ Diatonic - Reparaturen, Stimmungen, Einstellungen repairs, adjustments and tuning 1 Hohner Service Team Ciro Lenti Service Gabi Hand Chromonica Christoph Meissner Diatonic/
Montageanleitung für Kompakt-Laufwagen LFKL. Fitting manual for compact carriage LFKL 00015DAB
 Montageanleitung für Kompakt-Laufwagen LFKL Fitting manual for compact carriage LFKL 0005DAB Lieferumfang Kompakt-Laufwagen, vormontiert Schmier- und Abstreifeinheit Senkschraube DIN 7 99 Abdeckkappen
CLE. Heatpipe-System Kühlleistung > 30W. Heatpipe-System Kühlleistung > 25W. Heatpipe-System Kühlleistung > 25W. Heatpipe-System Kühlleistung > 20W
 LED FORTIMO KÜHLKÖRPER led fortimo heat sink system www.cardanlight.com CLE CARDAN LIGHT EUROPE CLE FORTIMO ADAPTER IP20 XFFO100....GR..SW..WS silbergrau weiß 19,90 CLE FORTIMO Adapter für CLE kardanische
p^db=`oj===pìééçêíáåñçêã~íáçå=
 p^db=`oj===pìééçêíáåñçêã~íáçå= Error: "Could not connect to the SQL Server Instance" or "Failed to open a connection to the database." When you attempt to launch ACT! by Sage or ACT by Sage Premium for
Installation manual for Conen height adjustable spring tension mechanism for interactive whiteboards Montageanleitung für Conen höhenverstellbare
 Installation manual for Conen height adjustable spring tension mechanism for interactive whiteboards Montageanleitung für Conen höhenverstellbare Federzugsysteme für interaktive Whiteboards 1. Introduction
Werkzeugwagen VAS Tool trolley VAS
 Flexibel einsetzbar Bedarfsgerecht zu konfigurieren Hochwertige Qualität Can be used flexibly Can be configured according to requirements High level of quality Werkzeugwagen VAS 276 001 Tool trolley VAS
Instant Roof INSTRUCTION AUFBAUANLEITUNG
 Instant Roof INSTRUCTION AUFBAUANLEITUNG 1 1 6 5 1 x Sides wall X Seitenwand x Front wall X 1 Vorderwand 1x x Mud guard x Windschutz x Storm strap x 7 Sturmabspannung 7x x roof x 1 Dachstange 1x x 1 Keder
rear view server cabinet perforated steel door, divided
 19 Server Cabinet Standard Page 1 of 5 Art.-No. 693126.60P1P2.. 693147.82P2 depth rail + traverse for high max. load front view server cabinet perforated steel door, one-part rear view server cabinet perforated
HONDA NC 700 X HONDA NC 700 X
 Hauptständer Artikel Nr.: 505.97 Artikel Nr.: 00.057.50 Montage Der Bausatz umfaßt die folgenden Teile: St. Bestellnr. Bezeichnung 700007869 Hauptständer NC 700 X 700007870 Haltebolzen 70000787 Federplatte
Krauser GmbH An der Steinmauer 6 D Pirmasens Tel.: Fax:
 60.967 schwarz 60.965 schwarz 4001.050.11 schwarz 4001.048.11 schwarz Montage Der Bausatz umfaßt die folgenden Teile: Stück Bestellnr. Bezeichnung 70000706 C-Bow schwarz 1 70000759 Halteadapter links 1
Level 1 German, 2016
 90886 908860 1SUPERVISOR S Level 1 German, 2016 90886 Demonstrate understanding of a variety of German texts on areas of most immediate relevance 2.00 p.m. Wednesday 23 November 2016 Credits: Five Achievement
fastpim 1 H fast switching H bridge module Features: - 1 Phase Input Rectifier Bridge - 1 Phase fast switching IGBT + FRED full H bridge - NTC
 fast switching H bridge module Features: - 1 Phase Input Rectifier Bridge - 1 Phase fast switching IGBT + FRED full H bridge - NTC Copyright by Vincotech 1 Revision: 1 module types / Produkttypen Part-Number
Level 2 German, 2013
 91126 911260 2SUPERVISOR S Level 2 German, 2013 91126 Demonstrate understanding of a variety of written and / or visual German text(s) on familiar matters 9.30 am Monday 11 November 2013 Credits: Five
Beipackzettel Instruction leaflet
 Beipackzettel Instruction leaflet Montage an einen Wandarm Mounting to wall arm Pepperl+Fuchs GmbH Antoniusstr. 21 D-73249 Wernau Germany Tel.: +49(0) 621 776-3712 Fax: +49(0) 621 776-3729 www.pepperl-fuchs.com
Tuesday 10 May 2011 Afternoon Time: 30 minutes plus 5 minutes reading time
 Write your name here Surname Other names Edexcel IGCSE German Paper 1: Listening Centre Number Candidate Number Tuesday 10 May 2011 Afternoon Time: 30 minutes plus 5 minutes reading time You do not need
TV- und Bildschirmhalterungen TV and monitor screen mounts
 TV- und Bildschirmhalterungen TV and monitor screen mounts Die richtige Halterung finden / Finding the right mount Platzieren Sie Ihren LCD-, Plasma oder LED-Fernseher optimal im Raum. Ganz nach Ihren
Uhrenbeweger Watch winders. Crystal
 Uhrenbeweger Watch winders Crystal Sehr geehrter Kunde, unsere Uhrenbeweger sind so konstruiert, dass sie trotz kompakter Abmessungen nur geringe Laufgeräusche verursachen. Jeder Antrieb erzeugt jedoch
Description of the PHOTOSONICS 4B - 35mm Highspeed Camera
 Description of the PHOTOSONICS 4B - 35mm Highspeed Camera Page 1/3 Framing Rates: Operating Voltage: Current Draw: Film: Magazines: Exposure Time: Movement: Image Steadyness: From 420 to 2.100 fps at five
How-To-Do. Communication to Siemens OPC Server via Ethernet
 How-To-Do Communication to Siemens OPC Server via Content 1 General... 2 1.1 Information... 2 1.2 Reference... 2 2 Configuration of the PC Station... 3 2.1 Create a new Project... 3 2.2 Insert the PC Station...
Schnell-Start-Anleitung Quick Start Guide
 Schnell-Start-Anleitung Quick Start Guide 3 1. Cube anschließen Schließen Sie den Cube an die Stromversorgung an. Verbinden Sie den Cube mit dem Router. Die Power- und die Internet-LED beginnen zu blinken,
03933L. Drehmomentschlüssel BEDIENUNGSANLEITUNG. umschaltbar, eingestellter Wert arretierbar, in Kunststoffkassette
 Drehmomentschlüssel umschaltbar, eingestellter Wert arretierbar, in Kunststoffkassette Genauigkeit +/- 4% vom Skalenwert Seriennummer und Zertifikat 40-210 Nm 24 Zähne Bedienung a) Drehmomentschlüssel
KOBIL SecOVID Token III Manual
 KOBIL SecOVID Token III Manual Einführung Vielen Dank, dass Sie sich für das KOBIL SecOVID Token entschieden haben. Mit dem SecOVID Token haben Sie ein handliches, einfach zu bedienendes Gerät zur universellen
Deceleration Technology. Rotary Dampers with high-torque range WRD-H 0607 WRD-H 0805 WRD-H 1208 WRD-H 1610 WRD-H
 Rotary Dampers with high-torque range WRD-H 67 WRD-H 85 WRD-H 128 WRD-H 161 WRD-H 21 Deceleration Technology ONLINE CALCULATION AND 2D / 3D CAD DOWNLOAD M m L F Benefits Applications: - Mechanical and
Printed Circuit Board Replacement for Sievers Model PPT TOC Analyzer
 Printed Circuit Board Replacement for Sievers Model PPT TOC Analyzer 1. Purpose 2. Scope Replace printed circuit boards (PCB s) in the Sievers Model PPT TOC analyzer. This procedure describes how to replace
Umschaltadapter/ Changeover / Trennadapter Disconnection Adapter für LSA-PLUS NT for LSA-PLUS NT. Montageanweisung Mounting Instructions
 Umschaltadapter/ Changeover / Trennadapter Disconnection Adapter für LSA-PLUS NT for LSA-PLUS NT Montageanweisung Mounting Instructions Der Umschalter dient zum unterbrechungsfreien Umschalten von Installations-drähten
4M Economy INSTRUCTION MANUAL
 4M Economy INSTRUCTION MANUAL Part List Part no. Qty 4x4m 4x6m 4x8m 4x10m No.1 6 8 10 12 No.2 6 9 12 15 No.3 6 8 10 12 No.4 6 6 6 6 No.5 3 6 9 12 No.6 56 64 72 80 No.7 30 42 54 66 Nr.8 4 4 4 4 No.9 4 4
Service. Bedienelement / operating panel
 Service Bedienelement / operating panel 21 894 000 21 895 000 21 892 000 21 893 000 Dampfdusche Serie 500 Seite Seite 2-7 2-7 Steam shower series 500 page page 2-7 2-7 Dampfdusche Serie 600 Seite Seite
How-To-Do. Hardware Configuration of the CC03 via SIMATIC Manager from Siemens
 How-To-Do Hardware Configuration of the CC03 via SIMATIC Manager from Siemens Content Hardware Configuration of the CC03 via SIMATIC Manager from Siemens... 1 1 General... 2 1.1 Information... 2 1.2 Reference...
Micro Push Pull Steckverbinder Micro Push Pull connectors
 BF-C BF-B BF-A 7/8 M8 M-US M-T M-S M-D M-B Verteiler VL M-A M8 M RD0 RD M Bajonett M M6 IP67 M6 IP0 PP IP67 NCC Bajonett SI IP67 M9 IP67 M9 IP0 PP IP67 MPP IP67 Bajonett SI IP67 SI IP0 Steckverbinder connectors
Seitenkoffer Topcases Gepäckträger Lock it System Softbags Aluminiumkoffer Lederkoffer Schutzbügel Hauptständer Chopper-Parts Quad-Parts Accessoires
 Motorschutzbügel Artikel-Nr.: 01.0 00 0 chrom Montage Seitenkoffer Topcases Gepäckträger Lock it System Aluminiumkoffer Lederkoffer Schutzbügel Hauptständer Chopper-Parts Quad-Parts Accessoires Der Bausatz
torqeedo heckmotorhalterung stern-motor-bracket holiday/explorer Riverstar, adventure
 torqeedo heckmotorhalterung stern-motor-bracket holiday/explorer Riverstar, adventure MONTAGEANLEITUNG Assembly instructions Besitzer/Name: Owner/name: PLZ, Ort: Post code, town: Straße, Nr.: Street, nr:
Montageanleitung DORMA PT 40. Winkeloberlichtbeschlag. Installation instruction DORMA PT 40. Patch fitting for overpanel and sidelight
 Montageanleitung DORMA PT 40 Winkeloberlichtbeschlag Installation instruction DORMA PT 40 Patch fitting for overpanel and sidelight Stand/Issue 09.0 / 00331 00.5.37..3 Wichtige Informationen: Important
VICTOR STRINGING PATTERN 72-HOLES. Starting Point lengthwise. Ending cross point (C6)
") VICTOR STRINGING PATTERN 72-HOLES Starting Point lengthwise Ending cross point (C6) C6 Tie off cross after two cross lines. Starting Point cross (B8) VICTOR STRINGING PATTERN 76-HOLES Starting Point lengthwise
VICTOR STRINGING PATTERN 72-HOLES Starting Point lengthwise Ending cross point (C6) C6 Tie off cross after two cross lines. Starting Point cross (B8) VICTOR STRINGING PATTERN 76-HOLES Starting Point lengthwise
Mar 2008 Rev _A
 Application Specification Verarbeitungs-Spezifikation 114-18919 12 Mar 2008 Rev _A 75way and 52way MQS connector, unsealed 75-polige und 52-polige MQS Steckverbindung, ungedichtet 1. GENERAL ALLGEMEINES
Hohner Service Team - Chromonica - Mundharmonika Reparaturen, Stimmungen, Einstellungen Harmonica repairs, adjustments and tuning
 Hohner Service Team - Chromonica - Reparaturen, Stimmungen, Einstellungen repairs, adjustments and tuning 1 Hohner Service Team Ciro Lenti Service Gabi Hand Chromonica Christoph Meissner Diatonic/ Themen/
NEWSLETTER. FileDirector Version 2.5 Novelties. Filing system designer. Filing system in WinClient
 Filing system designer FileDirector Version 2.5 Novelties FileDirector offers an easy way to design the filing system in WinClient. The filing system provides an Explorer-like structure in WinClient. The
Seitenkoffer Topcases Gepäckträger Lock it System Softbags Aluminiumkoffer Lederkoffer Schutzbügel Hauptständer Chopper-Parts Accessoires
 Motorschutzbügel ab Bj. 06 Art.-Nr.: 0.0 000 schwarz Ausführung B Montageanleitung Seitenkoffer Topcases Gepäckträger Lock it System Aluminiumkoffer Lederkoffer Schutzbügel Hauptständer Chopper-Parts Accessoires
C R 2025 C LOSE PUSH OPEN
 3V C R 2025 C LOSE PUSH OPEN ) ) ) 25 222 3V C R 2025 C LOSE PUSH OPEN 25 222 3V C R 2025 C LOSE PUSH OPEN 25 222 Den här symbolen på produkten eller i instruktionerna betyder att den elektriska
USB Treiber updaten unter Windows 7/Vista
 USB Treiber updaten unter Windows 7/Vista Hinweis: Für den Downloader ist momentan keine 64 Bit Version erhältlich. Der Downloader ist nur kompatibel mit 32 Bit Versionen von Windows 7/Vista. Für den Einsatz
Thermalright. Macho 120
 Thermalright Macho 120 Macho 120 Assembly package 4 1 4 4 4 7 5 4 4 4 1 Chill Factor 1 1 2 1 8 Macho 120 Intel 775/1155/1156/1366 Exploded View Important! Before proceeding with installation, please check
Phone: 800.894.0412 - Fax: 888.723.4773 - Web: www.ctiautomation.net - Email: info@ctiautomation.net
 MLDSET-Mx-yy00T (T-Shape) MLDSET Komponenten (im Lieferumfang enthalten): UDC-yy00-S2 Muting Transceiver MLD530-RT2M oder MLD530-RT3M MLD-M002 oder MLD-M003 SET-AC-MTX.2-2S (T-Shape) SET-AC-MTX.2-2SA (L-Shape)
STX RJ45 Steckereinsatz
 STX RJ Steckereinsatz Montageanleitung Lieferumfang: STX V RJ Steckerset Cat. J00A000 J00A000 J00A0009 J00A000 Lieferumfang: STX V RJ Steckerset Cat. J00A00 J00A00 Lieferumfang: STX V RJ Steckerset Cat.
VGM. VGM information. HAMBURG SÜD VGM WEB PORTAL - USER GUIDE June 2016
 Overview The Hamburg Süd VGM-Portal is an application which enables to submit VGM information directly to Hamburg Süd via our e-portal web page. You can choose to insert VGM information directly, or download
Campus Drucker Anleitung/ Campus Drucker User Guide
 Campus Drucker Anleitung/ Campus Drucker User Guide Aufwerten der Studentcard oder Gästekarte und Gerät starten, Seite 1 Charge blue Studentcard or guest card Page 1 Kopieren von Vorlagen auf Campus Drucker