WatchGuard XTM Quick Start Guide. Guide de démarrage rapide Kurzanleitung Guida introduttiva. Guía Rápida. WatchGuard Technologies, Inc.
|
|
|
- Axel Wolf
- vor 6 Jahren
- Abrufe
Transkript


1 WatchGuard XTM 050 Quick Start Guide Guide de démarrage rapide Kurzanleitung Guida introduttiva Guía Rápida WatchGuard Technologies, Inc.

 or to add a certificate exception (Mozilla Firefox). Next Steps Congratulations! You have finished basic setup of your WatchGuard XTM 050.")
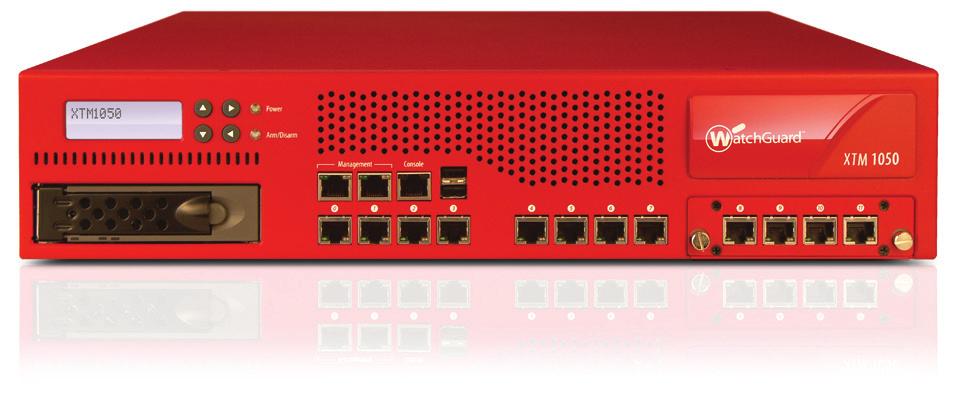
2 Getting Started Connect your WatchGuard XTM 050 and Power it On red green Router Make sure your computer is configured to use DHCP. When you connect it to the XTM 050, make sure it gets an IP address on the /4 network. Run the Web Setup Wizard Open a web browser and type to start the Web Setup Wizard. NOTE: Because the XTM 050 uses a self-signed certificate, you may see a certificate warning in your browser. It is safe to ignore the warning ( Explorer) or to add a certificate exception (Mozilla Firefox). Next Steps Congratulations! You have finished basic setup of your WatchGuard XTM 050. You can use the Web UI to continue basic configuration and management tasks. Before you begin, we strongly recommend that you use the instructions on this page to: Upgrade your XTM 050 to the latest Fireware XTM OS. Install WatchGuard System Manager (WSM). WSM provides a full suite of management and monitoring tools for your XTM 050. It includes WatchGuard server software and access to features such as logging, reporting, and offline configuration editing. Download Latest Software Go to Find and download the latest version of Fireware XTM OS and WSM software. Upgrade your XTM 050 with latest Fireware XTM OS On the computer you use to connect to the XTM 050, find and run the Fireware XTM OS installation package you downloaded from the WatchGuard web site. Connect to your XTM 050 with the Fireware XTM Web UI. Select System > Upgrade OS. NOTE: The default location for the upgrade file is C:\Program Files\Common Files\WatchGuard\resources\ FirewareXTM\[version number\model]. The file name is utm_xtm050.sysa-dl. English Log in with the user name admin and the passphrase readwrite. Follow the instructions on the screen and complete the Wizard. NOTE: Your WatchGuard XTM 050 now has a basic configuration that allows outbound TCP, UDP, and ping traffic, and blocks all unrequested traffic from the external network. Log in to the Fireware XTM Web UI using the user name admin and the configuration passphrase you set in the Wizard. Install and Start WatchGuard System Manager On the computer you use to connect to your XTM 050, run the WSM installation package you downloaded from the WatchGuard web site. NOTE: For WSM minimum system requirements, see the product release notes. Select Start > All Programs > WatchGuard System Manager. From WSM, click the Connect to Device icon to connect your management computer to the WatchGuard XTM 050. Connect to Device icon For more information about how to configure your WatchGuard XTM 050, go to and open the current help system.
3
4 Pour démarrer Étapes suivantes Branchez votre WatchGuard XTM 050 et allumez-le rouge vert Routeur Assurez-vous que votre ordinateur est configuré pour DHCP. Quand vous le connectez au XTM 050, vérifiez qu il a une adresse IP sur le réseau /4. Bravo! Vous avez fini l installation de base de votre WatchGuard XTM 050. Vous pouvez utiliser l interface utilisateur Web pour poursuivre la configuration de base et les tâches de gestion. Avant de commencer, nous vous conseillons vivement de suivre les instructions sur cette page pour : Mettre à jour votre XTM 050 avec le dernier Fireware XTM OS Installer WatchGuard System Manager (WSM). WSM vous fournit une suite complète d outils de gestion et de contrôle pour votre XTM 050, notamment le logiciel de serveur WatchGuard et l accès à des fonctions telles que la production de journaux et de rapports et la modification de la configuration hors ligne. Téléchargez les derniers logiciels Allez sur Recherchez et téléchargez la dernière version du système d exploitation Fireware XTM et du logiciel WSM. Mettez à niveau votre XTM 050 avec le dernier système d exploitation Fireware XTM Sur l ordinateur que vous utilisez pour vous connecter au XTM 050, recherchez et exécutez le pack d installation Fireware XTM OS que vous avez téléchargé sur le site de WatchGuard. Connectez votre XTM 050 à l interface utilisateur Fireware XTM Web. Sélectionnez System > Upgrade OS. REMARQUE : le fichier de mise à niveau se trouve par défaut dans C:\Program Files\Common Files\ WatchGuard\resources\FirewareXTM\[numéro de version/modèle]. Le nom du fichier est utm_xtm050. sysa-dl. Français Lancez l assistant d installation Web Ouvrez un navigateur et tapez pour lancer l assistant d installation Web. REMARQUE : comme le XTM 050 utilise un certificat auto-signé, un avertissement sur ce certificat peut s afficher dans votre navigateur. Vous pouvez en sécurité ignorer cet avertissement ( Explorer) ou ajouter une exception (Mozilla Firefox). Connectez-vous avec le nom d utilisateur admin et le mot de passe readwrite. Suivez les instructions affichées à l écran et terminez l assistant. REMARQUE : votre WatchGuard XTM 050 a maintenant une configuration de base qui autorise le trafic sortant TCP, UDP et ping, et bloque tout le trafic non sollicité du réseau externe. Connectez-vous à l interface utilisateur Fireware XTM Web avec le nom d utilisateur admin et le mot de passe que vous avez entré dans l assistant pour la configuration. Installez et lancez WatchGuard System Manager Sur l ordinateur que vous utilisez pour vous connecter au XTM 050, exécutez le pack d installation WSM que vous avez téléchargé sur le site de WatchGuard. REMARQUE : pour connaître la configuration minimale exigée pour WSM, consultez ses notes de version. Sélectionnez Démarrer > Programmes > WatchGuard System Manager. Dans WSM, cliquez sur l icône Connect to Device pour connecter votre ordinateur au WatchGuard XTM 050 Icône Connect to Device Pour en savoir plus sur la configuration de votre WatchGuard XTM 050, allez sur et ouvrez l aide.
5 Erste Schritte Nächste Schritte Anschließen/Starten Ihrer WatchGuard XTM 050 rot grün Router Herzlichen Glückwunsch! Das Setup für Ihre WatchGuard XTM 050 ist abgeschlossen. Weitere Konfigurations- und Verwaltungsaufgaben können Sie über die Webschnittstelle erledigen. Bevor Sie beginnen, führen Sie mit Hilfe der Anweisungen auf dieser Seite zunächst folgende Schritte durch: Upgrade Ihrer XTM 050 auf die neueste Version von Fireware XTM. Installation des WatchGuard System Manager (WSM) mit einer vollständigen Suite aus Management- und Überwachungs-Tools für Ihre XTM 050. Darin enthalten: WatchGuard-Server-Software mit Funktionen wie Protokollierung, Berichterstellung und Offline-Konfiguration. Download aktueller Software Gehen Sie zu Laden Sie die aktuellen Softwareversionen für Fireware XTM und den WSM herunter. Ihr PC muss auf die Verwendung von DHCP konfiguriert sein, um bei der Verbindung zur XTM 050 eine IP-Adresse vom /4-Netzwerk beziehen zu können. Ausführen des Installationsassistenten Starten Sie Ihren Webbrowser. Geben Sie als URL ein, um den Installationsassistenten zu starten. HINWEIS: Weil die XTM 050 ein selbstsigniertes Zertifikat benutzt, kann es sein, dass der Browser eine Warnmeldung anzeigt. Beim Explorer können Sie diese ignorieren, bei Mozilla Firefox müssen Sie eine Ausnahme hinzufügen. Upgrade Ihrer XTM 050 mit der aktuellen Fireware-XTM-Version Führen Sie auf dem für die XTM 050 zu verwendenden PC das Fireware-XTM- Installationspaket aus, das Sie von der WatchGuard-Website heruntergeladen haben. Stellen Sie über die Fireware-XTM-Webschnittstelle eine Verbindung zu Ihrer XTM 050 her. Wählen Sie dann System > Upgrade OS. HINWEIS: Die Upgrade-Datei utm_xtm050.sysa-dl finden Sie im Standardverzeichnis C:\Program Files\ Common Files\WatchGuard\resources\FirewareXTM\[Version\Modell]. Deutsch Installieren/Starten des WatchGuard System Manager Führen Sie auf dem für die XTM 050 zu verwendenden PC das WSM-Installationspaket aus, das Sie von der WatchGuard-Website heruntergeladen haben. HINWEIS: Die Mindest-Systemanforderungen für WSM finden Sie in den Versionshinweisen. Wählen Sie Start > Alle Programe > WatchGuard System Manager. Melden Sie sich mit dem Benutzernamen admin und der Passphrase readwrite an. Folgen Sie den Bildschirmanweisungen, um die Installation abzuschließen. HINWEIS: Ihre WatchGuard XTM 050 ist jetzt so konfiguriert, dass sie abgehenden TCP-, UDP- und Ping- Verkehr zulässt und unerwünschte Daten von externen Netzwerken blockiert. Melden Sie sich mit dem Benutzernamen admin und der konfigurierten Passphrase bei der Fireware XTM-Webschnittstelle an. Klicken Sie im WSM auf das im nachfolgenden Bild angezeigte Symbol, um eine Verbindung zwischen Ihrem Management-PC und der WatchGuard XTM 050 herzustellen. Verbindungssymbol Weitere Infos zur Konfiguration Ihrer WatchGuard XTM 050 finden Sie im aktuellen Hilfe-System unter
6 Guida introduttiva Passaggi successivi Collegare e accendere l appliance WatchGuard XTM 050 Congratulazioni. La configurazione di base di WatchGuard XTM 050 è completata. Si può utilizzare l interfaccia Web per le altre attività di configurazione e gestione di base. Prima di iniziare, raccomandiamo di seguire le istruzioni in questa pagina per: Aggiornare XTM 050 all ultimo sistema operativo Fireware XTM. Installare WatchGuard System Manager (WSM). WSM fornisce una suite completa di strumenti di gestione e monitoraggio per XTM 050. Include il software server WatchGuard e l accesso a funzioni di logging, reporting e modifica della configurazione offline. rosso verde Router Scaricare il software più aggiornato Visitare Individuare e scaricare la versione più recente del sistema operativo Fireware XTM OS e il software WSM. Assicurarsi che il computer sia configurato per utilizzare DHCP. Quando viene connesso a XTM 050, assicurarsi che ottenga un indirizzo IP sulla rete /4. Eseguire la configurazione guidata Web Aprire il browser Web e digitare per avviare la configurazione guidata Web. NOTA: XTM 050 utilizza un certificato self-signed, il browser può pertanto visualizzare un avviso di certificato. Ignorare l avviso ( Explorer) oppure aggiungere un eccezione di certificato (Mozilla Firefox). Aggiornare XTM 050 all ultimo sistema operativo Fireware XTM Sul computer utilizzato per connettersi a XTM 050, individuare ed eseguire il pacchetto di installazione del sistema operativo Fireware XTM scaricato dal sito Web di WatchGuard. Connettere la XTM 050 con l interfaccia Web di Fireware XTM. Selezionare System > Upgrade OS. NOTA: il percorso predefinito del file di aggiornamento è C:\Program Files\Common Files\WatchGuard\ resources\firewarextm\[numero versione\modello]. Il nome file è utm_xtm050.sysa-dl. Installare e avviare WatchGuard System Manager Sul computer utilizzato per connettere XTM 050, eseguire l installazione del pacchetto WSM scaricato dal sito Web di WatchGuard. NOTA: per i requisiti di sistema minimi di WSM, vedere le note di rilascio del prodotto. Selezionare Start > Tutti i programmi > WatchGuard System Manager. Italiano Eseguire l accesso con il nome utente admin e la password readwrite. Seguire le istruzioni visualizzate e completare la procedura guidata. NOTA: WatchGuard XTM 050 dispone ora di una configurazione di base che consente il traffico in uscita TCP, UDP e ping e blocca tutto il traffico non richiesto dalla rete esterna. Eseguire l accesso all interfaccia Web di Fireware XTM utilizzando il nome utente admin e la password di configurazione impostata nella procedura guidata. In WSM, fare clic sull icona Connetti a dispositivo per connettere il computer di gestione a WatchGuard XTM 050 Icona Connetti a dispositivo Per ulteriori informazioni su come configurare WatchGuard XTM 050, visitare www. watchguard.com/help/documentation e aprire la guida in linea.
7 Connect to Device
8 Next Steps red green Router Connect to Device icon
9 Para Comenzar Pasos Siguientes Conecte su WatchGuard XTM 050 y enchúfelo a la corriente eléctrica rojo verde Router Felicitaciones! Usted ha finalizado la configuración básica de su WatchGuard XTM 050. Ahora puede usar la interfaz Web para continuar la configuración básica y las tareas de administración. Antes de empezar, le recomendamos enfáticamente que utilice las instrucciones de esta página para: Actualizar su XTM 050 con el último Fireware XTM OS. Instalar el WatchGuard System Manager (WSM). WSM prove una suite completa de administración y herramientas de monitoreo para su XTM 050. Incluye software WatchGuard de servidor y acceso a características como creación de logs, reportes y edición offline de la configuración. Asegúrese de que su computadora esté configurada para usar DHCP. Cuando la conecte al XTM 050, asegúrese de que obtenga una dirección IP sobre la red /4. Ejecute el Web Setup Wizard Abra una ventana en el navegador y escriba para iniciar el Web Setup Wizard. NOTA: dado que el XTM 050 usa un certificado auto firmado, usted puede ver una advertencia sobre el certificado en su navegador. Es seguro ignorarla (en Explorer) o añadir una excepción de certificado (en Mozilla Firefox).. Loguéese con el nombre de usuario admin y la contraseña readwrite. Siga las instrucciones en pantalla y complete el Wizard. NOTA: Su WatchGuard XTM 050 ahora tiene una configuración básica que permite tráfico TCP y UDP saliente, así como ping, y bloquea todo el tráfico no solicitado de la red externa. Loguéese en la interfaz de usuario del Fireware XTM usando el nombre admin y la contraseña de configuración que puso en el Wizard. Descargue el último software Vaya a Encuentre y descargue la última versión del software Fireware XTM OS y WSM. Actualice su XTM 050 con el último Fireware XTM OS En la computadora que usa para conectarse al XTM 050, encuentre y ejecute el paquete de instalación del Fireware XTM OS que descargó del sitio de WatchGuard. Conéctese con su XTM 050 con la interfaz Web de usuario del Fireware XTM. Seleccione System > Upgrade OS. NOTA: la ubicación por defecto para el archivo de actualización es C:\Program Files\Common Files\ WatchGuard\resources\ FirewareXTM\[version number\model]. The file name is utm_xtm050.sysa-dl. Instalar e iniciar el WatchGuard System Manager En la computadora que usa para conectarse al XTM 050, ejecute el paquete de instalación del WSM que descargó del sitio de WatchGuard. NOTA: Para ver cuáles son los requerimientos mínimos de sistema para instalar WSM, vea las notas de lanzamiento del producto. Seleccione Start > All Programs > WatchGuard System Manager. Desde el WSM, haga clic en el ícono Connect to Device para conectar su computadora de administración al WatchGuard XTM Conectar al ícono de dispositivo Para más información sobre cómo configurar su WatchGuard XTM 050, vaya a www. watchguard.com/help/documentation y abra el sistema de ayuda vigente.
10 WatchGuard XTM050 Quick Start Guide WatchGuard XTM050 Quick Start Guide
11 WATCHGUARD TECHNICAL SUPPORT (U.S. and Canada) (all other countries) ADDRESS: 505 Fifth Avenue South, Suite 500, Seattle, WA 9804 WEB: U.S. SALES: INTERNATIONAL SALES: WatchGuard Technologies, Inc. All rights reserved. WatchGuard, the WatchGuard Logo, Firebox, Fireware, Core, Peak, and LiveSecurity are either trademarks or registered trademarks of WatchGuard Technologies, Inc. in the United States and/or other countries. All other trademarks and tradenames are the property of their respective owners. P.N WGPE66377_0080
WatchGuard XTM 5 Series. Quick Start Guide. Guide de démarrage rapide Kurzanleitung Guida introduttiva. Guía Rápida. WatchGuard Technologies, Inc.
 WatchGuard XTM 5 Series Quick Start Guide Guide de démarrage rapide Kurzanleitung Guida introduttiva Guía Rápida WatchGuard Technologies, Inc. Getting Started 1 Connect your WatchGuard XTM 5 Series Device
Quick Start Guide. WatchGuard XTM 2 Series WatchGuard XTM 2 Series Wireless. Guide de démarrage rapide Kurzanleitung Guida introduttiva.
 WatchGuard XTM 2 Series WatchGuard XTM 2 Series Wireless Quick Start Guide Guide de démarrage rapide Kurzanleitung Guida introduttiva Guía Rápida WatchGuard Technologies, Inc. Getting Started 1 Connect
Quick Start Guide. Firebox X Edge 10e, 20e, 55e Firebox X Edge 10e-W, 20e-W, 55e-W. Guide de démarrage rapide Kurzanleitung Guida introduttiva
 Firebox X Edge 0e, 0e, e Firebox X Edge 0e-W, 0e-W, e-w Quick Start Guide Guide de démarrage rapide Kurzanleitung Guida introduttiva Guía Rápida Getting Started 4 Before you connect To connect to the Firebox
Kurzanleitung Ersatzgerät Guide succinct de l appareil de remplacement Breve guida all dispositivo di sostituzione
 Kurzanleitung Ersatzgerät Guide succinct de l appareil de remplacement Breve guida all dispositivo di sostituzione Das Ersatzgerät kann als zweites Gerät für die Nutzung des E-Bankings eingesetzt werden
Thecus N8800 IP Storage Server
 Thecus Technology Corporation Thecus N8800 IP Storage Server Quick Installation Guide Guide d Installation Rapide Kurzanleitung Guida rapida all installazione Guía de instalación rápida V1.0 3 4 Start
DESS - 3SHAPE INTERFACE LIBRARY 1
 ENGLISH DEUTSCH FRANÇAIS ESPAÑOL DESS - 3SHAPE Interface library Download and installation instructions of dess interfaces (titan bases, gap cemented 0.09mm diameter) 3shape libraries. Download der Bibliotheken
Quick Installation Guide
 LevelOne WHG-1000 300Mbps Wireless PoE Hotspot Gateway Quick Installation Guide English Deutsch Table of Contents English... 3 Deutsch... 13 Default Settings IP Address-LAN1 192.168.1.254 IP Address-LAN2
E. Start Browser Finished! Access the current ALL-NAS200 administrator web user interface by pressing the Start Browser button.
 E. Start Browser Finished! Access the current ALL-NAS200 administrator web user interface by pressing the Start Browser button. E. Démarrage du navigateur Terminé! Accédez à la page Web administrateur
NASdeluxe NDL-2700T+ iscsi/nas System
 NASdeluxe NDL-2700T+ iscsi/nas System Quick Installation Guide Guide d Installation Rapide Kurzanleitung Guida rapida all installazione Guía de instalación rápida V1.0 1 Hard disk drive installation, Network
Sage 30 (Winway Z) Update-Installationsanleitung Installation de l update Installazione per l update
 Update-Installationsanleitung Installation de l update Installazione per l update") Sage 30 (Winway Z) Update-Installationsanleitung Installation de l update Installazione per l update Betriebswirtschaftliche Gesamtlösungen für Selbständige und kleine Unternehmen Logiciels de gestion
Sage 30 (Winway Z) Update-Installationsanleitung Installation de l update Installazione per l update Betriebswirtschaftliche Gesamtlösungen für Selbständige und kleine Unternehmen Logiciels de gestion
Power cable connection & Power on If you are using 1U4500R, please connect power cables to both power modules.
 3 4 Power cable connection & Power on If you are using 1U4500R, please connect power cables to both power modules. Branchement du câble d alimentation et mise sous tension Si vous utilisez le 1U4500R,
Thecus N3200PRO IP Storage Appliance
 Thecus Technology Corporation Thecus N3200PRO IP Storage Appliance Quick Installation Guide Guide d Installation Rapide Kurzanleitung Guida rapida all installazione Guía de instalación rápida V1.0 1 Hard
ALL6400PRO IP Storage Appliance
 ALL6400PRO IP Storage Appliance Quick Installation Guide Guide d Installation Rapide Kurzanleitung Guida rapida all installazione Guía de instalación rápida 1 Hard disk drive installation, Network cable
Multi Device. Ein Vertrag eine Rufnummer Surfen und telefonieren mit mehreren Geräten.
 Multi Device Ein Vertrag eine Rufnummer Surfen und telefonieren mit mehreren Geräten. Un contrat un numéro de téléphone Surfez et téléphonez avec plusieurs appareils. Un contratto un numero di telefono
Neue Fahrzeugauswahl (KW/CV)
") Update Software Rel.: 9,23 Nuova selezione del veicolo (KW/CV) New vehicle selection (KW/CV) Nouvelle selection du vehicule (KW/CV) Nueva selecion del vehiculo (KW/CV) Neue Fahrzeugauswahl (KW/CV) 1 Update
Update Software Rel.: 9,23 Nuova selezione del veicolo (KW/CV) New vehicle selection (KW/CV) Nouvelle selection du vehicule (KW/CV) Nueva selecion del vehiculo (KW/CV) Neue Fahrzeugauswahl (KW/CV) 1 Update
TCO REFERENCE: CAMERA ELEMENTS CODIC:
 TCO MARQUE: GIGASET REFERENCE: CAMERA ELEMENTS CODIC: 4033426 Erste Schritte First Steps Premiers pas camera Hallo! Hello! Bonjour! Wir freuen uns, dass Du Dich für die Gigaset elements camera entschieden
Cameraserver mini. commissioning. Ihre Vision ist unsere Aufgabe
 Cameraserver mini commissioning Page 1 Cameraserver - commissioning Contents 1. Plug IN... 3 2. Turn ON... 3 3. Network configuration... 4 4. Client-Installation... 6 4.1 Desktop Client... 6 4.2 Silverlight
1. UPS FIRMWARE UPGRADE. Step 1. Step 2. Eaton /6000
 Page 2 1. UPS FIRMWARE UPGRADE Step 1 Eaton 9135 5000/6000 Connect the RS232 cable to the UPS and serial port of the computer. Brancher le câble RS232 sur l ASI et sur le port série de l ordinateur. Schließen
ALL6600 NAS DiskServer. Quick Installation Guide Guide d Installation Rapide Kurzanleitung Guida rapida all installazione Guía de instalación rápida
 ALL6600 NAS DiskServer Quick Installation Guide Guide d Installation Rapide Kurzanleitung Guida rapida all installazione Guía de instalación rápida 1 Hard disk drive installation Installation du disque
ALL6501 Quick Installation Guide Guide d Installation Rapide Kurzanleitung Guida rapida all installazione Guía de instalación rápida
 ALL6501 Quick Installation Guide Guide d Installation Rapide Kurzanleitung Guida rapida all installazione Guía de instalación rápida V1.0 1 Hard disk drive installation and cable connections Open 2.5 HDD
Anleitung für FTP-Zugriff auf Apostroph Group
 Anleitung für FTP-Zugriff auf Apostroph Group 1. Den Microsoft Windows-Explorer (NICHT Internet-Explorer) starten 2. In der Adresse -Zeile die Adresse ftp://ftp.apostroph.ch eingeben und Enter drücken:
p^db=`oj===pìééçêíáåñçêã~íáçå=
 p^db=`oj===pìééçêíáåñçêã~íáçå= Error: "Could not connect to the SQL Server Instance" or "Failed to open a connection to the database." When you attempt to launch ACT! by Sage or ACT by Sage Premium for
Quick start guide. Philips GoGear Wifi Mini Tablet. Quick start guide Guide de mise en route Kurzanleitung
 Philips GoGear Wifi Mini Tablet Quick start guide Guide de mise en route Kurzanleitung SA3CNT08 SA3CNT16 Quick start guide Register your product and get support at www.philips.com/welcome Philips GoGear
Print Server Setup Roadmap
 LEGEND Print Server Setup Roadmap [Title] User Documentation PDF Print Server User Documentation disc User Software disc(s) Use this Roadmap ifà ò your Print Server has been unpacked and connected by a
JTAGMaps Quick Installation Guide
 Index Index... 1 ENGLISH... 2 Introduction... 2 Requirements... 2 1. Installation... 3 2. Open JTAG Maps... 4 3. Request a free JTAG Maps license... 4 4. Pointing to the license file... 5 5. JTAG Maps
1. Select the written language of the application interface. Later you can change it in Regional settings (page 93).
.") Caliber is optimised for in-car use. You can use it easily by tapping the screen buttons and the map with your fingertips. When using the navigation software for the first time, an initial setup process
Caliber is optimised for in-car use. You can use it easily by tapping the screen buttons and the map with your fingertips. When using the navigation software for the first time, an initial setup process
Hama GmbH & Co KG D Monheim/Germany
 Hama GmbH & Co KG D-86651 Monheim/Germany www.hama.com All listed brands are trademarks of the corresponding companies. Errors and omissions excepted, and subject to technical changes. Our general terms
M10/2/ANGER/SP2/GER/TZ0/XX
 M10/2/ANGER/SP2/GER/TZ0/XX 22102809 GERMAN AB INITIO STANDARD LEVEL PAPER 2 ALLEMAND AB INITIO NIVEAU Moyen épreuve 2 ALEMÁN AB INITIO NIVEL MEDIO PRUEBA 2 Friday 14 May 2010 (afternoon) Vendredi 14 mai
Table of Cont 6. 2 General Information... 4 Purpose...4 Documentation...4 Scope of Supply...5 Technical Data Safety Regulations...
 2 General Information........................ 4 Purpose........................................4 Documentation................................4 Scope of Supply................................5 Technical
Titelbild1 ANSYS. Customer Portal LogIn
 Titelbild1 ANSYS Customer Portal LogIn 1 Neuanmeldung Neuanmeldung: Bitte Not yet a member anklicken Adressen-Check Adressdaten eintragen Customer No. ist hier bereits erforderlich HERE - Button Hier nochmal
L Montageanleitung Assembly instructions Instruction de montage EASYHOMESYSTEM TH-EHS. Änderungen vorbehalten Alle Rechte vorbehalten
 L-09-1-50 Montageanleitung Assembly instructions Instruction de montage EASYHOMESYSTEM TH-EHS Änderungen vorbehalten Alle Rechte vorbehalten Komponenten / Components / Composants / Componenti PGD Touch
Anleitung zur Schnellinstallation TEW-623PI 3.02
 Anleitung zur Schnellinstallation TEW-623PI 3.02 Table of Contents Deutsch 1 1. Bevor Sie anfangen 2. Installation 1 2 3. Verwendung des drahtlosen Adapters 4 Troubleshooting 5 Version 02.05.2010 1. Bevor
LUPUSNET - LE930/940 Kurzanleitung User manual Guide Rapide
 LUPUSNET - LE930/940 Kurzanleitung User manual Guide Rapide 1/16 A. Monitor Einstellungen 1. Klicken Sie mit der rechten Maustaste auf die Desktopoberfläche. Wählen Sie Eigenschaften aus dem Menu und setzen
FlightSim Commander Database Manager 9.5
 FlightSim Commander Database Manager 9.5 Compatible with Lookheed Martin Prepar3D 1.0, 1.4 and Prepar3D v 2.0 The most recently updated database of the Prepar3D version is at the start of FlightSim Commander
Attention :Installez le logiciel fourni avant d'installer le lecteur de carte multislot!
 Manuel d utilisation Lecteur de carte 3,5 9 en 1, USB 2.0 Attention :Installez le logiciel fourni avant d'installer le lecteur de carte multislot! Installation du logiciel Insérez le CD-ROM fourni dans
w ww.hama.de Muster USB-Hub»Bluetooth/ Cardreader«, USB 2.0
 00049222 w ww.hama.de Muster 00049222-07.06 H ama GmbH & Co KG Postfach 80 86651 Monheim/Germany Tel. +49 (0)9091/502-0 Fax +49 (0)9091/502-274 hama@hama.de www.hama.com USB-Hub»Bluetooth/ Cardreader«,
1. Java installieren 2. Java für graf.eit.h-da.de im Java Control Panel freigeben 3. Starten der Java Applets oder Java Web Start im Webbrowser
 DE: Die Simulationen auf https://graf.eit.h-da.de und JXN verwenden Java. Dieses Dokument beschreibt die Installation von Java und die Freigabe von Java Applets und Java Web Start für graf.eit.h-da.de.
Installation und Einrichtung unter Windows 7/8/10. Installation and configuration for Windows 7/8/10
 AFS-Client Installation und Einrichtung unter Windows 7/8/10 Installation and configuration for Windows 7/8/10 18.04.2018 kim.uni-hohenheim.de kim@uni-hohenheim.de Bitte sowohl diese Anleitung als auch
Quick Installation Guide for 4 and 7-Port Broadband Router
 Quick Installation Guide for 4 and 7-Port Broadband Router A. Hardware Installation 1. Setup LAN connection: connect an Ethernet cable from your computer s Ethernet port to one of the LAN ports of this
VPN-Client Apple macos El Capitan (10.11)
") VPN-Client Apple macos El Capitan (10.11) Konfiguration und Installation des internen VPN-Clients und Cisco AnyConnect VPN-Clients Configuring and installing the internal VPN client and Cisco AnyConnect
VPN-Client Apple macos El Capitan (10.11) Konfiguration und Installation des internen VPN-Clients und Cisco AnyConnect VPN-Clients Configuring and installing the internal VPN client and Cisco AnyConnect
MicroCam. Installationsanleitung. Installation Guide. Guide d installation
 MicroCam Installationsanleitung Installation Guide Guide d installation Installationsanleitung BRESSER MikroCam (1,3 / 3,0 / 5,0 / 10,0 MP) 1. Installationsempfehlung Systemvoraussetzung: Personalcomputer
Konfiguration von eduroam. Configuring eduroam
 eduroam Windows 7 Konfiguration von eduroam Configuring eduroam 09.10.2018 kim.uni-hohenheim.de kim@uni-hohenheim.de Wissenschaftliche Einrichtungen und Universitäten bieten einen weltweiten Internetzugang
Installation und Einrichtung unter macos. Installation and configuration for macos
 AFS-Client Installation und Einrichtung unter macos Installation and configuration for macos 19.04.2018 kim.uni-hohenheim.de kim@uni-hohenheim.de Diese Anleitung beschreibt die Einrichtung des AFS-Clients
VPN-Client Apple macos El Capitan (10.11)
") VPN-Client Apple macos El Capitan (10.11) Konfiguration und Installation des internen VPN-Clients und Cisco AnyConnect VPN-Clients Configuring and installing the internal VPN client and Cisco AnyConnect
VPN-Client Apple macos El Capitan (10.11) Konfiguration und Installation des internen VPN-Clients und Cisco AnyConnect VPN-Clients Configuring and installing the internal VPN client and Cisco AnyConnect
1. Bitte stellen Sie eine Verbindung mit dem unverschlüsselten WLAN der TU TUB-intern her.
 WLAN - Einrichtung 1. Bitte stellen Sie eine Verbindung mit dem unverschlüsselten WLAN der TU TUB-intern her. Please connect your device to the unprotected WiFi-network TUBintern 2. Gehen Sie auf www.tubit.tu-berlin.de/wlan
p^db=`oj===pìééçêíáåñçêã~íáçå=
 p^db=`oj===pìééçêíáåñçêã~íáçå= How to Disable User Account Control (UAC) in Windows Vista You are attempting to install or uninstall ACT! when Windows does not allow you access to needed files or folders.
CONNECTION DIAGRAM - LA36. English. Deutsch. Italiano
 CONNECTION DIAGRA - LA36 English Deutsch Italiano CONNECTION DIAGRA - LA36 LA36 ACTUATOR Actuator with Parallel Actuator 8 Actuator 7 Actuator 6 Actuator 5 Actuator 4 Actuator 3 Actuator 2 Actuator 1 WARDS
USB Treiber updaten unter Windows 7/Vista
 USB Treiber updaten unter Windows 7/Vista Hinweis: Für den Downloader ist momentan keine 64 Bit Version erhältlich. Der Downloader ist nur kompatibel mit 32 Bit Versionen von Windows 7/Vista. Für den Einsatz
150Mbps Micro Wireless N USB Adapter
 150Mbps Micro Wireless N USB Adapter TEW-648UBM ŸAnleitung zur Schnellinstallation (1) ŸTroubleshooting (6) 1.11 1. Bevor Sie anfangen Packungsinhalt ŸTEW-648UBM ŸCD-ROM (Dienstprogramm & Bedienungsanleitung)
LevelOne. Quick Installation Guide. EAP series Enterprise Access Point. Default Settings. IP Address
 LevelOne EAP series Enterprise Access Point Quick Installation Guide English Deutsch Default Settings IP Address 192.168.1.1 Username admin Password admin Figure 1-1 Figure 1-2 Figure 1-3 2 Figure 2-1
IMPORTANT / IMPORTANT:
 Replacement of the old version 2.50. Procedure of installation and facility updates. New presentation. Remplacer l ancienne version 2.50. Procédure d installation et de mise à jour facilitée. Nouvelle
Silicon Graphics Zx10 Visual Workstation Documentation CD
 2000 Silicon Graphics, Inc. All rights reserved. SGI and the SGI logo are trademarks of Silicon Graphics, Inc. Acrobat is a registered trademark of Adobe Systems, Inc. Windows is a registered trademark
Installationskurzanleitung. Quick installation guide. Guide d installation rapide
 Installationskurzanleitung Smartcard & Online-Einreichung Quick installation guide Smart card and Online Filing Guide d installation rapide Carte à puce & Dépôt en ligne Inhaltsverzeichnis Table of contents
Durametric. Installations Anleitung Quick Installation Guide. Deutsch: Seite 2 bis 3. English: Page 4 to 5. ww.fvd.de
 Durametric Quick Installation Guide Deutsch: Seite 2 bis 3 English: Page 4 to 5 w 2 Systemvoraussetzungen: Windows 7 / XP / Vista, (32- und 64-bit) - mind. 1.8GHz Dual Core Prozessor - 1 GB Arbeitsspeicher
USB 3.0 PCI-E Card. Quick Installation Guide Guide d'installation rapide Installationsanleitung Guía breve de instalación.
 USB 3.0 PCI-E Card Quick Installation Guide Guide d'installation rapide Installationsanleitung Guía breve de instalación rev 2 9/10 English Installation 1. Unplug all peripherals and power cords connected
Installation Guide/ Installationsanleitung. Spring 16 Release
 Guide/ Installationsanleitung Spring 16 Release Visit AppExchange (appexchange.salesforce.com) and go to the CONNECT for XING listing. Login with your Salesforce.com user is required. Click on Get It Now.
German ab initio Standard level Paper 2 Allemand ab initio Niveau moyen Épreuve 2 Alemán ab initio Nivel medio Prueba 2
 German ab initio Standard level Paper 2 Allemand ab initio Niveau moyen Épreuve 2 Alemán ab initio Nivel medio Prueba 2 Friday 20 May 2016 (afternoon) Vendredi 20 mai 2016 (après-midi) Viernes 20 de mayo
Yealink W52 DECT IP Telefon
 Yealink W52 DECT IP Telefon Manuelle Neukonfiguration Dokumentenversion 1.0 Yealink W52 DECT IP Telefon Mauelle Neukonfiguration Copyright Hinweis Copyright 2016 finocom AG Alle Rechte vorbehalten. Jegliche
USB -> Seriell Adapterkabel Benutzerhandbuch
 USB -> Seriell Adapterkabel Benutzerhandbuch 1. Produkt Eigenschaften 1 2. System Vorraussetzungen 1 3. Treiber Installation (Alle Windows Systeme) 1 4. Den COM Port ändern 2 5. Einstellen eines RS232
ALL1681 Wireless 802.11g Powerline Router Quick Installation Guide
 ALL1681 Wireless 802.11g Powerline Router Quick Installation Guide 1 SET ALL1681 Upon you receive your wireless Router, please check that the following contents are packaged: - Powerline Wireless Router
Anleitung Manual Instruction Hybrid7 FRITZ!box 5490
 Anleitung Manual Instruction Hybrid7 FRITZ!box 5490 Init7 (Schweiz) AG Technoparkstrasse 5 CH-8406 Winterthur info@init7.net www.init7.net +41 44 315 44 00 Deutsch Lieferumfang. Delivery summary. Composition
rtube.nl/red975 Sold separately MN180008_ Off Price GmbH Rodenkirchener Str Hürth Copyright MICRO-USB RCD2002
 RCD2002 MICRO-USB 1x 1x 1x Sold separately A B QR rtube.nl/red975 1/4 1/8 A W B F = W - 4 cm F = W - 4,5 cm W Min. W = 50 cm Min. W = 50 cm 1 2 W F = W - 4 cm F F 3 4 0,5 cm 5 F - 1,0 cm 2/4 2/8 A B 1
Decoderprogrammiermodul
 Decoderprogrammiermodul 55045 2 Inhaltsverzeichnis: Seite Systemvoraussetzungen 4 Sicherheitshinweise 4 Aufbau 4 Installation 4 Anschluss 8 Sommaire : Page Matériel requis 6 Indications relatives à la
Quick Installation Guide HD PoE Network Camera
 Quick Installation Guide HD PoE Network Camera This document will guide you through the basic installation process for your new D-Link Network Camera. DCS-3010 Quick Installation Guide Installations-Anleitung
Informationen zur Verwendung des TFE-Portals / Information for Using the TFE portal
 Informationen zur Verwendung des TFE-Portals / Information for Using the TFE portal Inhalt / Content Vorraussetzungen für Java Web Start /... 3 Prerequisited for Java-WebStart... 3 Datenempfang /... 3
Benutzerhandbuch / User s Manual RUPS 2000 / -B1
 RUPS 2000 / RUPS 2000-B1 Benutzerhandbuch / User s Manual RUPS 2000 / -B1 Deutsch English Benutzerhandbuch RUPS 2000 / RUPS 2000-B1 Deutsch In diesem Benutzerhandbuch finden Sie eine Kurzanleitung zu Installation
Benutzeranleitung CAG mit SMS-Passwort
 Finanzdirektion des Kantons Bern Direction des finances du canton de Berne Amt für Informatik und Organisation Office d'informatique et d'organisation Wildhainweg 9 Case postale 3001 Berne Téléphone 031
FÜR NUTZER MIT EINER ITALIENISCHEN SIM-KARTE: 1. 2. 3. HOTSPOT-PUNKTE IN BRUNECK:
 FÜR NUTZER MIT EINER ITALIENISCHEN SIM-KARTE: WLAN auf Ihrem Handy, PC oder Tablet PC einschalten @FREE_LUNA Netzwerk auswählen Browser starten (Opera funktioniert nicht) es öffnet sich automatisch die
300Mbps Wireless Outdoor PoE Access Point/Bridge Quick Installation Guide
 LevelOne WAB-5120 300Mbps Wireless Outdoor PoE Access Point/Bridge Quick Installation Guide English Deutsch - 1 - Table of Content English... - 3 - Deutsch... - 9 - This guide covers only the most common
VPN-Client Android Konfiguration und Installation des internen VPN Clients und Cisco-AnyConnect VPN-Clients
 VPN-Client Android 6.0.1 Konfiguration und Installation des internen VPN Clients und Cisco-AnyConnect VPN-Clients Configuring and installing the internal VPN client and Cisco Any- Connect VPN client 7.
Anleitung zur Verwendung des Update-Tools für
 English version see below (page 10) Anleitung zur Verwendung des Update-Tools für - KW DDC Steuergeräte - KW DDC WLAN Module - KW DLC Steuergeräte - KW DLC WLAN Module Bitte beachten Sie: jedes Steuergerät
Quick Start Guide. PoE IP Camera. Technical Support EN/DE QG4_B
 EN/DE Technical Support PoE IP Camera Quick Start Guide For Windows Client & Mac Client, please download the PC software: https://reolink.com/software-and-manual/ For advanced setup, please download the
Software Update. Combi Steamer. Appliance Model Type of energy Language. FlexiCombi MagicPilot English - French
 Software Update Combi Steamer Appliance Model Type of energy Language FlexiCombi MagicPilot 6.15 6.21 10.15 10.21 20.15 20.21 Electric / Gas - Deutsch - English - French Software 7.1 Software-Update Voraussetzung
Kurzanleitung Instructions succinctes Guida rapida
 Kurzanleitung Instructions succinctes Guida rapida Verdi Connect Version 2012 Terminal- Bedienung 1. Aufruf Händlerbedienung via Touchscreen Die Händlerbedienung via Touchscreen kann mit folgender Tastatur-Kombination
NVR Mobile Viewer for iphone/ipad/ipod Touch
 NVR Mobile Viewer for iphone/ipad/ipod Touch Quick Installation Guide DN-16111 DN-16112 DN16113 2 DN-16111, DN-16112, DN-16113 for Mobile ios Quick Guide Table of Contents Download and Install the App...
Installation/setup notes
 Installation/setup notes Notes applicable for the software: stute.x1d Loudspeaker Designer stute.x1a Audio Analyzer stute.scpi SCPI controller DCX.Server Install/Test our software for free (Demo) Download
Gateway 70 588 Quick Start Guide
 Gateway 70 588 Quick Start Guide Deutsch DE 1 Gateway anschließen 1. Verbinden Sie das BEGA Gateway 70 588 über den Ethernet- Anschluss mit Ihrem Heimnetzwerk. 2. Schließen Sie das beiliegende Netzteil
Gamperl & Hatlapa GmbH Modem/WiFi settings
 1. Log in - Anmelden Pic001 device front / Gerätevorderseite Pic002 Login screen / Anmeldebildschirm Connect your computer to one of the Ethernetports on the front (Pic001) of the modem. Start your browser
Konfiguration von eduroam. Configuring eduroam
 eduroam Windows 8.1 / 10 Konfiguration von eduroam Configuring eduroam 08.10.2018 kim.uni-hohenheim.de kim@uni-hohenheim.de Wissenschaftliche Einrichtungen und Universitäten bieten einen weltweiten Internetzugang
150-in-1. Handbuch / Manual / Manuel. Externer Card Reader USB 2.0
 Handbuch / Manual / Manuel Vielen Dank, dass Sie sich für ein Produkt von ultron entschieden haben. Wir wünschen Ihnen viel Freude mit Ihrem neuen Gerät! CE-Erklärung und Hinweise Hiermit erklärt die
Quick manual: iphone_vpn
 Quick manual: iphone_vpn Rechenzentrum Garching der Max-Planck-Gesellschaft Klicken Sie auf den runden Knopf und wählen Sie anschließend im Menü Einstellungen aus. Click onto the round button and then
Configuring and installing the Cisco AnyConnect VPN client
 VPN-Client Linux Konfiguration und Installation des Cisco-AnyConnect VPN-Clients Configuring and installing the Cisco AnyConnect VPN client 17. Juli 2017 kim.uni hohenheim.de kim@uni hohenheim.de Über
Start the Thecus Setup Wizard
 1 Hard disk drive installation, Network cable connection. Connect Ethernet cable to the WAN port on N4100PRO and connect the other end to your switch/hub/router. Installation du disque dur, Branchement
Systemanforderungen ecscad System Requirements ecscad Conditions requises ecscad 2017
 Systemanforderungen ecscad 2017 System Requirements ecscad 2017 Conditions requises ecscad 2017 System Requirements ecscad 2017 V3 2017 Mensch und Maschine Mechatronik GmbH 1 / 7 Systemanforderungen ecscad
USB-Hub»Bluetooth«, USB 2.0
 00049223 www.hama.com 00049223-08.06 Hama GmbH & Co KG Postfach 80 86651 Monheim/Germany Tel. +49 (0)9091/502-0 Fax +49 (0)9091/502-274 hama@hama.de www.hama.com USB-Hub»Bluetooth«, USB 2.0 l Installationsanleitung
Word-CRM-Upload-Button. User manual
 Word-CRM-Upload-Button User manual Word-CRM-Upload for MS CRM 2011 Content 1. Preface... 3 2. Installation... 4 2.1. Requirements... 4 2.1.1. Clients... 4 2.2. Installation guidelines... 5 2.2.1. Client...
INSTALLATIONSANLEITUNG
 INSTALLATIONSANLEITUNG USB-Seriell-Adapter Treiberinstallation Windows 98 1. Schritt 1: Stecken Sie den Typ A Stecker des USB-Kabels in eine freie USB-Buchse Ihres Computers. Schritt 2: Legen die Treiber-CD
How to access licensed products from providers who are already operating productively in. General Information... 2. Shibboleth login...
 Shibboleth Tutorial How to access licensed products from providers who are already operating productively in the SWITCHaai federation. General Information... 2 Shibboleth login... 2 Separate registration
Diese Konformitätserklärung gilt nur für die Länder der Europäischen Union.
 Konformitätserklärung Diese Konformitätserklärung gilt nur für die Länder der Europäischen Union. Konformitätserklärung des Herstellers (Artikel 8 der Richtlinie 89/686/EWG). Der Hersteller / Importeur
SmartClass Firmware-Update Vorgehensweise
 Benutzeranweisungen SmartClass Firmware-Update Vorgehensweise 2008.01 (V 1.x.x) Deutsch Please direct all enquiries to your local JDSU sales company. The addresses can be found at: www.jdsu.com/tm-contacts
Anruferkennung am PC. g n. Hotline / Assistance: 056 426 58 21 (Normaltarif / tarif normal) E-Mail: info@twix.ch www.twix.ch oder/ou www.twixclip.
 E-Mail: info@twix.ch www.twix.ch oder/ou www.twixclip.") Windows 7 / Vista / XP / ME / 2000 / NT TwixClip G2 Internet nun g Mit EU N n A ruferken Hotline / Assistance: 056 426 58 21 (Normaltarif / tarif normal) E-Mail: info@twix.ch www.twix.ch oder/ou www.twixclip.ch
Windows 7 / Vista / XP / ME / 2000 / NT TwixClip G2 Internet nun g Mit EU N n A ruferken Hotline / Assistance: 056 426 58 21 (Normaltarif / tarif normal) E-Mail: info@twix.ch www.twix.ch oder/ou www.twixclip.ch
Evaluation Kit Engineer 2.0
 Kurzanleitung Funk-Schnappschalter Funk-Wippschalter Volumenmodell-Generator Empfänger USB-Kabel Atennenhülse Bitte lesen Sie vor der Inbetriebnahme unbedingt die beiliegende Kurzanleitung Erste Schritte
Anleitung zur Schnellinstallation TE100-P
 Anleitung zur Schnellinstallation TE100-P21 3.01 Table of Contents Deutsch 1 1. Bevor Sie anfangen 1 2. Installation 2 3. Konfiguration des Druckservers 3 4. Fügen Sie den Drucker an den Computer an 5
1. Java installieren 2. Java Applets für graf.eit.h-da.de im Java Control Panel freigeben 3. Starten der Java Applets im Webbrowser
 DE: Die Simulationen auf https://graf.eit.h-da.de und JXN verwenden Java. Dieses Dokument beschreibt die Installation von Java und die Freigabe von Java Applets für graf.eit.h-da.de im Webbrowser. 1. Java
Internet. SoftRemoteLT-VPN-Software ZyWALL Static IP Adresse
 192.168.1.1 LAN: 192.168.1.0/24 Internet SoftRemoteLT-VPN-Software ZyWALL Static IP Adresse 20.1.1.1 Prestige ZyWALL Im Menu VPN «Summary» erste Rule editieren. Editez le premier rule sur le menu VPN «Summary».
EDG FREE 3 YEAR WARRANTY REGISTRATION 3 ANS DE GARANTIE, I
 BlueSYNC EDG FREE 3 YEAR WARRANTY REGISTRATION 3 ANS DE GARANTIE, INSCRIPTION GRATUITE REGISTRO DE GARANTÍA DE 3 AÑOS GRATIS KOSTENLOSE REGISTRIERUNG 3 JAHRE GARANTIE 三 年 免 费 保 固 www.accessorypower.com/warranty