URZ0083E SCART RECEIVER TUNER CYFROWY
|
|
|
- Dörte Kalb
- vor 8 Jahren
- Abrufe
Transkript
1 URZ008E SCART RECEIVER TUNER CYFROWY Deutsch Română 4-59 English -4 Polski -

2

3

4 4

5 5

6 Panel tylny RF IN RF OUT CVBS R L Coaxial HDMI 6

7 STANDBY MUTE INFO SUBTITLE MENU CH+ EXIT VOL- OK VOL+ RECORD 9 9 CH- EPG 0 BACK 0 4 MEDIA USB TV/RADIO AUDIO TTX TIMER FAV RES (Powraca do poprzedniego programu) 7

8 RF IN RF OUT CVBS R L Coaxial HDMI RF IN RF OUT CVBS R L Coaxial HDMI 8
9 Witaj Region Język Tryb wyszukiwania Tryb proporcji automatycznego Poland Język polski 05i 4/LB OK Instalacja Instalacja Automatyczne wyszukiwanie Automatyczne wyszukiwanie Auto Wyszukiwanie Ręczne wyszukiwanie Ustawienia Anteny LCN Auto Wyszukiwanie Tylko niekodowane Szukaj Nie Szukaj Tylko niekodowane Ręczne wyszukiwanie Ręczne wyszukiwanie Szukaj kanał Tryb skanowania UHF Zakres Numer kanału CH7(666000KHz) KHz Częstotliwość 8MHz Pasmo Szukaj Siła sygnału Jakość sygnału 8% 97% Ustawienie Anteny Numer kanału CH7(666000KHz) Zasilanie Anteny 5V Wyłącz Ustawienia anteny Zasilanie anteny 5V ustawione na włącz podaje napięcie zasilania 5V na wyjściu antenowym Siła sygnału Jakość sygnału Jeżeli funkcja LCN (Numer kanału logicznego) jest włączona, to nie można zmienić kolejności kanałów. 9 8% 97%
 jest włączona, to nie można zmienić kolejności kanałów.")
10 Wybór kanału możliwy jest na różne sposoby: przechodząc po kanałach po kolei, za pomocą przycisku numerycznego oraz wybór z listy kanałów. Wybór kanału jest również możliwy za pomocą listy kanałów. Dostęp do listy kanałów realizowany jest poprzez naciśnięcie klawisza "OK" Zmiana grup list ulubionych klawiszami "Prawo / Lewo", zmiana kanałów na liście klawiszami "Góra"/"Dół" wybór kanału klawiszem "OK", ponowne naciśnięcie "OK" spowoduje wyjście z listy kanałów. Za pomocą klawiszy "Prawo/Lewo/Góra/Dół" przełącz się pomiędzy listą kanałów, programem danego kanału oraz teraźniejszymi i następnymi programami. Klawisz "OK" wyświetla szczegółową informację o programie. Naciśnij czerwony klawisz, aby wyświetlić menu paska czasu. Naciśnij zielony klawisz, aby przejść do ustawień Timera Szczegółowy opis funkcji Timera w dalszej cześci instrukcji. EPG 000 Polsat Hotel 5 s. V. odc 56 0: :9 xx/xx/xxxx /9 0:0 0:00 0:0 0:00 000Polsat 000TVN Hotel 5 s. V. odc 56 The Recor Commons Questions The Recor 000TV4 Auntie's War on Smut Proms on FOUR 0004TV Plus This is CBeebies! 0005TVN Sie Czas Zegar 0

11 Edycja kanału Edycja listy kanałów Lista kanałów Lista kanałów radiowych Kasuj wszystko Lista kanałów TV Lista kanałów TV Wszystkie kanały FAV Blokuj Przes Ruch Edycja 000 Polsat 000 TVN 000 TV TV PLUS 0005 TVN Siedem 0006 Puls 0007 TV 6 POLSAT xxxxxxxx xxxxxx xxxx xxx i Lista kanałów TV Wszystkie kanały Sortuj Zmien naz Usuń 000 TV PULS 000 TV TV PLUS 0005 TVN Siedem 0006 TVN 0007 POLSAT i BBC FOUR xxxxxxxx xxxxxx xxxx xxx Lista kanałów radiowych Tak Nie Kasuj wszystko Uwaga!: Czy na pewno chcesz usunąć wszystkie kanały? Tak Nie

12 USTAWIENIA SYSTEMOWE Ustawienia systemu Ustawienia systemu Język System TV Ustawienia czasu lokalnego Ustawienia Timera Blokada rodzicielska Ustawienia OSD Ulubione Automatyczny tryb czówania Język Język Pierwszy dźwięk Drugi dźwięk Język napisów Teletekst To menu pozwala na ustawienie języka dla: język menu, pierwszy dźwięk, drugi dźwięk, język napisów, teletekst. Język Język Język Język Język polski polski polski polski polski Język TV Rozdzielczość Tryb proporcji Wyjście wideo Cyfrowe wyjście audio RGB CVBS/RGB Ustawienia czasu lokalnego Region Użycie GMT Ofset GMT Czas letni Data Czas Poland Włącz GMT +0:00 Wyłącz Użycie GMT na Włącz ustawienia Użycie GMT na Wyłącz Ustawienia timera /Tygodniowo/Miesięcznie Tryb włączenia: Wybór kanału Bieżący czas/data: :5 8/0/0 Tryb zegara Raz Tryb włączenia Nagrywanie Wybór kanału Polsat Data 8/0/0 Godzina 5:50 Okres czasu 0:00 nagrania. Zapisz Anuluj godzinę rozpoczęcia. Godzina: nagrania. Okres czasu: Podświetl "Zapisz" i naciśnij "OK.", aby potwierdzić ustawienia lub "Anuluj", żeby zrezygnować. Bezpośredni dostęp do ustawień timera - wybierz klawisz "TIMER" na pilocie lub przez wejście w EPG i wybranie opcji zegar - zielony klawisz.

13 Blokada rodzicielska Blokada rodzicielska Blokada menu Blokada kanału Nowe hasło Potwierdź hasło Wyłącz Wyłacz ---- Ustawienia OSD Czas wyśiwetlania Przezroczystość Załaduj domyślne ustawienia Ulubione Ulubione Zmień n azwę Ulubiony A B C D E F G H I J K L M N O P Q R S T U V W X Y Z SP? <- OK CAPS Kas Tak Automatyczny tryb czówania Włacz Automatyczny tryb czu Wyłącz Włącz

14 Narzędzia a Za pomocą przycisków "Góra" / "Dół " podświetl żądane ustawienia i naciśnij przycisk OK aby przejść do podmenu. Narzędzia Informacje o sofcie Ustawienia fabryczne Aktualizacja oprog. przez OTA Aktualizacja oprog. przez USB Urządzenie USB Usuń bezpiecznie urzadzenie USB Informacje o sofcie xxx xxxxx xxxxx xxx xxx Informacje o sofcie x.x.x xxxxx xxxxx x.x.x x.x.x xxxx-x-xx xxxx-x-xx xxxx-x-xx xxxx-x-xx xxxx-x-xx Ustawienia fabryczne Ustawienia fabryczne Ta operacja załaduje ustawienia domślne i wykasuje wszystkie kanały dodane przez użytkownika! Kontynuować? Tak Nie Tak Nie 4

15 Narzędzia i wybierz: Aktualizacja oprogramowania przez USB naciśnij przycisk ok. Aktualizacja oprogr. przez USB Tryb aktualizacji Plik aktualizacji Start Tryb aktualizacji ustawiamy na "Allcode". Z nośnika USB wskaż plik aktualizacji, podświetl "start", a następnie naciśnij klawisz "ok.", aby rozpocząć aktualizację. Pojawi się komunikat z potwierdzeniem zmiany oprogramowania, naciśnij "Tak" jeżeli chcesz zmienić oprogramowanie lub "Nie", jeżeli zmiana ma zostać anulowana Ważne! Wyłączenie dekodera przed ukończeniem aktualizacji grozi uszkodzeniem odbiornika i nie jest objęte naprawą gwarancyjną! 4 Po załadowaniu softu dekoder wyłączy się i ponownie uruchomi z planszą powitalną. Uwaga! Niedozwolone jest stosowanie oprogramowania modyfikowanego lub przeznaczonego do innych modeli. Uszkodzenie dekodera spowodowane złym wykonaniem aktualizacji nie podlega naprawie gwarancyjnej! Urządzenia USB W menu narzędzi, wybierz Urządzenie USB i naciśnij przycisk ok. aby przejść do Menadżera nagrań. Za pomocą przycisków Góra / Dół podświetl żądany plik a następnie naciśnij przycisk ok go uruchomić. Naciśnij przycisk Exit aby wyjść z menu. Uwaga! Bezpośredni dostęp do "odtwarzacza klawisz "Media" na pilocie. Menadżer nagrań uda /.. MPG 840.mpg MP I swear.mp MP Why.mp I swear.mp 4 MP Lonely.mp 9KB 5 MP Because.mp 00:0: 6 7 JPG JPG Rose.jpg Fly.jpg 00:0:5 00:0: Play List INFOSetup 0 All Music FAV Add File Repeat Mode Sort All Image. Wciśnij klawisz "MENU", aby wejść do menu dekodera.. Klawiszami "Góra / Dół" Podświetl "Usuń bezpiecznie urządzenie USB", a następnie naciśnij klawisz "OK", aby wejść do ustawień.. Klawiszami "Lewo" / "Prawo" wybierz żądany dysk i podświetlając "Tak" potwierdź klawiszem "OK" 4. Możesz wyjąć urządzenie z portu USB dekodera Narzędzia Informacje o sofcie Ustawienia fabryczne S/W Upgrade by OTA Upgrade Możesz teraz By bezpiecznie USB usunąć USB urządzenie Device USB! Remove USB Tak device safely 5

16 Gry Gry 6
17 REC Naciśnij przycisk MENU aby wejść do menu urządzenia. Menadżer nagrywania Informacje o dysku Format HDD Konfiguracja DVR Skok przewijania Menadżer nagrywania REC Menadżer nagrywania Uwaga Bezpośredni dostęp do "Menadżera" klawisz "Media" na pilocie. Menadżer nagrywania BBC FOUR (DVR) 6:5-6:56(00:0:)98M No. Data Czas Program 9/0 /07 0:0-0:0 5:9-5:40 BBC FOUR The HITS 4 /07 9/0 7:4-7:4 6:5-6:56 Ideal World BBC FOUR Blokuj Usuń Zmień na Informacja o dysku REC Informacje o dysku i Informacje o dysku Pojemność Wolne Zajęte Timeshift Wolne na nagr. System plików REC Partycja Format HDD Format HDD Pojemność pojemność Wolne Zajęte System plików Partycja przechowy Uwaga! Opcja formatowania nieodwracalnie usuwa pliki zapisane na dysku 7

18 Nagrywanie Timeshift Włącz / Wyłącz Włącz / Wyłącz Konfiguracja DVR Timeshift Włącz Nagrywanie Timeshift Wyłącz Tryb nagrywania TS Wybór nagrywania USB Partition Wyłącz po zakończeniu Wyłącz Uwaga! Funkcja ta działa prawidłowo wyłącznie dla kanałów nadawanych w standardzie mpeg-. Przy obowiązującym w Polsce standardzie mpeg-4 nagrane zostaną pełne informacje w formacie TS. ustawienie Włącz spowoduje że dekoder automatycznie przejdzie w tryb czuwania. Skok przewijania To menu pozwala na zmianę czasu o jaki ma zostać przewinięty obraz. Skok przewijania Skok przewijania 0s 8

19 Możliwe jest: (Timeshift) BBC FOUR 0/9 0:6 Play 00:0:7 00:07: TS % Aby ustalić czas nagrywania naciśnij x klawisz "REC" i wpisz czas po którym nagrywanie ma zostać zakończone Tak Nie Możliwe jest zaprogramowanie nagrań przez opcję "Timer" lub wybór audycji przez EPG (patrz odpowiedni rozdział instrukcji) Aby zakończyć nagrywanie programu naciśnij klawisz "STOP" i potwierdź zakończenie nagrywania. 9
 Aby zakończyć nagrywanie programu naciśnij klawisz \"STOP\" i potwierdź zakończenie")
20 0

21 Teletext - VB MPEG- Layer zabezpieczone HDCP, STANDBAY 0.5W
22 Prawidłowe usuwanie produktu - Nie wyrzucaj urządzeń elektrycznych razem z innymi odpadami komunalnymi. Użyj oddzielnych punktów zbiórki odpadów. - W celu uzyskania informacji na temat miejsca i sposobu bezpiecznego dla środowiska recyklingu tego produktu użytkownicy w gospodarstwach domowych powinni skontaktować się z punktem sprzedaży detalicznej, w którym dokonali zakupu produkt, lub z organem władz lokalnych. - Opakowanie może być poddane recyklingowi. - Gospodarstwo domowe pełni istotną rolę w przyczynianiu się do ponownego użycia i odzysku, w tym recyklingu, zużytego sprzętu elektrycznego. Przestrzeganie zasad selektywnej zbiórki sprzętu ma zapewnić właściwy poziom zdrowia ludzkiego i ochrony środowiska naturalnego. Uwaga: Specyfikacja produktu może ulec zmianie bez wcześniejszego powiadomienia.
23 SAFETY INFORMATIONS TO REDUCE THE RISK OF FIRE AND ELECTRIC SHOCK, DO NOT EXPOSE THIS UNIT TO RAIN OR MOISTURE. CAUTION : To reduce the risk of fire and electric shock, do not remove the cover (or back) of the unit. Refer servicing only to qualified service personnel. The lightning flash with arrowhead symbol, within an equilateral triangle, is intended to alert the user to the presence of uninsulated "dangerous voltage" within product's enclosure that may be of sufficient magnitude to constitute a risk of electric shock. The exclamation point within an equilateral triangle is intended to alert the user to the presence of important operation and servicing instructions in the literature accompanying the appliance. WARNING: TO REDUCE THE RISK OF FIRE OR ELECTRIC SHOCK, DO NOT EXPOSE THIS APPLIANCE TO RAIN OR MOISTURE. CAUTION: TO PREVENT ELECTRIC SHOCK, MATCH WIDE BLADE OF PLUG TO WIDE SLOT AND FULLY INSERT. The apparatus shall not be exposed to dripping or splashing, and that no objects filled with liquids, such as vases, shall be place on the apparatus. Batteries shall not be exposed to excessive heat such as sunshine, fire or the like. CAUTION: Danger of explosion if battery is incorrectly replaced. Replace only with the same or equivalent type. Where the mains plug or a appliance coupler is used as the disconnect device, the disconnect device shall remain readily operable. IMPORTANT SAFEGUARDS In addition to the careful attention devoted to quality standards in the manufacture of your video product, safety is a major factor in the design of every instrument. However, safety is your responsibility, too. This sheet lists important information that will help to assure your enjoyment and proper use of the video product and accessory equipment. Please read them carefully before operation and using your video product. Installation. Read and Follow Instructions- All the safety and operation instructions should be read before the video product is operated. Follow all operating instructions.. Retain Instructions- The safety and operating instructions should be retained for future reference.. Heed all Warnings-Comply with all warnings on the video product and in the operating instructions. 4. Polarization- Some video products are equipped with a polarized alternating -current line plug. This plug will fit into the power outlet, try reversing the plug. If the plug still fails to fit, contact your electrician to replace your obsolete outlet. To prevent electric shock, do not use this polarized plug with an extension cord, receptacle, or other outlet unless the blades can be fully inserted without blade exposure. If you need an extension cord, use a polarized cord. 5. Power Sources- This video product should be operated only from the type of power source indicated on the marking label. If you are not sure of the type of power supply to your home, consult your video dealer or local power company. For video products intended to operate from battery power, or other sources, refer to the operating instructions. 6. Overloading- Do not overload wall outlets or extension cords as this can result in a risk of fire or electric shock. Overloaded AC outlets, extension cords, frayed power cords, damaged or cracked wire insulation, and broken plugs are dangerous, They may result in a shock or fire hazard. Periodically examine the cord, and if its appearance indicated damage or deteriorated insulation, have it replaced by your service technician. 7. Power-Cord Protection- Power-supply cords should be routed so that they are not likely to be walked on or pinched by items placed upon or against them, paying particular attention to cords at plugs, convenience receptacles, and the point where they exit from the video product. 8. Ventilation- Slots and openings in the case are provided for ventilation to ensure reliable operation of the video product and to protect it from overheating. These openings must not the blocked or covered. The openings should never be blocked by placing the video product on a bed, sofa, rug, or heat register. This video product should not be placed in a built-in installation such as a book case or rack, unless proper ventilation is provided or the video product manufacturer's instructions have been followed. English
24 SAFETY INFORMATIONS 9. Attachments- Do not use attachments unless recommended by the video product manufacturer as they may cause hazards. 0. Water and Moisture- do not use this video product near water for example, near a bath tub, wash bowl, kitchen sink or laundry tub, in a wet basement, or near a swimming pool and the like. Caution: Maintain electrical safety. Powerline operated equipment or accessories connected to this unit should bear safety certification mark on the accessory itself and should not be modified so as to defeat the safety features. This will help avoid any and should not be modified so as to defeat the safety features. This will help avoid any potential hazard from electrical shock or fire. If in doubt, contact qualified service personnel..accessories- Do not place this video product on an unstable cart, stand, tripod, bracket, or table. The video product may fall, causing serious injury to a child or adult as well as serious damage to the video product. Use this video product only with a cart, stand, tripod, bracket, or table recommended by the manufacturer's or sold with the video product. Any mounting of the product should follow the manufacturer's instructions and use of a mounting accessory recommended by the manufacturer. a. A video product and cart combination should be moved with care. Quick stops, excessive force, and uneven surfaces may cause the video product and cart combination to overturn. Note to CATV system installer This reminder is provided to call the CATV system installer's attention to Section of the NEC which provides guidelines for proper grounding and, in particular, specifies that the cable ground shall be connected to the grounding system of the building, as close to the point of cable entry as practical.. Outdoor Antenna Grounding- If an outside antenna or cable system is connected to the video product, be sure the antenna or cable system is grounded so as to provide some protection against voltage surges and built-up static charges. Section 80 of the National Electrical Code, ANSI/NFPA No (Section 54 of Canadian Electrical Code, Part) provides information with respect to proper grounding of the mast and supporting structure, grounding of the lead-in wire to an antenna-discharge unit, connection to grounding electrodes, and requirements for the grounding electrode.. Power Lines-An outside antenna system should not be located in the vicinity of overhead power lines, other electric light or power circuits, or where it can fall into such power lines or circuits. When installing an outside antenna system, extreme care should be taken to keep from touching or approaching such power lines or circuits, as contact with them might be fatal. Installing an outdoor antenna can be hazardous and should be left to a professional antenna installer. Use 4. Cleaning- Unplug this video product from the wall outlet before cleaning. Do not use liquid cleaners or aerosol cleaners. Use a damp cloth for cleaning. 5. Objects that may touch dangerous voltage points or "short-out" parts could result in a fire or electric shock. Never spill liquid of any kind on the video product. 6. Lightning-For added protection for this video product during a lightning storm, or when it is left unattended and unused for long periods of time, unplug it from the wall outlet and disconnect the antenna or cable system. This will prevent damage to the video product due to lightning and power line surges. Service 7. Servicing-Do not attempt to service this video product yourself, as opening or removing covers may expose you to dangerous voltage or other hazards. Refer all servicing to qualified service personnel. 8. Conditions Requiring Service-Unplug this video product from the wall outlet and refer servicing to qualified service personnel under the following conditions: A. When the power-supply cord or plug is damaged. B. If liquid has been spilled, or objects have fallen into the video product. C. If the video product has been exposed to rain or water. D. If the video does not operate normally by following the operating instructions. Adjust only those controls that are covered by operating instructions. Improper adjustment of other controls may result in damage and will often require extensive work by a qualified technician to restore the video product to its normal operation. E. If the video product has been dropped or cabinet has been damaged. F. When the video product exhibits a distinct change in performance-this indicates a need for service. 9. Replacement Parts-When replacement parts are required, have the service technician verify that the replacements he uses have the same safety characteristics as the original parts. Use of replacements specified by the video product manufacturer can prevent fire, electric shock, or other hazards. 0. Safety Check-Upon completion of any service or repairs to this video product, ask the service technician to perform safety checks recommended by the manufacturer to determine that the video product is in safe operating condition.. Wall or Ceiling Mounting- The product should be mounted to a wall or ceiling only as recommended by the manufacturer.. Heat-The product should be situated away from heat sources such as radiators, heat registers, stoves, or other products (including amplifiers) that products heat. 4 English
25 CONTENTS SAFETY INFORMATION INTRODUCTION Front panel Rear panel Remote control SYSTEM CONNECTION General Connecting the TV GETTING STARTED Welcome Installation OPERATION Changing channels Access the Electronic Programme Guide(EPG) EDIT CHANNEL Edit Channel menu TV Channel list Radio Channel list Delete All SYSTEM SETUP System setup menu Language TV System Local Time Setting Timer Setting Parental Lock OSD Setting Favorite Auto Standby TOOLS Tools main menu Information Load Factory Setting Software Upgrade USB Device Remove USB device safely GAMES Game REC REC main menu Record Manager DVR HDD Information HDD Format DVR Configuration TIMESHIFT/RECORD Timeshift Record TROUBLESHOOTING SPECIFICATIONS English
26 INTRODUCTION Front panel Remote sensor USB port Standby button Rear panel TV aerial for an external TV aerial Coaxial Digital Audio TV Scart for connection to the TV AC Mains RF IN RF OUT CVBS R L Coaxial HDMI RF Loop through for an external device HDMI Output Composite Video Down Mix Audio Channel L/R 6 English
27 Remote control 4 5 Previous/Next PAUSE(Pause/Active timeshift function) STANDBY MUTE INFO SUBTITLE Menu (Open and close the menu screen) Cursor/CH+, -/VOL+,- (Cursor: Navigation buttons used to navigate menu's items) (CH+/-: Channel Up and Down) (VOL+/-: Volume Up and Down) OK button (Confirm a selection within a menu) VOL- MENU CH+ OK EXIT VOL RECORD (Record the TV program) Numeric entry (Enter numeric values and select the channel directly by entering it's number) USB (Enter File Manager) 9 RECORD 9 MEDIA (Enter Recorder menu) 0 CH- EPG BACK TTX (Open interactive service) TIMER (Timer wake-up) MUTE (Turn off/on the volume) 6 SUBTITLE (On/Off Subtitle) 4 MEDIA USB TV/RADIO AUDIO TTX TIMER FAV RES Search backward /forward EXIT (Exit from menu) STOP (Stop program playback or recording) EPG (Open up Electronic Program Guide Menu) 6 4 BACK (Switch to previous channel) TV/RADIO (Switch between TV and Radio) AUDIO (Select audio mode and audio track) RES (Switch HDMI resolution) STANDBY (switch the STB on and standby) INFO (Press for current channel information/ Operation guide ) PLAY 5 6 FAV (Open the Favorite list) RED/GREEN/YELLOW/BLUE Buttons (For interactive function/submenu function buttons) 7 English
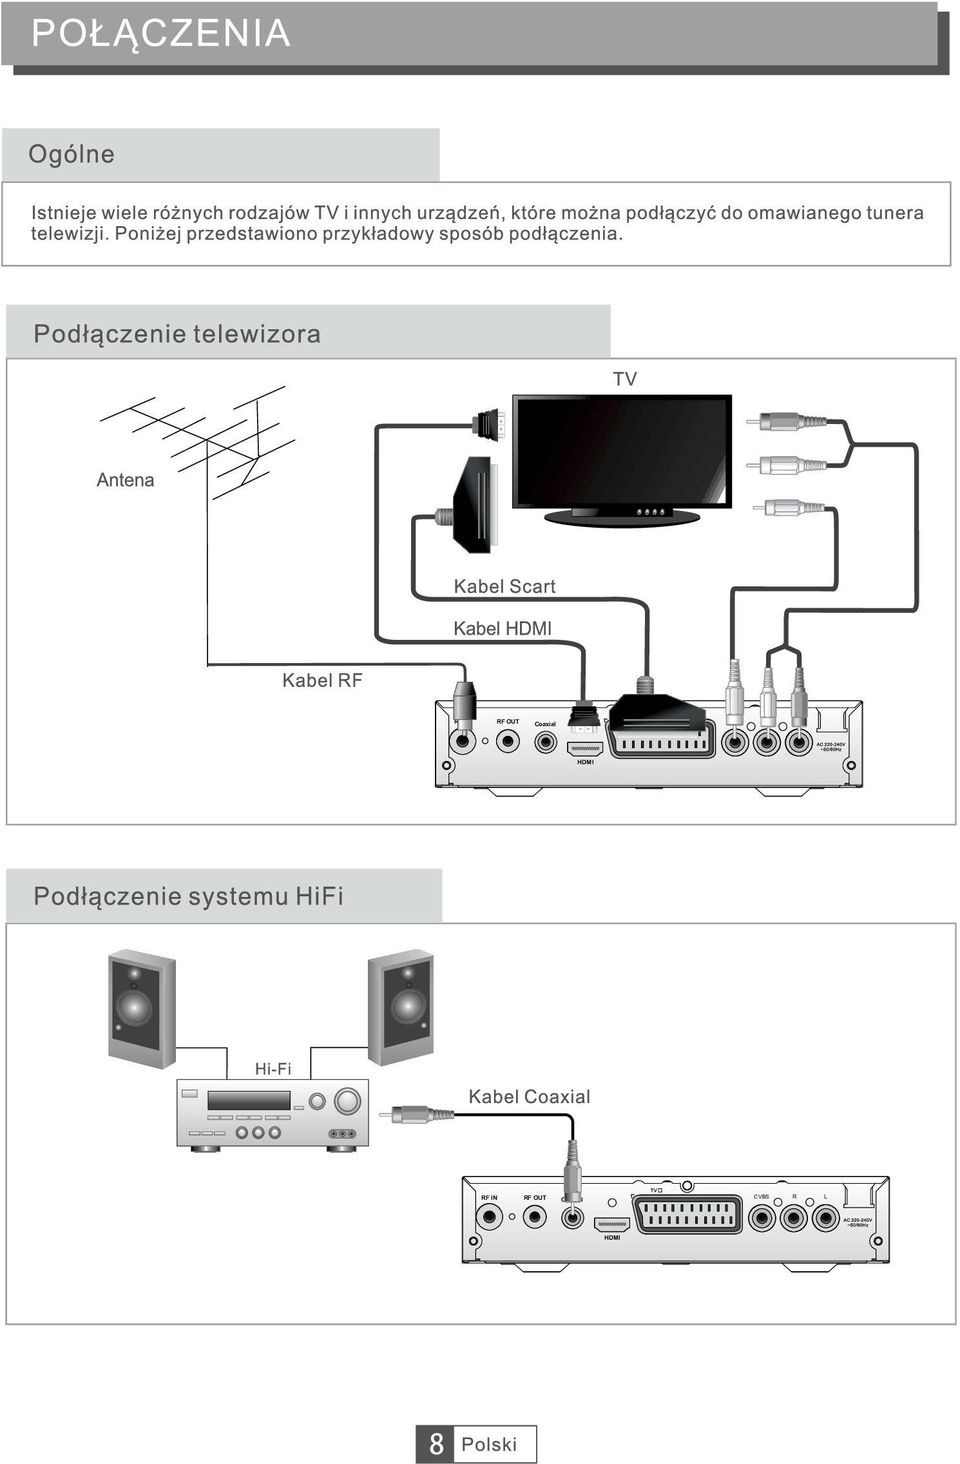
28 SYSTEM CONNECTION General There are many different types of TV and other equipment that you can connect to the STB. In this manual you will see some of the most common ways to connect your equipment. Connecting the TV TV Antenna Scart cable HDMI cable RF cable RF IN RF OUT CVBS R L Coaxial HDMI Connecting a HiFi system Hi-Fi Coaxial cable RF IN RF OUT CVBS R L Coaxial HDMI 8 English
29 GETTING STARTED Welcome If you use the STB for the firsttime, the "Welcome" menu appears. Press cursor button to setup the Region, Language, Display Mode and Aspect Mode. Highlight "OK" and press the "OK" button to start channel search. Region Language Display Mode Aspect Mode Welcome OK Poland English 080i Auto Installation 4 Press the "MENU" button to enter main menu. Press "UP"or " DOWN " button to highlight "Installation", press "RIGHT" button to enter the Installation menu. Press "UP" or "DOWN" cursor button to highlight the desired item and press "OK"button to enter the sub-menu. Press "EXIT" button to exit. Installation Auto Scan Channel Scan Aerial Adjustment LCN Auto Scan Select the "Auto Scan", press "OK" button to enter the Auto Scan menu. Press the cursor button to set "FTA Only", then highlight "Search", press the "OK" button to start auto scan. Auto Scan FTA Only Search No Channel Scan Select "Channel Scan", press the "OK" button to enter the Channel Scan menu. Press cursor button to set Scan mode, Scan Band, Channel No., Frequency and Bandwidth, then highlight "Search", press "OK" button to start channel scan. Channel Scan mode: By channel By frequency Scan Mode Scan Band Ch No. Channel Scan Frequency Bandwidth Search Signal Intensity Signal Quality By channel UHF CH7(666000KHz) KHz 8MHz 8% 97% Aerial Adjustment Select the "Aerial Adjustment", press"ok" to enter the Aerial Adjustment. Press the cursor button to set the desired setting. When "Tuner Power" is selected "On", the STB will provide 5V power to antenna. It will not provide when selected "Off". Aerial Adjustment Ch No. CH7(666000KHz) Tuner Power Off Signal Intensity Signal Quality 8% 97% LCN If LCN(Logical Channel Number) Select function is activated, you can't change the original number of TV channels by scanning. You can activate/disactivate the LCN function by setting the "LCN Mode" to on/off. 9 English
30 OPERATION Changing Channels There are three ways of channel selection - stepping through the channel list, selection by number and from the on-screen channel list. Stepping through the channel list: To move through the channel list, press the upward arrow or downward arrow key on the remote control. Selected by number: Enter the channel number directly by pressing numeric buttons,and press the "OK" button to select desired channel. Selected by on-screen channels list: You can also select the required channel directly from on-screen channel list. This is displayed using the STB's main menu. See "Edit Channel" in this manual for operation detail. Accessing the Electronic Program Guide (EPG) Accessing the EPG of all channels: 4 Press "EPG" button to enter EPG menu. Press cursor button to switch between channel list, events schedule of the selected channel and now/next events. Press "Green" button to Timer the events. Press "Red" button to display " Time Bar" menu. EPG 0:9 xx/xx/xxxx 000 BBC FOUR Auntie's War on Smut 0:0-0-0 /9 0:0 0:00 0:0 0: Interecon 0009BBC Parl The Recor Commons QuestionsThe Recor 000BBC FOAuntie's War on Smut Proms on FOUR 00CBeebieThis is CBeebies! 000 Time Timer 0 English
31 EDIT CHANNEL Edit Channel menu 4 Press the "MENU" button to enter main menu. Press "UP" or "DOWN " buttonto highlight "Edit Channel", press "RIGHT" button to enter the Edit Channel menu. Press "UP" or "DOWN" cursor button to highlight the desired item and press "OK" button to enter the sub-menu. Press "EXIT" button to exit. Edit Channel TV Channel List Radio Channel List Delete All TV Channel list In the Edit Channel menu, select "TV Channel List", press "OK" button to enter TV channel list menu. Press "UP" or "DOWN" button to highlight channel, press the "OK" button to preview the desired TV channel. Use this menu to favor, lock, skip, move, sort, delete and rename channel. Press "FAV" button, then press "OK" button to edit the FAV function. Press "color" button, then press "OK" button to edit the corresponding function. TV Channel List All Channel FAV Lock Skip Move Edit 000 No Name 000 YooPlay Ga 000 E UKTV Histor 0005 SKY THREE 0006 Sky Spts Ne 0007 Sky News TV Channel List All Channel Sort Rename Delete 000 No Name 000 YooPlay Ga 000 E UKTV Histor 0005 SKY THREE 0006 Sky Spts Ne 0007 Sky News i BBC FOUR xxxxxxxx xxxxxx xxxx xxx i BBC FOUR xxxxxxxx xxxxxx xxxx xxx Radio Channel list In the Edit Channel menu, select "Radio Channel List", press "OK" button to enter the Radio Channel list menu. Press "UP" or "DOWN" buttonto highlight channel press the "OK" button to listen the desired radio channel. NOTE: Basically, the operation of "Radio Channel List" is the same as "TV Channel List", but there is one point different: In "Radio Channel List" mode, there is no video information, so it will always display Radio's logo in the right side preview window. Delete All In the Edit Channel menu, select "Delete All", press "OK" button. A warning window appears. Select "Yes", press "OK" button to delete all channels. Select "No", Press "OK" button to cancel deleting. Warning! Do you really want to delete all channels? Yes No English
32 SYSTEM SETUP System setup menu System setup menu allows us to set Language, TV System,Local Time Setting, Timer Setting, Parental Lock, OSD Setting, Favorite and Auto Standby. Press the "MENU" button to enter main menu. Press "UP" or "DOWN" button to highlight "System Setup", press "RIGHT" button to enterthe System Setup menu. Press "UP" or "DOWN" cursor button to highlight the desired item and press "OK" button to enter the sub-menu. 4 Press "EXIT" button toexit. Language This menu allows you to set Language. System Setup Language TV System Local Time Setting Timer Setting Parental Lock OSD Setting Favorite Auto Standby Language Language English First Audio English Second Audio German Subtitle Language English Teletext English TV System This menu allows us to set Video Resolution, Aspect Mode, Video Output and Digital Audio Output. Video Resolution: Aspect Mode: Video Output: Digital Audio Output: 480i/480p/576i/576p/70p/080i/080p Auto/4:PS/4:LB/6:9 CVBS/RGB LPCM Out/ BS Out TV System Video Resolution 080i Aspect Mode Auto Video Output CVBS Digital Audio OutputLPCM Local Time Setting This menu allows you to set the region and time. Region: This menu is used for changing the region setting. GMT Usage: This menu is used for open the usage of GMT. The options are : Off / On GMT Offset: This menu is valid only when selected "Uesr Define" in GMT Usage menu. The GMT offset range is "-:0 ~ +:00", increasing half hour progressively. Date: Time: Local Time Setting Region GMT Usage GMT Offset Summer Time Date Time xxxx,xxx,xxxx "Date" and "Time" menus are valid only when selected "Off" in GMT Usage menu. Press numeric button to input the time. France On GMT+0:00 Off xxxx/xx/xx 0:5 Timer Setting This menu allows us to set the program timer. You can set 8 timers. Timer Mode: Off/Once/Daily/Weekly / Monthly Timer Service: Channel/Record Wakeup Channel: You can select a desired channel as the wakeup channel. Wakeup Date: Press numeric button to input date. Wakeup Time: Press numeric button to input the time. Duration: Press numeric button to input the duration time. Current Time/date: 0:6PM xx/xx/xxxx Timer Mode Daily Timer Service Channel Wakeup Channel BBC FOUR Wakeup Date xx/xx/xxxx Wakeup Time xx:xx Duration xx:xx Save Cancel English
33 Parental Lock This menu allows you to protect the installation menu and channel, and change the Password. In "System Setup" menu, select "Parental Lock" and press "OK" button, you are asked to input a password(the default password is"0000"). After inputting the correct password by pressing numeric buttons, the parental lock menu appears. Menu Lock: To lock the Edit channel/ installation/system setup/ Tools/ REC menu. When you want to enter these menus, you must input the password. You can set menu lock to on/off. Channel Lock: Off/ AGE 0/AGE /AGE 6/AGE 8 New Password: To change the password. Confirm Password: To confirm the new password. Parental Lock Menu Lock Channel Lock New Password Confirm Password Off Off OSD Setting This menu allows you to set OSD Timeout, OSD Transparency and load default OSD setting. OSD Timeout: -0 OSD Transparency: To set the OSD transparency to Off/0%/0%/0%/ 40%. Load Default OSD Setting: To clear all OSD setting and reset parameters as default value. OSD Setting OSD Timeout 5 OSD Transparency Off Load Default OSD Setting Favorite This menu allows you to rename the favorite group. In Channel menu, select "Favorite", press "OK" button to enter Favorite menu. Select desired group, press "OK" button to open the mock keypad. Input letter and numeric one by one by pressing the cursor button and press "OK" button to confirm. After finishing input, highlight "OK" on mock keypad to confirm, you change Favorite group name successfully. Press "EXIT" button to quit the group rename menu Favorite Fav group Fav group Fav group Fav group 4 Fav group 5 Fav group 6 Fav group 7 Fav group 8 Rename Fav group A B C D E F G H I J K L M N O P Q R S T U V W X Y Z SP? <- OK CAPS Del OK Auto Standby On No command to STB on front panel or Remoter in hours and no timer event,the STB will enter standby mode automatically. Auto Standby Auto Standby On Off The STB can't enter standby mode automatically. English
p^db=`oj===pìééçêíáåñçêã~íáçå=
 p^db=`oj===pìééçêíáåñçêã~íáçå= Error: "Could not connect to the SQL Server Instance" or "Failed to open a connection to the database." When you attempt to launch ACT! by Sage or ACT by Sage Premium for
Electrical testing of Bosch common rail piezo injectors
 Applies to generation CRI 3: Bosch 10-position order number 0 445 115 = CRI 3-16 (CRI 3.0) 1600 bar 0 445 116 = CRI 3-18 (CRI 3.2) 1800 bar 0 445 117 = CRI 3-20 (CRI 3.3) 2000 bar Tools required: Hybrid
Electrical tests on Bosch unit injectors
 Valid for Bosch unit injectors with order numbers 0 414 700 / 0 414 701 / 0 414 702 Parts Kit Magnet*: - F00H.N37.925 - F00H.N37.933 - F00H.N37.934 * For allocation to the 10-place Bosch order number,
miditech MIDI THRU 7 MIDI THRU 7
 miditech 1 x MIDI In / 7 x MIDI THRU Box LED für Betriebsanzeige/ Power LED für MIDI In-/Output USB Powered, mit optionalem USB Netzteil Hochwertiges Aluminium Gehäuse Update-fähige Firmware über den USB
C R 2025 C LOSE PUSH OPEN
 3V C R 2025 C LOSE PUSH OPEN ) ) ) 25 222 3V C R 2025 C LOSE PUSH OPEN 25 222 3V C R 2025 C LOSE PUSH OPEN 25 222 Den här symbolen på produkten eller i instruktionerna betyder att den elektriska
NEWSLETTER. FileDirector Version 2.5 Novelties. Filing system designer. Filing system in WinClient
 Filing system designer FileDirector Version 2.5 Novelties FileDirector offers an easy way to design the filing system in WinClient. The filing system provides an Explorer-like structure in WinClient. The
Cameraserver mini. commissioning. Ihre Vision ist unsere Aufgabe
 Cameraserver mini commissioning Page 1 Cameraserver - commissioning Contents 1. Plug IN... 3 2. Turn ON... 3 3. Network configuration... 4 4. Client-Installation... 6 4.1 Desktop Client... 6 4.2 Silverlight
Word-CRM-Upload-Button. User manual
 Word-CRM-Upload-Button User manual Word-CRM-Upload for MS CRM 2011 Content 1. Preface... 3 2. Installation... 4 2.1. Requirements... 4 2.1.1. Clients... 4 2.2. Installation guidelines... 5 2.2.1. Client...
URZ0188. Portable Digital TV Telewizor przenośny
 URZ088 Portable Digital TV Telewizor przenośny Deutsch 6-8 Română 45-6 English 4-44 Polski - 4 Widok z boku, widok z góry 7 8 9 9 0 0 Ustawienia timera 4 4 4 5 5 5 6 6 8 Urządzenie USB 8 8 8 9 0 0 5
Tube Analyzer LogViewer 2.3
 Tube Analyzer LogViewer 2.3 User Manual Stand: 25.9.2015 Seite 1 von 11 Name Company Date Designed by WKS 28.02.2013 1 st Checker 2 nd Checker Version history Version Author Changes Date 1.0 Created 19.06.2015
VIDEO CALL CAMERA G-VCAM-01
 VIDEO CALL CAMERA G-VCAM-01 EN AUS GUTEM GRUND ENGLISH 07-10 2 SAFETY AND INFORMATION Safety 7 This camera is designed to transmit video and audio signals. All other uses are expressly prohibited. 7 Protect
1. General information... 2 2. Login... 2 3. Home... 3 4. Current applications... 3
 User Manual for Marketing Authorisation and Lifecycle Management of Medicines Inhalt: User Manual for Marketing Authorisation and Lifecycle Management of Medicines... 1 1. General information... 2 2. Login...
Monitor VIS 3xx Kurzanleitung
 Monitor VIS 3xx Kurzanleitung 19.08.08 Art. Nr. 22261 Inhalt: 1. Spezifikationen...2 2. Tastenfunktionen...2 3. Menüführung und Einstellungen...3 Technik nach Maß Wöhler Monitor VIS 3xx 1. Spezifikationen
Electrical testing of Bosch common rail Injectors
 Electrical testing of Bosch common rail Injectors Contents: 1. Adapter cable for Hybridtester FSA 050 (article number 0 684 010 050 / 1 687 023 571) 2. Electrical testing of Bosch common rail solenoid
Exercise (Part V) Anastasia Mochalova, Lehrstuhl für ABWL und Wirtschaftsinformatik, Kath. Universität Eichstätt-Ingolstadt 1
 Anastasia Mochalova, Lehrstuhl für ABWL und Wirtschaftsinformatik, Kath. Universität Eichstätt-Ingolstadt 1") Exercise (Part V) Notes: The exercise is based on Microsoft Dynamics CRM Online. For all screenshots: Copyright Microsoft Corporation. The sign ## is you personal number to be used in all exercises. All
Exercise (Part V) Notes: The exercise is based on Microsoft Dynamics CRM Online. For all screenshots: Copyright Microsoft Corporation. The sign ## is you personal number to be used in all exercises. All
AKTIVE DVB-T ZIMMERANTENNE ANSCHLUSSHINWEISE ACTIVE DVB-T INDOOR ANTENNA CONNECTION INSTRUCTIONS
 K la vi er l ac ko p tik AKTIVE DVB-T ZIMMERANTENNE ANSCHLUSSHINWEISE ACTIVE DVB-T INDOOR ANTENNA CONNECTION INSTRUCTIONS ZA 8970 DRUCKS0682.indd 1 05.09.12 15:15 VerpAckunGsinhAlT UKW / UHF / VHF Flachantenne
Exercise (Part XI) Anastasia Mochalova, Lehrstuhl für ABWL und Wirtschaftsinformatik, Kath. Universität Eichstätt-Ingolstadt 1
 Anastasia Mochalova, Lehrstuhl für ABWL und Wirtschaftsinformatik, Kath. Universität Eichstätt-Ingolstadt 1") Exercise (Part XI) Notes: The exercise is based on Microsoft Dynamics CRM Online. For all screenshots: Copyright Microsoft Corporation. The sign ## is you personal number to be used in all exercises. All
Exercise (Part XI) Notes: The exercise is based on Microsoft Dynamics CRM Online. For all screenshots: Copyright Microsoft Corporation. The sign ## is you personal number to be used in all exercises. All
CABLE TESTER. Manual DN-14003
 CABLE TESTER Manual DN-14003 Note: Please read and learn safety instructions before use or maintain the equipment This cable tester can t test any electrified product. 9V reduplicated battery is used in
EMCO Installationsanleitung Installation instructions
 EMCO Installationsanleitung Installation instructions Installationsanleitung Installation instructions Digitalanzeige digital display C40, FB450 L, FB600 L, EM 14D/17D/20D Ausgabe Edition A 2009-12 Deutsch...2
Anleitung zur Schnellinstallation TFM-561U
 Anleitung zur Schnellinstallation TFM-561U V1 Table of Contents Deutsch 1 1. Bevor Sie anfangen 1 2. Installation 2 Troubleshooting 5 Version 08.25.2010 1. Bevor Sie anfangen Packungsinhalt TFM-561U Treiber
Electrical testing of Bosch common rail solenoid valve (MV) injectors
 injectors") Applies to MV injector, generation: -CRI 1.0 / 2.0 / 2.1 / 2.2 -CRIN 1 / 2 / 3, with K oder AK plug Bosch 10-position order number Bosch-Bestellnummer CRI: 0 445 110 xxx Bosch-Bestellnummer CRIN: 0 445
Applies to MV injector, generation: -CRI 1.0 / 2.0 / 2.1 / 2.2 -CRIN 1 / 2 / 3, with K oder AK plug Bosch 10-position order number Bosch-Bestellnummer CRI: 0 445 110 xxx Bosch-Bestellnummer CRIN: 0 445
p^db=`oj===pìééçêíáåñçêã~íáçå=
 p^db=`oj===pìééçêíáåñçêã~íáçå= How to Disable User Account Control (UAC) in Windows Vista You are attempting to install or uninstall ACT! when Windows does not allow you access to needed files or folders.
Anleitung zur Schnellinstallation TFM-560X YO.13
 Anleitung zur Schnellinstallation TFM-560X YO.13 Table of Contents Deutsch 1 1. Bevor Sie anfangen 1 2. Installation 2 Troubleshooting 6 Version 06.08.2011 1. Bevor Sie anfangen Packungsinhalt ŸTFM-560X
miditech midiface 4x4
 miditech midiface 4x4 4In-/4 Out USB MIDI Interface 4 x MIDI In / 4 x MIDI Out USB MIDI Interface 64 MIDI Kanäle 4 LEDs für MIDI Input 4 LEDs für MIDI Output Power LED USB Powered, USB 1, 2 und 3 kompatibel
Ingenics Project Portal
 Version: 00; Status: E Seite: 1/6 This document is drawn to show the functions of the project portal developed by Ingenics AG. To use the portal enter the following URL in your Browser: https://projectportal.ingenics.de
EMCO Installationsanleitung / Installation instructions
 EMCO Installationsanleitung / Installation instructions Installationsanleitung Installation instructions Digitalanzeige digital display C40, FB450 L, FB600 L, EM 14D/17D/20D Ausgabe / Edition B 2012-03
Android APP NVR Viewer
 Android APP NVR Viewer User Manual DN-16111 DN-16112 DN16113 2 DN-16111, DN-16112, DN-16113 for Android User Manual Table of Contents Download the APP... 3 Running the app - Add NVR... 3 Running the app
ODYS 19 LCD-TV VIEW ODYS 19 LCD-TV VIEW
 Anschlusskabel POWER Einschalten des Fernsehers MUTE Stummschaltung NICAM Umschalten des Soundsystems SLEEP Sleep-Timer einschalten ASPECT Umschalten des Bildseitenverhältnisses zwischen 4:3, 16:9,
Quick Guide Home Network Mode
 Quick Guide Home Network Mode English > 1 German > 3 About the Home Network Mode EN Tivizen Nano & iplug normally work on their own created networks (whose SSID starts with tivizentv or iplug ) in which
Magic Figures. We note that in the example magic square the numbers 1 9 are used. All three rows (columns) have equal sum, called the magic number.
 have equal sum, called the magic number.") Magic Figures Introduction: This lesson builds on ideas from Magic Squares. Students are introduced to a wider collection of Magic Figures and consider constraints on the Magic Number associated with such
Magic Figures Introduction: This lesson builds on ideas from Magic Squares. Students are introduced to a wider collection of Magic Figures and consider constraints on the Magic Number associated with such
PONS DIE DREI??? FRAGEZEICHEN, ARCTIC ADVENTURE: ENGLISCH LERNEN MIT JUSTUS, PETER UND BOB
 Read Online and Download Ebook PONS DIE DREI??? FRAGEZEICHEN, ARCTIC ADVENTURE: ENGLISCH LERNEN MIT JUSTUS, PETER UND BOB DOWNLOAD EBOOK : PONS DIE DREI??? FRAGEZEICHEN, ARCTIC ADVENTURE: Click link bellow
SETUP TOOL. Bedienungsanleitung User s Manual
 Bedienungsanleitung User s Manual Bitte lesen Sie diese Anleitung vor der Inbetriebnahme sorgfältig durch Please read the instructions carefully before use 1. Eigenschaften Das Setup Tool ist ein speziell
Application Note. Import Jinx! Scenes into the DMX-Configurator
 Application Note Import Jinx! Scenes into the DMX-Configurator Import Jinx! Scenen into the DMX-Configurator 2 The Freeware Jinx! is an user friendly, well understandable software and furthermore equipped
NVR Mobile Viewer for iphone/ipad/ipod Touch
 NVR Mobile Viewer for iphone/ipad/ipod Touch Quick Installation Guide DN-16111 DN-16112 DN16113 2 DN-16111, DN-16112, DN-16113 for Mobile ios Quick Guide Table of Contents Download and Install the App...
USB -> Seriell Adapterkabel Benutzerhandbuch
 USB -> Seriell Adapterkabel Benutzerhandbuch 1. Produkt Eigenschaften 1 2. System Vorraussetzungen 1 3. Treiber Installation (Alle Windows Systeme) 1 4. Den COM Port ändern 2 5. Einstellen eines RS232
Power supply Interference suppressed acc. to DIN EN /- 4, EN 55011, EN CI. B, power factor corrected Power factor BöSha LED driver
 Operating Instructions LED Mast Double Luminaire Callisto SC DB, incl. Inclination Adjustment, Single-Chip Technology (Please, read carefully before starting operation) Version: 16.01.2017 Model 369-M
Anleitung zur Schnellinstallation TFM-PCIV92A B1.21
 Anleitung zur Schnellinstallation TFM-PCIV92A B1.21 Table of Contents Deutsch 1 1. Bevor Sie anfangen 1 2. Installation 2 Troubleshooting 6 Version 05.11.2011 1. Bevor Sie anfangen Packungsinhalt ŸTFM-PCIV92A
How-To-Do. Hardware Configuration of the CC03 via SIMATIC Manager from Siemens
 How-To-Do Hardware Configuration of the CC03 via SIMATIC Manager from Siemens Content Hardware Configuration of the CC03 via SIMATIC Manager from Siemens... 1 1 General... 2 1.1 Information... 2 1.2 Reference...
Exercise (Part II) Anastasia Mochalova, Lehrstuhl für ABWL und Wirtschaftsinformatik, Kath. Universität Eichstätt-Ingolstadt 1
 Anastasia Mochalova, Lehrstuhl für ABWL und Wirtschaftsinformatik, Kath. Universität Eichstätt-Ingolstadt 1") Exercise (Part II) Notes: The exercise is based on Microsoft Dynamics CRM Online. For all screenshots: Copyright Microsoft Corporation. The sign ## is you personal number to be used in all exercises. All
Exercise (Part II) Notes: The exercise is based on Microsoft Dynamics CRM Online. For all screenshots: Copyright Microsoft Corporation. The sign ## is you personal number to be used in all exercises. All
MU-307 A SAFETY INSTRUCTIONS SICHERHEITSHINWEISE FEATURES MERKMALE
 SAFETY INSTRUCTIONS Read all safety instruction before operating the amplifiers. 1. Install equipment as follow condition: - Install at flat place, not bending curved. - Do not install near the water and
miditech midiface 8x8
 miditech midiface 8x8 8In-/8 Out USB MIDI Interface 8 x MIDI In / 8 x MIDI Out USB MIDI Interface 128 MIDI Kanäle 8 LEDs für MIDI Input 8 LEDs für MIDI Output USB Powered, USB 1, 2 und 3 kompatibel Hochwertiges
Guidance Notes for the eservice 'Marketing Authorisation & Lifecycle Management of Medicines' Contents
 Guidance Notes for the eservice 'Marketing Authorisation & Lifecycle Management of Medicines' Contents Login... 2 No active procedure at the moment... 3 'Active' procedure... 4 New communication (procedure
Bedienungsanleitung. User Manual
 Bedienungsanleitung Seite: -3 User Manual LightmaXX 5ive STAR LED LIG0009669-000 Page: 4-5 Lieber Kunde, vielen Dank das Sie sich für ein Produkt von LightmaXX entschieden haben. In der folgenden Anleitung
Englisch-Grundwortschatz
 Englisch-Grundwortschatz Die 100 am häufigsten verwendeten Wörter also auch so so in in even sogar on an / bei / in like wie / mögen their with but first only and time find you get more its those because
Anleitung zur Verwendung des Update-Tools für
 English version see below (page 10) Anleitung zur Verwendung des Update-Tools für - KW DDC Steuergeräte - KW DDC WLAN Module - KW DLC Steuergeräte - KW DLC WLAN Module Bitte beachten Sie: jedes Steuergerät
Dexatek's Alexa Smart Home Skills Instruction Guide
 Dexatek's Alexa Smart Home Skills Instruction Guide Version 0.3 Author Esther Date 01/10/18 ~ 1 ~ Revision History Version Date Editor Remark 0.1 2017/04/05 Esther Initial version 0.2 2018/01/09 Esther
Quick Installation Guide TBW-101UB TBW-102UB
 Quick Installation Guide TBW-101UB TBW-102UB Table of Contents Deutsch... 1. Bevor Sie anfangen... 2. Installation... 3. Cómo usar el adaptador Bluetooth... 1 1 2 4 Troubleshooting... 5 (Version 01.06.2006)
CB RADIO Service Manual AE 6890
 CB RADIO Service Manual AE 6890 Downloaded from www.cbradio.nl Technische Mitteilung zu AE 6890 Problem: Bei Montage einer schlecht geerdeten Antenne oder einer Antenne mit schlechtem SWR sehr nahe am
Chrosziel GmbH Klausnerring Kirchheim b. München Germany Tel , Fax
 - 2 33 - - 3 33 - - 4 33 - ... 8... 8... 9... 10... 10... 11... 12... 12... 15... 16... 16... 17... 17... 18... 20... 21... 22... 23... 24... 24... 25... 25... 26... 27... 28... 29... 29... 30-5 33 - -
SanStore: Kurzanleitung / SanStore: Quick reference guide
 SanStore Rekorder der Serie MM, MMX, HM und HMX Datenwiedergabe und Backup Datenwiedergabe 1. Drücken Sie die Time Search-Taste auf der Fernbedienung. Hinweis: Falls Sie nach einem Administrator-Passwort
Parameter-Updatesoftware PF-12 Plus
 Parameter-Updatesoftware PF-12 Plus Mai / May 2015 Inhalt 1. Durchführung des Parameter-Updates... 2 2. Kontakt... 6 Content 1. Performance of the parameter-update... 4 2. Contact... 6 1. Durchführung
Apex Series AN100 - Q&A
 EN Apex Series AN100 - Q&A Version:1.1 Q1: How do I connect the AN100 with my ios device? A1: To connect the AN100 with an ios device you need to use an App installed on the AN100. Users can download their
Hazards and measures against hazards by implementation of safe pneumatic circuits
 Application of EN ISO 13849-1 in electro-pneumatic control systems Hazards and measures against hazards by implementation of safe pneumatic circuits These examples of switching circuits are offered free
Registration of residence at Citizens Office (Bürgerbüro)
") Registration of residence at Citizens Office (Bürgerbüro) Opening times in the Citizens Office (Bürgerbüro): Monday to Friday 08.30 am 12.30 pm Thursday 14.00 pm 17.00 pm or by appointment via the Citizens
Registration of residence at Citizens Office (Bürgerbüro) Opening times in the Citizens Office (Bürgerbüro): Monday to Friday 08.30 am 12.30 pm Thursday 14.00 pm 17.00 pm or by appointment via the Citizens
Titelbild1 ANSYS. Customer Portal LogIn
 Titelbild1 ANSYS Customer Portal LogIn 1 Neuanmeldung Neuanmeldung: Bitte Not yet a member anklicken Adressen-Check Adressdaten eintragen Customer No. ist hier bereits erforderlich HERE - Button Hier nochmal
Quick Installation Guide TU2-ET100
 Quick Installation Guide TU2-ET100 Table of of Contents Contents... 1. Bevor Sie anfangen... 2. Installation... 1 1 2 Troubleshooting... 6 Version 08.30.2006 1. Bevor Sie anfangen Packungsinhalt TU2-ET100
JTAGMaps Quick Installation Guide
 Index Index... 1 ENGLISH... 2 Introduction... 2 Requirements... 2 1. Installation... 3 2. Open JTAG Maps... 4 3. Request a free JTAG Maps license... 4 4. Pointing to the license file... 5 5. JTAG Maps
Yealink W52 DECT IP Telefon
 Yealink W52 DECT IP Telefon Manuelle Neukonfiguration Dokumentenversion 1.0 Yealink W52 DECT IP Telefon Mauelle Neukonfiguration Copyright Hinweis Copyright 2016 finocom AG Alle Rechte vorbehalten. Jegliche
E asyline by Hama GmbH & Co KG Postfach 80 86651 Monheim/Germany Tel. +49 (0)9091/502-0 Fax +49 (0)9091/502-274 hama@hama.de www.hama.
9091/502-0 Fax +49 (0)9091/502-274 hama@hama.de www.hama.") 00021024-10.06 E asyline by Hama GmbH & Co KG Postfach 80 86651 Monheim/Germany Tel. +49 (0)9091/502-0 Fax +49 (0)9091/502-274 hama@hama.de www.hama.com Gamepad Thunderstorm II 0021024 l Bedienungsanleitung
00021024-10.06 E asyline by Hama GmbH & Co KG Postfach 80 86651 Monheim/Germany Tel. +49 (0)9091/502-0 Fax +49 (0)9091/502-274 hama@hama.de www.hama.com Gamepad Thunderstorm II 0021024 l Bedienungsanleitung
PONS DIE DREI??? FRAGEZEICHEN, ARCTIC ADVENTURE: ENGLISCH LERNEN MIT JUSTUS, PETER UND BOB
 Read Online and Download Ebook PONS DIE DREI??? FRAGEZEICHEN, ARCTIC ADVENTURE: ENGLISCH LERNEN MIT JUSTUS, PETER UND BOB DOWNLOAD EBOOK : PONS DIE DREI??? FRAGEZEICHEN, ARCTIC ADVENTURE: Click link bellow
CB-Radio AE 5090 XL Modification
 CB-Radio AE 5090 XL Modification Downloaded from www.cbradio.nl AE5290XL MULTI Power and channel settings Power settings by Plug-In Jumper Factory Power setting is automatic 1-4 Watt switching with country
DENTAL IMPLANTS BY CAMLOG medical
 IMPLANT PASS DENTAL IMPLANTS BY CAMLOG medical devices made in germany for your well-being and a natural appearance. Personal data Surname First name Address ZIP code City Date of birth Health insurance
EL-21SY. 2 in, 1 out v1.3 HDMI Switcher OPERATION MANUAL
 EL-21SY 2 in, 1 out v1.3 HDMI Switcher OPERATION MANUAL Table of Contents 1. Introduction 1 2. Features 1 3. Package Contents 1 4. Operation Controls and Functions 2 4.1 Front Panel Diagram 2 4.2 Rear
PROFIBUS-DP Repeater 1 to 1 and 1 to 5 with optional level converter module
 LSS PROFIBUS-DP Repeater 1 to 1 and 1 to 5 with optional level converter module The LSS PROFIBUS-DP repeaters 1 to 1 and 1 to 5 are used for coupling up to six PROFIBUS bus segments in RS 485 bus technology.
TravelPilot 55/65 Active Connect. Bluetooth TELEFONMENÜ /TELEPHONE MENU
 TravelPilot 55/65 Active Connect Bluetooth TELEFONMENÜ /TELEPHONE MENU Inhaltsverzeichnis / Table of content 3-10 DE 11-18 EN 2 Bluetooth Telefonmenü DE 3 Start Um Ihr Mobiltelefon zusammen mit Ihrem TravelPilot
Art.-Nr. 4450900300 greentea. Art.-Nr. 4450900200 whitemusk MAGICUS. 1 Stück/piece 2,5. 4 x 4 x 4 x. 1 x
 MAGICUS Art.-Nr. 4450900300 greentea 1 Stück/piece Art.-Nr. 4450900200 whitemusk 2,5 4 x 4 x 4 x 1 x 1. 2. 1 x Option 2 Option 1 3. 1 3 4 2 4. I AUTO RUN Mo Tu We Th Fr Sa Su OK + Clear R 230VAC, 50Hz
Bedienungsanleitung / Manual : LED-Nixie
 Bedienungsanleitung / Manual : LED-Nixie English please see below. Bei Neustart und gleichzeitig gedrückter Taste während der Versionsanzeige (halten bis Beep hörbar), erfolgt eine Zurücksetzung auf (Standard)
Can I use an older device with a new GSD file? It is always the best to use the latest GSD file since this is downward compatible to older versions.
 EUCHNER GmbH + Co. KG Postfach 10 01 52 D-70745 Leinfelden-Echterdingen MGB PROFINET You will require the corresponding GSD file in GSDML format in order to integrate the MGB system: GSDML-Vx.x-EUCHNER-MGB_xxxxxx-YYYYMMDD.xml
VGM. VGM information. HAMBURG SÜD VGM WEB PORTAL - USER GUIDE June 2016
 Overview The Hamburg Süd VGM-Portal is an application which enables to submit VGM information directly to Hamburg Süd via our e-portal web page. You can choose to insert VGM information directly, or download
CNC ZUR STEUERUNG VON WERKZEUGMASCHINEN (GERMAN EDITION) BY TIM ROHR
 BY TIM ROHR") (GERMAN EDITION) BY TIM ROHR READ ONLINE AND DOWNLOAD EBOOK : CNC ZUR STEUERUNG VON WERKZEUGMASCHINEN (GERMAN EDITION) BY TIM ROHR PDF Click button to download this ebook READ ONLINE AND DOWNLOAD CNC ZUR
(GERMAN EDITION) BY TIM ROHR READ ONLINE AND DOWNLOAD EBOOK : CNC ZUR STEUERUNG VON WERKZEUGMASCHINEN (GERMAN EDITION) BY TIM ROHR PDF Click button to download this ebook READ ONLINE AND DOWNLOAD CNC ZUR
v i r t u A L C O M P o r t s
 v i r t u A L C O M P o r t s (HO720 / HO730) Installieren und Einstellen Installation and Settings Deutsch / English Installieren und Einstellen des virtuellen COM Ports (HO720 / HO730) Einleitung Laden
Hama GmbH & Co KG Postfach Monheim/Germany Tel. +49 (0)9091/502-0 Fax +49 (0)9091/
9091/502-0 Fax +49 (0)9091/") www.hama.de Hama GmbH & Co KG Postfach 80 86651 Monheim/Germany Tel. +49 (0)9091/502-0 Fax +49 (0)9091/502-274 hama@hama.de www.hama.de 00062249-05.05 Multimedia Kit für/for Mercedes Command 2.0 00062249
www.hama.de Hama GmbH & Co KG Postfach 80 86651 Monheim/Germany Tel. +49 (0)9091/502-0 Fax +49 (0)9091/502-274 hama@hama.de www.hama.de 00062249-05.05 Multimedia Kit für/for Mercedes Command 2.0 00062249
mobilcom-debitel SmartHome Schnell-Start-Anleitung Quick Start Guide
 mobilcom-debitel SmartHome Schnell-Start-Anleitung Quick Start Guide 1. Cube anschließen 1. Connect Cube n Schließen Sie den Cube an die Stromversorgung an. n Legen Sie die Batterien polungsrichtig in
How to access licensed products from providers who are already operating productively in. General Information... 2. Shibboleth login...
 Shibboleth Tutorial How to access licensed products from providers who are already operating productively in the SWITCHaai federation. General Information... 2 Shibboleth login... 2 Separate registration
Setup Manual Anleitung zur Konfiguration
 Setup Manual Anleitung zur Konfiguration Tap your language 1 Introduction 1. The difference between the MusicCast Smart Home skill and the MusicCast skill MusicCast Smart Home skill The MusicCast Smart
MANUAL_EN ANLEITUNG_DE PHONE SUITE SYNCHRONISATION SOFTWARE
 MANUAL_EN ANLEITUNG_DE PHONE SUITE SYNCHRONISATION SOFTWARE 2 PHONE SUITE MANUAL PHONE SUITE MANUAL 3 RESERVATION Technical Data is subject to change without notice. Changes, errors and misprints may not
AVANTEK. Indoor HDTV Antenna DVB-T Zimmerantenne. Instruction Manual Bedienungsanleitung
 AVANTEK Indoor HDTV Antenna DVB-T Zimmerantenne Instruction Manual Bedienungsanleitung EN 1 Illustration AC Adapter Connecting Box EN 2 Product Introduction This indoor antenna brings you access to free
ONLINE LICENCE GENERATOR
 Index Introduction... 2 Change language of the User Interface... 3 Menubar... 4 Sold Software... 5 Explanations of the choices:... 5 Call of a licence:... 7 Last query step... 9 Call multiple licenses:...
150Mbps Micro Wireless N USB Adapter
 150Mbps Micro Wireless N USB Adapter TEW-648UBM ŸAnleitung zur Schnellinstallation (1) ŸTroubleshooting (6) 1.11 1. Bevor Sie anfangen Packungsinhalt ŸTEW-648UBM ŸCD-ROM (Dienstprogramm & Bedienungsanleitung)
PS3 / PS4 / PC XBOX 360 GAMING HEADSET LX16
 PS / PS / PC XBOX 60 GAMING HEADSET LX6 CHAT GAME Content Inhalt Lioncast LX6 gaming headset Lioncast LX6 Gaming Headset Inline remote kabelgebundene Fernbedienung MUTE - MIC - ON XBOX PS PS PC RCA splitter
Snap-in switch for switches PSE, MSM and MCS 30
 Product manual Snap-in switch for switches PSE, MSM and MCS 30 CONTENTS 1. PRODUCT DESCRIPTION 2. DATA AND DIMENSIONAL DRAWINGS 2.1. Technical Data 2.2. Dimensions of PSE with a Mounting Diameter 19 mm
MultiPortSwitch. VGA Umschalter. Version 1.0 As of April 19 th 2004 Subject to change!
 MultiPortSwitch VGA Umschalter Version 1.0 As of April 19 th 2004 Subject to change! Document version: Version Date Name Comment 1.00 29.03.2004 J. Klein Compiled Distributed by: idata industrielle Datensysteme
MQ964..GB MQ965..GB. en Operating instructions ar
 MQ964..GB MQ965..GB en Operating instructions ar MQ964-965GB-Uniklein_en-ar.book Seite 2 Donnerstag, 4. Dezember 2014 4:39 16 en English...........................................................3 ar...........................................................6.................................................
ABB i-bus EIB. EIB Power Supply Units
 ABB i-bus EIB EIB Power Supply Units Product Range Overview EIB Power Supplies ABB STOTZ-KONTAKT GmbH, 2002 - SK 029 F 02 E Product Range Overview EIB Power Supplies! EIB Power Supply, 320 ma SV/S 30.320.5!
Benutzerhandbuch / User s Manual RUPS 2000 / -B1
 RUPS 2000 / RUPS 2000-B1 Benutzerhandbuch / User s Manual RUPS 2000 / -B1 Deutsch English Benutzerhandbuch RUPS 2000 / RUPS 2000-B1 Deutsch In diesem Benutzerhandbuch finden Sie eine Kurzanleitung zu Installation
LINDY ELECTRONICS LIMITED & LINDY-ELEKTRONIK GMBH - FIRST EDITION
 8 Port PoE Midspan Switch User Manual English LINDY No. 25058 For Home and Office Use Tested to Comply with FCC Standards www.lindy.com LINDY ELECTRONICS LIMITED & LINDY-ELEKTRONIK GMBH - FIRST EDITION
iid software tools QuickStartGuide iid USB base driver installation
 iid software tools QuickStartGuide iid software tools USB base driver installation microsensys Nov 2016 Introduction / Einleitung This document describes in short form installation of the microsensys USB
I am starting on Page 4 and assuming that the person has DECODERPROGGRAMMER manual.
 I am starting on Page 4 and assuming that the person has DECODERPROGGRAMMER manual. If you already use the Digital Plus USB interface: Before you install the software for the decoder programmer, back up
PeakTech Zeitprogramm erstellen über Excel - Beispiel / Timed programs with Excel Example
 PeakTech 6180 Zeitprogramm erstellen über Excel - Beispiel / Timed programs with Excel Example 1. Excel Datei erstellen / Create Excel file Öffnen Sie Excel und erstellen eine xls-datei unter einem beliebigen
Newest Generation of the BS2 Corrosion/Warning and Measurement System
 Newest Generation of the BS2 Corrosion/Warning and Measurement System BS2 System Description: BS2 CorroDec 2G is a cable and energyless system module range for detecting corrosion, humidity and prevailing
Released energy meters for PIKO IQ / PLENTICORE plus
 Released energy meters for PIKO IQ / PLETICORE plus Version: 03/2018 / Released energy meters Inverter B+G E-Tech GmbH SDM630-Modbus TQ-System GmbH B-control EM 300 LR 1 The energy meter can be used instead
Quick Installation Guide
 LevelOne WHG-1000 300Mbps Wireless PoE Hotspot Gateway Quick Installation Guide English Deutsch Table of Contents English... 3 Deutsch... 13 Default Settings IP Address-LAN1 192.168.1.254 IP Address-LAN2
Quick Installation Guide TE100-PCBUSR
 Quick Installation Guide TE100-PCBUSR Table of of Contents Contents Deutsch... 1. Bevor Sie anfangen... 2. Installation... 1 1 2 Troubleshooting... 3 Version 03.14.2006 1. Bevor Sie anfangen Packungsinhalt
VN7640 FlexRay/CAN/LIN/Ethernet Interface Quick Start Guide. Version 1.1 English/Deutsch
 VN7640 FlexRay/CAN/LIN/Ethernet Interface Quick Start Guide Version 1.1 English/Deutsch Quick Start Guide VN7640 ENGLISH 1 ENGLISH 1.1 Installation Step by Step Procedure Please use the drivers from the
Quick Installation Guide TFM-560U
 Quick Installation Guide TFM-560U Table of of Contents Contents... 1. Bevor Sie anfangen... 2. Installation... 3. Prüfung der Installation... Troubleshooting... 1 1 2 5 6 Version 04.27.2006 1. Bevor Sie
DIBELS TM. German Translations of Administration Directions
 DIBELS TM German Translations of Administration Directions Note: These translations can be used with students having limited English proficiency and who would be able to understand the DIBELS tasks better
User Manual BB-anywhere
 User Manual BB-anywhere LOGIN PROCEDURE 1. Click the Start button, choose All Programs (right above the search box) and select BB-ANYWHERE from the Start menu: BB-anywhere in a nutshell Regardless whether
Bedienungsanleitung Regelbare Netzgeräte MRNG-Serie
 Bedienungsanleitung Regelbare Netzgeräte MRNG-Serie Einführung Geehrter Kunde, wir möchten Ihnen zum Erwerb Ihres neuen Netzgerätes gratulieren! Mit dieser Wahl haben Sie sich für ein Produkt entschieden,
Order Ansicht Inhalt
 Order Ansicht Inhalt Order Ansicht... 1 Inhalt... 1 Scope... 2 Orderansicht... 3 Orderelemente... 4 P1_CHANG_CH1... 6 Function: fc_ins_order... 7 Plug In... 8 Quelle:... 8 Anleitung:... 8 Plug In Installation:...