Using the Apple Universal Dock
|
|
|
- Leander Amsel
- vor 8 Jahren
- Abrufe
Transkript
1 Universal Dock

2 Using the Apple Universal Dock Congratulations on purchasing your Apple Universal Dock. You can use this Dock with any iphone and ipod model with a dock connector and adapter. Here are the things you can do with your new Dock: Connect the Dock to your computer, and then place your ipod or iphone in the Dock to charge the battery and sync content from itunes (page 5). Connect the Dock to a power outlet (using the included Apple USB Power Adapter), and then place your ipod or iphone in the Dock to charge the battery (page 7). Display photos on a TV or other video device (using the Apple Dock Connector to VGA Adapter, Composite AV Cable, or Component AV Cable, available separately; page 7). Display video on a TV or other video device (using the Apple Dock Connector to VGA Adapter, Composite AV Cable, or Component AV Cable, available separately; page 7). Connect the Dock to speakers or a stereo (using an audio cable, available separately) to play music from your ipod or iphone (page 9). Control playback from a distance using the Apple Remote (page 10). 2 English
.")
3 Important: Never force a connector into a port. If the connector and port don t join with reasonable ease, they probably don t match. Make sure that the connector matches the port and that you have positioned the connector correctly in relation to the port. Your Universal Dock includes the following: Universal Dock Apple Remote Dock adapters (5) Apple Dock Connector to USB Cable Apple USB Power Adapter English 3

4 Universal Dock at a Glance Infrared (IR) receiver Dock connector port Dock connector Line out port Component Infrared (IR) receiver Dock connector port Dock connector Line out port What You Can Do Control playback from a distance using the Apple Remote. Connect the Dock to your computer or the included Apple USB Power Adapter, using the Apple Dock Connector to USB Cable. Or connect the Apple Dock Connector to VGA Adapter, Composite AV Cable, or Component AV Cable to view photos or videos on a TV or other video device (with iphone and with ipod models that support video). Place your ipod or iphone in the Dock to charge the battery, sync content from itunes, listen to music, or view photos and videos. Connect to external speakers or a stereo receiver using an audio cable with a standard 3.5 millimeter stereo miniplug. 4 English
. Place your ipod or iphone in the Dock to charge the battery, sync content from itunes, listen to music, or view photos and videos.")
5 To use the Dock with your computer: 1 Attach the included Apple Dock Connector to USB Cable to your computer and connect the other end to the Dock. 2 Choose the dock adapter that fits your ipod or iphone. Your ipod or iphone fits snugly into the correct adapter. The number (15 20) shows which ipod or iphone fits iphone iphone ipod touch ipod touch ipod nano iphone 4 19 iphone 3G and 3GS th generation 2nd and 3rd generation th generation Note: If a dock adapter for your ipod or iphone model isn t included with your Universal Dock, you can purchase one at 3 Insert the dock adapter into the connector well of your Dock, and then put your ipod or iphone in the Dock. English 5

6 Dock adapter Connector well You can remove the dock adapter with your fingernail by using this slot. If itunes is set to sync your ipod or iphone automatically, syncing begins as soon as you put your ipod or iphone in the Dock. For more information about syncing content to your ipod or iphone and using all of its features, see the user guide for your ipod or iphone, available on the web at support.apple.com/manuals. 6 English

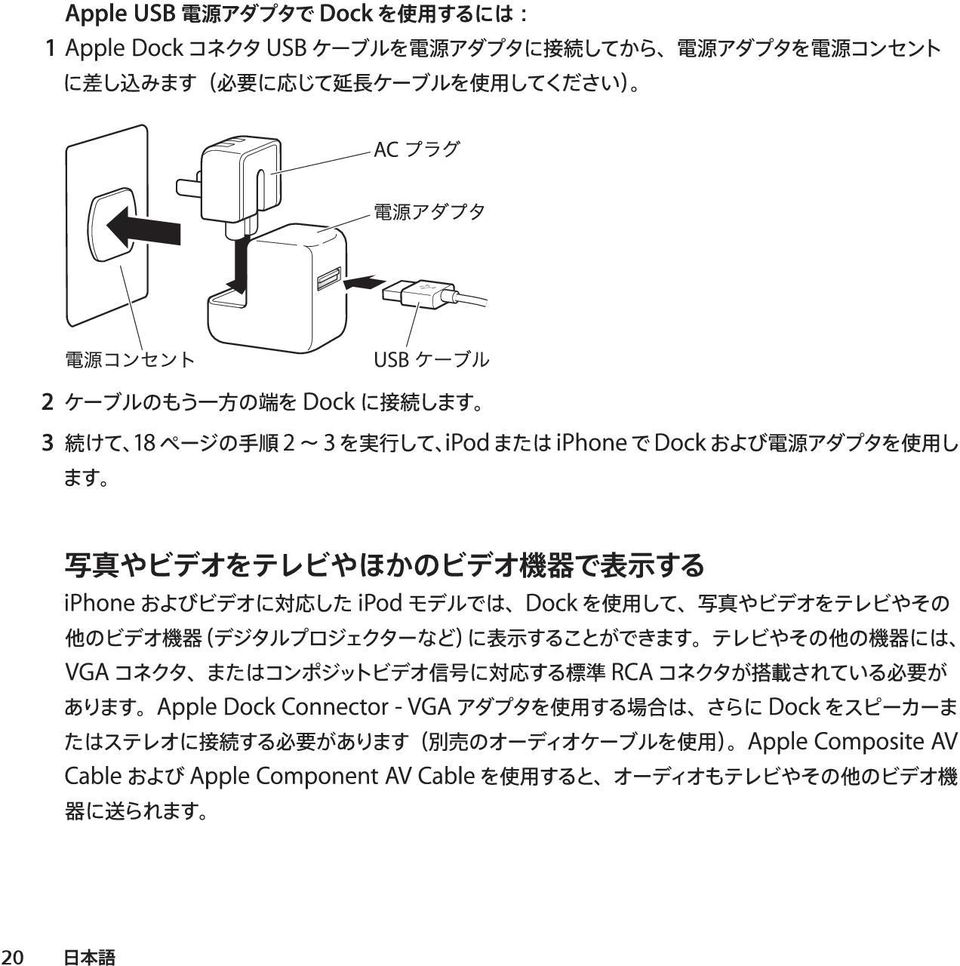
7 To use the Dock with the Apple USB Power Adapter: 1 Connect the Apple Dock Connector to USB Cable to the power adapter, extend the electrical prongs (if necessary), and plug the power adapter into a power outlet. AC plug Power adapter Power outlet USB cable 2 Connect the other end of the cable to the Dock. 3 Continue with steps 2-3 on page 5 to use your ipod or iphone with the Dock and power adapter. Viewing Photos and Videos on a TV or Other Video Device With iphone and ipod models that support video, you can use the Dock to view photos and video on a TV or other video device (such as a digital projector). The TV or other device must have a VGA connector or standard RCA connectors that support composite video signals. If you re using the Apple Dock Connector to VGA Adapter, you also need to connect the Dock to speakers or stereo (using an audio cable, available separately). The Apple Composite AV Cable and the Apple Component AV Cable will also route audio to your TV or other video device. English 7

8 Choose the cable or adapter based on the inputs available on your TV or video device. AV cables and adapters are available separately at Important: Make sure you set your ipod or iphone to send a video signal to your TV or receiver. For more information, see the user guide for your ipod or iphone, available on the web at support.apple.com/manuals. Before you begin connecting components, turn down the volume on your TV or stereo components, turn off your ipod or iphone, and turn off the power to all your components. Make all connections firmly to avoid hum and other noise. For information about avoiding hearing damage, see page 13. To connect the Dock to your TV or video device: 1 Connect the AV cable or adapter to the dock connector port on the Dock and to your TV or video device. See the instructions that came with your AV cable or adapter. 2 Turn on your ipod or iphone, adjust the volume to an appropriate level, and then turn on your TV or video device to start playing. To display photos or videos on your TV or video device: mm See the user guide for your ipod or iphone, available on the web at: support.apple.com/manuals 8 English

9 Playing Music Through External Speakers or a Stereo Using the Universal Dock, you can play music from your ipod or iphone through external speakers or a stereo receiver. Use an audio cable (available separately) with a standard 3.5 millimeter stereo miniplug (many external speakers use this type of cable). Before you connect stereo components, turn down the volume on the components. To use your ipod or iphone with the Dock to play music through speakers or a stereo: 1 Place your ipod or iphone in the Dock. 2 Connect the speakers or stereo to the Dock line out port. 3 To play music, use the ipod or iphone controls or the Apple Remote. Use the remote or the volume controls on the speakers or stereo to change the volume. With some ipod models, you can also use the Click Wheel, volume buttons, or onscreen controls. Note: You can play music while your ipod or iphone is in the Dock and the Dock is connected to a power outlet (using the included Apple USB Power Adapter) or to your computer. If the Dock is connected to your computer, your ipod must not be enabled for disk use. For information about enabling ipod for disk use, see the user guide for your ipod, available on the web at support.apple.com/manuals. To purchase external speakers or audio cables, go to English 9

10 Using the Apple Remote You can use the included infrared (IR) remote to control playback from your ipod or iphone when it s in the Dock. Make sure there are no obstructions between the remote and the Dock. Select Up Left Right Down Menu Play/Pause To use the Apple Remote: To Do This Play or pause a song or video Press Play/Pause ( ). Change the volume Press Up or Down. Skip to the next song Press Right. Start a song or video over or play the previous song Fast-forward or rewind a song or video Press Left once to start a song or video over. Press Left twice to play the previous song. Press and hold Right or Left. 10 English

11 Note: You can t use the remote to choose a different playlist. Use the ipod or iphone controls instead. The Apple Remote works with other compatible Apple products that have a built-in infrared (IR) receiver. You can pair your Dock to work only with a particular remote, so remotes for your other devices don t affect the Dock. To set the Dock to work with only a particular remote: 1 Place your ipod or iphone in the Dock and press any button on your ipod or iphone to turn it on. 2 Make sure other products that are compatible with the Apple Remote are out of range or powered off, and then hold the remote close to the IR receiver on the Dock (within 3 to 4 inches, or 8 to 10 cm). 3 Press and hold the Right button and Menu (») button on the Apple Remote for five seconds. Your Dock now works only with the paired remote. Note: You may want to pair your other Apple Remote compatible devices with other remotes, so the remote you use with your Dock doesn t affect those devices. For instructions, see the documentation that came with those devices. To reset the Dock to work with other Apple Remotes: mm Follow steps 1 and 2 above. Then press and hold the Left button and Menu (») button on the Apple Remote for five seconds. The Dock now works with any Apple Remote. English 11

12 The Apple Remote includes a battery. When needed, you can replace it with a CR2032 battery. To replace the battery: 1 Use a coin to remove the battery cover from the back of the remote. Battery cover 2 Insert a fresh CR2032 battery, with the positive (+) side up. 3 Replace the cover and use a coin to lock it in place. WARNING: There is a risk of explosion if the battery is replaced with an incorrect type. Dispose of used batteries according to your local environmental laws and guidelines. 12 English

13 Important Safety Instructions WARNING: Failure to follow these safety instructions could result in fire, electric shock, or other injury or damage. Avoid Hearing Damage Permanent hearing loss may occur if your ipod or iphone is used at high volume. Set the volume to a safe level. You can adapt over time to a higher volume that may sound normal but can be damaging to your hearing. If you experience ringing in your ears or muffled speech, stop listening and have your hearing checked. The louder the volume, the less time is required before your hearing could be affected. Hearing experts suggest that to protect your hearing: Limit the amount of time you listen at high volume. Avoid turning up the volume to block out noisy surroundings. Turn down the volume if you can t hear people speaking near you. For information about how to set a maximum volume limit, see the user guide for your ipod or iphone, available on the web at support.apple.com/manuals. Apple USB Power Adapter When you use the Apple USB Power Adapter to charge your ipod or iphone, connect the USB cable to the power adapter, and then plug the power adapter firmly into the power outlet. Do not connect or disconnect the Apple USB Power Adapter with wet hands. English 13

14 The Apple USB Power Adapter may become warm during normal use. Always allow adequate ventilation around the Apple USB Power Adapter and use care when handling. Unplug the Apple USB Power Adapter if any of the following conditions exist: The USB cable has become frayed or damaged. The plug part of the adapter or the adapter case has become damaged. The adapter is exposed to rain, liquid, or excessive moisture. You suspect the adapter needs service or repair. You want to clean the adapter. Specifications Input: AC volts (V), 50/60 hertz (Hz) Output: DC, 5 V, 1 A Service and Support Troubleshooting, service, and support information for ipod or iphone, the Universal Dock, the Apple Remote, the Apple USB Power Adapter, and Apple cables and adapters is available at 14 English
, 50/60 hertz (Hz) Output: DC, 5 V, 1 A Service and Support Troubleshooting, service, and support information for ipod or iphone, the Universal Dock, the")
15 15

16 16

17 17

18 18

19 19

20 20
21 21
22 22
23 23
24 24
25 25
26 26
27 27
28 Utilisation du socle Apple Universal Dock Félicitations pour l achat de votre socle Apple Universal Dock. Vous pouvez utiliser ce socle avec n importe quel modèle d iphone et d ipod, par le biais d un connecteur dock et d un adaptateur. Voici les possibilités qu offre votre nouveau socle : Connectez le socle à votre ordinateur, puis placez votre ipod ou votre iphone sur ce premier pour en recharger la batterie et pour synchroniser son contenu depuis itunes (page 31). Connectez le socle à une prise de courant (par le biais de l adaptateur secteur Apple USB Power Adapter), puis placez votre ipod ou votre iphone sur le socle pour en recharger la batterie (page 33). Visionnez des photos sur un téléviseur ou autre équipement vidéo (en utilisant le connecteur Apple Dock Connector vers adaptateur VGA, le câble Composite AV Cable ou le câble Component AV Cable, vendus séparément ; page 34). Visionnez de la vidéo sur un téléviseur ou autre équipement vidéo (par le biais du connecteur Apple Dock Connector vers adaptateur VGA, du câble Composite AV Cable ou du câble Component AV Cable, vendus séparément ; page 34). Reliez le socle à une chaîne stéréo ou à des haut-parleurs (en utilisant un câble audio, vendu séparément) pour reproduire de la musique de votre ipod ou iphone (page 35). Contrôlez la lecture à distance grâce à la télécommande Apple Remote (page 37). 28 Français
29 Important : ne forcez jamais un connecteur dans un port. Si le connecteur et le port ne s assemblent pas facilement, il est alors probable qu ils ne correspondent pas. Assurez-vous que le connecteur est compatible avec le port et que vous l avez branché correctement. Votre Universal Dock comprend les éléments suivants : Station d accueil Universal Dock Télécommande Apple Remote Adaptateurs Dock (5) Connecteur Apple Dock Connector vers câble USB Adaptateur secteur Apple USB Power Adapter Français 29
30 Vue d ensemble de l Universal Dock Capteur infrarouge Port de connexion Dock Connecteur Dock Port de sortie audio Composant Capteur infrarouge (IR) Port de connexion Dock Connecteur Dock Possibilités offertes Contrôlez la lecture à distance grâce à la télécommande Apple Remote. Connectez le socle à votre ordinateur ou à l adaptateur secteur Apple USB Power Adapter fourni, par le biais du connecteur Apple Dock Connector vers câble USB. Vous pouvez aussi brancher le connecteur Apple Dock Connector vers adaptateur VGA, le câble Composite AV Cable ou le câble Component AV Cable pour visionner des photos ou des vidéos sur un téléviseur ou autre équipement vidéo (avec les modèles d iphone et d ipod prenant en charge la vidéo). Placez votre ipod ou iphone sur le socle pour recharger la batterie de ce premier, synchroniser du contenu à partir d itunes, écouter de la musique ou visionner des photos et de la vidéo. 30 Français
31 Composant Port de sortie audio Possibilités offertes Connectez le dispositif à des haut-parleurs externes ou à un récepteur stéréo par le biais d un câble audio muni d un minijack stéréo standard de 3,5 mm. Pour utiliser le socle avec votre ordinateur : 1 Reliez à votre ordinateur le connecteur fourni Apple Dock Connector vers câble USB, puis l autre extrémité du câble au socle. 2 Choisissez l adaptateur de socle qui correspond à votre ipod ou iphone. Votre ipod ou iphone s intègre parfaitement si l adaptateur est le bon. Le nombre (15 20) indique quel ipod ou iphone s adapte iphone iphone ipod touch ipod touch ipod nano iphone 4 19 iphone 3G et 3GS e génération 2e et 3e génération e génération Français 31
32 Remarque : si un adaptateur de socle pour votre modèle d ipod ou iphone n est pas inclus avec votre Universal Dock, vous pouvez en acheter un à l adresse 3 Insérez à fond l adaptateur de socle dans le connecteur du socle, puis placez votre ipod ou iphone sur le socle. Adaptateur de socle Socle du connecteur Vous pouvez retirer l adaptateur Dock avec votre ongle à l aide de cette fente. Si itunes est configuré de façon à synchroniser votre ipod ou votre iphone automatiquement, le processus commence dès que vous placez l appareil sur le socle. 32 Français
33 Pour en savoir plus sur la synchronisation de contenu sur votre ipod ou iphone et sur l utilisation de l intégralité de ses fonctionnalités, consultez le guide de l utilisateur de votre ipod ou iphone, disponible sur le web à l adresse support.apple.com/fr_fr/manuals/. Pour utiliser le socle avec l adaptateur secteur Apple USB Power Adapter : 1 Branchez le connecteur Apple Dock Connector vers câble USB sur l adaptateur secteur, faites sortir les pattes de contact électrique (le cas échéant), puis branchez l adaptateur sur une prise de courant. Fiche CA Adaptateur secteur Prise de courant Câble USB 2 Branchez l autre extrémité du câble USB sur le socle. 3 Continuez avec les étapes 2 et 3 indiquées dans la page 31 pour utiliser votre ipod ou iphone avec le socle et l adaptateur secteur. Français 33
34 Visionnage de photos et de vidéos sur un téléviseur ou autre appareil vidéo Grâce aux modèles d iphone et d ipod prenant en charge la vidéo, vous pouvez utiliser le socle pour consulter des photos et regarder de la vidéo sur un téléviseur ou autre équipement vidéo (par exemple, un projecteur numérique). Le téléviseur ou autre équipement doit posséder un connecteur VGA ou des connecteurs RCA standard prenant en charge les signaux vidéo composites. Si vous utilisez le connecteur Apple Dock Connector vers adaptateur VGA, vous devez également brancher le socle sur des haut-parleurs ou sur une chaîne stéréo (par le biais d un câble audio, lequel est vendu séparément). Le câble Composite AV Cable et le câble Component AV Cable achemine également le signal audio à votre téléviseur ou autre équipement vidéo. Choisissez le câble ou l adaptateur en fonction des entrées disponibles sur votre téléviseur ou votre équipement vidéo. Des câbles et adaptateurs analogiquesnumériques (AV) sont vendus séparément à l adresse Important : assurez-vous de configurer votre ipod ou iphone de façon à envoyer un signal vidéo à votre téléviseur ou récepteur. Pour en savoir plus sur la synchronisation, consultez le guide de l utilisateur de votre ipod ou iphone, disponible sur le web à l adresse support.apple.com/fr_fr/manuals/. Avant de brancher des composants, baissez le volume de votre téléviseur ou des éléments stéréo, éteignez votre ipod ou iphone, puis coupez l alimentation de tous vos composants. Établissez fermement toutes les connexions afin d éviter tout bourdonnement et autre bruit. Pour en savoir plus sur la prévention de la diminution de l acuité auditive, consultez la page Français
35 Pour connecter le socle à votre téléviseur ou votre équipement vidéo : 1 Connectez le câble ou l adaptateur analogique-numérique (AV) au port du connecteur Dock Connector et à votre téléviseur ou votre équipement vidéo. Consultez les instructions fournies avec votre câble ou adaptateur analogique-numérique. 2 Allumez votre ipod ou iphone, réglez-le sur le volume approprié, puis allumez votre téléviseur ou équipement vidéo pour commencer la reproduction. Pour visionner des photos ou des vidéos sur votre téléviseur ou votre équipement vidéo : mm Consultez le guide de l utilisateur de votre ipod ou iphone, disponible sur le web à l adresse : support.apple.com/fr_fr/manuals Reproduction de musique à travers de haut-parleurs externes ou d une chaîne stéréo Grâce au socle Universal Dock, vous pouvez reproduire de la musique depuis votre ipod ou iphone à travers des haut-parleurs externes ou un récepteur stéréo. Utilisez un câble audio (vendu séparément) muni d un mini-jack stéréo standard de 3,5 mm (de nombreux haut-parleurs externes acceptent de type de câble). Avant de connecter les éléments stéréo, baissez leur volume. Pour utiliser votre ipod ou votre iphone placé sur le socle pour reproduire de la musique à travers de haut-parleurs ou d une chaîne stéréo : 1 Placez votre ipod ou iphone sur le socle. 2 Connectez les haut-parleurs ou la chaîne stéréo au port de sortie de ligne du socle. 3 Pour reproduire de la musique, utilisez les commandes de l ipod ou iphone ou la télécommande Apple Remote. Français 35
36 Utilisez la télécommande ou les commandes de volume sur les haut-parleurs ou la chaîne stéréo pour influer sur le volume. Certains modèles d ipod vous permetttent également d utiliser la molette cliquable, les boutons de volume ou les commandes à l écran. Remarque : vous pouvez reproduire de la musique lorsque votre ipod ou iphone est placé sur le socle et que ce dernier est relié à une prise de courant (par le biais de l adaptateur secteur Apple USB Power Adapter inclus) ou à votre ordinateur. Si le socle est branché sur votre ordinateur, votre ipod ne doit pas être activé en tant que disque. Pour en savoir plus sur l activation de votre ipod en tant que disque, consultez le guide de l utilisateur de votre ipod disponible sur le web à l adresse : support.apple.com/fr_fr/manuals/. Pour acheter des haut-parleurs externes ou des câbles audio, accédez à 36 Français
37 Utilisation de la télécommande Apple Remote Vous pouvez utiliser la télécommande à infrarouge (IR) pour contrôler la lecture sur votre ipod ou iphone une fois celui-ci placé sur le socle. Assurez-vous qu aucun obstacle ne se trouve entre la télécommande et ce dernier. Sélection Haut Gauche Droite Bas Menu Lecture/Pause Pour utiliser la télécommande Apple Remote : Pour Lire ou mettre en pause un morceau ou une vidéo Modifier le volume Passer au morceau suivant Recommencer la lecture d un morceau ou d une vidéo en cours, ou lancer la lecture du morceau précédent Faites ceci Appuyez sur Lecture/Pause ( ). Appuyez sur les touches Haut ou Bas. Appuyez sur Droite. Appuyez une fois sur Gauche pour recommencer la lecture d un morceau ou d une vidéo en cours. Appuyez deux fois sur Gauche pour lire le morceau précédent. Français 37
38 Pour Avancer ou rembobiner rapidement un morceau ou une vidéo Faites ceci Maintenez enfoncé le bouton Droite ou Gauche. Remarque : vous ne pouvez pas utiliser la télécommande pour passer à une autre liste de lecture. Utilisez plutôt les commandes de l ipod ou de l iphone. La télécommande Apple Remote fonctionne avec d autres produits Apple compatibles dotés d un récepteur infrarouge (IR) intégré. Vous pouvez jumeler votre socle de façon à ce qu il ne fonctionne qu avec une télécommande précise, de sorte que d autres télécommandes destinées à d autres appareils n aient aucune incidence sur le socle. Pour configurer le socle afin qu il ne fonctionne qu avec une télécommande particulière : 1 Placez votre ipod ou iphone sur le socle et appuyez sur n importe quel bouton de votre appareil pour l allumer. 2 Assurez-vous que d autres produits compatibles avec la télécommande Apple Remote sont hors de portée ou sont hors tension, puis maintenez la télécommande à proximité du récepteur IR du socle (à moins de 8 à 10 cm). 3 Appuyez sur les boutons Droite et Menu (») sur la télécommande Apple Remote pendant cinq secondes. Le socle fonctionne alors uniquement avec la télécommande jumelée. Remarque : vous pouvez jumeler vos autres appareils compatibles Apple Remote avec d autres télécommandes, de sorte que celle que vous utilisez avec votre socle n affecte pas ces appareils. Pour connaître les instructions à suivre, consultez la documentation accompagnant chaque appareil. 38 Français
39 Pour reconfigurer le socle de sorte pour qu il fonctionne avec d autres télécommandes Apple Remote : mm Suivez les étapes 1 et 2 ci-dessus. Maintenez ensuite enfoncés les boutons Gauche et Menu (») sur la télécommande Apple Remote pendant cinq secondes. Le socle fonctionne dès lors avec n importe quelle télécommande Apple Remote. La télécommande Apple Remote inclut une pile. Au besoin, vous pouvez la remplacer par une pile de type CR2032. Pour remplacer la pile : 1 Servez-vous d une pièce de monnaie pour ouvrir le cache du compartiment à pile situé à l arrière de la télécommande. Cache du compartiment à pile 2 Insérez une nouvelle pile CR2032, pôle positif (+) vers le haut. 3 Replacez le cache et servez-vous de la pièce de monnaie pour le verrouiller. AVERTISSEMENT : si la pile est remplacée par une de type incorrect, celle-ci risque d éclater. Jetez les piles usagées conformément aux lois en vigueur et aux indications qui s imposent en matière d environnement. Français 39
40 Consignes de sécurité importantes AVERTISSEMENT : tout manquement à ces consignes de sécurité peut entraîner un incendie, un choc électrique ou des dommages corporels d autre nature. Prévention de la diminution de l acuité auditive Une perte auditive permanente peut se produire si votre ipod ou iphone est utilisé à un volume élevé. Réglez le volume à un niveau sûr. Vous pouvez vous habituer au fil du temps à un volume plus élevé qui vous semble normal mais qui reste susceptible d endommager votre audition. Si vous entendez des sifflements dans les oreilles ou que la voix de personnes vous semble sourde, arrêtez l écoute et faites examiner votre audition. Plus le volume est élevé, moins la durée nécessaire avant que votre audition soit affectée s en voit réduite. Les spécialistes de l audition conseillent de protéger votre audition en respectant les points suivants : Limitez la durée d écoute à un volume élevé. Évitez d augmenter le volume de façon à couvrir les bruits ambiants. Baissez le volume si vous n arrivez pas à entendre les gens parler autour de vous. Pour en savoir plus sur le réglage d une limite de volume maximale, consultez le guide de l utilisateur de votre ipod ou iphone disponible sur le web à l adresse : support.apple.com/fr_fr/manuals/. Adaptateur secteur Apple USB Power Adapter Si vous faites appel à l adaptateur secteur Apple USB Power Adapter pour recharger la batterie de votre ipod ou iphone, branchez le câble USB sur l adaptateur secteur, puis connectez fermement ce dernier à la prise de courant. Ne le branchez et ne le débranchez pas avec les mains mouillées. 40 Français
41 L adaptateur secteur Apple USB Power Adapter peut chauffer lors d une utilisation normale. Assurez toujours une circulation adéquate de l air autour de l adaptateur secteur Apple USB Power Adapter et manipulez-le avec soin. Débranchez l adaptateur secteur dans les cas suivants : Le câble USB est usé ou endommagé. La zone de la prise de l adaptateur ou le boîtier de l adaptateur s est abîmé avec le temps. L adaptateur est exposé à la pluie, à un liquide ou à une humidité excessive. Vous estimez que l adaptateur doit être réparé. Vous comptez nettoyer l adaptateur. Spécifications Entrée : CA volts (V), 50/60 hertz (Hz) Sortie : CC, 5 V, 1 A Service et assistance Des informations sur le dépannage, la réparation et l assistance pour ipod ou iphone, socle Universal Dock, télécommande Apple Remote, adaptateur secteur Apple USB Power Adapter et câbles et adaptateurs Apple sont disponibles à l adresse Français 41
42 Verwenden des Apple Universal Dock Mit dem Kauf Ihres Apple Universal Dock haben Sie eine gute Wahl getroffen. Sie können dieses Dock mit jedem iphone und ipod-modell mit Dockanschluss und Adapter verwenden. Hier einige Beispiele zur Verwendung Ihres neuen Docks: Schließen Sie das Dock an Ihren Computer an und setzen Sie Ihren ipod oder Ihr iphone in das Dock, um die Batterie aufzuladen und um Inhalte von itunes zu synchronisieren (Seite 45). Schließen Sie das Dock (mit dem mitgelieferten Apple USB Power Adapter) an das Stromnetz an. Setzen Sie Ihren ipod oder Ihr iphone dann in das Dock, um die Batterie aufzuladen (Seite 47). Zeigen Sie Fotos auf einem Fernsehgerät oder einem anderen Anzeigegerät an. Verwenden Sie hierzu den Apple Dock Connector-auf-VGA-Adapter, das Composite- AV-Kabel oder das Component-AV-Kabel (separat erhältlich, vgl. Seite 48). Zeigen Sie Videos auf einem Fernsehgerät oder anderen Anzeigegerät an. Verwenden Sie hierzu den Apple Dock Connector-auf-VGA-Adapter, das Composite-AV-Kabel oder das Component-AV-Kabel (separat erhältlich, Seite 48). Verbinden Sie das Dock mit Lautsprechern oder einer Stereoanlagen, um Musik von Ihrem ipod oder Ihrem iphone wiederzugeben (Seite 49). Verwenden Sie hierzu ein separat erhältliches Audiokabel. Steuern Sie die Wiedergabe mithilfe der Apple Remote-Fernbedienung (Seite 51). 42 Deutsch
43 Wichtig: Versuchen Sie niemals, einen Stecker mit Gewalt in einen Anschluss zu stecken. Lässt sich der Stecker nicht problemlos anschließen, passt er vermutlich nicht in den Anschluss. Vergewissern Sie sich, dass Stecker und Anschluss zueinander passen und dass Sie den Stecker korrekt mit dem Anschluss ausgerichtet haben. Zu Ihrem Universal Dock gehören folgende Komponenten: Universal Dock Apple Remote- Fernbedienung Dock-Adapter (5) Apple Dock Connector-auf-USB-Kabel Apple USB Power Adapter (Netzteil) Deutsch 43
44 Universal Dock im Überblick Infrarotempfänger Dockanschluss Dock Connector Line-Out-Anschluss Komponente Infrarotempfänger Dockanschluss Dock Connector Line-Out-Anschluss Funktion Steuern Sie die Wiedergabe mit der Apple Remote- Fernbedienung. Schließen Sie das Dock mit dem Apple Dock Connector-auf- USB-Kabel an Ihren Computer oder den mitgelieferten Apple USB Power Adapter an. Alternativ können Sie auch den Apple Dock Connector-auf-VGA-Adapter, das Composite-AV-Kabel oder das Component-AV-Kabel anschließen, um Fotos oder Videos auf einem Fernsehgerät oder anderen Anzeigegerät (mit dem iphone und ipod-modellen mit Videounterstützung) anzusehen. Setzen Sie Ihren ipod oder Ihr iphone in das Dock, um die Batterie aufzuladen, Inhalte mit itunes zu synchronisieren, Musik zu hören oder Fotos bzw. Videos anzuschauen. Schließen Sie hier externe Lautsprecher oder einen Stereo- Receiver mithilfe eines Audiokabels mit standardmäßigem 3,5-mm-Stereoklinkenstecker an. 44 Deutsch
45 Gehen Sie wie folgt vor, um das Dock mit Ihrem Computer zu verwenden: 1 Schließen Sie das mitgelieferte Apple Dock Connector-auf-USB-Kabel an Ihren Computer und das andere Kabelende an das Dock an. 2 Wählen Sie den für Ihren ipod bzw. Ihr iphone passenden Dock-Adapter aus. Ihr ipod oder iphone passt exakt in den korrekten Adapter. Die Zahl (15 20) zeigt an, welcher ipod oder welches iphone passt. iphone iphone ipod touch ipod touch ipod nano iphone 4 19 iphone 3G und 3GS Generation 2. und Generation Generation 18 Hinweis: Wenn für Ihr ipod- bzw. iphone-modell kein Dock-Adapter mit dem Universal Dock geliefert wurde, können Sie einen passenden Adapter unter der folgenden Adresse erwerben: 3 Setzen Sie zunächst den Dock-Adapter in die Connector-Wanne (Anschlusssockel) Ihres Docks ein und stellen Sie dann Ihren ipod oder Ihr iphone in das Dock. Deutsch 45
46 Dock-Adapter Connector-Wanne Zum Entfernen des Dock-Adapters ziehen Sie ihn an diesem Schlitz mit dem Fingernagel heraus. Ist itunes so konfiguriert, dass Ihr ipod bzw. iphone automatisch synchronisiert wird, startet die Synchronisierung sofort nach dem Einsetzen des ipod bzw. iphone in das Dock. Weitere Informationen zum Synchronisieren von Inhalten sowie zur Verwendung sämtlicher Funktionen des ipod bzw. iphone finden Sie im Benutzerhandbuch zu Ihrem ipod oder iphone unter der folgenden Adresse: support.apple.com/de_de/manuals. 46 Deutsch
47 Gehen Sie wie folgt vor, um das Dock mit dem Apple USB Power Adapter zu verwenden: 1 Schließen Sie das Apple Dock Connector-auf-USB-Kabel an das Netzteil und dieses dann an einer Steckdose an. Netzteilstecker Netzteil Steckdose USB-Kabel 2 Schließen Sie das andere Ende des USB-Kabels an das Dock an. 3 Fahren Sie mit den Schritten 2-3 auf Seite 45 fort, um ipod oder iphone mit dem Dock und dem Netzteil zu verwenden. Deutsch 47
48 Ansehen von Fotos und Videos auf einem Fernsehgerät oder einem anderen Anzeigegerät Mit iphone und ipod-modellen mit Videounterstützung können Sie das Dock verwenden, um Fotos und Videos auf einem Fernsehgerät oder einem anderen Anzeigegerät (wie z. B. einem Digitalprojektor) anzuzeigen. Das Fernsehgerät bzw. ein sonstiges Anzeigegerät muss über einen VGA-Anschluss oder Standard-Cinch-Anschlüsse (RCA) verfügen, die Composite-Videosignale unterstützen. Wenn Sie den Apple Dock Connector-auf-VGA-Adapter verwenden, müssen Sie das Dock mit Laut sprechern oder einer Stereoanlage verbinden (das hierzu benötigte Audiokabel ist separat erhältlich). Das Apple Composite-AV-Kabel und das Apple Component-AV-Kabel kann ebenfalls für die Audiowiedergabe auf Ihrem Fernsehgerät oder anderen Anzeigegerät verwendet werden. Wählen Sie Kabel oder Adapter, je nachdem, welche Anschlüsse an Ihrem Fernsehgerät bzw. anderem Anzeigegerät zur Verfügung stehen. AV-Kabel und Adapter sind separat unter der folgenden Adresse erhältlich: Wichtig: Stellen Sie sicher, dass Ihr ipod bzw. iphone zum Senden von Videosignalen an Fernsehgerät bzw. Receiver konfiguriert wurde. Weitere Informationen finden Sie im Benutzerhandbuch zu Ihrem ipod oder iphone unter der folgenden Adresse: support.apple.com/de_de/manuals. Bevor Sie anfangen, die Geräte miteinander zu verbinden, reduzieren Sie die Laut stärke an Fernsehgerät oder Stereoanlage, schalten Sie ipod bzw. iphone und alle anderen Komponenten aus. Achten Sie darauf, alle Kabel korrekt anzuschließen, um Störgeräusche zu vermeiden. Informationen zum Vermeiden von Hörschäden finden Sie auf Seite Deutsch
49 Gehen Sie wie folgt vor, um das Dock an Ihr Fernsehgerät oder ein anderes Anzeigegerät anzuschließen: 1 Schließen Sie das AV-Kabel oder den Adapter an den Dockanschluss des Docks und an Ihr Fernseh- bzw. Anzeigegerät an. Befolgen Sie die Anleitungen, die mit Ihrem AV- Kabel oder Adapter geliefert wurden. 2 Schalten Sie den ipod bzw. das iphone ein, stellen Sie die Lautstärke nicht zu hoch ein und schalten Sie dann das Fernseh- bzw. Anzeigegerät ein, um mit der Wiedergabe zu beginnen. Gehen Sie wie folgt vor, um Fotos oder Videos auf Ihrem Fernseh- oder Anzeigegerät anzuzeigen: mm Weitere Informationen finden Sie im Benutzerhandbuch zu Ihrem ipod oder iphone unter der folgenden Adresse: support.apple.com/de_de/manuals. Abspielen von Musik über externe Lautsprecher oder eine Stereoanlage Wenn Sie das Universal Dock verwenden, können Sie über externe Lautsprecher oder einen Stereo-Receiver Musik von Ihrem ipod bzw. iphone anhören. Sie benötigen ein (separat erhältliches) Audiokabel mit einem standardmäßigen 3,5-mm-Stereoklinkenstecker (viele externe Lautsprecher verwenden diesen Kabeltyp). Reduzieren Sie vor dem Anschließen von Stereokomponenten deren Lautstärke. Deutsch 49
50 Gehen Sie wie folgt vor, um ipod oder iphone mit dem Dock für die Musikwiedergabe über Lautsprecher oder eine Stereoanlage zu verwenden: 1 Setzen Sie Ihren ipod bzw. Ihr iphone in das Dock ein. 2 Schließen Sie die Lautsprecher oder die Stereoanlage an den Line-Out-Anschluss des Docks an. 3 Verwenden Sie die Bedienelemente des ipod bzw. iphone oder der Apple Remote- Fernbedienung, um Musik wiederzugeben. Sie können die Fernbedienung oder die Lautstärkeregler an den Lautsprechern oder der Stereoanlage verwenden, um die Lautstärke zu ändern. Bei einigen ipod-modellen können Sie hierzu auch das Click Wheel, die Lautstärketasten oder Bedienelemente auf dem Bildschirm verwenden. Hinweis: Sie können mit dem im Dock eingesetzten ipod bzw. iphone Musik wiedergeben, während das Dock (mithilfe des mitgelieferten Apple USB Power Adapters) an einer Steckdose oder an Ihrem Computer angeschlossen ist. Wenn das Dock an Ihrem Computer angeschlossen ist, darf der ipod nicht für die Verwendung als Festplatte aktiviert sein. Informationen zum Aktivieren des ipod als Festplatte finden Sie im Benutzerhandbuch zu Ihrem ipod, das unter folgender Adresse verfügbar ist: support.apple.com/de_de/manuals. Wenn Sie externe Lautsprecher oder Audiokabel erwerben möchten, besuchen Sie folgende Website: 50 Deutsch
51 Verwenden der Apple Remote-Fernbedienung Sie können die mitgelieferte Infrarotfernbedienung zur Steuerung der Wiedergabe verwenden, wenn Ihr ipod oder iphone im Dock eingesetzt ist. Achten Sie darauf, dass sich keine Hindernisse zwischen Fernbedienung und Dock befinden. Auswahl Lauter Links Rechts Leiser Menu Start/Pause Gehen Sie wie folgt vor, um die Apple Remote-Fernbedienung zu verwenden: Funktion Abspielen oder Anhalten eines Musiktitels oder Videos Ändern der Lautstärke Wechseln zum nächsten Musiktitel Wiederholen eines Musiktitels/ Videos oder Abspielen des vorherigen Titels/Videos Aktion Drücken Sie die Taste Start/Pause ( ). Drücken Sie die Taste Lauter bzw. Leiser. Drücken Sie die Taste Rechts. Drücken Sie die Taste Links einmal, um die Wiedergabe von einem Musiktitel bzw. Video erneut zu starten. Drücken Sie die Taste Links zweimal, um den vorherigen Titel oder das vorherige Video abzuspielen. Deutsch 51
52 Funktion Schneller Vorlauf/Schneller Rücklauf eines Titels/Videos Aktion Drücken und halten Sie die Taste Rechts oder Links. Hinweis: Mit der Fernbedienung können Sie keine andere Wiedergabeliste auswählen. Verwenden Sie hierfür die Bedienelemente von ipod oder iphone. Die Apple Remote-Fernbedienung kann auch mit anderen kompatiblen Apple-Produkten verwendet werden, die über einen integrierten Infrarotempfänger verfügen. Sie können Ihr Dock so konfigurieren, dass es nur mit einer bestimmten Fernbedienung verwendet werden kann. Auf diese Weise wird verhindert, dass das Dock auf Fernbedienungen anderer Geräte reagiert. Gehen Sie wie folgt vor, um das Dock so zu konfigurieren, dass es nur auf eine bestimmte Fernbedienung reagiert: 1 Setzen Sie Ihren ipod oder Ihr iphone in das Dock und drücken Sie eine beliebige Taste auf dem ipod bzw. iphone, um das Gerät einzuschalten. 2 Vergewissern Sie sich, dass sich andere mit der Apple Remote-Fernbedienung kompatible Produkte außer Reichweite befinden und ausgeschaltet sind. Halten Sie dann die Fernbedienung möglichst nah (ca. 8 bis 10 cm) an den Infrarotempfänger am Dock. 3 Drücken Sie auf der Apple Remote-Fernbedienung die Tasten Rechts und Menu (») und halten Sie sie ca. fünf Sekunden lang gedrückt. Das Dock lässt sich jetzt nur noch mit der Fernbedienung steuern, die dafür konfiguriert worden ist. 52 Deutsch
53 Hinweis: Es empfiehlt sich, andere mit der Apple Remote-Fernbedienung kompatible Geräte mit jeweils anderen Fernbedienungen zu konfigurieren. Auf diese Weise verhindern Sie, dass die Fernbedienung, die Sie mit Ihrem Dock verwenden, die anderen Geräte steuert. Näheres hierzu finden Sie in der Dokumentation zu den anderen Geräten. Gehen Sie wie folgt vor, um das Dock zurückzusetzen, sodass es wieder auf andere Apple Remote-Fernbedienungen reagiert: mm Befolgen Sie die oben genannten Schritte 1 und 2. Drücken Sie auf der Apple Remote- Fernbedienung die Tasten Links und Menu (») und halten Sie sie ca. fünf Sekunden lang gedrückt. Das Dock reagiert jetzt wieder auf alle Apple Remote-Fernbedienungen. Deutsch 53
54 Die Apple Remote-Fernbedienung wird mit einer Batterie geliefert. Bei Bedarf können Sie die Batterie durch eine Batterie des Typs CR2032 ersetzen. Gehen Sie wie folgt vor, um die Batterie zu wechseln: 1 Verwenden Sie eine Münze, um die Batterieabdeckung an der Rückseite der Fernbedienung zu entfernen. Batterieabdeckung 2 Setzen Sie eine neue CR2032-Batterie mit dem Pluspol (+) nach oben ein. 3 Setzen Sie die Batterieabdeckung wieder ein und verriegeln Sie sie mithilfe der Münze. ACHTUNG: Wenn Sie einen falschen Batterietyp einsetzen, besteht die Gefahr, dass die Batterie explodiert. Entsorgen Sie verbrauchte Batterien bitte entsprechend den geltenden Umweltbestimmungen und -richtlinien. 54 Deutsch
55 Wichtige Sicherheitsinformationen ACHTUNG: Bei Nichtbeachtung dieser Sicherheitsinformationen kann es zu Brandgefahr, elektrischen Schlägen oder anderen Verletzungen oder zur Beschädigung von Komponenten kommen. Vermeiden von Hörschäden Das Verwenden Ihres ipod oder iphone mit hoher Lautstärke kann eine dauerhafte Schädigung des Gehörs zur Folge haben. Stellen Sie die Lautstärke nicht zu hoch ein. Sie gewöhnen sich mit der Zeit zwar an höhere Lautstärken, sodass diese für Sie normal erscheinen mögen, Ihre Hörfähigkeit kann jedoch beeinträchtigt werden. Falls Sie in Ihren Ohren ein Klingeln wahrnehmen oder Gesprochenes gedämpft hören, sollten Sie nicht weiter Musik hören und ggf. einen Ohrenarzt aufsuchen. Je höher Sie die Lautstärke einstellen, desto schneller kann Ihr Gehör geschädigt werden. Experten empfehlen, das Gehör wie folgt zu schützen: Hören Sie Musik und andere Audioinhalte nur für eine begrenzte Zeit bei hohen Lautstärken. Vermeiden Sie es, die Lautstärke hochzustellen, um Umgebungsgeräusche zu übertönen. Reduzieren Sie die Lautstärke, wenn Sie nicht hören können, dass Personen in Ihrer Nähe sprechen. Informationen zum Einstellen der Maximallautstärke finden Sie im Benutzerhandbuch zu Ihrem ipod oder iphone, das unter folgender Adresse verfügbar ist: support.apple.com/de_de/manuals. Deutsch 55
56 Apple USB Power Adapter Wenn Sie den Apple USB Power Adapter zum Aufladen Ihres ipod oder iphone verwenden, schließen Sie das USB-Kabel an das Netzteil und diesen dann an einer Steckdose an. Fassen Sie den Apple USB Power Adapter nicht mit nassen Händen, wenn Sie ihn ans Stromnetz anschließen oder die Verbindung trennen. Der Apple USB Power Adapter wird möglicherweise während des normalen Gebrauchs warm. Achten Sie stets auf eine ausreichende Luftzufuhr um den Apple USB Power Adapter und gehen Sie vorsichtig damit um. Trennen Sie den Apple USB Power Adapter in folgenden Fällen von Stromnetz und Gerät: Am USB-Kabel sind Drähte zu sehen oder es wurde beschädigt. Der Netzteilstecker oder das Netzteilgehäuse wurden beschädigt. Das Netzteil war Regen, Flüssigkeiten oder starker Feuchtigkeit ausgesetzt. Sie sind der Meinung, dass das Netzteil gewartet oder repariert werden muss. Sie möchten das Netzteil reinigen. Spezifikationen Eingangsspannung: Wechselstrom Volt (V), 50/60 Hertz (Hz) Ausgangsspannung: Gleichstrom, 5 V, 1 A Service und Support Informationen zu Fehlerbeseitigung, Service und Support für ipod oder iphone, das Universal Dock, die Apple Remote-Fernbedienung, den Apple USB Power Adapter und Apple-Kabel und -Adapter finden Sie unter: 56 Deutsch
57 Uso de la base Apple Universal Dock Enhorabuena por comprar la base Apple Universal Dock. Esta base puede utilizarse con cualquier modelo de iphone y ipod equipado con conector Dock y adaptador. Con la nueva base Apple Universal Dock podrá: conectarla al ordenador y colocar en ella su ipod o iphone para cargar la batería y sincronizar contenidos de itunes (página 60); conectarla a una toma de corriente (mediante el adaptador de corriente USB de Apple) y colocar en ella el ipod o el iphone para cargar la batería (página 62); ver fotos en un televisor o en otro dispositivo de vídeo (mediante el adaptador de conector Dock a VGA de Apple, un cable AV compuesto o un cable AV por componentes, disponibles por separado; página 63); ver vídeo en un televisor u otro dispositivo de vídeo (mediante un adaptador de conector Dock a VGA de Apple, un cable AV compuesto o un cable AV por componentes, disponibles por separado; página 63); conectarla a unos altavoces o a un equipo estéreo (mediante un cable de audio, disponible por separado) para reproducir música del ipod o el iphone (página 64); controlar la reproducción a distancia con el mando Apple Remote (página 66). Español 57
58 Importante: No introduzca nunca un conector en un puerto a la fuerza. Si la conexión entre el conector y el puerto no resulta relativamente fácil, seguramente no se correspondan. Asegúrese de que el conector encaja con el puerto y de que se ha colocado en la posición correcta con respecto a él. La base Apple Universal Dock incluye lo siguiente: Base Apple Universal Dock Mando Apple Remote Adaptadores para base Dock (5) Cable de conector Dock a USB de Apple Adaptador de corriente USB de Apple 58 Español
59 Visión general de la base Apple Universal Dock Receptor de infrarrojos Puerto del conector del Dock Conector del Dock Puerto de salida de línea Componente Receptor de infrarrojos (IR) Puerto del conector del Dock Conector del Dock Puerto de salida de línea Qué puede hacer Controle la reproducción a distancia con el mando Apple Remote. Conecte la base al ordenador o al adaptador de corriente USB de Apple incluido mediante el cable de conector Dock a USB de Apple. O conecte un adaptador de conector Dock a VGA de Apple, un cable AV compuesto o un cable AV por componentes para ver fotos o vídeos en un televisor o en cualquier otro dispositivo de vídeo (con el iphone y con modelos de ipod que admitan vídeo). Coloque el ipod o el iphone en la base para cargar la batería, sincronizar contenidos de itunes, escuchar música o ver fotos y vídeos. Conecte a la base unos altavoces externos o un receptor estéreo utilizando un cable de audio equipado con un miniconector estéreo estándar de 3,5 milímetros. Español 59
60 Para utilizar la base Apple Universal Dock con el ordenador: 1 Conecte un extremo del cable de conector Dock a USB de Apple incluido al ordenador y el otro a la base. 2 Seleccione el adaptador correspondiente a su ipod o iphone. El ipod o iphone encajan fácilmente en el adaptador correcto. El número (15 20) indica el modelo de ipod o iphone iphone iphone ipod touch ipod touch ipod nano iphone 4 19 iphone 3G y 3GS Cuarta generación Segunda y tercera generación Quinta generación Nota: Si el adaptador para su modelo de ipod o iphone no viene incluido en su base Apple Universal Dock, puede comprarlo en 3 Inserte el adaptador en el hueco de la base en el que está el conector y, a continuación, coloque el ipod o el iphone en ella. 60 Español
61 Adaptador para base Dock Puerto del conector Puede insertar la uña en esta ranura para retirar el adaptador de la base Dock. Si itunes está configurado para sincronizar el ipod o el iphone de forma automática, la sincronización se iniciará en el momento en el que se coloque el ipod o el iphone en la base. Para obtener información acerca de cómo sincronizar contenidos con el ipod o iphone y acerca del uso de sus funciones, consulte el manual del usuario de su ipod o iphone, disponible en support.apple.com/es_es/manuals. Español 61
62 Para utilizar la base Apple Universal Dock con el adaptador de corriente USB de Apple: 1 Conecte un extremo del cable de conector Dock a USB de Apple al adaptador de corriente, despliegue las clavijas (si es necesario) y enchufe el adaptador de corriente a una toma de corriente. Conector de CA Adaptador de corriente Toma de corriente Cable USB 2 Conecte el otro extremo del cable USB a la base. 3 Continúe con los pasos 2-3 de la página 60 para usar el ipod o iphone con la base y el adaptador de corriente. 62 Español
63 Cómo ver fotos y vídeos en un televisor o en otro dispositivo de vídeo Con el iphone y los modelos de ipod que admiten vídeo, puede utilizar la base Apple Universal Dock para ver fotos y vídeos en un televisor o en otro dispositivo de vídeo (como por ejemplo, un proyecto digital). El televisor o dispositivo en cuestión deberá contar con un conector VGA o conectores RCA estándar que admitan señales de vídeo compuesto. Si utiliza el adaptador de conector Dock a VGA de Apple, también deberá conectar la base a unos altavoces o a un equipo estéreo (mediante un cable de audio, disponible por separado). El cable AV compuesto y el cable AV por componentes de Apple también dirigirán el audio a su televisor o dispositivo de vídeo. Elija el cable o el adaptador en función de las tomas de entrada disponibles en el televisor o dispositivo de vídeo. Los cables AV y los adaptadores pueden adquirirse por separado en Importante: Asegúrese de configurar el ipod o iphone para que envíe una señal de vídeo al televisor o receptor. Para obtener más información, consulte el manual del usuario de su ipod o iphone, disponible en support.apple.com/es_es/manuals. Antes de empezar a conectar componentes, baje el volumen del televisor o los equipos estéreo, apague el ipod o el iphone y desactive la alimentación de todos los componentes. Realice adecuadamente todas las conexiones para evitar ruidos y zumbidos. Para obtener información acerca de cómo evitar daños en los oídos, consulte la página 69. Español 63
64 Para conectar la base a su televisor o dispositivo de vídeo: 1 Conecte el cable AV o el adaptador al puerto de conector Dock de la base y al televisor o dispositivo de vídeo. Consulte las instrucciones que venían con el cable AV o con el adaptador. 2 Encienda el ipod o iphone, ajuste el volumen a un nivel adecuado y encienda el televisor o el dispositivo de vídeo para iniciar la reproducción. Para ver fotos o vídeos en su televisor o dispositivo de vídeo: mm Consulte el manual del usuario de su ipod o iphone, disponible en: support.apple.com/es_es/manuals Cómo reproducir música mediante unos altavoces externos o en un equipo estéreo Con la base Apple Universal Dock, podrá reproducir música del ipod o del iphone en unos altavoces externos o en un receptor estéreo. Utilice un cable de audio (disponible por separado) con un miniconector estéreo estándar de 3,5 milímetros (muchos altavoces externos utilizan este tipo de cable). Antes de conectar componentes estéreo, baje el volumen en los componentes. Para utilizar el ipod o el iphone con la base para reproducir música a través de unos altavoces o en un equipo estéreo: 1 Coloque el ipod o iphone en la base. 2 Conecte los altavoces o el equipo estéreo al puerto de salida de línea de la base. 3 Para reproducir música, utilice los controles del ipod o del iphone, o el mando Apple Remote. 64 Español
65 Utilice el mando a distancia o los controles de volumen de los altavoces o del equipo estéreo para cambiar el volumen. En algunos modelos de ipod, también puede utilizar la rueda pulsable, los botones de volumen o los controles que aparecen en pantalla. Nota: Puede reproducir música mientras el ipod o iphone se encuentran en la base o cuando esta está conectada a una toma de corriente (mediante el adaptador de corriente USB de Apple) o a un ordenador. Si la base está conectada al ordenador, el ipod no debe estar configurado para usarse como disco. Para obtener información acerca de cómo configurar el ipod para usarlo como disco, consulte el manual del usuario de su ipod o iphone, disponible en support.apple.com/es_es/manuals. Para comprar altavoces externos o cables de audio, visite Español 65
Using the ipod nano Dock
 ipod nano Dock Using the ipod nano Dock Congratulations on purchasing your ipod nano Dock it holds ipod nano upright as it charges, loads music and photos, and plays music. Use the cable included with
ipod nano Lanyard Headphones
 ipod nano Lanyard Headphones English: Insert the lanyard connector into your ipod nano (Second Generation). Place the lanyard over your head, making sure that the headphones are oriented properly. Move
PS3 / PS4 / PC XBOX 360 GAMING HEADSET LX16
 PS / PS / PC XBOX 60 GAMING HEADSET LX6 CHAT GAME Content Inhalt Lioncast LX6 gaming headset Lioncast LX6 Gaming Headset Inline remote kabelgebundene Fernbedienung MUTE - MIC - ON XBOX PS PS PC RCA splitter
UWC 8801 / 8802 / 8803
 Wandbedieneinheit Wall Panel UWC 8801 / 8802 / 8803 Bedienungsanleitung User Manual BDA V130601DE UWC 8801 Wandbedieneinheit Anschluss Vor dem Anschluss ist der UMM 8800 unbedingt auszuschalten. Die Übertragung
Softwareupdate-Anleitung // AC Porty L Netzteileinschub
 1 Softwareupdate-Anleitung // AC Porty L Netzteileinschub Softwareupdate-Anleitung // AC Porty L Netzteileinschub HENSEL-VISIT GmbH & Co. KG Robert-Bunsen-Str. 3 D-97076 Würzburg-Lengfeld GERMANY Tel./Phone:
GAMING HEADSET LX16 PRO
 GAMING HEADSET LX6 PRO CHAT GAME Content Inhalt Lioncast LX6 Pro gaming headset Lioncast LX6 Pro Gaming Headset Inline remote kabelgebundene Fernbedienung MUTE - MIC - ON XBOX PS PS PC RCA splitter cable
CABLE TESTER. Manual DN-14003
 CABLE TESTER Manual DN-14003 Note: Please read and learn safety instructions before use or maintain the equipment This cable tester can t test any electrified product. 9V reduplicated battery is used in
Hama GmbH & Co KG D-86651 Monheim/Germany www.hama.com
 Hama GmbH & Co KG D-86651 Monheim/Germany www.hama.com d Bedienungsanleitung 2 4. Funktionserläuterung 10 11 7 1 5 2 4 3 6 9 8 Presenter Modus Media Player Modus 1 Seite vor Vorherige Media-Datei in der
Kurzanleitung um Transponder mit einem scemtec TT Reader und der Software UniDemo zu lesen
 Kurzanleitung um Transponder mit einem scemtec TT Reader und der Software UniDemo zu lesen QuickStart Guide to read a transponder with a scemtec TT reader and software UniDemo Voraussetzung: - PC mit der
UM ALLE DATEN ZU KOPIEREN. ZUNÄCHST die Daten des alten Telefons auf einen Computer kopieren
 IPHONE UM ALLE DATEN des alten Telefons auf einen Computer Software von welcomehome.to/nokia auf Ihrem PC oder Mac. verbinden Sie Ihr altes Telefon über 3. Wenn Sie Outlook nutzen, öffnen Sie itunes, um
miditech 4merge 4-fach MIDI Merger mit :
 miditech 4merge 4-fach MIDI Merger mit : 4 x MIDI Input Port, 4 LEDs für MIDI In Signale 1 x MIDI Output Port MIDI USB Port, auch für USB Power Adapter Power LED und LOGO LEDs Hochwertiges Aluminium Gehäuse
Newton 9W Power Adapter
 Newton 9W Power Adapter You can use the Newton 9W Power Adapter whenever you re near an electrical outlet to save your main batteries. Safety When you use the power adapter, follow these safeguards to
SanStore: Kurzanleitung / SanStore: Quick reference guide
 SanStore Rekorder der Serie MM, MMX, HM und HMX Datenwiedergabe und Backup Datenwiedergabe 1. Drücken Sie die Time Search-Taste auf der Fernbedienung. Hinweis: Falls Sie nach einem Administrator-Passwort
rtube.nl/red975 Sold separately MN180008_ Off Price GmbH Rodenkirchener Str Hürth Copyright MICRO-USB RCD2002
 RCD2002 MICRO-USB 1x 1x 1x Sold separately A B QR rtube.nl/red975 1/4 1/8 A W B F = W - 4 cm F = W - 4,5 cm W Min. W = 50 cm Min. W = 50 cm 1 2 W F = W - 4 cm F F 3 4 0,5 cm 5 F - 1,0 cm 2/4 2/8 A B 1
THE BRIDGE IIIP. Docking-Station für ipod und iphone. Bedienungsanleitung. iphone nicht im Lieferumfang DEUTSCH
 THE BRIDGE IIIP Docking-Station für ipod und iphone Bedienungsanleitung DEUTSCH iphone nicht im Lieferumfang Inhaltsverzeichnis Einführung 3 Leistungsmerkmale 3 Lieferumfang 3 Kompatibilität 3 Installation
S-Digicash Payez mobile depuis votre compte courant! Mobil bezahlen, direkt von Ihrem Girokonto aus! Pay mobile from your current account!
 S-Digicash Payez mobile depuis votre compte courant! Mobil bezahlen, direkt von Ihrem Girokonto aus! Pay mobile from your current account! Payez mobile depuis votre compte courant BCEE! Scannez le QR Code
Readme-USB DIGSI V 4.82
 DIGSI V 4.82 Sehr geehrter Kunde, der USB-Treiber für SIPROTEC-Geräte erlaubt Ihnen, mit den SIPROTEC Geräten 7SJ80/7SK80 über USB zu kommunizieren. Zur Installation oder Aktualisierung des USB-Treibers
Contact 1600 QUICK REFERENCE GUIDE GUIDE D UTILISATION BEDIENUNGSANLEITUNG GUÍA DE REFERENCIA RÁPIDA GUIDA RAPIDA. www.sonybiz.net CHANGING THE WAY
 Contact 1600 CHANGING THE WAY QUICK REFERENCE GUIDE GUIDE D UTILISATION BEDIENUNGSANLEITUNG BUSINESS GUÍA DE REFERENCIA RÁPIDA GUIDA RAPIDA COMMUNICATES www.sonybiz.net GB Getting started STEP 1 Turning
Hama GmbH & Co KG Postfach Monheim/Germany Tel. +49 (0)9091/502-0 Fax +49 (0)9091/
9091/502-0 Fax +49 (0)9091/") www.hama.de Hama GmbH & Co KG Postfach 80 86651 Monheim/Germany Tel. +49 (0)9091/502-0 Fax +49 (0)9091/502-274 hama@hama.de www.hama.de 00062249-05.05 Multimedia Kit für/for Mercedes Command 2.0 00062249
www.hama.de Hama GmbH & Co KG Postfach 80 86651 Monheim/Germany Tel. +49 (0)9091/502-0 Fax +49 (0)9091/502-274 hama@hama.de www.hama.de 00062249-05.05 Multimedia Kit für/for Mercedes Command 2.0 00062249
USER GUIDE BENUTZERANLEITUNG GUIDE DE L UTILISATEUR
 USER GUIDE BENUTZERANLEITUNG GUIDE DE L UTILISATEUR WIRELESS KEYBOARD AND MOUSE What s in the box Wireless Keyboard, Wireless Mouse, Nano Receiver, User Guide. Specification Operating frequency Voltage
Formatting the TrekStor i.beat run
 DE EN Formatting the TrekStor i.beat run Formatierung des TrekStor i.beat run a Beim Formatieren werden ALLE Daten auf dem MP3-Player gelöscht. In diesem Abschnitt wird Ihnen erläutert, wie Sie Ihren MP3-Player
Version/Datum: 1.5 13-Dezember-2006
 TIC Antispam: Limitierung SMTP Inbound Kunde/Projekt: TIC The Internet Company AG Version/Datum: 1.5 13-Dezember-2006 Autor/Autoren: Aldo Britschgi aldo.britschgi@tic.ch i:\products\antispam antivirus\smtp
USB Treiber updaten unter Windows 7/Vista
 USB Treiber updaten unter Windows 7/Vista Hinweis: Für den Downloader ist momentan keine 64 Bit Version erhältlich. Der Downloader ist nur kompatibel mit 32 Bit Versionen von Windows 7/Vista. Für den Einsatz
Nachdem Sie die Datei (z.b. t330usbflashupdate.exe) heruntergeladen haben, führen Sie bitte einen Doppelklick mit der linken Maustaste darauf aus:
 heruntergeladen haben, führen Sie bitte einen Doppelklick mit der linken Maustaste darauf aus:") Deutsch 1.0 Vorbereitung für das Firmwareupdate Vergewissern Sie sich, dass Sie den USB-Treiber für Ihr Gerät installiert haben. Diesen können Sie auf unserer Internetseite unter www.testo.de downloaden.
Deutsch 1.0 Vorbereitung für das Firmwareupdate Vergewissern Sie sich, dass Sie den USB-Treiber für Ihr Gerät installiert haben. Diesen können Sie auf unserer Internetseite unter www.testo.de downloaden.
Parameter-Updatesoftware PF-12 Plus
 Parameter-Updatesoftware PF-12 Plus Mai / May 2015 Inhalt 1. Durchführung des Parameter-Updates... 2 2. Kontakt... 6 Content 1. Performance of the parameter-update... 4 2. Contact... 6 1. Durchführung
KURZANLEITUNG. Firmware-Upgrade: Wie geht das eigentlich?
 KURZANLEITUNG Firmware-Upgrade: Wie geht das eigentlich? Die Firmware ist eine Software, die auf der IP-Kamera installiert ist und alle Funktionen des Gerätes steuert. Nach dem Firmware-Update stehen Ihnen
EMCO Installationsanleitung Installation instructions
 EMCO Installationsanleitung Installation instructions Installationsanleitung Installation instructions Digitalanzeige digital display C40, FB450 L, FB600 L, EM 14D/17D/20D Ausgabe Edition A 2009-12 Deutsch...2
ZeppelinAir AirPlay -Konfiguration wireless
 ZeppelinAir AirPlay -Konfiguration wireless Um das AirPlay-Feature nutzen zu können, muss der Zeppelin Air an Ihr bestehendes Heimnetzwerk (im folgenden Text als Ihr Heimnetzwerk bezeichnet) angeschlossen
DVD MAKER USB2.0 Installation Anleitung
 DVD MAKER USB2.0 Installation Anleitung Inhalt V1.0 Kapitel 1: DVD MAKER USB2.0 Hardware Montage...2 1.1 Inhalt der DVD MAKER USB2.0 Paket...2 1.2 Systemanforderungen...2 1.3 Hardware Montage...2 Kapitel
iphone-kontakte zu Exchange übertragen
 iphone-kontakte zu Exchange übertragen Übertragen von iphone-kontakten in ein Exchange Postfach Zunächst muss das iphone an den Rechner, an dem es üblicherweise synchronisiert wird, angeschlossen werden.
Facebook: www.facebook.com/finisinc. You Tube: www.youtube.com/finisswim. Download Multilingual Instruction Manuals: www.finisinc.
 Instruction Manual Technical Support Customer Care USA: 800.388.7404 Europe: 359.2.936. 86.36 Web: www.finisinc.com/support Facebook: www.facebook.com/finisinc Twitter: www.twitter.com/finisswim You Tube:
IP X4 MOA/SL/FL IP44, CH IP24. Montage-Anleitung Instructions de montage Assembling instructions. 225 cm. 60 cm 0
 MOA/SL/FL IP44, CH IP4 Arbeiten an den elektrischen Anlagen dürfen nur von autorisierten Fachleuten nach den örtlichen Vorschriften ausgeführt werden. Für nicht fachgerechte Installation wird jegliche
Das neue Volume-Flag S (Scannen erforderlich)
") NetWorker 7.4.2 - Allgemein Tip 2, Seite 1/5 Das neue Volume-Flag S (Scannen erforderlich) Nach der Wiederherstellung des Bootstraps ist es sehr wahrscheinlich, daß die in ihm enthaltenen Informationen
NetWorker 7.4.2 - Allgemein Tip 2, Seite 1/5 Das neue Volume-Flag S (Scannen erforderlich) Nach der Wiederherstellung des Bootstraps ist es sehr wahrscheinlich, daß die in ihm enthaltenen Informationen
Using the Apple Universal Dock
 Universal Dock Using the Apple Universal Dock Congratulations on purchasing your Apple Universal Dock. You can use this Dock with iphone or any ipod that has a Dock connector. Here are the things you
Wireless Earbuds. D39 Trouble Shooting
 Wireless Earbuds D39 Trouble Shooting Q: Pairing failed. A:1) Put the earbuds back to the charging case and make sure that they are off. 2) Take the earbuds out of the case and they are automatically on.
Bedienungsanleitung: Medienanlage Raum A104
 Bedienungsanleitung: Medienanlage Raum A104 Inhalt 1. Ein- und Ausschalten... 1 2. Wo kann ich mein Notebook oder externes AV-Gerät anschließen?... 2 3. Notebook oder AV-Geräte anschließen... 2 4. Arbeiten
Conditions de travail Arbeitsbedingungen
 Conditions de travail 39 Conditions de travail Emissions Conditions de travail Industriel: une profession 3 fois plus sûr! 9627 personnes sont assurées dans le domaine industriel en Valais. Le nombre d
Live Streaming => Netzwerk ( Streaming Server )
") Live Streaming => Netzwerk ( Streaming Server ) Verbinden Sie den HDR / IRD-HD Decoder mit dem Netzwerk. Stellen Sie sicher, dass der HDR / IRD-HD Decoder mit ihrem Computer kommuniziert. ( Bild 1 ) Wichtig:
Live Streaming => Netzwerk ( Streaming Server ) Verbinden Sie den HDR / IRD-HD Decoder mit dem Netzwerk. Stellen Sie sicher, dass der HDR / IRD-HD Decoder mit ihrem Computer kommuniziert. ( Bild 1 ) Wichtig:
Kurzanleitung Ersatzgerät Guide succinct de l appareil de remplacement Breve guida all dispositivo di sostituzione
 Kurzanleitung Ersatzgerät Guide succinct de l appareil de remplacement Breve guida all dispositivo di sostituzione Das Ersatzgerät kann als zweites Gerät für die Nutzung des E-Bankings eingesetzt werden
2 IP X4 WLS/FL IP24. Montage-Anleitung Instructions de montage Assembling instructions. 225 cm. 60 cm 0
 WLS/FL IP Arbeiten an den elektrischen Anlagen dürfen nur von autorisierten Fachleuten nach den örtlichen Vorschriften ausgeführt werden. Für nicht fachgerechte Installation wird jegliche Haftung abgelehnt.
XEMIO-243/253 USER MANUAL
 Besonderheiten Elegantes Design und einfache Bedienung. Multi-Codec-Player unterstützt die Audioformate MP3 und WMA. Treiberfreies USB-Laufwerk - Sie können Ihre (Musik)-Dateien direkt über das unter "Arbeitsplatz"
Anleitung zur Installation und Nutzung des Sony PRS-T1 ebook Readers
 Anleitung zur Installation und Nutzung des Sony PRS-T1 ebook Readers Der neue Sony PRS-T1 ebook-reader ist nicht mehr mit dem Programm Adobe Digital Editions zu bedienen. Es sind daher einige Schritte
Anleitung zur Installation und Nutzung des Sony PRS-T1 ebook Readers
 Anleitung zur Installation und Nutzung des Sony PRS-T1 ebook Readers Der neue Sony PRS-T1 ebook-reader ist nicht mehr mit dem Programm Adobe Digital Editions zu bedienen. Es sind daher einige Schritte
Firmware-Installationsanleitung für AVH-X2500BT
 Firmware-Installationsanleitung für AVH-X2500BT HINWEISE: Bei Problemen mit diesem Update sehen Sie bitte in den Fragen & Antworten am Ende dieser Anleitung nach oder wenden sich an die Pioneer Service
[ENGLISH] TWO IMPORTANT REMARKS ABOUT STEERING WHEELS ON PS4 [FRANÇAIS] DEUX REMARQUES IMPORTANTES A PROPOS DES VOLANTS SUR PS4
![[ENGLISH] TWO IMPORTANT REMARKS ABOUT STEERING WHEELS ON PS4 [FRANÇAIS] DEUX REMARQUES IMPORTANTES A PROPOS DES VOLANTS SUR PS4](/thumbs/71/64149392.jpg "[ENGLISH] TWO IMPORTANT REMARKS ABOUT STEERING WHEELS ON PS4 [FRANÇAIS] DEUX REMARQUES IMPORTANTES A PROPOS DES VOLANTS SUR PS4") [ENGLISH] TWO IMPORTANT REMARKS ABOUT STEERING WHEELS ON PS4 [FRANÇAIS] DEUX REMARQUES IMPORTANTES A PROPOS DES VOLANTS SUR PS4 [DEUTSCH] ZWEI WICHTIGE ANMERKUNGEN ZU LENKRÄDERN AUF DER PS4 [ESPAÑOL] DOS
[ENGLISH] TWO IMPORTANT REMARKS ABOUT STEERING WHEELS ON PS4 [FRANÇAIS] DEUX REMARQUES IMPORTANTES A PROPOS DES VOLANTS SUR PS4 [DEUTSCH] ZWEI WICHTIGE ANMERKUNGEN ZU LENKRÄDERN AUF DER PS4 [ESPAÑOL] DOS
Der Adapter Z250I / Z270I lässt sich auf folgenden Betriebssystemen installieren:
 Installationshinweise Z250I / Z270I Adapter IR USB Installation hints Z250I / Z270I Adapter IR USB 06/07 (Laden Sie den Treiber vom WEB, entpacken Sie ihn in ein leeres Verzeichnis und geben Sie dieses
Electrical testing of Bosch common rail piezo injectors
 Applies to generation CRI 3: Bosch 10-position order number 0 445 115 = CRI 3-16 (CRI 3.0) 1600 bar 0 445 116 = CRI 3-18 (CRI 3.2) 1800 bar 0 445 117 = CRI 3-20 (CRI 3.3) 2000 bar Tools required: Hybrid
AKTIVE DVB-T ZIMMERANTENNE ANSCHLUSSHINWEISE ACTIVE DVB-T INDOOR ANTENNA CONNECTION INSTRUCTIONS
 K la vi er l ac ko p tik AKTIVE DVB-T ZIMMERANTENNE ANSCHLUSSHINWEISE ACTIVE DVB-T INDOOR ANTENNA CONNECTION INSTRUCTIONS ZA 8970 DRUCKS0682.indd 1 05.09.12 15:15 VerpAckunGsinhAlT UKW / UHF / VHF Flachantenne
UM ALLE DATEN ZU KOPIEREN. ZUNÄCHST die Daten des alten Telefons auf einen Computer kopieren
 LUMIA mit WP8 IPHONE Daten des alten Telefons auf einen Computer kopieren Software von welcomehome.to/nokia auf Ihrem PC oder Mac. verbinden Sie Ihr altes Telefon über 3. Wenn Sie Outlook nutzen, öffnen
EDG FREE 3 YEAR WARRANTY REGISTRATION 3 ANS DE GARANTIE, I
 BlueSYNC EDG FREE 3 YEAR WARRANTY REGISTRATION 3 ANS DE GARANTIE, INSCRIPTION GRATUITE REGISTRO DE GARANTÍA DE 3 AÑOS GRATIS KOSTENLOSE REGISTRIERUNG 3 JAHRE GARANTIE 三 年 免 费 保 固 www.accessorypower.com/warranty
Einmalige Einbindung in Ihre Netzwerkumgebung
 Einmalige Einbindung in Ihre Netzwerkumgebung Den IB-MP401Air verbinden - Bitte bringen Sie die Antenne an dem IB-MP401Air an. - Verbinden Sie das micro USB Kabel mit dem Netzteil und stecken Sie dieses
4.) Geben Sie im Feld Adresse die IP Adresse des TDC Controllers ein. Die Standard Adresse lautet 192.168.1.50.
 Geben Sie im Feld Adresse die IP Adresse des TDC Controllers ein. Die Standard Adresse lautet 192.168.1.50.") Netzwerk: 1.) Kopieren Sie die Datei C30remote.exe von der Installations CD auf ihre Festplatte. 2.) Starten Sie die Datei C30remote.exe auf ihrer Festplatte. 3.) Wählen Sie aus dem Menü Verbindung den
Netzwerk: 1.) Kopieren Sie die Datei C30remote.exe von der Installations CD auf ihre Festplatte. 2.) Starten Sie die Datei C30remote.exe auf ihrer Festplatte. 3.) Wählen Sie aus dem Menü Verbindung den
DESS - 3SHAPE INTERFACE LIBRARY 1
 ENGLISH DEUTSCH FRANÇAIS ESPAÑOL DESS - 3SHAPE Interface library Download and installation instructions of dess interfaces (titan bases, gap cemented 0.09mm diameter) 3shape libraries. Download der Bibliotheken
HARD DISK CASING 2.5 STORAGE IDE/PATA TO USB 2.0
 STORAGE SUPPORT HARD DISK CASING 2.5 STORAGE IDE/PATA TO USB 2.0 Handbuch SI-707143 STORAGE SUPPORT HARD DISK CASING 2.5 STORAGE IDE/PATA TO USB 2.0 Vielen Dank, dass Sie sich für den Kauf dieses ICIDU
MMOne.tv Installationsanleitung der Set-Top Box 05/2008 Version 1.1. Seite 1 von 10
 MMOne.tv Installationsanleitung der Set-Top Box 05/2008 Version 1.1 Seite 1 von 10 Inhalt Inhalt des MMOne.tv Pakets Seite 3 Zusatzinformationen Seite 3 Installation Ihrer Set-Top Box Seite 3 Der richtige
User Manual Bedienungsanleitung. www.snom.com. snom Wireless Headset Adapter snom Schnurlos-Headset-Adapter. English. Deutsch
 English snom Wireless Headset Adapter snom Schnurlos-Headset-Adapter Deutsch User Manual Bedienungsanleitung 2007 snom technology AG All rights reserved. Version 1.00 www.snom.com English snom Wireless
A+B= 10-35 lbs (4.5-15.9 kg)
") Gebruikersgids WorkFit-T Sit-Stand Desktop Workstation Produkteigenschaften & Technische Daten 15 (381 mm) > 24 (61 cm) > 35 (89 cm) A B 10-35 lbs (4.5-15.88 kg) < 5 lbs (2.27 kg) A+B= 10-35 lbs (4.5-15.9
Gebruikersgids WorkFit-T Sit-Stand Desktop Workstation Produkteigenschaften & Technische Daten 15 (381 mm) > 24 (61 cm) > 35 (89 cm) A B 10-35 lbs (4.5-15.88 kg) < 5 lbs (2.27 kg) A+B= 10-35 lbs (4.5-15.9
Lockable Tablet Mount
 Gebruikersgids Lockable Tablet Mount resulting resulting in in possible possible equipment equipment damage. damage. create create an an unsecured unsecured installation installation and and may may cause
IVE-W530BT. Bluetooth Software Update Manual mit Android Telefonen 09.03.2015
 Bluetooth Software Update Manual mit Android Telefonen IVE-W530BT 1 Einleitung In der Anleitung wird die Vorgehensweise zum aktualisieren der Radio Bluetooth Firmware beschrieben. Bitte beachten Sie alle
https://portal.microsoftonline.com
 Sie haben nun Office über Office365 bezogen. Ihr Account wird in Kürze in dem Office365 Portal angelegt. Anschließend können Sie, wie unten beschrieben, die Software beziehen. Congratulations, you have
TASER CAM Rekorder Kurzanleitung
 TASER CAM Rekorder Kurzanleitung Wir gratulieren Ihnen zum Kauf eines TASER CAM Rekorders. Lesen Sie sich diesen Abschnitt durch, damit Sie das Gerät gleich einsetzen können. Der TASER CAM Rekorder kann
p^db=`oj===pìééçêíáåñçêã~íáçå=
 p^db=`oj===pìééçêíáåñçêã~íáçå= Error: "Could not connect to the SQL Server Instance" or "Failed to open a connection to the database." When you attempt to launch ACT! by Sage or ACT by Sage Premium for
Windows Server 2012 R2 Essentials & Hyper-V
 erklärt: Windows Server 2012 R2 Essentials & Hyper-V Windows Server 2012 R2 Essentials bietet gegenüber der Vorgängerversion die Möglichkeit, mit den Boardmitteln den Windows Server 2012 R2 Essentials
iq AirPort mit ipod/ipad Bedienungsanleitung
 iq AirPort mit ipod/ipad Bedienungsanleitung iq + AirPort Express + ipad Die einfache Bedienung dieses Systems macht es zum perfekten System für Kunden die erstmals ein Selbstspielsystem einsetzen. Für
SCHNITTSTELLENADAPTER für ipod KS-PD100 Vor der Verwendung dieses Adapters
 SCHNITTSTELLENADAPTER für ipod KS-PD100 Vor der Verwendung dieses Adapters Letzte Aktualisierung: 1. März 2006 1 Unterstützte JVC-Automobilreceiver Dieser Adapter unterstützt die folgenden JVC-Automobilreceiver*
Quick Guide Home Network Mode
 Quick Guide Home Network Mode English > 1 German > 3 About the Home Network Mode EN Tivizen Nano & iplug normally work on their own created networks (whose SSID starts with tivizentv or iplug ) in which
CONTROLLER RECEIVER REPEATER PAIRING SLIM CLIP
 ANLEITUNGEN // INSTRUCTIONS CONTROLLER RECEIVER REPEATER PAIRING SLIM CLIP BEDIENUNGSANLEITUNG // INSTRUCTION MANUAL MONTAGEANLEITUNG // ASSEMBLY INSTRUCTION MONTAGEANLEITUNG // ASSEMBLY INSTRUCTION KOPPLUNG
Bedienungsanleitung Smartinterface D469
 Bedienungsanleitung Smartinterface D469 Hinweis: Diese Anleitung wurde von einer neueren Version abgelöst. Sie finden die neue Anleitung hier. Please note: There is a newer version of these instructions
Installationsanleitung. PacketVideo Corporation http://www.twonkymedia.com
 Installationsanleitung PacketVideo Corporation http://www.twonkymedia.com Einführung TwonkyMedia Manager ist eine Anwendung zur Verwaltung von Medien, mit der Sie Ihre gesamten Musiktitel, Fotos und Videos
Aufgabe: Que faut-il faire? SK-Beispielaufgabe_Haustiere.docx
 Aufgabe: Que faut-il faire? SK-Beispielaufgabe_Haustiere.docx Lisez bien le sujet avant de vous précipiter sur votre copie et élaborez votre plan afin de préparer votre brouillon. On vous demande donc
LED WIFI Controller - Bedienungsanleitung
 LED WIFI Controller - Bedienungsanleitung Inhaltsverzeichnis 1. Übersicht...1 2. Software/Technische Daten...2 3. Software für Android...2 3.01 Installationsanleitung...2 3.02 WiFi Verbindungseinstellungen...3
Aufbau der Cutmaster Einheit
 Aufbau der Cutmaster Einheit Inhalt: Eine Cutmaster Einheit besteht aus einem Laptop, worauf ein Audioschnitt Programm installiert ist. Zur Zeit sind Cutmaster XP und Easy Cut 4.0. installiert. Weiter
Bedienungsanleitung Berlin
 Bedienungsanleitung Berlin Inhaltsverzeichnis HINWEIS...04 Eigenschaften...05 Bedienung...07 Verbinden...08 Party-Funktion...09 Funktionen der Knöpfe...10 LED Status...10 Freisprechen...11 Akku aufladen...11
roll-up SONJA powerdisplays Aufbauanleitung Assemble instructions
 powerdisplay SONJA Mit Rollfunktion! Die Werbefläche rollt sich vollständig in das Display. So ist Ihre Werbung geschützt und in Sekunden wieder aufgebaut. Farbe: chrom/silber inkl. Tasche With rolling
Kurzanleitung für die Nucleus CR230 Fernbedienung. Erste Schritte Kurzanleitung
 Kurzanleitung für die Nucleus CR230 Fernbedienung Erste Schritte Kurzanleitung Über das Gerät Die Cochlear Nucleus CR230 Fernbedienung dient zur Einstellung und Kontrolle von Funktionen Ihres Cochlear
QUECHUA PHONE 5 DAS ERSTE MOUNTAINPROOF SMARTPHONE. Gebrauchsanleitung Android. Schlagfest Dichtigkeit Autonomie Apps die für das Wandern
 QUECHUA PHONE 5 DAS ERSTE MOUNTAINPROOF SMARTPHONE Barometer Höhenmesser Schlagfest Dichtigkeit Autonomie Apps die für das Wandern Gebrauchsanleitung Android Überführung von Daten Ihres ios- iphone auf
Bedienungsanleitung Digital TV
 Bedienungsanleitung Digital TV Inhalt Ihrer Lieferung 1. Empfangsbox einrichten 1. Plazierung 1. Empfangsbox 2. Ethernet Kabel anschliessen 3. Fernseher anschliessen 4. Netzteil anschliessen 5. Empfangsbox
Exemple de configuration
 ZyWALL VPN DynDNS-SoftRemoteLT 192.168.1.1 LAN: 192.168.1.0/24 Internet SoftRemoteLT-VPN-Software ZyWALL Dynamic IP Adresse DynDNS: zywall.dyndns.org Account bei Dyndns Server herstellen: https://www.dyndns.org/account/create.html
Entwurf. preliminary
 KAPRi plus Erweiterungsset M12 KAPRi plus Extension Kit M12 KAPRi plus Kit d Extension M12 Bedienungsanleitung / User instructions / Instructions d installation 899366 KAPRi plus Erweiterungsset M12 /
08/12. Gebrauchsanleitung Trekkingrucksäcke Trekking rucksacks Instructions for use Notice d'emploi pour sacs à dos de trek
 08/12 Gebrauchsanleitung Trekkingrucksäcke Trekking rucksacks Instructions for use Notice d'emploi pour sacs à dos de trek X-TRANSITION Bedingungen der JACK WOLFSKIN 3-Jahres-Gewährleistung Terms and
NFC EXPRESS Benutzerhandbuch
 NFC EXPRESS Benutzerhandbuch G8557/Erste Ausgabe Oktober 2013 Copyright (c) ASUSTeK Computer Inc Alle Rechte vorbehalten Inhaltsverzeichnis 1 NFC EXPRESS starten... 3 1.2 NFC EXPRESS-Bildschirm... 4 2
Einkommensaufbau mit FFI:
 For English Explanation, go to page 4. Einkommensaufbau mit FFI: 1) Binäre Cycle: Eine Position ist wie ein Business-Center. Ihr Business-Center hat zwei Teams. Jedes mal, wenn eines der Teams 300 Punkte
Listening Comprehension: Talking about language learning
 Talking about language learning Two Swiss teenagers, Ralf and Bettina, are both studying English at a language school in Bristo and are talking about language learning. Remember that Swiss German is quite
Technical Support Information No. 123 Revision 2 June 2008
 I IA Sensors and Communication - Process Analytics - Karlsruhe, Germany Page 6 of 10 Out Baking Of The MicroSAM Analytical Modules Preparatory Works The pre-adjustments and the following operations are
C R 2025 C LOSE PUSH OPEN
 3V C R 2025 C LOSE PUSH OPEN ) ) ) 25 222 3V C R 2025 C LOSE PUSH OPEN 25 222 3V C R 2025 C LOSE PUSH OPEN 25 222 Den här symbolen på produkten eller i instruktionerna betyder att den elektriska
USB 2.0 PRINTSERVER. Installationsanleitung DN-13006-1
 USB 2.0 PRINTSERVER Installationsanleitung DN-13006-1 Bevor Sie beginnen, müssen Sie die folgenden Punkte vorbereiten: Ein Windows-basierter PC mit Printserver Installations-CD Ein Drucker Ein Druckerkabel
Streamserver24.com. Anleitung Auto-DJ
 Streamserver24.com Anleitung Auto-DJ Zu jedem Streaming-Account von Streamserver24.com ist die Nutzung des Auto-DJ kostenfrei inclusive. Die Auto-DJ-Funktion ermöglicht es Ihnen, Ihren Stream auch bei
Laden Sie unter gopro.com/support das Benutzerhandbuch herunter QUICK START GUIDE
 Laden Sie unter gopro.com/support das Benutzerhandbuch herunter QUICK START GUIDE / Hallo Wenn Sie Ihre GoPro als Teil Ihres aktiven Lebensstils verwenden, denken Sie immer an Ihre Umgebung, um zu verhindern,
Analogtechnik 2, Semestertest Technique analogique 2, Test de semestre
 Analogtechnik 2, Semestertest Technique analogique 2, Dr. Theo Kluter 05. 06. 2011 Name/Nom : Vorname/Prénom : Klasse/Classe : Aufgabe/ Punkte maximal/ Punkte erreicht/ Problème : Points maximaux : Points
Technische Daten. Sicherheitshinweise. Lieferumfang. Anschluss. Bedienung
 Sehr geehrter Kunde, Wir gratulieren Ihnen zum Erwerb Ihres Gerätes. Lesen Sie die folgenden Anschluss- und Anwendungshinweise sorgfältig durch und befolgen Sie diese, um möglichen technischen Schäden
Einfach noch mehr rausholen. Bedienungsanleitung Medien BETA
 Einfach noch mehr rausholen. Bedienungsanleitung Medien BETA MEDIEN BETA- Version Durch MEDIEN BETA können Sie mit Entertain Ihre Bild- und Musikdateien von Ihrem PC oder Laptop auf dem Fernseher anschauen
Multiple-USB-MIDI-Bridge-Overpass
 D I G I T A L K E Y B O A R D S Multiple-USB-MIDI-Bridge-Overpass Installation- Anleitung Deutsch Einleitung Mumbo ist ein auf Microsoft Windows 2000/XP bassierendes Programm,und stellt dieverbindung
Hama GmbH & Co KG D Monheim/Germany
 Hama GmbH & Co KG D-86651 Monheim/Germany www.hama.com All listed brands are trademarks of the corresponding companies. Errors and omissions excepted, and subject to technical changes. Our general terms
ZyWALL VPN DynDNS-SoftRemoteLT
 192.168.1.1 LAN: 192.168.1.0/24 Internet SoftRemoteLT-VPN-Software ZyWALL Dynamic IP Adresse DynDNS: zywall.dyndns.org Account bei Dyndns Server herstellen: https://www.dyndns.org/account/create.html Inscrivez-vous
Launchpad Mini. Überblick. Vielen Dank, dass Sie sich für unseren kompaktesten Launchpad Grid-Controller entschieden haben.
 Kurzanleitung Überblick Launchpad Mini Vielen Dank, dass Sie sich für unseren kompaktesten Launchpad Grid-Controller entschieden haben. Er mag zwar äußerlich klein wirken, aber über seine 64 Pads können
Einfach A1. Anleitung A1 TV aufnehmen. A1.net. Bitte beachten Sie: Aufnahmen sind nur mit dem A1 Mediabox Recorder möglich.
 Anleitung A1 TV aufnehmen A1.net Einfach A1. Bitte beachten Sie: Aufnahmen sind nur mit dem A1 Mediabox Recorder möglich. Stand: November 2012 Der A1 Mediabox Recorder bietet Ihnen mehr Möglichkeiten.
Hama GmbH & Co KG Postfach Monheim/Germany Tel. +49 (0)9091/502-0 Fax +49 (0)9091/
9091/502-0 Fax +49 (0)9091/") www.hama.de Hama GmbH & Co KG Postfach 80 86651 Monheim/Germany Tel. +49 (0)9091/502-0 Fax +49 (0)9091/502-274 hama@hama.de www.hama.de 00062248-05.05 Multimedia Kit für/for Audi Naviplus/ VW/Seat/Skoda
www.hama.de Hama GmbH & Co KG Postfach 80 86651 Monheim/Germany Tel. +49 (0)9091/502-0 Fax +49 (0)9091/502-274 hama@hama.de www.hama.de 00062248-05.05 Multimedia Kit für/for Audi Naviplus/ VW/Seat/Skoda
Drahtlosnetzwerke automatisch konfigurieren mit WCN (Windows Connect Now) unter Windows Vista
 unter Windows Vista") Drahtlosnetzwerke automatisch konfigurieren mit WCN (Windows Connect Now) unter Windows Vista Windows Connect Now (WCN) erlaubt eine einfache Einrichtung eines WLAN Netzwerkes wenn der Router oder Access
Drahtlosnetzwerke automatisch konfigurieren mit WCN (Windows Connect Now) unter Windows Vista Windows Connect Now (WCN) erlaubt eine einfache Einrichtung eines WLAN Netzwerkes wenn der Router oder Access
Anleitung zur Schnellinstallation TFM-560X YO.13
 Anleitung zur Schnellinstallation TFM-560X YO.13 Table of Contents Deutsch 1 1. Bevor Sie anfangen 1 2. Installation 2 Troubleshooting 6 Version 06.08.2011 1. Bevor Sie anfangen Packungsinhalt ŸTFM-560X
%"$!)'!#'%+!"%*)!-%*"")&&*!)"&&*!"%*")&")&&!*%&&!')')!1
'!#'%+!%*)!-%*)&&*!)&&*!%*)&)&&!*%&&!')')!1") %"$!)'!#'%+!"%*)!-%*"")&&*!)"&&*!"%*")&")&&!*%&&!')')!1 MAT-50282-003 2012 Research In Motion Limited. Alle Rechte vorbehalten. BlackBerry, RIM, Research In Motion und die zugehörigen Marken, Namen und
%"$!)'!#'%+!"%*)!-%*"")&&*!)"&&*!"%*")&")&&!*%&&!')')!1 MAT-50282-003 2012 Research In Motion Limited. Alle Rechte vorbehalten. BlackBerry, RIM, Research In Motion und die zugehörigen Marken, Namen und