Z31130 RADIO-CONTROLLED WEATHER STATION RADIO-OHJATTU SÄÄASEMA RADIOSTYRD VÄDERSTATION RADIOSTYRET VEJRSTATION FUNK-WETTERSTATION
|
|
|
- Theresa Kopp
- vor 8 Jahren
- Abrufe
Transkript
1 RADIO-CONTROLLED WEATHER STATION Operation and Safety Notes RADIO-OHJATTU SÄÄASEMA Käyttö- ja turvallisuusohjeet RADIOSTYRD VÄDERSTATION Bruksanvisning och säkerhetsanvisningar RADIOSTYRET VEJRSTATION Brugs- og sikkerhedsanvisninger FUNK-WETTERSTATION Bedienungs- und Sicherheitshinweise Z31130

2 GB / IE Operation and Safety Notes Page 7 FI Käyttö- ja turvaohjeet Sivu 48 SE Bruksanvisning och säkerhetsanvisningar Sidan 88 DK Brugs- og sikkerhedsanvisninger Side 127 DE / AT / CH Bedienungs- und Sicherheitshinweise Seite 167

3 A

4 B
5 C

6 D

7 Table of contents Intended use...page 9 Parts description...page 9 Technical data...page 11 Included items...page 12 Safety General Safety Information...Page 13 Safety Instructions for Batteries...Page 14 Before use Setting up the devices...page 15 Preparing to use the outdoor sensor...page 16 Preparing the weather station for use...page 17 Operation Receiving the DCF radio time signal...page 19 Setting the 12 / 24 hour mode / C / F / time zone / time / date / language manually...page 21 Setting the alarm time...page 22 Activating / deactivating the alarm function...page 23 Switching off the alarm signal...page 24 GB/IE 7

8 Table of contents SNOOZE function...page 24 Preparing to use the weather forecasting function...page 24 Selecting the location...page 26 Selecting the location manually...page 27 Lunar phases...page 38 Reading the barometric pressure for the last 12 hours...page 39 Setting the channel...page 39 Displaying temperature and temperature trend...page 40 Displaying the humidity and humidity trend...page 40 Displaying the maximum / minimum temperature / humidity...page 41 Temperature and frost alarm...page 42 Activating / deactivating the the temperature and frost alarm...page 42 Background lighting...page 43 Battery state display...page 43 Changing the batteries...page 43 Troubleshooting...Page 44 Cleaning and care...page 45 Disposal...Page 45 Information Declaration of Conformity...Page 46 8 GB/IE

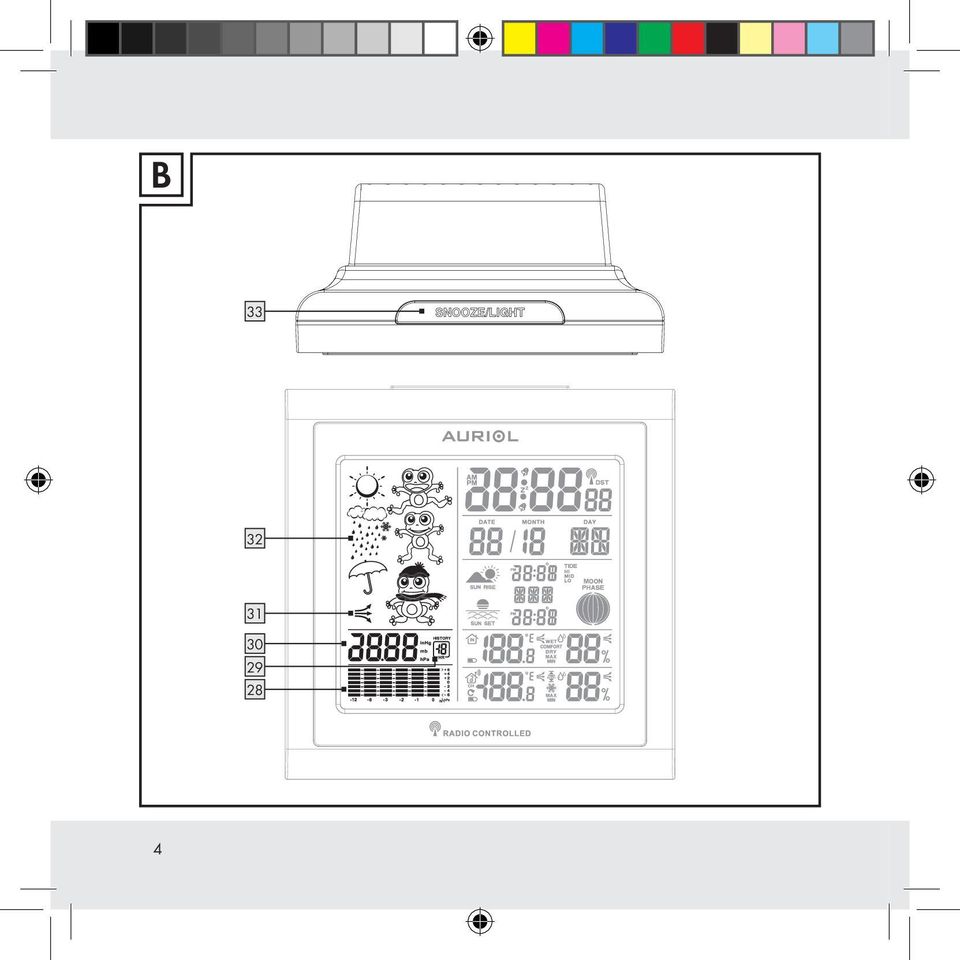
9 Radio-controlled weather station Intended use / Parts description Intended use The weather station displays the indoor and outdoor temperatures in Celsius ( C) or Fahrenheit ( F) and their maximum and minimum values. It also displays the indoor and outdoor humidity (% RH) as well as their maximum and minimum values. Additional display values of weather station include the weather forecast, the time in 12 / 24-hour clock modes and the date. The weather station displays the sunrise and sunset times for that day and the lunar phase as well. In addition, the weather station has two different alarm functions. The device is not intended for commercial use. Parts description Weather station: 1 Date display 2 Month display 3 Alarm 1 4 SNOOZE display 5 Radio tower symbol 6 DST display (summer time) 7 Time display GB/IE 9

10 Parts description 8 Alarm 2 9 Day of week display 10 Sunrise / time of sunrise 11 Tide display 12 Location 13 Lunar phase 14 Sundown / time of sundown 15 Temperature trend (indoor) 16 Humidity trend (indoor) 17 Humidity (indoor) 18 Comfort indicator (maximum / minimum) 19 Inside temperature ( C / F) 20 Battery state display 21 Humidity trend (outdoor) 22 Humidity (outdoor) 23 Temperature and frost alarm (maximum / minimum) 24 Temperature trend (outdoor) 25 Outdoor temperature ( C / F) 26 Battery state display (outdoor sensor) 27 Selected channel 28 Barometric pressure bar display 29 Barometric pressure display of the last hour 30 Absolute / relative barometric pressure 31 Barometric pressure trend 10 GB/IE
 27 Selected channel 28 Barometric pressure bar display 29 Barometric pressure display of the last hour 30 Absolute / relative barometric pressure 31 Barometric")
11 Parts description / Technical data 32 Weather forecast 33 SNOOZE / LIGHT button 34 MODE button 35 + button 36 button 37 Channel button (CH) 38 HISTORY button 39 CITY button 40 Battery compartment Outdoor sensor: 41 Control LED 42 Mount 43 RESET button 44 Channel selector switch 45 Battery compartment Technical data Weather station: Temperature measurement range: 0 to +50 C +32 to +122 F Temperature resolution: 0.1 C GB/IE 11

12 Technical data / Included items Humidity measurement range: 20 % 95% Humidity resolution: 1 % Radio signal: DCF Batteries: 3 x AA, 1.5 V Dimensions: 130 x 130 x 60 mm (B x H x D) Outdoor sensor: Temperature measurement range: 20 to +65 C 4 to +149 F HF transmission signal: 433 MHz HF transmission range: max. 25 metres over open ground Batteries: 2 x AA, 1.5 V Dimensions: 46 x 105 x 28 mm Included items Immediately after unpacking, check that the delivery is complete and that the product and all its parts are in perfect condition. 1 Weather station 1 Outdoor sensor 3 Batteries AA, 1.5 V 12 GB/IE

13 Included items / Safety 2 Batteries AA, 1.5 V 1 Operating instructions Safety Please read all safety information and instructions. Failure to comply with the safety information and instructions may result in an electric shock, fire and / or severe injuries. KEEP ALL THE SAFETY ADVICE AND INSTRUCTIONS IN A SAFE PLACE FOR FUTURE REFERENCE! General Safety Information DANGER OF LOSS OF LIFE OR ACCIDENT TO INFANTS AND CHILDREN! Never allow children to play unsupervised with the packaging material. The packaging material represents a danger of suffocation. Children frequently underestimate the dangers. Children should be kept away from the product at all times. DANGER TO LIFE! Batteries can be swallowed, which may represent a danger to life. If a battery has been swallowed, medical help is required immediately. Children or other individuals who do not know or have no experience of handling this device, or whose physical, sensory or mental abilities are restricted, must GB/IE 13

14 Safety not use the device without supervision or instruction by an individual responsible for their safety. Children must never be allowed to play with the device. Do not use the device if it is damaged. Damaged devices represent a danger of death! Please note that the guarantee does not cover damage caused by incorrect handling, non-compliance with the operating instructions or interference with the device by unauthorised individuals. Never take the device apart. Improper repairs may place the user in considerable danger. Repairs should only be carried out by specialist personnel. Safety Instructions for Batteries Remove the batteries from the device if they have not been used for a long period. CAUTION! DANGER OF EXPLOSION! The batteries must never be recharged! When inserting the battery, ensure the correct polarity! This is shown in the battery compartments. If necessary, clean the contacts on the batteries and on the device before inserting them. Remove spent batteries from the device immediately. There is an increased danger of leaks! Batteries must not be disposed of in the normal domestic waste! 14 GB/IE

15 Safety / Before use Every consumer is obliged to dispose of batteries properly in accordance with the regulations! Keep batteries away from children. Do not throw batteries into a fire. Never short-circuit them or take them apart. Always replace all the batteries at the same time. Use only batteries of the same type. If the batteries in your device have leaked, remove them immediately to prevent damage to the device! Avoid contact with the skin, eyes and mucous membranes. In the event of contact with fluid leaking from a battery, thoroughly flush the affected area with water and / or seek the advice of a doctor! Before use Setting up the devices CAUTION! When choosing where to position the weather station, make sure that it is not exposed to direct sunlight, vibrations, dust, heat, cold or moisture. Do not place the devices close to sources of heat, e.g. radiators. Otherwise they may be damaged. Do not place the devices on valuable or sensitive surfaces unless these are appropriately protected. Otherwise they may be damaged. GB/IE 15

16 Before use Do not place the devices near sources of interference such as television sets, computers, thick walls, thermopane windows etc. Otherwise the transmission of radio waves between the devices may be impaired. Please ensure that neighbouring devices are not operated at the same frequency of 433 MHz. Such devices may cause interference to the radio connection. Do not place the devices next to or on metal plates. Otherwise the quality of radio wave transmission may be reduced. Do not install the devices in buildings made of reinforced concrete, e.g. airports, high-rise buildings, factories or cellars. Otherwise the transmission of the radio waves between the devices may be severely impaired. In open spaces do not place the devices more than 30 metres apart, as otherwise transmission of the radio waves may be interrupted. Otherwise the quality of radio wave transmission may be interrupted. Preparing to use the outdoor sensor Remove the battery compartment cover from the back of the outdoor sensor. Remove the battery safety strip. The outdoor sensor is now ready for operation and the control LED 41 lights up briefly. Note: If you use more than one outdoor sensor (max. 3), you can receive data at the weather station from all the individual outdoor sensors. Set a different channel for each of the sensors using the channel selector switch 44. Close the battery compartment cover. 16 GB/IE

17 Before use Installing the Outdoor Sensor: Note: You will need an electric drill for this step. Find an appropriate place for the outdoor sensor. Note: Please ensure that you install the outdoor sensor within a radius of 30 m from the weather station. Check that there are no obstacles between the outdoor sensor and the weather station. Otherwise there may be interference of the transmission of data. For wall mounting: Hang the outdoor sensor with the mount 42 on one screw. Preparing the weather station for use Removing the battery safety strip: Open the battery compartment 40 on the back of the weather station. Pull out the battery safety strip. Then close the battery compartment. As soon as the battery safety strip has been removed, the weather station starts to receive the radio signal. GB/IE 17

18 Before use Note: Do not move the weather station while it is receiving the signal. This may disrupt reception. Connecting the weather station with the outdoor sensor and the DCF radio signal: After removal of the battery safety strip the weather station attempts to establish a connection with the outdoor sensor. This process can take a few minutes. On successful connection with the outdoor sensor, the selected channel symbol 27 appears in the LC display with the channel of the outdoor sensor (if necessary you can change the channel of the outdoor sensor as shown in the section Setting the channel ). If the connection with the outdoor sensor is not established automatically, this can be done manually by pressing RESET button 43 of the sensor. As soon as the weather station has established a connection with the outdoor sensor it automatically begins to receive the DCF radio signal. This process takes several minutes and is indicated in the LC display by a flashing radio tower symbol 5. When the DCF radio signal is being successfully received, the radio tower symbol is shown permanently in the display. If at the time of putting the device into operation it is not possible to synchronise with the atomic clock, you can also carry out the clock adjustments manually ( Setting the 12 / 24 hour mode / C / F / time zone / time / date / language manually ). 18 GB/IE

19 Before use / Operation Radio signal (DCF): The DCF signal (time signal transmitter) consists of time pulses emitted by one of the most accurate clocks in the world close to Frankfurt / Main, Germany this varies by 1 second in a million years. In ideal conditions, your weather station can pick up this signal over a distance of up to approx. 1,500 km around Frankfurt / Main. Reception of the radio signal generally takes approx minutes. Reception can be considerably impaired by obstacles (e.g. concrete walls) or sources of interference (e.g. other electrical devices). In the event of reception problems, change the position of the weather station (e.g. to somewhere near a window). Operation Receiving the DCF radio time signal After a connection with the outdoor sensor is established or 3 minutes after the battery safety strip is removed, the weather station automatically begins to search for the DCF radio signal. The search is shown in the LC display by the radio tower symbol 5 flashing. Note: In buildings made of reinforced concrete the reception of the radio signal may be severely impaired (see Setting up the devices ). GB/IE 19
.")
20 Operation In order to correct any deviations from the exact time, the clock is automatically synchronised with the DCF radio signal every day at 1:00, 2:00 and 3:00. If the synchronisation occurs at 3:00, the weather station will not conduct any further synchronisation with the DCF radio signal on this day. If the synchronisation with the DCF signal does not succeed, the radio tower signal goes out. In this case, the weather station attempts to conduct a synchronisation with the DCF radio signal at 4:00 and 5:00. If the synchronisation at 5:00 still does not succeed, the weather station will not conduct any further synchronisation with the DCF radio signal on this day. Reception of the DCF radio signal can also be started manually on the weather station. Press the + or button 35, 36 at the same time. The weather station attempts to receive the DCF radio signal. This process takes several minutes and is indicated in the LC display by a flashing radio tower symbol. If the connection with the DCF radio signal cannot be established, the search is stopped. Note: If the clock of the weather station cannot receive the DCF radio signal due to errors, too great a distance from the transmitter or similar reasons, it is possible to set the time manually. If reception of the DCF signal is successful, the manual settings are overwritten. 20 GB/IE

21 Operation Setting the 12 / 24 hour mode / C / F / time zone / time / date / language manually The reception of DCF radio signal where the weather station has been positioned may become degraded or interrupted. If this happens you can set the device manually. Follow these steps: 1. Press and hold down the MODE button 34 for about 3 seconds. The 12 / 24 hour mode blinks in the display. Press the + or button 35, 36 to set the desired value. Note: The AM symbol in the time display 7 stands for before noon in the 12 hour mode. The PM symbol in the time display stands for after noon in 12 hour mode. 2. Confirm your setting by pressing the MODE button. The temperature indicator flashes in the display. Press the + or button to set the desired value. 3. Confirm your setting by pressing the MODE button. The time zone indicator flashes in the display. Press the + or button to set the desired value (-2 to +2). Note: The standard setting for the time zone is GMT+1. Set the weather station to correspond to your time zone. 4. Confirm your setting by pressing the MODE button. The hour value of the time display flashes. Press the + or button to set the desired value. Tip: Hold the + or button pressed down. This will speed up the process of setting the values. You can also use this fast setting option for subsequent settings. If you do not press any button for 20 seconds, the LCD automatically reverts to the standard display. GB/IE 21
22 Operation 5. Confirm your setting by pressing the MODE button. The minute indicator of the time display blinks. Press the + or button to set the desired value. 6. Confirm your setting by pressing the MODE button. The year indicator flashes in the time display. Press the + or button to set the desired value. 7. Confirm your setting by pressing the MODE button. The month indicator flashes in the date display 1. Press the + or button to set the desired value. 8. Confirm your setting by pressing the MODE button. The day indicator flashes in the date display. Press the + or button to set the desired value. 9. Confirm your setting by pressing the MODE button. The day of the week indicator 9 flashes in the date display in the selected language. Press the + or button to set the desired value. Note: You have the choice of German, English, Italian, French and Spanish and French (German is set as the standard language). 10. Confirm your setting by pressing the MODE button. Setting the alarm time 1. Press the MODE button 34 briefly in order to get to alarm mode. The currently set waking time appears in the LC display. 2. Press and hold down the MODE button for about 2 seconds. The hours display flashes. 3. Press the + or button 35, 36 to set the desired value. 22 GB/IE
23 Operation 4. Confirm your setting by pressing the MODE button. The minutes display flashes. Repeat step 3 to set the minutes. 5. Confirm your setting by pressing the MODE button. Tip: Hold the + or button pressed down. This will speed up the process of setting the values. You can also use this fast setting option for subsequent settings. If you do not press any button for 20 seconds, the LCD automatically reverts to the standard display. Note: You can set two different alarms separately. 6. Press the MODE button twice briefly if the weather station is in time display 7 mode. Press the MODE button once briefly if the weather station is in ALARM 1 mode. This brings you now to ALARM 2 mode. 7. Repeat steps 2 5 to set the value for ALARM 2. Activating / deactivating the alarm function 1. Briefly press the MODE button 34 briefly once or twice to reach ALARM 1 or ALARM 2 mode. 2. Press the + button 35. The ALARM 1 symbol 3 or ALARM 2 symbol 8 appears in the LC display. The alarm has been activated. 3. Press the button + again. The ALARM 1 or ALARM 2 symbol in the LC display goes out. The alarm has been deactivated. GB/IE 23
24 Operation Switching off the alarm signal Press any button except the SNOOZE- / LIGHT button 33 to stop the alarm signal. It is not necessary to reactivate the alarm. It switches itself automatically to the alarm time which has already been set. Note: The alarm signal sounds for approx. 2 minutes. SNOOZE function Press the SNOOZE- / LIGHT button 33 as the alarm signal sounds to get to SNOOZE mode. The alarm signal sounds again after approx. 5 minutes. Preparing to use the weather forecasting function Note: Please take the weather forecast from your local weather forecasting service into account as well as the forecast from your weather station. If there are discrepancies between the information from your device and from the local weather forecasting service, please take the advice of the latter as authoritative. The weather forecast is calculated from evaluation of fluctuations in the barometric pressure and may deviate from the actual weather conditions. 24 GB/IE
25 Operation The weather station displays the following weather symbols: + = sunny + = slightly cloudy + = cloudy + = rainy GB/IE 25
26 Operation + = rain + snow The weather symbols indicate the weather fluctuation over the next eight hours and not the current weather. The weather station can display the barometric pressure trend 31. You may see the following displays: The barometric pressure will rise. The barometric pressure will remain constant. The barometric pressure will fall. Selecting the location Press the CITY button 39. The location display 12 blinks and the longitude and latitude are displayed. 26 GB/IE
27 Operation Press the + or button 35, 36 to select your location. Press the CITY button to confirm your entry. If the abbreviation for your location does not appear in the display, you may enter a user-defined location (see Selecting the location manually ). After a brief moment, the weather station display the times for sunrise and sundown, the lunar phases and low tide (TIDE LO), mean sea level (TIDE MID) and high tide (TIDE TH). Selecting the location manually Press the CITY button 39 down for approx. 2 seconds and keep it pressed. Press the + or button 35, 36 to select the beginning letters of your location. Press the CITY button to confirm your entry. Enter the 2nd and 3rd letters in the same fashion. GMT appears in the LC display and the time zone indicator blinks. Press the + or button to set the difference from your time zone to GMT. Press the CITY button to confirm your entry. Set the longitude and latitude of your location in the same fashion. After a brief moment, the weather station display the times for sunrise and sundown, the lunar phases and low tide (TIDE LO), mean sea level (TIDE MID) and high tide (TIDE TH). GB/IE 27
28 Operation You can choose from the following countries and cities: Germany (DE) Berlin BER 53 N 13 E Bremen BRE 53 N 9 E Köln KOE 51 N 7 E Dortmund DOR 52 N 7 E Dresden DRE 51 N 14 E Düsseldorf DUS 51 N 7 E Erfurt ERF 51 N 11 E Frankfurt FRA 50 N 9 E Freiburg FRE 48 N 8 E Hamburg HAM 54 N 10 E Hannover HAN 52 N 10 E Hof HOF 50 N 12 E Kaiserslautern KAI 49 N 8 E Kassel KAS 51 N 10 E Kiel KIE 54 N 10 E Leipzig LEI 51 N 12 E 28 GB/IE
29 Operation Magdeburg MAG 52 N 12 E München MUN 48 N 12 E Nürnberg NUR 49 N 11 E Osnabrück OSN 52 N 8 E Passau PAS 49 N 13 E Regensburg REG 49 N 12 E Rostock ROS 54 N 12 E Saarbrücken SAA 49 N 7 E Stuttgart STU 49 N 9 E Ulm ULM 48 N 10 E Würzburg WUR 50 N 10 E Australia (AU) Canberra CBR 35 S 149 E Melbourne MEL 38 S 145 E Sydney SYD 34 S 151 E Austria (AT) Bregenz BRE 47 N 10 E Graz GRZ 47 N 15 E Innsbruck INN 47 N 11 E GB/IE 29
30 Operation Linz LNZ 48 N 14 E Salzburg SLZ 48 N 13 E Vienna WIE 48 N 16 E Villach VIL 47 N 14 E Wels WEL 48 N 14 E Belgium (BE) Antwerp ANT 51 N 4 E Bruges BRG 51 N 3 E Brussels BRU 51 N 4 E Libramont LIB 50 N 4 E Liege LIE 51 N 6 E Bosnia & Herzegovina (BA) Sarajevo SAR 44 N 18 E Croatia (HR) Split SPL 44 N 16 E Zagreb ZAG 46 N 16 E 30 GB/IE
31 Operation Czech (CZ) Brno BRN 49 N 17 E Prague PRG 50 N 14 E Denmark (DK) Aalborg ALB 57 N 10 E Copenhagen KOB 56 N 13 E Odense ODE 55 N 10 E Finland (FI) Helsinki HEL 60 N 25 E France (FR) Ajaccio AJA 42 N 9 E Biarritz BIA 44 N 2 E Bordeaux BOR 45 N 1 W Brest BRE 48 N 4 W Cherbourg-Octeville CHE 50 N 2 W Clermont-Ferrand CMF 46 N 3 E Dijon DIJ 47 N 5 E Lille LIL 51 N 3 E Lyon LYO 45 N 5 E GB/IE 31
32 Operation Marseille MRS 43 N 5 E Metz MET 49 N 6 E Nantes NAN 47 N 2 W Nice NIC 44 N 7 E Orleans ORL 48 N 2 E Paris PAR 49 N 2 E Perpignan PER 43 N 3 E Rouen ROU 49 N 1 E Strasbourg STR 49 N 8 E Toulouse TOU 44 N 1 E Greece (GR) Athens AHN 38 N 24 E Hungary (HU) Budapest BUD 47 N 19 E Ireland (IE) Dublin DUB 53 N 6 W Italy (IT) Ancona ANC 44 N 14 E 32 GB/IE
33 Operation Bari BAR 41 N 17 E Bolzano BOZ 47 N 11 E Cagliari CAG 39 N 9 E Florence FIR 44 N 11 E Foggia FOG 41 N 16 E Genoa GEN 44 N 9 E Lecce LEC 40 N 18 E Messina MES 38 N 16 E Milan MIL 45 N 9 E Naples NAP 41 N 14 E Palermo PAL 38 N 13 E Parma PAR 45 N 10 E Perugia PER 43 N 12 E Rome ROM 42 N 12 E San Remo SRE 44 N 8 E Triest TRI 46 N 14 E Turin TOR 45 N 8 E Venice VEN 45 N 12 E GB/IE 33
34 Operation Verona VER 45 N 11 E Liechtenstein (LI) Vaduz VDZ 47 N 10 E Luxemburg (LU) Luxembourg LUX 50 N 6 E Monaco (MC) Monte Carlo MCM 44 N 7 E Netherlands (NL) Amsterdam AMS 52 N 5 E Arnhem ARN 52 N 6 E Eindhoven EIN 50 N 5 E Groningen GRO 53 N 7 E Rotterdam ROT 52 N 4 E The Hague DHA 52 N 4 E New Zealand (NZ) Wellington WLG 41 S 175 E Norway (NO) Bergen BGN 60 N 5 E Lillehammer LIL 61 N 10 E Oslo OSL 60 N 11 E 34 GB/IE
35 Operation Poland (PL) Cracow KRA 50 N 20 E Gdansk GDA 54 N 19 E Poznan POZ 52 N 17 E Warsaw WAR 52 N 21 E Portugal (PT) Faro FAR 37 N 8 W Lisbon LIS 39 N 9 W Porto POR 41 N 9 W Russian Federation (RU) St. Petersburg PET 60 N 30 E Serbia (RS) Belgrade BEO 45 N 20 E Slovakia (SK) Bratislava BRV 48 N 17 E Kosice KOS 49 N 21 E Slovenia (SI) Ljubliana LUB 46 N 15 E Spain (ES) Alicante ALI 38 N 0 W GB/IE 35
36 Operation Andorra AND 43 N 2 E Badajoz BAD 39 N 7 W Barcelona BAR 41 N 2 E Bilbao BIL 43 N 3 W Cordoba COR 38 N 5 W Eivissa Ibiza IBZ 39 N 1 E La Coruña LCO 43 N 8 W Las Palmas LPA 28 N 15 W Leon LEO 43 N 6 W Madrid MAD 40 N 4 W Malaga MAL 37 N 4 W Palma de Mallorca PAL 40 N 3 E Salamanca SAL 41 N 6 W Sevilla SEV 37 N 6 W Valencia VAL 39 N 0 W Zaragoza ZAR 42 N 1 W Sweden (SE) Gothenburg GOT 58 N 12 E Karlstad KAR 59 N 14 E 36 GB/IE
37 Operation Stockholm STO 59 N 18 E Switzerland (CH) Basel BAS 48 N 8 E Berne BRN 47 N 7 E Chur CHU 47 N 10 E Geneva GEN 46 N 6 E Lucerne LUC 47 N 8 E Lugano LUG 46 N 9 E Sion SIO 46 N 7 E St. Gallen SGL 47 N 9 E Zurich ZUR 47 N 9 E United Kingdom (GB) Aberdeen ABD 57 N 2 W Belfast BEL 55 N 6 W Birmingham BIR 52 N 2 W Cardiff CAR 51 N 3 W Glasgow GLW 56 N 4 W London LON 51 N 0 W GB/IE 37
38 Operation Manchester MAN 53 N 2 W Newcastle NEC 55 N 2 W upon Tyne Plymouth PLY 50 N 4 W United States (US) Los Angeles LAX 34 N 118 W New York NYC 41 N 74 W Washington WAS 39 N 77 W Lunar phases The weather station has a display which automatically displays the current lunar phase 13. New moon Waxing halfmoon Half-moon Waxing full moon Full moon Waning full moon Half-moon Waning halfmoon 38 GB/IE
39 Operation Reading the barometric pressure for the last 12 hours Press the HISTORY button 38 to read the barometric pressure values for the last 12 hours. 0HR = present barometric pressure 1HR = barometric pressure an hour earlier 2HR = barometric pressure two hours earlier, etc. Press and hold down the HISTORY button for about 3 seconds to switch between displaying the barometric pressure units in inhg or mb / hpa. Setting the channel The weather station receives the outdoor sensor signal automatically after you have made all the settings. The symbol for humidity (outdoor) 22 and outdoor temperature 25 flashes during this time. Note: If you use more than one outdoor sensor (max. 3), you can receive data at the weather station from all the individual outdoor sensors. Select a different channel for each outdoor sensor by pressing the channel button 37. The relevant data is shown in the LC display. - 1: Outdoor sensor channel 1-2: Outdoor sensor channel 2-3: Outdoor sensor channel 3 - : automatic channel change GB/IE 39
40 Operation Displaying temperature and temperature trend The current indoor temperature 19 and the temperature trend (indoors) 15 are shown in the LC display. After successfully connecting with the outdoor sensor, the weather station can display the outdoor temperature 25 and the temperature trend (outdoor) 24. You may see the following displays: The temperature is rising. The temperature is remaining constant. The temperature is falling. Displaying the humidity and humidity trend The current humidity trend (indoors) 16 and the current humidity (indoors) 17 are shown in the LC display. The COMFORT indicator 18 displays the humidity in three categories. The following categories are available: DRY = Humidity < 40 % COMFORT = Humidity %, indoor temperature 20 C 28 C 40 GB/IE
41 Operation WET = Humidity > 75 % After a successful connection has been made with the outdoor sensor, the weather station shows the humidity trend (outdoors) 21 and the humidity (outdoors) 22 in the LC display. Displaying the maximum / minimum temperature / humidity The minimum / maximum temperature / humidity is measured for the first time after the batteries have been inserted and stored in the weather station. The maximum and minimum values for temperature, hygrometer and barometric pressure are automatically saved. If the weather station is in time display 7, press the + button 35 to display the maximum values. Press the + button twice to display the minimum values. Hold the + button down for approx. 3 seconds to erase the stored maximum and minimum values. GB/IE 41
42 Operation Temperature and frost alarm Press the button 36 to get top the temperature alarm mode. Hold the button down for 3 seconds. The maximum temperature display blinks. Press the + or button to set the values. Press the MODE button 34 to confirm your setting. The minimum temperature display blinks. Press the + or button to set the values. Press the MODE button to confirm your setting. Activating / deactivating the the temperature and frost alarm If more than one outdoor sensor is activated, press the channel button 37 to select one. Press the button 36 repeatedly to activate the temperature and frost alarms. If the frost alarm alarm is activated, the corresponding symbol 23 appears next to the outdoor temperature. The alarm signal sounds at 1 C to + 3 C. If the temperature alarm is activated, the corresponding symbol appears next to the outdoor temperature. The alarm signal sounds at the set values. If the temperature and frost alarm are activated, both symbols appear in the display. 42 GB/IE
43 Operation Background lighting Press the SNOOZE / LIGHT button 33. The backlight illuminates for 5 seconds. Battery state display The battery state display 20, 26 appears in the weather station s LC display if the batteries are weak. Make sure you replace the batteries at the earliest opportunity (see Changing the batteries ). Changing the batteries Weather station: Replace the batteries if the LC display becomes illegible or if the battery display 20 is shown. Remove the battery compartment cover on the back of the weather station. Remove the used batteries. Insert 3 new batteries type AA, 1.5 V. Note: Make sure that the polarity is correct when you insert the battery. The correct polarity is shown inside the battery compartment 40. Close the battery compartment. GB/IE 43
44 Operation / Troubleshooting Outdoor sensor: Replace the batteries if battery display 26 is shown. Remove the battery compartment cover from the back of the outdoor sensor. Remove the used batteries. Insert 2 new batteries type AA, 1.5 V. Note: Make sure you insert the batteries with the correct polarity. The correct polarity is shown inside the battery compartment 45. Close the battery compartment. Troubleshooting Note: This device has delicate electronic components. This means that if it is placed near an object that transmits radio signals, it could cause interference. This could be, for example, mobile telephones, walkie talkies, CB radios, remote controls and microwaves. If the display indicates a problem, move such objects away from the weather station or outdoor sensor or remove the batteries from the weather station or outdoor sensor for a short while and then replace them. 44 GB/IE
45 Cleaning and care / Disposal Cleaning and care Under no circumstances should you use liquids or detergents, as these will damage the device. Clean only the outside of the device with a soft, dry cloth. Under no circumstances should you spray the outdoor sensor, e.g. with a garden hose. The outdoor sensor is only protected against rain from above. Disposal The packaging is made entirely of recyclable materials, which you may dispose of at local recycling facilities. Contact your local refuse disposal authority for more details of how to dispose of your worn-out product. When your device has come to the end of its life, please do not throw it out with your household refuse, but in the interests of the environment take it to a suitable centre where it can be disposed of properly. Information on collection points and their opening hours can be obtained from your local authority. GB/IE 45
46 Disposal / Information Faulty or used batteries must be recycled in accordance with Directive 2006 / 66 / EC. Return the batteries and / or the device through the appropriate collection facilities. Environmental damage through incorrect disposal of the batteries! Batteries may not be disposed of with the usual domestic waste. They may contain toxic heavy metals and are subject to hazardous waste treatment rules and regulations. The chemical symbols for heavy metals are as follows: Cd = cadmium, Hg = mercury, Pb = lead. That is why you should dispose of used batteries at a local collection point. Information Declaration of Conformity We, Milomex Ltd., c / o Milomex Services, Hilltop Cottage, Barton Road, Pulloxhill, Bedfordshire, MK45 5HP, UK, hereby declare under our sole responsibility that the product: Radio weather station, Model No.: Z31130, Version: 02 / 2012, to which this declaration refers, complies with the standards / normative documents of 1999 / 5 / EC. You can download these conformance documents if required from 46 GB/IE
47 EMC GB/IE 47
48 Sisällysluettelo Määräysten mukainen käyttö... Sivu 50 Osien kuvaus... Sivu 50 Tekniset tiedot... Sivu 52 Toimituksen sisältö... Sivu 53 Turvallisuus Yleiset turvaohjeet... Sivu 54 Paristoja koskevia turvallisuusohjeita... Sivu 55 Toimenpiteet ennen käyttöönottoa Laitteen sijoitus... Sivu 56 Ulkoanturin käyttöönotto... Sivu 57 Sääaseman käyttöönotto... Sivu 58 Käyttö DCF-radiosignaalin vastaanotto... Sivu / 24-tunnin näytön / C / F / aikavyöhykkeen / kellonajan / päivämäärän / kielen asettaminen manuaalisesti... Sivu 61 Herätysajan asettaminen... Sivu 63 Herätystoiminnon kytkeminen päälle / pois päältä... Sivu 64 Hälytyssignaalin kytkeminen pois päältä... Sivu FI
49 Sisällysluettelo TORKKU-toiminto... Sivu 65 Sääennustuksen käyttöönotto... Sivu 65 Sijoituspaikan valinta... Sivu 67 Sijoituspaikan manuaalinen valinta... Sivu 67 Kuun vaiheet... Sivu 78 Viimeksi kuluneiden 12 tunnin lukeminen... Sivu 79 Kanavan säätö... Sivu 80 Lämpötilan ja lämpötilan kehityksen näyttö... Sivu 80 Ilmanpaine ja ilmanpaineen kehitys... Sivu 81 Korkeimman / alhaisimman lämpötilan / ilmankosteuden näyttö... Sivu 81 Lämpötila- ja pakkashälytys... Sivu 82 Lämpötila- ja pakkashälytyksen kytkeminen päälle / pois päältä... Sivu 83 Taustavalaistus... Sivu 83 Paristonäyttö... Sivu 84 Paristojen vaihto... Sivu 84 Virheiden korjaaminen... Sivu 85 Puhdistus ja hoito... Sivu 85 Hävittäminen... Sivu 86 Lisätietoa Vaatimustenmukaisuusvakuutus... Sivu 87 FI 49
50 Määräysten mukainen käyttö / Osien kuvaus Radio-ohjattu sääasema Määräysten mukainen käyttö Sääasema näyttää sisä- ja ulkolämpötilan Celsius ( C) tai Fahrenheit ( F) -yksiköissä sekä niiden maksimi- ja minimiarvot. Samoin sisä- ja ulkoilmankosteuden (% RH) sekä niiden maksimi- ja minimiarvot. Sääaseman muita näyttötietoja ovat sääennuste, aika 12- / 24 tunnin näyttömuodossa sekä päivämäärä. Lisäksi sääasema näyttää päivittäisen auringonnousun ja -laskun kellonajan ja kuun vaiheet. Sääasemassa on myös kaksi eri hälytystoimintoa. Laitetta ei ole tarkoitettu ammattimaiseen käyttöön. Osien kuvaus Sääasema: 1 Päiväyksen näyttö 2 Kuukauden näyttö 3 Hälytys 1 4 SNOOZE-näyttö 5 Radiomasto-symboli 6 DST-näyttö (kesäaika) 7 Ajannäyttö 8 Hälytys 2 50 FI
51 Osien kuvaus 9 Viikonpäivien näyttö 10 Auringonnousu / auringonnousun kellonaika 11 Vuorovesinäyttö 12 Sijoituspaikka 13 Kuun vaihe 14 Auringonlasku / auringonlaskun kellonaika 15 Lämpötilan kehitys (sisäilma) 16 Ilmankosteuden kehitys (sisäilma) 17 Ilmankosteus (sisäilma) 18 Comfort-indikaattori (maks. / min.) 19 Sisälämpötila ( C / F) 20 Paristojen näyttö 21 Ilmankosteuden kehitys (ulkoilma) 22 Ilmankosteuden kehitys (ulkoilma) 23 Lämpötila- ja pakkashälytys (maks. / min.) 24 Lämpötilan kehitys (ulkoilma) 25 Ulkoilman lämpötila ( C / F) 26 Paristojen näyttö (ulkoanturi) 27 Valittu kanava 28 Ilmanpaineen palkkinäyttö 29 Viimeksi kuluneen tunnin ilmanpainenäyttö 30 Absoluuttinen / suhteellinen ilmanpaine 31 Ilmanpaineen kehitys 32 Sääennuste FI 51
52 Osien kuvaus / Tekniset tiedot 33 SNOOZE- / LIGHT-painike 34 MODE-painike 35 +-painike 36 -painike 37 Kanavapainike (CH) 38 HISTORY-painike 39 CITY-painike 40 Paristolokero Ulkoanturi: 41 Kontrolli-LED 42 Ripustuslaite 43 RESET-painike 44 Kanavan valintapainike 45 Paristolokero Tekniset tiedot Sääasema: Lämpötilan mittausalue: C F Lämpötilan resoluutio: 0,1 C Ilmankosteuden mittausalue: % 52 FI
53 Tekniset tiedot / Toimituksen sisältö Ilmankosteuden resoluutio: 1 % Radiosignaali: DCF Paristo: 3 x AA, 1,5 V Mitat: 130 x 130 x 60 mm (L x K x S) Ulkoanturi: Lämpötilan mittausalue: C F HF-siirtosignaali: 433 MHz HF-kantavuusalue: maks. 25 metriä vapaassa maastossa Paristo: 2 x AA, 1,5 V Mitat: 46 x 105 x 28 mm Toimituksen sisältö Tarkista heti pakkauksen purettuasi, ettei yhtäkään osaa puutu ja että tuote ja kaikki osat ovat moitteettomassa kunnossa. 1 sääasema 1 ulkoanturi 3 paristoa AA, 1,5 V 2 paristoa AA, 1,5 V 1 käyttöohje FI 53
54 Turvallisuus Turvallisuus Lue kaikki turvallisuusohjeet ja muut ohjeet. Turvaohjeiden sekä muiden ohjeiden laiminlyönti voi aiheuttaa sähköiskun, tulipalon ja / tai vakavia loukkaantumisia. SÄILYTÄ KAIKKI TURVAOHJEET JA MUUT ASIAKIRJAT MAHDOLLISTA TULE- VAA TARVETTA VARTEN! Yleiset turvaohjeet VOI AIHEUTTAA TAPATURMAN TAI HENGENVAARALLISEN TILANTEEN PIKKULAPSILLE JA LAPSILLE! Älä koskaan jätä lapsia pakkausmateriaalien läheisyyteen ilman valvontaa. Pakkausmateriaalit voivat aiheuttaa tukehtumisvaaran. Lapset aliarvioivat usein tuotteeseen liittyvät vaarat. Pidä lapset aina loitolla tuotteesta. HENGENVAARA! Paristojen nieleminen voi johtaa hengenvaaralliseen tilanteeseen. Jos paristo tulee nieltyä, käänny välittömästi lääkärin puoleen. Lapset tai henkilöt, joilla ei ole kokemusta eikä tietoja tuotteen käsittelystä tai joiden fyysinen tai henkinen kunto tai aistit ovat rajoittuneet, saavat käyttää laitetta ainoastaan turvallisuudesta vastuuta kantavan henkilön valvonnassa tai opastuksella. Lasten ei saa antaa leikkiä laitteella. 54 FI
55 Turvallisuus Älä ota laitetta käyttöön, jos se on viallinen. Vioittuneet laitteet voivat aiheuttaa hengenvaarallisen sähköiskun! Huomaa, että takuu ei korvaa vääränlaisesta käsittelystä, käyttöohjeen tietojen noudattamatta jättämisestä tai valtuuttamattomien henkilöiden toimenpiteistä aiheutuvia vikoja. Älä koskaan pura laitetta osiin. Asiantuntemattomasti tehdyt korjaukset voivat aiheuttaa käyttäjälle huomattavia vaaratilanteita. Anna korjaukset aina ammattilaisen tehtäväksi. Paristoja koskevia turvallisuusohjeita Poista paristot laitteesta, jos niitä ei ole käytetty pitkään aikaan. VARO! RÄJÄHDYSVAARA! Älä koskaan lataa paristoja uudelleen! Kun asetat paristot paikoilleen, noudata laitteen napaisuustietoja! Napojen oikea paikka on merkitty paristokoteloihin. Puhdista paristojen ja laitteen kosketuspinnat tarvittaessa, ennen kuin asetat paristot lokeroon. Poista loppuun käytetyt paristot heti laitteesta. Ne saattavat alkaa vuotamaan! Paristoja ei saa hävittää tavallisen kotitalousjätteen mukana! Laki velvoittaa jokaista käyttäjää hävittämään paristot määräysten mukaisesti! Säilytä paristot lasten ulottumattomissa. Älä koskaan heitä niitä tuleen äläkä oikosulje tai pura niitä. Vaihda kaikki paristot aina samanaikaisesti. FI 55
56 Turvallisuus / Toimenpiteet ennen käyttöönottoa Käytä vain samantyyppisiä paristoja. Vuotavat paristot on poistettava välittömästi, jotta laitteen vaurioituminen voidaan välttää! Vältä koskettamasta ihoa, silmiä ja limakalvoja. Jos pariston happoa joutuu iholle, huuhtele kyseinen kohta runsaalla määrällä vettä ja / tai ota yhteyttä lääkäriin! Toimenpiteet ennen käyttöönottoa Laitteen sijoitus VARO! Varmista laitteiden sijoituspaikkaa valitessasi, että laitteet eivät altistu suoralle auringonsäteilylle, tärinälle, pölylle, kuumuudelle, kylmyydelle ja kosteudelle. Älä sijoita laitteita lämpölähteiden (esim. lämpöpatteri) läheisyyteen. Laitteet voivat vioittua. Älä aseta laitteita arvokkaille tai aroille pinnoille suojaamatta pintaa tarkoitukseen sopivalla suojuksella. Pinta voi muuten vioittua. Älä sijoita laitteita mahdollisten häiriölähteiden (televisio, tietokone, paksut seinämät, Thermopen-ikkunat jne.) lähelle. Laitteiden välinen radiosignaali voi heikentyä. Varmista, että läheisyydessä ei ole laitteita, joita käytetään samalla 433 MHz:n taajuudella. Nämä laitteet voivat aiheuttaa häiriöitä radioyhteyteen. 56 FI
57 Toimenpiteet ennen käyttöönottoa Älä sijoita laitteita metallilevyjen viereen tai niiden päälle. Laitteiden välinen radiosignaali voi heikentyä. Älä sijoita laitteita teräsbetonisiin rakennuksiin (näitä ovat esim. lentoasemat, kerrostalot, tehtaat tai kellarit). Laitteiden välinen radiosignaali voi heikentyä huomattavasti. Älä sijoita laitteita avoimessa maastossa 30 metriä kauemmaksi toisistaan. Laitteiden välinen radiosignaali voi keskeytyä. Ulkoanturin käyttöönotto Avaa paristokotelon kansi ulkoanturin takapuolelta. Poista pariston turvanauha. Ulkoanturi on nyt valmis käytettäväksi ja LED-merkkivalo 41 syttyy hetkeksi päälle. Ohje: Jos käytät useampaa kuin yhtä ulkoanturia (korkeintaan 3), voit vastaanottaa yksittäisten ulkoanturien tiedot sääaseman avulla. Aseta kanavan valintakytkimen avulla 44 jokaiselle ulkoanturille eri kanava. Sulje paristokotelon kansi. Ulkoanturin asentaminen: Huomautus: Tähän työvaiheeseen tarvitset porakoneen. Etsi ulkoanturille sopiva paikka. FI 57
58 Toimenpiteet ennen käyttöönottoa Ohje: Älä unohda, että ulkoanturin saa asentaa enintään 30 m etäisyydelle sääasemasta. Varmista, että ulkoanturin ja sääaseman välissä ei ole häiritseviä esteitä. Tietojen siirto voi muuten häiriintyä. Seinäasennus: Ripusta ulkoanturi ripustimella 42 ruuvin varaan. Sääaseman käyttöönotto Pariston turvaliuskan poistaminen: Avaa sääaseman takapuolella oleva paristokotelo 40. Vedä pariston turvaliuska irti. Sulje tämän jälkeen paristotila uudelleen. Sääasema käynnistää radiosignaalin vastaanoton heti, kun pariston turvaliuska on irrotettu. Ohje: Älä vaihda sääaseman paikkaa tietojen vastaanoton aikana. Se voi aiheuttaa häiriöitä vastaanotossa. Sääaseman yhdistäminen ulkoanturiin ja DCF-signaaliin: Sääasema yrittää saada aikaa yhteyden ulkoanturiin, kun pariston turvaliuska on irrotettu. Tämä voi kestää muutaman minuutin. Kun yhteys ulkoanturiin on saatu, 58 FI
59 Toimenpiteet ennen käyttöönottoa LC-näytöllä näytetään valittu kanavan symboli 27 ulkoanturin kanavan kanssa (vaihda tarvittaessa ulkoanturin kanava kappaleessa Kanavan säätö kuvatulla tavalla). Ellei automaattista yhteyttä saada aikaan, paina RESET-painiketta 43 yhteyden aikaansaamiseksi manuaalisesti. Sääasema aloittaa DCF-radiosignaalin vastaanoton automaattisesti, kun se on saanut luotua yhteyden ulkoanturiin. Yhteyden luominen kestää muutaman minuutin ja sen aikana radiomaston valo 5 vilkkuu. Kun DCF-radiosignaalin vastaanotto on onnistunut, radiomaston symboli jää LCnäytölle pysyvästi. Jos synkronisointi atomikellon kanssa ei ole mahdollista käyttöönoton ajankohtana, voi kellon säätää myös manuaalisesti (katso 12- / 24-tunnin näytön / C / F / aikavyöhykkeen / kellonajan / päivämäärän / kielen asettaminen manuaalisesti ). Radiosignaali (DCF): DCF-signaali (aikasignaalilähetin) koostuu aikaimpulsseista, jotka tulevat yhdestä maailman tarkimmista kelloista Saksasta Frankfurt am Mainin läheltä sen poikkeama on 1 sekunti 1 miljoonan vuoden aikana. Sääasemasi vastaanottaa nämä signaalit optimaalisissa olosuhteissa jopa noin km etäisyydeltä Frankfurt am Mainista. Radiosignaalin vastaanotto kestää normaalisti noin 3 10 minuuttia. FI 59
60 Toimenpiteet ennen käyttöönottoa / Käyttö Esteet (esim. betoniseinät) tai häiriölähteet (esim. muut sähkölaitteet) voivat heikentää signaalin vastaanottamista huomattavasti. Vaihda tarvittaessa sääaseman sijoituspaikka (esim. ikkunan lähelle), jos vastaanotossa on ongelmia. Käyttö DCF-radiosignaalin vastaanotto Kun yhteys ulkolämpötila-anturiin on saatu luotua tai pariston turvaliuskan poistamisesta on kulunut 3 minuuttia, sääasema aloittaa automaattisesti DCF-radiosignaalin hakemisen. Radiomaston symbolin 5 vilkkuminen ilmoittaa haun olevan käynnissä. Huom: Teräsbetonirakennuksissa radiosignaalin vastaanottaminen voi olla vaikeaa (katso Laitteen sijoitus ). Jotta poikkeamat tarkasta ajasta voidaan korjata, kello suorittaa päivittäin automaattisesti klo 1:00, 2:00 ja 3:00 synkronisoinnin DCF-signaalilla. Jos synkronisointi tapahtuu kello 03:00, ei sääasema suorita samana päivänä enää synkronisointia DCF-radiosignaalin kanssa. Jos synkronointi DCF-radiosignaalilla epäonnistuu, radiomaston symboli sammuu. Sääasema yrittää synkronointia DCF-radiomaston kanssa uudelleen klo 04:00 ja 05:00. Jos synkronisointi ei onnistu edes kello 05:00, ei sääasema suorita samana päivänä enää synkronisointia DCF-radiosignaalin kanssa. DCF-radiosignaalin vastaanotto voidaan käynnistää sääasemalta myös manuaalisesti. 60 FI
61 Käyttö Paina samanaikaisesti painikkeita + tai 35, 36. Sääasema yrittää vastaanottaa DCF-radiosignaalin. Yhteyden luominen kestää muutaman minuutin ja radiomaston symboli vilkkuu yhteyden etsimisen ajan LC-näytöllä. Jos yhteys DCF-radiosignaaliin ei onnistu, haku keskeytyy. Ohje: Voit säätää ajan myös manuaalisesti, jos sääasema ei saa vastaanotettua DCF-radiosignaalia vikojen, liian suuren lähetinetäisyyden tms. vuoksi. Heti kun DCF-radiosignaalin vastaanotto onnistuu, manuaalisesti asetetut arvot korvataan uusilla. 12- / 24-tunnin näytön / C / F / aikavyöhykkeen / kellonajan / päivämäärän / kielen asettaminen manuaalisesti Sääaseman sijoituspaikalla voi esiintyä häiriöitä tai katkoksia DCF-radiosignaalin vastaanoton yhteydessä. Tässä tapauksessa laitteen asetukset voidaan tehdä manuaalisesti. Menettele seuraavasti: 1. Paina MODE-painiketta 34 ja pidä sitä n. 3 sekunnin ajan alhaalla. 12- / 24-tunnin näyttö vilkkuu näytöllä. Paina painiketta + tai 35, 36 toivotun arvon asettamista varten. FI 61
62 Käyttö Ohje: Ajan näytöllä 7 näkyvä AM-symboli tarkoittaa 12-tunnin näyttömuotoa ja aamupäivää. Ajan näytöllä näkyvä PM-symboli tarkoittaa 12-tunnin näyttömuotoa ja iltapäivää. 2. Vahvista valintasi painamalla MODE-painiketta. Lämpötilanäyttö vilkkuu kuvaruudussa. Paina + tai -painiketta, toivotun arvon asettamista varten. 3. Vahvista valintasi painamalla MODE-painiketta. Kuvaruudussa vilkkuu aikavyöhykkeen näyttö. Paina + tai -painiketta, toivotun arvon ( ) asettamista varten. Ohje: Aikavyöhykkeen vakioasetus on GMT+1. Aseta sääasema oman aikavyöhykkeesi mukaan. 4. Vahvista valintasi painamalla MODE-painiketta. Aikanäytöllä vilkkuu nyt tuntien näyttö. Paina painiketta + tai toivotun arvon asettamista varten. Ohje: Pidä painiketta + tai alhaalla. Tämä nopeuttaa arvojen asettamista. Tätä pika-asetusta voit käyttää hyväksesi myös seuraavissa asetuksissa. Ellet 20 sekuntiin paina yhtäkään painiketta, LC-näyttö palaa automaattisesti takaisin vakionäyttöön. 5. Vahvista valintasi painamalla MODE-painiketta. Aikanäytöllä vilkkuu minuuttinäyttö. Paina painiketta + tai toivotun arvon asettamista varten. 6. Vahvista valintasi painamalla MODE-painiketta. Aikanäytöllä vilkkuu vuosinäyttö. Paina painiketta + tai toivotun arvon asettamista varten. 7. Vahvista valintasi painamalla MODE-painiketta. Päivämääränäytön kuukausinäyttö 1 vilkkuu. Paina painiketta + tai toivotun arvon asettamista varten. 8. Vahvista valintasi painamalla MODE-painiketta. Päivämääränäytön päivänäyttö vilkkuu. Paina painiketta + tai toivotun arvon asettamista varten. 62 FI
63 Käyttö 9. Vahvista valintasi painamalla MODE-painiketta. Viikonpäivänäyttö 9 vilkkuu päivämääränäytöllä valitsemallasi kielellä. Paina + tai -painiketta, toivotun arvon asettamista varten. Ohje: Valittavat ovat kielet saksa, englanti, italia, ranska ja espanja (saksa on säädetty vakiokieleksi). 10. Vahvista valintasi painamalla MODE-painiketta. Herätysajan asettaminen 1. Paina lyhyesti MODE-painiketta 34 päästäksesi hälytystilaan. LC-näytölle ilmestyy asettamasi herätysaika. 2. Paina MODE-painiketta ja pidä sitä alhaalla noin 2 sekunnin ajan. Tuntinäyttö vilkkuu. 3. Paina painiketta + tai 35, 36 toivotun arvon säätämistä varten. 4. Vahvista valintasi painamalla MODE-painiketta. Minuuttinäyttö vilkkuu. Toista toiminto 3 asettaaksesi minuutit. 5. Vahvista syöttö painamalla MODE-painiketta. Ohje: Pidä painiketta + tai alhaalla. Tämä nopeuttaa arvojen asettamista. Tätä pika-asetusta voit käyttää hyväksesi myös seuraavissa asetuksissa. Ellet 20 sekuntiin paina yhtäkään painiketta, LC-näyttö palaa automaattisesti takaisin vakionäyttöön. Ohje: Laitteessa on mahdollisuus säätää kaksi erilaista yksilöllistä herätystä. FI 63
64 Käyttö 6. Paina kahdesti lyhyesti MODE-painiketta, kun sääasema on ajannäytössä 7. Paina MODE-painiketta kerran lyhyesti, kun sääasema on tilassa HÄLYTYS 1. Siirryt nyt tilaan HÄLYTYS Toista vaiheet 2-5 asettaaksesi arvon hälytykselle 2. Herätystoiminnon kytkeminen päälle / pois päältä 1. Paina lyhyesti kerran tai kaksi MODE-painiketta 34 päästäksesi tiloihin HÄLY- TYS 1 tai HÄLYTYS Paina painiketta Hälytyksen 1 symboli 3 tai hälytyksen 2 symboli 8 ilmestyy LC-näytölle. Hälytys on aktivoitu. 3. Paina painiketta + uudelleen. Hälytyksen 1 symboli tai hälytyksen 2 symboli häviää LC-näytöltä. Hälytys on pois päältä. Hälytyssignaalin kytkeminen pois päältä Paina haluamaasi painiketta lukuunottamatta painiketta SNOOZE- / LIGHT 33 hälytysäänen lopettamiseksi. Hälytystä ei tarvitse aktivoida uudelleen. Se kytkeytyy automaattisesti päälle valmiiksi säädettynä hälytysaikana. Ohje: Hälytyssignaali hälyttää noin 2 minuutin ajan. 64 FI
65 Käyttö TORKKU-toiminto Paina hälytysäänen soidessa painiketta SNOOZE- / LIGHT 33 niin pääset TORKKU-tilaan. Hälytyssignaali hälyttää uudelleen noin 5 minuutin kuluttua. Sääennustuksen käyttöönotto Ohje: Huomioi lisäksi paikallisen säähavaintoaseman sääennuste. Mikäli laitteen ja paikallisen sääpalvelusi tiedot poikkeavat toisistaan, noudata sääpalvelun tiedotuksia. Sääennustus lasketaan ilmanpaineiden vaihtelujen perusteella ja se voi sen vuoksi poiketa todellisesta säästä. Sääasema näyttää seuraavat sääsymbolit: + = aurinkoista + = melkein selkeää FI 65
66 Käyttö + = pilvistä + = sateista + = sadetta + lunta Sään symbolit näyttävät sään liikkeet viimeisten kahdeksan tunnin aikana, ei siis ajankohtaista säätä. Sääasema voi näyttää ilmanpaineen kehityksen 31. Seuraavat näytöt ovat mahdollisia: Ilmanpaine nousee. 66 FI
67 Käyttö Ilmanpaine pysyy vakaana. Ilmanpaine laskee. Sijoituspaikan valinta Paina CITY-painiketta 39. Sijoituspaikan näyttö 12 vilkkuu ja pituus- ja leveysasteet näkyvät näytöllä. Paina painiketta + tai 35, 36 sijoituspaikan valitsemista varten. Vahvista valintasi CITY-painiketta painamalla. Jos näytölle ei ilmesty sijoituspaikan lyhennettä, voit ilmoittaa sijoituspaikan käyttäjän mukaan määriteltynä (katso kohta Sijoituspaikan manuaalinen valinta ). Hetken päästä sääasemalla näkyy auringon nousu- ja laskuajat, kuun vaiheet sekä laskuvesi (TIDE LO), veden keskivertokorkeus (TIDE MID) ja nousuvesi (TIDE TH). Sijoituspaikan manuaalinen valinta Paina CITY-painiketta 39 ja pidä sitä noin 2 sekunnin ajan alhaalla. Paina painiketta + tai 35, 36 sijoituspaikkasi alkukirjainten valitsemista varten. Vahvista valintasi painamalla CITY-painiketta. Syötä 2. ja 3. kirjain samalla tavalla. FI 67
Word-CRM-Upload-Button. User manual
 Word-CRM-Upload-Button User manual Word-CRM-Upload for MS CRM 2011 Content 1. Preface... 3 2. Installation... 4 2.1. Requirements... 4 2.1.1. Clients... 4 2.2. Installation guidelines... 5 2.2.1. Client...
VIDEO CALL CAMERA G-VCAM-01
 VIDEO CALL CAMERA G-VCAM-01 EN AUS GUTEM GRUND ENGLISH 07-10 2 SAFETY AND INFORMATION Safety 7 This camera is designed to transmit video and audio signals. All other uses are expressly prohibited. 7 Protect
Hazards and measures against hazards by implementation of safe pneumatic circuits
 Application of EN ISO 13849-1 in electro-pneumatic control systems Hazards and measures against hazards by implementation of safe pneumatic circuits These examples of switching circuits are offered free
Electrical testing of Bosch common rail piezo injectors
 Applies to generation CRI 3: Bosch 10-position order number 0 445 115 = CRI 3-16 (CRI 3.0) 1600 bar 0 445 116 = CRI 3-18 (CRI 3.2) 1800 bar 0 445 117 = CRI 3-20 (CRI 3.3) 2000 bar Tools required: Hybrid
VGM. VGM information. HAMBURG SÜD VGM WEB PORTAL - USER GUIDE June 2016
 Overview The Hamburg Süd VGM-Portal is an application which enables to submit VGM information directly to Hamburg Süd via our e-portal web page. You can choose to insert VGM information directly, or download
VGM. VGM information. HAMBURG SÜD VGM WEB PORTAL USER GUIDE June 2016
 Overview The Hamburg Süd VGM Web portal is an application that enables you to submit VGM information directly to Hamburg Süd via our e-portal Web page. You can choose to enter VGM information directly,
Electrical tests on Bosch unit injectors
 Valid for Bosch unit injectors with order numbers 0 414 700 / 0 414 701 / 0 414 702 Parts Kit Magnet*: - F00H.N37.925 - F00H.N37.933 - F00H.N37.934 * For allocation to the 10-place Bosch order number,
mobilcom-debitel SmartHome Schnell-Start-Anleitung Quick Start Guide
 mobilcom-debitel SmartHome Schnell-Start-Anleitung Quick Start Guide 1. Cube anschließen 1. Connect Cube n Schließen Sie den Cube an die Stromversorgung an. n Legen Sie die Batterien polungsrichtig in
B/S/H/ Startfolie. B/S/H Bosch und Siemens Hausgeräte GmbH - KDT-T B/S/H Bosch und Siemens Hausgeräte GmbH KDT-T
 Startfolie B/S/H/ 1 Product division Event Location Refrigeration Side by Side USA B/S/H Bosch und Siemens Hausgeräte GmbH KDT-T 2 Side-by-Side Appliances Models: Bosch Siemens KAN 56V** KAN58A** KA58NA**with
Tube Analyzer LogViewer 2.3
 Tube Analyzer LogViewer 2.3 User Manual Stand: 25.9.2015 Seite 1 von 11 Name Company Date Designed by WKS 28.02.2013 1 st Checker 2 nd Checker Version history Version Author Changes Date 1.0 Created 19.06.2015
NEWSLETTER. FileDirector Version 2.5 Novelties. Filing system designer. Filing system in WinClient
 Filing system designer FileDirector Version 2.5 Novelties FileDirector offers an easy way to design the filing system in WinClient. The filing system provides an Explorer-like structure in WinClient. The
Die Bedeutung neurowissenschaftlicher Erkenntnisse für die Werbung (German Edition)
") Die Bedeutung neurowissenschaftlicher Erkenntnisse für die Werbung (German Edition) Lisa Johann Click here if your download doesn"t start automatically Download and Read Free Online Die Bedeutung neurowissenschaftlicher
Die Bedeutung neurowissenschaftlicher Erkenntnisse für die Werbung (German Edition) Lisa Johann Click here if your download doesn"t start automatically Download and Read Free Online Die Bedeutung neurowissenschaftlicher
iid software tools QuickStartGuide iid USB base driver installation
 iid software tools QuickStartGuide iid software tools USB base driver installation microsensys Nov 2016 Introduction / Einleitung This document describes in short form installation of the microsensys USB
Electrical testing of Bosch common rail Injectors
 Electrical testing of Bosch common rail Injectors Contents: 1. Adapter cable for Hybridtester FSA 050 (article number 0 684 010 050 / 1 687 023 571) 2. Electrical testing of Bosch common rail solenoid
PONS DIE DREI??? FRAGEZEICHEN, ARCTIC ADVENTURE: ENGLISCH LERNEN MIT JUSTUS, PETER UND BOB
 Read Online and Download Ebook PONS DIE DREI??? FRAGEZEICHEN, ARCTIC ADVENTURE: ENGLISCH LERNEN MIT JUSTUS, PETER UND BOB DOWNLOAD EBOOK : PONS DIE DREI??? FRAGEZEICHEN, ARCTIC ADVENTURE: Click link bellow
Registration of residence at Citizens Office (Bürgerbüro)
") Registration of residence at Citizens Office (Bürgerbüro) Opening times in the Citizens Office (Bürgerbüro): Monday to Friday 08.30 am 12.30 pm Thursday 14.00 pm 17.00 pm or by appointment via the Citizens
Registration of residence at Citizens Office (Bürgerbüro) Opening times in the Citizens Office (Bürgerbüro): Monday to Friday 08.30 am 12.30 pm Thursday 14.00 pm 17.00 pm or by appointment via the Citizens
Monitor VIS 3xx Kurzanleitung
 Monitor VIS 3xx Kurzanleitung 19.08.08 Art. Nr. 22261 Inhalt: 1. Spezifikationen...2 2. Tastenfunktionen...2 3. Menüführung und Einstellungen...3 Technik nach Maß Wöhler Monitor VIS 3xx 1. Spezifikationen
Mock Exam Behavioral Finance
 Mock Exam Behavioral Finance For the following 4 questions you have 60 minutes. You may receive up to 60 points, i.e. on average you should spend about 1 minute per point. Please note: You may use a pocket
Application Note. Import Jinx! Scenes into the DMX-Configurator
 Application Note Import Jinx! Scenes into the DMX-Configurator Import Jinx! Scenen into the DMX-Configurator 2 The Freeware Jinx! is an user friendly, well understandable software and furthermore equipped
SETUP TOOL. Bedienungsanleitung User s Manual
 Bedienungsanleitung User s Manual Bitte lesen Sie diese Anleitung vor der Inbetriebnahme sorgfältig durch Please read the instructions carefully before use 1. Eigenschaften Das Setup Tool ist ein speziell
Bedienungsanleitung Manual
 NK ZSU 2 ZEITSCHALTUHR DIGITAL 51277 NK ZSU 3 ZEITSCHALTUHR DIGITAL IP44 51301 NK ZSU 4 ZEITSCHALTUHR DIGITAL 93256 NK ZSU 2 TIME SWITCH DIGITAL 51277 NK ZSU 3 TIME SWITCH DIGITAL IP44 51301 NK ZSU 4 TIME
Where are we now? The administration building M 3. Voransicht
 Let me show you around 9 von 26 Where are we now? The administration building M 3 12 von 26 Let me show you around Presenting your company 2 I M 5 Prepositions of place and movement There are many prepositions
ONLINE LICENCE GENERATOR
 Index Introduction... 2 Change language of the User Interface... 3 Menubar... 4 Sold Software... 5 Explanations of the choices:... 5 Call of a licence:... 7 Last query step... 9 Call multiple licenses:...
Bedienungsanleitung / Manual : LED-Nixie
 Bedienungsanleitung / Manual : LED-Nixie English please see below. Bei Neustart und gleichzeitig gedrückter Taste während der Versionsanzeige (halten bis Beep hörbar), erfolgt eine Zurücksetzung auf (Standard)
CABLE TESTER. Manual DN-14003
 CABLE TESTER Manual DN-14003 Note: Please read and learn safety instructions before use or maintain the equipment This cable tester can t test any electrified product. 9V reduplicated battery is used in
Newest Generation of the BS2 Corrosion/Warning and Measurement System
 Newest Generation of the BS2 Corrosion/Warning and Measurement System BS2 System Description: BS2 CorroDec 2G is a cable and energyless system module range for detecting corrosion, humidity and prevailing
Cycling. and / or Trams
 Cycling and / or Trams Experiences from Bern, Switzerland Roland Pfeiffer, Departement for cycling traffic, City of Bern Seite 1 A few words about Bern Seite 2 A few words about Bern Capital of Switzerland
Outdoor-Tasche. Operating Instructions Bedienungsanleitung GB D
 00 181243 Outdoor Case Outdoor-Tasche Splish Splash Operating Instructions Bedienungsanleitung GB D A B C D OPEN G Operating instruction 1. Important Notes Children are not permitted to play with the device.
Level 1 German, 2014
 90886 908860 1SUPERVISOR S Level 1 German, 2014 90886 Demonstrate understanding of a variety of German texts on areas of most immediate relevance 9.30 am Wednesday 26 November 2014 Credits: Five Achievement
Quick Guide Home Network Mode
 Quick Guide Home Network Mode English > 1 German > 3 About the Home Network Mode EN Tivizen Nano & iplug normally work on their own created networks (whose SSID starts with tivizentv or iplug ) in which
C R 2025 C LOSE PUSH OPEN
 3V C R 2025 C LOSE PUSH OPEN ) ) ) 25 222 3V C R 2025 C LOSE PUSH OPEN 25 222 3V C R 2025 C LOSE PUSH OPEN 25 222 Den här symbolen på produkten eller i instruktionerna betyder att den elektriska
Electrical testing of Bosch common rail solenoid valve (MV) injectors
 injectors") Applies to MV injector, generation: -CRI 1.0 / 2.0 / 2.1 / 2.2 -CRIN 1 / 2 / 3, with K oder AK plug Bosch 10-position order number Bosch-Bestellnummer CRI: 0 445 110 xxx Bosch-Bestellnummer CRIN: 0 445
Applies to MV injector, generation: -CRI 1.0 / 2.0 / 2.1 / 2.2 -CRIN 1 / 2 / 3, with K oder AK plug Bosch 10-position order number Bosch-Bestellnummer CRI: 0 445 110 xxx Bosch-Bestellnummer CRIN: 0 445
p^db=`oj===pìééçêíáåñçêã~íáçå=
 p^db=`oj===pìééçêíáåñçêã~íáçå= Error: "Could not connect to the SQL Server Instance" or "Failed to open a connection to the database." When you attempt to launch ACT! by Sage or ACT by Sage Premium for
Beleuchteter Spiegel
 Beleuchteter Spiegel 00099 00099 00099 0 Artikel Artikelnummer 00099 00099 00099 Maße 80x60 cm 0x80 cm 40x70 cm Teile im Lieferumfang Lieferumfang A B C Spiegel Schrauben Dübel Benötigtes Werkzeug (nicht
Level 2 German, 2015
 91126 911260 2SUPERVISOR S Level 2 German, 2015 91126 Demonstrate understanding of a variety of written and / or visual German text(s) on familiar matters 2.00 p.m. Friday 4 December 2015 Credits: Five
DENTAL IMPLANTS BY CAMLOG medical
 IMPLANT PASS DENTAL IMPLANTS BY CAMLOG medical devices made in germany for your well-being and a natural appearance. Personal data Surname First name Address ZIP code City Date of birth Health insurance
Cycling and (or?) Trams
 Trams") Cycling and (or?) Trams Can we support both? Experiences from Berne, Switzerland Roland Pfeiffer, Departement for cycling traffic, City of Bern Seite 1 A few words about Bern Seite 2 A few words about
Cycling and (or?) Trams Can we support both? Experiences from Berne, Switzerland Roland Pfeiffer, Departement for cycling traffic, City of Bern Seite 1 A few words about Bern Seite 2 A few words about
Cameraserver mini. commissioning. Ihre Vision ist unsere Aufgabe
 Cameraserver mini commissioning Page 1 Cameraserver - commissioning Contents 1. Plug IN... 3 2. Turn ON... 3 3. Network configuration... 4 4. Client-Installation... 6 4.1 Desktop Client... 6 4.2 Silverlight
BEDIENUNGSANLEITUNG MIYOTA UHRWERK KALIBER 6P23 MANUAL FOR MIYOTA MOVEMENT CAL. 6P23
 BEDIENUNGSANLEITUNG MIYOTA UHRWERK KALIBER 6P23 MANUAL FOR MIYOTA MOVEMENT CAL. 6P23 BEDIENUNGSANLEITUNG FUER MIYOTA UHRWERK KALIBER 6P23 BATTERIE: SR621SW FUNKTIONEN: ANALOGE QUARZUHR MIT MEHREREN ZEIGERN
BEDIENUNGSANLEITUNG UHRWERK KALIBER VD 53 MANUAL FOR MOVEMENT CAL. VD 53
 BEDIENUNGSANLEITUNG UHRWERK KALIBER VD 53 MANUAL FOR MOVEMENT CAL. VD 53 BEDIENUNGSANLEITUNG FUER UHRWERK KALIBER VD 53 BATTERIE: SR920SW FUNKTIONEN: CHRONOGRAPH 2 ANZEIGE UND FUNKTIONEN DER KRONE/BEDIENTASTEN
PONS DIE DREI??? FRAGEZEICHEN, ARCTIC ADVENTURE: ENGLISCH LERNEN MIT JUSTUS, PETER UND BOB
 Read Online and Download Ebook PONS DIE DREI??? FRAGEZEICHEN, ARCTIC ADVENTURE: ENGLISCH LERNEN MIT JUSTUS, PETER UND BOB DOWNLOAD EBOOK : PONS DIE DREI??? FRAGEZEICHEN, ARCTIC ADVENTURE: Click link bellow
Rev. Proc Information
 Rev. Proc. 2006-32 Information 2006, CPAs 1 Table 1-Total loss of the home Table 2- Near total loss is water to the roofline. Completely gut the home from floor to rafters - wiring, plumbing, electrical
MATHEMATIK - MODERNE - IDEOLOGIE. EINE KRITISCHE STUDIE ZUR LEGITIMITAT UND PRAXIS DER MODERNEN MATHEMATIK (THEORIE UND METHODE) FROM UVK
 FROM UVK") MATHEMATIK - MODERNE - IDEOLOGIE. EINE KRITISCHE STUDIE ZUR LEGITIMITAT UND PRAXIS DER MODERNEN MATHEMATIK (THEORIE UND METHODE) FROM UVK DOWNLOAD EBOOK : MATHEMATIK - MODERNE - IDEOLOGIE. EINE KRITISCHE
MATHEMATIK - MODERNE - IDEOLOGIE. EINE KRITISCHE STUDIE ZUR LEGITIMITAT UND PRAXIS DER MODERNEN MATHEMATIK (THEORIE UND METHODE) FROM UVK DOWNLOAD EBOOK : MATHEMATIK - MODERNE - IDEOLOGIE. EINE KRITISCHE
OPERATING INSTRUCTIONS Test pump ZG 5.1. and ZG 5.2.
 Elektromotoren und Gerätebau Barleben GmbH OPERATING INSTRUCTIONS Test pump ZG 5.1. and ZG 5.2. Elektromotoren und Gerätebau Barleben GmbH 2 Inhaltsverzeichnis Page 1 Use 4 2 Design features 4 2.1 Test
Level 2 German, 2013
 91126 911260 2SUPERVISOR S Level 2 German, 2013 91126 Demonstrate understanding of a variety of written and / or visual German text(s) on familiar matters 9.30 am Monday 11 November 2013 Credits: Five
Weather forecast in Accra
 Weather forecast in Accra Thursday Friday Saturday Sunday 30 C 31 C 29 C 28 C f = 9 5 c + 32 Temperature in Fahrenheit Temperature in Celsius 2 Converting Celsius to Fahrenheit f = 9 5 c + 32 tempc = 21
PONS DIE DREI??? FRAGEZEICHEN, ARCTIC ADVENTURE: ENGLISCH LERNEN MIT JUSTUS, PETER UND BOB
 Read Online and Download Ebook PONS DIE DREI??? FRAGEZEICHEN, ARCTIC ADVENTURE: ENGLISCH LERNEN MIT JUSTUS, PETER UND BOB DOWNLOAD EBOOK : PONS DIE DREI??? FRAGEZEICHEN, ARCTIC ADVENTURE: Click link bellow
Titelmasterformat Object Generator durch Klicken bearbeiten
 Titelmasterformat Object Generator durch Klicken bearbeiten How to model 82 screws in 2 minutes By Pierre-Louis Ruffieux 17.11.2014 1 Object Generator The object generator is usefull tool to replicate
Snap-in switch for switches PSE, MSM and MCS 30
 Product manual Snap-in switch for switches PSE, MSM and MCS 30 CONTENTS 1. PRODUCT DESCRIPTION 2. DATA AND DIMENSIONAL DRAWINGS 2.1. Technical Data 2.2. Dimensions of PSE with a Mounting Diameter 19 mm
BEDIENUNGSANLEITUNG FUER MIYOTA UHRWERK KALIBER OS20 UND OS21 MANUAL FOR MIYOTA MOVEMENT OS20 AND OS21
 BEDIENUNGSANLEITUNG FUER MIYOTA UHRWERK KALIBER OS20 UND OS21 MANUAL FOR MIYOTA MOVEMENT OS20 AND OS21 2 BEDIENUNGSANLEITUNG FUER MIYOTA UHRWERK KALIBER: OS20 BATTERIE: SR927W (FUER BEIDE KALIBER) FUNKTIONEN
FACHKUNDE FüR KAUFLEUTE IM GESUNDHEITSWESEN FROM THIEME GEORG VERLAG
 FACHKUNDE FüR KAUFLEUTE IM GESUNDHEITSWESEN FROM THIEME GEORG VERLAG DOWNLOAD EBOOK : FACHKUNDE FüR KAUFLEUTE IM GESUNDHEITSWESEN Click link bellow and free register to download ebook: FACHKUNDE FüR KAUFLEUTE
EVANGELISCHES GESANGBUCH: AUSGABE FUR DIE EVANGELISCH-LUTHERISCHE LANDESKIRCHE SACHSEN. BLAU (GERMAN EDITION) FROM EVANGELISCHE VERLAGSAN
 FROM EVANGELISCHE VERLAGSAN") EVANGELISCHES GESANGBUCH: AUSGABE FUR DIE EVANGELISCH-LUTHERISCHE LANDESKIRCHE SACHSEN. BLAU (GERMAN EDITION) FROM EVANGELISCHE VERLAGSAN DOWNLOAD EBOOK : EVANGELISCHES GESANGBUCH: AUSGABE FUR DIE EVANGELISCH-LUTHERISCHE
EVANGELISCHES GESANGBUCH: AUSGABE FUR DIE EVANGELISCH-LUTHERISCHE LANDESKIRCHE SACHSEN. BLAU (GERMAN EDITION) FROM EVANGELISCHE VERLAGSAN DOWNLOAD EBOOK : EVANGELISCHES GESANGBUCH: AUSGABE FUR DIE EVANGELISCH-LUTHERISCHE
Ingenics Project Portal
 Version: 00; Status: E Seite: 1/6 This document is drawn to show the functions of the project portal developed by Ingenics AG. To use the portal enter the following URL in your Browser: https://projectportal.ingenics.de
Was heißt Denken?: Vorlesung Wintersemester 1951/52. [Was bedeutet das alles?] (Reclams Universal-Bibliothek) (German Edition)
![Was heißt Denken?: Vorlesung Wintersemester 1951/52. [Was bedeutet das alles?] (Reclams Universal-Bibliothek) (German Edition)](/thumbs/68/59244907.jpg "Was heißt Denken?: Vorlesung Wintersemester 1951/52. [Was bedeutet das alles?] (Reclams Universal-Bibliothek) (German Edition)") Was heißt Denken?: Vorlesung Wintersemester 1951/52. [Was bedeutet das alles?] (Reclams Universal-Bibliothek) (German Edition) Martin Heidegger Click here if your download doesn"t start automatically Was
Was heißt Denken?: Vorlesung Wintersemester 1951/52. [Was bedeutet das alles?] (Reclams Universal-Bibliothek) (German Edition) Martin Heidegger Click here if your download doesn"t start automatically Was
Brand Label. Daimler Brand & Design Navigator
 Daimler Brand & Design Navigator 30. März 2016 Brand Label FUSO Financial uses the FUSO letters in combination with the word Financial in the font Daimler CS for name and label. Black lettering is set
Ronda Quarz 706.B, 505/515, 507/517, 6004.D. Bedienungsanleitung / User s Manual
 Ronda Quarz 706.B, 505/515, 507/517, 6004.D Bedienungsanleitung / User s Manual DE Kal. 706.B Kal. 706.B KD D I II A A Pos. I Ruhestellung (Uhr läuft) Pos. II Während den nachfolgend erwähnten Sperrfristen
MANUAL_EN ANLEITUNG_DE PHONE SUITE SYNCHRONISATION SOFTWARE
 MANUAL_EN ANLEITUNG_DE PHONE SUITE SYNCHRONISATION SOFTWARE 2 PHONE SUITE MANUAL PHONE SUITE MANUAL 3 RESERVATION Technical Data is subject to change without notice. Changes, errors and misprints may not
Elektrische Kerzen
 Elektrische Kerzen 10030648 10030649 10030650 10030651 Sehr geehrter Kunde, wir gratulieren Ihnen zum Erwerb Ihres Gerätes. Lesen Sie die folgenden Anschluss- und Anwendungshinweise sorgfältig durch und
MultiPortSwitch. VGA Umschalter. Version 1.0 As of April 19 th 2004 Subject to change!
 MultiPortSwitch VGA Umschalter Version 1.0 As of April 19 th 2004 Subject to change! Document version: Version Date Name Comment 1.00 29.03.2004 J. Klein Compiled Distributed by: idata industrielle Datensysteme
p^db=`oj===pìééçêíáåñçêã~íáçå=
 p^db=`oj===pìééçêíáåñçêã~íáçå= How to Disable User Account Control (UAC) in Windows Vista You are attempting to install or uninstall ACT! when Windows does not allow you access to needed files or folders.
Wie man heute die Liebe fürs Leben findet
 Wie man heute die Liebe fürs Leben findet Sherrie Schneider Ellen Fein Click here if your download doesn"t start automatically Wie man heute die Liebe fürs Leben findet Sherrie Schneider Ellen Fein Wie
BRUUDT Kennzeichenhalter für die Honda NC750X ab 2016 BRUUDT Tail Tidy for the Honda NC750X 2016 and onwards.
 Montageanleitung Mounting instructions BRUUDT Kennzeichenhalter für die Honda NC750X ab 2016 BRUUDT Tail Tidy for the Honda NC750X 2016 and onwards. Noch einmal vielen Dank, dass Sie sich für unsere Produkte
ATEX-Check list. Compiled by: Date: Signature: Acceptable practice at the determination of flash point: Closed cup according to ISO 2719
 Fire and explosion hazard ATEX 137 1999/92/EG und ATEX 95 2014/34/EU Danger assessment and determination of explosion protection zone for the test space as well as the installation site ATEX-Check list
CB-Radio AE 5090 XL Modification
 CB-Radio AE 5090 XL Modification Downloaded from www.cbradio.nl AE5290XL MULTI Power and channel settings Power settings by Plug-In Jumper Factory Power setting is automatic 1-4 Watt switching with country
Wissenschaftliche Dienste. Sachstand. Payment of value added tax (VAT) (EZPWD-Anfrage ) 2016 Deutscher Bundestag WD /16
 (EZPWD-Anfrage ) 2016 Deutscher Bundestag WD /16") Payment of value added tax (VAT) (EZPWD-Anfrage ) 2016 Deutscher Bundestag Seite 2 Payment of value added tax (VAT) (EZPWD-Anfrage ) Aktenzeichen: Abschluss der Arbeit: 07.04.2016 Fachbereich: WD 4: Haushalt
Payment of value added tax (VAT) (EZPWD-Anfrage ) 2016 Deutscher Bundestag Seite 2 Payment of value added tax (VAT) (EZPWD-Anfrage ) Aktenzeichen: Abschluss der Arbeit: 07.04.2016 Fachbereich: WD 4: Haushalt
* * * IMPORTANT * * IMPORTANT * * IMPORTANT * * * Read these instructions carefully before using this product and save them for future use.
 Change bag Instructions [UK] * * * IMPORTANT * * IMPORTANT * * IMPORTANT * * * Read these instructions carefully before using this product and save them for future use. Your child may be injured if you
How-To-Do. Hardware Configuration of the CC03 via SIMATIC Manager from Siemens
 How-To-Do Hardware Configuration of the CC03 via SIMATIC Manager from Siemens Content Hardware Configuration of the CC03 via SIMATIC Manager from Siemens... 1 1 General... 2 1.1 Information... 2 1.2 Reference...
* * * IMPORTANT * * IMPORTANT * * IMPORTANT * * * Read these instructions carefully before using this product and save them for future use
 Instructions [UK] * * * IMPORTANT * * IMPORTANT * * IMPORTANT * * * Read these instructions carefully before using this product and save them for future use Your child may be injured if you do not follow
Level 1 German, 2012
 90886 908860 1SUPERVISOR S Level 1 German, 2012 90886 Demonstrate understanding of a variety of German texts on areas of most immediate relevance 9.30 am Tuesday 13 November 2012 Credits: Five Achievement
Level 1 German, 2016
 90886 908860 1SUPERVISOR S Level 1 German, 2016 90886 Demonstrate understanding of a variety of German texts on areas of most immediate relevance 2.00 p.m. Wednesday 23 November 2016 Credits: Five Achievement
Uhrenbeweger Watch winders. Crystal
 Uhrenbeweger Watch winders Crystal Sehr geehrter Kunde, unsere Uhrenbeweger sind so konstruiert, dass sie trotz kompakter Abmessungen nur geringe Laufgeräusche verursachen. Jeder Antrieb erzeugt jedoch
Guidance Notes for the eservice 'Marketing Authorisation & Lifecycle Management of Medicines' Contents
 Guidance Notes for the eservice 'Marketing Authorisation & Lifecycle Management of Medicines' Contents Login... 2 No active procedure at the moment... 3 'Active' procedure... 4 New communication (procedure
Overview thermostat/ temperature controller
 Thermostat TR-238 The Thermostat TR-238 is a electronic two-level controller for controlling of and in climate control units and vehicles. Voltage range (12V): Voltage range (24V): Control range: Hystereses:
BEDIENUNGSANLEITUNG MIYOTA UHRWERK KALIBER 6P29 MANUAL FOR MIYOTA MOVEMENT CAL. 6P29
 BEDIENUNGSANLEITUNG MIYOTA UHRWERK KALIBER 6P29 MANUAL FOR MIYOTA MOVEMENT CAL. 6P29 BEDIENUNGSANLEITUNG FUER MIYOTA UHRWERK KALIBER 6P29 BATTERIE: SR621SW FUNKTIONEN: ANALOGE MULTIFUNKTIONS-QUARZUHR MIT
Exercise (Part V) Anastasia Mochalova, Lehrstuhl für ABWL und Wirtschaftsinformatik, Kath. Universität Eichstätt-Ingolstadt 1
 Anastasia Mochalova, Lehrstuhl für ABWL und Wirtschaftsinformatik, Kath. Universität Eichstätt-Ingolstadt 1") Exercise (Part V) Notes: The exercise is based on Microsoft Dynamics CRM Online. For all screenshots: Copyright Microsoft Corporation. The sign ## is you personal number to be used in all exercises. All
Exercise (Part V) Notes: The exercise is based on Microsoft Dynamics CRM Online. For all screenshots: Copyright Microsoft Corporation. The sign ## is you personal number to be used in all exercises. All
Martin Luther. Click here if your download doesn"t start automatically
 Die schönsten Kirchenlieder von Luther (Vollständige Ausgabe): Gesammelte Gedichte: Ach Gott, vom Himmel sieh darein + Nun bitten wir den Heiligen Geist... der Unweisen Mund... (German Edition) Martin
Fermentierkessel. Fermentation Kettle
 Fermentierkessel Fermentation Kettle 10032122 10032123 Sehr geehrter Kunde, DE wir gratulieren Ihnen zum Erwerb Ihres Gerätes. Lesen Sie die folgenden Hinweise sorgfältig durch und befolgen Sie diese,
Materialien zu unseren Lehrwerken
 Word order Word order is important in English. The word order for subjects, verbs and objects is normally fixed. The word order for adverbial and prepositional phrases is more flexible, but their position
Paper Reference. Paper Reference(s) 4375/01 London Examinations IGCSE German Paper 1: Listening
 4375/01 London Examinations IGCSE German Paper 1: Listening") Centre No. Candidate No. Paper Reference 4 3 7 5 0 1 Surname Signature Paper Reference(s) 4375/01 London Examinations IGCSE German Paper 1: Listening Friday 22 May 2009 Morning Time: 30 minutes (plus reading
Centre No. Candidate No. Paper Reference 4 3 7 5 0 1 Surname Signature Paper Reference(s) 4375/01 London Examinations IGCSE German Paper 1: Listening Friday 22 May 2009 Morning Time: 30 minutes (plus reading
Reparaturen kompakt - Küche + Bad: Waschbecken, Fliesen, Spüle, Armaturen, Dunstabzugshaube... (German Edition)
") Reparaturen kompakt - Küche + Bad: Waschbecken, Fliesen, Spüle, Armaturen, Dunstabzugshaube... (German Edition) Peter Birkholz, Michael Bruns, Karl-Gerhard Haas, Hans-Jürgen Reinbold Click here if your
Reparaturen kompakt - Küche + Bad: Waschbecken, Fliesen, Spüle, Armaturen, Dunstabzugshaube... (German Edition) Peter Birkholz, Michael Bruns, Karl-Gerhard Haas, Hans-Jürgen Reinbold Click here if your
Level 2 German, 2016
 91126 911260 2SUPERVISOR S Level 2 German, 2016 91126 Demonstrate understanding of a variety of written and / or visual German texts on familiar matters 2.00 p.m. Tuesday 29 November 2016 Credits: Five
CNC ZUR STEUERUNG VON WERKZEUGMASCHINEN (GERMAN EDITION) BY TIM ROHR
 BY TIM ROHR") (GERMAN EDITION) BY TIM ROHR READ ONLINE AND DOWNLOAD EBOOK : CNC ZUR STEUERUNG VON WERKZEUGMASCHINEN (GERMAN EDITION) BY TIM ROHR PDF Click button to download this ebook READ ONLINE AND DOWNLOAD CNC ZUR
(GERMAN EDITION) BY TIM ROHR READ ONLINE AND DOWNLOAD EBOOK : CNC ZUR STEUERUNG VON WERKZEUGMASCHINEN (GERMAN EDITION) BY TIM ROHR PDF Click button to download this ebook READ ONLINE AND DOWNLOAD CNC ZUR
Handbuch der therapeutischen Seelsorge: Die Seelsorge-Praxis / Gesprächsführung in der Seelsorge (German Edition)
") Handbuch der therapeutischen Seelsorge: Die Seelsorge-Praxis / Gesprächsführung in der Seelsorge (German Edition) Reinhold Ruthe Click here if your download doesn"t start automatically Handbuch der therapeutischen
Handbuch der therapeutischen Seelsorge: Die Seelsorge-Praxis / Gesprächsführung in der Seelsorge (German Edition) Reinhold Ruthe Click here if your download doesn"t start automatically Handbuch der therapeutischen
SAMPLE EXAMINATION BOOKLET
 S SAMPLE EXAMINATION BOOKLET New Zealand Scholarship German Time allowed: Three hours Total marks: 24 EXAMINATION BOOKLET Question ONE TWO Mark There are three questions. You should answer Question One
Android APP NVR Viewer
 Android APP NVR Viewer User Manual DN-16111 DN-16112 DN16113 2 DN-16111, DN-16112, DN-16113 for Android User Manual Table of Contents Download the APP... 3 Running the app - Add NVR... 3 Running the app
Schmuckspiegel mit LED-Beleuchtung
 Schmuckspiegel mit LED-Beleuchtung 10029174 10029176 Sehr geehrter Kunde, wir gratulieren Ihnen zum Erwerb Ihres Gerätes. Lesen Sie die folgenden Anschluss- und Anwendungshinweise sorgfältig durch und
Walter Buchmayr Ges.m.b.H.
 Seite 1/10 Chapter Description Page 1 Advantages 3 2 Performance description 4 3 Settings 5 4 Options 6 5 Technical data 7 6 Pictures 8 http://members.aon.at/buchmayrgmbh e-mail: walter.buchmayr.gmbh@aon.at
1. General information... 2 2. Login... 2 3. Home... 3 4. Current applications... 3
 User Manual for Marketing Authorisation and Lifecycle Management of Medicines Inhalt: User Manual for Marketing Authorisation and Lifecycle Management of Medicines... 1 1. General information... 2 2. Login...
MQ964..GB MQ965..GB. en Operating instructions ar
 MQ964..GB MQ965..GB en Operating instructions ar MQ964-965GB-Uniklein_en-ar.book Seite 2 Donnerstag, 4. Dezember 2014 4:39 16 en English...........................................................3 ar...........................................................6.................................................
Ein Stern in dunkler Nacht Die schoensten Weihnachtsgeschichten. Click here if your download doesn"t start automatically
 Ein Stern in dunkler Nacht Die schoensten Weihnachtsgeschichten Click here if your download doesn"t start automatically Ein Stern in dunkler Nacht Die schoensten Weihnachtsgeschichten Ein Stern in dunkler
Accelerating Information Technology Innovation
 Accelerating Information Technology Innovation http://aiti.mit.edu Ghana Summer 2011 Lecture 05 Functions Weather forecast in Accra Thursday Friday Saturday Sunday 30 C 31 C 29 C 28 C f = 9 5 c + 32 Temperature
Bewässerung von Gewächshauspflanzen / Irrigation system for greenhouse plants
 Bewässerung von Gewächshauspflanzen / Irrigation system for greenhouse plants I2 I I1 I Minimal Wert Minimum Value Maximal Wert Maximum Value S R Par B004 RS B001 & Q1 Q Pflanzen Typ1 Plant type 1 I4 I
JTAGMaps Quick Installation Guide
 Index Index... 1 ENGLISH... 2 Introduction... 2 Requirements... 2 1. Installation... 3 2. Open JTAG Maps... 4 3. Request a free JTAG Maps license... 4 4. Pointing to the license file... 5 5. JTAG Maps
Wireless Earbuds. D39 Trouble Shooting
 Wireless Earbuds D39 Trouble Shooting Q: Pairing failed. A:1) Put the earbuds back to the charging case and make sure that they are off. 2) Take the earbuds out of the case and they are automatically on.
Technische Information. Toolset Software und Cosworth Geräte
 Technische Information Technical Information 07/2014 911 GT3 Cup (991) Toolset Software und Cosworth Geräte Toolset software and Cosworth devices Fahrzeug / Vehicle: 911 GT3 Cup (991) Bauteil / Part: ICD
Kurzanleitung / Quick Start Manual
 Kurzanleitung / Quick Start Manual Version 1.0 03.11.2016 2 Kurzanleitung / Quick Start Manual WICHTIGE INFORMATION Der von Ihnen erworbene SEEBURG acoustic line Lautsprecher besitzt einen integrierten
Fachübersetzen - Ein Lehrbuch für Theorie und Praxis
 Fachübersetzen - Ein Lehrbuch für Theorie und Praxis Radegundis Stolze Click here if your download doesn"t start automatically Fachübersetzen - Ein Lehrbuch für Theorie und Praxis Radegundis Stolze Fachübersetzen
FAHRZEUGENTWICKLUNG IM AUTOMOBILBAU FROM HANSER FACHBUCHVERLAG DOWNLOAD EBOOK : FAHRZEUGENTWICKLUNG IM AUTOMOBILBAU FROM HANSER FACHBUCHVERLAG PDF
 Read Online and Download Ebook FAHRZEUGENTWICKLUNG IM AUTOMOBILBAU FROM HANSER FACHBUCHVERLAG DOWNLOAD EBOOK : FAHRZEUGENTWICKLUNG IM AUTOMOBILBAU FROM Click link bellow and free register to download ebook:
Magic Figures. We note that in the example magic square the numbers 1 9 are used. All three rows (columns) have equal sum, called the magic number.
 have equal sum, called the magic number.") Magic Figures Introduction: This lesson builds on ideas from Magic Squares. Students are introduced to a wider collection of Magic Figures and consider constraints on the Magic Number associated with such
Magic Figures Introduction: This lesson builds on ideas from Magic Squares. Students are introduced to a wider collection of Magic Figures and consider constraints on the Magic Number associated with such