EN, BIH, HR, BG, SB, MK
|
|
|
- Rudolph Reuter
- vor 8 Jahren
- Abrufe
Transkript

1 EN, BIH, HR, BG, SB, MK SSA25020 REFRIGERATOR-FREEZER Type I FRIGO-CONGELATORE di tipo I HLADILNO-ZAMRZOVALNI APARAT tipa I KÜHL-GEFRIER-Typ I RÉFRIGÉRATEUR-CONGÉLATEUR Type I HLADNJAK-ZAMRZIVAČ tipa I FRIZIDERA-FREZER tip I

2

3 WARNING! In order to ensure a normal operation of your refrigerating appliance, which uses a completely environmentally friendly refrigerant the R600a (flammable only under certain conditions) you must observe the following rules: Do not hinder the free circulation of the air around the appliance. Do not use mechanical devices in order to accelerate the defrosting, others than the ones recommended by the manufacturer. Do not destroy the refrigerating circuit. Do not use electric appliances inside the food keeping compartment, other than those that might have been recommended by the manufacturer. AVVERTENZA! Per garantire il funzionamento adeguato dell'elettrodomestico, che utilizza il refrigerante R600a completamente adatto all'ambiente (infiammabile solo in determinate condizioni), è necessario attenersi alle seguenti regole: Non ostacolare la libera circolazione dell'aria attorno all'elettrodomestico. Per accelerare lo sbrinamento non utilizzare dispositivi meccanici diversi da quelli consigliati dal produttore. Non danneggiare il circuito refrigerante. Non utilizzare all'interno del comparto del cibo elettrodomestici diversi da quelli consigliati dal produttore. OPOZORILO! Za normalno delovanje vaše zamrzovalne naprave, ki uporablja naravi prijazno hladilno sredstvo R600a (vnetljivo samo pod določenimi pogoji), je treba upoštevati naslednja pravila: Ne zadržujte prostega pretoka zraka okoli naprave. Za hitrejše odtajanje, ne uporabljajte mehanskih naprav, ki jih ni priporočil proizvajalec. Ne uničujte hladilnega krogotoka. V prostoru za hrano ne uporabljajte električnih naprav, ki jih ni priporočil proizvajalec. WARNUNG! Ihr Gerät verwendet ein umweltverträgliches Kältemittel, R600a (nur unter bestimmten Umständen brennbar). Um einen einwandfreien Betrieb Ihres Gerätes sicherzustellen, beachten Sie bitte folgende Vorschriften: Die Luftzirkulation um das Gerät darf nicht behindert sein. Verwenden Sie außer der vom Hersteller empfohlenen, keine mechanischen Hilfsmittel, um den Abtauprozess zu beschleunigen. Der Kältemittelkreislauf darf nicht beschädigt werden. Verwenden Sie im Lebensmittelaufbewahrungsbereich Ihres Gerätes keine elektrischen Geräte, es sei denn, sie sind vom Hersteller empfohlen. ATTENTION! Pour assûrer un fonctionnement normal de votre appareil qui utilise un agent frigorifique complètement écologique, R600a (inf ammable seulement dans certaines conditions) vous devez respecter les règles suivantes: N empêchez pas la libre circulation de l air autour de l appareil. N utilisez pas des dispositifs mécaniques pour accélérer le dégivrage, autres que ceux récommendés par le fabriquant. Ne détruissez pas le circuit frigorifique. N utilisez pas des appareils électiques à l intérieur du compartiment pourconserver les denrées, apart celles qui sont éventuellement récommendés par le fabriquant. UPOZORENJE! Da biste osigurali normalan rad Vašeg hladnjaka, koji koristi potpuno po okoliš neškodljivu tvar za hlađenje R600a (zapaljiv samo pod određenim uvjetima), morate se držati sljedećih pravila: Nemojte sprječavati slobodan protok zraka oko uređaja. Nemojte koristiti mehaničke uređaje da biste ubrzali odmrzavanje, osim onih koje je preporučio proizvođač. Ne uništavajte sklop za zamrzavanje. Ne koristite električne uređaje u odjeljku za hranu, osim onih koje je preporučio proizvođač. UPOZORENJE! Kako bi se osigurao normalan rad vašeg hladnjaka koji koristi kompletno ekološki prihvatljivo rashladno sredstvo R600a (zapaljivo samo pod određenim uvjetima), trebate se pridržavati slijedećih pravila: Ne ometati slobodnu cirkulaciju zraka oko hladnjaka. Ne koristiti mehanička sredstva za ubrzavanje odleđivanja, koja nije preporučio proizvođač. Paziti da se ne ošteti krug rashladnog sredstva. Unutar prostora hladnjaka za spremanje namirnice ne koristiti električne uređaje koje nije preporučio proizvođač.

4 GB Index Safety first /1 Electrical requirements /2 Transportation instructions /2 Installation instructions /2 Getting to know your appliance /3 Suggested arrangement of food in the appliance /3 Temperature control and adjustment /4 Before operating /4 Freezing fresh food /4 Making ice cubes /5 Defrosting /5 Replacing the interior light bulb /6 Cleaning and care /6 Repositioning the door /6 Do s and don ts /7 Troubleshooting /8 Tehnical data /8 IT Indice Sicurezza iniziale /9 Requisiti elettrici /10 Istruzioni per il trasporto /10 Istruzioni di installazione /10 Conoscere l elettrodomestico /11 Suggerimenti sulla disposizione del cibo nell'elettrodomestico /11 Controllo e regolazione della temperatura /12 Prima della messa in funzione /12 Conservazione di cibo congelato /12 Congelamento di cibo fresco /12 Preparazione dei cubetti di ghiaccio /13 Sbrinamento /13 Sostituzione della lampadina interna /14 Pulizia e manutenzione /14 Riposizionamento dello sportello /14 Cosa fare e cosa non fare /15 Risoluzione dei problemi /16 Date tecnici /16 SL Kazalo Varnost /17 Električne zahteve /18 Navodila za prevoz /18 Navodila za namestitev /18 Spoznajte vašo napravo /19 Predlagana ureditev hrane v napravi /19 Nadzorovanje in prilagoditev temperature /20 Pred delovanjem /20 Zamrzovanje sveže hrane /20 Izdelava ledenih kock /21 Odtajanje /21 Zamenjava notranje žarnice /22 Čiščenje in nega /22 Premeščanje vrat /22 Kaj lahko in kaj ne smete /23 Iskanje in odpravljanje napak /24 Tehnični podatki /24 D Inhalt Sicherheit an erster Stelle /25 Voraussetzungen für den Elektroanschluss /26 Transportvorschriften /26 Hinweise zur Installation und zum Aufstellungsort /26 Kennenlernen des geräts /27 Vorschläge für das einordnen von Lebensmitteln /27 Einstellung und Regelung der Temperatur /28 Inbetriebnahme /28 Einfrieren von frischen Lebensmitteln /29 Herstellung von Eiswürfeln /29 Abtauen /29 Auswechseln der Glühlampe für die Innenbeleuchtung /30 Reinigung und Pflege /30 Wechseln des türanschlags /31 Was Sie tun sollten und was auf keinen fall-einige hinweise /31 Massnahmen bei Betriebstőrunger /32 Technische angaben /33 FR Sommaire La sécurité d abord /34 Conditions électriques /35 Instructions de transport /35 Instructions d installation /35 Apprendre à connaître votre appareil /36 Suggestion d agencement des denrées dans l appareil /36 Commande de température et réglage /37 Avant l utilisation /37 Congélation des produits frais /37 Fabrication de glaçons /38 Dégivrage /38 Remplacer l'ampoule intérieure /38 Repositionnement de la porte /38 Nettoyage et entretien /39 À faire / À éviter /40 Diagnostic /41 Caractéristiques techniques /41 HR Sadržaj Prvo sigurnost /42 Električni zahtjevi /43 Upute za prijevoz /43 Upute za ugradnju /43 Upoznavanje s Vašim uređajem /44 Predloženo slaganje hrane u uređaju /44 Kontrola i prilagođavanje temperature /45 Prije rada /45 Pohrana svježe hrane /45 Pravljenje kockica leda /46 Odmrzavanje /46 Zamjena unutarnje žarulje /47 Čišćenje i održavanje /47 Prebacivanje vrata /47 Što se smije a što se ne smije /48 Rješavanje problema /49 Tehnički podaci /49 SR Sadržaj Mere bezbednosti /50 Priključivanje na struju /51 Uputstva za prevoz uredjaja /51 Uputstva za instalaciju /51 Upoznavanje s uredjajem /52 Preporučeni raspored hrane u urenaju /52 Podešavanje temperature /52 Pre upotrebe /53 Zamrzavanje sveže hrane /53 Pravljenje kockica leda /53 Odmrzavanje /54 Zamena sijalice unutrašnjeg osvetljenja /54 Čišćenje i održavanje /54 Učiniti / Ne učiniti /55 Otklanjanje problema /56 Tehnički podaci /57

5 1
6
7 8

8 GB Instruction for use Congratulations on your choice of a Quality Appliance, designed to give you many years of service. Safety first! Do not connect your appliance to the electricity supply until all packing and transit protectors have been removed. Leave to stand for at least 12 hours before switching on, to allow compressor oil to settle, if transported horizontally. If you are discarding an old appliance with a lock or latch fitted to the door, ensure that it is left in a safe condition to prevent the entrapment of children. This appliance must only be used for its intended purpose. Do not dispose of the appliance on a fire. Your appliance contains non CFC substances in the insulation which are flammable. We suggest you contact your local authority for information on disposal and available facilities. We do not recommend use of this appliance in an unheated, cold room. (e.g. garage, conservatory, annex, shed, out-house etc.) To obtain the best possible performance and trouble free operation from your appliance it is very important to read these instructions carefully. Failure to observe these instructions may invalidate your right to free service during the guarantee period. Please keep these instructions in a safe place for easy reference. This appliance is not intended for use by person with reduced physical, sensory or mental capabilities or lack of experience and knowledge unless they have been given supervision or instruction concerning use of the appliance by a person responsible for their safety. Children should be supervised to ensure that they do not play with the appliance. 1

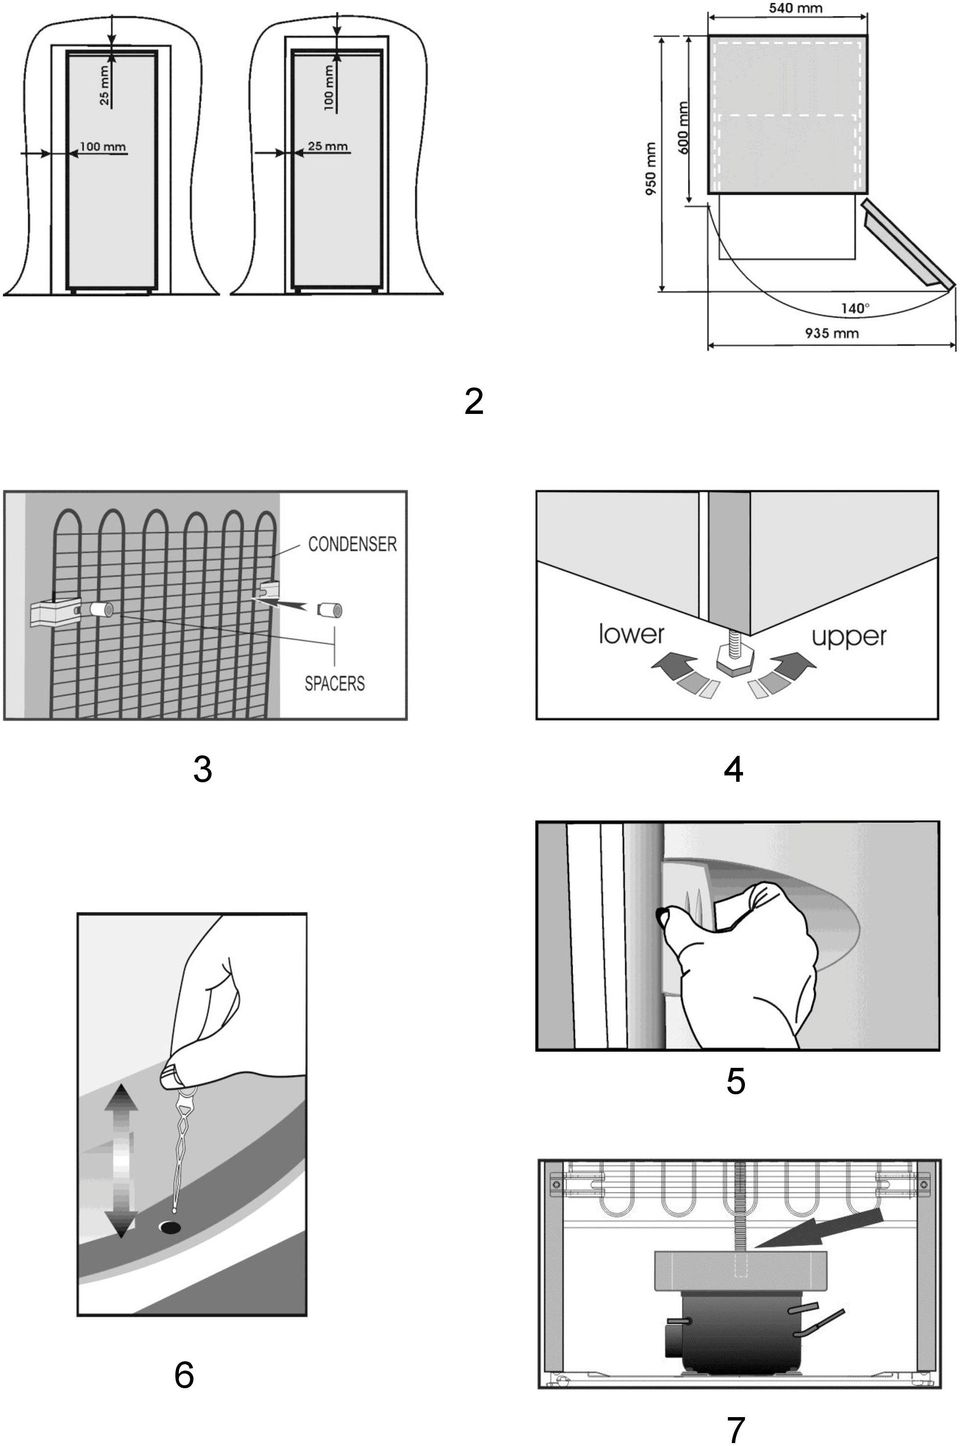
9 GB Electrical requirements Before inserting the plug into the wall socket make sure that the voltage and the frequency shown in the rating plate inside the appliance corresponds to your electricity supply. We recommend that this appliance is connected to the mains supply via a suitably switched and fused socket in a readily accessible position. Warning! This appliance must be earthed. Repairs to electrical equipment should only be performed by a qualified technician. Incorrect repairs carried out by an unqualified person are carry risks that may have critical consequences for the user of the appliance. ATTENTION! This appliance operates with R600a which is an environmental friendly but flammable gas. During the transportation and fixing of the product, care must be taken not to damage the cooling system. If the cooling system is damaged and there is a gas leakage from the system, keep the product away from open flame sources and ventilate the room for a while. WARNING - Do not use mechanical devices or other means to accelerate the defrosting process, others than those recommended by the manufacturer. WARNING - Do not damage the refrigerant circuit. WARNING - Do not use electrical appliances inside the food storage compartments of the appliance, unless they are of the type recommended by the manufacturer. WARNING - If the supply cord is damaged, it must be replaced by the manufacturer, its service agent or similarly qualified persons in order to avoid a hazard. Transportation instructions 1. The appliance should be transported only in an upright position. The packing as supplied must be intact during transportation. 2. If during the transport the appliance, has been positioned horizontally, it must not be operated for at least 12 hours, to allow the system to settle. Instruction for use 3. Failure to comply with the above instructions could result in damage to the appliance, for which the manufacturer will not be held liable. 4. The appliance must be protected against rain, moisture and other atmospheric influences. Important! Care must be taken while cleaning/carrying the appliance not to touch the bottom of the condenser metal wires at the back of the appliance, as this could cause injury to fingers and hands. Do not attempt to sit or stand on top of your appliance as it is not designed for such use. You could injure yourself or damage the appliance. Make sure that the mains cable is not caught under the appliance during and after moving, as this could damage the cable. Do not allow children to play with the appliance or tamper with the controls. When you open/shut the door of the low temperature compartment, pull the closing flap slightly (Item 5). Installation instructions 1. Do not keep your appliance in a room where the temperature is likely to fall below 10 degrees C (50 degrees F) at night and/or especially in winter, as it is designed to operate in ambient temperatures between +10 and +38 degrees C (50 and 100 degrees F). At lower temperatures the appliance may not operate, resulting in a reduction in the storage life of the food. 2. Do not place the appliance near cookers or radiators or in direct sunlight, as this will cause extra strain on the appliance's functions. If installed next to a source of heat or freezer, maintain the following minimum side clearances: From Cookers 30 mm From Radiators 300 mm From Freezers 25 mm 3. Make sure that sufficient room is provided around the appliance to ensure free air circulation (Item 2). Put the back airing lid to the back of your refrigerator to set the distance between the refrigerator and the wall (Item 3). 2

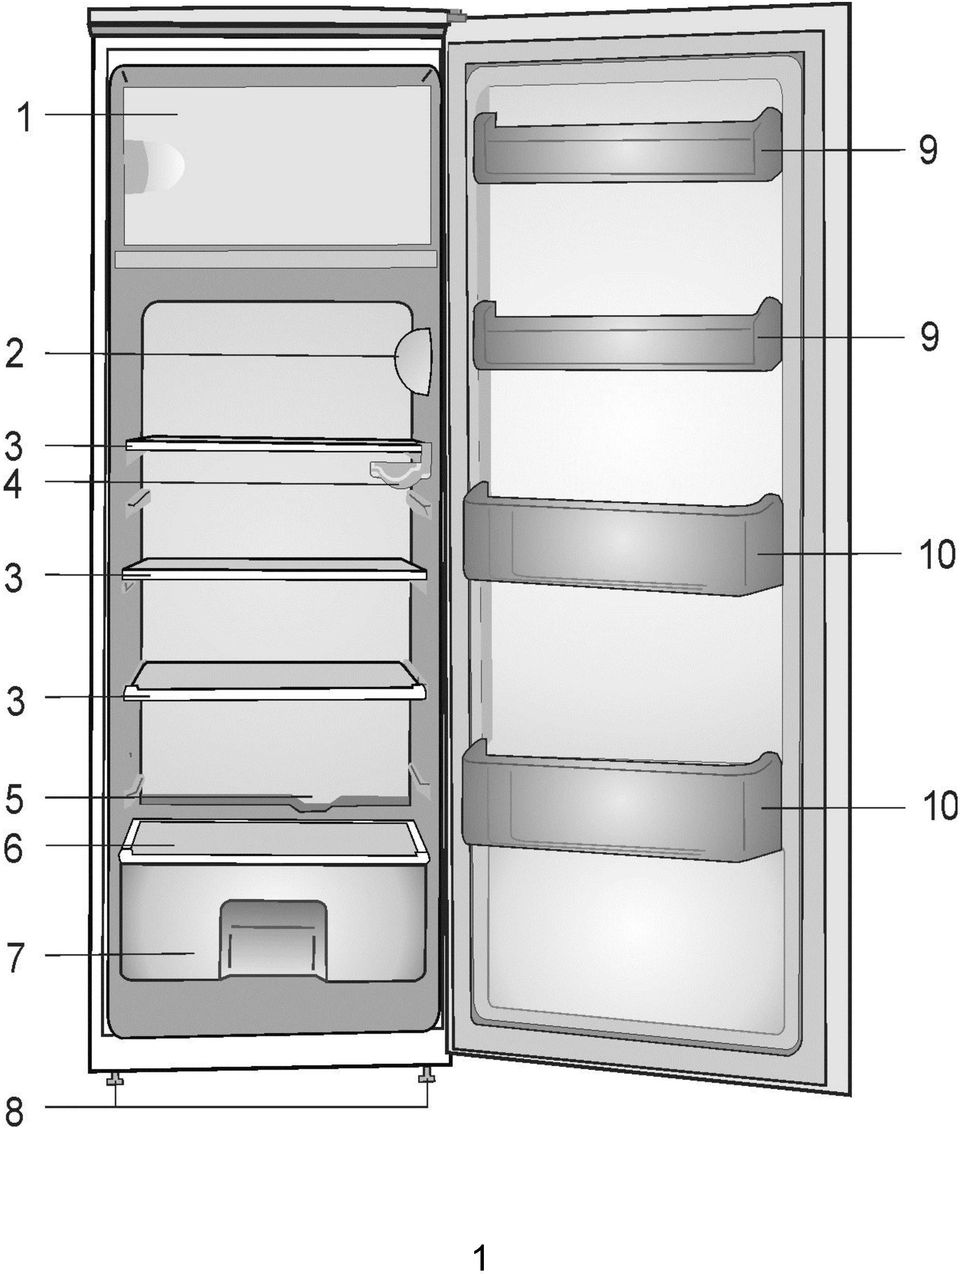
10 GB 4. The appliance should be positioned on a smooth surface. The two front feet can be adjusted as required.to ensure that your appliance is standing upright adjust the two front feet by turning clockwise or anticlockwise, until firm contact is secured with the floor. Correct adjustment of feet prevents excessive vibration and noise (Item 4). 5. Refer to "Cleaning and Care" section to prepare your appliance for use. Getting to know your appliance (Item 1) 1 - Low temperature compartment 2 - Thermostat and lamp housing 3 - Adjustable Cabinet shelves 4 - Wine bottle support 5 - Defrost water collection channel - Drain tube 6 - Crisper cover 7 - Crisper 8 - Adjustable front feet 9 - Jars shelf 10 - Bottle shelf Suggested arrangement of food in the appliance Instruction for use 6. To store raw meat, wrap in polythene bags and place on the lowest shelf. Do not allow to come into contact with cooked food, to avoid contamination. For safety, only store raw meat for two to three days. 7. For maximum efficiency, the removable shelves should not be covered with paper or other materials to allow free circulation of cool air. 8. Do not keep vegetable oil on door shelves. Keep the food packed, wrapped or covered. Allow hot food and beverages to cool before refrigerating. Leftover canned food should not be stored in the can. 9. Fizzy drinks should not be frozen and products such as flavoured water ices should not be consumed too cold. 10. Some fruit and vegetables suffer damage if kept at temperatures near 0 C. Therefore wrap pineapples, melons, cucumbers, tomatoes and similar produce in polythene bags. 11. High-proof alcohol must be stored upright in tightly closed containers. Never store products that contain an inflammable propellant gas (e.g. cream dispensers, spray cans, etc.) or explosive substances. These are an explosion hazard. Guidelines for obtaining optimum storage and hygiene: 1. The fridge compartment is for the shortterm storage of fresh food and drinks. 2. The low temperature compartment is rated and suitable for the freezing and storage of pre-frozen food. The recommendation for storage as stated on the food packaging should be observed at all times. 3. Cooked dishes should be stored in airtight containers. 4. Fresh wrapped produce can be kept on the shelf. Fresh fruit and vegetables should be cleaned and stored in the crispers. 5. Bottles can be kept in the door section. 3
 1 - Low temperature compartment 2 - Thermostat and lamp housing 3 - Adjustable Cabinet shelves 4 - Wine bottle support 5 - Defrost water collection channel -")
11 GB Temperature control and adjustment Operating temperatures are controlled by the thermostat knob. If the thermostat knob is in position "0" the appliance is off. In this case neither the lamp for inside lighting will light. If the appliance works correctly the following temperatures are obtained: - Low temperature compartment (marked with 4 stars ): C or a lower temperature. - Fridge compartment: C. The inside temperatures can vary according to the use conditions of the appliance: location, ambient temperature, door opening frequency, charge with food. The position of the thermostat knob will be modified according to these conditions. Generally, for an ambient temperature of 25 0 C, the thermostat knob will be adjusted on an average position. Avoid a thermostat knob position which could result in a continuous operation of the appliance. This leads to the decrease of the temperatures below 0 0 C, with the danger of drinks and fresh food freezing, and of excessive ice build-up on the evaporator and on the evaporator door as well as of decrerasing the energy efficiency of the appliance (increase of the energy consumption). Before operating Final Check Before you start using the appliance check that: 1. The feet have been adjusted for perfect levelling. 2. The interior is dry and air can circulate freely at the rear. 3. The interior is clean as recommended under "Cleaning and care. 4. The plug has been inserted into the wall socket and the electricity is switched on. When the door is open the interior light will come on. Instruction for use And note that: 5. You will hear a noise as the compressor starts up. The liquid and gases sealed within the refrigeration system may also make some (noise), whether the compressor is running or not. This is quite normal. 6. Slight undulation of the top of the cabinet is quite normal due to the manufacturing process used; it is not a defect. 7. We recommend setting the thermostat knob midway and monitor the temperature to ensure the appliance maintains desired storage temperatures (See section Temperature Control and Adjustment). 8. Do not load the appliance immediately it is switched on. Wait until the correct storage temperature has been reached. We recommend checking the temperature with an accurate thermometer (see; Temperature Control and Adjustment). Freezing fresh food Please observe the following instructions to obtain the best results. Do not freeze too large a quantity at any one time. The quality of the food is best preserved when it is frozen right through to the core as quickly as possible. Do not exceed the freezing capacity of your appliance in 24 h. Placing warm food into the low temperature compartme compartment causes the refrigeration machine to operate continously until the food is frozen solid. This can temporarily lead to excessive cooling of the refrigeration compartment. When freezing fresh food, keep the thermostat knob at medium position. Small quantities of food up to 1/2 kg. (1 lb) can be frozen without adjusting the temperature control knob. Take special care not to mix already frozen food and fresh food. 4

12 GB Making ice cubes Fill the ice - cube tray 3/4 full with water and place it in the freezer. Loosen frozen trays with a spoon handle or a similar implement; never use sharp-edged objects such as knives or forks. Defrosting The fridge compartment defrosts automatically. The defrost water runs to the drain tube via a collection container at the back of the appliance (Item 6). During defrosting, water droplets may form at the back of the fridge compartment where a concealed evaporator is located. Some droplets may remain on the liner and refreeze when defrosting is completed. Do not use pointed or sharp-edged objects such as knives or forks to remove the droplets which have refrozen. If, at any time, the defrost water does not drain from the collection channel, check that no food particles have blocked the drain tube. The drain tube can be cleared with a pipecleaner or similar implement. Check that the tube is permanently placed with its end in the collecting tray on the compressor to prevent the water spilling on the electric installation or on the floor (Item 7). Freezer compartment Instruction for use The low temperature compartment: defrost twice a year or when a frost layer of around 7 (1/4") mm has formed. To start the defrosting procedure, switch off the appliance at the socket outlet and pull out the mains plug. All food should be wrapped in several layers of newspaper and stored in a cool place (e.g. fridge or larder). Containers of warm water may be placed carefully in the freezer to speed up the defrosting. Do not use pointed or sharp-edged objects, such as knives or forks to remove the frost. Never use hairdryers, electrical heaters or other such electrical appliances for defrosting. Sponge out the defrost water collected in the bottom of the freezer compartment. After defrosting, dry the interior thoroughly. Insert the plug into the wall socket and switch on the electricity supply. 5

13 GB Replacing the interior light bulb Should the light fail, switch off at the socket outlet and pull out the mains plug. Then ensure the bulb is screwed securely in the bulb holder. Replace the plug and switch on. If the light still fails, obtain a replacement E14 screw-cap type 15 Watt (Max) bulb from your local electrical store and then fit it. Carefully dispose of the burnt-out light bulb immediately. Cleaning and care 1. We recommend that you switch off the appliance at the socket outlet and pull out the mains plug before cleaning. 2. Never use any sharp instruments or abrasive substances, soap, household cleaner, detergent or wax polish for cleaning. 3. Use luke warm water to clean the cabinet of the appliance and wipe it dry. 4. Use a damp cloth wrung out in a solution of one teaspoon of bicarbonate of soda to one pint of water to clean the interior and wipe it dry. 5. Make sure that no water enters the temperature control box. 6. If the appliance is not going to be used for a long period of time, switch it off, remove all food, clean it and leave the door ajar. 7. We recommend that you polish the metal parts of the product (i.e. door exterior, cabinet sides) with a silicone wax (car polish) to protect the high quality paint finish. 8. Any dust that gathers on the condenser, which is located at the back of the appliance, should be removed once a year with a vacuum cleaner. 9. Check door seals regularly to ensure they are clean and free from food particles. Instruction for use 10. Never: Clean the appliance with unsuitable material; eg petroleum based products. Subject it to high temperatures in any way, Scour, rub etc., with abrasive material. 11. Removal of door tray: To remove a door tray, remove all the contents and then simply push the door tray upwards from the base. 12. Make sure that the special plastic container at the back of the appliance which collects defrost water is clean at all times. If you want to remove the tray to clean it, follow the instructions below: Switch off at the socket outlet and pull out the mains plug Gently uncrimp the stud on the compressor, using a pair of pliers, so that the tray can be removed Lift it up. Clean and wipe it dry Reassemble, reversing the sequence and operations 13. Large accumulation of ice will impair the performance of the low temperature compartment. Repositioning the door Proceed in numerical order (Item 8). 6

14 GB Do s and don ts Do- Clean and defrost your appliance regularly (See "Defrosting") Do- Keep raw meat and poultry below cooked food and dairy products. Do- Take off any unusable leaves on vegetables and wipe off any soil. Do- Leave lettuce, cabbage, parsley and cauliflower on the stem. Do- Wrap cheese firstly in greaseproof paper and then in a polythene bag, excluding as much air as possible. For best results, take out of the fridge compartment an hour before eating. Do- Wrap raw meat and poultry loosely in polythene or aluminium foil. This prevents drying. Do- Wrap fish and offal in polythene bags. Do- Wrap food with a strong odour or which may dry out, in polythene bags, or aluminium foil or place in airtight container. Do- Wrap bread well to keep it fresh. Do- Chill white wines, beer, lager and mineral water before serving. Do- Check contents of the freezer every so often. Do- Keep food for as short a time as possible and adhere to "Best Before" and "Use by" etc. dates. Do- Store commercially frozen food in accordance with the instructions given on the packets. Do- Always choose high quality fresh food and be sure it is thoroughly clean before you freeze it. Do- Prepare fresh food for freezing in small portions to ensure rapid freezing. Do- Wrap all food in aluminium foil or freezer quality polythene bags and make sure any air is excluded. Do- Wrap frozen food immediately after purchasing and put it in to the freezer as soon as possible. Do- Defrost food in the fridge compartment. Instruction for use Don t- Store bananas in your fridge compartment. Don t- Store melon in your fridge. It can be chilled for short periods as long as it is wrapped to prevent it flavouring other food. Don t- Cover the shelves with any protective materials which may obstruct air circulation. Don t- Store poisonous or any dangerous substances in your appliance. It has been designed for the storage of edible foodstuffs only. Don t- Consume food which has been refrigerated for an excessive length of time. Don t- Store cooked and fresh food together in the same container. They should be packaged and stored separately. Don t- Let defrosting food or food juices drip onto food. Don t- Leave the door open for long periods, as this will make the appliance more costly to run and cause excessive ice formation. Don t- Use sharp edged objects such as knives or forks to remove the ice. Don t- Put hot food into the appliance. Let it cool down first. Don t- Put liquid-filled bottles or sealed cans containing carbonated liquids into the freezer, as they may burst. Don t- Exceed the maximum freezing loads when freezing fresh food. Don t- Give children ice-cream and water ices direct from the freezer. The low temperature may cause 'freezer burns' on lips. Don t- Freeze fizzy drinks. Don t- Try to keep frozen food which has thawed; it should be eaten within 24 hours or cooked and refrozen. Don t- Remove items from the freezer with wet hands. 7

15 GB Troubleshooting If the appliance does not operate when switched on, check; That the plug is inserted properly in the socket and that the power supply is on. (To check the power supply to the socket, plug in another appliance). Whether the fuse has blown/circuit breaker has tripped/main distribution switch has been turned off. Instruction for use That the temperature control has been set correctly. That the new plug is wired correctly, if you have changed the fitted, moulded plug. If the appliance is still not operating at all after above checks, contact the dealer from whom you purchased the unit. Please ensure that above checks have been done, as a charge will be made if no fault is found. Technical data Brand Appliance type REFRIGERATOR-FREEZER Type I SSA25020 Total gross volume (l.) 233 Total usable volume (l.) 221 The low temperature compartment usable volume (l.) 20 Refrigerator useful volume 201 Freezing capacity (kg/24 h) 2 Energy class (1) A+ Power consumption (kwh/year) (2) 214 Autonomy (h) 18 Noise [db(a) re 1 pw] 41 Ecological refrigerating agent R600a (1) Energy class: A+++ D (A+++ = economical D = less economical) (2) The real power consumption depends on using conditions and appliance location. The symbol on the product or on packaging indicates that this product may not be treated as household waste. Instead it shall be handed over to the applicable collection point for the recycling of electrical and electronic equipment. By ensuring this product is disposed of correctly, you will help prevent potential negatyve consequences for the environment and human health, which could otherwise be otherwise be caused by inappropriate waste handling of this product. For more detailed information about recycling of this product, please contact your local city office, you household waste disposal service or the shop where you purchased the product. 8

16 IT Istruzioni per l'uso Complimenti per la scelta di un elettrodomestico di qualità, progettato per una lunga durata. Innanzitutto la sicurezza! Non collegare l'elettrodomestico all'alimentazione elettrica finché non sono stati rimossi l'imballaggio e le protezioni per il trasporto. Lasciare l'elettrodomestico diritto per almeno 12 ore prima di accenderlo, per consentire all'olio del compressore di risistemarsi se è stato trasportato in modo orizzontale. Se si dismette un elettrodomestico vecchio con lucchetto o chiusura sullo sportello, assicurarsi che sia in condizione di sicurezza per evitare che un bambino vi resti intrappolato. Questo elettrodomestico deve essere utilizzato esclusivamente per l'uso per cui è stato progettato. Non gettare l'elettrodomestico nel fuoco. L'elettrodomestico contiene sostanze non CFC nel materiale isolante che sono infiammabili. Si consiglia di contattare l'autorità locale per informazioni sullo smaltimento e sugli impianti disponibili. È sconsigliato l'utilizzo dell'elettrodomestico in ambienti freddi e non riscaldati (ad esempio garage, serra, dipendenza, rimessa, giardino, etc.). Per ottenere le migliori prestazioni possibili e un funzionamento senza problemi è molto importante leggere con attenzione le seguenti informazioni. La mancata osservanza di queste istruzioni può invalidare il diritto alla manutenzione gratuita in periodo di garanzia. Conservare queste istruzioni al sicuro per una rapida consultazione. Questo apparecchio elettrico non e' inteso per essere utilizzato da persona con handicap fisico, e/o mentale o con mancanza di esperienza e competenza anche se ad esse siano state date istruzioni concernenti l'uso da un supervisore o da persona con esperienza. I bambini devono essere supervisionati da un un adulto affinche' non utilizzino l'apperecchio per il gioco. 9

17 IT Requisiti elettrici Prima di inserire la spina nella presa a muro assicurarsi che la tensione e la frequenza riportate sull'etichetta informativa all'interno dell'elettrodomestico corrispondano all'alimentazione in uso. Si consiglia di collegare questo elettrodomestico alla rete di alimentazione tramite una presa dotata di interruttore e fusibile in una posizione facilmente accessibile. Avvertenza! Questo elettrodomestico deve essere dotato di messa a terra. Le riparazioni all'apparecchiatura elettrica devono essere eseguite elusivamente da tecnici qualificati. Riparazioni errate eseguite da persone non qualificate possono provocare conseguenze cruciali per l'utilizzatore dell'elettrodomestico. ATTENZIONE! Questo elettrodomestico utilizza il gas R600a che rispetta l'ambiente ma è infiammabile. Durante il trasporto e l'installazione del prodotto è necessario fare attenzione a non danneggiare il sistema di raffreddamento. Se il sistema di raffreddamento è danneggiato e vi è perdita di gas dal sistema, tenere il prodotto lontano da fiamme e ventilare la stanza per il tempo necessario. AVVERTENZA - Non utilizzare apparecchiature meccaniche o altri mezzi diversi da quelli consigliati dal produttore per accelerare il processo di sbrinamento. AVVERTENZA - Non danneggiare il circuito del refrigerante. AVVERTENZA - Non utilizzare componenti elettrici all'interno degli scomparti per la conservazione del cibo, a meno che non siano del tipo consigliato dal produttore. AVVERTENZA - Se il cavo di alimentazione è danneggiato, deve essere sostituito dal produttore, dal suo agente per l'assistenza o da persone similmente qualificate per evitare rischi. Istruzioni per il trasporto 1. L'elettrodomestico deve essere trasportato solo in posizione verticale. L'imballaggio fornito deve essere intatto durante il trasporto. 2. Se l'elettrodomestico è stato trasportato in posizione orizzontale, non deve essere messo in funzione per almeno 12 ore per consentire al sistema di risistemarsi. Istruzioni per l'uso 3. La mancata osservanza delle istruzioni sopra riportare può causare danni all'elettrodomestico dei quali il produttore non è responsabile. 4. L'elettrodomestico deve essere protetto da pioggia, umidità e altri fenomeni atmosferici. Importante! È necessario fare attenzione quando si pulisce/trasporta l'elettrodomestico affinché quest'ultimo non tocchi la parte inferiore dei cavi metallici del condensatore sulla parte posteriore dell'elettrodomestico in quanto potrebbero verificarsi lesioni alle dita e alle mani. Non tentare di sedersi o di stare in piedi sull'elettrodomestico poiché non è progettato per tale uso. Potrebbero risultarne lesioni personali o danni all'elettrodomestico. Assicurarsi che i cavi principali non siano impigliati sotto l'elettrodomestico durante e dopo lo spostamento poiché potrebbero derivarne danni ai cavi. Non permettere ai bambini di giocare con l'elettrodomestico o di manomettere i comandi. Quando si apre/chiude lo sportello dello scomparto bassa temperatura, tirare delicatamente l aletta di chiusura (elemento 5). Istruzioni di installazione 1. Non tenere l'elettrodomestico in un ambiente in cui la temperatura scenderà con ogni probabilità sotto i 10 C (50 F) di notte e/o in inverno, poiché è progettato per il funzionamento a temperature comprese tra i +10 e +38 C (50 e 100 F). A temperature più basse, l'elettrodomestico potrebbe non funzionare, provocando una riduzione nella durata di conservazione del cibo. 2. Non posizionare l'elettrodomestico vicino a fornelli o radiatori o alla luce diretta del sole, poiché ciò causerebbe ulteriore sollecitazione sulle funzioni dell'elettrodomestico. Se viene installato accanto a una fonte di calore o a un freezer, mantenere le seguenti distanze laterali minime: Da fornelli 30 mm Da radiatori 300 mm Da freezer 25 mm 3. Assicurarsi che ci sia spazio sufficiente intorno all'elettrodomestico per garantire la libera circolazione dell'aria (elemento 2). Collocare il coperchio di aerazione posteriore sul retro del frigorifero per impostare la distanza tra il frigorifero e il muro (elemento 3). 10

18 IT 4. L'elettrodomestico deve essere collocato su una superficie piana. È possibile regolare i due piedi anteriori come necessario. Per assicurare che l'elettrodomestico sia in posizione verticale regolare i due piedi anteriori ruotandoli in senso orario o antiorario finché non si ottiene contatto stabile con il pavimento. La corretta regolazione dei piedi previene vibrazione e rumore eccessivi (elemento 4). 5. Consultare il capitolo "Pulizia e manutenzione" per preparare l'elettrodomestico per l'uso. Conoscere l'elettrodomestico (Elemento 1) 1 - Scomparto bassa temperatura 2 - Alloggiamento del termostato e della spia 3 - Mensole regolabili dell'armadietto 4 - Supporto per bottiglie di vino 5 - Canale di raccolta dell'acqua di sbrinamento - tubo di drenaggio 6 - Coperchio scomparto frutta e verdura 7 - Scomparto frutta e verdura 8 - Piedi anteriori regolabili 9 - Mensola barattoli 10 - Mensola bottiglie Suggerimenti sulla disposizione del cibo nell'elettrodomestico Istruzioni per l'uso 6. Per conservare carne cruda avvolgerla in buste di polietilene e collocarla sulla mensola più bassa. Non mettere la carne cruda in contatto con cibi cotti, per evitare contaminazioni. Per sicurezza conservare la carne cruda solo per due o tre giorni. 7. Per la massima efficienza le mensole amovibili non devono essere coperte di carta o altri materiali affinché sia possibile la libera circolazione dell'aria fredda. 8. Non conservare oli vegetali sulle mensole dello sportello. Conservare i cibi confezionati, incartati o coperti. Permettere ai cibi e alle bevande calde di raffreddarsi prima di inserirle nel frigorifero. I cibi in scatole di latta parzialmente consumati non devono essere conservati nella latta. 9. Non congelare bevande gasate e non consumare prodotti come cubetti di ghiaccio aromatizzati troppo freddi. 10. Alcuni tipi di frutta e verdura si rovinano se conservati a temperature intorno a 0 C. Pertanto avvolgere ananas, meloni, cetrioli e prodotti simili in buste di polietilene 11. I super alcolici devono essere conservati in posizione verticale in contenitori ben chiusi. Non conservare mai prodotti che contengono gas propellenti infiammabili (ad esempio erogatori di crema, bombolette spray, ecc.) o sostanze esplosive. Sono a rischio di esplosione. Linee guida per ottenere la conservazione e l'igiene ottimale: 1. Lo scomparto frigo serve per la conservazione a breve termine di cibi freschi e bevande. 2. Lo scomparto bassa temperatura è adatto al congelamento e alla conservazione di cibo precongelato. È necessario osservare sempre i consigli per la conservazione riportati sulla confezione dei cibi. 3. I piatti cotti devono essere conservati in contenitori a tenuta d'aria. 4. I prodotti freschi incartati possono essere conservati sulla mensola. La frutta fresca e le verdure devono essere puliti e conservati nello scomparto apposito. 5. È possibile conservare le bottiglie nell'apposito spazio nello sportello. 11
 1 - Scomparto bassa temperatura 2 - Alloggiamento del termostato e della spia 3 - Mensole regolabili dell'armadietto 4 - Supporto per bottiglie di vino 5 -")
19 IT Controllo e regolazione della temperatura Le temperature di funzionamento sono controllate dalla manopola del termostato. Se la manopola del termostato è nella posizione "0" l'elettrodomestico è spento. In tal caso la luce interna non si illuminerà. Se l apparecchio funziona in modo corretto, saranno presenti le seguenti temperature: - Scomparto bassa temperatura (marcato con 4 stelle ): C o una temperatura inferiore. - Scomparto frigo: C. Le temperature ottenute all'interno possono variare in base alle condizioni di utilizzo dell'elettrodomestico: posizionamento, temperatura ambiente, frequenza di apertura dello sportello, alimenti caricati. La posizione della manopola del termostato cambierà in base a queste condizioni. In genere con una temperatura ambientale di 25 0 C, il termostato verrà regolato su una posizione media. Evitare una posizione del termostato che potrebbe provocare il funzionamento continuo dell apparecchio. Questo porta alla diminuzione della temperatura al di sotto di 0 C, a danno di bevante e cibi freschi che si congelano e provocando una eccessiva formazione di ghiaccio sullo sportello dell evaporatore nonché una diminuzione dell efficienza energetica dell apparecchio (aumento di consumo energetico). Prima della messa in funzione Controllo finale Prima di cominciare a utilizzare l'elettrodomestico controllare che: 1. I piedi siano stati regolati per un livellamento perfetto. 2. L'interno sia asciutto e l'aria circoli liberamente nella parte posteriore. 3. L'interno sia pulito come consigliato nel capitolo "Pulizia e manutenzione. 4. La spina sia stata inserita nella presa a muro e l'elettricità sia accesa. Quando lo sportello è aperto la luce interna è accesa. Istruzioni per l'uso Si noti che: 5. Si udrà un rumore quando il compressore si avvia. I liquidi e i gas sigillati nel sistema refrigerante possono produrre dei rumori, che il compressore sia in funzione o meno. Ciò è abbastanza normale. 6. La leggera ondulazione della parte superiore dell'armadietto è abbastanza normale a causa del processo di fabbricazione utilizzato: non si tratta di un difetto. 7. Si consiglia di impostare la manopola del termostato a metà strada e di monitorare la temperatura per assicurare che l'elettrodomestico mantenga la temperatura di conservazione desiderata (vedere il capitolo Controllo e regolazione della temperatura). 8. Non caricare l'elettrodomestico appena lo si accende. Attendere finché non viene raggiunta la temperatura di conservazioni corretta. Si consiglia di controllare la temperatura con un termometro di precisione (vedere il capitolo Controllo e regolazione della temperatura). Congelamento di cibi freschi Attenersi alle seguenti istruzioni per ottenere i risultati migliori. Non congelare quantità troppo grandi in una volta sola. La qualità del cibo viene preservata in modo ottimale quando il cibo viene congelato il più velocemente possibile. Non superare la capacità di congelamento dell'elettrodomestico in 24 ore. Il posizionamento di cibi caldi nello scomparto bassa temperatura provoca il funzionamento continuo del refrigeratore finché il cibo non si solidifica. Ciò può causare un raffreddamento temporaneo eccessivo dello scomparto di refrigerazione. Quando si congela cibo fresco, tenere la manopola del termostato in una posizione intermedia. È possibile congelare piccole quantità di cibo fino a 1/2 kg. (1 la) senza regolare la manopola della temperatura. Fare attenzione a non mescolare cibi già congelati e cibi freschi. 12

20 IT Preparazione dei cubetti di ghiaccio Riempire la vaschetta per cubetti di ghiaccio per 3/4 con acqua e metterla nel freezer. Allentare la vaschetta congelata con un cucchiaio o un attrezzo simile; non utilizzare mai oggetti appuntiti come coltelli o forchette. Sbrinamento A) Lo scomparto frigo si sbrina automaticamente. L'acqua di sbrinamento scorre nel tubo di scarico tramite un contenitore di raccolta posizionato nella parte posteriore dell'elettrodomestico (elemento 6). Durante lo sbrinamento, possono formarsi goccioline d'acqua nella parte posteriore dello scomparto frigo in cui è posto un evaporatore nascosto. Alcune goccioline possono rimanere sul bordo e congelarsi di nuovo al termine dello sbrinamento. Non utilizzare oggetti appuntiti come coltelli o forchette per rimuovere le goccioline ricongelate. Se in qualsiasi momento l'acqua di sbrinamento non viene scaricata dal canale di raccolta, controllare che il tubo di scarico non sia stato ostruito da particelle di cibo. È possibile pulire il tubo di scarico con un pulitore per tubi o un attrezzo analogo. Controllare che il tubo sia collocato in modo stabile con l'estremità nel vassoio di raccolta sul compressore per evitare che l'acqua spruzzi sull'istallazione elettrica o sul pavimento (elemento 7). Istruzioni per l'uso B) Scomparto bassa temperatura: sbrinare due volte all'anno o quando si crea uno spessore di ghiaccio di circa 7 mm (1/4"). Per avviare la procedura di sbrinamento, spegnere l'elettrodomestico sulla presa e scollegare il cavo di alimentazione. Tutto il cibo deve essere incartato in diversi strati di carta di giornale e conservato il un luogo fresco (ad esempio un frigorifero o una dispensa). È possibile porre con attenzione contenitori di acqua calda nel freezer per accelerare lo sbrinamento. Non utilizzare oggetti appuntiti come coltelli o forchette per rimuovere il ghiaccio. Non utilizzare mai asciugacapelli, stufe o altri elettrodomestici simili per lo sbrinamento. Pulire via l'acqua di sbrinamento raccolta nella parte inferiore dello scomparto freezer. Dopo lo sbrinamento, asciugare completamente l'interno. Inserire la spina nella presa a muro e accendere l'alimentazione elettrica. 13

MQ964..GB MQ965..GB. en Operating instructions ar
 MQ964..GB MQ965..GB en Operating instructions ar MQ964-965GB-Uniklein_en-ar.book Seite 2 Donnerstag, 4. Dezember 2014 4:39 16 en English...........................................................3 ar...........................................................6.................................................
B/S/H/ Startfolie. B/S/H Bosch und Siemens Hausgeräte GmbH - KDT-T B/S/H Bosch und Siemens Hausgeräte GmbH KDT-T
 Startfolie B/S/H/ 1 Product division Event Location Refrigeration Side by Side USA B/S/H Bosch und Siemens Hausgeräte GmbH KDT-T 2 Side-by-Side Appliances Models: Bosch Siemens KAN 56V** KAN58A** KA58NA**with
Power supply Interference suppressed acc. to DIN EN /- 4, EN 55011, EN CI. B, power factor corrected Power factor BöSha LED driver
 Operating Instructions LED Mast Double Luminaire Callisto SC DB, incl. Inclination Adjustment, Single-Chip Technology (Please, read carefully before starting operation) Version: 16.01.2017 Model 369-M
CABLE TESTER. Manual DN-14003
 CABLE TESTER Manual DN-14003 Note: Please read and learn safety instructions before use or maintain the equipment This cable tester can t test any electrified product. 9V reduplicated battery is used in
Outdoor-Tasche. Operating Instructions Bedienungsanleitung GB D
 00 181243 Outdoor Case Outdoor-Tasche Splish Splash Operating Instructions Bedienungsanleitung GB D A B C D OPEN G Operating instruction 1. Important Notes Children are not permitted to play with the device.
VIDEO CALL CAMERA G-VCAM-01
 VIDEO CALL CAMERA G-VCAM-01 EN AUS GUTEM GRUND ENGLISH 07-10 2 SAFETY AND INFORMATION Safety 7 This camera is designed to transmit video and audio signals. All other uses are expressly prohibited. 7 Protect
Fermentierkessel. Fermentation Kettle
 Fermentierkessel Fermentation Kettle 10032122 10032123 Sehr geehrter Kunde, DE wir gratulieren Ihnen zum Erwerb Ihres Gerätes. Lesen Sie die folgenden Hinweise sorgfältig durch und befolgen Sie diese,
Gartenbrunnen
 Gartenbrunnen 10029934 10029935 10029932 10030994 10029932 10029934 10029935 Sehr geehrter Kunde, wir gratulieren Ihnen zum Erwerb Ihres Gerätes. Lesen Sie die folgenden Hinweise sorgfältig durch und befolgen
DSA25020S GB IT D. Instruction for use. Istruzioni per l'uso. Gebrauchsanweisung
 DSA25020S GB IT D Instruction for use Istruzioni per l'uso Gebrauchsanweisung WARNING! In order to ensure a normal operation of your refrigerating appliance, which uses a completely environmentally friendly
DENTAL IMPLANTS BY CAMLOG medical
 IMPLANT PASS DENTAL IMPLANTS BY CAMLOG medical devices made in germany for your well-being and a natural appearance. Personal data Surname First name Address ZIP code City Date of birth Health insurance
Westfalia Bedienungsanleitung. Nr
 Westfalia Bedienungsanleitung Nr. 108610 Bedienungsanleitung Edelstahl Sicherheits-Brennbehälter Artikel Nr. 10 99 83 Sicherheitshinweise Der Sicherheits-Brennbehälter ist zur Verwendung in dem Westfalia
Where are we now? The administration building M 3. Voransicht
 Let me show you around 9 von 26 Where are we now? The administration building M 3 12 von 26 Let me show you around Presenting your company 2 I M 5 Prepositions of place and movement There are many prepositions
Englisch-Grundwortschatz
 Englisch-Grundwortschatz Die 100 am häufigsten verwendeten Wörter also auch so so in in even sogar on an / bei / in like wie / mögen their with but first only and time find you get more its those because
ISTRUZIONI PER COLLEGAMENTO ECU MERCEDES TEMIC ACTROS ATEGO UNIMOG ECONIC ecc.
 ISTRUZIONI PER COLLEGAMENTO ECU MERCEDES TEMIC ACTROS ATEGO UNIMOG ECONIC ecc. ISTRUCTIONS FOR THE ECU MERCEDES TEMIC ACTROS ATEGO UNIMOG ecc. CONNECTION FG Technology 1/11 Smontare la Ecu dal camion,
p^db=`oj===pìééçêíáåñçêã~íáçå=
 p^db=`oj===pìééçêíáåñçêã~íáçå= Error: "Could not connect to the SQL Server Instance" or "Failed to open a connection to the database." When you attempt to launch ACT! by Sage or ACT by Sage Premium for
ATEX-Check list. Compiled by: Date: Signature: Acceptable practice at the determination of flash point: Closed cup according to ISO 2719
 Fire and explosion hazard ATEX 137 1999/92/EG und ATEX 95 2014/34/EU Danger assessment and determination of explosion protection zone for the test space as well as the installation site ATEX-Check list
VELA ROUND. Montageanleitung Mounting Instructions Istruzioni di montaggio
 VELA ROUND WALL 170 VELA ROUND WALL 260 VELA ROUND WALL 350 VELA ROUND WALL 450 20 73,6 30 35 105 10 50 55 75 75 40 42,5 95 40 105 VELA ROUND CEILING 170 VELA ROUND CEILING 260 VELA ROUND CEILING 350 VELA
Electrical tests on Bosch unit injectors
 Valid for Bosch unit injectors with order numbers 0 414 700 / 0 414 701 / 0 414 702 Parts Kit Magnet*: - F00H.N37.925 - F00H.N37.933 - F00H.N37.934 * For allocation to the 10-place Bosch order number,
Trouble Shooting Guide
 Trouble Shooting Guide Post-Installation Check List YES NO 1. Visual check if the wiring matches with the installation manual. (3.2 Cable connection) 2. Check if both the Auxilliary Power Switch and Circuit
OPERATING INSTRUCTIONS Test pump ZG 5.1. and ZG 5.2.
 Elektromotoren und Gerätebau Barleben GmbH OPERATING INSTRUCTIONS Test pump ZG 5.1. and ZG 5.2. Elektromotoren und Gerätebau Barleben GmbH 2 Inhaltsverzeichnis Page 1 Use 4 2 Design features 4 2.1 Test
BRUUDT Kennzeichenhalter für die Honda NC750X ab 2016 BRUUDT Tail Tidy for the Honda NC750X 2016 and onwards.
 Montageanleitung Mounting instructions BRUUDT Kennzeichenhalter für die Honda NC750X ab 2016 BRUUDT Tail Tidy for the Honda NC750X 2016 and onwards. Noch einmal vielen Dank, dass Sie sich für unsere Produkte
 PATENT PENDING T4 9380198-8580198 - 8880198-2080198 INDICE / INDEX / INHALTSVERZEICHNIS Contenuto della scatola / Box contents / Verpackungsinhalt... 3 Informazioni tecniche / Technical information / Technische
Marderfalle
 Marderfalle 10028946 10028947 10028948 Sehr geehrter Kunde, zunächst möchten wir Ihnen zum Erwerb Ihres Gerätes gratulieren. Bitte lesen Sie die folgenden Anschluss- und Anwendungshinweise sorgfältig durch
Cleaning & Disinfection of Eickview Videoendoscopes
 Cleaning & Disinfection of Eickview Videoendoscopes EICKEMEYER KG Eltastrasse 8 78532 Tuttlingen T +497461 96 580 0 F +497461 96 580 90 E info@eickemeyer.de www.eickemeyer.de Preparation Cleaning should
Vinyl Clean.
 Vinyl Clean 10030740 Sehr geehrter Kunde, zunächst möchten wir Ihnen zum Erwerb Ihres Gerätes gratulieren. Bitte lesen Sie die folgenden Anschluss- und Anwendungshinweise sorgfältig durch und befolgen
Snap-in switch for switches PSE, MSM and MCS 30
 Product manual Snap-in switch for switches PSE, MSM and MCS 30 CONTENTS 1. PRODUCT DESCRIPTION 2. DATA AND DIMENSIONAL DRAWINGS 2.1. Technical Data 2.2. Dimensions of PSE with a Mounting Diameter 19 mm
Aufbaudose mit Schalter Spacing box with switch. Montageanleitung mounting instructions
 Aufbaudose mit Schalter Spacing box with switch Montageanleitung mounting instructions body head Aufbaudose mit Schalter Montageanleitung S. 2 mounting instructions p. 9 $ 0.2m Sicherheitshinweise Die
TUNING GUIDE. ridefox.com
 TUNING GUIDE ridefox.com sag setting To achieve the best performance from your FOX suspension, adjust the air pressure to attain your proper sag setting. Sag is the amount your suspension compresses under
CSA21032 GB D. Instruction for use. Gebrauchsanweisung
 CSA21032 GB D Instruction for use Gebrauchsanweisung WARNING! In order to ensure a normal operation of your refrigerating appliance, which uses a completely environmentally friendly refrigerant the R600a
Beleuchteter Spiegel
 Beleuchteter Spiegel 00099 00099 00099 0 Artikel Artikelnummer 00099 00099 00099 Maße 80x60 cm 0x80 cm 40x70 cm Teile im Lieferumfang Lieferumfang A B C Spiegel Schrauben Dübel Benötigtes Werkzeug (nicht
4M Economy INSTRUCTION MANUAL
 4M Economy INSTRUCTION MANUAL Part List Part no. Qty 4x4m 4x6m 4x8m 4x10m No.1 6 8 10 12 No.2 6 9 12 15 No.3 6 8 10 12 No.4 6 6 6 6 No.5 3 6 9 12 No.6 56 64 72 80 No.7 30 42 54 66 Nr.8 4 4 4 4 No.9 4 4
LEUCHTKRAFT USER MANUAL PARL-7730
 LEUCHTKRAFT USER MANUAL PARL-7730 English Important Notes The unit corresponds to all relevant directives of the EU and is therefore marked with. WARNING The unit uses dangerous mains voltage.
Vini WKS 25. Cantina per vini Weinkühlschrank Cave à vin - Mode d'emploi. - Manuale dell'utente Bedienungsanleitung
 Vini WKS 25 Cantina per vini Weinkühlschrank Cave à vin - Mode d'emploi - Manuale dell'utente Bedienungsanleitung 9 3 3 Vini WKS 25 White Down TEMPERATURE Up On/Off Red TEMPERATURE Down White Up Red On/Off
Magic Figures. We note that in the example magic square the numbers 1 9 are used. All three rows (columns) have equal sum, called the magic number.
 have equal sum, called the magic number.") Magic Figures Introduction: This lesson builds on ideas from Magic Squares. Students are introduced to a wider collection of Magic Figures and consider constraints on the Magic Number associated with such
Magic Figures Introduction: This lesson builds on ideas from Magic Squares. Students are introduced to a wider collection of Magic Figures and consider constraints on the Magic Number associated with such
Uhrenbeweger Watch winders. Crystal
 Uhrenbeweger Watch winders Crystal Sehr geehrter Kunde, unsere Uhrenbeweger sind so konstruiert, dass sie trotz kompakter Abmessungen nur geringe Laufgeräusche verursachen. Jeder Antrieb erzeugt jedoch
Rev. Proc Information
 Rev. Proc. 2006-32 Information 2006, CPAs 1 Table 1-Total loss of the home Table 2- Near total loss is water to the roofline. Completely gut the home from floor to rafters - wiring, plumbing, electrical
Deceleration Technology. Rotary Dampers mit hohem Drehmoment WRD-H 2515 WRD-H 3015 WRD-H 4025 WRD-H
 Rotary Dampers mit hohem Drehmoment WRD-H 2515 WRD-H 3015 WRD-H 4025 WRD-H 6030 Deceleration Technology ONLINE CALCULATION AND 2D / 3D CAD DOWNLOAD M m L F Benefits Material: - Aluminium and steel Applications:
Hazards and measures against hazards by implementation of safe pneumatic circuits
 Application of EN ISO 13849-1 in electro-pneumatic control systems Hazards and measures against hazards by implementation of safe pneumatic circuits These examples of switching circuits are offered free
QUICK Inbetriebnahme. Pr ma. Inbetriebnahme Kurzanleitung Use quick instruction Uso guida rapida. primap15quv4. welcome to the world of Prima
 Pr ma i heat pellet heating systems Der Plug & Play Pelletskessel mit dem Selfservice Faktor QUICK Inbetriebnahme Inbetriebnahme Kurzanleitung Use quick instruction Uso guida rapida primap15quv4 Technische
Parameter-Updatesoftware PF-12 Plus
 Parameter-Updatesoftware PF-12 Plus Mai / May 2015 Inhalt 1. Durchführung des Parameter-Updates... 2 2. Kontakt... 6 Content 1. Performance of the parameter-update... 4 2. Contact... 6 1. Durchführung
Electrical testing of Bosch common rail piezo injectors
 Applies to generation CRI 3: Bosch 10-position order number 0 445 115 = CRI 3-16 (CRI 3.0) 1600 bar 0 445 116 = CRI 3-18 (CRI 3.2) 1800 bar 0 445 117 = CRI 3-20 (CRI 3.3) 2000 bar Tools required: Hybrid
Zitruspresse orange. Kochplatte
 Zitruspresse orange Kochplatte 10008166 10008167 10008168 10027880 Sehr geehrter Kunde, Wir gratulieren Ihnen zum Erwerb Ihres Klarstein Gerätes. Lesen Sie die folgenden Anschluss- und Anwendungshinweise
Installation manual / Montageanleitung WBC2 splice patch with Fibertray Spleissung/Rangierung mit Fibertray
 Content of Assembly Instruction I. Required tools II. Required parts III. Installation Inhalt der Montageanleitung I. Benötigte Werkzeuge II. Benötigte Teile III. Installation I. Required tools: I. Benötigtes
Technische Daten. Sicherheitshinweise
 10030256 LED-Baum Sehr geehrter Kunde, wir gratulieren Ihnen zum Erwerb Ihres Gerätes. Lesen Sie die folgenden Hinweise sorgfältig durch und befolgen Sie diese, um möglichen Schäden vorzubeugen. Für Schäden,
Registration of residence at Citizens Office (Bürgerbüro)
") Registration of residence at Citizens Office (Bürgerbüro) Opening times in the Citizens Office (Bürgerbüro): Monday to Friday 08.30 am 12.30 pm Thursday 14.00 pm 17.00 pm or by appointment via the Citizens
Registration of residence at Citizens Office (Bürgerbüro) Opening times in the Citizens Office (Bürgerbüro): Monday to Friday 08.30 am 12.30 pm Thursday 14.00 pm 17.00 pm or by appointment via the Citizens
Deceleration Technology. Rotary Dampers with high-torque range WRD-H 7550 WRD-H 9565 WRD-H
 Rotary Dampers with high-torque range WRD-H 7550 WRD-H 9565 WRD-H 12070 Deceleration Technology ONLINE CALCULATION AND 2D / 3D CAD DOWNLOAD M m L F Benefits Material: - Aluminium and steel Applications:
Lukas Hydraulik GmbH Weinstraße 39 D Erlangen. Mr. Sauerbier. Lukas Hydraulik GmbH Weinstraße 39 D Erlangen. edraulic rescue equipment
 Technical Report No. 028-7130 95685-050 of 22.02.2017 Client: Lukas Hydraulik GmbH Weinstraße 39 D-91058 Erlangen Mr. Sauerbier Manufacturing location: Lukas Hydraulik GmbH Weinstraße 39 D-91058 Erlangen
Leister SYSTEM SINGLE PATCH MODULE SPM 01
 D GB Leister SYSTEM SINGLE PATCH MODULE SPM 01 Leister Process Technologies Galileo-Strasse 10 CH-05 Kaegiswil/Switzerland Tel. +41-41 4 4 Fax +41-41 4 1 www.leister.com sales@leister.com Einbauanleitung
VGM. VGM information. HAMBURG SÜD VGM WEB PORTAL USER GUIDE June 2016
 Overview The Hamburg Süd VGM Web portal is an application that enables you to submit VGM information directly to Hamburg Süd via our e-portal Web page. You can choose to enter VGM information directly,
p^db=`oj===pìééçêíáåñçêã~íáçå=
 p^db=`oj===pìééçêíáåñçêã~íáçå= How to Disable User Account Control (UAC) in Windows Vista You are attempting to install or uninstall ACT! when Windows does not allow you access to needed files or folders.
BRUUDT Kennzeichenhalter für die Kawasaki Z800 BRUUDT Tail Tidy fort the Kawasaki Z800
 Montageanleitung Mounting instructions BRUUDT Kennzeichenhalter für die Kawasaki Z800 BRUUDT Tail Tidy fort the Kawasaki Z800 Noch einmal vielen Dank, dass Sie sich für unsere Produkte entschieden haben!
YOYO. Betriebsanleitung. operating instructions
 YOYO Betriebsanleitung operating instructions SICHERHEITS UND GEFAHRENHINWEISE: Der Aufbau dieser Leuchte entspricht der Schutzklasse I. Um diesen Zustand zu erhalten und einen gefahrlosen Betrieb sicherzustellen,
5M Economy INSTRUCTION MANUAL
 5M Economy INSTRUCTION MANUAL Part List Part no. Qty 5x6 5x8 5x10 5x12 No.1 16 20 24 28 No.2 9 12 15 18 No.3 8 10 12 14 No.4 8 10 12 14 No.5 2 2 2 2 No.6 4 4 4 4 No.7 2 3 4 5 No.8 4 6 8 10 No.9 56 64 72
Leister SYSTEM MULTI PATCH MODULE MPM 01
 D GB Leister SYSTEM MULTI PATCH MODULE MPM 0 Leister Process Technologies Galileo-Strasse 0 CH-0 Kaegiswil/Switzerland Tel. +- Fax +- www.leister.com sales@leister.com Einbauanleitung D Einbauanleitung
2.1 Subwoofer System EL-550
 2R057135 2.1 Subwoofer System EL-550 2R057135-07.07 Hama GmbH & Co KG D-86651 Monheim/Germany www.hama.com 2 2 1 3 0 4 Input 5 6 Output 7 8 9 2 d Bedienungsanleitung 1) Lautstärkeregler 2) Lautsprecheranschlusskabel
USBASIC SAFETY IN NUMBERS
 USBASIC SAFETY IN NUMBERS #1.Current Normalisation Ropes Courses and Ropes Course Elements can conform to one or more of the following European Norms: -EN 362 Carabiner Norm -EN 795B Connector Norm -EN
Gartenleuchte in Stein-Optik
 Gartenleuchte in Stein-Optik 10027662 10027664 10027666 10027668 10030343 10030344 10030345 10030346 10030347 Sehr geehrter Kunde, wir gratulieren Ihnen zum Erwerb Ihres Gerätes. Lesen Sie die folgenden
https://portal.microsoftonline.com
 Sie haben nun Office über Office365 bezogen. Ihr Account wird in Kürze in dem Office365 Portal angelegt. Anschließend können Sie, wie unten beschrieben, die Software beziehen. Congratulations, you have
Die Bedeutung neurowissenschaftlicher Erkenntnisse für die Werbung (German Edition)
") Die Bedeutung neurowissenschaftlicher Erkenntnisse für die Werbung (German Edition) Lisa Johann Click here if your download doesn"t start automatically Download and Read Free Online Die Bedeutung neurowissenschaftlicher
Die Bedeutung neurowissenschaftlicher Erkenntnisse für die Werbung (German Edition) Lisa Johann Click here if your download doesn"t start automatically Download and Read Free Online Die Bedeutung neurowissenschaftlicher
DSA DSA S
 Frigo-Congelatore Di Tipo I Kühl-Gefrier-Typ I Refrigerador-Congelador de Tipo I Réfrigérateur-Congélateur Type I Koel-Vriescombinatie Type I Külmik-Sügavkülmik, Tüüp I Хладилник и Фризер Тип I DSA 25030
Markengeschichte. Hingabe unterscheidet uns. Hartnäckigkeit beschreibt uns.
 Bedienungsanleitung Mit unserem Glauben gehen wir voran. Mit unserer Leidenschaft steigern wir unsere Erfahrung. Vergessen die eigenen Fehlschläge, aber nicht das unerfüllte Potential. Die Leidenschaft
VGM. VGM information. HAMBURG SÜD VGM WEB PORTAL - USER GUIDE June 2016
 Overview The Hamburg Süd VGM-Portal is an application which enables to submit VGM information directly to Hamburg Süd via our e-portal web page. You can choose to insert VGM information directly, or download
Wie man heute die Liebe fürs Leben findet
 Wie man heute die Liebe fürs Leben findet Sherrie Schneider Ellen Fein Click here if your download doesn"t start automatically Wie man heute die Liebe fürs Leben findet Sherrie Schneider Ellen Fein Wie
Elektrische Kerzen
 Elektrische Kerzen 10030648 10030649 10030650 10030651 Sehr geehrter Kunde, wir gratulieren Ihnen zum Erwerb Ihres Gerätes. Lesen Sie die folgenden Anschluss- und Anwendungshinweise sorgfältig durch und
Funktionsbeschreibung/ Montageanweisung Steuermodul DSM 400 für Dunstabzugshaube DA 6000 W
 Funktionsbeschreibung/ Montageanweisung Steuermodul DSM 400 für Dunstabzugshaube DA 6000 W Operation/Installation Control module DSM 400 for Cooker Hood DA 6000 W de, en M.-Nr. 09 165 660 Inhalt/Contents
Inbay Lüftungshalter universal Inbay air vent universal smartphone mount Part-no.: / Artikel-Nr.: INSTALLATION GUIDE
 Inbay Lüftungshalter universal Inbay air vent universal smartphone mount Part-no.: / Artikel-Nr.: 241000-20-1 D Seite 2-5 EINBAUANLEITUNG GB Page 8-11 INSTALLATION GUIDE Sachgemäße Installation unter Beachtung
Zitruspresse orange
 Zitruspresse orange 10008166 10008167 10008168 Sehr geehrter Kunde, zunächst möchten wir Ihnen zum Erwerb Ihres Gerätes gratulieren. Bitte lesen Sie die folgenden Anschluss- und Anwendungshinweise sorgfältig
USB -> Seriell Adapterkabel Benutzerhandbuch
 USB -> Seriell Adapterkabel Benutzerhandbuch 1. Produkt Eigenschaften 1 2. System Vorraussetzungen 1 3. Treiber Installation (Alle Windows Systeme) 1 4. Den COM Port ändern 2 5. Einstellen eines RS232
SAMPLE EXAMINATION BOOKLET
 S SAMPLE EXAMINATION BOOKLET New Zealand Scholarship German Time allowed: Three hours Total marks: 24 EXAMINATION BOOKLET Question ONE TWO Mark There are three questions. You should answer Question One
Montageanleitung Assembly Instruction Artikel: Werkstattschrank mit 2 Türen
 1 Montageanleitung Assembly Instruction Artikel: Werkstattschrank mit 2 Türen Allgemeine Hinweise: Prüfen Sie bitte vor Zusammenbau, ob alle Teile vorhanden und unbeschädigt sind. Sollte das nicht der
MU-307 A SAFETY INSTRUCTIONS SICHERHEITSHINWEISE FEATURES MERKMALE
 SAFETY INSTRUCTIONS Read all safety instruction before operating the amplifiers. 1. Install equipment as follow condition: - Install at flat place, not bending curved. - Do not install near the water and
Hypex d.o.o. Alpska cesta 43, 4248 Lesce Slovenija Tel: +386 (0) Fax: +386 (0)
 Fax: +386 (0)") MAINTENANCE INSTRUCTIONS MTJ MRJ SERIES Hypex d.o.o. Alpska cesta, Lesce Slovenija Tel: + (0) 00 Fax: + (0) 0 www.unimotion.eu email: sales@unimotion.eu www.unimotion.eu MTJ MRJ Series OVERVIEW Used symbols
MAINTENANCE INSTRUCTIONS MTJ MRJ SERIES Hypex d.o.o. Alpska cesta, Lesce Slovenija Tel: + (0) 00 Fax: + (0) 0 www.unimotion.eu email: sales@unimotion.eu www.unimotion.eu MTJ MRJ Series OVERVIEW Used symbols
Deceleration Technology. Rotary Dampers with high-torque range WRD-H 0607 WRD-H 0805 WRD-H 1208 WRD-H 1610 WRD-H
 Rotary Dampers with high-torque range WRD-H 67 WRD-H 85 WRD-H 128 WRD-H 161 WRD-H 21 Deceleration Technology ONLINE CALCULATION AND 2D / 3D CAD DOWNLOAD M m L F Benefits Applications: - Mechanical and
SICHERHEITSHINWEISE STROMER LADEGERÄT SAFETY INSTRUCTIONS STROMER CHARGERS
 SICHERHEITSHINWEISE STROMER LADEGERÄT SAFETY INSTRUCTIONS STROMER CHARGERS 1 SICHERHEITSHINWEISE FÜR DAS LADEGERÄT Sie können den Akku Ihres Stromers laden, wenn er in Ihrem S-Pedelec installiert ist.
Umschaltadapter/ Changeover / Trennadapter Disconnection Adapter für LSA-PLUS NT for LSA-PLUS NT. Montageanweisung Mounting Instructions
 Umschaltadapter/ Changeover / Trennadapter Disconnection Adapter für LSA-PLUS NT for LSA-PLUS NT Montageanweisung Mounting Instructions Der Umschalter dient zum unterbrechungsfreien Umschalten von Installations-drähten
Level 2 German, 2015
 91126 911260 2SUPERVISOR S Level 2 German, 2015 91126 Demonstrate understanding of a variety of written and / or visual German text(s) on familiar matters 2.00 p.m. Friday 4 December 2015 Credits: Five
Cycling and (or?) Trams
 Trams") Cycling and (or?) Trams Can we support both? Experiences from Berne, Switzerland Roland Pfeiffer, Departement for cycling traffic, City of Bern Seite 1 A few words about Bern Seite 2 A few words about
Cycling and (or?) Trams Can we support both? Experiences from Berne, Switzerland Roland Pfeiffer, Departement for cycling traffic, City of Bern Seite 1 A few words about Bern Seite 2 A few words about
Newest Generation of the BS2 Corrosion/Warning and Measurement System
 Newest Generation of the BS2 Corrosion/Warning and Measurement System BS2 System Description: BS2 CorroDec 2G is a cable and energyless system module range for detecting corrosion, humidity and prevailing
Electrical testing of Bosch common rail Injectors
 Electrical testing of Bosch common rail Injectors Contents: 1. Adapter cable for Hybridtester FSA 050 (article number 0 684 010 050 / 1 687 023 571) 2. Electrical testing of Bosch common rail solenoid
KURZANLEITUNG. Firmware-Upgrade: Wie geht das eigentlich?
 KURZANLEITUNG Firmware-Upgrade: Wie geht das eigentlich? Die Firmware ist eine Software, die auf der IP-Kamera installiert ist und alle Funktionen des Gerätes steuert. Nach dem Firmware-Update stehen Ihnen
MQT Horlogère Suisse MARBLE COLLECTION. Operating Instructions. Bedienungsanleitung
 MQT Horlogère Suisse MARBLE COLLECTION Operating Instructions Bedienungsanleitung - 2-3 Operating Instructions 8 Bedienungsanleitung - 3 - OVERVIEW 1 2 4 3 1 Hour hand 2 Minute hand 3 Second hand 4 Crown
C R 2025 C LOSE PUSH OPEN
 3V C R 2025 C LOSE PUSH OPEN ) ) ) 25 222 3V C R 2025 C LOSE PUSH OPEN 25 222 3V C R 2025 C LOSE PUSH OPEN 25 222 Den här symbolen på produkten eller i instruktionerna betyder att den elektriska
Technische Daten. Sicherheitshinweise
 10029812 Teak-Lampe Sehr geehrter Kunde, wir gratulieren Ihnen zum Erwerb Ihres Gerätes. Lesen Sie die folgenden Hinweise sorgfältig durch und befolgen Sie diese, um möglichen Schäden vorzubeugen. Für
Word-CRM-Upload-Button. User manual
 Word-CRM-Upload-Button User manual Word-CRM-Upload for MS CRM 2011 Content 1. Preface... 3 2. Installation... 4 2.1. Requirements... 4 2.1.1. Clients... 4 2.2. Installation guidelines... 5 2.2.1. Client...
Hinweisblatt indication sheet
 Seite page 1 von of 7 Hinweisblatt indication sheet Typ: / type: Leuchtstoffleuchten (z.b.: 50010400, 53500100) Kurzbezeichnung: Lampenwechsel bei Leuchtstoffleuchten short term: exchange of fluorescent
2 IP X4 WLS/FL IP24. Montage-Anleitung Instructions de montage Assembling instructions. 225 cm. 60 cm 0
 WLS/FL IP Arbeiten an den elektrischen Anlagen dürfen nur von autorisierten Fachleuten nach den örtlichen Vorschriften ausgeführt werden. Für nicht fachgerechte Installation wird jegliche Haftung abgelehnt.
Schmuckspiegel mit LED-Beleuchtung
 Schmuckspiegel mit LED-Beleuchtung 10029174 10029176 Sehr geehrter Kunde, wir gratulieren Ihnen zum Erwerb Ihres Gerätes. Lesen Sie die folgenden Anschluss- und Anwendungshinweise sorgfältig durch und
Wäscheschleuder. Spin Dryer
 Wäscheschleuder Spin Dryer 10032559 DE Sehr geehrter Kunde, wir gratulieren Ihnen zum Erwerb Ihres Gerätes. Lesen Sie die folgenden Hinweise sorgfältig durch und befolgen Sie diese, um möglichen Schäden
Bedienungsanleitung User Manual
 Bedienungsanleitung User Manual - 1 - Deutsch...3 English...4-2 - Deutsch 1. Sicherheitshinweise Blendungs- und Verletzungsgefahr! Sehen Sie niemals mit optischen Geräten in die Sonne oder eine andere
MILLING UNIT 5X. Anleitung zur Durchführung der Autokalibrierung. Instructions for use Instructions for autocalibration. DE Gebrauchsanweisung 2-4
 MILLING UNIT 5X DE Gebrauchsanweisung 2-4 Anleitung zur Durchführung der Autokalibrierung EN Instructions for use 5-7 Instructions for use Instructions for autocalibration ANLEITUNG ZUR DURCHFÜHRUNG DER
Cable Tester NS-468. Safety instructions
 Cable Tester NS-468 Safety instructions Do not use the cable tester NS-468 if it is damaged. This device is only for use inside dry and clean rooms. This device must be protected from moisture, splash
Was heißt Denken?: Vorlesung Wintersemester 1951/52. [Was bedeutet das alles?] (Reclams Universal-Bibliothek) (German Edition)
![Was heißt Denken?: Vorlesung Wintersemester 1951/52. [Was bedeutet das alles?] (Reclams Universal-Bibliothek) (German Edition)](/thumbs/68/59244907.jpg "Was heißt Denken?: Vorlesung Wintersemester 1951/52. [Was bedeutet das alles?] (Reclams Universal-Bibliothek) (German Edition)") Was heißt Denken?: Vorlesung Wintersemester 1951/52. [Was bedeutet das alles?] (Reclams Universal-Bibliothek) (German Edition) Martin Heidegger Click here if your download doesn"t start automatically Was
Was heißt Denken?: Vorlesung Wintersemester 1951/52. [Was bedeutet das alles?] (Reclams Universal-Bibliothek) (German Edition) Martin Heidegger Click here if your download doesn"t start automatically Was
E asyline by Hama GmbH & Co KG Postfach 80 86651 Monheim/Germany Tel. +49 (0)9091/502-0 Fax +49 (0)9091/502-274 hama@hama.de www.hama.
9091/502-0 Fax +49 (0)9091/502-274 hama@hama.de www.hama.") 00021024-10.06 E asyline by Hama GmbH & Co KG Postfach 80 86651 Monheim/Germany Tel. +49 (0)9091/502-0 Fax +49 (0)9091/502-274 hama@hama.de www.hama.com Gamepad Thunderstorm II 0021024 l Bedienungsanleitung
00021024-10.06 E asyline by Hama GmbH & Co KG Postfach 80 86651 Monheim/Germany Tel. +49 (0)9091/502-0 Fax +49 (0)9091/502-274 hama@hama.de www.hama.com Gamepad Thunderstorm II 0021024 l Bedienungsanleitung
Partyzelt
 10029443 10029444 Partyzelt Sehr geehrter Kunde, wir gratulieren Ihnen zum Erwerb Ihres Gerätes. Lesen Sie die folgenden Hinweise sorgfältig durch und befolgen Sie diese, um möglichen Schäden vorzubeugen.
Istruzioni di montaggio e regolazione Cab-R 3D. Fitting and adjustment instructions Cab-R 3D. Montage- und Verstellanleitung CAB-R 3D
 Istruzioni di montaggio e regolazione Cab-R 3D Fitting and adjustment instructions Cab-R 3D Montage- und Verstellanleitung CAB-R 3D Piano di fresatura anta e telaio per maschio incassato Milling plan for
DURCARE SET CRISTADUR
 DURCARE SET CRISTADUR DURCARE PRECLEANER DURCARE VORREINIGER ANWENDUNG: Mit DurCare Vorreiniger und einem fusselfreiem Tuch die bereits mit Spülmittel abgereinigte Oberfläche behandeln. Anschließend die
11 EN 81-70 Page 1 of 2 Standard: INTERPRETATION RELATED TO. Clause(s): 5.4.2.3
: 5.4.2.3") CEN RELATED TO 11 Page 1 of 2 Standard: Edition: 2003 Clause(s): 5.4.2.3 Valid from: 15/09/2010 Date of modification: Key-word(s): Car operating panel, Two entrance lift Replacing interpretation No.: QUESTION
CEN RELATED TO 11 Page 1 of 2 Standard: Edition: 2003 Clause(s): 5.4.2.3 Valid from: 15/09/2010 Date of modification: Key-word(s): Car operating panel, Two entrance lift Replacing interpretation No.: QUESTION
Guidelines for the efficient preparing for your colonoscopy
 Guidelines for the efficient preparing for your colonoscopy Information, Instructions and answers to your questions Dear patient, You`ve been scheduled for a colonoscopy in our clinic. For the success
Geometrie und Bedeutung: Kap 5
 : Kap 5 21. November 2011 Übersicht Der Begriff des Vektors Ähnlichkeits Distanzfunktionen für Vektoren Skalarprodukt Eukidische Distanz im R n What are vectors I Domininic: Maryl: Dollar Po Euro Yen 6
Non users after Cochlear Implantation in Single Sided Deafness
 Non users after Cochlear Implantation in Single Sided Deafness W. Pethe*, J. Langer*, S. Lissel**, K. Begall* *HNO-Klinik, AMEOS Klinikum Halberstadt **Cochlear Implant Rehabilitationszentrum Sachsen-Anhalt