Xo_freestanding bathtub mixer
|
|
|
- Gerburg Auttenberg
- vor 8 Jahren
- Abrufe
Transkript
1 Xo_freestanding bathtub mixer CL/ bath findings Montage instructies Installation Instructions Notice de montage Montageanweisungen

2 NL - Alvorens de montage te beginnen moet de volledigheid van de levering gecontroleerd worden. Tevens moet ook op transportschade gecontroleerd worden, te late schademeldingen (> dag na levering) worden niet aanvaard. - Gebruik enkel zachte stoffen om de kranen te reinigen, gebruik geen zure of alkaline producten voor het reinigen. - Binnenwerk en omstelknop zijn getest in de fabriek, niet zelf assembleren of demonteren. - Alvorens de vloer te betegelen dienen de ingebouwde componenten een watertest van minimaal 30 minuten te doorstaan bij 0,8 MPa, om te verzekeren dat er geen lekken zijn. - Ingebouwde leidingen dienen strikt volgens de handleiding te zijn gemonteerd. Het omwisselen van warm en koud waterleiding is niet toegestaan. -Als de kamertemperatuur onder 0 C daalt dient de watertoevoer te worden afgesloten, en het water volledig uit de kraan verwijderen. Dit om te voorkomen dat de kraan breekt tijdens vrieskou en lekt als het terug dooit. - Watertoevoer leidingen dienen te worden gereinigd alvorens aan te sluiten. Verontreinigingen kunnen binnenwerk, omstelknop en perlator beschadigen. - Om kalkafzettingen te vermijden dient men steeds eerst de kraan in de koude stand te openen en vervolgens naar de gewenste temperatuur. - Clou behoudt zich het recht voor technische en optische wijzigingen aan te brengen t.o.v. afgebeelde producten. - Door wijzigingen in de productie kan het zijn dat gegeven afmetingen niet meer correct zijn. Alle vermelde afmetingen in deze handleiding dienen te worden geverifieerd alvorens de actie uit te voeren. - Clou b.v. kan niet verantwoordelijk worden gesteld voor de gevolgen van onaangepast gebruik, onaangepast transport of beschadigingen veroorzaakt door tussenopslag. - De van toepassing zijnde garantievoorwaarden gelden steeds. - De montage dient uitgevoerd te worden door 2 personen waarvan minstens één vakkundig opgeleid persoon. - Draag steeds handschoenen tijdens de installatie. - Alle maten zijn in mm. - Indien de waterdoorstroming onvoldoende is, zorg er dan voor dat de hoekstopkranen voldoende geopend zijn. - Indien de waterstroom geen regelmatige vorm heeft, zorg er dan voor dat de perlator gereinigd is. - Indien de temperatuur niet geregeld kan worden, zorg ervoor dat de hoekstopkranen en de aansluitingen correct zijn geïnstalleerd.

3 GB - Before starting with the mounting check whether the delivery is complete. At the same time the delivery should be checked for damage due to transportation, damage reports that are too late (> day after delivery) will not be accepted. - Only use soft fabric to clean the taps, no acidic or alkalescent products should be used for cleaning. - Cartridge and diverter are tested in the factory, no self assembly and disassembly allowed. - Underground components should pass a 30 minutes water test under 0,8 MPa before tiling, to make sure there are no water leaks. - Underground pipes should be installed strictly according to the manual, the exchange of cold water pipe and hot water pipe is not allowed. - When the roomtemperature is below 0 C, please close the water angle valve, open the tap and let the water flow out completely. This to avoid the tap breaking during freezing period, and water leaking when temperature rises. - Water inlet pipes must be cleaned before the installation of the tap, impurities could damage the cartridge, diverter and aereator. - To avoid scale always turn on cold water first before adjusting to the desired temperature. - Clou reserves the right to introduce technical and visual changes with respect to the depicted images. - Due to changes in production it is possible that given dimensions are no longer correct. All mentioned dimensions in this manual should be verified before executing the action. - Clou b.v. can not be held responsible for the results of improper use, improper transportation or any damage caused during interim storage. - The current terms of guarantee are always valid. - The installation has to be performed by at least 2 persons of whom at least one should be a skilled professional. - Gloves should be wared during installation of the tap. - all dimensions are in mm. - If the water flow is not enough, please make sure the angle valves are opened. - If the water flow is not regularly shaped, please make sure the aereator is cleaned. - If temperature is not adjustable, please make sure the angle valves and connection pipes are correctly installed.

4 FR - Avant de procéder au montage, veuillez contrôler si l article livré est complet. Veuillez aussi contrôler des dommages éventuels causés par le transport, nous n acceptons pas de réclamations dues à des dégâts causés par le transport au-delà de jour après livraison. - N utilisez qu un tissu doux pour nettoyer les robinets, des produits acides ou alcalins ne peuvent pas être utilisé pour le nettoyage. - La cartouche et l inverseur sont testés en usine, aucun montage ou démontage n est autorisé. - Les composants sous le sol doivent passer un test de 30 minutes avec l eau sous 0,8 MPa avant de carreler, pour s assurer qu il n y ait pas de fuites d eau. - Tuyaux souterrains doivent être installés en respectant strictement le manuel, le tuyau d eau froide et le tuyau d eau chaude ne peuvent être inversés. - Si la température ambiante est inférieure à 0 C, s il vous plaît fermer le robinet d arrivé d eau, ouvrir le robinet et laisser l eau s écouler complètement. Ceci afin d éviter la rupture du robinet pendant la période de gel, et fuite d eau lorsque la température augmente. - Les tuyaux d arrivée d eau doivent être nettoyés avant l installation du robinet, des impuretés peuvent endommager la cartouche, inverseur et aérateur. - Pour éviter les dépôts de calcaire ouvriz toujours d abord le robinet d eau froide et adaptez par la suite à la température souhaitée. - Clou se réserve le droit pour tout changement technique ou optique par rapport à la photo représentant le produit. - Des changements de production peuvent faire en sorte que les dimensions affichées ne correspondent plus, nous vous prions de vérifier avant de procéder à toute action. - Clou BV ne peut être tenu responsable pour usage non approprié des articles, transport inadéquat ou dommages causés dans votre entrepôt en attente de livraison. - Les conditions de garanties en vigueur restent toujours valables. - Le montage doit être effectué par 2 personnes dont une au moins soit un corps de métier. - Nous conseillons le port de gants pour l installation de la robinetterie afin d éviter les griffes. - Toutes les mesures affichées sont en mm. - Si le débit de l eau ne suffit pas, s il vous plaît assurez-vous que les robinets d équerre soient ouverts. - Si le débit d eau est irrégulier, s il vous plaît assurez-vous que le aérateur est nettoyé. - Si la température n est pas réglable, s il vous plaît assurez-vous que les robinets d équerre et tuyaux de raccordement sont correctement installés.

5 DE - Vor Beginn der Montage überprüfen Sie bitte, ob die Lieferung vollständig ist bzw. ob durch den Transport Schäden entstanden sind. Diese Überprüfung muss direkt am Liefertag erfolgen. Sollte ein Schaden festgestellt werden, muss dieser unmittelbar nach der Lieferung, spätestens (> Tag nach Lieferung) angezeigt werden. - Verwenden Sie nur weiches Gewebe, um die Wasserhähne zu reinigen, sollten keine sauren oder schwach alkalisch Produkte zur Reinigung verwendet werden. - Cartridge und Umsteller werden in der Fabrik getestet, keine Selbstentladung Montage und Demontage erlaubt. - Eingebaute Komponenten sollten einen 30 Minuten Wassertest unter 0,8 Mpa durchlaufen, um sicherzustellen, dass kein Wasser austritt. - Die vorhandene Kalt,- bzw. Warmwasserleitung bitte strikt nach der Montageanweisung montieren - Wenn die Raumtemperatur unter 0 Grad ist, schliessen Sie bitte das Eckventil, öffnen Sie die Armatur und lassen Sie das Wasser vollständig aus. - Wasserzulauf Rohre müssen gereinigt werden, bevor die Installation des Leitungswassers, Verunreinigungen könnten die Patrone, Umsteller und Perlator beschädigen. - Um zu vermeiden Skala immer auf kaltem Wasser schalten Sie zuerst vor dem Einstellen auf die gewünschte Temperatur. - Nach Gebrauch ist die Armatur auf Kalt-Wasser zu stellen. Vor dem nächsten Gebrauch, bitte die gewünschte Temperatur einstellen. - Clou behält sich das Recht auf technische und optische Änderungen in Bezug auf die dargestellten Bilder vor.. - Aufgrund von Änderungen in der Produktion ist es möglich, dass angegebene Maße nicht mehr korrekt sind. Alle genannten Dimensionen in diesem Handbuch sollten vor der Ausführung der Maßnahme überprüft werden. - Clou B.V. ist nicht verantwortlich für die Ergebnisse des unsachgemäßen Gebrauch, unsachgemäßen Transport oder Schäden, die während Zwischenlagerung verursacht werden. - Der aktuelle Garantiebedingungen sind immer gültig. - Die Installation muß von mindestens 2 Personen durchgeführt werden, wobei Person bereits vorhandene Fachkenntnisse hat. - Handschuhe sollten währen der Installation getragen werden. - Alle Dimensionen erfolgen in mm Angaben. - Wenn der Wasserfluss nicht genug ist, stellen Sie bitte sicher, dass die Eckventile geöffnet werden. - Wenn der Wasserfluss nicht regelmäßig geformt, stellen Sie bitte sicher, dass das aereator gereinigt wird. - Wenn die Temperatur ist nicht einstellbar, stellen Sie bitte sicher, dass die Eckventile und Verbindungsleitungen richtig installiert sind.

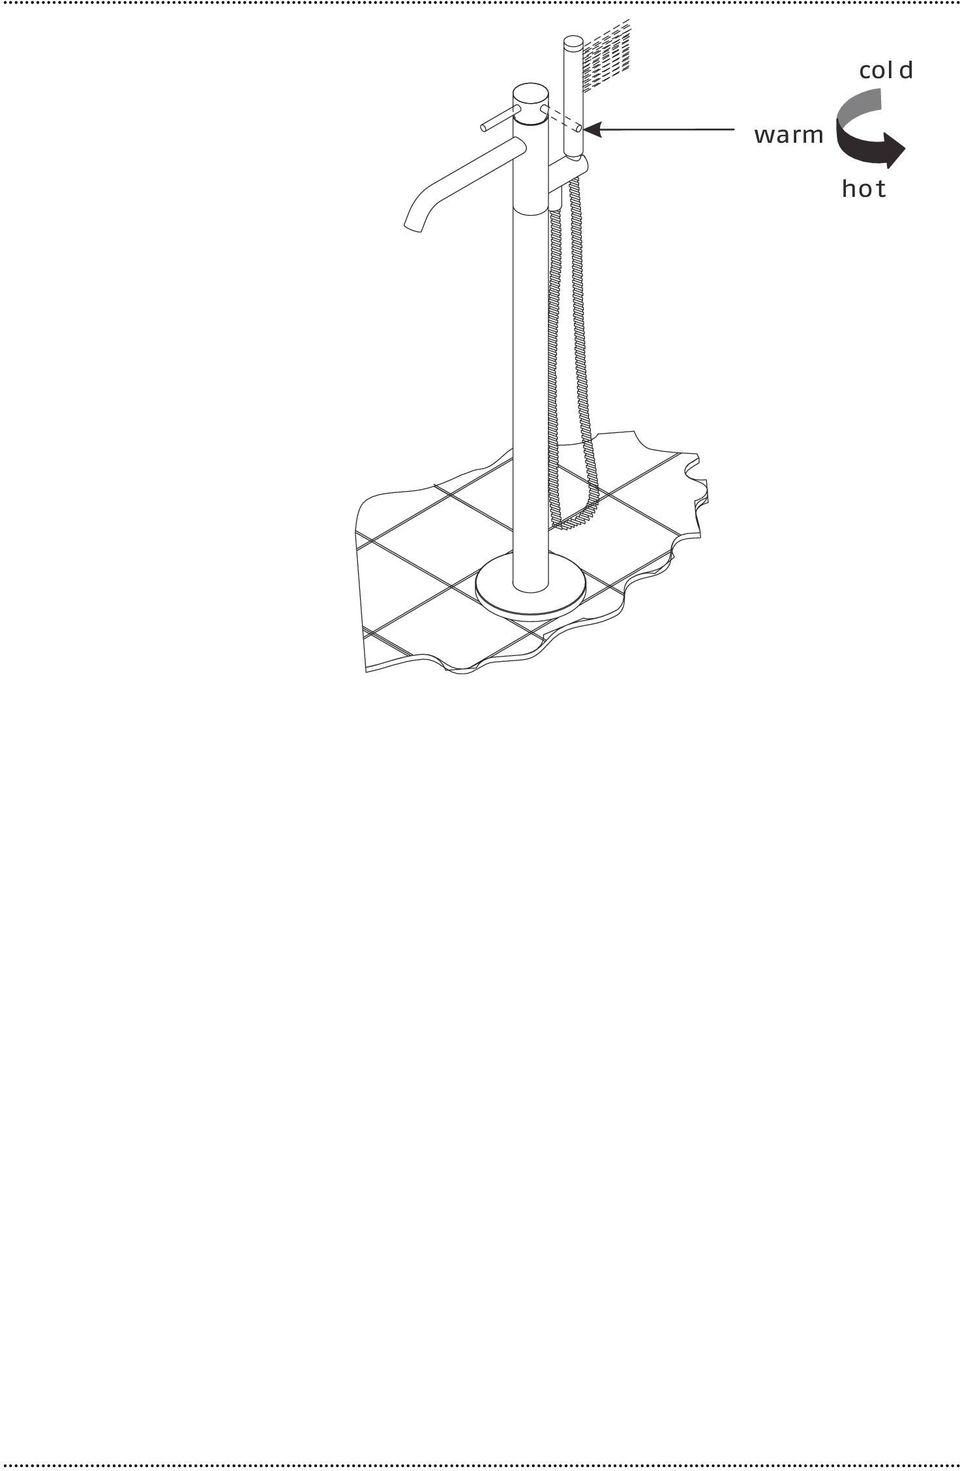
6 hot /2" ø ø50 cold

7 Checking List Name spout body hand shower hose S2mm hex wrench S4mm hex wrench connecting pipe water inlet pipe M5x5 hex. bolt M5 washer water test base rubber ring rubber water stop dustproof cover fixing nut rosette expansion anchor bolts plastic box manual water pipe QTY specifications: water pipe thread: G/2 working pressure: 0.Mpa~0.5Mpa working temp.: 3 C ~ 85 C working material: normal water producing standard: GB SE

8 _ Neem de kartonnen stofbescherming en de rubber beschermbussen uit de montagebox. Take the cardboard dust cover and the rubber protection cylinders out of the plastic box. Retirez le capot de protection en carton et les douilles de protection en caoutchouc de la boîte de montage. Nehmen Sie den Karton Staubschutz und Sie die Gummischutzkappe Zylindern aus die Einbaudose. 2_ Plaats de kartonnen stofbescherming terug. Place back the cardboard dust cover. Replacez le capot de protection en carton. Setzen Sie den Staubschutz ein.

9 3_ Bepaal de positie van de kraan. Fix the position of the tap. Déterminer la position du robinet. Fixieren Sie die Position der Armatur. hot wate r col d wate r 4_ Boor de gaten (ø 0 mm). Drill the holes (ø 0 mm). Percer les trous (ø 0 mm). Bohren Sie die Löcher (ø 0 mm).! Ø0 x deep 40m m
. Percer les trous (ø 0 mm).")
10 5_ Monteer de waterleidingen. Connect the water pipes. Raccorder les tuyaux d eau. Schliessen Sie die Wasserleitungen an. cold hot 6_ Installeer de montagebox, draai de bouten vast nadat de hoogte van de montagebox bepaald is.! Install the mounting box, fasten the bolts after adjusting the level. Installez le boîtier de montage, fixez les boulons après le réglage du niveau. Installieren Sie die Einbaudose, befestigen Sie die Schrauben nach dem Einstellen des Pegels. highes t undergroun d leve l lowes t undergroun d leve l

11 7_ Na vastdraaien van de bouten nogmaals waterpas plaatsen. Level the box again after tightening the bolts. Niveler à nouveau la boîte après le serrage des boulons.! Richten Sie die Box wieder nach dem Anziehen der Schrauben. hot 8_ Neem de kartonnen stofbescherming uit de montagebox. Take the cardboard dust cover out of the plastic box. Retirez le capot de protection en carton de la boîte de montage. col d Nehmen Sie den Staubschutz wieder aus dem Einbaukörper. hot

12 9_ Installeer de onderdelen voor de water test, inclusief de rubber beschermbussen. Install the spare parts for the water test, including the rubber protection cylinders. Installer les pièces servant à tester, y compris les douilles de protection en caoutchouc. Installieren Sie die Ersatzteile für den Wassertest, einschl. des Gummischutzzylindern. col d hot 0_ Zet de watertoevoer gedurende 30 minuten open onder 0,8 MPa druk. Dit om lekken op te sporen. Turn on the water for 30 minutes, under a pressure of 0,8 MPs. This for discovering leaks. Ouvrir l eau pendant 30 minutes, sous une pression de 0,8 MPa, cela pour découvrir d éventuelles fuites d eau. Öffnen Sie das Wasser für 30 Minuten unter einem Druck von 0,8 MPa. Somit können evt. Lecks entdeckt werden. on Mpa on

13 _ Verwijder de rubber beschermbussen weer. Remove the rubber protection cylinders. Retirer les douilles de protection en caoutchouc.! off Entfernen Sie die Gummi- Schutz Zylindern. off 2_ Bevestig de testonderdelen terug en installeer de flexibele buis om de leidingen te reinigen. Install the testing parts and install the flexible tube for cleaning the pipes. Installer les pièces servant à tester et ensuite installer le tube flexible pour le nettoyage des tuyaux. off Installieren Sie die Ersatzteile und installieren Sie den Schlauch für die Reinigung der Rohre. off

14 3_ Open de hoekstopkranen om de leidingen te spoelen Open the angle valves to let the water flush clean the pipes. Ouvrir les robinets d équerre pour nettoyer les conduites d eau. Öffnen Sie die Eckventile, damit das bündig fließt. Somit reinigen Sie die Rohre. on on 4_ Verwijder de testonderdelen en de flexibele buis. Remove the testing parts and the flexible tube. Retirer les pièces servant à tester et le tube flexible. Entfernen Sie die Ersatzteile und den Schlauch. off off

15 5_ Plaats de kartonnen stofbescherming terug. Place back the cardboard dust cover. Replacez le capot de protection en carton. Legen Sie den Staubschutz wieder ein. cold hot 6_ Betegel de vloer, werk alle openingen rond de montagebox af met siliconkit. Pave the tiles, finish all gaps around the mounting box with silicon. Placer le carrelage, et sceller les interstices autour du boitier avec du silicone. Nun sollte die ebenbüdnige Fliesenmontage erfolgen. Alle Lücken rundum die Einbaudose, muessen mit Silikon verschlossen werden.

16 7_ Verwijder het uitstekende gedeelte van de montagebox, verwijder de kartonnen stofbescherming. Remove the protruding part of the mounting box, remove the cardboard dust cover. Retirer la partie saillante de la boîte de montage, enlever le capot de protection en carton. Entfernen Sie den überstehenen Rand des Einbaukörper. Anschliesen entfernen Sie den Staubschutz. 8_ Schuif de rozet op de kraan (), zorg ervoor geen krassen te maken. Schroef de bevestigingsrozet op de kraan (2). Put the rosette on the tap (), avoid making scratches. Fasten the mounting rosette to the tap (2). Placer la rosace sur le robinet (), éviter de faire des rayures. Attacher la rosace de fixation de la robinetterie (2). Befestigen Sie die Rosette () und verhindern Sie bitte Kratzer, Fixieren Sie die Rosette mit der Armatur (2). 2
. Placer la rosace sur le robinet (), éviter de faire des rayures. Attacher la rosace de fixation de la robinetterie (2).")
17 9_ Plaats de waterleidingen in de kraan in de gaten in de montagebox (). Bevestig de bevestigingsrozet op de montagebox (2). Insert the water pipes of the tap in the holes of the mounting box (). Install the mounting rosette on the mounting box (2). Insérer les tuyaux d eau du robinet dans les trous du bloc de montage (). Installer la rosette de fixation sur le boîtier de montage (2). Schliessen Sie die Wasserleitungen der Armatur an die vorgesehenen Anschlüsse des Einbaukörpers () Installieren Sie die Montagerosette auf dem Einbaukörper (2) 20_ Schuif de rozet voorzichtig tot tegen de grond. Carefully slide the rosette to the ground. Glisser délicatement la rosace sur le sol. Schieben Sie die Rosette auf den Boden. 2
 Installieren Sie die Montagerosette auf dem Einbaukörper (2) 20_ Schuif de rozet")
18 2_ Installeer de handdouche. Install the hand shower. Installer la douchette. Installieren Sie die Handbrause. col d 2 warm hot

19 col d warm hot
20 bath findings Office Clou bv Thermiekstraat NL-636 HB Nuth T +3 (0) F +3 (0) Warehouse Thermiekstraat NL-636 HB Nuth info@clou.nl

AT-01. Installation Instructions Notice de montage Einbauanleitung.
 AT-01 Installation Instructions Notice de montage Einbauanleitung www.badeloft.com GB - Before starting with the mounting check whether the delivery is complete. At the same time the delivery should be
freddo 2_cold-water tap
 freddo 2_cold-water tap CL/06.03.001.29, CL/06.03.001.41 bath findings Montage instructies Installation Instructions Notice de montage Montageanweisungen Dimensions in mm, for reference only / 27.01.2016
kaldur_wall mounted cold-water tap
 kaldur_wall mounted cold-water tap CL/06.05.001.29 bath findings Montage instructies Installation Instructions Notice de montage Montageanweisungen - Alvorens de montage te beginnen moet de volledigheid
minisuk_design trap CL/06.53011.29, CL/06.53011.41 Montage instructies Installation Instructions Notice de montage Montageanweisungen bath findings
 minisuk_design trap CL/06.53011.29, CL/06.53011.41 bath findings Montage instructies Installation Instructions Notice de montage Montageanweisungen NL - Alvorens de montage te beginnen moet de volledigheid
first_toilet seat CL/04.06010, CL/04.06011 Montage instructies Installation Instructions Notice de montage Montageanweisungen bath findings
 first_toilet seat CL/04.06010, CL/04.06011 bath findings Montage instructies Installation Instructions Notice de montage Montageanweisungen NL - Alvorens de montage te beginnen moet de volledigheid van
Freddo 9 Cold-water tap, chrome
 Freddo 9 Cold-water tap, chrome CL/06.03013 Montage instructies Installation instructions Notice de montage Montageanweisungen REV 02 03.03.2017 NL EN - Alvorens de montage te beginnen moet de volledigheid
shine on me_florence CL/
 shine on me_florence CL/08.10.005.29 bath findings Instructies om een lamp te vervangen Instructions for changing the lightbulb Notice pour échanger l ampoule Anweisungen für das Ändern der Birne NL -
InBe_trap for flush 6
 InBe_trap for flush 6 IB/06.53090 bath findings Montage instructies Installation Instructions Notice de montage Montageanweisungen Dimensions in mm, for reference only / 23.03.2016 / rev_01 www.clou.nl
clou CLM1 mini match me_dresser 45 cm CLM1 CL/ Montage Instructies Installation Instructions Notice de Montage Montageanweisungen CLM2
 mini match me_dresser 45 cm CL/07.56.150.65 clou bath findings Montage Instructies Installation Instructions Notice de Montage Montageanweisungen CLM1 CLM2 220 CLM1 NL Alvorens de montage te beginnen moet
Hammock rimless toilet 49 cm, without seat
 Hammock rimless toilet 49 cm, without seat CL/04.01070 Montage instructies Installation instructions Notice de montage Montageanweisungen REV 01 03.03.2017 NL EN - Alvorens de montage te beginnen moet
first_washbasin CL/ Montage instructies Installation Instructions Notice de montage Montageanweisungen
 first_washbasin CL/02.27011 bath findings Montage instructies Installation Instructions Notice de montage Montageanweisungen Dimensions in mm, for reference only / 30.09.2015 / rev_03 www.clou.nl NL -
wash me_50 cm concrete
 wash me_50 cm concrete CL/02.11030 bath findings Montage instructies Installation Instructions Notice de montage Montageanweisungen NL - Alvorens de montage te beginnen moet de volledigheid van de levering
flush 4_ceramics with tap hole
 flush 4_ceramics with tap hole CL/03.03040 bath findings Montage instructies Installation Instructions Notice de montage Montageanweisungen NL - Alvorens de montage te beginnen moet de volledigheid van
Match Me mirror 70x70 cm
 Match Me mirror 70x70 cm CL/08.02.001.01 Montage instructies Installation instructions Notice de montage Montageanweisungen REV 02 27.03.2017 NL EN - Alvorens de montage te beginnen moet de volledigheid
IP X4 MOA/SL/FL IP44, CH IP24. Montage-Anleitung Instructions de montage Assembling instructions. 225 cm. 60 cm 0
 MOA/SL/FL IP44, CH IP4 Arbeiten an den elektrischen Anlagen dürfen nur von autorisierten Fachleuten nach den örtlichen Vorschriften ausgeführt werden. Für nicht fachgerechte Installation wird jegliche
2 IP X4 WLS/FL IP24. Montage-Anleitung Instructions de montage Assembling instructions. 225 cm. 60 cm 0
 WLS/FL IP Arbeiten an den elektrischen Anlagen dürfen nur von autorisierten Fachleuten nach den örtlichen Vorschriften ausgeführt werden. Für nicht fachgerechte Installation wird jegliche Haftung abgelehnt.
mini wash me_56 left composite
 mini wash me_56 left composite CL/03.08138, CL/03.13138 bath findings Montage instructies Installation Instructions Notice de montage Montageanweisungen NL - Alvorens de montage te beginnen moet de volledigheid
wash me_70 cm ceramics
 wash me_70 cm ceramics CL/02.01032, CL/02.30032, CL/02.31032 bath findings Montage instructies Installation Instructions Notice de montage Montageanweisungen NL - Alvorens de montage te beginnen moet de
Quick guide 360-45011
 Quick guide A. KEUZE VAN DE TOEPASSING EN: SELECTION OF APPLICATION CHOIX D UNE APPLICATION DE: AUSWAHL DER ANWENDUNGSPROGRAMME DIM Memory Off DIM Memory = Off User: Display: 1. EXIT Press Niko (Back light)
match me_shelf 40 cm CL/ Montage instructies Installation Instructions Notice de montage Montageanweisungen
 match me_shelf 40 cm CL/07.56.001.50 bath findings Montage instructies Installation Instructions Notice de montage Montageanweisungen Dimensions in mm, for reference only / 11.04.2016 / rev_02 www.clou.nl
Hohlwanddose HWD 90. Montageanleitung / Assembly instructions / Instructions de montage / Montage instructies
 Hohlwanddose HWD 90 HWD 90 cavity wall box / Boîtier pour parois creuses HWD 90 / Inbouwdoos voor holle wanden HWD 90 DIBt-Zulassung * Für Bauteile der Feuerwiderstandsklasse F90 nach DIN 40- Montageanleitung
DE Gebrauchsanleitung / Montageanleitung 2 EN Instructions for use / assembly instructions 3 E / S / Metris S /
 DE Gebrauchsanleitung / Montageanleitung 2 EN Instructions for use / assembly instructions 3 13423000 / 13424000 31416000 / 31417000 Deutsch Sicherheitshinweise Bei der Montage müssen zur Vermeidung von
match me_70 cm ceramics
 match me_70 cm ceramics CL/02.01051.01 bath findings Montage instructies Installation Instructions Notice de montage Montageanweisungen NL - Alvorens de montage te beginnen moet de volledigheid van de
Honeywell AG Hardhofweg. D-74821 Mosbach MU1H-1220GE23 R1001
 BA 95 Einbau-Anleitung Installation Instructions Einbau Installation Einbaubeispiel Installation example Ablaufleitung vorsehen Install discharge pipework Durchflussrichtung beachten! Consider direction
CABLE TESTER. Manual DN-14003
 CABLE TESTER Manual DN-14003 Note: Please read and learn safety instructions before use or maintain the equipment This cable tester can t test any electrified product. 9V reduplicated battery is used in
www.okw.com assembly instruction instruction de montage
 www.okw.com assembly instruction instruction de montage MONTAGEANLEITUNG datec-control M/L GEHÄUSE / ENCLOSURE / BOÎTIER Seite / page Best.-Nr./Part-No./Réf. M L DATEC-CONTROL M/L 4 A 90 78 107 A 90 79
New Flush 3 composite
 New Flush 3 composite CL/03.13430 - CL/03.13430.02 Montage instructies Installation instructions Notice de montage Montageanweisungen REV 01 24.01.2017 NL EN - Alvorens de montage te beginnen moet de volledigheid
Austausch Saugschlauch am CUBE-Dieseltank
 Austausch Saugschlauch am CUBE-Dieseltank GB Exchange of suction hose of CUBE diesel tank 137.0109.301 / 06.14 / Rn CEMO GmbH In den Backenländern 5 D-71384 Weinstadt Tel. +49 7151 9636-0 Fax +49 7151
DE Gebrauchsanleitung / Montageanleitung 2 EN Instructions for use / assembly instructions 3. Talis E²
 DE Gebrauchsanleitung / Montageanleitung 2 EN Instructions for use / assembly instructions 3 Talis E² 31612009 31612019 31612029 Deutsch Sicherheitshinweise Bei der Montage müssen zur Vermeidung von Quetsch-
11 EN 81-70 Page 1 of 2 Standard: INTERPRETATION RELATED TO. Clause(s): 5.4.2.3
: 5.4.2.3") CEN RELATED TO 11 Page 1 of 2 Standard: Edition: 2003 Clause(s): 5.4.2.3 Valid from: 15/09/2010 Date of modification: Key-word(s): Car operating panel, Two entrance lift Replacing interpretation No.: QUESTION
CEN RELATED TO 11 Page 1 of 2 Standard: Edition: 2003 Clause(s): 5.4.2.3 Valid from: 15/09/2010 Date of modification: Key-word(s): Car operating panel, Two entrance lift Replacing interpretation No.: QUESTION
CarMedia. Bedienungsanleitung Instruction manual. AC-Services Albert-Schweitzer-Str.4 68766 Hockenheim www.ac-services.eu info@ac-services.
 CarMedia Bedienungsanleitung Instruction manual AC-Services Albert-Schweitzer-Str.4 68766 Hockenheim www.ac-services.eu info@ac-services.eu DE Inhaltsverzeichnis 1. Allgemeine Hinweise... 3 2. CarMedia...
Hammock rimless toilet 56 cm, with seat
 Hammock rimless toilet 56 cm, with seat CL/04.01060 Montage instructies Installation instructions Notice de montage Montageanweisungen REV 01 04.01.2017 NL EN - Alvorens de montage te beginnen moet de
ZERTIFIKAT. Rohrwerk Maxhütte GmbH ISO 9001:2008. Die Zertifizierungsstelle der TÜV SÜD Management Service GmbH bescheinigt, dass das Unternehmen
 ZERTIFIKAT Die Zertifizierungsstelle der TÜV SÜD Management Service GmbH bescheinigt, dass das Unternehmen Franz-Kunze-Straße 1 Deutschland für den Geltungsbereich Produktion von nahtlosen warmgewalzten,
EN Instructions for use / assembly instructions 2 DE Gebrauchsanleitung / Montageanleitung 4. Exafill
 EN Instructions for use / assembly instructions 2 DE Gebrauchsanleitung / Montageanleitung 4 Exafill 58129003 English Safety Notes Gloves should be worn during installation to prevent crushing and cutting
2 IP X4 TAI/LED IP44, CH IP24. Montage-Anleitung Instructions de montage Assembling instructions. 225 cm. 60 cm 0
 Montage-Anleitung Instructions de montage Assembling instructions TAI/LED IP, CH IP Sensor-Schalter aussen unten rechts Interrupteur sensitif en bas à l'extérieur à droite Sensor switch outside right below
Entwurf. preliminary
 KAPRi plus Erweiterungsset M12 KAPRi plus Extension Kit M12 KAPRi plus Kit d Extension M12 Bedienungsanleitung / User instructions / Instructions d installation 899366 KAPRi plus Erweiterungsset M12 /
INSTALLATION GUIDE MONTAGE HANDLEIDING GUIDE D INSTALLATION MONTAGEANLEITUNG
 JEE-O pure bath wall (400-2500 / 400-2580) New code valid from September 2016! (300-3510 / 300-3511) INSTALLATION GUIDE MONTAGE HANDLEIDING GUIDE D INSTALLATION MONTAGEANLEITUNG 1. Take the JEE-O pure
UP Unterputz-Montage Montage en encastré Recessed mounting
 Wandeinbau UP Unterputz-Montage Montage en encastré Recessed mounting PAL/LED IP4 Arbeiten an den elektrischen Anlagen dürfen nur von autorisierten Fachleuten nach den örtlichen Vorschriften ausgeführt
UC4 Rapid Automation HP Service Manager Agent Versionshinweise
 UC4 Rapid Automation HP Service Manager Agent Versionshinweise UC4 Software, Inc. Copyright UC4 and the UC4 logo are trademarks owned by UC4 Software GmbH (UC4). All such trademarks can be used by permission
Technische Information
 Flüsskeitsgekühlte Anfahrkupplung Die Mähvorsätze der Typen 345 und 360 sind mit einer flüssigkeitsgekühlten Anfahrkupplung nachrüstbar. Best.-Nr.: LCA93830 (650Nm) für Best.-Nr: LCA93831 (900 Nm) für
Installation manual / Montageanleitung WBC2 splice patch with Fibertray Spleissung/Rangierung mit Fibertray
 Content of Assembly Instruction I. Required tools II. Required parts III. Installation Inhalt der Montageanleitung I. Benötigte Werkzeuge II. Benötigte Teile III. Installation I. Required tools: I. Benötigtes
1 225 cm IP X4 SLI/FL IP24. Montage-Anleitung Instructions de montage Assembling instructions. 60 cm 0
 Sensor-Schalter aussen unten links und rechts SLI/FL IP Interrupteurs sensitifs en bas à l'extérieur à gauche et à droite Sensor switches outside left and right below Arbeiten an den elektrischen Anlagen
Serviceinformation Nr. 02/11
 Serviceinformation Nr. 02/11 vom: 06.10.2011 von: BAM 1. Software Navigator und Release Notes Auf unserer Homepage unter www.idm-energie.at/de/navigator-software.html steht ab sofort eine neue Version
Montageanleitung Installation instructions Instructions de montage Montagehandleiding
 69-04/03 Montageanleitung Installation instructions Instructions de montage Montagehandleiding PT PT SW PT BSW 6x 8x 3,5 x 9,5mm 4, x 45mm x Ø3 mm BSW SW SW 4 SW,5 Z5050 Z00034 6x K035 K0665 Z505 K0666
Eurocube Eurocube FIN EST SLO UAE RUS Design & Quality Engineering GROHE Germany
 19 898 Eurocube 19 896 Eurocube D...1 I...2 N...3 GR...5 TR...6 BG...7 RO...9 GB...1 NL...2 FIN...4 CZ...5 SK...6 EST...8 CN...9 F...1 S...3 PL...4 H...5 SLO...7 LV...8 UA...9 E...2 DK...3 UAE...4 P...6
MINF - Mini Freestanding / MINW - Mini Wall. Montagehandleiding / Instructions de montage Montagehinweis / Mounting instructions
 MI - Mini reestaning / MIW - Mini Wall Montagehanleiing / Instructions e montage Montagehinweis / Mounting instructions AMETIGE VOOR AASLUITIG MET JAGA THERMOSTAATVETIEL IMESIOS POUR RACCOREMET AVEC VAE
AP Aufputz-Montage Montage en applique Surface mounting
 PAL/LED IP44, CH IP4 AP Aufputz-Montage Montage en applique Surface mounting Arbeiten an den elektrischen Anlagen dürfen nur von autorisierten Fachleuten nach den örtlichen Vorschriften ausgeführt werden.
Bedienungsanleitung SUNNYHEAT Standfuß (Art. Nr )
") Bedienungsanleitung SUNNYHEAT Standfuß (Art. Nr. 221012) Der SUNNYHEAT Standfuß ist zur Positionierung Ihres Heizpaneels auf dem Standfuß gedacht. Anwendung findet der Standfuß bei allen Paneelen außer
Bedienungsanleitung SUNNYHEAT Standfuß (Art. Nr. 221012) Der SUNNYHEAT Standfuß ist zur Positionierung Ihres Heizpaneels auf dem Standfuß gedacht. Anwendung findet der Standfuß bei allen Paneelen außer
DE Gebrauchsanleitung / Montageanleitung 2 FR Mode d'emploi / Instructions de montage 3 EN Instructions for use / assembly instructions 4
 DE Gebrauchsanleitung / Montageanleitung 2 FR Mode d'emploi / Instructions de montage 3 EN Instructions for use / assembly instructions 4 Focus 31816000 Deutsch Sicherheitshinweise Bei der Montage müssen
Montageanleitung Installation Instructions Notice de Montage
 Montageanleitung Installation Instructions Notice de Montage R Reflexlichtschranke / Reflexlichttaster Retro-reflective sensor / Diffuse reflection sensor Système réflex / Système réflexion directe OE
GEA Heat Exchangers An/To: Von/From: Date/Datum. Dirk Graichen 2010. Product Manager BPHE
 An/To: Von/From: Date/Datum Sales Dirk Graichen 2010 Product Manager BPHE 1. Isolierungen FCKW-frei PUR-Halbschalen, schwarz: Insulation: - FCKW-free polyurethane-foam with PS-folia, black GB../GN.. 100,200,220,240,300,400,418,420,500,525,700,
quality linked to Permanently Fitting instructions Landcruiser J100; 1998> Toyota Make : Type :
 Fitting instructions Make : Toyota Landcruiser J100; 1998> Type : 2757 Permanently linked to quality Tested in accordance with directives 94/20/EG 2757/31-05-19991 NL GB A tow ball or an automatic coupling
Rue Gurnigel 48 CH-2501 Bienne Tél.: +41 (0) Fax: +41 (0)
 Fax: +41 (0)") OPTISCHE MESSTECHNIK OPTICAL MEASURING SYSTEMS SYSTEMES DE MESURE OPTIQUE marcel - aubert - sa Rue Gurnigel 48 CH-2501 Bienne Tél.: +41 (0)32 365 51 31 Fax: +41 (0)32 365 76 20 E-mail: info@marcel-aubert-sa.ch
OPTISCHE MESSTECHNIK OPTICAL MEASURING SYSTEMS SYSTEMES DE MESURE OPTIQUE marcel - aubert - sa Rue Gurnigel 48 CH-2501 Bienne Tél.: +41 (0)32 365 51 31 Fax: +41 (0)32 365 76 20 E-mail: info@marcel-aubert-sa.ch
BRUUDT Kennzeichenhalter für die Honda NC750X ab 2016 BRUUDT Tail Tidy for the Honda NC750X 2016 and onwards.
 Montageanleitung Mounting instructions BRUUDT Kennzeichenhalter für die Honda NC750X ab 2016 BRUUDT Tail Tidy for the Honda NC750X 2016 and onwards. Noch einmal vielen Dank, dass Sie sich für unsere Produkte
Montageanleitung Racing Lenkerstummelsatz
 Montageanleitung Racing Lenkerstummelsatz Bei Verwendung der Racing Lenkerstummel muss erst ein Loch (Bild 2) zur Befestigung der Armaturen gebohrt werden. Durchmesser = 3,5 mm / Abstand vom Lenkerende
first_short toilet 48 cm
 first_short toilet 48 cm CL/04.01040 bath findings Montage instructies Installation Instructions Notice de montage Montageanweisungen Dimensions in mm, for reference only / 22.01.2016 / rev_02 www.clou.nl
Installation instructions Instructions de montage Montagehandleiding
 630- Montageanleitung 0/7 Installation instructions Instructions de montage Montagehandleiding DT DT SW DT BSW 6x 8x 3,5 x 9,5mm 4, x 45mm Ø3 mm x 4x 3,5 x 38mm rot, red rouge, rod schwarz, black noir,
TECHNISCHE FICHE CONTACT CONTACTOR
 TECHNISCHE FICHE CONTACT CONTACTOR 02-01-02-00 voorbeeld gegevens klant: Type machine:... Serie nr. machine:... prijsaanvraag bestelling CODE: AT-CT x D1 x L1 x L2 x AT-TI x AT-PL x AT-GA x TA x D2 x B
Installation mit Lizenz-Server verbinden
 Einsteiger Fortgeschrittene Profis markus.meinl@m-quest.ch Version 1.0 Voraussetzungen für diesen Workshop 1. Die M-Quest Suite 2005-M oder höher ist auf diesem Rechner installiert 2. Der M-Lock 2005 Lizenzserver
Kuppeldach-Pavillon / Pavilion with dome-shaped roof / Koepeldak Paviljoen
 Pavilion with dome-shaped roof Koepeldak Paviljoen Vor Montage und Benutzung unbedingt sorgfältig lesen und für spätere Zwecke aufbewahren. Read these instructions carefully before use and assembly and
Service Manual Service Anleitung U 58/7 KIT
 Service Manual Service Anleitung U 58/7 KIT Service manual for changing the main filter on a supply unit Serviceanleitung zum Austausch des Hauptfilters an der Versorgungseinheit Exemplary, only the type
INSTALLATION GUIDE MONTAGE HANDLEIDING GUIDE D INSTALLATION MONTAGEANLEITUNG
 JEE-O pure bath wall (300-3510 / 300-3511) INSTALLATION GUIDE MONTAGE HANDLEIDING GUIDE D INSTALLATION MONTAGEANLEITUNG JEE-O pure bath wall installation guide September 2016 JEE-O 1. Take the JEE-O pure
Balkonmarkise. ca. 120 x 200 cm / ca. 150 x 200cm
 Ersatzteilliste / Spare part list / Onderdelenlijst 1 x E 2 x inkl. Schrauben incl. Screws inkl. schroeven 2.5mm 1 x F 1 x 2.5mm C 2 x G 1 x 10mm H 1 x 5mm D 2 x inkl. Schrauben incl. Screws inkl. schroeven
ART 396. Handbuch für SAM Artikulatoren Manual for SAM Articulators SPLITCAST- ARTIKULATOR PRÜFSOCKEL SPLITCAST ARTICULATOR VERIFICATION DEVICE
 SAM PRÄZISIONSTECHNIK GMBH SPLITCAST- ARTIKULATOR PRÜFSOCKEL ART 396 SPLITCAST ARTICULATOR VERIFICATION DEVICE www.sam-dental.de Handbuch für SAM Artikulatoren Manual for SAM Articulators 1 Der Splitcast
miditech 4merge 4-fach MIDI Merger mit :
 miditech 4merge 4-fach MIDI Merger mit : 4 x MIDI Input Port, 4 LEDs für MIDI In Signale 1 x MIDI Output Port MIDI USB Port, auch für USB Power Adapter Power LED und LOGO LEDs Hochwertiges Aluminium Gehäuse
1 Allgemeine Information
 1 Allgemeine Information ACHTUNG! Der Betriebsdruck der Klasse 867 ist 6 bar. Sollte der Druck Ihrer Versorgungsleitung höher als 6 bar sein, muss der Druck an der Versorgungseinheit der Nähmaschine auf
hanit Assembly Instruction - Sandbox System Thar -
 Thank you for purchasing a hanit recycling plastic product, We wish you a lot of pleasure with that product. Please find below important installation instructions which need to be taken into consideration
Profi-Pavillon / Profi Pavilion / Profiteren Paviljoen
 Vor Montage und Benutzung unbedingt sorgfältig lesen und für spätere Zwecke aufbewahren. Read these instructions carefully before use and assembly and keep for future reference! Lees deze instructies zorgvuldig
Profi-Pavillon / Profi Pavilion / Profiteren Paviljoen
 Profi pavilion Profiteren paviljoen Vor Montage und Benutzung unbedingt sorgfältig lesen und für spätere Zwecke aufbewahren. Read these instructions carefully before use and assembly and keep for future
EN Instructions for use / assembly instructions 2 DE Gebrauchsanleitung / Montageanleitung 3
 EN Instructions for use / assembly instructions 2 DE Gebrauchsanleitung / Montageanleitung 3 Ecos 14080019 / 14080029 Ecos L 14081019 / 14081029 Novus 70 71020019 / 71020029 Novus 100 71030019 / 71030029
mini match me_shelf 120 cm
 mini match me_shelf 120 cm CL/07.56.403.50 bath findings Montage instructies Installation Instructions Notice de montage Montageanweisungen NL - Alvorens de montage te beginnen moet de volledigheid van
Electronic components within the VLT are susceptible to Electrostatic Discharge
 VLT Instruction Drives and Controls RELAY OPTION CARD VLT 5000 175Z2500 VLT 6000 HVAC 175Z7803 Montering, Mounting, Montage, Installation Bookstyle... page 3 Compact IP 20... page 9 Compact IP 54... page
UM ALLE DATEN ZU KOPIEREN. ZUNÄCHST die Daten des alten Telefons auf einen Computer kopieren
 IPHONE UM ALLE DATEN des alten Telefons auf einen Computer Software von welcomehome.to/nokia auf Ihrem PC oder Mac. verbinden Sie Ihr altes Telefon über 3. Wenn Sie Outlook nutzen, öffnen Sie itunes, um
Wandarm inkl. Montagebox und Netzteil Wall bracket incl. installation box and power supply
 Wandarm inkl. Montagebox und Netzteil Wall bracket incl. installation box and power supply Beschreibung und technische Daten: Wandarm (IP-66) mit Montagebox und eingebautem Netzteil Passend für SANTEC
Lockable Tablet Mount
 Gebruikersgids Lockable Tablet Mount resulting resulting in in possible possible equipment equipment damage. damage. create create an an unsecured unsecured installation installation and and may may cause
Diagramm 1 2 A [mm] B [mm] C [mm] D [mm] Abmessungen
![Diagramm 1 2 A [mm] B [mm] C [mm] D [mm] Abmessungen](/thumbs/98/137025716.jpg "Diagramm 1 2 A [mm] B [mm] C [mm] D [mm] Abmessungen") Typennummer RFI Filter I0FAE3xxF100XxxxxS Filter Typ 3~ RFI Filter I0FAE3xxF100XxxxxS Technische Daten Typ E311F E322F E345F 100D... 100S... 100D 100D Bemessungsstrom [A] 29.00 / 22.6 55.00/46.00 100.00/86.00
Typennummer RFI Filter I0FAE3xxF100XxxxxS Filter Typ 3~ RFI Filter I0FAE3xxF100XxxxxS Technische Daten Typ E311F E322F E345F 100D... 100S... 100D 100D Bemessungsstrom [A] 29.00 / 22.6 55.00/46.00 100.00/86.00
roll-up SONJA powerdisplays Aufbauanleitung Assemble instructions
 powerdisplay SONJA Mit Rollfunktion! Die Werbefläche rollt sich vollständig in das Display. So ist Ihre Werbung geschützt und in Sekunden wieder aufgebaut. Farbe: chrom/silber inkl. Tasche With rolling
BECOscreen BERHALTER continously and efficiently screen changer
 T E C - S P I R A T I O N technology meets inspiration swiss made BECOscreen BERHALTER continously and efficiently screen changer your partner for melt filtration system screenchanger BERHALTER BECOscreen
A-CERT CERTIFICATION SERVICE
 A-CERT ADVANCED pdf-signaturprüfung einrichten 2011 A-CERT ADVANCED p pdf-signaturprüfung g p g einrichten und e-billing Stammzertifikat installieren Support - Kurzinformation optimiert für Adobe Reader
Montagehandleiding - Instructions de montage Montageanleitung - Mounting instructions. *Standaard positie / Standard position / Position standard
 1 heatwave large Montagehandleiding - Instructions de montage Montageanleitung - Mounting instructions *Standaard positie / Standard position / Position standard 1040 mm / 40.95 in 56 kg / 124 lb 2086
VLT REAL TIME CLOCK OPTION. VLT Series Bookstyle... page 2. Compact IP page 6. Compact IP page 16. Instruction
 VLT Instruction Drives and Controls REAL TIME CLOCK OPTION VLT Series 6000 Montering, Mounting, Montage, Installation Bookstyle... page 2 Compact IP 20... page 6 Compact IP 54... page 16 Advarsel! Real
Softwareupdate-Anleitung // AC Porty L Netzteileinschub
 1 Softwareupdate-Anleitung // AC Porty L Netzteileinschub Softwareupdate-Anleitung // AC Porty L Netzteileinschub HENSEL-VISIT GmbH & Co. KG Robert-Bunsen-Str. 3 D-97076 Würzburg-Lengfeld GERMANY Tel./Phone:
Handbuch. Artologik EZ-Equip. Plug-in für EZbooking version 3.2. Artisan Global Software
 Artologik EZ-Equip Plug-in für EZbooking version 3.2 Artologik EZbooking und EZ-Equip EZbooking, Ihre webbasierte Software zum Reservieren von Räumen und Objekten, kann nun durch die Ergänzung um ein oder
Hama GmbH & Co KG D Monheim/Germany
 Hama GmbH & Co KG D-86651 Monheim/Germany www.hama.com All listed brands are trademarks of the corresponding companies. Errors and omissions excepted, and subject to technical changes. Our general terms
SanStore: Kurzanleitung / SanStore: Quick reference guide
 SanStore Rekorder der Serie MM, MMX, HM und HMX Datenwiedergabe und Backup Datenwiedergabe 1. Drücken Sie die Time Search-Taste auf der Fernbedienung. Hinweis: Falls Sie nach einem Administrator-Passwort
Live Streaming => Netzwerk ( Streaming Server )
") Live Streaming => Netzwerk ( Streaming Server ) Verbinden Sie den HDR / IRD-HD Decoder mit dem Netzwerk. Stellen Sie sicher, dass der HDR / IRD-HD Decoder mit ihrem Computer kommuniziert. ( Bild 1 ) Wichtig:
Live Streaming => Netzwerk ( Streaming Server ) Verbinden Sie den HDR / IRD-HD Decoder mit dem Netzwerk. Stellen Sie sicher, dass der HDR / IRD-HD Decoder mit ihrem Computer kommuniziert. ( Bild 1 ) Wichtig:
Vaisselle. Color CO.1211
 Tafelgeschirr Vaisselle Color CO.1211 Porzellan weiss mit apricot, marone oder grauem Rand, matt, von Kahla. Alle Preise in CHF. Porcelaine blanche avec bord mat, abricot, marone ou gris de Kahla. Tous
 XA-W407BT Update Situation Fehler Meldungen Aktion Bluetooth connection Device authentication Software verification Flash erasing Software updating The communication with the device could not be
HE 33 Tricom. Warewash
 Warewash 33 Tricom Spare Parts Pièces Détachées Ersatzteile Onderdelen Thi s document is the property of Hobart Manufacturing.Reproductionof this document is prohibited without the written consent of Hobart
Zuladung: max. 100kg Load rating: 100kg
 Montageanleitung zum Vollauszugbeschlag Dispensa-VVS für feste und höhenverstellbare Tragrahmen Art.-Nr.: 04235 mit Schnellmontagetechnik Mounting instructions for full-extension top- and bottom runner
3. Klicken Sie im folgenden Fenster unbedingt auf "Installation fortsetzen", um die für das Update benötigten Treiber zu installieren.
 TrekStor - ebook-reader 3.0 - Weltbild + Hugendubel (WB+HD) Edition - Firmware-Update Es gibt mehrere Versionen der Software (Firmware), da es unterschiedliche Editionen des ebook-reader 3.0 gibt. Um zu
Montageanleitung DORMA PT 30. Oberlichtbeschlag. Installation instruction DORMA PT 30. Overpanel patch fitting
 Montageanleitung DORMA PT 30 Oberlichtbeschlag Installation instruction DORMA PT 30 Overpanel patch fitting Stand/Issue 09.0 / 00331 00.5.371.6.3 Wichtige Informationen: Important information: 1 = Bauteil/Baugruppe
Quick Installation Guide Installatie handleiding Guide d installation rapide Kurzanleitung Installation
 Quick Installation Guide Installatie handleiding Guide d installation rapide Kurzanleitung Installation English Uitbreidingsmodule Nederlands Leveringsomvang schroef Uitbreidingsmodule tiptel KM-38
Deurgrepen / Poignées de porte / Stoßgriffe / Pull handles
 PH50 5 PH54 6 PH60 7 PH61 8 PH62 9 PH63 10 PH64 11 PH65 12 PH66 13 PH70 14 PH72 15 PH85 16 PH90 17 www.artitec.com 3 4 PH50 Maatwerk mogelijk. Geschikt voor deurdikte Doorgaand-, enkelzijdig- en Possible
Conditions de travail Arbeitsbedingungen
 Conditions de travail 39 Conditions de travail Emissions Conditions de travail Industriel: une profession 3 fois plus sûr! 9627 personnes sont assurées dans le domaine industriel en Valais. Le nombre d