Montage und Gebrauchsanleitung Installation and use instructions Instructions de montage et mode d emploi. Markise DE. Awning EN
|
|
|
- Sarah Martin
- vor 5 Jahren
- Abrufe
Transkript

1 fiamma.com Markise DE Awning Store Montage und Installation and use instructions Instructions de montage et mode d emploi Toldo y uso Tendalino Istruzioni di montaggio e uso
2 Montage und Markise DE use instructions Store Tendalino Istruzioni di montaggio e uso DE Verpackungsinhalt Contenu de l emballage Contenuto dell imballo Package contents Contenido del embalaje fiamma.com A Installation and Awning Instructions de montage et mode d emploi Toldo y uso 1x F G C D E 2x 4x 2x 2x 2x H I RAFTER CARAVANSTORE 2x Standard Optional x L CARAVANSTORE SUPPORT LEG Standard 440 1x 2
3 Kontrolle bei der Übernahme Goods receipt inspection Contrôle à la réception Control al recibimiento Controllo al ricevimento DE Bitte kontrollieren Sie, ob alle Einzelteile einwandfrei sind oder eventuell während dem Transport beschädigt wurden. Wenden Sie sich in diesem Falle bitte an den Händler. Check that nothing has been damaged or deformed during the transport. In case of damage contact the dealer. Contrôler qu aucune pièce ne soit cassée ou déformée suite au transport. En cas contraire, contacter le revendeur. Controlar que ningún detalle se haya roto o deformado durante el transporte. En este caso contactar al revendedor. Controllare che nessun particolare sia rotto o deformato a causa di errori di trasporto. In questo caso contattare il rivenditore. DE Montageanleitung Installation instructions Instructions de montage Istruzioni di montaggio DE Um die Markise optimal nutzen zu können, lesen Sie bitte die Bedienungsanleitung aufmerksam durch und bewahren Sie sie zur späteren Verwendung gut auf. To use the awning in the best way, read the user s instructions carefully and keep them on hand for consultation in the future. Pour tirer le meilleur parti de votre store, nous vous invitons à lire attentivement les notices d emploi et à les conserver pour toute consultation ultérieure. Para usar el toldo en lo mejor de los modos, os invitamos a leer atentamente las instrucciones de uso, guardandolas en caso de necesidad. Per utilizzare al meglio il tendalino, vi invitiamo a leggere attentamente le istruzioni d uso e a conservarle in caso di necessità. 3
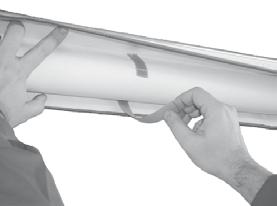
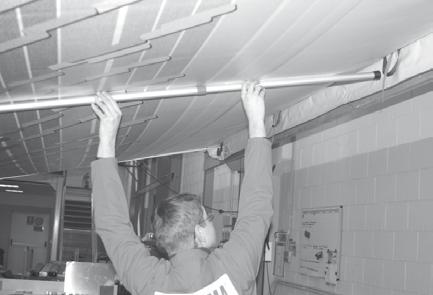
4 Montageanleitung Installation instructions Instructions de montage Istruzioni di montaggio A DE Wir empfehlen, die folgende Abläufe zu zweit auszuführen. 1 We recommend the following operations are carried out by 2 people. Nous vous conseillons d effectuer les operations suivantes en 2 personnes. Aco sejamos efectuar las siguientes operaciones en 2 personas. Consigliamo di effettuare le fasi seguenti in 2 persone. DE Das Tuch komplett ausrollen. Completely unroll the fabric. 2 Dérouler complètement la toile. Desenrollar completamente la lona. Srotolare completamente il telo. IMPORTANT WICHTIG CUIDADO IMPORTANTE DE Das Kederschienenende leicht weitern, bei Bedarf auch entsprechend in der Rundung vornehmen. Widen the opening and the curved parts of the caravan rail. Elargissez le rail à l ouverture et au niveau des zones courbes. Ampliar la parte inicial y las partes curvas de la canalina. Allargare la canalina all imbocco ed in corrispondenza delle curve. 4
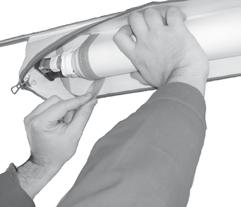
5 Montageanleitung Installation instructions Instructions de montage Istruzioni di montaggio IMPORTANT WICHTIG CUIDADO IMPORTANTE DE Vergewissern Sie sich immer bei Anbringung der Markise, dass die Schiene geradlinig und der Keder komplett im Innern angebracht ist. Install the Caravanstore checking that the awning rail is straight (horizontal position) and that the beading is fully inserted. Procédez à l installation du store en vérifiant que le rail soit en position horizontale et que la baguette soit complètement insérée à l intérieur Montar siempre el toldo asegurándose que la canalina esté derecha y que la cabilla haya sido puesta completamente dentro de ella. Montare sempre il tendalino accertandosi che la canalina sia dritta e il tondino sia completamente messo al suo interno. 5

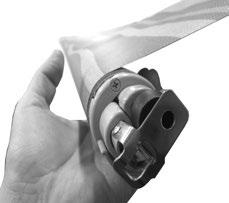
6 Stossdämpfer Absorbeur de choc Assorbitore d urto Shock absorber Absorbedor de golpe DE Die Markise enthält, in Höhe der Spannarmauflagen, serienmässig 3 Stossdämpfer. Die Anbringung des Rafter Caravanstore oder Caravanstore Support Leg erfolgt immer an der zentralen Spannarmauflage. The Caravanstore awning now comes with 3 Rafter Support Kits fitted as standard. Two are mounted at opposing ends of the awning and are for use with the 2 integrated Rafter bars and the third is fitted in the centre of the Caravanstore and is to be utilised if using a Rafter Caravanstore or Caravanstore Support Leg. Le store est équipé de série avec 3 Absorbeurs de Choc fixés en correspondance des zones d appui du tendeur de toile Rafter. En cas d installation du Rafter Caravanstore ou du Caravanstore Support Leg, nous vous conseillons d utiliser celui du milieu. El toldo viene de serie con 3 amortiguadores fijados a nivel de los soportes de los Rafter, si es necesario poner el Caravanstore Rafter o la Caravanstore Supoort Leg, usar lo central. Il tendalino ha di serie i 3 assorbitori d urto fissati in corrispondenza degli appoggi Rafter; in caso si debba mettere il Rafter Caravanstore o Caravanstore Support Leg, utilizzare quello centrale. 6
7 Stossdämpfer Absorbeur de choc Assorbitore d urto Shock absorber Absorbedor de golpe CARAVANSTORE 410 CARAVANSTORE 440 7
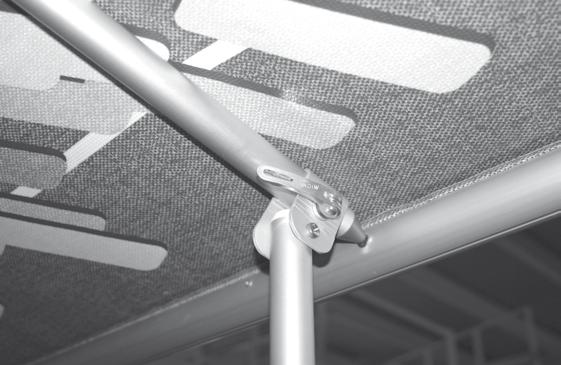
8 Montageanleitung Installation instructions Instructions de montage Istruzioni di montaggio DE Befestigungsmöglichkeit der Markise an der vorhandenen Kederschiene. Solution to fix the awning to the existing awning rail. Possibilté de fixation du store au rail du véhicule. Modalidad de fijación del toldo a la canalina. Modalità di fissaggio del tendalino alla canalina esistente. DE Möglichkeit 1 Option 1 Possibilté 1 Modalidad 1 Modalità 1 C DE Möglichkeit 2 Option 2 D Possibilté 2 Modalidad 2 Modalità 2 8

9 Instructions for use Mode d emploi Istruzioni d uso 1 2 9
10 Instructions for use Mode d emploi Istruzioni d uso 3 DE Das Tuch komplett ausrollen. Completely unroll the fabric. Dérouler complètement la toile. Desenrollar completamente la lona. Srotolare completamente il telo. 10


11 Instructions for use Mode d emploi Istruzioni d uso 4 DE Die Stützfüsse komplett ausziehen und zusammen, durch Drehen des Stiftes und ohne Kraftaufwand, absenken. Pull the legs completely out, and, lower them together to the ground simply by turning on pins and without forcing. Extraire complètement les pieds d appui, les baisser en direction du sol en les faisant tourner simplement sur les pivots, sans forcer. Extraer las patas completamente y, juntas, bajarlas a la tierra solo girándolas sobre los pernios sin forzar. Estrarre le paline completamente e, insieme, abbassarle a terra ruotandole semplicemente sui perni e senza forzare. A C B 11


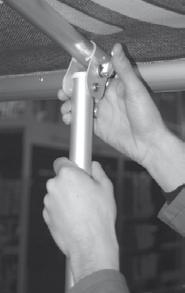
12 Instructions for use Mode d emploi Istruzioni d uso 5 DE Den Stützfuss A festhalten, den Arm B anheben und komplett ausziehen, dabei den Druckknopf gedrückt halten. Keeping Leg A still, lift and extend Rafter B completely by pushing the button. Maintenez immobile le pied A, soulevez et étendez complètement le Rafter B tout en appuyant sur le bouton. Manteniendo la pata A parada, levantar y extender el Rafter B presando el butón. Tenendo ferma la palina A, sollevare ed estendere completamente il Rafter B, premendo il pulsante. B 12


13 Instructions for use Mode d emploi Istruzioni d uso 6 13

14 Instructions for use Mode d emploi Istruzioni d uso 7 DE Den Rafter ausziehen und spannen, bis das Tuch ausreichend gespannt ist. Tighten the rafter until the fabric is sufficiently taut. Mettre en tension le rafter jusqu à ce que la toile soit suffisamment tendue. Poner en tensión el rafter hasta que la lona esté completamente tendida. Tensionare il rafter fino a quando il telo è sufficientemente teso. 14

15 Instructions for use Mode d emploi Istruzioni d uso 8 DE Den Stützfuss A in die gewünschten Höhe ausziehen. Lift up leg A to the desired height. Montez le pied d appui A à la hauteur désirée. Levantar la pata A a la altura deseada. Alzare la palina A all altezza desiderata. DE Zum Schliessen der Markise die Schritte 1-8 in entgegengesetzter Reihenfolge wiederholen (mit dem Hinweis den Druckknopf gedrückt halten, Abb. 5). To close the awning repeat steps 1-8 in reverse remembering to push the button (fig. 5). Pour fermer le store, répétez les étapes 1-8, en sens inverse (assurez-vous d appuyer sur le bouton, fig.5) Para cerrar el toldo, repetir los pasos 1-8, en sentido contrario (pulsando el botón). Per chiudere il tendalino, ripetere le fasi 1-8, al contrario (con l avvertenza di premere il pulsante, fig. 5). 9 15
16 Mode d emploi Istruzioni d uso Instructions for use TEILÖFFNUNG DER FIAMMA CARAVANSTORE DE Die Teilöffnung der Caravanstore ist nur bei den Längen von 310 cm bis 440 cm möglich. ACHTUNG! Bei der Teilöffnung der Markise muss der Stützfuss an die Wand * befestigt werden. 1. DAS TUCH MUSS IMMER VON OB AUFGEROLLT SEIN (Abb. 1). Dies muss bei der Teilöffnung beachtet werden, andernfalls kann das Tuch auch von unten aufgerollt werden. 2. Das Tuch in 7 Umdrehungen aufrollen, dabei die Aufschrift Fiamma (horizontal) als Anhaltspunkt berücksichtigen. 3-3a. Den Stützfuß und Rafter (A + B) ausziehen und den Rafter (B) in Höhe positionieren. 4. Das Endstück des Rafters (B) in die Spannarmauflage einsetzen. 5. Das Rafterende (B) so weit ausziehen, bis der Druckknopf einrastet. 6. Den gleichen Vorgang auch beim anderen Stützfuß und Rafter (A + B) vornehmen 7. ACHTUNG! Die Teilöffnung ist nur durch die Befestigung der Stützfüsse mit den Wandhalterungen (siehe Abb. ) möglich. * 8. Für den Abbau in entgegengesetzter Reihenfolge vorgehen (von Abb.7 zur Abb.1) * 1 16
17 Instructions for use Mode d emploi Istruzioni d uso 2 3 A + B 3a 4 7 B B A 5 A 17
18 Mode d emploi Istruzioni d uso Instructions for use PARTIAL OPING OF FIAMMA CARAVANSTORE Partial opening of the Caravanstore is only possible from model sizes cm. * ATTTION! Partial opening of the awning can only be performed if the Wall Fixing Brackets have been mounted to the wall of the vehicle. 1. CANOPY MUST ALWAYS BE ROLLED OM THE TOP (see fig 1), this is to be taken in to consideration if you want to open the awning partially, otherwise you can roll the canopy in both directions. 2. Unroll the roller tube 7 turns, keeping the Fiamma logo horizontal. 3-3a. Pull leg and arm A and Rafter B out and put Rafter B in the horizontal position. 4. Insert the end part of Rafter B in the support seat. 5. Extend the end part of Rafter B until it clicks in to position 6. Repeat the operation on the other leg. 7. Attention: Partial opening of the awning can only be performed if the Wall Fixing Brackets have been mounted to the wall of the vehicle (fig. ). 8. To stow the awning away repeat the whole operation in reverse. (from fig. 7 * to fig.1) * 1 18
19 Instructions for use Mode d emploi Istruzioni d uso 2 3 A + B 3a 4 7 B B A 5 A 19
20 Mode d emploi Istruzioni d uso Instructions for use * OUVERTURE PARTIELLE DU CARAVANSTORE FIAMMA La possibilité d ouverture partielle des Caravanstore existe exclusivement pour les mesures de 310 à 440 m. * ATTTION! L ouverture partielle du store est possible seulement avec la modalité de fixation des pieds d appui sur la paroi. 1. LA TOILE DO TOUJOURS SE PRÉSTER ROULÉE VERS LE HAUT (voir fig. 1). Cet élément est fondamental si l on veut une ouverture partielle du store ; si tel n est pas le cas, il est toujours possible d enrouler la toile en sens inverse. 2. Déroulez le rouleau en faisant 7 tours, en prenant comme point de repère le mot Fiamma. (horizontal). 3-3a. Sortez le pied d appui et le Rafter (A+B) et portez le Rafter (B) en position vers le haut. 4. Placez la partie terminale du Rafter (B) dans sa zone d appui. 5. Étendez la partie finale du Rafter (B) jusqu au déclic du bouton. 6. Répétez l opération pour l autre pied. 7. ATTTION! L ouverture partielle du store est possible seulement avec la modalité de fixation des pieds d appui sur la paroi (voir fig. ). * 8. Pour démonter le tout, effectuez les mêmes opérations mais en sens contraire. (de fig. 7 à fig.1) 1 20
21 Instructions for use Mode d emploi Istruzioni d uso 2 3 A + B 3a 4 7 B B A 5 A 21
22 Mode d emploi Istruzioni d uso Instructions for use APERTURA PARCIAL DEL CARAVANSTORE FIAMMA La apertura parcial del Caravanstore está presente solamente en las medidas de 310 a 440 cm. ADVERTCIA! La apertura parcial del toldo es posible sólo con la fijación de * las patas en la pared. 1. LA LONA SE DEBE PRTAR SIEMPRE ROLLADA DE ARRIBA (ver fig. 1). Esto se debe tener en cuenta si se quiere hacer la apertura parcial, de lo contrario la lona se puede enrollar en otro sentido también. 2. Desenrollar el rodillo haciendo 7 vueltas, teniendo cómo referencia el letrero Fiamma (horizontal). 3-3a. Sacar las patas y el Rafter (A + B) y poner el Rafter (B) en posición hacia arriba. 4. Insertar la parte terminal del Rafter (B) en el asiento del soporte. 5. Extender la parte final del Rafter (B) hasta que haga clic en el botón. 6. Repetir con la otra pata. 7. ADVERTCIA! La apertura parcial del toldo es posible sólo con la fijación de las patas en la pared (véase fig. ). * 8. Para quitar todo, proceder en el sentido contrario (de fig. 7 a fig. 1) * 1 22
23 Instructions for use Mode d emploi Istruzioni d uso 2 3 A + B 3a 4 7 B B A 5 A 23
24 Mode d emploi Istruzioni d uso Instructions for use APERTURA PARZIALE CARAVANSTORE L apertura parziale delle Caravanstore è presente solo sulle misure da 310 a 440 cm. ATTZIONE! L apertura parziale del tendalino è possibile solo con il fissaggio * delle paline a parete. 1. IL TELO SI DEVE PRTARE, SEMPRE, AVVOLTO DALL ALTO (vedi fig. 1). Questa cosa è da tenere presente se si vuol fare l apertura parziale; diversamente si può avvolgere il telo anche nell altro senso. 2. Svolgere il rullo facendo 7 giri, tenendo come riferimento la scritta Fiamma (orizzontale). 3-3a. Estrarre la palina + Rafter (A+B) e portare il Rafter (B) in posizione verso l alto. 4. Inserire il terminale del Rafter (B) nella sede dell appoggio. 5. Estendere la parte finale del Rafter (B) fino allo scatto del pulsante. 6. Ripetere l operazione per l altra palina. 7. ATTZIONE! L apertura parziale del tendalino è possibile solo con il fissaggio delle paline a parete (vedi fig. ). * 8. Per smontare il tutto, procedere al contrario (dalla fig. 7 alla fig.1) * 1 24

25 Instructions for use Mode d emploi Istruzioni d uso 2 3 A + B 3a 4 7 B B A 5 A 25
26 Instructions for use Mode d emploi Istruzioni d uso DE Anbringung des Zubehörs zur Spannung der Markise. Installation of awnings tension accessories. Installation des accessoires pour une tension optimale de l auvent. Instalacion de los accesorios para desplegar el toldo. Montaggio degli accessori per il tensionamento del tendalino. E F G 26

27 Montageanleitung Installation instructions Instructions de montage Istruzioni di montaggio DE Anbringung der Spannarmauflage. Installation of wall brackets. Installation des pieds de support sur la paroi. Instalacion de los enganches en la pared. Montaggio degli attacchi a parete. H 2x DE Wandhalterungs- kit für Stützfüss. Wall hooking legs kit. Etriers de support pour pieds. Kit enganche patas en la pared. Kit attacco palina a parete. 27
28 Instructions for use Mode d emploi Istruzioni d uso DE Wir empfehlen, die folgende Abläufe zu zweit auszuführen. We recommend the following operations are carried out by 2 people. Nous vous conseillons d effectuer les operations suivantes en 2 personnes. Aco sejamos efectuar las siguientes operaciones en 2 personas. Consigliamo di effettuare le fasi seguenti in 2 persone. 28
29 Instructions for use Mode d emploi Istruzioni d uso 29
30 Gebrauchsanweisungen und Ratschläge Maintenance instructions Instructions et conseils Recomendaciones Avvertenze e suggerimenti DE Anbringung der Spannstangen Rafter für die Caravanstore. Installation of awning tension rafters for Caravanstore. Installation des tendeurs de toile pour le store Caravanstore. Instalacion de los Rafter para la Caravanstore. Montaggio dei rafter per la Caravanstore. IMPORTANT WICHTIG CUIDADO IMPORTANTE DE Eine Markise ist ein Sonnenschutz, deshalb muss sie bei kräftigem Wind, starkem Regen oder Schnee, eingefahren werden! Wenn es regnet die Markise neigen damit das Wasser ablaufen kann und die Spannstange RAFTER montieren. Remember that the awning was designed to protect from the sun, and not from rain, wind or snow. In these cases, we recommend that it will be rolled up! In case of moderate rain, incline the awning for the drainage of water and install the special tension RAFTER. Un store est conçu pour protéger du soleil et de ce fait il doit être enroulé lors d intempéries! En cas de pluie légère incliner le store afin que l eau puisse s écouler et monter le tendeur de toile RAFTER. El toldo ha sido creado para protegerse del sol y no de la lluvia, en estos casos se aconseja inclinar el toldo para que el agua fluya y enganchar el rafter. En caso de lluvia intensa, viento o nieve se aconseja cerrarlo. Ricordare che il tendalino è stato concepito per ripararsi dal sole e non dalla pioggia; in questo caso si consiglia di inclinare il tendalino per favorire il deflusso dell acqua e montare il RAFTER. In caso di forte pioggia, vento o neve si consiglia di chiuderlo. 30


31 Instructions for use Mode d emploi Istruzioni d uso I Standard Optional


32 Instructions for use Mode d emploi Istruzioni d uso L 32
33 Gebrauchsanweisungen und Ratschläge Instructions et conseils Avvertenze e suggerimenti Maintenance instructions Recomendaciones Alle unsere Markisen werden auf höchstem Niveau Made in Italy hergestellt. Die Fiamma Markisen sind sorgfältig hergestellte Artikel. Dennoch ist es möglich, dass sich Besonderheiten der Materialien (wie z. B. kleine Unvollkommenheiten der Lackierung oder der Linie des Aluminiumprofils; kleine Macken oder leichte Deformierungen der Plastikkomponenten) feststellen lassen, welche als Unvollkommenheit angesehen werden könnten. Diese Eigenschaften jedoch sind abhängig von den jeweiligen Materialen und den spezifischen Arbeitsprozessen. Diese Besonderheiten treten, trotz der Anwendung von fortschrittlichen und innovativen Maschinen und Techniken für Produktion und Konfektion, welche immer auf dem neuesten Stand sind, dennoch hin und wieder auf. Neben unseren strengen Qualitätskontrollen lassen wir unsere Artikel auch kontinuierlich von unabhängigen Instituten beurteilen, um sich von der Reissfestigkeit, der Wasserdichte, der Farbfestigkeit und Widerstandsfähigkeit bei Umwelteinflüssen zu überzeugen. Und damit auch Sie sich auf lange Zeit über Ihre Markise, auch Jahre nach dem Erwerb, freuen können, bitten wir Sie, die folgenden, einfachen Ratschläge zu beachten: ANLEUNG ZUR PFLEGE UND INSTANDHALTUNG IHR MARKISTUCH Bitte verpacken Sie Ihre Markise nur, wenn diese trocken und möglichst sauber ist. Feuchtigkeit kann Flecken verursachen. Bleibt Ihnen dennoch nichts anderes übrig, als die Markise feucht einzufahren, ist es sinnvoll, diese nach max. 12 Stunden wieder auszufahren, um sie trocknen zu lassen. Der meiste Schmutz ist oberflächlich und kann mit sauberem Wasser und einem Lappen oder einer Bürste beseitigt werden. Sollte das Tuch sehr schmutzig sein, fügen Sie ein mildes Reinigungsmittel hinzu. Bitte benützen Sie nie aggressive Chemikalien oder Hochdruckreinigungsgeräte. Neben diesen Vorschlägen zur Reinigung von Spezialmaterialen, empfehlen wir Ihnen, die Markise nicht unter 0 C zu benützen. Um eine absolute Dichte zu gewähren, werden die Stoffe mehrfach beschichtet und gewalzt. Während dieses Prozesses ist es möglich, dass sich einzelne Farbpigmente verschieben und somit Lichtpünktchen verursachen, welche jedoch nur Unregelmässigkeiten des Stoffes, technisch leider unvermeidbar, sind. Die Wasserdichte wird jedoch in keinster Weise beeinträchtigt. Somit ist auch das Markisentuch absolut hermetisch, auch an dieser Stelle. Bei der Bearbeitung des Materiales können sich Falten bilden, welche vor allem bei hellen Stoffen im Gegenlicht dunkel wirken können. Auch helle Streifen (der sogenannte Weissbruch ) lassen sich mit/bei diesem Material nicht vermeiden. Die wetterbedingten Einflüsse können mit der Zeit eine Abänderung der Farbe verursachen. Alle Tücher sind an der Frontblende verschweisst und somit wasserdicht: bei Regen können sich im Bereich der Frontblende Tropfen ansammeln (auch bei geöffneter Markise), was jedoch in keinster Weise die Funktion des Produktes beeinträchtigt. 33
34 Garantie Fiamma Garantie Fiamma Garanzia Fiamma Fiamma Warranty Garantía Fiamma 1. FIAMMA garantiert nur für Produkte, die innerhalb von 24 Monaten nach dem Kaufdatum durch den Endverbraucher reklamiert werden und durch Kaufbescheinigung nachgewiesen werden können. 2. FIAMMA erkennt die Garantie nur bei Schäden an, welche durch Material- oder Produktionsfehler verursacht worden sind. 3. Die Garantie wird nicht bei natürlicher Abnutzung oder bei Abnutzung durch den Gebrauch der betroffenen Teile gewährleistet; bei Nichtberücksichtigung der Gebrauchsanweisung oder Anbringung durch nicht fachgerechte Handhabung, bei Einsatz von Ersatzteilen die nicht Original FIAMMA sind, bei Eingriff einer nicht qualifizierten Person, bei eventueller Abänderung des Produktes durch den Endverbraucher oder Dritte ohne die Berechtigung durch Fiamma. 4. Für den Fall, dass der Garantieanspruch berechtigt ist, sieht FIAMMA die Regelung des Schadens vor. Es ist aber FIAMMA vorbehalten zu entscheiden, ob eine Reparatur oder ein Austausch der defekten Teile durchgeführt wird. 5. Bei Reklamationen bitte an den Händler wenden, bei welchem das Produkt erworben worden ist. Dabei muss immer die Seriennummer des Produktes, die Rechnung oder der Kassenzettel (FIAMMA ist berechtigt eine Kopie anzufordern) und eine genaue Beschreibung des Schadens (Fotos sind hier die beste Lösung) anzugeben. Bei unvollständiger oder Falschangabe wird das Recht auf Garantieanspruch von FIAMMA vorbehalten. 6. FIAMMA ist berechtigt, sich das Produkt zur Überprüfung des Garantieanspruches jederzeit zuschicken zu lassen. Frachtkostenerstattung des schadhaften Produktes wird nur bei berechtigter Reklamation von FIAMMA übernommen, zusätzlich zu der Entschädigung. Ist der Anspruch der Garantie nicht berechtigt, werden die Reparaturkosten bzw. eine Entschädigung des Produktes, mittels eines Kostenvoranschlages durch den Kunden selbst getragen. WICHTIG : Es wird die Anbringung der im Kit enthaltenen Stossdämper für den Rafter empfohlen (B) und die Caravanstore immer laut einer der beiden auf der Seite 8 empfohlenen Möglichkeiten anzubringen. Kontaktieren Sie den Händler Ihres Vertrauens und stellen Sie vor dem Gebrauch der Caravanstore sicher, dass die Fahrzeugwand für solch eine Markise robust genug ist. Im Zweifelsfall empfehlen wir die Markise nach dem Gebrauch abzunehmen um Schäden während der Fahrt zu vermeiden. Fiamma kommt nicht für eventuelle Schäden, die während der Fahrt oder während dem Gebrauch an zu schwachen Fahrzeugwänden verursacht worden sind, auf. 34
35 Gebrauchsanweisungen und Ratschläge Instructions et conseils Avvertenze e suggerimenti Maintenance instructions Recomendaciones All our awnings Made in Italy and manufactured following high standards. The awnings are made with precision, but some of the characteristics of the materials (as little imperfections on paint or linearity of aluminium profiles; little marks or light deformations of plastic parts), which could be interpreted as defects, derive from the materials and from the specific work processes, and these characteristics occur even though Fiamma uses advanced and innovative machines production techniques. Apart from our strict quality controls, we also have our fabrics continuously controlled by independent institutes to ensure that the fabric is tear resistant, they can hold the weight of water, the colours don t fade and it is resistent against atmospheric agents. In order to enjoy your awning for a long time, even for many years after the purchase date, we ask you to take note of and follow the simple advices below: MAINTANCE INSTRUCTIONS OF FABRIC Make sure that your awning is completely dry and clean before closing it. The remaining humidity could cause stains. If however you have no choice but closing the awning when it is still wet, make sure to open it for drying within 12 hours maximum. Most of the dirt is superficial and can be removed with clean water and a cloth or a brush. If the fabric is very dirty, add some light cleaning detergent. Be aware never to use any aggressive chemical substances and never to clean the fabric with a high pressure machine. We recommend not to use the awning at a temperature below 0 C. To guarantee a perfect quality, the fabrics are waxed or laminated several times. During this operation, single coloured pigments could move and thus create small bright spots in the material, which are only irregularities that are technically inevitable to avoid, but do not influence the impermeability of the fabric. The fabric is therefore completely hermetic, also in these spots. During the production of the material, small creases could form, which especially on bright fabric in backlight could seem dark. Bright stripes (the so called white crease) are inevitable with these materials. With time the influence of weather could cause change in colour. All Fiamma fabrics are soldered on the front bar for a high resistance to water : in case of rain little drops of water may form near the front bar and this may happen when the awning is open as well, this doesn t compromise awning s functionality. 35
36 Garantie Fiamma Garantie Fiamma Garanzia Fiamma Fiamma Warranty Garantía Fiamma 1. FIAMMA Products have a 24 month guarantee from the date the end user purchases the product. 2. The FIAMMA warranty covers claims for damages that are due to defective material or production failures. 3. The warranty is not valid under the following circumstances: natural wear of the product, if proper installation instructions have not been followed, in cases of negligence or improper use, if non original FIAMMA spare parts have been used, if the damage comes from transporting the product with improper packaging not authorised by FIAMMA, in the case of intervention by a non qualified person, or when the end user or anybody else has modified the product without the proper authorisation of FIAMMA. 4. If the claim is covered under warranty, FIAMMA reserves the right to decide whether to repair or replace the covered part(s) determined to be defective. 5. The claim should be submitted to the supplier, from which the product was originally purchased. It is vital to always provide the following information: serial number of the product, proof of purchase (FIAMMA could ask for a copy) and a precise description of the damage (together with some digital photos to help substantiate the claim). In the case of false or incomplete information, FIAMMA reserves the right to refuse the claim. 6. FIAMMA reserves the right to ask for return of the products in order to verify the warranty claim. The cost and risks/insurance of transportation is to be paid by the client. If the warranty request is then verified, FIAMMA will pay for the transport, i.e. cost of sending and returning the part, as well as costs for repairing/replacing the part. If the warranty claim is not accepted, the cost of repair and replacement of the part or product, as indicated beforehand by the client, will be paid by the client. IMPORTANT: We recommend installation of the shock absorbers (B) which are delivered as standard, installation must be carried out as per either of the 2 installation options (see page 8). Before using the Caravanstore, check with your local dealer, in order to be sure that the wall of your caravan in sturdy enough. If in any doubt then we recommend removal of the awning after use and not to travel with the awning fixed to the vehicle. Fiamma refutes any responsibility for damage to lightweight walls caused during use. 36
37 Gebrauchsanweisungen und Ratschläge Instructions et conseils Avvertenze e suggerimenti Maintenance instructions Recomendaciones Tous nos stores sont Made in Italy selon des standards de grande exigence. Les stores ont été conçus avec le plus grand soin cependant, il est possible que vous recontriez; vous pouvez toutefois rencontrer certaines particularités sur les matériaux (par exemple des imperfections sur la peinture ou sur la linéarité des profils en aluminium; petites marques et imperceptibles voilages des parties en plastique) qui pourraient être perçues comme des imperfections mais qui dépendent des matériaux mêmes et des processus de fabrication. Ces particularités se vérifient parfois bien que Fiamma utilise des outils et des techniques de production et de confection avancées et innovatrices. En plus de nos contrôles de qualité très rigoureux, nous faisons contrôler nos tissus régulièrement par des instituts indépendants afin de nous assurer de la bonne résistance aux déchirures, à la pression de l eau, et pour garantir la tenue des couleurs aux différents facteurs atmosphériques. Pour pouvoir profiter de votre store durant de longues années, nous vous invitons à bien vouloir observer les simples règles suivantes. INSTRUCTIONS D TRETI ET DE MANUTTION DE LA TOILE Rangez votre store seulement s il est sec et si possible propre l humidité restante pouvant peut provoquer des taches. Si vous êtes cependant obligé d enrouler votre store encore humide, étendez-le ensuite pour le sécher dans les 12 heures qui suivent. La saleté est généralement superficielle et peut être éliminée à l eau propre à l aide d une éponge ou d une brosse. Si le tissu est encore sale, ajoutez à l eau un détergent délicat. N utilisez jamais de substances chimiques agressives ni d appareils à haute pression pour le nettoyage. Nous vous conseillons de ne pas utiliser votre store en cas de températures inférieures à 0 C. Pour garantir une tenue absolue les tissus sont enduits et laminés plusieurs fois. Durant cette opération, des pigments colorés peuvent se déplacer créant dans les matériaux des petits points lumineux, qui sont de simples irrégularités des tissus techniquement inévitables et qui ne compromettent en rien l imperméabilité du tissu. La toile est donc absolument hermétique, même en ces endroits. Durant l élaboration des matériaux, des plis peuvent se former qui, surtout sur les tissus clairs à contre jour, semblent sombres. La formation de bandes claires (plis blancs) ne peut donc être évitée avec ces matériaux. Au fil du temps et à cause des conditions météorologiques, les couleurs pourraient présenter des variations. Toutes les toiles sont soudées sur le bandeau frontal du store pour une parfaite étanchéité. Lorsqu il pleut, de petites gouttes peuvent se former à proximité du bandeau frontal même si le store est ouvert. Cette situation ne compromet toutefois, en aucun cas, la fonctionnalité de l article. 37
38 Garantie Fiamma Garantie Fiamma Garanzia Fiamma Fiamma Warranty Garantía Fiamma 1. FIAMMA garantit ses propres articles pour une période de 24 mois à partir de la date d achat effectué par le consommateur final. 2. Fiamma accepte la garantie pour des dommages dus à un défaut du matériel ou à une non-conformité de production. 3. Aucune garantie n est acceptée pour les pièces sujettes à usure naturelle, au cas où le mode d emploi et les instructions d installation n auraient pas été suivis, en cas de négligence ou d usage non conforme, en cas d utilisation de pièces détachées autres que celles de marque Fiamma, en cas d emballage ou de transport non conformes ou non autorisés par Fiamma, en cas d intervention d une personne non qualifiée, si l utilisateur final ou que quelqu un d autre a apporté des modifications à l article sans l autorisation de Fiamma. 4. Pour les cas où les conditions pour le recours à la garantie seront applicables, Fiamma répondra du dommage en décidant soit d effectuer une réparation soit de remplacer la pièce défectueuse. 5. Pour effectuer une réclamation, veuillez vous adresser auprès du revendeur où vous avez effectué votre achat. Vous devrez toujours indiquer le numéro de série du produit, la référence de la facture ou du ticket de caisse (Fiamma pourra vous en demander la copie) et une description précise du dommage (des photos numériques seraient la meilleure solution). En cas d information fausses et/ou incomplètes, Fiamma ne pourra pas appliquer les conditions de droits à la garantie. 6. Fiamma peut demander le retour du produit pour vérifier l applicabilité des droits de garantie. Les frais et les risques d expédition sont à la charge du client. Si le recours en garantie est applicable, Fiamma payera les frais de transport, c est-à-dire les coûts d envoi et de restitution de l article en plus des frais liés à la réparation du dommage. En cas de non applicabilité du recours en garantie, les coûts de réparation et de restitution de l article, desquels le client aura été informé au préalable, seront à la charge du client. IMPORTANT: Il est recommandé d installer les absorbeurs de choc livrés d origine (B) et de toujours fixer le Caravanstore en suivant une des modalités recommandées à la page 8. Avant d utiliser le Caravanstore, merci de contacter votre concessionnaire pour vérifier que la paroi de votre caravane soit suffisamment robuste. En cas de doute, nous conseillons d enlever toujours le store après l utilisation; ne pas rouler avec le store installé. Fiamma décline toute responsabilité pour dommages aux parois faibles causés pendant l utilisation. 38
39 Gebrauchsanweisungen und Ratschläge Instructions et conseils Avvertenze e suggerimenti Maintenance instructions Recomendaciones Todos nuestros toldos son Made in Italy y fabricados según estandares muy exigentes. Fiamma produce todos los toldos con esmero, pero unas particularidades del material (como pequeñas imperfecciones sobre la pintura o linealidad de los perfiles de aluminio;pequeños signos o ligeras deformaciones de las partes de plástico), que podrán ser interpredadas como imperfecciones, dipenden de los mismos materiales y de los procesos de producción aunque Fiamma use maquinarias y técnicas de producción avanzadas y siempre inovadivas. Trás de pasar nuestros severos controles de calidad, nuestras telas vienen controladas por institutos independientes para garantizar una lona completamente estanca a los desgarros, a la presión del agua, tienen colores duraderos, resistentes a la luz y al lavado. Para disfrutar por mucho tiempo de su toldo incluso por muchos años después de la compra, Le rogamos seguir los siguientes simples consejos: INSTRUCCION PARA LA CURA Y EL MANTIMITO DE LA LONA Por favor, cierre su toldo solo si está seco y posiblemente lindo. La humedad residual puede causar manchas. De todas formas si está obligado a empaquetar su toldo cuando está todavía humedo, después de 12 horas, tendría que tenderla para que se seque. La mayor parte de la suciedad es superficial y se puede eliminar con agua, un estropajo o un cepillo. Si la lona tuviese que ser demasiado sucia, añada un detersivo delicado al agua. Por favor, no use nunca sustancias químicas agresivas y no use nunca un aparato para la limpieza de alta presión. Se aconseja no utilizar los toldos bajo 0 C. Para garantizar un mantenimiento absoluto las telas vienen laminadas o untadas más veces. Durante esta operación los síngulos pigmientos colorados pueden desplazarse y esto crea muy pequeños puntos luminosos, que son sólo irregularidades de los tejidos tecnicamente inevitables y que no comprometen la impermeabilidad de la lona. La lona es absolutamente hermética, también en estos puntos. Durante la confección de la lona pueden fomarse unas arrugas, que, sobretodo en los tejidos claros, al trasluz, parecen oscurarse. También las tiras claras (las denominadas tiras blancas) no se pueden evitar usando estos tejidos. A medida que pasa el tiempo los influjos meteorológicos pueden causar variaciones en los colores. Todas lonas están soldadas sobre el frontal para garantizar una alta resistencia al agua: en caso de lluvia pueden formarse pequeñas gotas cerca del frontal y esto ocurre aún cuando el toldo está abierto; esta situación no perjudica de alguna manera la funcionalidad del toldo. 39
40 Garantie Fiamma Garantie Fiamma Garanzia Fiamma Fiamma Warranty Garantía Fiamma 1. FIAMMA garantiza los propios productos por un periodo de 24 meses a partir de la fecha de adquisición 2. FIAMMA reconoce la garantía por averías debidas a defectos de la lona o que no son en conformidad de producción. 3. No se reconoce garantía en caso de partes dañadas por desgaste y en caso de consunción natural debida al uso, en caso de negligencia o de utilización inadecuada, en caso de uso de recambios no originales Fiamma, a consecuencia de un embalaje por el transporte inadecuado o no autorizado por Fiamma, en caso de intervención de una persona no cualificada, en el caso de que los que efectivamente utilizan los productos aporten modificaciones sin la autorización Fiamma. 4. En el caso de que el producto resulte en garantía, Fiamma se preocupará de eliminar la avería, decidiendo si repararlo o sustituir la parte defectuosa. 5. Para la exhibición del reclamo, dirigirse al revendedor donde se ha comprado el producto. Se debe siempre indicar el número de serie del producto, la referencia de la factura o del ticket de caja (FIAMMA podrá pedir una copia) y una descripción precisa de la avería (lo mejor son las fotos digitales). En caso de informaciones falsas o incompletas FIAMMA no aplicará los derechos de garantía. 6. FIAMMA puede pedir el regreso del producto para verificar la existencia de los derechos de garantía. Los gastos y los riesgos de la expedición son a cargo del cliente. Si la petición de aplicación de la garantía vendrá valutada válida, FIAMMA sostendrá los gastos de transporte, es decir los gastos de envío y de devolución, además de los gastos para la eliminación de la avería. En caso de no aplicabilidad de los derechos de garantía, los gastos de reparación y de devolución del producto, serán a cargo del cliente. CUIDADO: Les recomendamos la instalación de los shock absorbers para el Rafter, que vienen suministrados de serie (B) y de fijar el toldo Caravanstore siempre según una de las dos modalidades aconsejadas en la página 8. Antes de usar la Caravanstore, controlen con su revendedor que las paredes de la caravana estén bastante robustas. En caso de cualquier duda les recomendamos de quitar siempre el toldo despues del uso; no viajar con el toldo montado sobre el vehiculo. Fiamma declina cada responsabilidad de posibles daños a las paredes débiles de las caravanas causados durante el uso. 40
41 Gebrauchsanweisungen und Ratschläge Instructions et conseils Avvertenze e suggerimenti Maintenance instructions Recomendaciones Tutti i nostri tendalini sono Made in Italy e fabbricati secondo standard esigentissimi. I tendalini sono prodotti accuratamente, ma certe particolarità dei materiali (come piccole imperfezioni sulla vernice o linearità dei profili di alluminio; piccoli segni e leggere deformazioni delle parti plastiche), che potrebbero essere interpretare come imperfezioni, dipendono dai materiali stessi e dagli specifici processi di lavorazione, e si verificano nonostante il fatto che Fiamma utilizzi macchinari e tecniche di produzione e di confezione avanzate e sempre innovative. Oltre ai nostri severi controlli della qualità, facciamo controllare i nostri tessuti continuamente da istituti indipendenti per accertarne la resistenza allo strappo, resistenza alla pressione dell acqua, solidità dei colori e resistenza agli agenti atmosferici. Ed affinché anche Lei possa godere a lungo del Suo tendalino anche molti anni dopo l acquisto, La preghiamo di osservare i seguenti, semplici consigli: ISTRUZIONI PER LA CURA E LA MANUTZIONE DEL TELO Per favore chiuda il Suo tendalino solo se è asciutto e possibilmente pulito. L umidità residua può provocare macchie. Se comunque é costretto ad impacchettare il Suo tendalino ancora umido, dopo 12 ore al massimo dovrebbe stenderlo per farlo asciugare. La maggior parte dello sporco è superficiale e si può eliminare con acqua pulita ed un panno o una spazzola. Se il tessuto dovesse essere molto sporco, aggiunga un detersivo delicato all acqua. Per favore non usi mai sostanze chimiche aggressive e non utilizzi mai un apparecchio per la pulizia ad alta pressione. Si consiglia di non utilizzare il tendalino ad una temperatura inferiore agli 0 C. Per garantire una tenuta assoluta, i tessuti vengono spalmati o laminati più volte. Durante questa operazione, singoli pigmenti colorati possono spostarsi e ciò crea nei materiali piccolissimi punti luminosi, che sono solo irregolarità dei tessuti tecnicamente inevitabili e che non compromettono minimamente l impermeabilità del tessuto. Il telo è quindi assolutamente ermetico, anche in questi punti. Nella lavorazione di materiali, possono formarsi pieghe, che specialmente con tessuti chiari in controluce sembrano scure. Anche strisce chiare (la cosiddetta piega bianca) non si possono evitare con questi materiali. Gli influssi metereologici possono nel tempo provocare cambiamenti di colore. Tutti i teli sono saldati sul frontale per una alta tenuta all acqua: in caso di pioggia si possono formare piccole gocce in prossimità del frontale e questo succede anche a tendalino aperto, tale situazione non pregiudica in alcun modo la funzionalità del prodotto. 41
42 Garantie Fiamma Garantie Fiamma Garanzia Fiamma Fiamma Warranty Garantía Fiamma 1. FIAMMA garantisce i propri prodotti per un periodo di 24 mesi dalla data di acquisto da parte del consumatore finale. 2. FIAMMA riconosce la garanzia per danni dovuti a difetti del materiale o non conformità di produzione. 3. Non si riconosce alcuna garanzia in caso di parti soggette a usura e in caso di logoramento naturale dovuto all uso, a seguito dell inosservanza delle istruzioni d uso e installazione, in caso di negligenza o di utilizzo improprio, in caso di impiego di ricambi non originali FIAMMA, a seguito di un imballaggio per il trasporto improprio e non autorizzato da FIAMMA, in caso di intervento di una persona non qualificata, nell eventualità in cui l utilizzatore finale o chiunque altro abbiano apportato modifiche al prodotto senza la preventiva autorizzazione di FIAMMA. 4. Nel caso in cui siano applicabili i diritti di garanzia, FIAMMA provvederà all eliminazione del danno, ma potrà decidere se effettuare una riparazione o una sostituzione della parte difettosa. 5. Per la presentazione di un reclamo rivolgersi al rivenditore presso cui è stato acquistato il prodotto. Si dovrà sempre indicare il numero di serie del prodotto, il riferimento della fattura o dello scontrino fiscale (FIAMMA potrà richiederne una copia) e una descrizione precisa del guasto (alcune fotografie digitali sono la soluzione migliore). In caso di informazioni incorrette o incomplete FIAMMA non riterrà valide le condizioni di applicabilità dei diritti di garanzia. 6. FIAMMA può richiedere il rientro del prodotto per verificare la sussistenza dei diritti di garanzia. Le spese e i rischi di spedizione sono a carico del cliente. Se la richiesta di applicazione della garanzia sarà ritenuta valida, FIAMMA sosterrà i costi di trasporto ovvero i costi di invio e di restituzione, oltre alle spese dovute all eliminazione del guasto. In caso di non applicabilità dei diritti di garanzia, i costi di riparazione e di restituzione del prodotto, preventivamente segnalati al cliente, saranno a carico del cliente. IMPORTANTE: Si raccomanda l installazione e l uso degli assorbitori d urto per il Rafter in dotazione (B) e di fissare sempre la Caravanstore seguendo una delle due modalità consigliate a pag. 8. Prima di utilizzare la Caravanstore, vogliate consultare il vostro rivenditore di fiducia per assicurarvi che le pareti della vostra caravan siano sufficientemente robuste. In caso di dubbio, consigliamo di rimuovere sempre la Caravanstore dopo l utilizzo e di non viaggiare con il tendalino montato sul mezzo. La Fiamma declina ogni responsabilità per eventuali danni alle pareti deboli delle caravan provocati durante l uso. 42
43 Ersatzteile Spare parts Piecès detachées Recambios Ricambi 43
44 Ersatzteile Spare parts Piecès detachées Recambios Ricambi 44
45 Informationen zum umweltschutz Conseils pour la protection de l environnement Consigli per la salvaguardia dell ambiente Safe guarding the environment Informaciones para la proteccion del ambiente DE TSORGUNG VON VERPACKUNGSMATERIALI Das Verpackungmaterial ist zu 100% wiederverwertbar. Werfen Sie das Verpackungsmaterial deshalb nicht einfacht fort, sondern entsorgen Sie es so, wie es die verantwortlichen Stellen vorschlagen. DISPOSAL OF PACKAGING MATERIALS The packaging material is 100% recyclable Packing materials should therefore not be thrown away with household rubbish but disposed of as directed by local authorities. ÉLIMINATION D EMBALLAG Les matériaux d emballage sont entièrement recyclables. Par conséquent, ne les jetez rien dans la nature mais conformez-vous aux réglementations locales en vigueur en matière d élimination des déchets. ELIMINACION DEL EMBALAJE El material del embalaje es reciclable al 100%. Las diferentes partes del embalaje no tienen que dispersarse en el ambiente, sino tienen que ser eliminadas en conformidad con las normas establecidas por las autoridades locales. SMALTIMTO IMBALLAGGIO Il materiale di imballaggio è riciclabile al 100%. Le diverse parti dell imballaggio non devono quindi essere disperse nell ambiente, ma smaltite in conformità alle norme stabilite dalle autorità locali. 45
46 Maße Dimensions Dimensions Tamaños Misure d ingombro A B C Kg cm 180 cm 196 cm 6, cm 225 cm 236 cm 7, cm 225 cm 266 cm 8, cm 225 cm 288 cm 9, cm 225 cm 318 cm 10, cm 225 cm 369 cm 11, cm 225 cm 419 cm 12, cm 225 cm 449 cm 13,0 46
KIT STANDARD F35 PRO. Montageanleitung für die Halterungen Installation instructions for brackets. Instructions de montage pattes
 fiamma.com K STANDARD F35 PRO Montageanleitung für die Halterungen Installation instructions for brackets Instructions de montage pattes Instrucciones de instalacion de los estribos Istruzioni di montaggio
ZIP MARKISEN AWNINGS STORES VERANDE D GB F I
 Montage und Gebrauchsanleitung nstallation and uses instructions nstructions de montage et mode d emploi struzioni di montaggio e d uso MAKSEN AWNNGS STOES VEANE iamma SpA - Milano Airport Highway 69,
KIT FIAT DUCATO CITROËN JUMPER PEUGEOT BOXER High Roof
 fiamma.com K FIAT DUCATO CROËN JUMPER PEUGEOT BOXER High Roof für die Halterungen for brackets pattes Instrucciones de instalacion de los estribos staffe Fiamma F65 Fiamma F45 fiamma.com der Halterungen
VW CRAFTER MERCEDES SPRINTER High Roof VERSION U.K. 98655-746 KIT 98655-889 KIT
 fiamma.com 98655-746 K VW RFTR MR SPRINTR igh Roof 98655-889 K VRSIN U.K. für die alterungen for brackets pattes Instrucciones de instalacion de los estribos staffe Fiamma F65 Fiamma F65 fiamma.com für
08/12. Gebrauchsanleitung Trekkingrucksäcke Trekking rucksacks Instructions for use Notice d'emploi pour sacs à dos de trek
 08/12 Gebrauchsanleitung Trekkingrucksäcke Trekking rucksacks Instructions for use Notice d'emploi pour sacs à dos de trek X-TRANSITION Bedingungen der JACK WOLFSKIN 3-Jahres-Gewährleistung Terms and
KIT TURBO DACHHAUBE ROOFLIGHT LANTERNEAU CLARABOYA OBLÓ EDE GB EN
 Montage- und Gebrauchsanleitung Installation and use instructions Instructions de montage et mode d emploi Instruciones de montaje y uso Istruzioni di montaggio e d uso E GB F I I DACHHAUBE ROOFLIGHT LANTERNEAU
Montage und Gebrauchsanleitung Installation and use instructions Instructions de montage et mode d emploi. Markise DE. Awning EN
 fiamma.com Markise Awning Store Montage und Gebrauchsanleitung Installation and use instructions Instructions de montage et mode d emploi Toldo Instrucciones de montaje y uso Tendalino Istruzioni di montaggio
ES Instruciones de montaje y uso
 fiamma.com Dachbox DE Roof-box Coffre de toit Cofre portaequipajes para el techo Montage- und Gebrauchsanleitung Installation and use instructions Instructions de montage et mode d emploi Instruciones
TITANIUM DEEP BLACK. Montage und Gebrauchsanleitung Installation and usage instructions Instructions de montage et mode d emploi.
 fiamma.com Markisen Awnings Stores Montage und Gebrauchsanleitung Installation and usage instructions Instructions de montage et mode d emploi Toldos Instrucciones de montaje y uso Tendalini Istruzioni
Montage und Gebrauchsanleitung Installation and usage instructions Instructions de montage et mode d emploi. Markise DE. Awning EN
 fiamma.com Markise Awning Store Montage und Gebrauchsanleitung Installation and usage instructions Instructions de montage et mode d emploi Toldo Instrucciones de montaje y uso Tendalino Istruzioni di
Montage und Gebrauchsanleitung Installation and usage instructions Instructions de montage et mode d emploi. Markise DE. Awning EN
 fiamma.com Markise DE Awning Store Montage und Gebrauchsanleitung Installation and usage instructions Instructions de montage et mode d emploi Toldo y uso Tendalino Istruzioni di montaggio e uso fiamma.com
Montage und Gebrauchsanleitung Installation and use instructions Instructions de montage et mode d emploi. Markise DE. Awning EN
 fiamma.com Markise DE Awning Store Montage und Gebrauchsanleitung Installation and use instructions Instructions de montage et mode d emploi Toldo y uso Tendalino Istruzioni di montaggio e uso Fiammastore
TITANIUM DEEP BLACK. Montage und Gebrauchsanleitung Installation and usage instructions Instructions de montage et mode d emploi.
 fiamma.com Markisen DE Awnings Stores Montage und Gebrauchsanleitung Installation and usage instructions Instructions de montage et mode d emploi Toldos Instrucciones de montaje y uso Tendalini Istruzioni
fi amma.com Montage und Markisen Gebrauchsanleitung Installation and Awnings use instructions Instructions de montage et Stores mode d emploi Toldos
 fiamma.com Markisen DE Awnings Stores Montage und Gebrauchsanleitung Installation and use instructions Instructions de montage et mode d emploi Toldos Instrucciones de montaje y uso Tendalini Istruzioni
rtube.nl/red975 Sold separately MN180008_ Off Price GmbH Rodenkirchener Str Hürth Copyright MICRO-USB RCD2002
 RCD2002 MICRO-USB 1x 1x 1x Sold separately A B QR rtube.nl/red975 1/4 1/8 A W B F = W - 4 cm F = W - 4,5 cm W Min. W = 50 cm Min. W = 50 cm 1 2 W F = W - 4 cm F F 3 4 0,5 cm 5 F - 1,0 cm 2/4 2/8 A B 1
Installation Instructions Instructions d assemblage Montageanleitungen Instrucciones de montaje
 Installation Instructions Instructions d assemblage Montageanleitungen Instrucciones de montaje General Instructions Instructions générales Allgemeine Anweisungen Instrucciones generales En It is recommended
NOTICE DE MONTAGE NOTE OF ASSEMBLY / INSTRUCCIONES DE MONTAJE / MANTAGE ANLEITUNG
 NOTICE DE MONTAGE NOTE OF ASSEMBLY / INSTRUCCIONES DE MONTAJE / MANTAGE ANLEITUNG -0-0 REFERENCE NO. REFERENCE NO. REFERENCIA NO. REFERENZ-NR. BV767K8WTT BV767K8BL BLANC \ WHITE BLEU \ BLUE NOM DU PRODUIT.
 Verwenden Sie nur Original-KRONE-Ersatzteile! Das gibt Sicherheit und spart Kosten! Use Original-KRONE parts only This will increase operational reliability and help to save costs! N'utiliser que des piéces
 Verwenden Sie nur Original-KRONE-Ersatzteile! Das gibt Sicherheit und spart Kosten! Use Original-KRONE parts only This will increase operational reliability and help to save costs! N'utiliser que des piéces
 Verwenden Sie nur Original-KRONE-Ersatzteile! Das gibt Sicherheit und spart Kosten! Use Original-KRONE parts only This will increase operational reliability and help to save costs! N'utiliser que des piéces
Hama GmbH & Co KG D Monheim/Germany
 Hama GmbH & Co KG D-86651 Monheim/Germany www.hama.com All listed brands are trademarks of the corresponding companies. Errors and omissions excepted, and subject to technical changes. Our general terms
MARKISEN AWNINGS STORES TOLDOS TENDALINI
 Montage und Gebrauchsanleitung Installation and use instructions Instructions de montage et mode d emploi Instrucciones de montaje y uso Istruzioni di montaggio e d uso MARKIS AWNINGS STOR TOLDOS TDALINI
NEU! PCS 950 win. Der Nachfolger des bewährten Eingabegeräts PCS 950
 NEU! PCS 950 win Der Nachfolger des bewährten Eingabegeräts PCS 950 Das PCS 950 hat viele Jahre lang hervorragende Dienste bei der Herstellung vielseitigster Gitterprodukte geleistet. Ein technisch aufbereitetes
Bedienungsanleitung User s Manual Manuel d utilisation PAH DEUTSCH ENGLISH FRANCAIS
 Bedienungsanleitung User s Manual Manuel d utilisation PAH0017252-000 DEUTSCH ENGLISH FRANCAIS 4x Speaker I/O 2x XLR I/O Herzlichen Glückwunsch zu Ihrem neuen FAME Patch Panel! Vielen Dank, dass Sie sich
Outdoor-Tasche. Operating Instructions Bedienungsanleitung GB D
 00 181243 Outdoor Case Outdoor-Tasche Splish Splash Operating Instructions Bedienungsanleitung GB D A B C D OPEN G Operating instruction 1. Important Notes Children are not permitted to play with the device.
Multi Device. Ein Vertrag eine Rufnummer Surfen und telefonieren mit mehreren Geräten.
 Multi Device Ein Vertrag eine Rufnummer Surfen und telefonieren mit mehreren Geräten. Un contrat un numéro de téléphone Surfez et téléphonez avec plusieurs appareils. Un contratto un numero di telefono
Bedienungsanleitung User Manual
 Bedienungsanleitung User Manual - 1 - Deutsch...3 English...4-2 - Deutsch 1. Sicherheitshinweise Blendungs- und Verletzungsgefahr! Sehen Sie niemals mit optischen Geräten in die Sonne oder eine andere
NOTICE DE MONTAGE NOTE OF ASSEMBLY / INSTRUCCIONES DE MONTAJE / MANTAGE ANLEITUNG BV8703K92MX-MO POLLY COIFFEUSE. 82cm.
 NOTICE DE MONTAGE NOTE OF ASSEMBLY / INSTRUCCIONES DE MONTAJE / MANTAGE ANLEITUNG -0-0 REFERENCE NO. REFERENCE NO. REFERENCIA NO. REFERENZ NR. BV03KMX-MO NOM DU PRODUIT PRODUCT NAME NOMBRE DEL PRODUCTO
LEON
 3249005-1013 Technische Daten: Leon Z Material/Nutzschicht: Polyester Breite: 153 cm Scheuertouren mind. 50.000 Touren Heißlichtechtheit Note 6-7 (theor. Höchstwert = 8). Brandprüfung gemäß der neuen ECE
M10/2/ANGER/SP2/GER/TZ0/XX
 M10/2/ANGER/SP2/GER/TZ0/XX 22102809 GERMAN AB INITIO STANDARD LEVEL PAPER 2 ALLEMAND AB INITIO NIVEAU Moyen épreuve 2 ALEMÁN AB INITIO NIVEL MEDIO PRUEBA 2 Friday 14 May 2010 (afternoon) Vendredi 14 mai
JIG
 3420785-938 3420765-938 3420775-938 Technische Daten: Jig B Material/Nutzschicht: Polyester Breite: 156 cm Scheuertouren mind. 70.000 Touren Heißlichtechtheit Note 6-7 (theor. Höchstwert = 8). Brandprüfung
Montage- und Gebrauchsanleitung Installation and use instructions Instructions de montage et mode d emploi. Gepäckbox DE.
 fiamma.com Gepäckbox DE Rear box Coffre arrière Montage- und Gebrauchsanleitung Installation and use instructions Instructions de montage et mode d emploi Cofres portaequipajes trasero Instruciones de
Sage 30 (Winway Z) Update-Installationsanleitung Installation de l update Installazione per l update
 Update-Installationsanleitung Installation de l update Installazione per l update") Sage 30 (Winway Z) Update-Installationsanleitung Installation de l update Installazione per l update Betriebswirtschaftliche Gesamtlösungen für Selbständige und kleine Unternehmen Logiciels de gestion
Sage 30 (Winway Z) Update-Installationsanleitung Installation de l update Installazione per l update Betriebswirtschaftliche Gesamtlösungen für Selbständige und kleine Unternehmen Logiciels de gestion
LED SENSOR DOOR LIGHT
 fiamma.com LED Aussen- und Innenlicht für die Markise und Stauräume. External/internal LED light for awnings and garage facilities. Lampe à LED pour extérieur et intérieur pour le store et les soutes.
 Verwenden Sie nur Original-KRONE-Ersatzteile! Das gibt Sicherheit und spart Kosten! Use Original-KRONE parts only This will increase operational reliability and help to save costs! N'utiliser que des piéces
 Verwenden Sie nur Original-KRONE-Ersatzteile! Das gibt Sicherheit und spart Kosten! Use Original-KRONE parts only This will increase operational reliability and help to save costs! N'utiliser que des piéces
 Verwenden Sie nur Original-KRONE-Ersatzteile! Das gibt Sicherheit und spart Kosten! Use Original-KRONE parts only This will increase operational reliability and help to save costs! N'utiliser que des piéces
 Verwenden Sie nur Original-KRONE-Ersatzteile! Das gibt Sicherheit und spart Kosten! Use Original-KRONE parts only This will increase operational reliability and help to save costs! N'utiliser que des piéces
MARKISEN AWNINGS STORES TOLDOS TENDALINI
 Montage und Gebrauchsanleitung Installation and use instructions Instructions de montage et mode d emploi Instrucciones de montaje y uso Istruzioni di montaggio e d uso MARKIS AWNINGS STOR TOLDOS TDALINI
MARKISEN AWNINGS STORES TOLDOS TENDALINI
 Montage und Gebrauchsanleitung Installation and uses instructions Instructions de montage et mode d emploi Instrucciones de montaje y uso Istruzioni di montaggio e d uso DE MARKIS AWNINGS STOR TOLDOS TDALINI
INSTALLAZIONE INSTALLATION MONTAGE EINBAU
 INSTALLAZIONE INSTALLATION MONTAGE EINBAU MANUTENZIONE SOFFIONI MySlim ISPEZIONABILI MAINTENANCE OF MySlim INSPECTABLE&SERVICEABLE SHOWER HEADS ENTRETIEN DES POMMES DE DOUCHE MySlim INSPECTABLES WARTUNG
1,2-1,8 TON TWIST 100 TWIST 100
 1,2-1,8 TWIST 100 L attuatore idraulico bi-direzionale Cangini permette di inclinare attrezzature o attacchi rapidi fino ad un angolazione di, facilitando le operazioni di scavo, anche in posizioni difficili
ES Instruciones de montaje y uso
 fiamma.com Gepäckbox DE Rear box Coffre arrière Cofres portaequipajes trasero Montage- und Gebrauchsanleitung Installation and use instructions Instructions de montage et mode d emploi Instruciones de
Programmieranleitung CADAS 100 LPG 158
 Kupfer Programmieranleitung CADAS 100 LPG 158 Küvetten-Test LCK 529 Seite 1 Ausgabe 98/04 Achtung! Das Ausgabedatum dieser Programmieranleitung muß mit dem Ausgabedatum der Arbeitsvorschrift der Reagenzien
Rev. Proc Information
 Rev. Proc. 2006-32 Information 2006, CPAs 1 Table 1-Total loss of the home Table 2- Near total loss is water to the roofline. Completely gut the home from floor to rafters - wiring, plumbing, electrical
Programmieranleitung CADAS 100 LPG 210
 Programmieranleitung CADAS 100 LPG 210 Küvetten-Test LCK 555 Seite 1 BSB 5 BSB [n] Ausgabe 9804 Achtung! Das Ausgabedatum dieser Programmieranleitung muß mit dem Ausgabedatum der Arbeitsvorschrift der
SHIMMER mensole e consolle
 SHIMMER mensole e consolle DESIGN PATRICIA URQUIOLA Istruzioni di montaggio ed utilizzo Assembling and use instruction SHIMMER mensole e consolle DESIGN PATRICIA URQUIOLA SHI05/SHI06 Accessori / Tools
Die Bedeutung neurowissenschaftlicher Erkenntnisse für die Werbung (German Edition)
") Die Bedeutung neurowissenschaftlicher Erkenntnisse für die Werbung (German Edition) Lisa Johann Click here if your download doesn"t start automatically Download and Read Free Online Die Bedeutung neurowissenschaftlicher
Die Bedeutung neurowissenschaftlicher Erkenntnisse für die Werbung (German Edition) Lisa Johann Click here if your download doesn"t start automatically Download and Read Free Online Die Bedeutung neurowissenschaftlicher
Montageanleitung l Mode d emploi. Art Phoenix MTB24V01 Mountain Bike (gelb) Phoenix MTB24V01 Mountain Bike (jaune)
 Phoenix MTB24V01 Mountain Bike (jaune)") Montageanleitung l Mode d emploi Art. 020888 Phoenix MTB24V01 Mountain Bike (gelb) Phoenix MTB24V01 Mountain Bike (jaune) 2 Inhaltsverzeichnis 1 Allgemein... 4 2 Lieferung... 5 3 Montage... 6 Sommaire
Montageanleitung l Mode d emploi Art. 020888 Phoenix MTB24V01 Mountain Bike (gelb) Phoenix MTB24V01 Mountain Bike (jaune) 2 Inhaltsverzeichnis 1 Allgemein... 4 2 Lieferung... 5 3 Montage... 6 Sommaire
MONTAGE-, GEBRAUCHS- UND WARTUNGSANLEITUNG
 MONTAGE-, GEBRAUCHS- UND WARTUNGSANLEITUNG GB FR IT ASSEMBLY, USER AND MAINTENANCE INSTRUCTIONS SWIMMING POOL NOTICE DE MONTAGE, D'UTILISATION ET D'ENTRETIEN PISCINE ISTRUZIONI DI MONTAGGIO, USO E MANUTENZIONE
Programmieranleitung CADAS 100 LPG 158
 Wasserhärte Programmieranleitung CADAS 100 LPG 158 Küvetten-Test LCK 327 Seite 1 Ausgabe 97/06 Achtung! Das Ausgabedatum dieser Programmieranleitung muß mit dem Ausgabedatum der Arbeitsvorschrift der Reagenzien
German ab initio Standard level Paper 2 Allemand ab initio Niveau moyen Épreuve 2 Alemán ab initio Nivel medio Prueba 2
 German ab initio Standard level Paper 2 Allemand ab initio Niveau moyen Épreuve 2 Alemán ab initio Nivel medio Prueba 2 Friday 20 May 2016 (afternoon) Vendredi 20 mai 2016 (après-midi) Viernes 20 de mayo
Montageanleitung Installation Instructions Notice de Montage
 Montageanleitung Installation Instructions Notice de Montage R Reflexlichtschranke / Reflexlichttaster Retro-reflective sensor / Diffuse reflection sensor Système réflex / Système réflexion directe OE
Schwimmbad Bausatz Toprail
 Montage-, Bedienungs- und Wartungsanleitung en fr it ASSEMBLY, USER AND MAINTENANCE INSTRUCTIONS NOTICE DE MONTAGE, D'UTILISATION ET D'ENTRETIEN ISTRUZIONI DI MONTAGGIO, USO E MANUTENZIONE Schwimmbad Bausatz
Casse fixation tubulure sur radiateur de 12MTX3.6
 Rapport Technique // NIT INFORMATION NIT 2238 DATE D EDITION : 24.05.201 TYPE : 12MTX3. N MACHINES CONCERNEES 43200 43277 DÉLAI : 2810201 PRISE EN CHARGE MECALAC : OUI KIT : K89045 RESPONSABLE : B. Ligot
Brazo Stor. COMPRARTOLDOS - C/ Camino Santiago, Benavente - Zamora - Tel: Móvil:
 Características y aplicaciones Characteristics and aplications Caractéristiques et les usages Eigenschaften und Anwendungen Sistema con aplicación principal en balcones con techo, con brazos de 50 cm.
durlum GmbH
 6 LUMEO -R, der elegante Klassiker unter den Lichtflächen, setzt Architektur gekonnt in Szene. In unterschiedlichen Größen verfügbar, ist die als Einbau-, Anbau- oder Pendelvariante verfügbare Leuchte
Gebrauchsanleitung Installation and Operating Instructions Mode d emploi Manual de instrucciones Istruzioni d uso SCULPO METOR ALGARVE WEGA 2012/02/A
 Gebrauchsanleitung Installation and Operating Instructions Mode d emploi Manual de instrucciones Istruzioni d uso SCULPO METOR ALGARVE WEGA 2012/02/A 1 ! Wichtige Hinweise Important Information Consignes
Handbuch der therapeutischen Seelsorge: Die Seelsorge-Praxis / Gesprächsführung in der Seelsorge (German Edition)
") Handbuch der therapeutischen Seelsorge: Die Seelsorge-Praxis / Gesprächsführung in der Seelsorge (German Edition) Reinhold Ruthe Click here if your download doesn"t start automatically Handbuch der therapeutischen
Handbuch der therapeutischen Seelsorge: Die Seelsorge-Praxis / Gesprächsführung in der Seelsorge (German Edition) Reinhold Ruthe Click here if your download doesn"t start automatically Handbuch der therapeutischen
FIRE FAMILY FEUERLÖSCHERHALTER - EXTIGUISHER HOLDER - SUPPORT POUR EXTINCTEUR
 FIRE FAMILY FEUERLÖSCHERHALTER - EXTIGUISHER HOLDER - SUPPORT POUR EXTINCTEUR FIRE LARGE 35 x 24 x 75 cm Feuerlöscherhöhe / height extinguisher / max. 70 cm FIRE SMALL 30 x 20,2 x 65 cm Feuerlöscherhöhe
Pasta Dryer
 Pasta Dryer 10011459 10011482 Sehr geehrter Kunde, wir gratulieren Ihnen zum Erwerb Ihres Gerätes. Lesen Sie die folgenden Hinweise sorgfältig durch und befolgen Sie diese, um möglichen Schäden vorzubeugen.
60 min WEBER INDUSTRIES. FAB /xx xxxxsxx MERTWILLER MOD.: LOT.:
 IMPORTANT - Notice à lire attentivement et à conserver pour consultation ultérieure. IMPORTANT - Read carefully Instructions and keep for future reference. WIHTIG - Anweisungen sorgfältig lesen und für
2 IP X4 WLS/FL IP24. Montage-Anleitung Instructions de montage Assembling instructions. 225 cm. 60 cm 0
 WLS/FL IP Arbeiten an den elektrischen Anlagen dürfen nur von autorisierten Fachleuten nach den örtlichen Vorschriften ausgeführt werden. Für nicht fachgerechte Installation wird jegliche Haftung abgelehnt.
Q.TA' Q.TY Q.TE M.GE C.AD POS NO N. INDEX POS.
 TAVOLA BILD DRAWING TAB. 001 IR2A 1 75660310 1 21 12505 1 41 81660220A 1 61 2 13901 6 22 11230 1 42 75450320 1 62 3 14001 2 23 01502200A 1 43 63 4 13809 2 24 99000149Z 1 44 64 5 14703 2 25 15660660A 1
Programmieranleitung CADAS 100 LPG 158
 Programmieranleitung CADAS 100 LPG 158 Ammonium-Stickstoff Küvetten-Test LCK 304 Seite 1 Ausgabe 98/04 Achtung! Das Ausgabedatum dieser Programmieranleitung muß mit dem Ausgabedatum der Arbeitsvorschrift
[ENGLISH] TWO IMPORTANT REMARKS ABOUT STEERING WHEELS ON PS4 [FRANÇAIS] DEUX REMARQUES IMPORTANTES A PROPOS DES VOLANTS SUR PS4
![[ENGLISH] TWO IMPORTANT REMARKS ABOUT STEERING WHEELS ON PS4 [FRANÇAIS] DEUX REMARQUES IMPORTANTES A PROPOS DES VOLANTS SUR PS4](/thumbs/71/64149392.jpg "[ENGLISH] TWO IMPORTANT REMARKS ABOUT STEERING WHEELS ON PS4 [FRANÇAIS] DEUX REMARQUES IMPORTANTES A PROPOS DES VOLANTS SUR PS4") [ENGLISH] TWO IMPORTANT REMARKS ABOUT STEERING WHEELS ON PS4 [FRANÇAIS] DEUX REMARQUES IMPORTANTES A PROPOS DES VOLANTS SUR PS4 [DEUTSCH] ZWEI WICHTIGE ANMERKUNGEN ZU LENKRÄDERN AUF DER PS4 [ESPAÑOL] DOS
[ENGLISH] TWO IMPORTANT REMARKS ABOUT STEERING WHEELS ON PS4 [FRANÇAIS] DEUX REMARQUES IMPORTANTES A PROPOS DES VOLANTS SUR PS4 [DEUTSCH] ZWEI WICHTIGE ANMERKUNGEN ZU LENKRÄDERN AUF DER PS4 [ESPAÑOL] DOS
TAVOLI DA LAVORO SU GAMBE WORK TABLES TABLES DE TRAVAIL CABINETS ARBEITSTISCHE
 IT I nuovi tavoli su gambe sono costruiti con un rivoluzionario sistema che permette di assemblare il prodotto in pochi secondi, consentendo rapidità di montaggio e al contempo permettendo di ridurre i
 Multimedia Audio Hub Bedienungsanleitung Sehr geehrter Kunde, wir danken Ihnen für den Kauf dieses Multimedia Audio Hub. Sie haben ein Produkt erworben, das entwickelt wurde, um den höchsten Ansprüchen
11 EN 81-70 Page 1 of 2 Standard: INTERPRETATION RELATED TO. Clause(s): 5.4.2.3
: 5.4.2.3") CEN RELATED TO 11 Page 1 of 2 Standard: Edition: 2003 Clause(s): 5.4.2.3 Valid from: 15/09/2010 Date of modification: Key-word(s): Car operating panel, Two entrance lift Replacing interpretation No.: QUESTION
CEN RELATED TO 11 Page 1 of 2 Standard: Edition: 2003 Clause(s): 5.4.2.3 Valid from: 15/09/2010 Date of modification: Key-word(s): Car operating panel, Two entrance lift Replacing interpretation No.: QUESTION
1
 1 2 3 4 5 6 7 SERIE ////////////////////////////////////////////////////////////////////////////////////////////////////////////////// E un particolare ed originale mosaico realizzato con cocco naturale
MEGASTAR. Renforcement KIT D143
 LA BUVETTE Rue Maurice Perin Parc d'activites Ardennes Emeraude - Tournes F-003 CHARLEVILLE-MEZIERES Cedex FRANCE TEL : 03.24.52.37.20 - FAX : 03.24.52.37.24 Int. : +33.3.24.52.37.23 Int. : +33.3.24.52.37.24
EBA 4370 / EBA 4470 EBA 4376 / EBA DUVsWO. M.-Nr
 EBA 4370 / EBA 4470 EBA 4376 / EBA 4476 DUVsWO M.-Nr. 06 560 560 EBA 4370 / EBA 4470 2 EBA 4376 / EBA 4476 3 EBA 4376 / EBA 4476 Achtung: EBA 4376 / EBA 4476 Ist der Frontausschnitt seitlich nicht bündig
Programmieranleitung CADAS 100 LPG 210
 Phosphat-Phosphor Programmieranleitung CADAS 100 PG 210 Küvetten-Test Seite 1 CK 350 Ausgabe 91/03 Achtung! Das Ausgabedatum dieser Programmieranleitung muß mit dem Ausgabedatum der Arbeitsvorschrift der
IMPORTANT / IMPORTANT:
 Replacement of the old version 2.50. Procedure of installation and facility updates. New presentation. Remplacer l ancienne version 2.50. Procédure d installation et de mise à jour facilitée. Nouvelle
1 225 cm IP X4 SLI/FL IP24. Montage-Anleitung Instructions de montage Assembling instructions. 60 cm 0
 Sensor-Schalter aussen unten links und rechts SLI/FL IP Interrupteurs sensitifs en bas à l'extérieur à gauche et à droite Sensor switches outside left and right below Arbeiten an den elektrischen Anlagen
PONS DIE DREI??? FRAGEZEICHEN, ARCTIC ADVENTURE: ENGLISCH LERNEN MIT JUSTUS, PETER UND BOB
 Read Online and Download Ebook PONS DIE DREI??? FRAGEZEICHEN, ARCTIC ADVENTURE: ENGLISCH LERNEN MIT JUSTUS, PETER UND BOB DOWNLOAD EBOOK : PONS DIE DREI??? FRAGEZEICHEN, ARCTIC ADVENTURE: Click link bellow
EU Declaration of Conformity Itron GmbH Hardeckstrasse 2 D Karlsruhe
 EU Declaration of Conformity declares under his sole responsibility that the gas meter Quantometer Delta QD is designed and manufactured in conformity with the following Directives: 1. 2014/68EU Modules
UP Unterputz-Montage Montage en encastré Recessed mounting
 Wandeinbau UP Unterputz-Montage Montage en encastré Recessed mounting PAL/LED IP4 Arbeiten an den elektrischen Anlagen dürfen nur von autorisierten Fachleuten nach den örtlichen Vorschriften ausgeführt
Plaid. Alpi italiane. Autumn - Winter 2018/2019 Collection
 Alpi italiane Autumn - Winter 2018/2019 Collection BERNINA cm 135x190 91785 91788 CERVINO v.6 cm 135x190 91789 91790 91794 v.6 v.6 cm 155x220 91830 91833 cm 180x250 91868 91870 cm 240x250 91886 91887 cm
1_Togliere il. 2_Mettere le lampadine. Put the bulbs. 3_Mettere il vetro e riporre
 _Togliere il lamierino. Take off the metal tab. _Mettere le lampadine. Put the bulbs. _Mettere il vetro e riporre lamierino. Put the glass and the metal tab. 5_Fissare staffa e fare cablare. Secure the
Installing a thermal imager into the Powerhouse horizontally
 Powerhouse Thermal Imager Installation Manual Please follow these instructions to prepare your Powerhouse unit for a thermal imager installation. 3 Correct Press down on the Bullard button. The arms will
dlan 1200 triple+ Starter Kit Installation
 dlan 1200 triple+ Starter Kit Installation 1 dlan 1200+ dlan 1200 triple+ 02 03 12 1 sec. 1 sec. 2 min. 04 05 1 06 07 30 08 31 09 DE Garantie: 3 Jahre Wenden Sie sich bei einem Defekt innerhalb der Garantiezeit
der Schnürung Adjusting of the lacing Ajustement du laçage
 Anpassung der Schnürung Adjusting of the lacing Ajustement du laçage FIRE FLASH PRO Wichtige Hinweise für die erste Anprobe: Important notes for fitting: Conseils importants pour le premier essayage: 1.
* * * IMPORTANT * * IMPORTANT * * IMPORTANT * * * Read these instructions carefully before using this product and save them for future use.
 Change bag Instructions [UK] * * * IMPORTANT * * IMPORTANT * * IMPORTANT * * * Read these instructions carefully before using this product and save them for future use. Your child may be injured if you
PONS DIE DREI??? FRAGEZEICHEN, ARCTIC ADVENTURE: ENGLISCH LERNEN MIT JUSTUS, PETER UND BOB
 Read Online and Download Ebook PONS DIE DREI??? FRAGEZEICHEN, ARCTIC ADVENTURE: ENGLISCH LERNEN MIT JUSTUS, PETER UND BOB DOWNLOAD EBOOK : PONS DIE DREI??? FRAGEZEICHEN, ARCTIC ADVENTURE: Click link bellow
Otto Dieterle Spezialwerkzeuge GmbH
 Otto Dieterle Spezialwerkzeuge Gmb Predigerstr. 56, 78628 Rottweil, Germany Fax:+49(0) 741 94205-50 Übersicht System Fix-Profil Overview system Fix-Profil / Aperçu système Fix-Profil Ihr Anspruch - unsere
COLLECTION WOOD FORM STONE
 COLLECTION WOOD FORM STONE WWW.LHVFORMLINER.COM con nosotros. EN.Try it and better yourself with us. FR.Essayez-le et améliorez-vous avec nous DE.Probieren Sie es aus und wachsen Sie mit uns über sich
Rue Gurnigel 48 CH-2501 Bienne Tél.: +41 (0) Fax: +41 (0)
 Fax: +41 (0)") OPTISCHE MESSTECHNIK OPTICAL MEASURING SYSTEMS SYSTEMES DE MESURE OPTIQUE marcel - aubert - sa Rue Gurnigel 48 CH-2501 Bienne Tél.: +41 (0)32 365 51 31 Fax: +41 (0)32 365 76 20 E-mail: info@marcel-aubert-sa.ch
OPTISCHE MESSTECHNIK OPTICAL MEASURING SYSTEMS SYSTEMES DE MESURE OPTIQUE marcel - aubert - sa Rue Gurnigel 48 CH-2501 Bienne Tél.: +41 (0)32 365 51 31 Fax: +41 (0)32 365 76 20 E-mail: info@marcel-aubert-sa.ch
Schreibtisch Montageanleitung Notice de montage Assembly instruction
 Montageanleitung Notice de montage Assembly instruction the furniture factory R Schreibtisch 4036 Ø 5 + 8 mm Bitte die Sicherheitshinweise auf der letzten Seite beachten Please note: saftey instructions
German ab initio Standard level Paper 2 Allemand ab initio Niveau moyen Épreuve 2 Alemán ab initio Nivel medio Prueba 2
 German ab initio Standard level Paper 2 Allemand ab initio Niveau moyen Épreuve 2 Alemán ab initio Nivel medio Prueba 2 Tuesday 9 May 2017 (morning) Mardi 9 mai 2017 (matin) Martes 9 de mayo de 2017 (mañana)
PONS DIE DREI??? FRAGEZEICHEN, ARCTIC ADVENTURE: ENGLISCH LERNEN MIT JUSTUS, PETER UND BOB
 Read Online and Download Ebook PONS DIE DREI??? FRAGEZEICHEN, ARCTIC ADVENTURE: ENGLISCH LERNEN MIT JUSTUS, PETER UND BOB DOWNLOAD EBOOK : PONS DIE DREI??? FRAGEZEICHEN, ARCTIC ADVENTURE: Click link bellow
p^db=`oj===pìééçêíáåñçêã~íáçå=
 p^db=`oj===pìééçêíáåñçêã~íáçå= Error: "Could not connect to the SQL Server Instance" or "Failed to open a connection to the database." When you attempt to launch ACT! by Sage or ACT by Sage Premium for
ISTRUZIONI PER COLLEGAMENTO ECU MERCEDES TEMIC ACTROS ATEGO UNIMOG ECONIC ecc.
 ISTRUZIONI PER COLLEGAMENTO ECU MERCEDES TEMIC ACTROS ATEGO UNIMOG ECONIC ecc. ISTRUCTIONS FOR THE ECU MERCEDES TEMIC ACTROS ATEGO UNIMOG ecc. CONNECTION FG Technology 1/11 Smontare la Ecu dal camion,
BIRIGNAO design Ferruccio Laviani
 BIRIGNAO design Ferruccio Laviani Tables in various versions: - In solid fir wood brushed, - With mat lacquered base and oak veneered top; - Completely mat lacquered. The solid fir version has finishes
Englisch-Grundwortschatz
 Englisch-Grundwortschatz Die 100 am häufigsten verwendeten Wörter also auch so so in in even sogar on an / bei / in like wie / mögen their with but first only and time find you get more its those because
Bio BIO ACC INOX. Bioetanolo Bioethanol Bioéthanol Bioethanol Bioetanol. Alluminio Aluminium Aluminium Aluminium Aluminio
 BIO AL INOX Bioetanolo Bioethanol Bioéthanol Bioethanol Bioetanol Alluminio Aluminium Aluminium Aluminium Aluminio Acciaio al Carbonio Carbon steel Acier au carbone Carbon Stahl Acero de carbono Acciaio
Hängeschrank Montageanleitung Notice de montage Assembly instruction. Ø 8 mm
 Montageanleitung Notice de montage Assembly instruction the furniture factory R Hängeschrank 1501 Ø 8 mm Bitte die Sicherheitshinweise auf der letzten Seite beachten! Please note: saftey instructions on
Cycling and (or?) Trams
 Trams") Cycling and (or?) Trams Can we support both? Experiences from Berne, Switzerland Roland Pfeiffer, Departement for cycling traffic, City of Bern Seite 1 A few words about Bern Seite 2 A few words about
Cycling and (or?) Trams Can we support both? Experiences from Berne, Switzerland Roland Pfeiffer, Departement for cycling traffic, City of Bern Seite 1 A few words about Bern Seite 2 A few words about
catalogo INNESTI MECCANICI
 catalogo INNESTI MECCANICI INNESTI MECCANICI EMBRAYAGES MÉCANIQUES MECHANICAL COUPLINGS MECHANISCHE KUPPLUNGEN INNESTI MECCANICI SERIE 30100-30300 - 30500 Gli innesti meccanici di ns. produzione sono bidirezionali