Passende Schiebetürsysteme / matching sliding door systems Art. Nr.: A: Sicherheitshinweise / Safety-related Information
|
|
|
- Vincent Abel
- vor 5 Jahren
- Abrufe
Transkript


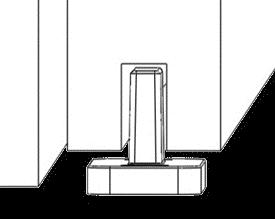
1 A: SICHERHEITSHINWEISE SAFETY-RELATED INFORMATION B: MONTAGEANLEITUNG, PFLEGE UND WARTUNG INSTALLATION INSTRUCTION, CARE INSTRUCTIONS, SERVICE AND MAINTENANCE Passende Schiebetürsysteme / matching sliding door systems Art. Nr.: A: Sicherheitshinweise / Safety-related Information D Wichtige Sicherheitshinweise für die Montage und Nutzung von Griffwerk Schiebetürsystemen (Zusätzlich zur Montage- und Bedienungsanleitung zu beachten, um Schäden am Produkt sowie Personen- und Sachschäden zu vermeiden.) Wichtig: Alle Nutzer sind über die sie betreffenden Punkte der nachfolgenden Hinweise sowie die Hinweise aus Montage- bzw. Bedienungsanleitung zu informieren! Allgemein Schiebetüren dürfen nicht zu hart zu- oder aufgezogen werden. Dies trifft vor allem auf Schiebetüren ohne Soft-Close zu. Montage Mitgeliefertes Befestigungsmaterial ist auf Kompatibilität zu den vorhandenen Untergründen zu prüfen. Gegebenenfalls muss geeignetes Befestigungsmaterial selbst besorgt werden. Vor der Montage müssen Klemm- und Klebebereichen mit fettlösenden Haushaltsmitteln von Fetten befreit werden. Es besteht die Gefahr von Quetschungen beim Heben der Türe. Entsprechend ist die erforderliche Schutzkleidung (Handschuhe) zu tragen. Beim Ausrichten der Tür müssen die vorgegebenen Spaltmaße beachtet werden. Die Spaltmaße müssen so eingestellt werden, dass ein Kontakt der Tür mit harten Werkstoffen (z.b. Glas, Metall, Beton) verhindert wird. Es ist ein zwängungsfreier Einbau (ohne lokale Spannungsüberschreitung durch z.b. zu fest angezogene Schrauben) sicherzustellen. GB Important safety-related information for the mounting and use of Griffwerk sliding door systems (Follow these instructions in addition to the mounting and operating instructions in order to avoid damage of product and damage to person or property.) Important: All users have to be informed about relevant points mentioned in these safety-related information and the mounting and operating instructions! General information Do not shut sliding doors with excessive force. This is especially important on sliding doors without "Soft Close". Mounting Included mounting material must be checked for compatibility with the existing wall and ceiling. If needed suitable mounting material must be purchased. Clean clamping and adhesive areas with fat solvent (standard commercial cleaning agent) before mounting. There is a danger of bruising when lifting the door. Corresponding wear protective clothing (gloves) is required. When adjusting the door, always stick to the required clearance for the respective fitting. Adjust clearance so that the door does not touch hard components such as glass, metal or concrete. Make sure not to use excessive force when installing the glass (avoid local stress resulting from very tight screws). 1 / 8 Technische Änderungen vorbehalten / subject to alterations 12/2017
2 Wartung Der Sitz und die Gängigkeit der geklemmten Teile sowie die Justierung der Tür müssen regelmäßig kontrolliert werden. Insbesondere im Falle von hochfrequentierten Anlagen sollte die Prüfung von einem Fach- oder Installationsbetrieb erfolgen. Die Reinigung der Metall-Oberflächen (z.b. Griffe) darf nur mit geeigneten Reinigern und Pflegemitteln erfolgen. Maintenance Check clamped parts at regular intervals for proper positioning and smooth running and door for correct adjustment. Especially highly-frequented door systems require inspection by properly qualified staff (specialised companies or installation firms). Only use suitable cleaning and care products to clean the metallic surfaces (for example the handles). B: Montageanleitung, Pflege und Wartung / installation instruction, care instructions, service and maintenance Wichtige Informationen / important information - Maximal zulässiges Gewicht der Türe liegt bei 50kg. Maximum permissible weight of the door is 50 kg. - Maximal zulässige Türenstärke ist 40mm. Maximum permissible thickness of the door is 40mm. - Vor der Montage mit handelsüblichem Glasreiniger im Bereich der Klemmflächen reinigen. All clamping areas have to be cleaned with standard glass cleaning products prior to installation - Keine Verdünnung verwenden Do not use thinners - Mitgeliefertes Befestigungsmaterial ist auf Kompatibilität zu den vorhandenen Untergründen zu prüfen. Gegebenenfalls muss geeignetes Befestigungsmaterial selbst besorgt werden. Included mounting material must be checked for compatibility with the existing wall and ceiling. If needed suitable mounting material must be purchased. Pflege allgemein / general care instructions Die Oberflächen der Schiebetürsysteme sind nicht wartungsfrei und sollten gemäß ihrer Ausführung gereinigt werden. The surface finishes of the sliding door systems are not maintenance-free and should be cleaned according to their material and texture. Für metallische Oberflächen (Eloxaltöne, Edelstahl) bitte nur geeignete Reiniger ohne Scheuermittelanteil verwenden. For metallic surfaces (anodised finishes, stainless steel) please only use appropriate cleaning agents without abrasive additives. Für lackierte Oberflächen bitte nur entsprechende lösemittelfreie Reiniger verwenden. For varnished surfaces please only use appropriate solvent-free cleaning agents. 2 / 8


3 Lieferumfang / scope of delivery 6x40 6x30 M4x6 6 x 2 x 3 x 2 x 2 x SW 2 SW 3 SW 4 3 x 4x25 2 x 5x60 8x40 8 x 8 x Montagewerkzeuge welches nicht im Lieferumfang ist/ assembly tools which is not included Ø 8mm Ø 6mm 6mm Wandabstand kann mit optional erhältlichen Abstandsprofilen erweitert werden. ohne Abstandsprofil / without spacer profil 12,5mm 18,5mm Wall distance can be extended with optionally available spacer profiles. 3 / 8


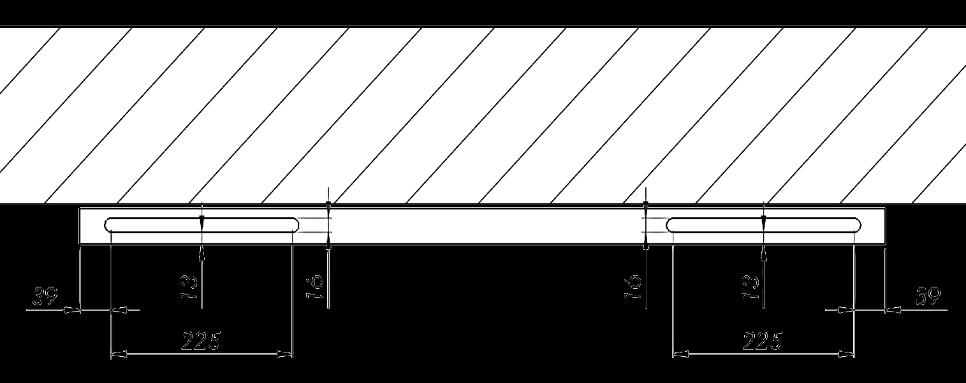
4 BH = Bohrhöhe / drilling level GH = Gesamthöhe / total height TH = Türhöhe / door height LDH = Lichte Durchgangshöhe / pass line height LDB = Lichte Durchgangsbreite / pass line width TB = Türbreite / door width B B C D Wandabstand ohne Abstandsprofil wall distance without spacer profil 4 / 8


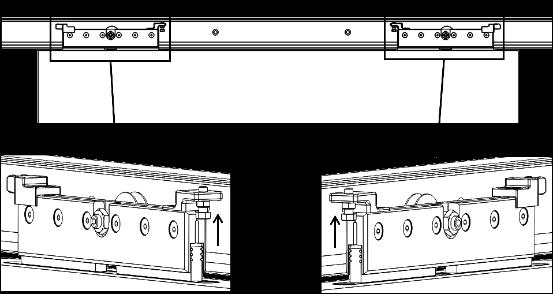
5 1 2 C D 5 / 8


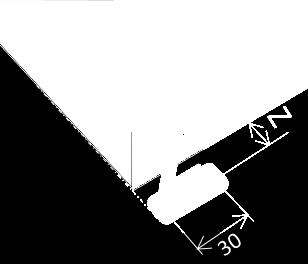
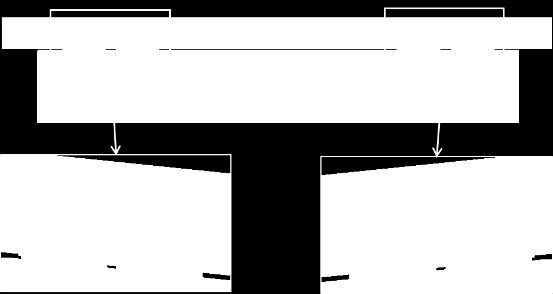
6 3 4 M3 x 8 M5 M5 x 15 M5 M5 x 15 Z = 25mm Für Türstärke 40mm / for door thickness 40mm Ggf. Maß des Abstandsprofils addieren / if applicable add thickness of the spacer profil 6 / 8


7 SW 4 min. 3mm Nm 4 6 ca. 3mm 7 / 8


8 8 10 Aufkleber nicht geeignet für: Parkett, Teppich, Nassräume und unebene Oberfläche. Stickers not suitable for: parquet, carpet, wetroom and uneven surfaces. SW Nm 11 Griffmuschel optional erhältlich / grip optionally available 0 9 3x M4x6 8 / 8
A: A SICHERHEITSHINWEISE SAFETY ADVICES B: B MONTAGE, PFLEGE UND WARTUNG ASSEMBLY, CARE INSTRUCTIONS, SERVICE AND MAINTENANCE.
 A: A SICHERHEITSHINWEISE SAFETY ADVICES B: B MONTAGE, PFLEGE UND WARTUNG ASSEMBLY, CARE INSTRUCTIONS, SERVICE AND MAINTENANCE A Sicherheitshinweise: Safety advices: D Wichtige Sicherheitshinweise für die
Passende Schiebetürsysteme / matching sliding door systems Art. Nr.: A: Sicherheitshinweise / Safety-related Information
 A: SICHERHEITSHINWEISE SAFETY-RELATED INFORMATION B: MONTAGEANLEITUNG, PFLEGE UND WARTUNG INSTALLATION INSTRUCTION, CARE INSTRUCTIONS, SERVICE AND MAINTENANCE Passende Schiebetürsysteme / matching sliding
SCHIEBETÜRSYSTEM 120 HOLZ SOFTEINZUG 1-FLG.
 A: SICHERHEITSHINWEISE SAFETY ADVICES B: MONTAGE, PFLEGE UND WARTUNG ASSEMBLY, CARE INSTRUCTIONS, SERVICE AND MAINTENANCE Passende Schiebetürsysteme / matching sliding door systems Art. Nr.:.. 403 07 01....
A: A SICHERHEITSHINWEISE SAFETY ADVICES B: B MONTAGE, PFLEGE UND WARTUNG ASSEMBLY, CARE INSTRUCTIONS, SERVICE AND MAINTENANCE
 A: A SICHERHEITSHINWEISE SAFETY ADVICES B: B MONTAGE, PFLEGE UND WARTUNG ASSEMBLY, CARE INSTRUCTIONS, SERVICE AND MAINTENANCE A Sicherheitshinweise / safety advices Wichtige Sicherheitshinweise für die
A: SICHERHEITSHINWEISE SAFETY ADVICES B: MONTAGE, PFLEGE UND WARTUNG ASSEMBLY, CARE INSTRUCTIONS, SERVICE AND MAINTENANCE
 A: SICHERHEITSHINWEISE SAFETY ADVICES B: MONTAGE, PFLEGE UND WARTUNG ASSEMBLY, CARE INSTRUCTIONS, SERVICE AND MAINTENANCE Passende Schiebetürsysteme / matching sliding door systems Art. No.:.. 403 05 01....
GLASANLAGE 120 SOFTEINZUG 1-FLG. MIT SEITENTEIL
 A: SICHERHEITSHINWEISE SAFETY ADVICES B: MONTAGE, PFLEGE UND WARTUNG ASSEMBLY, CARE INSTRUCTIONS, SERVICE AND MAINTENANCE Passende Schiebetürsysteme / matching sliding door systems Ganzglasanlage Variante
Montageanleitung DORMA PT 60/61. Winkelverbinder mit beidseitiger Aussteifung. Installation instruction DORMA PT 60/61
 Montageanleitung DORMA PT 60/61 Winkelverbinder mit beidseitiger Aussteifung Installation instruction DORMA PT 60/61 Connector for overpanel and sidelight with fin fitting on both sides Stand/Issue 09.08
Montageanleitung DORMA PT 10 Unterer Eckbeschlag DORMA PT 20 Oberer Eckbeschlag
 Montageanleitung DORMA PT 10 Unterer Eckbeschlag DORMA PT 20 Oberer Eckbeschlag Installation instruction DORMA PT 10 Bottom patch fitting DORMA PT 20 Top patch fitting / 003620 800.2.368.6.32 Wichtige
Montageanleitung DORMA PT 40. Winkeloberlichtbeschlag. Installation instruction DORMA PT 40. Patch fitting for overpanel and sidelight
 Montageanleitung DORMA PT 40 Winkeloberlichtbeschlag Installation instruction DORMA PT 40 Patch fitting for overpanel and sidelight Stand/Issue 09.0 / 00331 00.5.37..3 Wichtige Informationen: Important
Montageanleitung DORMA PT 51. Doppelter Oberlichtbeschlag mit einseitiger Aussteifung. Installation instruction DORMA PT 51
 Montageanleitung DORMA PT 51 Doppelter Oberlichtbeschlag mit einseitiger Aussteifung Installation instruction DORMA PT 51 Double overpanel patch fitting with fin fitting on one side Stand/Issue 09.08 /
Montageanleitung DORMA PT 41. Winkeloberlichtbeschlag mit beidseitiger Aussteifung. Installation instruction DORMA PT 41
 Montageanleitung DORMA PT 41 Winkeloberlichtbeschlag mit beidseitiger Aussteifung Installation instruction DORMA PT 41 Patch fitting for overpanel and sidelight with fin fitting on both sides Stand/Issue
Montageanleitung DORMA Schloss mit Drückerführung Studio Rondo Studio Classic ARCOS Studio
 Montageanleitung DORMA Schloss mit Drückerführung Studio Rondo Studio Classic ARCOS Studio Installation instructions DORMA lock with follower Studio Rondo Studio Classic ARCOS Studio DORMA-Glas Stand/Issue
Montageanleitung DORMA Türbänder Junior Office Junior Office Classic ARCOS Office
 Montageanleitung DORMA Türbänder Junior Office Junior Office Classic ARCOS Office Installation instructions DORMA hinges Junior Office Junior Office Classic ARCOS Office DORMA-Glas Stand/Issue 10.07 800.52.320.6.32
MANET COMPACT Set 4.1 / 4.2
 MANET COMPACT 24 MANET COMPACT Set 4.1 / 4.2 Schiebetür MANET COMPACT für Montage an Wand, für 8-12 mm Glas, Set 4.1 mit versenkten Punkthaltern Set 4.2 mit aufliegenden Punkthaltern Fixlänge: LL = 4 *
1. DORMA empfiehlt die Verwendung von ESG-H (heißgelagertem Einscheibensicherheitsglas) nach DIN EN
 nach DIN EN") GK 4 - Gegenkasten mit einseitiger Aussteifung / GK 4 - Strike box with fin fitting on one side WN 05864-455, 0/6, 009 Inhalt / Contents Sicherheitshinweise / Safety-related information Wichtige Informationen
GK 4 - Gegenkasten mit einseitiger Aussteifung / GK 4 - Strike box with fin fitting on one side WN 05864-455, 0/6, 009 Inhalt / Contents Sicherheitshinweise / Safety-related information Wichtige Informationen
PT 30 Oberlichtbeschlag mit Zapfen, Blind- oder Anschlageinsatz / PT 30 overpanel patch fitting with pivot, blank- or stop insert
 WN 05863-4553, 06/5 Inhalt / Contents Sicherheitshinweise / Safety-related Information Wichtige Informationen / Important Information Montagewerkzeug / Mounting tool Glasbearbeitung / Glass preparation
Wichtige Sicherheitshinweise für die Montage und Nutzung von dormakaba Glasbeschlägen
 WN 05867-4553, 0/7, 0793 Inhalt / Contents Sicherheitshinweise / Safety-related information Wichtige Informationen / Important information Montagewerkzeug / Mounting tool Glasbearbeitung / Glass preparation
2. DORMA Glasbeschläge sind für Räume, in denen Chemikalien (z. B. Chlor) zum Einsatz kommen, z. B. Schwimm-, Sauna- und Solebäder, nicht geeignet.
 zum Einsatz kommen, z. B. Schwimm-, Sauna- und Solebäder, nicht geeignet.") WN 058945-4553, 05/6 Inhalt / Contents Sicherheitshinweise / Safety-related Information Wichtige Informationen / Important Information Montagewerkzeug / Mounting tool Seite / Page - 3 4 Glasbearbeitung
WN 058945-4553, 05/6 Inhalt / Contents Sicherheitshinweise / Safety-related Information Wichtige Informationen / Important Information Montagewerkzeug / Mounting tool Seite / Page - 3 4 Glasbearbeitung
Wichtige Sicherheitshinweise für die Montage und Nutzung von dormakaba Glasbeschlägen
 WN 05868-4553, 0/7, 0793 Inhalt / Contents Sicherheitshinweise / Safety-related information Wichtige Informationen / Important information Montagewerkzeug / Mounting tool Lieferumfang / Scope of delivery
(Zusätzlich zur Montage- und Bedienungsanleitung zu beachten, um Schäden am Produkt sowie Personen- und Sachschäden zu vermeiden.)
") WN 05867-4553, 05/5 Inhalt / Contents Sicherheitshinweise / Safety-related Information Wichtige Informationen / Important Information Montagewerkzeug / Mounting tool Seite / Page - 3 4 Glasbearbeitung
WN 05867-4553, 05/5 Inhalt / Contents Sicherheitshinweise / Safety-related Information Wichtige Informationen / Important Information Montagewerkzeug / Mounting tool Seite / Page - 3 4 Glasbearbeitung
2. DORMA Glasbeschläge sind für Räume, in denen Chemikalien (z. B. Chlor) zum Einsatz kommen, z. B. Schwimm-, Sauna- und Solebäder, nicht geeignet.
 zum Einsatz kommen, z. B. Schwimm-, Sauna- und Solebäder, nicht geeignet.") WN 058946-4553, 05/6 Inhalt / Contents Sicherheitshinweise / Safety-related Information Wichtige Informationen / Important Information Montagewerkzeug / Mounting tool Seite / Page - 3 4 Lieferumfang /
WN 058946-4553, 05/6 Inhalt / Contents Sicherheitshinweise / Safety-related Information Wichtige Informationen / Important Information Montagewerkzeug / Mounting tool Seite / Page - 3 4 Lieferumfang /
Montageanleitung DORMA PT 30. Oberlichtbeschlag. Installation instruction DORMA PT 30. Overpanel patch fitting
 Montageanleitung DORMA PT 30 Oberlichtbeschlag Installation instruction DORMA PT 30 Overpanel patch fitting Stand/Issue 09.0 / 00331 00.5.371.6.3 Wichtige Informationen: Important information: 1 = Bauteil/Baugruppe
Wichtige Sicherheitshinweise für die Montage und Nutzung von dormakaba Glasbeschlägen
 WN 05894-4553, 0/17 Inhalt / Contents Sicherheitshinweise / Safety-related information Wichtige Informationen / Important information Lieferumfang / Scope of delivery Seite / Page 1-3 5 Montagewerkzeug
Wichtige Sicherheitshinweise für die Montage und Nutzung von dormakaba Glasbeschlägen
 MUNDUS PREMIUM PT 0 WN 058938-4553, 0/7, 0793 Inhalt / Contents Sicherheitshinweise / Safety-related information Wichtige Informationen / Important information Montagewerkzeug / Mounting tool Glasbearbeitung
Montageanleitung DORMA MANET Concept Schiebetür an Wand / an Glas Installation DORMA MANET Concept Sliding door onto wall / onto glass
 Montageanleitung DORMA MANET Concept Schiebetür an Wand / an Glas Installation DORMA MANET Concept Sliding door onto wall / onto glass DORMA-Glas Seite / Page 1 /14 800.52.242.6.32 3n26 Wichtige Informationen:
Montageanleitung DORMA MANET Schiebetür an Wand/an Glas Installation DORMA MANET Sliding door onto wall/onto glass
 Montageanleitung DORMA MANET Schiebetür an Wand/an Glas Installation DORMA MANET Sliding door onto wall/onto glass DORMA-Glas Seite / Page 1 /14 800.52.233.6.32 Wichtige Informationen: Important information:
The luminaire must be installed and main - tained by a suitably qualified person in compliance with latest installation and safety regulations.
 60 640 98 840 640 Deutsch English 27 Ø42/60 SX 967 /76 SX 966 7 /76 SX 966 Ø42/60 SX 967 7 98 Gewicht / Weight : Kg Max. LPH. : 8000mm Aw. : 0,061m² 0 IP66 WEEE-REG.-NR. DE 2402 Montage und Wartung darf
Outdoor-Tasche. Operating Instructions Bedienungsanleitung GB D
 00 181243 Outdoor Case Outdoor-Tasche Splish Splash Operating Instructions Bedienungsanleitung GB D A B C D OPEN G Operating instruction 1. Important Notes Children are not permitted to play with the device.
Montageanleitung Installation instructions
 Montageanleitung Installation instructions SOFT-STOP SPRINT Private Line Glasstärken von 8 und 8,76 mm ESG/VSG von 10 und 10,76 mm ESG/VSG SOFT-STOP SPRINT Private Line Glass thickness from 8 and 8,76
Montageanleitung Installation instructions
 Montageanleitung Installation instructions HELM Einzugsdämpfer GT-L 80 Glasstärken von 8 und 8,76 mm ESG/VSG von 10 und 10,76 mm ESG/VSG HELM Damper GT-L 80 Glass thickness from 8 and 8,76 mm ESG/VSG from
Wall Connecting. Profiles - WCP
 Wall Connecting Profiles - WCP Planung und Ausführung von Aussteifungen Usage and assembly of fins Aussteifungsbeschläge siehe Seiten 12-17 und 21. Weitere Ausführungen auf Anfrage. Aussteifungs- und Winkelverbindungsbeschläge
Montageanleitung DORMA. AGILE 150 Deckenmontage mit Seitenteil. Installation instruction DORMA. AGILE 150 ceiling assembly with sidelight
 Montageanleitung DORMA AGILE 150 Deckenmontage mit Seitenteil Installation instruction DORMA AGILE 150 ceiling assembly with sidelight Stand/Issue 01.09 / 003374 800.52.621.6.32 Wichtige Informationen:
STUDIO GALA 2.0. Montage- und Betriebsanleitung
 STUDIO GALA 0 Montage- und Betriebsanleitung STUDIO GALA 0 Inhalt Seite Allgemeines... 2 Wartung und Pflege... 2 3. Sicherheit... 3 4. Produktbeschreibung... 4 5. Montage vorbereiten... 4 6. Schloss montieren...
Bedienungsanleitung SUNNYHEAT Standfuß (Art. Nr )
") Bedienungsanleitung SUNNYHEAT Standfuß (Art. Nr. 221012) Der SUNNYHEAT Standfuß ist zur Positionierung Ihres Heizpaneels auf dem Standfuß gedacht. Anwendung findet der Standfuß bei allen Paneelen außer
Bedienungsanleitung SUNNYHEAT Standfuß (Art. Nr. 221012) Der SUNNYHEAT Standfuß ist zur Positionierung Ihres Heizpaneels auf dem Standfuß gedacht. Anwendung findet der Standfuß bei allen Paneelen außer
Snap-in switch for switches PSE, MSM and MCS 30
 Product manual Snap-in switch for switches PSE, MSM and MCS 30 CONTENTS 1. PRODUCT DESCRIPTION 2. DATA AND DIMENSIONAL DRAWINGS 2.1. Technical Data 2.2. Dimensions of PSE with a Mounting Diameter 19 mm
Serie / Type FKRS-EU
 Zusatz-Montageanleitung Additional Manual DE GB Umrüstbaugruppen / Conversion kits Serie / Type FKRS-EU Video http://qr.trox.de/k-.-fkrs-eu Vor Beginn aller Arbeiten die Anleitungen lesen! / Read the manuals
Power Supply ND Series. USER MANUAL BEDIENUNGSANLEITUNG
 Power Supply ND Series USER MANUAL BEDIENUNGSANLEITUNG www.biontechnologies.com USER MANUAL Power Supply ND Series Safety Instructions Devices must be installed by qualified personnel in compliance with
linea m mounting SET USER MANUAL BEDIENUNGSANLEITUNG
 linea m mounting 90-228 SET plate USER MANUAL BEDIENUNGSANLEITUNG www.biontechnologies.com USER MANUAL linea m mounting 90-228 SET plate Safety Instructions Devices must be installed by qualified personnel
Westfalia Bedienungsanleitung. Nr
 Westfalia Bedienungsanleitung Nr. 108610 Bedienungsanleitung Edelstahl Sicherheits-Brennbehälter Artikel Nr. 10 99 83 Sicherheitshinweise Der Sicherheits-Brennbehälter ist zur Verwendung in dem Westfalia
Montageanleitung DORMA VISUR Drehtürsystem. Installation instruction DORMA VISUR pivoting door system / /09.
 Montageanleitung DORMA VISUR Drehtürsystem Installation instruction DORMA VISUR pivoting door system DORMA-Glas Seite / Page 1 /12 003505 / 800.52.244.6.32 01/09 Stand / Issue Wichtige Informationen: Important
EN Instructions for use / assembly instructions 2 DE Gebrauchsanleitung / Montageanleitung 4. Exafill
 EN Instructions for use / assembly instructions 2 DE Gebrauchsanleitung / Montageanleitung 4 Exafill 58129003 English Safety Notes Gloves should be worn during installation to prevent crushing and cutting
Montageanleitung DORMA VISUR Drehtürsystem Installation instruction DORMA VISUR pivoting door system
 Montageanleitung DORMA VISUR Drehtürsystem Installation instruction DORMA VISUR pivoting door system DORMA Glas Seite / Page 1 /11 800.2.244.6.32 Wichtige Informationen: Important information: 98 8 Vor
hanit Assembly Instruction - Sandbox System Thar -
 Thank you for purchasing a hanit recycling plastic product, We wish you a lot of pleasure with that product. Please find below important installation instructions which need to be taken into consideration
MONTAGE INFORMATION WICKY II
 MONT NORMTON WCKY OPTONN OPTON_ OPTON_ - 2 - 2 5 6 5 6 3 1 4 2 3 1 2 3 4 5 6 7 8 0x75x70 0x75x70 185x100x20 185x100x20 185x0x20 155x0x20 1480x0x20 1480x0x20 350x84x20 2x 1/2 2x 1/2 2x 2/2 2x 2/2 2x 2/2
HPS /B Revision: 01
 Hauptständer KTM 0 SM '08 / 0 SM '0 '07 / 0 SM-R '07 '08 Center Stand KTM 0 SM '08 / 0 SM '0 '07 / 0 SM-R '07 '08 Montagehinweise Revision: 0 Mounting Instruction Achtung: Die Kurven- und Bodenfreiheit
TV STÄNDER. Bitte überprüfen Sie VOR der Montage den Lochabstand zwischen den VESA Befestigungslöchern an Ihrem Bildschirm! VESA-Befestigungslöcher
 STÄNDER MONTAGEANLEITUNG v.17.01 ACHTUNG: NIEMALS DAS MAXIMAL ZULÄSSIGE BELASTUNGSGEWICHT ÜBERSCHREITEN. MISSACHTUNG KANN ZU SACHSCHÄDEN ODER SCHWEREN VERLETZUNGEN FÜHREN!! Bitte überprüfen Sie VOR der
Instructions de montage. Spiegel / Leuchten / SP.1 SP.2 LE.2 LE.3 LE.1 LE.7 LE.4 LE /
 Montageanleitung Montageaanwijzing Monteringsanvisining Instrucciones de montaje Assembly Instruction Instructions de montage Instruzioni di montaggio Spiegel / Leuchten / Mirror Lamps SP.1 SP.2 A LE.1
InductWarm. astro s. Montageanleitung InductWarm -Tische. Assembly Instruction InductWarm Tables. Version de/eng
 InductWarm Montageanleitung InductWarm -Tische Assembly Instruction InductWarm Tables Version 0-.0 - de/eng astro s S W I T Z E R L A N D Allgemeine Hinweise und Lieferumfang / General instructions and
DORMA RS 40. Allgemeine Information 30 Typendarstellung 31 Beschlagmodule 32 Zubehör 33-35
 DORMA RS 40 Inhalt Seite Allgemeine Information 30 Typendarstellung 31 Beschlagmodule Zubehör 33-35 Contents Page General information 30 Typical assemblies 31 Fitting modules Accessories 33-35 29 Eckbeschläge
DE Gebrauchsanleitung / Montageanleitung 2 EN Instructions for use / assembly instructions 3. Talis E²
 DE Gebrauchsanleitung / Montageanleitung 2 EN Instructions for use / assembly instructions 3 Talis E² 31612009 31612019 31612029 Deutsch Sicherheitshinweise Bei der Montage müssen zur Vermeidung von Quetsch-
- M o n t a g e a n l e i t u n g - D e s i g n e l e m e n t e S e i t e n s c h w e l l e r
 - M o n t a g e a n l e i t u n g - Chromline-Set D e s i g n e l e m e n t e S e i t e n s c h w e l l e r Teile-Nr.: 5113 207 120 Allgemeine Hinweise! AC Schnitzer Chromline Set für Designelemente Seitenschweller
DE Gebrauchsanleitung / Montageanleitung 2 EN Instructions for use / assembly instructions 3 E / S / Metris S /
 DE Gebrauchsanleitung / Montageanleitung 2 EN Instructions for use / assembly instructions 3 13423000 / 13424000 31416000 / 31417000 Deutsch Sicherheitshinweise Bei der Montage müssen zur Vermeidung von
Zehnder ComfoWell 220
 Benefits All air treatment functions available: attenuator, fine filter, active carbon filter, manifold box Modular design Compact dimensions Easy to clean Components connected with sliding profiles for
Montageanleitung Mounting instructions. Glass thickness mm, up to 150 kg
 Montageanleitung Mounting instructions Amortiguación Einzugsdämpfer Synchronumlenkung: ambos beidseitig: lados: BO BO 51 51015 01675N 95 Amortiguación Dampener Synchronised: ambos two lados: sided: BO
Einbau- und Montageanleitung Tankabdeckung TopCover Seite 2-4 Assembly and installation instructions Tank Cover - TopCover Page 5-7
 Einbau- und Montageanleitung Tankabdeckung TopCover Seite 2-4 Assembly and installation instructions Tank Cover - TopCover Page 5-7 TopCover DORW3115 17.04.2009 1 / 8 1. Allgemeines 1.1 Verkehrslasten
DORMA-Glas MANET COMPACT. MANET COMPACT sliding door sets of highquality stainless steel offer a discrete yet effective enhancement
 24 MANET COMPACT 25 MANET Schiebetürsystem MANET sliding door system Schiebetürsets aus hochwertigem Edelstahl setzen dezent und wirkungsvoll gestalterische Akzente in jedem Raum. Frei positionierbare
Zehnder ComfoWell 320
 Benefits All air treatment functions available: attenuator, fine filter, active carbon filter, manifold box Modular design Compact dimensions Easy to clean Components connected with locking slides for
DURCARE SET CRISTADUR
 DURCARE SET CRISTADUR DURCARE PRECLEANER DURCARE VORREINIGER ANWENDUNG: Mit DurCare Vorreiniger und einem fusselfreiem Tuch die bereits mit Spülmittel abgereinigte Oberfläche behandeln. Anschließend die
Anschlagtürbänder selbstschließend
 Glasinnentürbänder // glass interior door hinges Halteklammern // connectors Übersicht // overview (Glasinnentürbänder eckig // glass interior hinges square) DIN links: 09111 09121 09131 09136 09138 09141
AL-Vario Atelierhaus, Zug (CH) Atelier house, Zug (CH) Betriebsgebäude, Turnov (CZ) Business premises, Turnov (CZ)
 Atelier house, Zug (CH) Betriebsgebäude, Turnov (CZ) Business premises, Turnov (CZ)") AL-Vario www.langleglas.com AL-Vario Atelierhaus, Zug (CH) Atelier house, Zug (CH) Betriebsgebäude, Turnov (CZ) Business premises, Turnov (CZ) 2 AL-Vario Perfekte Montage durch vielfache Einstellmöglichkeiten
AL-Vario www.langleglas.com AL-Vario Atelierhaus, Zug (CH) Atelier house, Zug (CH) Betriebsgebäude, Turnov (CZ) Business premises, Turnov (CZ) 2 AL-Vario Perfekte Montage durch vielfache Einstellmöglichkeiten
TV- und Bildschirmhalterungen TV and monitor screen mounts
 TV- und Bildschirmhalterungen TV and monitor screen mounts Die richtige Halterung finden / Finding the right mount Platzieren Sie Ihren LCD-, Plasma oder LED-Fernseher optimal im Raum. Ganz nach Ihren
Technische Produktinformation
 Technische Produktinformation Technical Product Information ABT-Stabilisatorset Art.-Nr.: 5G0 507 300 ABT-anti-roll-bar set Order no.: 5G0 507 300 Technische Produktinformation für ABT-Stabilisatorset
FR777 Differenzial-Kulissenauszug Bodenmontage, 200 kg Tragkraft, mit Gegenführung
 http://www.fulterer.com http://www.fultererusa.com Instructions F777 Differenzial-Kulissenauszug Bodenmontage, 00 kg Tragkraft, mit Gegenführung F777 Progressive-Action Pantry Pull-out, Bottom Mount 450
max. Flügelgewicht: 140 kg max. Flügelgewicht: 200 kg max. Flügelbreite: mm max. Flügelbreite: mm
 JUMBO Allgemeine und technische Hinweise: JUMBO - Universalbeschläge haben ihren besonderen Einsatzbereich bei stärkeren Glasdicken und großen Flügelabmessungen gefunden. Dieser Beschlag ist geeignet für
TRH-05. PC-Rechner Halterung. 10kg (22lbs) MAX. MONTAGEANLEITUNG v Deutsch. English
 MAX. MONTAGEANLEITUNG v Deutsch. English") PC-Rechner Halterung MONTAGEANLEITUNG v.18.02 ACHTUNG: NIEMALS DAS MAXIMAL ZULÄSSIGE BELASTUNGSGEWICHT ÜBERSCHREITEN. MISSACHTUNG KANN ZU SACHSCHÄDEN ODER SCHWEREN VERLETZUNGEN FÜHREN! TRH-05 10kg (22lbs)
PC-Rechner Halterung MONTAGEANLEITUNG v.18.02 ACHTUNG: NIEMALS DAS MAXIMAL ZULÄSSIGE BELASTUNGSGEWICHT ÜBERSCHREITEN. MISSACHTUNG KANN ZU SACHSCHÄDEN ODER SCHWEREN VERLETZUNGEN FÜHREN! TRH-05 10kg (22lbs)
Lukas Hydraulik GmbH Weinstraße 39 D Erlangen. Mr. Sauerbier. Lukas Hydraulik GmbH Weinstraße 39 D Erlangen
 Technical Report No. 028-71 30 95685-350 of 22.02.2017 Client: Lukas Hydraulik GmbH Weinstraße 39 D-91058 Erlangen Mr. Sauerbier Manufacturing location: Lukas Hydraulik GmbH Weinstraße 39 D-91058 Erlangen
VIDEO CALL CAMERA G-VCAM-01
 VIDEO CALL CAMERA G-VCAM-01 EN AUS GUTEM GRUND ENGLISH 07-10 2 SAFETY AND INFORMATION Safety 7 This camera is designed to transmit video and audio signals. All other uses are expressly prohibited. 7 Protect
WM4L. Höhenverstellbarer Stand. MAX 10kg / (22lbs) jede Ablage MONTAGEANLEITUNG. v.17.11
 jede Ablage MONTAGEANLEITUNG. v.17.11") Höhenverstellbarer Stand MONTAGEANLEITUNG v.17.11 ACHTUNG: NIEMALS DAS MAXIMAL ZULÄSSIGE BELASTUNGSGEWICHT ÜBERSCHREITEN. MISSACHTUNG KANN ZU SACHSCHÄDEN ODER SCHWEREN VERLETZUNGEN FÜHREN! WM4L MAX 10kg
Höhenverstellbarer Stand MONTAGEANLEITUNG v.17.11 ACHTUNG: NIEMALS DAS MAXIMAL ZULÄSSIGE BELASTUNGSGEWICHT ÜBERSCHREITEN. MISSACHTUNG KANN ZU SACHSCHÄDEN ODER SCHWEREN VERLETZUNGEN FÜHREN! WM4L MAX 10kg
1 Allgemeine Information
 1 Allgemeine Information ACHTUNG! Der Betriebsdruck der Klasse 867 ist 6 bar. Sollte der Druck Ihrer Versorgungsleitung höher als 6 bar sein, muss der Druck an der Versorgungseinheit der Nähmaschine auf
EN Instructions for use / assembly instructions 2 DE Gebrauchsanleitung / Montageanleitung 3
 EN Instructions for use / assembly instructions 2 DE Gebrauchsanleitung / Montageanleitung 3 Ecos 14080019 / 14080029 Ecos L 14081019 / 14081029 Novus 70 71020019 / 71020029 Novus 100 71030019 / 71030029
Cleaning & Disinfection of Eickview Videoendoscopes
 Cleaning & Disinfection of Eickview Videoendoscopes EICKEMEYER KG Eltastrasse 8 78532 Tuttlingen T +497461 96 580 0 F +497461 96 580 90 E info@eickemeyer.de www.eickemeyer.de Preparation Cleaning should
Power supply Interference suppressed acc. to DIN EN /- 4, EN 55011, EN CI. B, power factor corrected Power factor BöSha LED driver
 Operating Instructions LED Mast Double Luminaire Callisto SC DB, incl. Inclination Adjustment, Single-Chip Technology (Please, read carefully before starting operation) Version: 16.01.2017 Model 369-M
Container. Pedestal. Bedienungsanleitung Operating instructions
 Container Pedestal D EN Bedienungsanleitung Operating instructions D Inhalt Vorwort Containerhöhe ändern Montage der Trennstege Pflege- und Reinigungshinweise Sicherheitshinweise 2 3 3 4 4 EN Contents
DORMA Universal DORMA RS 40
 DORMA Universal Eckbeschläge Patch fittings Stabile Laufschienen Die Laufschienen sind als Hohlprofile leicht und zugleich stabil und verwindungssteif. Sie können direkt an der Decke oder Wand befestigt
MSS /S Revision: 03. Motorschutz / Engine Guard ACHTUNG / ATTENTION. Mounting Instructions. Montagehinweise
 Motorschutz / Engine Guard MSS.0.366.0000/S Revision: 03 Die Modellzuweisungen von diesem rtikel finden Sie auf unserer Website. The application list for this product can be found on our website. Montagehinweise
Füllstandskontrolle. Scheibensensor. Level Control. Disc sensor. Gebrauchsanweisung Operating Manual V 1
 Füllstandskontrolle Scheibensensor Level Control Disc sensor V 1 Gebrauchsanweisung Operating Manual DE DE Vielen Dank, dass Sie sich für ein Sicherheitsprodukt aus dem Hause S.C.A.T. entschieden haben.
MQ964..GB MQ965..GB. en Operating instructions ar
 MQ964..GB MQ965..GB en Operating instructions ar MQ964-965GB-Uniklein_en-ar.book Seite 2 Donnerstag, 4. Dezember 2014 4:39 16 en English...........................................................3 ar...........................................................6.................................................
Montageanleitung. Schritt 1 Bringen Sie die Nutensteine M6 (REF ), in die richtige Position, falls diese beim Transport verrutscht sind.
, in die richtige Position, falls diese beim Transport verrutscht sind.") Montageanleitung Anbausatz Mikroskop REF 541.2300.0 an ATMOS C 11 Systema Für die Montage des Anbausatzes sind zwei Personen erforderlich. Überprüfen Sie vor Montagebeginn alle Teile auf einwandfreien
Montageanleitung Anbausatz Mikroskop REF 541.2300.0 an ATMOS C 11 Systema Für die Montage des Anbausatzes sind zwei Personen erforderlich. Überprüfen Sie vor Montagebeginn alle Teile auf einwandfreien
ASSEMBLY INSTRUCTIONS MONTAGEANLEITUNG. 3 Circuit ( 230V ) Tracks and Adaptors. 3 Phasen ( 230V ) Stromschienen und Adaptoren.
 Tracks and Adaptors. 3 Phasen ( 230V ) Stromschienen und Adaptoren.") Essential safety Informations This product is suitable for 3-circuit track systems ( EUTRAC and comparable). This product is suitable for indoor dry locations only. The track system must be installed and
Essential safety Informations This product is suitable for 3-circuit track systems ( EUTRAC and comparable). This product is suitable for indoor dry locations only. The track system must be installed and
Electrical tests on Bosch unit injectors
 Valid for Bosch unit injectors with order numbers 0 414 700 / 0 414 701 / 0 414 702 Parts Kit Magnet*: - F00H.N37.925 - F00H.N37.933 - F00H.N37.934 * For allocation to the 10-place Bosch order number,
HPS.04.696.10000/B Revision: 01. Hauptständer KTM 990 SM-T / SM-R '09 Center Stand KTM 990 SM-T / SM-R '09
 Hauptständer KTM 0 SM-T / SM-R '0 Center Stand KTM 0 SM-T / SM-R '0 Montagehinweise Revision: 01 Mounting Instruction Achtung: Die Kurven- und Bodenfreiheit kann durch einen Hauptständer eingeschränkt
Fermentierkessel. Fermentation Kettle
 Fermentierkessel Fermentation Kettle 10032122 10032123 Sehr geehrter Kunde, DE wir gratulieren Ihnen zum Erwerb Ihres Gerätes. Lesen Sie die folgenden Hinweise sorgfältig durch und befolgen Sie diese,
Montageanleitung DORMA MANET. Drehflügeltürsystem. Mounting instruction DORMA MANET. Pivoting door system. Stand/Issue /
 Montageanleitung DORMA MANET Drehflügeltürsystem Mounting instruction DORMA MANET Pivoting door system Stand/Issue 10.08 / 003456 800.52.318.6.32 Wichtige Informationen: Important information: 1 = Bauteil/Baugruppe
OPERATING INSTRUCTIONS
 OPERATING INSTRUCTIONS for Gas Cartridge Adapter CP250 Part no. 144051 and Gas Cartridge Adapter CV300/470 Part no. 144052 CP 250 CV 300/470 144959_V04 Safety Precautions Possible dangers if the safety
ELEGANT LINE EN DE. Assembly instructions for Elegant Line sauna. Montageanleitung für Elegant Line Sauna SD2015 SD2020
 ELEGANT LINE EN Assembly instructions for Elegant Line sauna Montageanleitung für Elegant Line Sauna SD2015 SD2020 15122006 Please read through these assembly instructions before starting installation.
Modularer Klemmrollenfreilauf GL...F2-D2(D3) Modular freewheel, roller type GL...F2-D2(D3)
 Modular freewheel, roller type GL...F2-D2(D3)") Modularer Klemmrollenfreilauf GL...F2-D2(D3) Modular freewheel, roller type GL...F2-D2(D3) Modell GL...F2-D2(D3) Die GL...F2-D2(D3) Serie ist gekennzeichnet durch Passungen zwischen dem Freilauf GL, dem
Modularer Klemmrollenfreilauf GL...F2-D2(D3) Modular freewheel, roller type GL...F2-D2(D3) Modell GL...F2-D2(D3) Die GL...F2-D2(D3) Serie ist gekennzeichnet durch Passungen zwischen dem Freilauf GL, dem
Ambos - Lift 700. Lift 700. The upward return mechanism is controlled by the hydraulic device that works with a specially formulated fiuld.
 Ambos - Lift 700 The upward return mechanism is controlled by the hydraulic device that works with a specially formulated fiuld. Materials and finishes Installation Load Capacity Plastic parts : Black
Pendeltürbänder selbstschließend
 Glasinnentürbänder // glass interior door hinges Halteklammern // connectors Übersicht // overview (eckig // square) 94830 94831 94832 94330 94331 94332 Übersicht // overview (rund // rounded) 95830 95831
Aufbaudose mit Schalter Spacing box with switch. Montageanleitung mounting instructions
 Aufbaudose mit Schalter Spacing box with switch Montageanleitung mounting instructions body head Aufbaudose mit Schalter Montageanleitung S. 2 mounting instructions p. 9 $ 0.2m Sicherheitshinweise Die
Einbauanleitung / Installation Instructions Kit CM44xR
 EA01080C/07/A2/01.13 71225033 Products Solutions Services Einbauanleitung / Installation Instructions Kit CM44xR Externes Display / External display Identifizierung Kit CM44xR 1 Identifizierung 1.1 Lieferumfang
Attention! Allgemeine Hinweise zur Montage
 DE MONTAGEANLEITUNG EN ASSEMBLY MANUAL Holzlattenrost 0 cm Horizontal Wood slatted (0 cm Horizontal) bed base 0 cm Vertikal (0 cm Vertikal) SMATBett STANDAT SYSTEM DE ur die Montage benotigen Sie folgendes:
Attenuator and Distribution System Zehnder ComfoWell 220
 Benefits All air treatment functions available: attenuator, fine filter, active carbon filter, manifold box Modular design Compact dimensions Easy to clean Components connected with sliding profiles for
Level 1 German, 2014
 90886 908860 1SUPERVISOR S Level 1 German, 2014 90886 Demonstrate understanding of a variety of German texts on areas of most immediate relevance 9.30 am Wednesday 26 November 2014 Credits: Five Achievement
Bedienungsanleitung User Manual
 Bedienungsanleitung User Manual - 1 - Deutsch...3 English...4-2 - Deutsch 1. Sicherheitshinweise Blendungs- und Verletzungsgefahr! Sehen Sie niemals mit optischen Geräten in die Sonne oder eine andere
Platzhalter für Funktions-Garantie- Zeichen. für alle HOPPE Tür- und Fenstergriffe! Export Catalogue 20/202
 Platzhalter für Funktions-Garantie- Zeichen für alle HOPPE Tür- und Fenstergriffe! Export Catalogue 20/202 for all HOPPE door- and window handles... for more information, see on p. 8. 2 Contents General
Ladeluftkühler / Intercooler Honda Civic Type R Kit-Nr.:
 190001056 - Einbauanleitung / Installation Instruction - Ladeluftkühler / Intercooler Honda Civic Type R Kit-Nr.: 200001086 Wichtige Hinweise! Diese Montageanleitung ist unbedingt vor Beginn der Einbauarbeiten
Telefon: +49 (0) 5251 / Telefax: +49 (0) 5251 /
 5251 / Telefax: +49 (0) 5251 /") 1 / 9 Assembly: Assembly plate: The left and right assembly plates are screwed onto the side of the vehicle frame via the designated bore holes. The following items shall be used per side for this purpose:
1 / 9 Assembly: Assembly plate: The left and right assembly plates are screwed onto the side of the vehicle frame via the designated bore holes. The following items shall be used per side for this purpose: