Kit Number 57A-6036 K&N Apollo Closed Intake System (CIS) Skoda Fabia VRS TDi 1.9L 130bhp 2003 Instruction sheet A
|
|
|
- Stefan Ackermann
- vor 6 Jahren
- Abrufe
Transkript
 3. Unclip and remove the intake hose from the MAS. (Fig. 2) 4. Remove the APC (Air Pressure Control) valve hose from the air box lid. (Fig. 3) 5.")
 8. Assemble the saddle bracket / mounting bracket using the hardware supplied. (Fig.8) 9.")
 10.")
 13.")
 15. Refit the electrical harness plug to the MAS. (Fig.19) 16.")
 18. Position the Apollo to give maximum clearances & now fully tighten the mounting bracket. 19.")
 20. Feed the other end of the cold air hose into the hole in the slam panel & secure using a plastic tie supplied. (Fig.23) 21.")
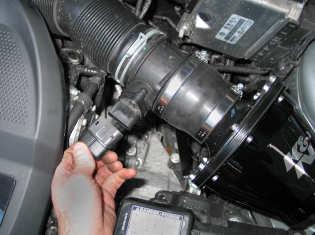
1 Kit Number 57A-6036 K&N Apollo Closed Intake System (CIS) Skoda Fabia VRS TDi 1.9L 130bhp 2003 Instruction sheet A Disconnect the negative terminal from the vehicle battery. 2. Unclip and remove the electrical harness plug from the MAS (Mass Air Sensor). (Fig. 1) 3. Unclip and remove the intake hose from the MAS. (Fig. 2) 4. Remove the APC (Air Pressure Control) valve hose from the air box lid. (Fig. 3) 5. Remove the air box feed pipe from the scoop located on the slam panel. (Fig. 4) 6. Unscrew & remove the scoop from the slam panel. (Fig. 5) 7. Undo the air box mounting bolt & remove the complete air box assembly from the vehicle. (Fig. 6&7) 8. Assemble the saddle bracket / mounting bracket using the hardware supplied. (Fig.8) 9. Unbolt & remove the rear gearbox-mounting bolt. Position the 2 large flat washers either side of the large hole on the new mounting bracket & secure the bracket assembly to the gearbox mounting using the M10 bolt supplied. (Fig. 9&10) 10. Unscrew & carefully remove the MAS from the air box assembly. (Fig.11&12) 11. Refit the MAS into the intake hose and secure using the original clip. (Fig.13) 12. Fit the stepped silicone adaptor hose to the MAS. Place the supplied #48 hose clamp around both the saddle bracket & adaptor hose as shown. Tighten the hose clamp. (Fig.14&15) 13. Screw the 1/4 OD threaded vent adaptor into the threaded hole in the base of the Apollo. (Fig.16) 14. Fit the Apollo filter system to the silicone adaptor hose assembly & secure using the #44 hose clamp supplied. (Fig.17&18) 15. Refit the electrical harness plug to the MAS. (Fig.19) 16. Fit the barbed adaptor into end of the new silicone hose. Join the new silicone hose assembly to the APC valve hose as shown. (Fig.20) 17. Fit the APC valve hose to the end of the threaded vent adaptor on the Apollo as shown. (Fig.21) 18. Position the Apollo to give maximum clearances & now fully tighten the mounting bracket. 19. For best performance results the cold air hose should be fitted: Insert the flexi cold air hose into the end of the aluminum end cap, position the end of the cold air hose to finish approx. 4 / 10cm from the Apollo & secure using a plastic tie supplied. (Fig.22) 20. Feed the other end of the cold air hose into the hole in the slam panel & secure using a plastic tie supplied. (Fig.23) 21. Reconnect the negative battery terminal. 22. Carry out a final check of the height / alignment of the K&N induction system before starting the engine. Installation is now complete. (Fig.24) APOLLO Parts list: 1 x Apollo Filter Assembly. 1 x Flexi Cold Air Hose. 1 x Aluminum End Cap. 1 x Stepped Adaptor Hose. Fixing Kit :- 3 x Plastic Tie. 1 x #44 Hose Clamp. 1 x #48 Hose Clamp. 1 x ¼ OD Threaded Vent.. 1 x Barbed Hose Adaptor. 1 x M6 Nylock Nut. 1 x M6 C sunk Bolt. 1 x M10 Hex Head Bolt. 1 x M6 Flat Washer. 1 x Nylon Conical Washer. 2 x Large Flat Washer. 1 x Mounting Bracket. 1 x Saddle Bracket. 1 x Silicone Adaptor Hose. WARNING: Before starting the engine carry out a final fitment check of the K&N performance kit. It will be necessary for all intake systems to be checked periodically for realignment, clearance and tightening of all connections. Failure to follow the above instructions or proper maintenance may void the warranty. FILTER MAINTENANCE: K&N suggests checking the filter periodically for excessive dirt build-up. When the element becomes covered in dirt (or once a year), service it according to the instructions on the Recharger service kit available from your K&N dealer, part number or Fig. # 1 Fig. # 2 Fig. # 3 Fig. # 4 Fig. # 5 Fig. # 6 Fig. # 7 Fig. # 8 Technical Support: eindhoven.tech@knfilters.com UK technical enquiries: phone the R&D department at , Mon-Thu from 8:30 am to 5 pm, Fri from 8:30 am to 1 pm


2 Fig. # 9 Fig. # 10 Fig. # 11 Fig. # 12 Fig. # 13 Fig. # 14 Fig. # 15 Fig. # 16 Fig. # 17 Fig. # 18 Fig. # 19 Fig. # 20 Fig. # 21 Fig. # 22 Fig. # 23 Fig. # 24 Technical Support: eindhoven.tech@knfilters.com UK technical enquiries: phone the R&D department at , Mon-Thu from 8:30 am to 5 pm, Fri from 8:30 am to 1 pm
3 Artikelnummer 57A-6036 Skoda Fabia VRS TDI 1.9L 130pk 2003 Instructieblad No. A Haal de sleutel uit het contactslot en neem de negatieve accukabel los. Onderdelen 2. (Fig.1) Neem de stekker van de luchtmassameter (LMM) los. Apollo 3. (Fig.2) Maak de slangklem los en verwijder de inlaatslang van de luchtmassameter (LMM). Flexibele Koude-Luchtslang 4. (Fig.3) Verwijder de pijpen van het luchtfilterhuis zoals afgebeeld. Eindstuk, Aluminium 5. (Fig.4) Maak de toevoerpijp naar het luchtfilterhuis los van het frontpaneel zoals afgebeeld. Adapter, Verloop, Groot 6. (Fig.5) Maak de inlaatslang los en verwijder deze uit de auto zoals afgebeeld. Inbouwkit:- 7.(Fig.6&7) Schroef het luchtfilterhuis los en verwijder het uit de auto zoals afgebeeld. 8. (Fig.8) Monteer de halfronde beugel op de bevestigingsbeugel met de bijgeleverde 3x Tie-Wrap platkopschroef, conische ring, platte metalen ring en borgmoer. #44 Slangklem 9. (Fig.9&10) Verwijder de aangeduide montagebout van de versnellingsbaksteun. #48 Slangklem 10. (Fig.11&12) Plaats de 2 grote ringen om het gat in de montagebeugel en monteer deze op de Slang-Adapter, Met Draad versnellingsbaksteun met de geleverde bout zoals afgebeeld. Adapter, kunststof 11. (Fig.13) Maak de luchtmassameter los van het luchtfilterhuis. Borgmoer M6 12. (Fig.14&15) Plaats de LMM terug in de inlaatslang met de originele slangklem. Conische Platkopschroef, M6 13. Bevestig de geleverde verloopadapter op de LMM zoals afgebeeld. Bout M10x (Fig.16) Plaats de siliconenslang door de halfronde beugel; schuif nu de slangklem om de Metalen Ring M6 halfronde beugel en siliconenslang zoals afgebeeld en draai deze volledig vast. 15. (Fig.17&18) Steek de slang-adapter in het gat in de onderkant van het filter. Conische Ring, Nylon 16. (Fig.19) Bevestig het luchtfilter op de inlaatbuis met de geleverde slangklem. Zorg nu dat alle 2x Metalen Ring, vlak, groot delen vrijliggen en draai alle bevestigingspunten goed vast. Beugel 17. (Fig.20) Sluit de stekker weer aan op de LMM. Halfronde Beugel 18. (Fig.21) Plaats de geleverde ontluchtingsslang tussen de slang-adapter en de aansluiting op de motor zoals afgebeeld. Rechte Siliconenslang 19. Schuif de vacuümslang om de slang-adapter zoals afgebeeld. WAARSCHUWING: Controleer 20. Richt het filter en de andere onderdelen zo, dat ze naar alle kanten vrij liggen. Draai nu alle bevestigingspunten goed vast. nogmaals, alvorens de motor te starten, of de K&N-kit correct 21. (Fig.22) Trek de flexibele koude-luchtslang voorzichtig uit. gemonteerd is. Het is noodzakelijk om regelmatig te controleren of de 22. Richt het uiteinde van de koude-luchtslang op het filter; zorg dat er ongeveer 10 cm inlaatkit nog goed vrij ligt en of alle ruimte tussen slang en filter zit. Maak de slang vast met een geleverde tie-wrap. onderdelen nog goed vast zitten. 23. (Fig.23) Maak het uiteinde van de koude luchtslang ovaal en steek dit in gat in het Indien deze instructies niet worden frontpaneel. nageleefd of geen onderhoud wordt 24. Sluit de negatieve accukabel weer aan. gepleegd, kan de garantie komen te 25. (Fig.24) Controleer nogmaals of alle onderdelen goed bevestigd zijn en vrij liggen alvorens de vervallen. motor te starten. De inbouw is nu voltooid. ONDERHOUD VAN HET FILTER: K&N adviseert om het filter regelmatig te inspecteren op overmatige vervuiling. Pleeg onderhoud volgens de instructies van de Recharger service kit, artikelnummer of , verkrijgbaar bij uw K&N verkooppunt, zodra het filter volledig vervuild is (of eens per jaar). Technische Ondersteuning: eindhoven.tech@knfilters.com Stel uw vragen s.v.p. in het Nederlands of Engels voor een snellere afhandeling!
4 Artikelnummer 57A-6036 Skoda Fabia VRS TDI 1.9L 130PS 2003 Instruktionsblatt No. A Nehme den Schlüssel aus dem Kontaktschloß und klemme das Minuskabel der Batterie ab. 2. (Fig.1) Löse und entferne den Stecker vom Luftmengenmesser (LMM). 3. (Fig.2) Löse und entferne das Lufteinlaßrohr vom Luftmengenmesser (LMM). 4. (Fig.3) Entferne die Rohre vom Luftfiltergehäuse wie abgebildet. 5. (Fig.4) Löse das Einlaßrohr des Luftfiltergehäuses von der Frontplatte wie abgebildet. 6. (Fig.5) Löse und entferne den Einlaßschlauch vom Fahrzeug wie abgebildet. 7. (Fig.6&7) Entschraube das Luftfiltergehäuse und entferne es vom Fahrzeug wie abgebildet. 8. (Fig.8) Befestige den halbrunden Bügel zusammen mit der Halterung mit der gelieferten Senkschraube, konischem Zwischenring, flachem Metallring & Verschlußmutter. 9. (Fig.9&10) Entferne den angezeigten Befestigungsbolzen des Getriebegehäuses. 10. (Fig.11&12) Platze die 2 große Metallringe ums Loch in der Halterung und befestige sie auf die Getriebegehäusestütze mit dem gelieferten Bolzen wie abgebildet. 11. (Fig.13) Entferne den Luftmengenmesser vom Luftfiltergehäuse. 12. (Fig.14&15) Befestige den LMM wieder ins Lufteinlaßrohr mit der Originalschlauchschelle. 13. Befestige den gelieferten Übergangsadaptor auf den LMM wie abgebildet. 14. (Fig.16) Platze den Silikonschlauch durch den halbrunden Bügel; schiebe nun die Schlauchschelle um den halbrunden Bügel und Silikonschlauch wie abgebildet und ziehe sie richtig fest. 15. (Fig.17&18) Schiebe den Entlüftungsadaptor ins Loch im Filterboden. 16. (Fig.19) Befestige den Luftfilter aufs Einlaßrohr mit der gelieferten Schlauchschelle. Stelle alles nach für Raum und ziehe alle Verbindungen fest. 17. (Fig.20) Schließe den Stecker wieder an auf den LMM. 18. (Fig.21) Befestige den gelieferten Belüftungsschlauch zwischen den Entlüftungsadaptor und Anschluß auf dem Motor wie abgebildet. 19. Schiebe den Vakuumschlauch um den Entlüftungsadaptor wie abgebildet. 20. Stelle die Filterzusammensetzung nach; wenn alle Teile ausreichend Zwischenraum haben alle Verbindungen festziehen. 21. (Fig.22) Dehne vorsichtig den gelieferten flexibelen Kaltluftschlauch aus. 22. Führe das Ende des Kaltluftchlauches zum Filter; es sollte ca. 10 cm vor dem Filter enden. Befestige den Schlauch mit einem gelieferten Kabelbinder. 23. (Fig.23) Mache das Ende des Kaltluftschlauches oval und führe es in die Aussparung in der Frontplatte. 24. Schließe das Minuskabel der Batterie wieder an. 25. (Fig.24) Prüfe nochmals, bevor Sie den Motor starten, ob alle Teile ausreichend Zwischenraum haben und richtig fest sind. Die Installation ist nun beendet. Teile 3x 2x Apollo Flexibelen Kaltluftschlauch Endstück, Aluminium Übergangs-Adapter, Groß Einbaukit:- Kabelbinder Schlauchschelle #44 Schlauchschelle #48 Entlüftungsadaptor, Gewinde Kunststoffadaptor Verschlußmutter, M6 Senkschraube, konisch, M6 Bolzen, M10x45 Metallring, M6 Kunststoffring, konisch, Nylon Metallring, flach, groß Halterung Halbrunden Bügel Rechten Schlauch, silikon WARNUNG: Prüfe nochmals, bevor Sie den Motor starten, ob das K&N Kit richtig eingebaut ist. Es ist notwendig um regelmäßig zu prüfen ob das Kit noch ausreichend frei liegt und das alle Teile richtig fest sind. Wenn Sie diesen Hinweisen nicht folgen oder wenn das Kit nicht gewartet wird, kann die Garantie verfallen. WARTUNG DES FILTERS: K&N schlägt Sie vor, um den Filter auf übermäßige Schmutzanhäufung regelmäßig zu überprüfen. Warten Sie ihn entsprechend den Anweisungen im Recharger Service-Kit das von Ihrem K&N Händler erhältlich ist, Artikelnummer oder , wenn das Element im Schmutz bedeckt wird (oder einmal jährlich). Technische Unterstützung: eindhoven.tech@knfilters.com Stellen Sie bitte Ihre Fragen auf englisch oder niederländisch für eine schnellere Antwort!
5 Kit référence 57A-6036 Skoda Fabia VRS TDI 1.9L 130ch 2003 Feuille d'instructions No. A Prener le clef du contact et déconnecter le terminal négatif de la batterie. Liste des pièces 2. (Fig.1) Déconnecter la connexion électrique du débitmètre (DBM). Apollo 3. (Fig.2) Décliper le collier de serrage et prener le tuyau d'admission du débitmètre (DBM). Canalisation flexible d'air froid 4. (Fig.3) Enlever les tubes de la boîte à air comme indiqué. Entennoir, Aluminium 5. (Fig.4) Décliper la canalisation d'admission de la boîte du panneau avant comme indiqué. Adapteur étagé, grand 6. (Fig.5) Décliper et enlever le tuyau d'admission de la voiture comme indiqué. Kit de Montage:- 7. (Fig.6) Déviser et enlever la boîte à air de la voiture comme indiqué. 3x Collier plastique 8. (Fig.8) Installer le support demi-rond sur le support en utilisant la vis à tête fraisée, la Collier de serrage #44 rondelle conique, la rondelle plate et l écrou Nylock fournis. 9. (Fig.9) Enlever le boulon de montage de la boîte de vitesses indiqué. Collier de serrage # (Fig.11) Placer les 2 grandes rondelles autour du trou dans le support de montage et l'installer Adapteur reniflard, fileté sur le support de boîte de vitesses en utilisant le boulon fourni comme indiqué. Adaptateur, plastique 11. (Fig.13) Enlever le DBM de la boîte à air. 12. (Fig.14) Installer le DBM dans le tuyau d'admission en utilisant le collier de serrage original. 13. Installer l'adapteur étagé fourni au DBM comme indiqué. 14. (Fig.16) Installer la canalisation en silicone à travers du support demi-rond; maintenant glisser le collier de serrage autour du support demi-rond et canalisation en silicone comme indiqué et le serrer entièrement. 15. (Fig.17) Insérer l'adapteur reniflard dans le trou dans le fond du filtre. 16. (Fig.19) Installer le Filtercharger au tube d'admission en utilisant le collier de serrage fourni. Ajuster tout pour dégagement et serrer tout le matériel de montage. 17. (Fig.20) Reconnecter la connexion électrique du DBM. 18. (Fig.21) Installer la canalisation de reniflard fournie entre l'adapteur reniflard et le tube de reniflard du moteur comme indiqué. 19. Installer la canalisation de vide à l'adapteur reniflard comme indiqué. 20. Ajuster l'assemblée de filtre et support pour bénéficier d'un maximum de dégagement et serrer tout le matériel de montage. 21. (Fig.22) Étirer avec précaution la canalisation flexible d air froid. 22. Placer l'extrémité de la canalisation flexible vers le filtre de façon qu'elle s'arrête environ à 10 cm du filtre. Fixer la canalisation en utilisant un collier plastique fourni. 23. (Fig.23) Ovaliser l'extrémité de la canalisation à air froid et l'insérer au passage dans le pannaeu avant. 24. Reconnecter le terminal négatif de la batterie. 25. (Fig.24) Effectuer un contrôle final de l alignement et de la hauteur du kit. L installation est maintenant achevée. 2x Écrou, Nylock, M6 Vis à tête fraisée, conique, M6 Boulon, M10x45 Rondelle, métal, M6 Rondelle conique, Nylon Rondelle, Métal, plate, grande Support Support, demi-rond Canalisation silicone, droite ATTENTION : avant de démarrer votre moteur, effectuer un dernier contrôle du montage du Kit Performances K&N. Il sera nécessaire pour tous les systèmes d admission de vérifier périodiquement l alignement, la place et le serrage de toutes les connexions. Le non-respect des instructions ci-dessus ou le manque d entretien annule la garantie. ENTRETIEN DU FILTRE: K&N vous conseille de vérifier périodiquement la présence de salissures sur l élément Filtercharger. Quand l élément est couvert de salissures (ou une fois par an), effectuer une opération d entretien selon les instructions du kit service Recharger disponible à votre point de vente K&N, référence ou Assistance technique: eindhoven.tech@knfilters.com Posez-vous s.v.p. vos questions en anglais ou néerlandais pour une réponse plus rapide!
Kit Number 57A K&N Apollo Closed Intake System (CIS) Vauxhall/Opel Astra H 1.6L, 1.8L, 2L Turbo April 05.. Instruction sheet A
 Vauxhall/Opel Astra H 1.6L, 1.8L, 2L Turbo April 05.. Instruction sheet A") Kit Number 57A-6016 K&N Apollo Closed Intake System (CIS) Vauxhall/Opel Astra H 1.6L, 1.8L, 2L Turbo April 05.. Instruction sheet A2054-675 APOLLO 1. Disconnect the negative terminal from the vehicle battery.
Kit Number 57A-6016 K&N Apollo Closed Intake System (CIS) Vauxhall/Opel Astra H 1.6L, 1.8L, 2L Turbo April 05.. Instruction sheet A2054-675 APOLLO 1. Disconnect the negative terminal from the vehicle battery.
Part Number Instruction Sheet No.A Page 1 of 2
 Instruction Sheet No.A2054-562 Page 1 of 2 Part Number 57-0526 INSTALLATION INSTRUCTIONS 1. Disconnect the negative terminal from the battery. 2. Unclip & remove the electrical harness plug from the MAS
INSTALLATION INSTRUCTIONS. Part Number 57A Seat Leon I 1.8L 20v Turbo 180bhp VW Golf IV 1.8L 20v Turbo 150bhp
 Part Number 57A -6015 Seat Leon I 1.8L 20v Turbo 180bhp 2000-2006 VW Golf IV 1.8L 20v Turbo 150bhp 1997-2004 1. Disconnect the negative terminal from the vehicle battery. 2. Unclip & remove the harness
Kit Number Volkswagen Transporter T4, 2.5L L5 TDI, 102 bhp, TUV approved
 Kit Number 57-0565 Volkswagen Transporter T4, 2.5L L5 TDI, 102 bhp, TUV approved 1995-2003 Instruction sheet No. A2054-605 1. Take the key from the ignition and disconnect the vehicle's negative battery
Kit Number 57A K&N Apollo Closed Intake System (CIS) Mini Cooper 1.6i 16v 120bhp Instruction sheet A
 Mini Cooper 1.6i 16v 120bhp Instruction sheet A") Kit Number 57A -6033 K&N Apollo Closed Intake System (CIS) Mini Cooper 1.6i 16v 120bhp 2007- Instruction sheet A2054-759 APOLLO Parts list: 1. Disconnect the negative terminal from the vehicle battery.
Kit Number 57A -6033 K&N Apollo Closed Intake System (CIS) Mini Cooper 1.6i 16v 120bhp 2007- Instruction sheet A2054-759 APOLLO Parts list: 1. Disconnect the negative terminal from the vehicle battery.
Kit Number VW Polo 1.4TDi / VW Fox1.4TDi / Skoda Fabia 1.4TDi, Skoda Fabia 1.9TDi,
 VW Polo 1.4TDi 2001-2006 / VW Fox1.4TDi 2005-2010 / Skoda Fabia 1.4TDi, 2003-2006 Instruction sheet No. A2054-662 (22.6.2011) 1. Disconnect the negative battery terminal from the battery. 2. Unclip and
Fig. # 1 Fig. # 2 Fig. # 3 Fig. # 4
 Kit Number 57A -6033 K&N Apollo Closed Intake System (CIS) Mini Cooper 1.6i 16v 120bhp 2007- Instruction sheet A2054-759 APOLLO Parts list: 1. Disconnect the negative terminal from the vehicle battery.
Kit Number 57-0634 Vauxhall Tigra 1.4L 2004-2009 / Opel Tigra 1.4L 2004-2010
 Kit Number 57-0634 Vauxhall Tigra 1.4L 2004-2009 / Opel Tigra 1.4L 2004-2010 Instruction sheet A2054-692 (19.08.10) 1. Disconnect the negative terminal from the vehicle battery. 2. Unclip & remove the
K&N Apollo Closed Intake System (CIS) Mazda MX5 / Miata 1.8L / 2.0L
 Mazda MX5 / Miata 1.8L / 2.0L") Instruction Sheet No. A2054-742a 7/2014 Part Number 57A-6023 INSTALLATION INSTRUCTIONS 1. Disconnect the negative terminal from the vehicle battery. 2. Unclip & remove the harness plug from the MAS (Mass
Instruction Sheet No. A2054-742a 7/2014 Part Number 57A-6023 INSTALLATION INSTRUCTIONS 1. Disconnect the negative terminal from the vehicle battery. 2. Unclip & remove the harness plug from the MAS (Mass
Part Number 57A Mazda MX5 / Miata 2.0L 16v 158bhp 2006 INSTALLATION INSTRUCTIONS. Instruction Sheet No. A
 Part Number 57A -6023 Mazda MX5 / Miata 2.0L 16v 158bhp 2006 1. Disconnect the negative terminal from the vehicle battery. 2. Unclip & remove the harness plug from the MAS (Mass Air Sensor). (Fig. 1) 3.
Kit Number 57A-6038 K&N Apollo Closed Intake System (CIS) Lotus Elise 1.8L 16v 134bhp (Toyota Eng.) 2006 Instruction sheet A
 Lotus Elise 1.8L 16v 134bhp (Toyota Eng.) 2006 Instruction sheet A") Kit Number 57A-6038 K&N Apollo Closed Intake System (CIS) Lotus Elise 1.8L 16v 134bhp (Toyota Eng.) 2006 Instruction sheet A2054-767 1. Disconnect the negative terminal from the vehicle battery. 2. Unclip
Kit Number 57A-6038 K&N Apollo Closed Intake System (CIS) Lotus Elise 1.8L 16v 134bhp (Toyota Eng.) 2006 Instruction sheet A2054-767 1. Disconnect the negative terminal from the vehicle battery. 2. Unclip
Kit Number 57A-6044 K&N Apollo Closed Intake System (CIS) Subaru Impreza 2.5i Turbo WRX /STi Instruction sheet A
 Subaru Impreza 2.5i Turbo WRX /STi Instruction sheet A") Kit Number 57A-6044 K&N Apollo Closed Intake System (CIS) Subaru Impreza 2.5i Turbo WRX /STi 2008- Instruction sheet A2054-816 1. Disconnect the negative terminal from the vehicle battery. 2. Unclip the
Kit Number 57A-6044 K&N Apollo Closed Intake System (CIS) Subaru Impreza 2.5i Turbo WRX /STi 2008- Instruction sheet A2054-816 1. Disconnect the negative terminal from the vehicle battery. 2. Unclip the
INSTALLATION INSTRUCTIONS
 Instruction Sheet No.A2054-673 Page 1 of 2 Part Number 57-0620 INSTALLATION INSTRUCTIONS VW Touran 1.6L L4 F/I 102BHP 2003-2009 VW Golf V 1.6L L4 F/I 102BHP 2004-2008 Skoda Octavia 1.6L L4 F/I 102bhp 2004-2009
Fig. # 1 Fig. # 2 Fig. # 3 Fig. # 4. Fig. # 5 Fig. # 6 Fig. # 7 Fig. # 8
 Ford Mondeo III 2.0L 16v Di/TDCi 115 (with MAS) 2000-2006 Ford Mondeo IV 2.0L 16v Di/TDCi 115 (with MAS) 2007 Instruction sheet A2054-604-1 1. Disconnect the negative terminal from the vehicle battery.
Fig. # 1 Fig. # 2 Fig. # 3 Fig. #4. Fig. # 57 Fig. # 6 Fig. # 7 Fig. #8
 Kit Number 57-0676-1 Instruction sheet A2054-829 1. Take the key card from the ignition slot; make sure the card is kept out of the car. 2. Unclip and remove the battery cover, disconnect the negative
Kit Number 57i Citroën Saxo 1.1L/1.4L Oct Citroën Saxo 1.6L 8v 98bhp Sep Instruction sheet A
 Kit Number 57i-6515 Citroën Saxo 1.1L/1.4L Oct.1999-2004 Citroën Saxo 1.6L 8v 98bhp Sep.2000-2004 Instruction sheet A2054-640-1 1. Disconnect the negative terminal from the vehicle battery. 2. Remove the
Part Number 57-0270-1
 Instruction Sheet No.A2054-681 Page 1 of 2 Part Number 57-0270-1 INSTALLATION INSTRUCTIONS 1. Disconnect the negative terminal from the vehicle battery. 2. Unclip and remove the intake pipe from the air
Kit Number 57i-1001 BMW 323(t)i/325i/328i E36, 2.5L/2.5L/2.8L L6 24v, 170/192/193 bhp, Instruction sheet No. A
i/325i/328i E36, 2.5L/2.5L/2.8L L6 24v, 170/192/193 bhp, Instruction sheet No. A") Kit Number 57i-1001 BMW 323(t)i/325i/328i E36, 2.5L/2.5L/2.8L L6 24v, 170/192/193 bhp, 1991-2000 Instruction sheet No. A2054-621 1. Take the key from the ignition and disconnect the vehicle's negative
Kit Number 57i-1001 BMW 323(t)i/325i/328i E36, 2.5L/2.5L/2.8L L6 24v, 170/192/193 bhp, 1991-2000 Instruction sheet No. A2054-621 1. Take the key from the ignition and disconnect the vehicle's negative
Kit Number Renault Mégane, 1.6L, 2.0L, Instruction sheet A ( )
") Kit Number 57-0521-1 Renault Mégane, 1.6L, 2.0L, - 2008 Instruction sheet A2054-699 (16.09.2010) 1. Disconnect the negative, then positive terminal from the vehicle battery. (Fig.1) 2. Disconnect the battery
Kit Number 57-0521-1 Renault Mégane, 1.6L, 2.0L, - 2008 Instruction sheet A2054-699 (16.09.2010) 1. Disconnect the negative, then positive terminal from the vehicle battery. (Fig.1) 2. Disconnect the battery
K&N 57i Induction System Kit Number 57-0655
 K&N 57i Induction System Kit Number 57-0655 Instruction sheet A2054-739-2 1. Disconnect the negative terminal from the vehicle battery. 2. Punto: Remove the air box feed pipe from its chassis leg mounting
Kit Number 57-0615. Mazda 6, 1.8L 2002-2009/ 2.0L 2002-2009 / 2.3L 16v, 2002-2006 / 2.5L 2008-2010 Instruction sheet A2054-666b 11-2014
 Kit Number 57-0615 Mazda 6, 1.8L 2002-2009/ 2.0L 2002-2009 / 2.3L 16v, 2002-2006 / 2.5L 2008-2010 Instruction sheet A2054-666b 11-2014 1. Disconnect the negative terminal from the vehicle battery. 2. Remove
Trekhaken Attelages Anhängevorrichtungen Tow bars. GDW nv Hoogmolenwegel 23 B-8790 Waregem TEL. 32(0)56 60 42 12(5) FAX.
56 60 42 12(5) FAX.") Trekhaken Attelages Anhängevorrichtungen Tow bars GDW Ref. 1335 EEC APPROVAL N : e6*94/20*2015*00 D= max kg max kg x + max kg max kg x 0,00981 14,44 kn s/ = 140 kg Max. = 3500 kg GDW nv Hoogmolenwegel
Trekhaken Attelages Anhängevorrichtungen Tow bars GDW Ref. 1335 EEC APPROVAL N : e6*94/20*2015*00 D= max kg max kg x + max kg max kg x 0,00981 14,44 kn s/ = 140 kg Max. = 3500 kg GDW nv Hoogmolenwegel
Trekhaken Attelages Anhängevorrichtungen Tow bars
 Trekhaken Attelages Anhängevorrichtungen Tow bars GDW Ref. 1400 EEC APPROVAL N : D= max kg max kg x + max kg max kg x 0,00981 18,15 kn s/ = 150 kg Max. = 3500 kg GDW nv Hoogmolenwegel 23 B-8790 Waregem
Vivanti. Art.no
 Vivanti RV - MI-00 +-zits met rollatorvoorziening +-assise avec support chaise roulante +-Sitzer mit Rollatorstütze +-seat with rollator stand Vivanti Art.no. 000 rvdhooven --200 www.velopa.com / 2 Torx
Technische Information
 Flüsskeitsgekühlte Anfahrkupplung Die Mähvorsätze der Typen 345 und 360 sind mit einer flüssigkeitsgekühlten Anfahrkupplung nachrüstbar. Best.-Nr.: LCA93830 (650Nm) für Best.-Nr: LCA93831 (900 Nm) für
1 Allgemeine Information
 1 Allgemeine Information ACHTUNG! Der Betriebsdruck der Klasse 867 ist 6 bar. Sollte der Druck Ihrer Versorgungsleitung höher als 6 bar sein, muss der Druck an der Versorgungseinheit der Nähmaschine auf
SUNSHOWER PURE XL Installation Manual Part 2 Installatie handleiding deel 2 Installationshandbuch Teil 2 Manual d installation Partie 2
 XL SUNSHOWER PURE XL Installation Manual Part 2 Installatie handleiding deel 2 Installationshandbuch Teil 2 Manual d installation Partie 2 P1219 09-2014 Requirements / Benodigdheden / Materialbedarf In
1. ReplacING THE 115/230 V AC POWER
 Ersetzungsblatt REPLACEMENT OF THE SPARE PART WITH ORDER CODE 00555722 OR 00553168 Before removing the 115/230 V AC power supply board from the device: Cut the power supply on all conductors and isolate
Montage instructie Assembly instruction Instruction de montage Montageanleitung. Interface (MCBA / Appl. Bus)
") Montage instructie Assembly instruction Instruction de montage Montageanleitung Interface (MCBA / Appl. Bus) Montage instructie voor Interface (MCBA / Appl. Bus) Assembly instruction for Interface (MCBA
Montage instructie Assembly instruction Instruction de montage Montageanleitung Interface (MCBA / Appl. Bus) Montage instructie voor Interface (MCBA / Appl. Bus) Assembly instruction for Interface (MCBA
Quick Installation Guide Installatie handleiding Guide d installation rapide Kurzanleitung Installation
 Quick Installation Guide Installatie handleiding Guide d installation rapide Kurzanleitung Installation English Uitbreidingsmodule Nederlands Leveringsomvang schroef Uitbreidingsmodule tiptel KM-38
rematic interface Quinta 45/65
 Montage instructie Assembly instructions Instructions de montage Montageanweisung rematic interface Quinta 45/65 rematic interface Quinta 45/65 Montage instructie voor rematic interface voor Remeha Quinta
GDW Ref Chrysler Cherokee Trekhaken Attelages Anhängevorrichtungen Tow bars. EEC APPROVAL N : e6*94/20*2015*00. x 0, ,45 kn
 Trekhaken Attelages Anhängevorrichtungen Tow bars Chrysler Cherokee 2002 -. GDW Ref. 1335 EEC APPROVAL N : e6*94/20*2015*00 D= max kg max kg x + max kg max kg x 0,00981 14,45 kn s/ = 140 kg Max. = 3500
Profi-Pavillon / Profi Pavilion / Profiteren Paviljoen
 Profi pavilion Profiteren paviljoen Vor Montage und Benutzung unbedingt sorgfältig lesen und für spätere Zwecke aufbewahren. Read these instructions carefully before use and assembly and keep for future
BT 4. Bügelschellen U-bolt clamps Collier arceau
 Bügelschellen U-bolt clamps Collier arceau BT 4 BT 4.1. Rundstahlbügelschellen ähnlich DIN 3570 BT 4.1. U-bolt clamps similar to DIN 3570 BT 4.1. Collier arceau semblable à DIN 3570 BT 4.2. Flachstahlbügelschellen
Kuppeldach-Pavillon / Pavilion with dome-shaped roof / Koepeldak Paviljoen
 Pavilion with dome-shaped roof Koepeldak Paviljoen Vor Montage und Benutzung unbedingt sorgfältig lesen und für spätere Zwecke aufbewahren. Read these instructions carefully before use and assembly and
Mercedes Sprinter
 Trekhaken Attelages Anhängevorrichtungen Tow bars GDW Ref. 0473 EEC APPROVAL N : e6*94/20*0143*00 D/ : 16,30 KN S/ : 100 Kg Max. = Max. 3000kg 3500kg 4600kg 3500kg 3150kg 2600kg Ref. 0473 Montagehandleiding
Montage instructie Assembly instruction Instruction de montage Montageanleitung. MCBA-Appl. Bus-interface
 Montage instructie Assembly instruction Instruction de montage Montageanleitung MCBA-Appl. Bus-interface Montage instructie voor MCBA-Appl. Bus-interface. Assembly instruction for MCBA-Appl. Bus-interface.
Pavilion TREND. Vor Montage und Benutzung unbedingt sorgfältig lesen und für spätere Zwecke aufbewahren.
 Vor Montage und Benutzung unbedingt sorgfältig lesen und für spätere Zwecke aufbewahren. Read these instructions carefully before use and assembly and keep for future reference! Lees deze instructies zorgvuldig
Profi-Pavillon / Profi Pavilion / Profiteren Paviljoen
 Vor Montage und Benutzung unbedingt sorgfältig lesen und für spätere Zwecke aufbewahren. Read these instructions carefully before use and assembly and keep for future reference! Lees deze instructies zorgvuldig
Balkonmarkise. ca. 120 x 200 cm / ca. 150 x 200cm
 Ersatzteilliste / Spare part list / Onderdelenlijst 1 x E 2 x inkl. Schrauben incl. Screws inkl. schroeven 2.5mm 1 x F 1 x 2.5mm C 2 x G 1 x 10mm H 1 x 5mm D 2 x inkl. Schrauben incl. Screws inkl. schroeven
DEUTSCH 4 FRANÇAIS 6 NEDERLANDS 8
 SY DEUTSCH 4 FRANÇAIS 6 NEDERLANDS 8 DEUTSCH Ölen der Nähmaschine Achtung! Vor dem Ölen der Maschine immer den Netzstecker ziehen und die Nähmaschine abschalten. 1 Nur Schmiermittel benutzen, das speziell
Rue Gurnigel 48 CH-2501 Bienne Tél.: +41 (0) Fax: +41 (0)
 Fax: +41 (0)") OPTISCHE MESSTECHNIK OPTICAL MEASURING SYSTEMS SYSTEMES DE MESURE OPTIQUE marcel - aubert - sa Rue Gurnigel 48 CH-2501 Bienne Tél.: +41 (0)32 365 51 31 Fax: +41 (0)32 365 76 20 E-mail: info@marcel-aubert-sa.ch
OPTISCHE MESSTECHNIK OPTICAL MEASURING SYSTEMS SYSTEMES DE MESURE OPTIQUE marcel - aubert - sa Rue Gurnigel 48 CH-2501 Bienne Tél.: +41 (0)32 365 51 31 Fax: +41 (0)32 365 76 20 E-mail: info@marcel-aubert-sa.ch
Moss art. Frame Aluminium without topper rim Round moss/flat moss. Frame Aluminium with topper rim Round moss. Special project Round moss
 Aluminium without topper rim Round moss/flat moss Aluminium with topper rim Round moss Special project Round moss Moss art Polystone rock finish Flat moss 4 Introduction 6 Polystone natural finish 7 Naturescast
Zubehör/Ersatzteile Accessories/Spare parts Accessoires/Pièces de rechange
 /Ersatzteile /Spare parts /Pièces de rechange Montagehalter komplett Mounting fixture complete Dispositif complet d assemblage Die Abbildung entspricht Ausführung HS The illustration shows the HS version
Wobbler. WWW.EPSiLONSIGNS.COM INFO@EPSiLONSIGNS.COM
 - Easy to change the poster - Withstands strong wind - Corrosion free - Easy to install / easy to handle - Mobile by built-in castors - Rocking base - Different possible colour finishes - Possible branding
BODY CHASSIS. Ihr Ersatzteilspezialist im Internet
 BODY CHASSIS 4 4 0 8 8 9 4 48 4 9 4 4 4 49 4 8 4 9 4 4 44 4 9 9 0 40 9 4 8 Seat 98 Hinge, Seat E00 Retainer x4 4 Lockwasher 8x Bolt, Hex x4 Plate, Seat Switch 99 Spring, Compression 4x 8 Glide, Seat Spring
TECHNISCHE FICHE CONTACT CONTACTOR
 TECHNISCHE FICHE CONTACT CONTACTOR 02-01-02-00 voorbeeld gegevens klant: Type machine:... Serie nr. machine:... prijsaanvraag bestelling CODE: AT-CT x D1 x L1 x L2 x AT-TI x AT-PL x AT-GA x TA x D2 x B
SUNSHOWER PURE WHITE XL. Installation manual Part 2 / Installatie handleiding deel 2 / Installationshandbuch Teil 2 / Manual d installation Partie 2
 SUNSHOWER PURE WHITE XL Installation manual Part 2 / Installatie handleiding deel 2 / Installationshandbuch Teil 2 / Manual d installation Partie 2 P1219 10-2015 Requirements / Benodigdheden / Materialbedarf
Zuladung: max. 100kg Load rating: 100kg
 Montageanleitung zum Vollauszugbeschlag Dispensa-VVS für feste und höhenverstellbare Tragrahmen Art.-Nr.: 04235 mit Schnellmontagetechnik Mounting instructions for full-extension top- and bottom runner
torqeedo heckmotorhalterung stern-motor-bracket holiday/explorer Riverstar, adventure
 torqeedo heckmotorhalterung stern-motor-bracket holiday/explorer Riverstar, adventure MONTAGEANLEITUNG Assembly instructions Besitzer/Name: Owner/name: PLZ, Ort: Post code, town: Straße, Nr.: Street, nr:
1. Allgemeine Information
 1. Allgemeine Information ACHTUNG! Der Betriebsdruck der Klasse 876 ist 6 bar. Sollte der Druck Ihrer Versorgungsleitung höher als 6 bar sein, muss der Druck an der Versorgungseinheit der Nähmaschine auf
SUNSHOWER PURE WHITE XL. Installation manual Part 2 / Installatie handleiding deel 2 / Installationshandbuch Teil 2 / Manual d installation Partie 2
 SUNSHOWER PURE WHITE XL Installation manual Part 2 / Installatie handleiding deel 2 / Installationshandbuch Teil 2 / Manual d installation Partie 2 P1219 06-2015 Requirements / Benodigdheden / Materialbedarf
BODY CHASSIS. Ihr Ersatzteilspezialist im Internet
 BODY CHASSIS 2 4 4 0 2 2 8 8 9 4 48 4 9 42 4 4 49 42 8 2 2 2 29 4 4 44 4 2 9 9 0 40 9 4 8 Seat 99 2 Hinge, Seat E0 Retainer x4 4 Lockwasher 8x Bolt, Hex x4 Plate, Seat Switch 99Z Spring, Compression 4x2
Trekhaken Attelages Anhängevorrichtungen Towbars. GDW Ref. 1297. EEC APPROVAL N : e6*94/20*1866*00. D/ : 10,40 KN S/ : 80 kg Max.
 Trekhaken Attelages Anhängevorrichtungen Towbars Chrysler Voyager / Dodge Ram VAN 2+4WD GDW Ref. 1297 EEC APPROVAL N : e6*94/20*1866*00 D/ : 10,40 KN S/ : 80 kg Max. : 1600 kg : kg GDW nv Hoogmolenwegel
M1.2 x 8 mm M1.4 x 10 mm M0.5 - M1.2 mm
 NORMTEILE / HARDWARE 0 Muttern / 0 nuts 0 Muttern / 0 nuts 0 Muttern / 0 nuts Edelstahl VA / stainless steel Edelstahl VA / stainless steel Edelstahl VA / stainless steel M M.8 mm M.0 mm M. mm SW. mm SW.
Century Gun. Artikelbezeichnung: Century-Pistole Part Description: Artikelnummer/ Part No.: 029-2500
 1 / 11 2 / 11 6W FNOLVWH&HQWXU\3LVWROH3DUWV/LVW&HQWXU\*XQ $UWLNHOQXPPHU 1XPPHU1R $UWLNHOEHVFKUHLEXQJ 3DUW'HVFULSWLRQ 3DUW1XPEHU 1 Haltering Retaining Ring 029-2501 2 Luft-/Peroxidkappe Air/Catalyst Cap
SH SKH. Einbauanleitung Verschleißsensierung TSB Installation instructions wear sensing Notice de montage de capteurs d usure
 SH SKH Einbauanleitung Verschleißsensierung TSB Installation instructions wear sensing Notice de montage de capteurs d usure 05.801.49.50.0 BPW-EA VS TSB 04.00.543592 - Rev. 3 Seite 2 BPW-EA VS TSB 04.00.543592
Einbauanleitung & Radioblende Doppel-/1-DIN Honda Civic
 Einbauanleitung 14070 & 14120 Radioblende Doppel-/1-DIN Honda Civic 2006-2010 Mounting instructions 14070 & 14120 Radio frame double/1-din Honda Civic 2006-2010 Lieferumfang / Kit components A) Radiorahmen,
Quick guide 360-45011
 Quick guide A. KEUZE VAN DE TOEPASSING EN: SELECTION OF APPLICATION CHOIX D UNE APPLICATION DE: AUSWAHL DER ANWENDUNGSPROGRAMME DIM Memory Off DIM Memory = Off User: Display: 1. EXIT Press Niko (Back light)
1. Verwendung des Teilesatzes. 2. Komponenten des Teilesatzes
 1. Verwendung des Teilesatzes Der Teilesatz Bandzuführung ist für Kettenstichmaschinen der Klasse 176 vorgesehen. 2. Komponenten des Teilesatzes Der Teilesatz besteht aus folgenden Bauteilen: 1 x Armdeckel
1. Verwendung des Teilesatzes. 2. Komponenten des Teilesatzes
 1. Verwendung des Teilesatzes Der Teilesatz Elektropneumatische Mehrweite ist für Kettenstichmaschinen der Klasse 175 und 176 vorgesehen. 2. Komponenten des Teilesatzes Der Teilesatz besteht aus folgenden
user manual Get inspired by Light
 user manual Get inspired by Light Pure Origin Pure by The beauty of nature and the modern architecture has been my inspirational source while creating the beautiful Pure light collection. Light up your
Downpipe Honda Civic Type R Kit-Nr.:
 190001063 - Einbauanleitung / Installation Instruction - Downpipe Honda Civic Type R Kit-Nr.: 500001021 Wichtige Hinweise! Diese Montageanleitung ist unbedingt vor Beginn der Einbauarbeiten zu lesen. Die
Edition June 2015 Visserie Guerry - A company by Dejond nv. Your Partner in Special Screws
 Edition June 2015 Visserie Guerry - A company by Dejond nv. Your Partner in Special Screws Visserie Guerry Your solution for special screws! Where the standard range of screws stops, the service begins
Nr. 12 March März Mars 2011
 Nr. 12 March März Mars 2011 Sound Edition Benz Patent Motor Car 1886 - Limited edition Highly detailed precision model of the first Benz automobile, in an elegant Mercedes- Benz Museum gift box and limited
11 EN 81-70 Page 1 of 2 Standard: INTERPRETATION RELATED TO. Clause(s): 5.4.2.3
: 5.4.2.3") CEN RELATED TO 11 Page 1 of 2 Standard: Edition: 2003 Clause(s): 5.4.2.3 Valid from: 15/09/2010 Date of modification: Key-word(s): Car operating panel, Two entrance lift Replacing interpretation No.: QUESTION
CEN RELATED TO 11 Page 1 of 2 Standard: Edition: 2003 Clause(s): 5.4.2.3 Valid from: 15/09/2010 Date of modification: Key-word(s): Car operating panel, Two entrance lift Replacing interpretation No.: QUESTION
 Verwenden Sie nur Original-KRONE-Ersatzteile! Das gibt Sicherheit und spart Kosten! Use Original-KRONE parts only This will increase operational reliability and help to save costs! N'utiliser que des piéces
HPS.04.696.10000/B Revision: 01. Hauptständer KTM 990 SM-T / SM-R '09 Center Stand KTM 990 SM-T / SM-R '09
 Hauptständer KTM 0 SM-T / SM-R '0 Center Stand KTM 0 SM-T / SM-R '0 Montagehinweise Revision: 01 Mounting Instruction Achtung: Die Kurven- und Bodenfreiheit kann durch einen Hauptständer eingeschränkt
Montageanleitung Assembly Instruction Werkbank mit 6 Schubladen/ 2 Türen
 1 Montageanleitung Assembly Instruction Werkbank mit 6 Schubladen/ 2 Türen Art. 25733 Art. 45700 Allgemeine Hinweise: Prüfen Sie bitte vor Zusammenbau, ob alle Teile vorhanden und unbeschädigt sind. Sollte
D F D F D F D F D F D F D F D F /15
 - Montageanleitung - Assembly instructions - Notice de montage - Montagehandleiding 79- /5 D00-F D00-F D006-F D008-F D00-F D006-F D50-F D506-F 8 79-5 6# 7 8 5 6 9 0 8 7 D 9 Pos. Bezeichnung Ersatzteil-Nr.
VI Auflockerungssysteme Aeration systems
 VI Auflockerungssysteme / Aeration systems Seite / Page 125 VI Auflockerungssysteme Aeration systems Seite / Page Auflockerungssysteme + Zubehör / Aeration systems + accessories...126 Auflockerungssysteme
TriASS Schreibtische. TriASS Schreibtischsystem Montageanleitung. TriASS Desking System Assembly Instructions. Das Assmann Prinzip. Gute Arbeit.
 Das Assmann Prinzip. Gute Arbeit. TriASS Schreibtischsystem Montageanleitung TriASS Desking System Assembly Instructions The Assmann principle. Designed to work well. TriASS Desks Schreibtisch, Typ ST16
Grischa. Spielregel Rules Règles Spelregels
 Grischa Spielregel Rules Règles Spelregels Spielregeln Inhalt: 60 Aufgaben 3 schwarze Murmeln rote Murmel Marble Monster Transportbox Ziel des Spiels: Verflixt, schon wieder ist die kleine rote Murmel
Seitenkoffer Topcases Gepäckträger Lock it System Softbags Aluminiumkoffer Lederkoffer Schutzbügel Hauptständer Chopper-Parts Accessoires
 Motorschutzbügel ab Bj. 06 Art.-Nr.: 0.0 000 schwarz Ausführung B Montageanleitung Seitenkoffer Topcases Gepäckträger Lock it System Aluminiumkoffer Lederkoffer Schutzbügel Hauptständer Chopper-Parts Accessoires
MINF - Mini Freestanding / MINW - Mini Wall. Montagehandleiding / Instructions de montage Montagehinweis / Mounting instructions
 MI - Mini reestaning / MIW - Mini Wall Montagehanleiing / Instructions e montage Montagehinweis / Mounting instructions AMETIGE VOOR AASLUITIG MET JAGA THERMOSTAATVETIEL IMESIOS POUR RACCOREMET AVEC VAE
 Verwenden Sie nur Original-KRONE-Ersatzteile! Das gibt Sicherheit und spart Kosten! Use Original-KRONE parts only This will increase operational reliability and help to save costs! N'utiliser que des piéces
 Verwenden Sie nur Original-KRONE-Ersatzteile! Das gibt Sicherheit und spart Kosten! Use Original-KRONE parts only This will increase operational reliability and help to save costs! N'utiliser que des piéces
 Verwenden Sie nur Original-KRONE-Ersatzteile! Das gibt Sicherheit und spart Kosten! Use Original-KRONE parts only This will increase operational reliability and help to save costs! N'utiliser que des piéces
 Verwenden Sie nur Original-KRONE-Ersatzteile! Das gibt Sicherheit und spart Kosten! Use Original-KRONE parts only This will increase operational reliability and help to save costs! N'utiliser que des piéces
Attention :Installez le logiciel fourni avant d'installer le lecteur de carte multislot!
 Manuel d utilisation Lecteur de carte 3,5 9 en 1, USB 2.0 Attention :Installez le logiciel fourni avant d'installer le lecteur de carte multislot! Installation du logiciel Insérez le CD-ROM fourni dans
Montageanleitung Installation Instructions Notice de Montage
 Montageanleitung Installation Instructions Notice de Montage T-Verteiler V4A T splitter stainless steel Répartiteur passif M12 1 voie en acier inox E70354 Sachnr. 7390861/00 08/2010 Bestimmungsgemäße Verwendung
Ersatzteilliste Spare parts list Liste de pièces de rechange
 Ersatzteilliste Spare parts list Liste de pièces de rechange Wechselrahmen Euro-MX Tool frame Euro-MX Cadre porte-outil Euro-MX ProfiLine FZ ProfiLine FS 8-80. 8-0. 365530 E58WR 06 Bei Ersatzteilbestellungen
Dosenadapter Can Adapter Adaptateur pour boites EBI DA
 Dosenadapter Can Adapter Adaptateur pour boites EBI DA EBI DA Deutsch Vorwort Dieser Dosenadapter kann für Dosen jeglicher Art eingesetzt werden. Er adaptiert einen EBI-Logger so an die Dose, dass die
Volkswagen Transporter T5 KITNR: NR
 Volkswagen Transporter T5 KITNR: NR-197104 NL Montage handleiding VH1970710-00 GB Mounting instruction VH1970710-00 D Einbau Anleitung VH1970710-00 1 1 NL Demonteer de onderste schokdemperbevestiging.
Thermalright. Macho 120
 Thermalright Macho 120 Macho 120 Assembly package 4 1 4 4 4 7 5 4 4 4 1 Chill Factor 1 1 2 1 8 Macho 120 Intel 775/1155/1156/1366 Exploded View Important! Before proceeding with installation, please check
SCOOTER CATALOGUE 2015
 SCOOTER CATALOGUE 2015 , t i e Rid! t i e v L Hartelijk dank voor het bekijken van de Razzo scooter brochure. Razzo scooters kenmerken zich niet alleen door de uitzonderlijke prijs/kwaliteit verhouding,
BUITENZONWERING Installatieadvies Installation advice Installationsberatung
 BUITENZONWERING Installatieadvies Installation advice Installationsberatung Inhoud Buitenzonwering, voorgemonteerd 1 Schroeven (4.8x13) 8 Kabelwartel 1 Afstandsbediening optioneel Ontvanger optioneel Content
S-Digicash Payez mobile depuis votre compte courant! Mobil bezahlen, direkt von Ihrem Girokonto aus! Pay mobile from your current account!
 S-Digicash Payez mobile depuis votre compte courant! Mobil bezahlen, direkt von Ihrem Girokonto aus! Pay mobile from your current account! Payez mobile depuis votre compte courant BCEE! Scannez le QR Code
gebruikershandleiding user Manual Bedienungsanleitung
 gebruikershandleiding user Manual Bedienungsanleitung Nederlands Let op: 1. Lees vóór gebruik eerst deze handleiding. 2. Demonteer de camera of de hoofd-unit niet. 3. Ga zorgvuldig te werk. 4. Draai beide
Ersatzteile / Spare parts. INTRAsurg 1000 / INTRAsurg 1000 Air.
 Ersatzteile / Spare parts.. Immer auf der sicheren Seite. Vertrieb/distribution: KaVo Dental GmbH Bahnhofstraße 20 D-88447 Warthausen Hersteller/manufacturer: Kaltenbach & Voigt GmbH Bismarckring 39 D-88400
2 IP X4 WLS/FL IP24. Montage-Anleitung Instructions de montage Assembling instructions. 225 cm. 60 cm 0
 WLS/FL IP Arbeiten an den elektrischen Anlagen dürfen nur von autorisierten Fachleuten nach den örtlichen Vorschriften ausgeführt werden. Für nicht fachgerechte Installation wird jegliche Haftung abgelehnt.
HOLZWAGEN MIT BLUMEN H0 1228/
 Anleitung. Instructions. Mode d emploi. HOLZWAGEN MIT BLUMEN H0 1228/1 2.10.12281 Vor Gebrauch die Sicherheitshinweise und Anleitung genau lesen und beachten. Vor dem Zusammenbau sollten Sie sich mit den
Honeywell AG Hardhofweg. D-74821 Mosbach MU1H-1220GE23 R1001
 BA 95 Einbau-Anleitung Installation Instructions Einbau Installation Einbaubeispiel Installation example Ablaufleitung vorsehen Install discharge pipework Durchflussrichtung beachten! Consider direction
08/12. Gebrauchsanleitung Trekkingrucksäcke Trekking rucksacks Instructions for use Notice d'emploi pour sacs à dos de trek
 08/12 Gebrauchsanleitung Trekkingrucksäcke Trekking rucksacks Instructions for use Notice d'emploi pour sacs à dos de trek X-TRANSITION Bedingungen der JACK WOLFSKIN 3-Jahres-Gewährleistung Terms and
Instructions AVTI. ENGLISH Page 2. DEUTSCH Seite 2. NEDERLANDS blz. 2. Multifunctional self-acting controller AVTI. Multifunktionsregler AVTI
 Instructions Multifunctional self-acting controller Page 2 Multifunktionsregler Seite 2 blz. 2 Temperatuurregelaar voor warm tapwater 7369054-0 SIBC VI.GB.H4.6G 1 is a combined controller developed for
Ladeluftkühler/ Intercooler Kit Golf MK7 GTI/R
 190001032 -Einbauanleitung / Installation Instruction - Ladeluftkühler/ Intercooler Kit Golf MK7 GTI/R Achtung! Zusätzliche Hinweise zur Installation im Seat Leon 5F erhalten sie online. Note! Online you
BAHNHOF»BONNBONN«STATION GARE DE»BONN«STATION»BONN«Art. Nr. 110113 D
 BAHNHOF»BONNBONN«STATION GARE DE»BONN«STATION»BONN«Art. Nr. 110113 D Vor Beginn des Bastelns sollten Sie sich mit den Spritzlingen und der Anleitung vertraut machen. Sollte es einmal vorkommen, dass ein
Ersatzteilliste FRONTPACKER. Avant 45. mit Simplex 45 D FRONT PACKER. Avant 45 with Simplex roller 45 D. Avant 45 avec rouleau Simplex 45 D
 Ersatzteilliste PARTS LIST LISTE DES PIÈCES FRONTPACKER Avant 45 mit Simplex 45 D FRONT PACKER Avant 45 with Simplex roller 45 D Packer Frontal Avant 45 avec rouleau Simplex 45 D Inhaltsverzeichnis table
FOX-150/E... FOX-350/E Solar Laderegler
 FOX-150/E... FOX-350/E Solar Laderegler Solar Charge Regulator Einbauanleitung mounting guidelines Einbauanleitung Diese Anleitung ist eine Ergänzung zu folgenden Installationsanleitungen: D "FOX-150
Trekhaken Attelages Anhängevorrichtungen Tow bars. EEC APPROVAL N : e6*94/20*0488*00
 Trekhaken Attelages Anhängevorrichtungen Tow bars GDW Ref. 1156 EEC APPROVAL N : e6*94/20*0488*00 D= max kg max kg x + max kg max kg x 0,00981 5,65 kn s/ = 50 kg Max. = 900 kg GDW nv Hoogmolenwegel 23