IAN MULTI COOKER SMUK 1500 A1 APARAT PENTRU GĂTIT MULTIFUNCŢIONAL MULTI COOKER MULTIKOCHER. Instrucţiuni de utilizare. Operating instructions
|
|
|
- Miriam Heintze
- vor 6 Jahren
- Abrufe
Transkript

1 MULTI COOKER MULTI COOKER Operating instructions APARAT PENTRU GĂTIT MULTIFUNCŢIONAL Instrucţiuni de utilizare MULTIKOCHER Bedienungsanleitung IAN
2 Before reading, unfold the page containing the illustrations and familiarise yourself with all functions of the device. Înainte de a citi instrucţiunile, priviţi imaginile şi familiarizaţi-vă cu toate funcţiile aparatului. Klappen Sie vor dem Lesen die Seite mit den Abbildungen aus und machen Sie sich anschließend mit allen Funktionen des Gerätes vertraut. GB / CY Operating instructions Page 1 RO Instrucţiuni de utilizare Pagina 21 DE / AT / CH Bedienungsanleitung Seite 41


3 A B 6 x
4 Contents Introduction...2 Intended use...2 Package contents...2 Appliance description...2 Technical data...2 Safety guidelines...3 Information about this appliance...5 Before first use...5 Assembly and setting up...6 Operation...7 Temperature settings... 7 Keeping warm/slow cooking/boiling/roasting... 7 Fondue... 8 Steaming... 8 Sautéing/roasting... 9 Deep frying... 9 Cleaning and care...10 Storage...10 Troubleshooting...11 Warranty and service...12 Disposal...12 Importer...12 Recipes...13 GB CY 1
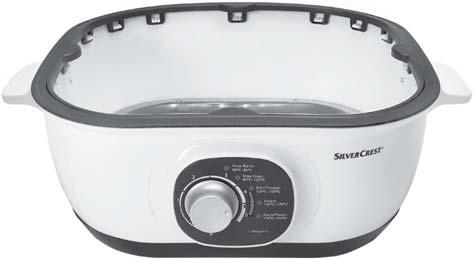
5 MULTI COOKER Introduction Congratulations on the purchase of your new appliance. You have selected a high-quality product. The operating instructions are part of this product. They contain important information on safety, usage and disposal. Before using the product, familiarise yourself with all handling and safety guidelines. Use the product only as described and for the range of applications specified. Upon cession of the product to any future owner(s) also hand over all documents. Intended use This appliance is intended exclusively for preparing food. This appliance is intended solely for use in private homes. Not to be used for commercial purposes. Package contents Multi Cooker (base) with inner bowl and lid Frying basket Steamer grill 6 fondue forks Skimmer Grab handle Operating instructions Appliance description Figure A: Lid Grab handle Frying basket hook Frying basket Inner bowl Base Indicator lamp Heat-up indicator lamp Temperature control Figure B: Steamer grill Skimmer Fondue forks Technical data Rated voltage: V ~, 50 Hz Max. power consumption: 1500 W All of the parts of this appliance that come into contact with food are food-safe. NOTE Check contents for completeness and damage immediately after unpacking. Contact Customer Services if necessary. 2 GB CY
6 Safety guidelines DANGER ELECTRIC SHOCK! Do not use the appliance outdoors. To prevent accidents, have defective plugs and/or power cables replaced immediately by a qualified specialist technician or our Customer Service department. Do not kink or crush the power cable. Keep the power cable well away from sources of heat. Never touch the power plug or the power cable with wet hands. Remove the inner bowl from the base before rinsing with water! Never immerse the appliance in water or any other liquid! WARNING! RISK OF INJURY! This appliance is not to be used by children under the age of 8. This appliance may be used by children aged 8 and above if they are under constant supervision. This appliance can be used by persons with limited physical, sensory or mental capabilities or lack of experience and knowledge if they have been given supervision or instruction concerning safe use of the appliance, and if they are aware of the potential risks. Cleaning and maintenance may not be carried out by children. Cooking appliances should be set up in a stable position using the grab handles to avoid spillage of hot liquids. Children must not use the appliance as a plaything. Children younger than 8 years of age must be kept away from the appliance and the power cable. To ensure that you can disconnect the appliance quickly in the event of an emergency, do not use extension cables. GB CY 3
7 WARNING! RISK OF INJURY! Do not operate the appliance if it has been dropped or is damaged in any way. Have the appliance checked and/or repaired by qualified technicians if necessary. Hot steam is given off during cooking, steaming, sautéing and frying, especially if you open the lid. Maintain a safe distance from the steam. Ensure that all parts are completely dry before pouring oil or liquid fat into the deep fat fryer. Otherwise, hot oil or fat could splatter out. Carefully pat all foodstuffs dry before placing them in the frying basket for deep frying. Otherwise, hot oil or fat could splatter out. Use the inner bowl exclusively with the base that is supplied with it! Ensure that all parts are completely dry before operating the appliance. Dry all parts properly after cleaning. Be especially careful with frozen foodstuffs. Remove all ice particles. The more ice there is on the foodstuff, the more the hot oil or fat will splatter. Some parts of the appliance become very hot during operation. Touching these may cause serious burns. Never pour liquids directly into the base! Always insert the inner bowl first. WARNING! RISK OF FIRE! Do not use the appliance near hot surfaces. Never leave the appliance unattended while it is being used. Do not use an external timing switch or a separate remote control system to operate the appliance. 4 GB CY
8 ATTENTION! MATERIAL DAMAGE! Do not place the appliance close to open flames or other sources of heat (heating, direct sunlight, gas stoves, etc.). Never place the appliance in a fitted cupboard, recesses or similar. Never fill th se appliance to above the MAX marking or to below the MIN marking. Ensure that enough liquid is in the appliance before switching it on. Be careful when using metallic, pointed or sharp objects to remove food from the appliance. These may damage the coating. Do not pare food in the inner bowl! This may damage the coating! Information about this appliance This appliance can be used for a number of purposes. This versatility and the various settings that are available, allow it to be used for: keeping warm, cooking, slow cooking, sautéing/roasting, steaming, deep frying and as a fondue. Before first use Take all the parts out of the box and remove the packaging material and any protective wrapping or stickers. Clean all components as described in the section "Cleaning and Care". Ensure that all parts are completely dry. Insert the inner bowl so that the 3 power contacts on the base connect with the sockets in the base. Press the inner bowl down carefully so that it sits firmly in the base. Insert the plug into a mains power socket. The indicator lamp and the heat-up indicator lamp light up. Set the temperature control to level 4. Wait 3 minutes. Turn the temperature control to level 0 again and then disconnect the power plug from the mains. Allow the appliance to cool down. NOTE The first time the appliance heats up, a small amount of smoke and odour may be generated due to production-related residue. This is normal and is completely harmless. Provide sufficient ventilation by opening a window, for example. GB CY 5
9 Assembly and setting up Place the appliance on a clean and level heatresistant surface. Insert the inner bowl so that the 3 power contacts on the base of the inner bowl connect with the sockets in the base. Press the inner bowl down carefully so that it sits firmly in the base. For steaming, insert the steamer grill into the inner bowl so that it hangs within the inner bowl : Loosen your grip on the pressed together rods of the handle so that the rods move apart and the holding pins project into the holes: For frying, you will need the frying basket and the handle : Press the rods of the handle together so that the holding pins can be inserted into the eyelets on the frying basket : The handle now sits firmly on the frying basket. Place the lid on the inner bowl. Insert the plug into a mains power socket. The indicator lamp lights up and the appliance heats up to the defined temperature level. Once the temperature level defined has been reached, open the lid and place the frying basket carefully onto the floor of the inner bowl. The rods on the grab handle are now positioned within the notches of the inner bowl. Now close the lid. NOTE If the lid is open, you can hang the frying basket on the rim of the inner bowl using the hook. For instance, if the fried food is ready and the excess fat is to be allowed to drain. 6 GB CY
10 Operation Temperature settings Temperature level 1 2 Cooking type Keep Warm (approx. 50 C - 80 C) Slow Cook (approx. 80 C C) Keeping warm/slow cooking/boiling/ roasting After you have assembled the appliance as described in the chapter "Assembly and setting up": 1) Set the temperature control to the required level (1, 2, 3 or 5). The heat-up indicator lamp lights up as soon as the desired temperature has been reached. 2) Place the food in the inner bowl. 3) Now close the lid. 4) When you no longer need to use the appliance, turn the temperature control to Boil/Fondue (approx. 120 C C) Steam (approx. 150 C C) Saute/Roast (approx. 170 C C) ATTENTION! MATERIAL DAMAGE! Use the supplied skimmer or another heatresistant plastic or wooden utensil to remove food from the appliance. Otherwise the coating of the insert could be damaged and the appliance will be usable. 5) Remove the plug from the mains power socket. Deep Fry (approx. 170 C) NOTE The figures in the table are only reference values. The temperature level can vary depending on the type and quantity of food being cooked. NOTE The indicator lamp lights up as soon as the power plug is connected to a mains power socket. The heat-up indicator lamp lights up as soon as the appliance has heated up to the set temperature level. However, the lamp may go out and on again at any time. This indicates that the set temperature has briefly fallen and the appliance is heating itself back up. GB CY 7
11 Fondue After you have assembled the appliance as described in the chapter "Assembly and setting up": 1) Add some oil or another fat suitable for fondue to the inner bowl. Add oil/fat to the inner bowl until the MAX marking is reached. Do not exceed the MAX marking! 2) Close the lid. 3) Set the temperature control to level 3. The heat-up indicator lamp lights up as soon as the desired temperature has been reached. 4) Remove the lid. 5) Skewer small pieces of meat onto the fondue forks and lower these carefully into the hot fat. 6) The pieces of meat will be ready in just a few minutes. Remove them from the fat. 7) Once you are finished using the fondue, turn the temperature to 0 and remove the plug from the mains power socket. NOTE After the oil or fat has cooled down (fat must still be warm enough that it is still liquid), pour it into suitable containers, for example, bottles. Use the pouring spout at the corner of the inner bowl. The disposal of cooking oils and fats is regulated differently in every community or town. Disposal of such oils or fats in normal domestic waste is often prohibited. Make enquiries at your local community administration office about suitable disposal sites. Steaming After you have assembled the appliance as described in the chapter "Assembly and setting up": 1) Add about 1 litre of water to the inner bowl. 1 litre of water is sufficient for about 30 minutes of steaming. If you wish to steam for a longer period, add more water accordingly. Pour a maximum of 2.5 litres of water into the appliance. Otherwise, the boiling water may spray onto the food from below. NOTE The MIN and MAX markings on the inner bowl only apply to fat/oil levels! They are not to be observed when adding water! The volume of water depends upon the duration for which you wish to steam. The longer the food needs to cook, the more water you will need to add. The more frequently the lid is raised during cooking, the longer the cooking duration. Hot steam escapes every time the lid is raised! You may then require more water as a portion of the steam escapes each time the lid is raised. If, during cooking, the water is used up, carefully lift the lid and add fresh water to the appliance. While re-adding water, ensure that it does not flow onto the food. After readding the water, it will take a while before the water is heated and steam re-forms. 2) Hang the steamer grill in the inner bowl as described in the chapter "Assembly and setting up". 3) Set the temperature control to level 4. 4) Wait until steam is perceptibly emitted. 5) Place the food onto the steamer grill. 6) Now close the lid. 8 GB CY
12 7) When the food is ready, use a pair of tongs or similar to remove it from the steamer grill. WARNING! RISK OF INJURY! The steamer grill is very hot! Be careful when handling the steamer grill. 8) Set the temperature control to 0. 9) Remove the plug from the mains power socket. NOTE When the appliance and remaining water have cooled down, pour out the water via the pouring runnel on the corner of the inner bowl. Sautéing/roasting After you have assembled the appliance as described in the chapter "Assembly and setting up": 1) Add some oil to the inner bowl. 2) Set the temperature control to level 5. The heat-up indicator lamp lights up as soon as the desired temperature has been reached. 3) Place the sautéed/roasted food in the inner bowl. 4) Turn the food occasionally and remove it as soon as it is ready. ATTENTION! MATERIAL DAMAGE! Use the supplied skimmer or another heatresistant plastic or wooden utensil to remove food from the inner bowl. Otherwise the coating of the inner bowl may be damaged and the appliance may become unusable. 5) When you have removed the sautéed/roasted food, turn the temperature controller to 0. 6) Remove the plug from the mains power socket. Deep frying After you have assembled the appliance as described in the chapter "Assembly and setting up": 1) Add some oil or another fat suitable for deepfat frying to the inner bowl. Add oil/fat to the inner bowl until the MAX marking is reached. Do not exceed the MAX marking! 2) Close the lid. 3) Set the temperature control to the level. The level is to be found between the numbers 4 and 5 on the temperature control. The heatup indicator lamp lights up as soon as the desired temperature has been reached. 4) Add the food that is to be deep-fried into the frying basket. Ensure that the food is as dry as possible and remove any excess ice particles. Do not fill the frying basket up to more than the MAX marking. Otherwise the food will not be cooked properly as it will not be properly immersed in the hot fat. 5) Remove the lid and lower the frying basket carefully into the hot fat. The rods on the grab handle are now positioned within the notches of the inner bowl. 6) Replace the lid. NOTE The grab handle remains attached to the frying basket during the frying process! WARNING! RISK OF INJURY! Fat can splash and cause burns if it comes into contact with wet food. Be careful when handling hot fat! 7) When the fried food is ready, remove the lid and lift the frying basket out of the hot fat. Using the hook, hang it on the rim of the inner bowl. This allows the excess fat to drain. GB CY 9
13 8) Once you are finished frying, turn the temperature to 0 and remove the plug from the mains power socket. TIPS After the oil or fat has cooled down (fat must still be warm enough that it is still liquid), pour it into suitable containers, for example, bottles. Use the pouring spout at the corner of the inner bowl. The disposal of cooking oils and fats is regulated differently in every community or town. Disposal of such oils or fats in the normal domestic waste is often prohibited. Make enquiries at your local community administration office about suitable disposal sites. NOTE You can also finish off deep-fried pastries without using the frying basket. Simply add the food to the hot fat in the inner bowl. Remove the cooked food from the inner bowl using the skimmer. Cleaning and care DANGER ELECTRIC SHOCK! Before cleaning the appliance, disconnect the plug from the mains power socket! Risk of electric shock! Never submerse the base in water or other fluids! WARNING! RISK OF INJURY! Always allow the appliance to cool down before cleaning it. Otherwise there is a risk of burns! ATTENTION! MATERIAL DAMAGE! Do not use abrasive or aggressive cleaning materials. These could damage the surface of the appliance! Clean the base with a moist cloth. For stubborn dirt use a mild detergent on the cloth. Ensure that the base is completely dry before operating it again. Rinse the inner bowl, the fondue forks, the skimmer, the frying basket, the steamer grill, the lid and the grab handle in warm water. Add a little mild detergent. Rinse all the parts off using clean water. After rinsing, dry all pieces thoroughly with a drying cloth. Ensure that all parts are dry before reusing. NOTE The frying basket, the lid, the skimmer and the fondue forks can also be washed in the dishwasher. Always ensure, however, that everything is completely dry before re-assembling and using the appliance. Storage Store the cleaned appliance in a clean, dust-free and dry location. 10 GB CY
14 Troubleshooting Fault Cause Solution The mains plug is not connected to the mains power. Insert the plug into a mains power socket. The appliance is not working. The mains power socket is defective. Use a different mains power socket. The appliance is defective. In this case, contact the ustomer Service. The food does not get hot. The wrong temperature level has been set. Select a higher temperature level. The wrong temperature level has been set. Select the temperature level 4. No steam is generated during cooking. The water is used up. Re-fill the appliance with water. The heat-up indicator lamp is illuminating and going out again frequently. This is not a defect. The appliance is maintaining the set temperature level. To do this, it has to heat up briefly every so often. This is not a defect. If the malfunction cannot be corrected with the above suggestions, or if you have found some other kind of malfunction, please contact our Customer Service. GB CY 11
15 Warranty and service You are provided a 3-year warranty on this device, valid from the date of purchase. This appliance has been manufactured with care and inspected meticulously prior to delivery. Please retain your receipt as proof of purchase. In the event of a warranty claim, please contact your Customer Service centre by telephone. This is the only way to guarantee free return of your goods. The warranty only covers claims for material and manufacturing defects, not for damage sustained during carriage, components subject to wear and tear or damage to fragile components such as switches or batteries. This appliance is intended solely for private use and not for commercial purposes. The warranty shall be deemed void in the case of misuse or improper handling, use of force and repairs or modifications which have not been carried out by one of our authorised Service centres. Your statutory rights are not restricted by this warranty. The warranty period is not prolonged by repairs effected under the warranty. This also applies to replaced and repaired components. Any damage and defects present at the time of purchase must be reported immediately after unpacking, but no later than 2 days after the date of purchase. Repairs effected after expiry of the warranty period shall be subject to charge. Disposal Under no circumstances should the appliance be disposed of in standard domestic waste. This product is subject to the provisions of European Directive 2012/19/EU. Dispose of the device via an approved waste disposal company or your municipal waste disposal facility. Please observe all currently applicable regulations. Please contact your local waste disposal facility if you are in any doubt. Importer The packaging is made from environmentally friendly material and can be disposed of at your local recycling unit. KOMPERNASS HANDELS GMBH BURGSTRASSE BOCHUM GERMANY Service Great Britain Tel.: ( 0.10/Min.) kompernass@lidl.co.uk IAN CY Service Cyprus Tel.: kompernass@lidl.com.cy IAN GB CY
16 Recipes NOTE These recipes are provided without guarantee. All ingredients and preparation information are guidelines. Enhance these recipe suggestions in line with your own experience. Chocolate fondue 150 g milk chocolate couverture 150 g plain chocolate couverture 300 ml condensed milk 1) Add the chocolate and the condensed milk to the inner bowl. 2) Set the temperature control to level 2. 3) Stir the ingredients until a smooth chocolate paste is formed. 4) Now set the temperature control to level 1. You can now dip fruit, nuts or marshmallows in the liquid chocolate. Cheese dip 120 g processed cheese 240 ml salsa (in jar/tin) 1 green pepper Pepper, salt, chilli powder 1) Wash and core the pepper. Cut it into small cubes. 2) Add all the ingredients to the inner bowl and close the lid. 3) Set the temperature control to level 2. 4) Simmer the ingredients for about minutes so that the cheese melts and stir the cheesy mix occasionally. 5) Season the dip to taste with the spices. 6) Then turn the temperature control down to 1 and serve the dip warm direct from the appliance. You can dip crisps, nachos or bread in the mix. Porridge 250 g porridge oats 600 ml milk 1 packets of vanilla sugar 1) Add all the ingredients to the inner bowl and close the lid. 2) Set the temperature control to level 2. 3) Simmer everything for about minutes, stirring the porridge occasionally. Prawns in cream sauce Approx g large prawns (cleaned) 2 large cloves of garlic (finely chopped) 150 ml cream 100 g butter 2 tbsp dry sherry or white wine Salt, pepper, chilli Possibly 3 tsp sauce thickener 1) Set the temperature control to level 3. 2) Add the butter and the chopped garlic to the inner bowl and wait until the butter has melted. 3) Then add the prawns. 4) Once the prawns have turned pink, add the sherry or white wine and cook everything for about one minute. 5) Add the cream and allow everything to simmer for a short while and add salt, chilli and pepper to taste. 6) If the cream sauce is too runny, you can add a little sauce thickener. GB CY 13
17 Semolina pudding 80 g semolina (durum wheat) 500 ml milk 100 ml cream 2 packets of vanilla sugar 1) Add all the ingredients to the inner bowl and close the lid. 2) Set the temperature control to level 2. 3) Simmer everything for around 10 minutes, stirring constantly. NOTE If you prefer your semolina pudding a little more runny, simply add a little more milk and simmer a little while longer. Garlic king prawns Approx. 10 raw king prawns (cleaned) 1 clove of garlic (finely chopped) A little olive oil 1) Add the olive oil to the inner bowl. 2) Set the temperature control to the level ) Once the appliance has heated up, add the finely chopped garlic and the king prawns. 4) Turn the prawns occasionally until they are cooked. The prawns taste especially good eaten with a piece of fresh bread. Scrambled eggs with spinach 350 g spinach leaves 1/4 cup of finely chopped onion 2 tbsp olive oil 200 ml cream 5 eggs Salt and pepper 1) Set the temperature control to level 3. 2) Finely chop the spinach. 3) Add the olive oil to the inner bowl and fry the onions until they are soft. 4) Add the spinach and stir everything while adding the cream for about 5 7 minutes. The spinach should then be soft. 5) Beat the eggs into a foamy consistency and add them while stirring constantly. 6) Keep stirring until the egg mix hardens (approx. 4 5 minutes). 7) Add salt and pepper to taste. Amaretto apple sauce 5 apples 10 tbsp Amaretto 2 tbsp sugar 1 tsp. cinnamon 1 packets of vanilla sugar 1) Peel and core the apples. 2) Chop the apples into small pieces. 3) Set the temperature control to level 3. 4) Add apple pieces and other ingredients to the inner bowl and close the lid. 5) Stir the apple sauce occasionally. 6) Wait for minutes. If the apple pieces have not disintegrated, you can mash them into a paste using a potato masher or similar. 14 GB CY
18 Asparagus and artichoke salad 2 bunches of asparagus 1 tin of artichoke hearts, approx 450 ml in water 3 peppers 3 onions Balsamic vinegar 1) Set the temperature control to level 4. 2) Add water for steaming to the inner bowl. 3) Insert the steamer grill in the inner bowl and lay the peeled asparagus on it. 4) Close the lid. 5) After about minutes, depending on the thickness of the asparagus, the asparagus will be cooked. 6) Drain the artichoke hearts and chop each one into 4 pieces. 7) Finely chop the peppers and onions. 8) Cut the asparagus into small pieces and let it cool down. 9) Mix everything in a bowl and add a little balsamic vinegar. Spicy dip 1 chilli pepper 1/2 bell pepper 1 clove of garlic 1 jar tomato sauce (approx. 250 g) 1 tbsp cooking oil 1/2 tsp chilli powder 1 pinch of paprika powder, spicy 1/2 tsp pepper, roughly ground 1) Peel the garlic and cut it into slices. 2) Add the oil to the inner bowl and set the temperature control to level 4. 3) Fry the garlic for a short time. 4) Core the chilli and the bell pepper and cut them into thin strips. 5) Add the chilli and the bell pepper to the inner bowl and stew these for a little while. 6) Add the tomato sauce and allow the dip to cook for a little while. 7) Season the dip to taste with the spices. You can dip crisps, nachos or bread in the mix. GB CY 15
19 Steamed salmon Approx. 500 g salmon fillet Approx. 470 g rice 400 ml water 400 ml chicken stock 225 g peas (frozen) 1/4 cup of almond slivers A little butter 1) Add the chicken stock, water, peas, rice and almond slivers to the inner bowl. 2) Now close the lid. 3) Set the temperature control to level 3 and wait 5 minutes. 4) Open the lid, insert the steamer grill into the inner bowl and place the salmon fillets onto it. Deep-frozen salmon fillets should be allowed to thaw prior to cooking. Dab each salmon fillet with a knob of butter. 5) Close the lid and let the whole thing cook for around 10 minutes at level 3. NOTE The cooking time of the rice can vary depending on personal preference: If you like your rice extremely soft, increase the cooking time somewhat. If so, add a little more water to prevent the rice from sticking to the bottom of the inner bowl. If you prefer harder rice, reduce the cooking time a little. However, if you do this the quantity of water must be reduced, otherwise liquid will be left inside the inner bowl. 6) Set the temperature control to level 2 and wait another 5 minutes. 7) Then turn the temperature control to 0 and switch off the appliance. 8) Open the lid, carefully remove the salmon fillets from the steamer grill and place to one side. Stir the rice once and allow it to simmer for approx. 5 minutes with the lid closed. 9) You can now serve the salmon with the rice. Fried potatoes 5 potatoes 2 onions Salt and pepper Olive oil 1) Peel the potatoes and cut them into thin slices. 2) Peel the onions and dice them. 3) Add a thin layer of olive oil to the inner bowl. 4) Set the temperature control to level 5 and wait until the appliance has heated up. 5) Then add the potato slices and onions and fry them until they are golden brown. Turn the potato slices occasionally. 6) Season the fried potatoes with salt and pepper. Barbecued ribs g ribs (spare ribs) 1 bottle of barbecue sauce 1 packet of onion soup 1 medium-sized onion 100 ml tomato sauce 1 1/2 cups of water 2 potatoes 1) Clean the ribs and remove the fat. 2) Peel the potatoes and onions and dice them. 16 GB CY
20 3) Set the temperature control to level 4 and wait until the appliance has heated up. 4) Mix the onion soup with the water. 5) Add the onion, barbecue sauce and the onion soup to the inner bowl and stir the mixture. 6) Then add the ribs and potatoes. 7) Braise everything for about hours (depending on the thickness of the ribs). 8) Afterwards, set the temperature control to level 2 3 and simmer everything for about 2 hours. Sandwiches 2 slices of bread (or hamburger bap) Corned beef Cheese (e.g. cheddar) Drained sauerkraut Mayonnaise/remoulade Butter 1) Set the temperature control to level 5 and wait until the appliance has heated up. 2) Butter the bread and fry it in the inner bowl. 3) Remove the bread from the inner bowl and place the corned beef, sauerkraut, mayonnaise/ remoulade and cheese on it. 4) Hang the steamer grill in the appliance. 5) Lay the bread and ingredients on the steamer grill close the lid. 6) Wait until the cheese has melted. Chilli con carne 800 g minced meat (half beef, half pork) 2 onions 2 tins of tomato pieces (approx. 800 ml) 2 peppers 1 tbsp ground chilli 5 chilli peppers 1 tsp caraway, ground 1 tin of kidney beans 1 tin of sweetcorn 1) Set the temperature control to level 5 and wait until the appliance has heated up. 2) Place the mince in the inner bowl and brown. 3) Wash, core and slice the peppers and the chillies. 4) Chop the onions into small pieces. 5) Drain the beans and the sweetcorn. Wash the beans and sweetcorn under clear running water. 6) Add all the ingredients into the inner bowl. 7) Set the temperature control to level ) Close the lid and allow everything to simmer for about 2-3 hours so that the beans are soft. GB CY 17
21 Cranberry turkey Approx. 660 g turkey breast Approx. 500 ml stock (turkey stock) 375 g cranberries 1) Skin the turkey breasts. 2) Set the temperature control to level 5 and wait until the appliance has heated up. 3) Sear the meat on both sides. 4) Add the remaining ingredients and close the lid. 5) Set the temperature control to level 3. 6) Leave the meat to simmer for 3 hours. 7) To serve, cut the meat into strips and garnish with the sauce. Braised beef Approx g beef without bones 1 packet of onion soup 300 ml water Approx. 800 ml peeled tomatoes (tinned) 2 large carrots 3 potatoes Salt, pepper 1) Set the temperature control to level 5 and wait until the appliance has heated up. 2) Sear the meat in the inner bowl. 3) Mix the onion soup with the water. 4) Add the onion soup and the tomatoes to the meat in the inner bowl. 5) Bring the mixture to the boil ad then set the temperature control to level 3. 6) Close the lid and leave everything to simmer for around 1 1/2 hours. Turn the meat occasionally. NOTE If, during this process, the liquid in the inner bowl gets used up, add a little water. 7) Peel the carrots and potatoes and cut them into strips. 8) After 1 1/2 hours, add the potatoes and carrots and simmer for a further 40 minutes until the meat and the vegetables are soft. 18 GB CY
22 Onion rings 3 large yellow onions 2 cups of beer (room temperature) 1 1/2 cups of flour Salt and pepper Cooking oil 1) Mix the flour and beer in a bowl and leave it to stand for 3 hours covered at room temperature. 2) Add oil (suitable for frying) to the inner bowl and set the temperature control to the level. Wait until the appliance has heated up. 3) Cut the onions into slices around 1/2 cm thick and separate out the rings. 4) Dip the onion rings into the flour-beer dough and then lower them carefully into the hot fat. Use heat-resistant tongs for this. NOTE Do not use the frying basket to lower the onion rings into the fat. The dough will stick to the basket and then tear off when you remove the onion rings. 5) Fry the onion rings for about 2 minutes. During this time, turn the onion rings once so that they acquire an even brown colour. Chicken fillet Chicken fillet 3 cups of flour 2 tbsp ground paprika 2 eggs 1 cup of milk Salt and pepper Cooking oil 1) Whisk together the eggs, the milk and the water. 2) Add oil (suitable for frying) to the inner bowl and set the temperature control to the level. Wait until the appliance has heated up. 3) Roll the chicken fillet in the flour and the egg mixture and then in the flour again. 4) Add the coated chicken fillet to the frying basket and then carefully lower the frying basket into the hot oil and fry the chicken fillet for about 3-5 minutes. 5) Then turn the temperature control down to level 4 and leave the chicken in the fat for about minutes with the lid closed. Turn the chicken fillet occasionally. 6) After 20 minutes, set the temperature control back up to level and wait 4 5 minutes. 7) Remove the chicken fillet carefully from the hot oil and allow it to drain. GB CY 19
23 Chips Approx. 4 potatoes Salt Cooking oil 1) Peel the potatoes. 2) Cut the potatoes into narrow strips (chips). 3) Add oil (suitable for frying) to the inner bowl and set the temperature control to the level. Wait until the appliance has heated up. 4) Add the chips to the frying basket. 5) Lower the frying basket carefully into the hot oil and fry the chips for around minutes. 6) Lift the frying basket carefully out of the hot oil and hang it on the rim to allow any excess fat to drain. 20 GB CY
24 Cuprins Introducere...22 Utilizarea conform destinaţiei...22 Furnitura...22 Descrierea aparatului...22 Date tehnice...22 Indicaţii de siguranţă...23 Informaţii privind aparatul...25 Înainte de prima utilizare...25 Asamblarea şi instalarea...26 Utilizarea...27 Reglajele de temperatură...27 Păstrarea la cald/înăbuşirea/fierberea/prăjirea...27 Fondue...28 Gătirea la aburi...28 Prăjirea...29 Prăjirea în baie de ulei...29 Curăţarea şi îngrijirea...30 Depozitarea...30 Remedierea defecţiunilor Garanţia şi service-ul...32 Eliminarea...32 Importator...32 Reţete RO 21
25 APARAT PENTRU GĂTIT MULTI- FUNCŢIONAL Introducere Felicitări pentru cumpărarea noului dvs. aparat. Aţi decis să alegeţi un produs de calitate superioară. Instrucţiunile de utilizare fac parte integrantă din acest produs. Acestea cuprind informaţii importante privind siguranţa, utilizarea şi eliminarea. Înainte de utilizarea produsului familiarizaţi-vă cu toate indicaţiile privind utilizarea şi siguranţa. Utilizaţi produsul numai în modul descris şi numai în scopurile menţionate. În cazul transmiterii produsului unei alte persoane, predaţi-i toate documentele aferente acestuia. Utilizarea conform destinaţiei Acest aparat este destinat exclusiv preparării de alimente. Acest aparat este destinat exclusiv uzului casnic. Nu îl utilizaţi în scopuri comerciale. Furnitura Aparat de gătit multifuncţional (bază) cu recipient interior şi capac Coş de prăjire Grătar pentru gătirea la aburi 6 furculiţe pentru fondue Spumieră Mâner Instrucţiuni de utilizare Descrierea aparatului Figura A: Capac Mâner Cârlig coş de prăjire Coş de prăjire Recipient interior Bază Becul de control al funcţionării Bec de control pentru încălzire Regulator de temperatură Figura B: Grătar pentru gătirea la aburi Spumieră Furculiţe pentru fondue Date tehnice Tensiune nominală: consum max.: V ~, 50 Hz 1500 W Toate componentele acestui aparat care intră în contact cu alimentele, sunt adecvate pentru uz alimentar. INDICAŢIE Imediat după dezambalare verificaţi dacă furnitura este completă şi nu prezintă deteriorări. Dacă este cazul, adresaţi-vă centrului de service. 22 RO
26 Indicaţii de siguranţă PERICOL DE ELECTROCUTARE! Nu utilizaţi aparatul în aer liber. Pentru a evita pericolele, solicitaţi imediat înlocuirea de către personalul de specialitate autorizat sau de către serviciul clienţi a ştecărelor sau a cablurilor de alimentare deteriorate. Nu îndoiţi şi nu striviţi cablul de alimentare. Ţineţi cablul de alimentare departe de sursele de căldură. Nu puneţi niciodată mâinile ude pe ştecăr sau pe cablul de alimentare. Scoateţi mai întâi recipientul interior din bază înainte de a-l curăţa în apă! Nu introduceţi niciodată aparatul în apă sau în alte lichide! AVERTIZARE! PERICOL DE RĂNIRE! Nu este permisă utilizarea acestui aparat de către copii cu vârsta între 0 şi 8 ani. Acest aparat poate fi utilizat de copii începând cu vârsta de 8 ani cu condiţia ca aceştia să fie supravegheaţi permanent. Acest aparat poate fi utilizat de persoane cu abilităţi fizice, senzoriale sau mentale reduse sau fără experienţă şi/sau fără cunoştinţe necesare, dacă sunt supravegheate sau dacă au fost instruite cu privire la utilizarea sigură a acestui aparat şi au înţeles pericolele cu privire la acesta. Curăţarea şi acţiunile de întreţinere destinate utilizatorului nu se vor efectua de către copii. Aparatele de gătit trebuie aşezate într-o poziţie stabilă, cu ajutorul mânerelor, pentru a evita vărsarea lichidului fierbinte. Copiilor le este interzis să se joace cu aparatul. Copiii cu vârsta sub 8 ani nu trebuie să se afle în apropierea aparatului şi a cablului de conexiune. Nu utilizaţi niciun cablu prelungitor, în caz de pericol ştecărul trebuie să fie uşor accesibil. RO 23
27 AVERTIZARE! PERICOL DE RĂNIRE! Nu mai utilizaţi aparatul dacă a căzut pe jos sau dacă este deteriorat. În aceste cazuri, aparatul trebuie verificat, respectiv reparat de către un specialist calificat. În timpul procesului de fierbere/gătire la aburi/prăjire sau prăjire în baie de ulei sunt eliberaţi aburi fierbinţi, în special când deschideţi capacul. Păstraţi o distanţă de siguranţă faţă de aburi. Înainte de a turna ulei sau grăsime lichidă în friteuză, asiguraţi-vă că toate părţile componente sunt complet uscate. În caz contrar, uleiul cald sau grăsimea fierbinte vă poate stropi. Ştergeţi de apă cu grijă toate alimentele înainte de a le introduce în coşul de prăjire pentru a fi prăjite în baie de ulei. În caz contrar, uleiul cald sau grăsimea fierbinte vă poate stropi. Utilizaţi recipientul interior exclusiv cu baza furnizată! Înainte de a pune aparatul în funcţiune, asiguraţi-vă că toate piesele s-au uscat complet. După curăţare uscaţi bine toate componentele! Procedaţi cu atenţie în special cu alimentele congelate. Îndepărtaţi toate bucăţile de gheaţă. Cu cât mai multă gheaţă se află pe alimente, cu atât cantitatea de ulei sau grăsime fierbinte împroşcată este mai mare. Componentele aparatului se încălzesc în timpul utilizării. Nu atingeţi aceste componente pentru a evita arsurile. Nu adăugaţi lichide niciodată direct în bază! Mai întâi introduceţi întotdeauna recipientul interior. AVERTIZARE! PERICOL DE INCENDIU! Nu utilizaţi aparatul în apropierea suprafeţelor fierbinţi. În timpul funcţionării nu lăsaţi aparatul nesupravegheat. Nu utilizaţi temporizatoare externe sau sisteme separate de comandă de la distanţă pentru operarea aparatului. 24 RO
28 ATENŢIE! PAGUBE MATERIALE! Nu amplasaţi aparatul în apropierea flăcărilor deschise sau a altor surse de căldură (calorifer, radiaţia solară directă, cuptoare pe gaz etc.). În niciun caz nu amplasaţi aparatul într-un dulap încorporat, nişe etc. Nu turnaţi în aparat niciodată mai mult lichid decât până la marcajul MAX şi nici mai puţin decât până la marcajul MIN. Înainte de fiecare pornire asiguraţi-vă că în aparat există o cantitate suficientă de lichid. Aveţi grijă când utilizaţi obiecte metalice, ascuţite sau tăioase pentru a scoate alimentele din aparat. Acestea pot deteriora învelişul! Nu tăiaţi alimente în recipientul interior! Astfel se poate deteriora învelişul! Informaţii privind aparatul Acest aparat poate fi utilizat multilateral. Datorită accesoriilor variabile şi diferitelor posibilităţi de reglare, aparatul poate fi utilizat în vederea: păstrării la cald, fierberii, înăbuşirii, prăjirii, gătirii la aburi, prăjirii în baie de ulei şi ca fondue. Înainte de prima utilizare Scoateţi toate componentele din cutie şi îndepărtaţi ambalajul, eventualele folii de protecţie şi autocolantele. Curăţaţi toate componentele în modul descris în capitolul Curăţarea şi îngrijirea. Asiguraţi-vă că toate componentele sunt complet uscate. Introduceţi recipientul interior, astfel încât cei 3 conectori de pe partea inferioară să pătrundă în mufa din bază. Apăsaţi cu grijă în jos recipientul interior, astfel încât acesta să se afle complet în bază. Introduceţi ştecărul în priză. Becul de control al funcţionării şi becul de control pentru încălzire luminează. Poziţionaţi regulatorul de temperatură pe treapta 4. Aşteptaţi 3 minute. Rotiţi regulatorul de temperatură din nou pe treapta 0 şi apoi scoateţi ştecărul din priză. Lăsaţi aparatul să se răcească. INDICAŢIE La prima încălzire a aparatului se pot degaja uşoare mirosuri şi fum din cauza resturilor rămase din fabricaţie. Acest lucru este absolut normal şi inofensiv. Asiguraţi aerisirea suficientă a încăperii, de exemplu prin deschiderea unei ferestre. RO 25
29 Asamblarea şi instalarea Aşezaţi aparatul pe o suprafaţă termorezistentă, curată şi plană. Introduceţi recipientul interior, astfel încât cei 3 conectori de pe partea inferioară a recipientului interior să pătrundă în mufa din bază. Apăsaţi cu grijă în jos recipientul interior, astfel încât acesta să se afle complet în bază. Pentru gătirea la aburi introduceţi grătarul pentru gătirea la aburi în recipientul interior, astfel încât acesta să stea suspendat în recipientul interior : Apoi eliberaţi barele apăsate ale mânerului, astfel încât bolţurile de prindere să pătrundă în orificii: Pentru prăjirea în baie de ulei aveţi nevoie de coşul de prăjire şi de mâner : Apăsaţi barele mânerului, astfel încât bolţurile de prindere să poată intra din interior în verigile de la coşul de prăjire : Acum mânerul este fixat la coşul de prăjire. Ataşaţi capacul pe recipientul interior. Introduceţi ştecărul în priză. Becul de control al funcţionării luminează, iar aparatul încălzeşte la treapta de temperatură setată. Dacă s-a atins temperatura setată, deschideţi capacul şi aşezaţi cu grijă coşul de prăjire pe baza recipientului interior. Barele mânerului se află în decupajele recipientului interior. Închideţi capacul. INDICAŢIE Puteţi agăţa coşul de prăjire cu capacul deschis cu ajutorul cârligului pe marginea recipientului interior. De exemplu, atunci când produsul pe care doriţi să-l preparaţi este gata şi când grăsimea excesivă trebuie să se scurgă. 26 RO
30 Utilizarea Reglajele de temperatură Treapta de temperatură Tipul de preparare Păstrarea la cald Keep Warm (cca C) Fierberea lentă (înăbuşirea) Slow Cook (cca C) Fierberea/fondue Boil/Fondue (cca C) Gătirea la aburi Steam (cca C) Prăjirea Saute/Roast (cca C) Prăjirea în baie de ulei Deep Fry (cca 170 C) Păstrarea la cald/înăbuşirea/fierberea/prăjirea După ce aţi pregătit aparatul conform descrierii din capitolul Asamblarea şi instalarea : 1) Setaţi regulatorul de temperatură la treapta dorită (1, 2, 3 sau 5). Imediat ce temperatura setată este atinsă, becul de control pentru încălzire se aprinde. 2) Adăugaţi alimentele în recipientul interior. 3) Închideţi capacul. 4) Dacă nu mai utilizaţi aparatul, rotiţi regulatorul de temperatură la 0. ATENŢIE! PAGUBE MATERIALE! Utilizaţi numai spumiera furnizată sau alt tacâm termorezistent din plastic sau lemn pentru a scoate alimentele din aparat. În caz contrar, se poate deteriora învelişul accesoriului şi aparatul poate deveni inutilizabil. 5) Scoateţi ştecărul din priză. INDICAŢIE Indicaţiile din tabel reprezintă numai valori orientative. Treapta de temperatură poate varia în funcţie de tipul şi de cantitatea alimentului. INDICAŢIE Becul de control al funcţionării luminează imediat ce este conectat ştecărul la o priză. Becul de control pentru încălzire luminează imediat ce aparatul este încălzit la treapta de temperatură setată. Totuşi, becul se poate aprinde şi stinge din nou. Aceasta înseamnă că pentru scurt timp temperatura a scăzut sub valoarea setată şi că aparatul a încălzit din nou. RO 27
31 Fondue După ce aţi pregătit aparatul conform descrierii din capitolul Asamblarea şi instalarea : 1) Adăugaţi în recipientul interior ulei sau alt fel de grăsime potrivită pentru fondue. Adăugaţi ulei/grăsime în recipientul interior până când se ajunge la marcajul MAX. Nu depăşiţi însă marcajul MAX! 2) Închideţi capacul. 3) Setaţi regulatorul de temperatură pe treapta 3. Imediat ce temperatura setată este atinsă, becul de control pentru încălzire se aprinde. 4) Ridicaţi capacul. 5) Străpungeţi mici bucăţi de carne cu furculiţele pentru fondue şi aşezaţi-le cu grijă în grăsimea fierbinte. 6) După câteva minute bucăţile de carne sunt gata. Scoateţi-le din grăsime. 7) Dacă nu mai aveţi nevoie de fondue, setaţi regulatorul de temperatură la 0 şi scoateţi ştecărul din priză. INDICAŢIE După răcire turnaţi uleiul sau grăsimea (grăsimea trebuie să fie încă fluidă) în recipiente adecvate, de exemplu în sticle. Folosiţi în acest scop gura de turnare din colţul recipientului interior. În fiecare localitate sau oraş, modul de eliminare a uleiurilor sau grăsimilor alimentare este reglementat diferit. Adesea este interzisă eliminarea acestor tipuri de uleiuri sau grăsimi în gunoiul menajer obişnuit. Solicitaţi informaţii despre posibilităţile de eliminare de la administraţia locală. Gătirea la aburi După ce aţi pregătit aparatul conform descrierii din capitolul Asamblarea şi instalarea : 1) Turnaţi cca 1 litru de apă în recipientul interior. 1 litru de apă este suficient pentru cca 30 de minute de gătire la aburi. Dacă doriţi să gătiţi la aburi mai mult timp, adăugaţi în mod corespunzător mai multă apă. Turnaţi maximum 2,5 litri de apă în aparat. În caz contrar, se poate întâmpla ca apa clocotită să sară de jos pe preparat. INDICAŢIE Marcajul MIN şi MAX din recipientul interior sunt relevante numai pentru umplerea cu grăsime/ulei! Acestea nu trebuie respectate în cazul umplerii cu apă! Cantitatea de apă depinde de timpul în care doriţi să gătiţi la aburi preparatul. Cu cât preparatul necesită mai mult timp pentru a fi gătit la aburi, cu atât mai multă apă trebuie completată. Cu cât este ridicat mai des capacul pe durata gătirii, cu atât va fi mai lung timpul de gătire. La fiecare ridicare se emană abur fierbinte! Eventual, ulterior veţi avea nevoie de mai multă apă, deoarece o parte din abur este emanată la fiecare ridicare a capacului! Dacă se termină apa în timpul procesului de gătire, ridicaţi cu grijă capacul şi turnaţi din nou apă în aparat. Aveţi grijă ca la completare să nu se toarne apă peste preparat. După completare durează puţin până când apa este încălzită şi este generat din nou abur. 2) Suspendaţi grătarul pentru gătirea la aburi în recipientul interior conform descrierii din capitolul Asamblarea şi instalarea. 3) Setaţi regulatorul de temperatură pe treapta 4. 4) Aşteptaţi până când se ridică în mod vizibil aburul. 5) Aşezaţi alimentele pe grătarul pentru gătirea la aburi. 6) Închideţi capacul. 28 RO
32 7) Dacă preparatul este gata, scoateţi-l cu ajutorul unui cleşte etc. de pe grătarul pentru gătirea la aburi. AVERTIZARE! PERICOL DE RĂNIRE! Grătarul pentru gătirea la aburi este foarte fierbinte! Procedaţi cu atenţie când folosiţi grătarul pentru gătirea la aburi. 8) Setaţi regulatorul de temperatură la 0. 9) Scoateţi ştecărul din priză. INDICAŢIE Dacă aparatul şi restul de apă sunt reci, eliminaţi apa cu ajutorul gurii de turnare de la colţul recipientului interior. Prăjirea După ce aţi pregătit aparatul conform descrierii din capitolul Asamblarea şi instalarea : 1) Adăugaţi puţin ulei în recipientul interior. 2) Setaţi regulatorul de temperatură pe treapta 5. Becul de control pentru încălzire luminează la atingerea temperaturii setate. 3) Adăugaţi apoi produsul de prăjit în recipientul interior. 4) Pe parcurs întoarceţi produsul de prăjit şi scoateţi-l atunci când este gata. ATENŢIE! PAGUBE MATERIALE! Utilizaţi numai spumiera furnizată sau alt tacâm termorezistent din plastic sau lemn pentru a scoate alimentele din recipientul interior. În caz contrar, se poate deteriora învelişul recipientului interior şi aparatul poate deveni inutilizabil. 5) După scoaterea preparatului rotiţi regulatorul de temperatură la 0. 6) Scoateţi ştecărul din priză. Prăjirea în baie de ulei După ce aţi pregătit aparatul conform descrierii din capitolul Asamblarea şi instalarea : 1) Adăugaţi în recipientul interior ulei sau alt fel de grăsime potrivită pentru friteuze. Adăugaţi ulei/grăsime în recipientul interior până când se ajunge la marcajul MAX. Nu depăşiţi însă marcajul MAX! 2) Închideţi capacul. 3) Setaţi regulatorul de temperatură pe treapta. Treapta se află între cifrele 4 şi 5 pe regulatorul de temperatură. Becul de control pentru încălzire luminează la atingerea temperaturii setate. 4) Aşezaţi alimentele de prăjit în coşul de prăjire. Aveţi grijă ca pe alimente să se afle cât mai puţină apă sau gheaţă posibil. Nu umpleţi niciodată mai mult decât până la marcajul MAX de pe coşul de prăjire. În caz contrar, alimentele nu se gătesc, deoarece acestea nu sunt înconjurate de grăsime fierbinte. 5) Ridicaţi capacul şi lăsaţi cu atenţie coşul de prăjire în grăsimea fierbinte. Barele mânerului se află în decupajele recipientului interior. 6) Aşezaţi capacul. INDICAŢIE Mânerul rămâne conectat la coşul de prăjire şi în timpul procesului de prăjire! AVERTIZARE! PERICOL DE RĂNIRE! Grăsimea poate sări şi conduce la arsuri dacă intră în contact cu alimente umede! Manevraţi grăsimea fierbinte cu atenţie! 7) Când preparatul este gata, ridicaţi capacul şi scoateţi cu atenţie coşul de prăjire din grăsimea fierbinte. Agăţaţi-l cu ajutorul cârligului pe marginea recipientului interior. Astfel se poate scurge grăsimea în exces. RO 29
33 8) După terminarea prăjirii în baie de ulei, setaţi regulatorul de temperatură la 0 şi scoateţi ştecărul din priză. INDICAŢII După răcire turnaţi uleiul sau grăsimea (grăsimea trebuie să fie încă fluidă) în recipiente adecvate, de exemplu în sticle. Folosiţi în acest scop gura de turnare din colţul recipientului interior. În fiecare localitate sau oraş, modul de eliminare a uleiurilor sau grăsimilor alimentare este reglementat diferit. Adesea este interzisă eliminarea acestor tipuri de uleiuri sau grăsimi în gunoiul menajer obişnuit. Solicitaţi informaţii despre posibilităţile de eliminare de la administraţia locală. INDICAŢIE Puteţi prăji alimentele în grăsime şi fără coşul de prăjire. Introduceţi pur şi simplu alimentele în grăsimea fierbinte din recipientul interior. Scoateţi alimentele gata cu ajutorul spumierei din recipientul interior. Curăţarea şi îngrijirea PERICOL DE ELECTROCUTARE! Înainte de fiecare curăţare, scoateţi ştecărul din priză! Pericol de electrocutare! Nu introduceţi niciodată baza în apă sau în alte lichide! AVERTIZARE! PERICOL DE RĂNIRE! Înainte de a-l curăţa, aşteptaţi până când aparatul s-a răcit. În caz contrar, există pericol de arsuri! ATENŢIE! PAGUBE MATERIALE! Nu utilizaţi substanţe de curăţare abrazive sau agresive. Acestea pot deteriora suprafaţa aparatului! Curăţaţi baza cu o lavetă umedă. În cazul depunerilor persistente de murdărie aplicaţi un detergent delicat pe lavetă. Asiguraţi-vă că baza este complet uscată înaintea repunerii acesteia în funcţiune. Curăţaţi în apă caldă recipientul interior, furculiţele pentru fondue, spumiera, coşul de prăjire, grătarul pentru gătire la aburi, capacul şi mânerul. Adăugaţi un detergent delicat. Clătiţi toate componentele cu apă curată. Ştergeţi bine după spălare toate componentele cu ajutorul unei lavete uscate. Înaintea reutilizării asiguraţi-vă ca toate componentele să fie uscate. INDICAŢIE Coşul de prăjire, capacul, spumiera şi furculiţele pentru fondue pot fi curăţate şi în maşina de spălat vase. Cu toate acestea asiguraţi-vă că totul este din nou complet uscat, înainte de a asambla şi reutiliza aparatul. Depozitarea Păstraţi aparatul curăţat într-un loc curat, lipsit de praf şi uscat. 30 RO
p^db=`oj===pìééçêíáåñçêã~íáçå=
 p^db=`oj===pìééçêíáåñçêã~íáçå= Error: "Could not connect to the SQL Server Instance" or "Failed to open a connection to the database." When you attempt to launch ACT! by Sage or ACT by Sage Premium for
Ingenics Project Portal
 Version: 00; Status: E Seite: 1/6 This document is drawn to show the functions of the project portal developed by Ingenics AG. To use the portal enter the following URL in your Browser: https://projectportal.ingenics.de
RS232-Verbindung, RXU10 Herstellen einer RS232-Verbindung zwischen PC und Messgerät oder Modem und Messgerät
 Betriebsanleitung RS232-Verbindung, RXU10 Herstellen einer RS232-Verbindung zwischen PC und Messgerät oder Modem und Messgerät ä 2 Operating Instructions RS232 Connection, RXU10 Setting up an RS232 connection
1. General information... 2 2. Login... 2 3. Home... 3 4. Current applications... 3
 User Manual for Marketing Authorisation and Lifecycle Management of Medicines Inhalt: User Manual for Marketing Authorisation and Lifecycle Management of Medicines... 1 1. General information... 2 2. Login...
Parameter-Updatesoftware PF-12 Plus
 Parameter-Updatesoftware PF-12 Plus Mai / May 2015 Inhalt 1. Durchführung des Parameter-Updates... 2 2. Kontakt... 6 Content 1. Performance of the parameter-update... 4 2. Contact... 6 1. Durchführung
Cable Tester NS-468. Safety instructions
 Cable Tester NS-468 Safety instructions Do not use the cable tester NS-468 if it is damaged. This device is only for use inside dry and clean rooms. This device must be protected from moisture, splash
CABLE TESTER. Manual DN-14003
 CABLE TESTER Manual DN-14003 Note: Please read and learn safety instructions before use or maintain the equipment This cable tester can t test any electrified product. 9V reduplicated battery is used in
FLEX LIGHT. D Bedienungsanleitung
 FLEX LIGHT D Bedienungsanleitung GB INSTRUCTION Manual 3x Micro AAA 9 7 8 2 3 4 1 5 2 6 D Bedienungsanleitung FlexLight Beschreibung Multifunktionale Buch-/Laptop-Leuchte mit LED-Technologie (4). Das
p^db=`oj===pìééçêíáåñçêã~íáçå=
 p^db=`oj===pìééçêíáåñçêã~íáçå= How to Disable User Account Control (UAC) in Windows Vista You are attempting to install or uninstall ACT! when Windows does not allow you access to needed files or folders.
Bedienungsanleitung Ferngesteuerter GT-Rennwagen McTrack Challange
 Bedienungsanleitung Ferngesteuerter GT-Rennwagen McTrack Challange Einführung Geehrter Kunde, wir möchten Ihnen zum Erwerb Ihres neuen GT-Rennwagen gratulieren! Mit dieser Wahl haben Sie sich für ein Produkt
Titelbild1 ANSYS. Customer Portal LogIn
 Titelbild1 ANSYS Customer Portal LogIn 1 Neuanmeldung Neuanmeldung: Bitte Not yet a member anklicken Adressen-Check Adressdaten eintragen Customer No. ist hier bereits erforderlich HERE - Button Hier nochmal
Directions. Trouble shooting
 Betriebsanleitung 1. Legen Sie die Uhr mit der Vorderwand auf den Tisch und öffnen Sie die Rückwand des Uhrengehäuses (A). 2. Entfernen Sie das Papier welches zwischen die Rückwand und Tonfeder geklemmt
Release Notes BRICKware 7.5.4. Copyright 23. March 2010 Funkwerk Enterprise Communications GmbH Version 1.0
 Release Notes BRICKware 7.5.4 Copyright 23. March 2010 Funkwerk Enterprise Communications GmbH Version 1.0 Purpose This document describes new features, changes, and solved problems of BRICKware 7.5.4.
Leister SYSTEM SINGLE PATCH MODULE SPM 01
 D GB Leister SYSTEM SINGLE PATCH MODULE SPM 01 Leister Process Technologies Galileo-Strasse 10 CH-05 Kaegiswil/Switzerland Tel. +41-41 4 4 Fax +41-41 4 1 www.leister.com sales@leister.com Einbauanleitung
Abteilung Internationales CampusCenter
 Abteilung Internationales CampusCenter Instructions for the STiNE Online Enrollment Application for Exchange Students 1. Please go to www.uni-hamburg.de/online-bewerbung and click on Bewerberaccount anlegen
KURZANLEITUNG. Firmware-Upgrade: Wie geht das eigentlich?
 KURZANLEITUNG Firmware-Upgrade: Wie geht das eigentlich? Die Firmware ist eine Software, die auf der IP-Kamera installiert ist und alle Funktionen des Gerätes steuert. Nach dem Firmware-Update stehen Ihnen
XV1100K(C)/XV1100SK(C)
/XV1100SK(C)") Lexware Financial Office Premium Handwerk XV1100K(C)/XV1100SK(C) All rights reserverd. Any reprinting or unauthorized use wihout the written permission of Lexware Financial Office Premium Handwerk Corporation,
Lexware Financial Office Premium Handwerk XV1100K(C)/XV1100SK(C) All rights reserverd. Any reprinting or unauthorized use wihout the written permission of Lexware Financial Office Premium Handwerk Corporation,
ONLINE LICENCE GENERATOR
 Index Introduction... 2 Change language of the User Interface... 3 Menubar... 4 Sold Software... 5 Explanations of the choices:... 5 Call of a licence:... 7 Last query step... 9 Call multiple licenses:...
How-To-Do. Hardware Configuration of the CC03 via SIMATIC Manager from Siemens
 How-To-Do Hardware Configuration of the CC03 via SIMATIC Manager from Siemens Content Hardware Configuration of the CC03 via SIMATIC Manager from Siemens... 1 1 General... 2 1.1 Information... 2 1.2 Reference...
How to access licensed products from providers who are already operating productively in. General Information... 2. Shibboleth login...
 Shibboleth Tutorial How to access licensed products from providers who are already operating productively in the SWITCHaai federation. General Information... 2 Shibboleth login... 2 Separate registration
Honeywell AG Hardhofweg. D-74821 Mosbach MU1H-1220GE23 R1001
 BA 95 Einbau-Anleitung Installation Instructions Einbau Installation Einbaubeispiel Installation example Ablaufleitung vorsehen Install discharge pipework Durchflussrichtung beachten! Consider direction
After sales product list After Sales Geräteliste
 GMC-I Service GmbH Thomas-Mann-Str. 20 90471 Nürnberg e-mail:service@gossenmetrawatt.com After sales product list After Sales Geräteliste Ladies and Gentlemen, (deutsche Übersetzung am Ende des Schreibens)
C R 2025 C LOSE PUSH OPEN
 3V C R 2025 C LOSE PUSH OPEN ) ) ) 25 222 3V C R 2025 C LOSE PUSH OPEN 25 222 3V C R 2025 C LOSE PUSH OPEN 25 222 Den här symbolen på produkten eller i instruktionerna betyder att den elektriska
Cisco SSPA122. Installation und manuelle Rekonfiguration. Dokumentenversion 1
 Cisco SSPA122 Installation und manuelle Rekonfiguration Dokumentenversion 1 Placetel UC-One Cisco SPA122 Installation und manuelle Rekonfiguration Copyright Hinweis Copyright 2015 finocom AG Alle Rechte
Bedienungsanleitung Netzwerkkabeltester ST-45 v2
 Bedienungsanleitung Netzwerkkabeltester ST-45 v2 Einführung Geehrter Kunde, wir möchten Ihnen zum Erwerb Ihres neuen Kabeltesters gratulieren! Mit dieser Wahl haben Sie sich für ein Produkt entschieden,
SELF-STUDY DIARY (or Lerntagebuch) GER102
 GER102") SELF-STUDY DIARY (or Lerntagebuch) GER102 This diary has several aims: To show evidence of your independent work by using an electronic Portfolio (i.e. the Mahara e-portfolio) To motivate you to work regularly
SELF-STUDY DIARY (or Lerntagebuch) GER102 This diary has several aims: To show evidence of your independent work by using an electronic Portfolio (i.e. the Mahara e-portfolio) To motivate you to work regularly
PRO SCAN WASSERANALYSE PER SMARTPHONE WATER ANALYSIS BY SMARTPHONE ANALYSE DE L EAU PAR SMARTPHONE
 N02 WASSERANALYSE PER SMARTPHONE WATER ANALYSIS BY SMARTPHONE ANALYSE DE L EAU PAR SMARTPHONE NO 2 NO 3 ph Cl 2 CO 2 ANALYSE DIAGNOSE LÖSUNG ANALYSIS DIAGNOSIS SOLUTION THE NEW GENERATION ph KH GH N03
Jetzt ist Zeit sich um Geschenke zu kümmern.
 Jetzt ist Zeit sich um Geschenke zu kümmern. Warum nicht Badezusätze mit Ihrem Logo verschenken? Now is time to take care about gifts. Why not give bath products with your own logo? handgemachter Badestern
DOWNLOAD. Englisch in Bewegung. Spiele für den Englischunterricht. Britta Buschmann. Downloadauszug aus dem Originaltitel:
 DOWNLOAD Britta Buschmann Englisch in Bewegung Spiele für den Englischunterricht auszug aus dem Originaltitel: Freeze Hör-/ und Sehverstehen Folgende Bewegungen werden eingeführt: run: auf der Stelle rennen
Bedienungsanleitung Hydraulischer Rangier-Wagenheber
 Einführung Geehrter Kunde, wir möchten Ihnen zum Erwerb Ihres neuen Wagenhebers gratulieren! Mit dieser Wahl haben Sie sich für ein Produkt entschieden, welches ansprechendes Design und durchdachte technische
Einbauanleitung /Manual Rev. 1
 Knüppelschalter mit 3-pos. / 2-pos. Kippschalter (und Taste) Knüppeltaster (mit zusätzlicher Taste) Für Einbau in Weatronic Sender BAT 60 und BAT 64 Bezugsquelle: RC Technik Peter Herr Müllerweg 34 83071
KOBIL SecOVID Token III Manual
 KOBIL SecOVID Token III Manual Einführung Vielen Dank, dass Sie sich für das KOBIL SecOVID Token entschieden haben. Mit dem SecOVID Token haben Sie ein handliches, einfach zu bedienendes Gerät zur universellen
PCTV DVB-S2 Stick (461e) Quick Start Guide Kurzanleitung
 Quick Start Guide Kurzanleitung") PCTV DVB-S2 Stick (461e) Quick Start Guide Kurzanleitung 2013 PCTV Systems S.à r.l. QI-461E-V1-4LANG Lieferumfang 1 2 3 4 5 6 Installation I. II. III. IV. V. VI. Lieferumfang* Beispielhafte Abbildungen
PCTV DVB-S2 Stick (461e) Quick Start Guide Kurzanleitung 2013 PCTV Systems S.à r.l. QI-461E-V1-4LANG Lieferumfang 1 2 3 4 5 6 Installation I. II. III. IV. V. VI. Lieferumfang* Beispielhafte Abbildungen
https://portal.microsoftonline.com
 Sie haben nun Office über Office365 bezogen. Ihr Account wird in Kürze in dem Office365 Portal angelegt. Anschließend können Sie, wie unten beschrieben, die Software beziehen. Congratulations, you have
Softwareupdate-Anleitung // AC Porty L Netzteileinschub
 1 Softwareupdate-Anleitung // AC Porty L Netzteileinschub Softwareupdate-Anleitung // AC Porty L Netzteileinschub HENSEL-VISIT GmbH & Co. KG Robert-Bunsen-Str. 3 D-97076 Würzburg-Lengfeld GERMANY Tel./Phone:
UWC 8801 / 8802 / 8803
 Wandbedieneinheit Wall Panel UWC 8801 / 8802 / 8803 Bedienungsanleitung User Manual BDA V130601DE UWC 8801 Wandbedieneinheit Anschluss Vor dem Anschluss ist der UMM 8800 unbedingt auszuschalten. Die Übertragung
Obstspieße. Du brauchst: Weintrauben, Kiwi, Banane, Nektarine, Apfel, Birne oder anderes Obst, etwas Zitronensaft, Schaschlik-Spieße.
 Obstspieße Weintrauben, Kiwi, Banane, Nektarine, Apfel, Birne oder anderes Obst, etwas Zitronensaft, Schaschlik-Spieße - Obst waschen, entkernen und in Stücke schneiden - auf Schaschlik-Spieße stecken
GB Operating Instructions ALC 24
 GB Operating Instructions ALC 24 Use of the charger: Charger with automatic refreshing function for 1-4Micro AAA or Mignon AA cells, in addition to 1-2 pcs. 9 V blocks. NiCd and NiMH rechargeable batteries
XV1100K(C)/XV1100SK(C)
/XV1100SK(C)") Lexware Warenwirtschaft Pro XV1100K(C)/XV1100SK(C) All rights reserverd. Any reprinting or unauthorized use wihout the written permission of Lexware Warenwirtschaft Pro Corporation, is expressly prohibited.
Lexware Warenwirtschaft Pro XV1100K(C)/XV1100SK(C) All rights reserverd. Any reprinting or unauthorized use wihout the written permission of Lexware Warenwirtschaft Pro Corporation, is expressly prohibited.
Prediction Market, 28th July 2012 Information and Instructions. Prognosemärkte Lehrstuhl für Betriebswirtschaftslehre insbes.
 Prediction Market, 28th July 2012 Information and Instructions S. 1 Welcome, and thanks for your participation Sensational prices are waiting for you 1000 Euro in amazon vouchers: The winner has the chance
SmartClass Firmware-Update Vorgehensweise
 Benutzeranweisungen SmartClass Firmware-Update Vorgehensweise 2008.01 (V 1.x.x) Deutsch Please direct all enquiries to your local JDSU sales company. The addresses can be found at: www.jdsu.com/tm-contacts
NEWSLETTER. FileDirector Version 2.5 Novelties. Filing system designer. Filing system in WinClient
 Filing system designer FileDirector Version 2.5 Novelties FileDirector offers an easy way to design the filing system in WinClient. The filing system provides an Explorer-like structure in WinClient. The
MindestanforderungenanDokumentationvon Lieferanten
 andokumentationvon Lieferanten X.0010 3.02de_en/2014-11-07 Erstellt:J.Wesseloh/EN-M6 Standardvorgabe TK SY Standort Bremen Standard requirements TK SY Location Bremen 07.11.14 DieInformationenindieserUnterlagewurdenmitgrößterSorgfalterarbeitet.DennochkönnenFehlernichtimmervollständig
www.yellowtools.com E-License - Product Activation E-License - Produktaktivierung
 www.yellowtools.com E-License - Product Activation E-License - Produktaktivierung A-1 Yellow Tools E-License Activation Yellow Tools E-License Activation A-2 Dear user, thanks for purchasing one of our
Schnell-Start-Anleitung Quick Start Guide
 Schnell-Start-Anleitung Quick Start Guide 3 1. Cube anschließen Schließen Sie den Cube an die Stromversorgung an. Verbinden Sie den Cube mit dem Router. Die Power- und die Internet-LED beginnen zu blinken,
BECOscreen BERHALTER continously and efficiently screen changer
 T E C - S P I R A T I O N technology meets inspiration swiss made BECOscreen BERHALTER continously and efficiently screen changer your partner for melt filtration system screenchanger BERHALTER BECOscreen
Cleanroom Fog Generators Volcano VP 12 + VP 18
 Cleanroom Fog Generators Volcano VP 12 + VP 18 Description & Functional Principle (Piezo Technology) Cleanrooms are dynamic systems. People and goods are constantly in motion. Further installations, production
NVR Mobile Viewer for iphone/ipad/ipod Touch
 NVR Mobile Viewer for iphone/ipad/ipod Touch Quick Installation Guide DN-16111 DN-16112 DN16113 2 DN-16111, DN-16112, DN-16113 for Mobile ios Quick Guide Table of Contents Download and Install the App...
Instruktionen Mozilla Thunderbird Seite 1
 Instruktionen Mozilla Thunderbird Seite 1 Instruktionen Mozilla Thunderbird Dieses Handbuch wird für Benutzer geschrieben, die bereits ein E-Mail-Konto zusammenbauen lassen im Mozilla Thunderbird und wird
E asyline by Hama GmbH & Co KG Postfach 80 86651 Monheim/Germany Tel. +49 (0)9091/502-0 Fax +49 (0)9091/502-274 hama@hama.de www.hama.
9091/502-0 Fax +49 (0)9091/502-274 hama@hama.de www.hama.") 00021024-10.06 E asyline by Hama GmbH & Co KG Postfach 80 86651 Monheim/Germany Tel. +49 (0)9091/502-0 Fax +49 (0)9091/502-274 hama@hama.de www.hama.com Gamepad Thunderstorm II 0021024 l Bedienungsanleitung
00021024-10.06 E asyline by Hama GmbH & Co KG Postfach 80 86651 Monheim/Germany Tel. +49 (0)9091/502-0 Fax +49 (0)9091/502-274 hama@hama.de www.hama.com Gamepad Thunderstorm II 0021024 l Bedienungsanleitung
The Solar Revolution New Ways for Climate Protection with Solar Electricity
 www.volker-quaschning.de The Solar Revolution New Ways for Climate Protection with Solar Electricity Hochschule für Technik und Wirtschaft HTW Berlin ECO Summit ECO14 3. June 2014 Berlin Crossroads to
Frequently asked Questions for Kaercher Citrix (apps.kaercher.com)
") Frequently asked Questions for Kaercher Citrix (apps.kaercher.com) Inhalt Content Citrix-Anmeldung Login to Citrix Was bedeutet PIN und Token (bei Anmeldungen aus dem Internet)? What does PIN and Token
Frequently asked Questions for Kaercher Citrix (apps.kaercher.com) Inhalt Content Citrix-Anmeldung Login to Citrix Was bedeutet PIN und Token (bei Anmeldungen aus dem Internet)? What does PIN and Token
There are 10 weeks this summer vacation the weeks beginning: June 23, June 30, July 7, July 14, July 21, Jul 28, Aug 4, Aug 11, Aug 18, Aug 25
 Name: AP Deutsch Sommerpaket 2014 The AP German exam is designed to test your language proficiency your ability to use the German language to speak, listen, read and write. All the grammar concepts and
Installation Instructions
 EN DE Installation Instructions WLAN Installation Kit, 300 Mbps, 5 GHz, 16 dbi AK-4 Wireless Kit Scope of delivery Junction box AK-4 (1x) 1 Connection board AK-4 CB with 12VDC power supply unit (1x) 2
XV1100K(C)/XV1100SK(C)
/XV1100SK(C)") Wlan Telefon Aastra 312w XV1100K(C)/XV1100SK(C) All rights reserverd. Any reprinting or unauthorized use wihout the written permission of Wlan Telefon Aastra 312w Corporation, is expressly prohibited.
Wlan Telefon Aastra 312w XV1100K(C)/XV1100SK(C) All rights reserverd. Any reprinting or unauthorized use wihout the written permission of Wlan Telefon Aastra 312w Corporation, is expressly prohibited.
Patentrelevante Aspekte der GPLv2/LGPLv2
 Patentrelevante Aspekte der GPLv2/LGPLv2 von RA Dr. Till Jaeger OSADL Seminar on Software Patents and Open Source Licensing, Berlin, 6./7. November 2008 Agenda 1. Regelungen der GPLv2 zu Patenten 2. Implizite
Mitglied der Leibniz-Gemeinschaft
 Methods of research into dictionary use: online questionnaires Annette Klosa (Institut für Deutsche Sprache, Mannheim) 5. Arbeitstreffen Netzwerk Internetlexikografie, Leiden, 25./26. März 2013 Content
ReadMe zur Installation der BRICKware for Windows, Version 6.1.2. ReadMe on Installing BRICKware for Windows, Version 6.1.2
 ReadMe zur Installation der BRICKware for Windows, Version 6.1.2 Seiten 2-4 ReadMe on Installing BRICKware for Windows, Version 6.1.2 Pages 5/6 BRICKware for Windows ReadMe 1 1 BRICKware for Windows, Version
Effizienz im Vor-Ort-Service
 Installation: Anleitung SatWork Integrierte Auftragsabwicklung & -Disposition Februar 2012 Disposition & Auftragsabwicklung Effizienz im Vor-Ort-Service Disclaimer Vertraulichkeit Der Inhalt dieses Dokuments
XV1100K(C)/XV1100SK(C)
/XV1100SK(C)") Cobra Terminal Server Zugriff XV1100K(C)/XV1100SK(C) All rights reserverd. Any reprinting or unauthorized use wihout the written permission of Cobra Terminal Server Zugriff Corporation, is expressly prohibited.
Cobra Terminal Server Zugriff XV1100K(C)/XV1100SK(C) All rights reserverd. Any reprinting or unauthorized use wihout the written permission of Cobra Terminal Server Zugriff Corporation, is expressly prohibited.
Einsatz einer Dokumentenverwaltungslösung zur Optimierung der unternehmensübergreifenden Kommunikation
 Einsatz einer Dokumentenverwaltungslösung zur Optimierung der unternehmensübergreifenden Kommunikation Eine Betrachtung im Kontext der Ausgliederung von Chrysler Daniel Rheinbay Abstract Betriebliche Informationssysteme
Bedienungsanleitung User Manual. System AED Plus
 Bedienungsanleitung User Manual System AED Plus INHALTSVERZEICHNIS TABLE OF CONTENTS Einleitung Sicherheitshinweise Verwendungszweck... 3 Lieferumfang Technische Daten Zubehör.... 4 Montage. 5 Bedienung
Bedienungsanleitung Instruction Manual K 106/1 & 2
 Auf dem Knapp 46 Tel.: ++49 (0)2191/907-0 D-42855 Remscheid Fax: ++49 (0)2191/907-141 Bedienungsanleitung Instruction Manual K 106/1 & 2 WE.3347_C Version 1.c 7/01 Auf dem Knapp 46 Tel.: ++49 (0)2191/907-0
fastpim 1 H fast switching H bridge module Features: - 1 Phase Input Rectifier Bridge - 1 Phase fast switching IGBT + FRED full H bridge - NTC
 fast switching H bridge module Features: - 1 Phase Input Rectifier Bridge - 1 Phase fast switching IGBT + FRED full H bridge - NTC Copyright by Vincotech 1 Revision: 1 module types / Produkttypen Part-Number
300Mbps Wireless Outdoor PoE Access Point/Bridge Quick Installation Guide
 LevelOne WAB-5120 300Mbps Wireless Outdoor PoE Access Point/Bridge Quick Installation Guide English Deutsch - 1 - Table of Content English... - 3 - Deutsch... - 9 - This guide covers only the most common
ALL1681 Wireless 802.11g Powerline Router Quick Installation Guide
 ALL1681 Wireless 802.11g Powerline Router Quick Installation Guide 1 SET ALL1681 Upon you receive your wireless Router, please check that the following contents are packaged: - Powerline Wireless Router
TVHD800x0. Port-Weiterleitung. Version 1.1
 TVHD800x0 Port-Weiterleitung Version 1.1 Inhalt: 1. Übersicht der Ports 2. Ein- / Umstellung der Ports 3. Sonstige Hinweise Haftungsausschluss Diese Bedienungsanleitung wurde mit größter Sorgfalt erstellt.
European IAIDO Summer Seminar 2015 Germany 15th 17th August
 European IAIDO Summer Seminar 2015 Germany 15th 17th August We are proud to present a European IAIDO Summer Seminar with Morita Sensei and Oshita Sensei in Augsburg, Germany. We invite all Iaidoka regardless
Markengeschichte. Hingabe unterscheidet uns. Hartnäckigkeit beschreibt uns.
 Bedienungsanleitung Mit unserem Glauben gehen wir voran. Mit unserer Leidenschaft steigern wir unsere Erfahrung. Vergessen die eigenen Fehlschläge, aber nicht das unerfüllte Potential. Die Leidenschaft
Notice: All mentioned inventors have to sign the Report of Invention (see page 3)!!!
!!!") REPORT OF INVENTION Please send a copy to An die Abteilung Technologietransfer der Universität/Hochschule An die Technologie-Lizenz-Büro (TLB) der Baden-Württembergischen Hochschulen GmbH Ettlinger Straße
REPORT OF INVENTION Please send a copy to An die Abteilung Technologietransfer der Universität/Hochschule An die Technologie-Lizenz-Büro (TLB) der Baden-Württembergischen Hochschulen GmbH Ettlinger Straße
Exercise (Part XI) Anastasia Mochalova, Lehrstuhl für ABWL und Wirtschaftsinformatik, Kath. Universität Eichstätt-Ingolstadt 1
 Anastasia Mochalova, Lehrstuhl für ABWL und Wirtschaftsinformatik, Kath. Universität Eichstätt-Ingolstadt 1") Exercise (Part XI) Notes: The exercise is based on Microsoft Dynamics CRM Online. For all screenshots: Copyright Microsoft Corporation. The sign ## is you personal number to be used in all exercises. All
Exercise (Part XI) Notes: The exercise is based on Microsoft Dynamics CRM Online. For all screenshots: Copyright Microsoft Corporation. The sign ## is you personal number to be used in all exercises. All
Invitation - Benutzerhandbuch. User Manual. User Manual. I. Deutsch 2. 1. Produktübersicht 2. 1.1. Beschreibung... 2
 Invitation - Inhaltsverzeichnis I. Deutsch 2 1. Produktübersicht 2 1.1. Beschreibung......................................... 2 2. Installation und Konfiguration 2 2.1. Installation...........................................
Verarbeitungsspezifikation Application Specification. Verarbeitungsspezifikation. Application Specification MA-59V093. für for. Winkelstecker für PCB
 Verarbeitungsspezifikation MA-59V093 für for Winkelstecker für PCB Right angle plug for PCB 59S2AF-40MXX-Y 59S2LF-40MXX-Y 59S2RF-40MXX-Y 59S2UF-40MXX-Y 200 09-0100 U_Winkler 11.02.09 100 08-v323 U_Winkler
roll-up SONJA powerdisplays Aufbauanleitung Assemble instructions
 powerdisplay SONJA Mit Rollfunktion! Die Werbefläche rollt sich vollständig in das Display. So ist Ihre Werbung geschützt und in Sekunden wieder aufgebaut. Farbe: chrom/silber inkl. Tasche With rolling
microkontrol/kontrol49 System Firmware Update
 microkontrol/kontrol49 System Firmware Update Update Anleitung (für Windows) Dieses Update ist lediglich mit Windows XP kompatibel, versuchen Sie dieses nicht mit Windows 98/ME und 2000 auszuführen. 1.
Umstellung Versand der täglichen Rechnungen Auktionsmarkt
 EEX Kundeninformation 2004-05-04 Umstellung Versand der täglichen Rechnungen Auktionsmarkt Sehr geehrte Damen und Herren, die Rechnungen für den Handel am Auktionsmarkt werden täglich versandt. Dabei stehen
Worx Landroid - Software Update
 Worx Landroid - Software Update WORX Landroid Software Update für Anwender 30.04.2015 Website: www.worxlandroid.com Direct Direkter Link Link for auf the Update: Update: https://www.worxlandroid.com/en/software-update
Service Manual Kugelgelenke an DT Swiss Dämpfer ersetzen Replace spherical bearings on DT Swiss shocks
 Service Manual Kugelgelenke an DT Swiss Dämpfer ersetzen Replace spherical bearings on DT Swiss shocks www.dtswiss.com - Inhaltsverzeichnis / Table of contents Einleitung... 2 Instructions... 2 Montage
REPARATURSERVICE von starren und flexiblen Endoskopen
 REPARATURSERVICE von starren und flexiblen Endoskopen Reparaturservice: Kundenbetreuung: Abholung / Lieferung: Unser Paketservice holt defekte Geräte deutschlandweit am gleichen Tag der Schadensmeldung
Installation guide for Cloud and Square
 Installation guide for Cloud and Square 1. Scope of delivery 1.1 Baffle tile package and ceiling construction - 13 pcs. of baffles - Sub construction - 4 pcs. of distance tubes white (for direct mounting)
Exercise (Part II) Anastasia Mochalova, Lehrstuhl für ABWL und Wirtschaftsinformatik, Kath. Universität Eichstätt-Ingolstadt 1
 Anastasia Mochalova, Lehrstuhl für ABWL und Wirtschaftsinformatik, Kath. Universität Eichstätt-Ingolstadt 1") Exercise (Part II) Notes: The exercise is based on Microsoft Dynamics CRM Online. For all screenshots: Copyright Microsoft Corporation. The sign ## is you personal number to be used in all exercises. All
Exercise (Part II) Notes: The exercise is based on Microsoft Dynamics CRM Online. For all screenshots: Copyright Microsoft Corporation. The sign ## is you personal number to be used in all exercises. All
VPPR Stab Sicherheit, Gesundheit und Umwelt Safety, Security, Health and Environment. Laser which rules apply in Switzerland?
 Laser which rules apply in Switzerland? ETH Zürich KT/07.07.2008 When in danger say STOP! VPPR Laser classes Class 1 Eye safe < 0.39 mw Class 1M Eye safe without optical instruments 400 700 nm < 0.39 mw
eurex rundschreiben 094/10
 eurex rundschreiben 094/10 Datum: Frankfurt, 21. Mai 2010 Empfänger: Alle Handelsteilnehmer der Eurex Deutschland und Eurex Zürich sowie Vendoren Autorisiert von: Jürg Spillmann Weitere Informationen zur
ELBA2 ILIAS TOOLS AS SINGLE APPLICATIONS
 ELBA2 ILIAS TOOLS AS SINGLE APPLICATIONS An AAA/Switch cooperative project run by LET, ETH Zurich, and ilub, University of Bern Martin Studer, ilub, University of Bern Julia Kehl, LET, ETH Zurich 1 Contents
Advanced Availability Transfer Transfer absences from HR to PPM
 Advanced Availability Transfer Transfer absences from HR to PPM A PLM Consulting Solution Public Advanced Availability Transfer With this solution you can include individual absences and attendances from
Asynchronous Generators
 Asynchronous Generators Source: ABB 1/21 2. Asynchronous Generators 1. Induction generator with squirrel cage rotor 2. Induction generator with woed rotor Source: electricaleasy.com 2/21 2.1. Induction
Rezept zum Nachkochen. Kotelett und Roulade vom Lamm Frühlingszwiebeln, Spinat und Röstzwiebelgnocchi
 Rezept zum Nachkochen Kotelett und Roulade vom Lamm Frühlingszwiebeln, Spinat und Röstzwiebelgnocchi Stefan Schartner und Csabai Levente, öffnen exklusiv Ihr Kochbuch. Genießen Sie auch zu Hause einen
XML Template Transfer Transfer project templates easily between systems
 Transfer project templates easily between systems A PLM Consulting Solution Public The consulting solution XML Template Transfer enables you to easily reuse existing project templates in different PPM
Supplier Questionnaire
 Supplier Questionnaire Dear madam, dear sir, We would like to add your company to our list of suppliers. Our company serves the defence industry and fills orders for replacement parts, including orders
Aufgabenstellung Mit welchen SICLOCK Produkten kann ich einen PC Zeitsynchronisieren?
 SICLOCK Application Note AN-0005 Titel Synchronisation von PCs mit SICLOCK Aufgabenstellung Mit welchen SICLOCK Produkten kann ich einen PC Zeitsynchronisieren? Schlüsselwörter SICLOCK DCFRS, WinGPS, GPS1000,
Batterie-Identifikations-Modul EL-BIM
 Bedienungs- und Montageanleitung Batterie-Identifikations-Modul EL-BIM 1.0 Allgemeines Das Batterie-Identifikations-Modul EL-BIM ermöglicht eine eindeutige Zuordnung von Ladevorgang und Batterie in den
WP2. Communication and Dissemination. Wirtschafts- und Wissenschaftsförderung im Freistaat Thüringen
 WP2 Communication and Dissemination Europa Programm Center Im Freistaat Thüringen In Trägerschaft des TIAW e. V. 1 GOALS for WP2: Knowledge information about CHAMPIONS and its content Direct communication
OMNITRONIC DSP Control Installationsanweisungen bis Version 1.3.1
 OMNITRONIC DSP Control Installationsanweisungen bis Version 1.3.1 Bitte befolgen Sie diese Schritt-für-Schritt Anleitung genau, nachdem Sie ein Software Update von unserer Website heruntergeladen haben.
USBASIC SAFETY IN NUMBERS
 USBASIC SAFETY IN NUMBERS #1.Current Normalisation Ropes Courses and Ropes Course Elements can conform to one or more of the following European Norms: -EN 362 Carabiner Norm -EN 795B Connector Norm -EN
Exercise (Part I) Anastasia Mochalova, Lehrstuhl für ABWL und Wirtschaftsinformatik, Kath. Universität Eichstätt-Ingolstadt 1
 Anastasia Mochalova, Lehrstuhl für ABWL und Wirtschaftsinformatik, Kath. Universität Eichstätt-Ingolstadt 1") Exercise (Part I) Notes: The exercise is based on Microsoft Dynamics CRM Online. For all screenshots: Copyright Microsoft Corporation. The sign ## is you personal number to be used in all exercises. All
Exercise (Part I) Notes: The exercise is based on Microsoft Dynamics CRM Online. For all screenshots: Copyright Microsoft Corporation. The sign ## is you personal number to be used in all exercises. All
Art.-Nr. 4450900300 greentea. Art.-Nr. 4450900200 whitemusk MAGICUS. 1 Stück/piece 2,5. 4 x 4 x 4 x. 1 x
 MAGICUS Art.-Nr. 4450900300 greentea 1 Stück/piece Art.-Nr. 4450900200 whitemusk 2,5 4 x 4 x 4 x 1 x 1. 2. 1 x Option 2 Option 1 3. 1 3 4 2 4. I AUTO RUN Mo Tu We Th Fr Sa Su OK + Clear R 230VAC, 50Hz
Ermittlung und Berechnung von Schadendreiecken mit HANA Live und R-Integration
 Ermittlung und Berechnung von Schadendreiecken mit HANA Live und R-Integration Matthias Beyer-Grandisch, Presales Senior Specialist, SAP Mai, 2015 Public DEMO Die Demo zeigt unter Verwendung von HANA Live
Technology for you. Media Solutions
 Technology for you Media Solutions Media Units / Media Units Media Units Robuste Installationstechnik für jeden Klassenund Schulungsraum Robust installation technology for each class- and conference room
iid software tools QuickStartGuide iid USB base RFID driver read installation 13.56 MHz closed coupling RFID
 iid software tools QuickStartGuide iid software tools USB base RFID driver read installation write unit 13.56 MHz closed coupling RFID microsensys Jun 2013 Introduction / Einleitung This document describes
Franke & Bornberg award AachenMünchener private annuity insurance schemes top grades
 Franke & Bornberg award private annuity insurance schemes top grades Press Release, December 22, 2009 WUNSCHPOLICE STRATEGIE No. 1 gets best possible grade FFF ( Excellent ) WUNSCHPOLICE conventional annuity