CCTVP CONSUMER ZUBEHÖR USER MANUAL
|
|
|
- Edith Glöckner
- vor 8 Jahren
- Abrufe
Transkript
1 CCTVP PROM10 CONSUMER 7" LCD SECURITY SET: DVR + 4 CAMERAS + ACCESSORIESS + 500GB HARD DISK 7" LCD BEVEILIGINGSPACK: DVR + 4 CAMERA'S + 500GB HARDDISK + ACCESSOIRES PACK VIDÉOSURVEILLANCE 7" LCD : ENREGISTREUR NUMÉRIQUE + 4 CAMÉRAS + DISQUE DUR 500Go + ACCESSOIRES JUEGO DE VIGILANCIA 7" LCD: VIDEOGRABADORA DIGITAL + 4 CÁMARAS + DISCO DURO 500GB + ACCESORIOS 7" LCD-ÜBERWACHUNGSSATZ: DVR + 4 KAMERAS + 500GB FESTPLATTE + ZUBEHÖR USER MANUAL GEBRUIKERSHANDLEIDING NOTICE D EMPLOI MANUAL DEL USUARIO BEDIENUNGSANLEITUNG

2
3 1. Introduction To all residents of the European Union Important environmental informationn about this product This symbol on the device or the package indicates that disposal of the device after its lifecycle could harm the environment. Do not dispose of the unit (or batteries) as unsorted municipal waste; it should be taken to a specialized company for recycling. This device should be returned to your distributor or to a local recycling service. Respect the local environmental rules. If in doubt, contact your local waste disposal authorities. Thank you for choosing Velleman! Please read the manual thoroughly before bringing this device into service. If the device was damaged in transit, do not install or use it and contact your dealer. Damage caused by disregard of certain guidelines in this manual is not covered by the warranty and the dealer will not accept responsibility for any ensuing defects or problems. Package content: 1 x DVR with built-in SATA hard disk 4 x IR colour CMOS cameras 4 x 18m camera cables (video + power) 1x power adaptor 100~240VAC/50~60Hz to 12VDC (5x) + power cable IR remote control + AAA batteries USB mouse 1x CD-ROM containing the full user manual 2. Safety Instructions 3. General Guidelines Refer to the Velleman Service and Quality Warranty on the last pages of this manual. Indoor use only. Keep this device away form rain, moisture, splashing and dripping liquids. Never put objects filled with liquid on top. Keep this device away from dust and extreme temperatures. Make sure the ventilationn openings are clear at all times. For sufficient air circulation, leave at least 1 (±2.5 cm) in front of the openings. Familiarise yourself with the functions of the devicee before actually using it. All modifications of the device are forbidden for safety reasons. Only use the device for its intended purpose. Using the device in an unauthorised way will void the warranty. Damage caused by disregard of certain guidelines in this manual is not covered by the warranty and the dealer will not accept responsibility for any ensuing defects or problems. Do not use this product to violate privacy laws or perform other illegal activities. 4. Features CCTVPROM10 User manual Keep the device away from children and unauthorised users. Risk of electroshock when opening the cover. Touching live wires can cause life-threatening electroshocks. Always disconnect mains power when the device is not in use or when servicing or maintenance activities are performed. Handle the power cord by the plug only. Protect this device from shocks and abuse. Avoid brute force when operating the device. DVR H.264 recording recording via motion trigger, manual and timer backup function: USB/LAN OSD menu: English, Chinese user manual: English, French, German, Spanish and Dutch SATA Hard disk (500Gb) built-in system auto recovery after power reconnected DVR Control: DVR buttons, IR remote control and USB mouse Camera (4x) CMOS colour camera with B/W night vision (IR LEDs)

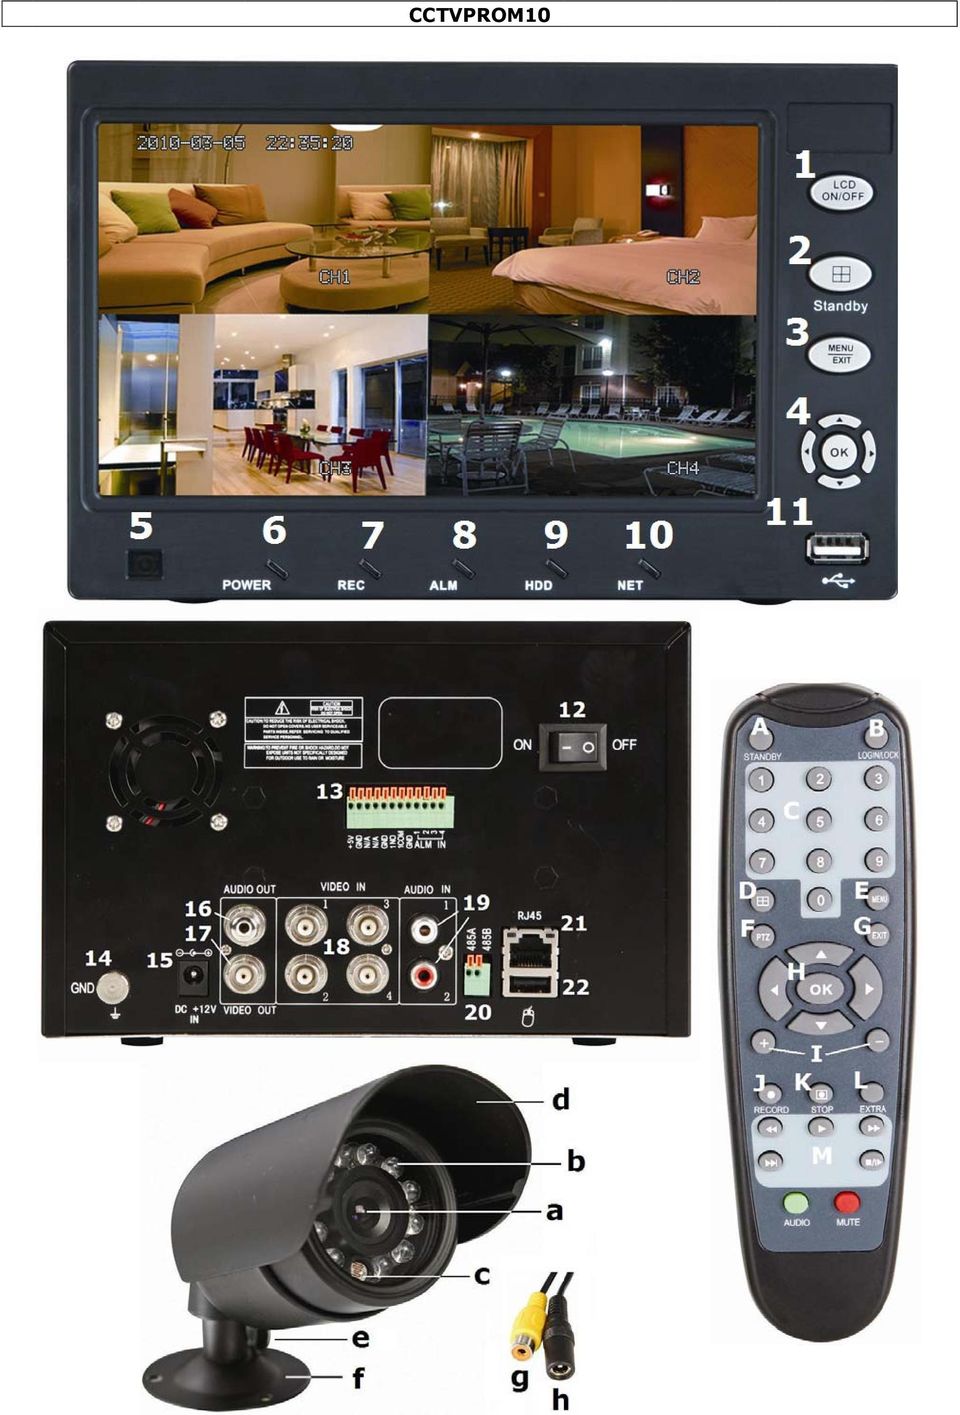
4 5. Overview Refer to the illustrations on page 2 of this manual. Front panel 1 LCD ON/OFF switch 2 channel selector / quadruple view 3 menu/exit button 4 arrow buttons + confirmation button (OK) 5 IR receiver 6 power LED Rear panel 12 power ON/OFF switch 13 alarm signal connector 14 ground terminal VDC input 16 audio out 17 video out Camera a b c d lens IR LEDs light sensor sunshield e f g h position bolt mounting bracket Video output connector DC 12V input terminal Remote control A B C STANDBY LOGIN/LOCK num. keys turn standby mode on or off open password login screen (when security is enabled) press to display corresponding channel in full screen (5~9 not applicable) or press to enter values during setup D E F G H I J K L M MENU PTZ EXIT navigationn + / - RECORD STOP EXTRA playback controls press to select channel or quadruple view open main menu open PTZ control window ( not applicable) go to previous menu / exit main menu to navigate, OK to confirm increase / decrease value start manual recording stop manual recording not used reverse playback speed 2x, 4x, 8x startt playback increase forward playback speed 2x, 4x 8x decrease forward playback speed 1/2x, 1/ 4x 1/8x press to freeze, press again to see next frame Note: other keys on the remote control have no function programmed for this DVR. 6. Hardware setup CCTVPROM10 7 recording LED 8 alarm LED 9 HDD LED 10 network LED 11 USB port 18 video input channel 1~4 (BNC) 19 audio input L/R 20 PTZ/RS-485 connector 21 network connector 22 USB mouse port Refer to the illustrations on page 2 of this manual. The DVR comes with a HDD installed. To replace it, refer to 11) Make sure the device is unplugged from the mains before making any connections and do not touch any electronic circuitry to avoid electrostatic discharge. Connecting the cameras Choose a location for the camera, keeping following guidelines in mind: do not install the camera in locations where extremely high or low temperatures or excessive vibrations may occur. avoid mounting the camera near high electro-magnetic fields. do not aim the cameraa at the sun or other extremely bright objects or reflections (e.g. metal doors). The included signal/power cables are 18m each. Use the mounting bracket [f] to determine the location of the mounting holes. Drill the holes and secure the bracket [f] using 3 screws. Attach the camera to the mounting bracket [f] with the cameraa bolt (rear). Point the camera towards the field of interest and tighten the position bolt [e]. Connect the power [h] and RCA [g] connector to the signal/power cable. Connect the other end of the signal/power cable to the DVR. The channel number is indicated above the BNC connector [18]. It determines the position of the image on the screen. Connect the power connector to one of the 5 adaptor outputs.

5 Connecting the mouse CCTVPROM10 Plug the USB-mouse connector into the USB input [22] at the rear of the DVR. Connecting external alarms / RS485 When desired, connect external alarm inputs (e.g. from door/window contacts) to the alarm input connector [13]. Connecting ground Connecting the ground terminal [14] to earth might resolve any image interference problems. Do not connect when the image is fine. Connecting the power supply Plug a DC output connector of the included power adaptor into the 12VDC power input [15] at the back of the DVR. WARNING: only use the included adaptor. Plug the included power cable into the adaptor input connector and plug the other end into the mains. Switch to DVR on with the ON/OFF switch [12]. Connecting Local Area Network (LAN) Connect the DVR to a local network by plugging a network cable into the LAN port [21] at the back of the DVR. Connector type is 8P8C (RJ45). Setup is done through the OSD. 7. Operation Note: the functions, navigation and options of the DVR are accessible via the front panel, the remote control or by using the mouse. Switching on the DVR with the ON/OFF switch [12] at the back. It takes about 45 seconds for the initialization to complete and to show live images. After start-up, the power LED [6] is on and the display shows the 4 camera channels simultaneously. Date and time is shown in the top area of the display. Should one of the images remain blank, check the camera and cabling of that channel. Press the LCD power switch [2] to switch the LCD screen on or off. This does not interrupt the recording operation of the DVR! Standby Mode The system can also be put into standby mode. Power will remain to the system but recording is disabled. To start/stop Standby mode: Press and hold the STANDBY button on the front panel [2] or remote control [A] until the progress bar filled up completely. The system enters standby mode. Press and hold the STANDBY button on the front panel [2] or remote control [A] for ±3 seconds. The system will power up again. Password ATTENTION: By default, passwords are disabled on the system. You do not need to enter a password when accessing any system menu. However, for security purposes, it is highly recommended to enable passwords on the system using the password menu. Refer to NOTE: If there is no HDD in device, or the device can t read the HDD, or the HDD isn t formatted, a [H] is displayed in the video preview interface. The HDD in the DVR must be formatted before first use. Refer to General menu guidelines Enter the menu of the DVR by either pushing the MENU-button on the front panel [4] or remote control, or click the right mouse button, select MAIN MENU and click left. NOTE: If passwords are enabled on the system, you need to select your Device ID and enter the 6-digit numerical password to open the Main Menu (see 7.3.4). 12/04/2011 5
![Connecting the power supply Plug a DC output connector of the included power adaptor into the 12VDC power input [15] at the back of the DVR. WARNING: only use the included adaptor.](/docs-images/43/1543293/images/page_5.jpg "Plug the included power cable into the adaptor input connector and plug the other end into the mains. Switch to DVR on with the ON/OFF switch [12].")
6 7.2 Screen image Front panel controls: Press the channel selector [2] repeatedly to scroll through the 4 channels or see all four channels simultaneously. Remote control: Press on a numbered channel button (1~4) to see that channel full screen. Press the button to return to the quadruple display. Mouse control: Left-click 2x on any channel to display that channel full screen. Double-click again to return to quadruple view. 7.3 Menu options Following menu options are available: Search Record HDD Basic Advance Exit SEARCH NOTE: When you first open the Search menu, it will display the current month and date. To perform a Quick Search: Open the Search menu and click PLAY. The last minute of recorded playback begins. To perform a Date & Time search: 1) Under DATE, click the field and enter the desired date using the virtual Keyboard and then click SEARCH. The system searches for data. 2) Under RECORD STATE, the system shows recorded events in a month grid and a time Grid. The selected day of the month will be outlined in red. Green=normal recording; Red=alarm recording (including both alarm and motion events). 3) Click a date in the month grid to view recorded video files for that selected date in the hour grid. 4) During playback, use the onscreen controls or the playback buttons on the remote control or front panel to control playback. FILE LIST Use the File List sub-menu to see a detailed list of all the recorded video on your system. To open the File List: 1) From the Search Menu, click SEARCH to search the system for recorded video. 2) Click FILE LIST at the bottom of the menu. The File List menu opens. 12/04/2011 6

7 To use the File List: 1) Under CHN SWITCH, select individual channels or select ALL. 2) Under TYPE, select NORMAL to view only normal recordings, ALARM, to view alarm recordings (includes alarm and motion detection), or ALL to view all video on your system. 3) Use the buttons on the side panel to navigate the file list: FIRST: Jump to the first page of the list PRE: Turn to the previous page NEXT: Turn to the next page LAST: Jump to the last page of the list ALL: Select all files OTHER: Clear all files BACKUP: After selecting a file(s), click to begin copying the data to a USB flash drive (not included); 4) Click any file to begin playback. BACKUP NOTE: The system is compatible with most major brands of USB flash drives, with capacities from 256 MB to 4 GB. To backup recorded data: 1) Connect a blank USB flash drive to the bottom USB port on the front panel of the system. 2) Open the Search menu and search for recorded data on the system, click FILE LIST and select the files you want to backup. 3) Click the "BAK" box next to the filename. Select multiple files if desired, click ALL to select all files; click OTHER to deselect all files. NOTE: The size of each file is shown in the File List menu. Use this to help you find a USB flash drive large enough to hold all the files you wish to backup. 4) Click BACKUP from the side-panel to immediately begin copying the files to the USB flash drive. NOTE: Backup progress appears in the status window. DO NOT remove the USB flash drive during backup. Notes: 1) When free space on the backup device is less than the size of the file to back-up, the system will prompt Space not enough... 2) You can remove the USB device directly when backup is finished. 12/04/2011 7
, click to begin copying the data to a USB flash drive (not included); 4) Click any file to begin playback.")
8 7.3.2 RECORD Configure record parameters, enable/disable audio. NOTE: Audio capable cameras (not included) are required for audio recording. Figure Record To configure recording options: 1) Under CHANNEL, use the drop-down menus and select ON/OFF to enable/disable recording from the selected channel. 2) Under RESOLUTION, select HIGHEST, HIGH, or NORMAL (corresponding to D1, HD1, CIF resolution). NOTE: PAL: / NTSC: HD1@15fps, 3) Under QUALITY, select BEST,FINE, NORMAL CIF: corresponding to 384Kbps and 512Kbps and 768Kbps. HD1: corresponding to 512Kbps and 768Kbps and 1024Kbps. D1: corresponding to 512Kbps and 768Kbps and 1024Kbps. 4) Under AUDIO, select ENABLE or DISABLE. If audio recording is enabled, the system will record audio from connected audio capable cameras (not included). 5) Under REC. MODE, select POWER UP or TIMER RECORD. If you select POWER UP, the system will record continuously (normal recording) when the system is powered on. If you select TIMER RECORD, you have to set a recording schedule on the system. 6) Under REC. SIZE, select 15MIN, 30MIN, 45MIN, or 60MIN. NOTE: Record size sets the file size for recorded video files on the system. Instead of recording data as one large file, the system will divide the data into blocks of 15, 30, 45, or 60 minutes. This makes the recorded data easier to search. 7) Click APPLY. Click SURE in the confirmation window. 8) Click EXIT in every menu until all windows are closed. Recording Schedule By default, the system is set to record continuously, 24 hours a day, 7 days a week. You can program the system to record according to a customized recording schedule. Figure Recording Schedule The schedule grid shows the days of the week and hours 0~23. You can set ALARM recording (red), GENERAL (normal) recording (green), or MANUAL recording (blue) for each time block of each day. To set a recording schedule: 1) Open the Main Menu and click RECORD. 2) Under REC. MODE, select TIMER RECORD. 3) Click SCHEDULE. The Schedule menu opens. 4) Under CHANNEL, select specific channels or select ALL. 5) Below the grid, click either ALARM (red), GENERAL (green), or MANUAL RECORD (blue) and then click a time block on the desired day. 6) Use the FROM/TO drop-down menus to copy the schedule of one day to another. 12/04/2011 8
 Under AUDIO, select ENABLE or DISABLE.")
9 For example, if you want your schedule for Monday to be the same on Wednesday: under FROM select MON, under TO select WED, and then click COPY. 7) Click SAVE. 8) Click EXIT in each menu until all windows are closed. Example You want your system to record continuously on all channels from 9 AM to 5 PM Monday to Friday. You also want Alarm/Motion recording from 5 PM to 9 AM. You do not want the system to record Saturday or Sunday. To set the recording schedule: 1) Open the Schedule menu. 2) Under CHANNEL, select ALL. 3) Click the blue MANUAL RECORD block below the grid. A checkmark will appear in the block. 4) Under SUN, click blocks 00~23. The blocks will turn blue. 5) Under FROM, select SUN. Under TO select SAT, and then click COPY. 6) Click the red ALARM block below the grid. 7) Under MON, click blocks 00~08 and blocks 18~23. The blocks will turn red. 8) Click the green GENERAL block below the grid. 9) Under MON, click blocks 09~17. The blocks will turn green. 10) Under FROM, select MON. Under TO select TUE, and then click COPY. Repeat for Wednesday, Thursday, and Friday. Your completed schedule should the same as the image below: 11) Click SAVE. Click CLOSE in the confirmation window. 12) Click EXIT in all menus until all windows are closed. Mask Field Setup The Mask Field lets you block a specific portion of a channel you do not want recorded or shown on the display screen. This can be useful if you need to conceal a sensitive area being captured by the installed camera. To use the mask field: 1) From the Record menu, click MASK FIELD SETUP. The Mask Field menu opens. 2) Choose a channel you wish to apply the Mask Field. Select ON from the SWITCH drop-down menu. 3) Click SETUP. The Mask Menu disappears and the select channel is shown in full-screen. 4) Using the mouse, click and drag the cursor over the area you want to conceal. A single click will produce a small black square. 5) Right-click anywhere on the screen to return to the Mask Field menu. 6) Click APPLY. Click SURE in the confirmation window. 7) Click EXIT in all menus until all windows are closed. 12/04/2011 9
 Click the blue MANUAL RECORD block below the grid. A checkmark will appear in the block. 4) Under SUN, click blocks 00~23. The blocks will turn blue. 5) Under FROM, select SUN.")
10 7.3.3 HDD Displays essential information about the system`s internal hard drive, and lets you format the internal HDD and external USB flash drive (not included). The HDD menu displays the following: HDD STATUS: The system will display "OK" for normal operation SIZE: The size (in gigabytes) of the internal hard disk drive. FREE SPACE: The space (in gigabytes) remaining on HDD AVAILABLE TIME: The recording time (in hours) remaining on the HDD based on your current record settings OVERWRITE: Select ENABLE or DISABLE. If overwrite is enabled, the system will record over the oldest video data once the HDD is full. If overwrite is disabled, the system will stop recording once the HDD is full and the live screen will show H symbol. Formatting the Hard Drive Click on HDD FORMAT. ATTENTION: Formatting the HDD will erase all video data. This step cannot be undone. Formatting the USB Flash Drive Use a USB flash drive (not incl.) to backup recorded video and upgrade the systems firmware. You should always format the USB flash drive you intend to use with the system. NOTE: Not formatting the USB flash drive may result in improper functionality BASIC Set the system language, date and time, passwords, and configure audio and display options. The Basic Setup menu contains the following sub-menus: Language, Date/Time, Password, Display, and Audio. 12/04/

11 LANGUAGE CCTVPROM10 To change the system language: 1) From the drop-down menu select ENGLISH, or CHINESE. 2) Click APPLY. Click SURE in the confirmation window. 3) Click EXIT to close the menu. NOTE: The device will restart when you finish system language setup DATA/TIME It is highly recommended to immediately set the date and time when first setting up your system. To set the date and time: 1) Click DATE/TIME and configure the following options: o DATE: Enter the day, month, and year. o DATE FORMAT: Select DD/MM/YYYY, MM/DD/YYYY, or YYYY/MM/DD o TIME: Enter the time o TIME FORMAT: Use the drop-down menu and select 12HOURS or 24HOURS o DST: Use the drop-down menu to select ON/OFF to enable/disable Daylight Savings Time 2) Click MODIFY DATE AND TIME. Click SURE in the confirmation window. 3) Click APPLY. The new date and time are saved. Daylight Savings Time To set daylight savings time: 1) Under DST, select ON. DST options appear. 2) Under DST MODE select one of the following: o CUSTOM: Set customized start and end times for DST (go to step 4) o DEFAULT: The Default setting will apply DST from the second Sunday of March to the second Sunday in November (go to step 3) 3) If using the DEFAULT, click APPLY. 4) If setting a CUSTOM DST, use the drop-down menus to select a week and month for the start and end times. 5) Click APPLY. Click SURE in the confirmation window. 6) Click EXIT in each menu until all windows are closed PASSWORD When you first start up your system, you are technically logged in as the ADMIN under Device ID The system allows two user authorities connected to a Device ID. The authorities are as follows: o ADMIN administrator: has full control of the system, and can change both administrator and user passwords and enable/disable password checking o USER normal user: only has access to live viewing, search, playback, and other limited authorities. For security reasons, it is highly recommended to enable passwords on your system. If you enable passwords, you must select a 6-digit USER password and a 6-digit ADMIN password. 12/04/
 Click DATE/TIME and configure the following options: o DATE: Enter the day, month, and year.")
12 ATTENTION: By default, passwords are disabled on the system. You will not need a password to log in or access menus. You will not need a password to access your system using the browser-based remote software. You can change the Device ID and password of the ADMIN and the USER from the Password menu. To open the Password/security menu: 1) Right-click anywhere onscreen to open the Sub-Menu and select MAIN MENU. 2) Click BASIC. The Basic Setup Menu opens. 3) Click PASSWORD. The Password/Security menu opens. To change your Device ID and Password: 1) Click the field beside DEVICE ID and enter a 6-digit numerical Device ID using the Virtual Keyboard (mouse only). For example, change the ID to ) Under PASSWORD, select ENABLE. 3) Click the field beside USER PASSWORD to enter a 6-digit numerical password using the Virtual Keyboard (mouse only). Re-enter the password in the corresponding field. 4) Click the field beside ADMIN PASSWORD to enter a 6-digit numerical password using the Virtual Keyboard (mouse only). Re-enter the password in the corresponding field. NOTE: The USER and ADMIN passwords must not be the same. 5) Click APPLY to save your changes. Click SURE in the confirmation window. 6) Click EXIT in each menu until all windows are closed. Use your new password to log in to the system and access system menus. You can also use the USER and ADMIN passwords to access your system using the browser-based remote software. NETWORK PW CLEAN: select and click APPLY will initialize the IE browser password DISPLAY Use the Display Setup menu to customize channel titles, show/hide the date and time in live viewing and playback, and enable/disable preview channels. To customize Display settings: 1) Configure the following options: o NAME: click any of the fields and enter a new title for the selected channel using the Virtual Keyboard (mouse only) o POSITION: reposition the channel title; select TOPLEFT, BOTTOMLEFT, TOPRIGHT, BOTTOMRIGHT or OFF. If OFF, the title will not be displayed for the selected channel o COLOR: Adjust CHROMATICITY, LUMINOSITY, CONTRAST, and SATURATION for the selected channel o PREVIEW TIME: select ON/OFF to show/ hide the date and time during live viewing o RECORD TIME: select ON/OFF to show/hide the date and time during playback. 2) Click NEXT PAGE to change the settings for the remaining channels (8-channel models only). 3) Click APPLY to save your settings. Click SURE in the confirmation window. Preview Preview channels can be very useful if your display monitor is in public view. Select OFF of a preview channel will appear black on the display to give the impression that no cameras are connected and the system is not recording. 12/04/
 Click the field beside DEVICE ID and enter a 6-digit numerical Device ID using the Virtual Keyboard (mouse only).")
13 To enable/disable preview channels: 1) Choose a channel you wish to conceal. For example, channel 3. Under PREVIEW, select OFF. 2) Click APPLY. Channel 3 will turn black. Click CLOSE in the confirmation window. 3) Click EXIT in all menus until al windows are closed AUDIO Use the Audio menu to set the resolution and camera system on the system. To configure video options: 1) Under CAMERA SYSTEM, select NTSC or PAL. 2) Click APPLY. Click CLOSE in the confirmation window. 3) Click EXIT in all menus until all windows are closed. To configure audio options: 1) From the Audio menu, click VOLUME SETUP. A split-screen display view appears. 2) Click any channel and adjust the slider to increase/decrease the volume for listen-in audio. 3) Click X to return to the Audio menu. 4) Click APPLY. Click SURE in the confirmation window. 5) Click EXIT in all menus until all windows are closed. LOOP TIME: 1) Click the input box to set. 2) Left click to exit, Click SURE in the confirmation window. 3) Click EXIT in all menus until all windows are closed ADVANCE Use the advanced setup menu to configure alarm settings, motion detection, mobile surveillance, PTZ settings and network settings. The advanced setup menu contains the following sub-menus: Alarm, Info, MD, Mobile, System, PTZ, and Network. 12/04/
 From the Audio menu, click VOLUME SETUP. A split-screen display view appears.")
14 ALARM Use the Alarm menu to configure alarm and settings. I/O Alarm: each channel has one I/O alarm. When an alarm is triggered the corresponding channel will start alarm record. NO (Normal Open, when alarm in, close) OFF (Normal Closed, when alarm in, open) HDD LOSS: The alarm will sound if the internal HDD is damaged. The live screen will show [H]. HDD SPACE: when the space less then 500MB, the live screen will show not enough space. Clear data or replace HDD. VIDEO LOSS: when a camera is disconnected, the live screen will show video loss. ALARM MANAGE: alarm output: set the time of alarm output: 0, 10, 20, 40 or 60 seconds. Buzz: set the time of buzz: 0, 10, 20, 40 or 60 seconds. post record: set the record time after alarm: 30 Sec, 1, 2 or 5 Min. SETUP: The system can send an notification with a JPEG snapshot for triggered events on the system every 3 minutes. To setup notification: 1) Under , select ON. 2) Under SSL, select OFF. NOTE: SSL deals with encryption. Only advanced users should enable this option. 3) Under SMTP PORT, enter the SMTP port of your server. 4) Under SMTP, enter the SMTP address of your server. For example, smtp.gmail.com 5) Under SEND , enter the sender address. 6) Under SEND PW, enter the password of your server. 7) Under RECV , enter the address that will receive the notification. 8) Click APPLY. Click SURE in the confirmation window. 9) Click EXIT in all menus until all windows are closed. 12/04/

15 INFO View system information, including the firmware version, MAC address, and serial number of the system MD (MOTION DETECT) Configure motion detection for each channel. To configure motion detection: Under STATUS, select ON to enable motion detection for the desired channel. Click NEXT PAGE for additional channels (8-channel models only). Under SENSITIVITY, select 1, 2, 3, or 4. The higher the number, the more sensitive the motion detection. Under MD SETUP, click SETUP. The red motion grid appears over the selected channel in full screen. Click the blocks in the grid to enable/disable motion detection. Red=motion detection enabled; Clear=motion detection disabled. Right-click anywhere on the screen to return to the Motion Detection menu. Click APPLY. Click SURE in the confirmation window. Click EXIT in all menus until all windows are closed. NOTE: You can disable the MD buzzer in the alarm setup menu MOBILE Send alerts to your cellular phone Windows Mobile enabled touch-screen smart phone (Windows Mobile 6.0 or greater, S60 3 rd generation or greater is required). 12/04/

16 To configure mobile notification settings: 1) Under MOBILE NETWORK, select 3G,2.75G, or 2.5G. NOTE: Contact your cellular provider if you are unsure about the network of your cellular phone. 2) Under MOBILE PORT, enter your mobile port number. 3) Click APPLY. Click SURE in the confirmation window. 4) Click EXIT in all menus until all windows are closed MAINTAIN Use the System menu to update system firmware and set an automatic system reset schedule. To enable auto-reset: 1) Under AUTO RESET, select ON. The Settings option appears. 2) Under SETTINGS, select EVERY DAY, EVERY WEEK, or EVERY MONTH. The date drop-down menu appears. 3) Select the date for auto-reset from the drop-down menu. 4) Enter the time for auto-reset using the virtual keyboard (mouse only). 5) Click APPLY. Click SURE in the confirmation window To restore factory settings: 1) Click DEFAULT SETTINGS. This will restore the system to the original factory settings. 2) Click OK in the prompt. NOTE: Recorded video on the HDD will not be erased. To restart the machine (soft-reset): 1) Click RESTART. 2) Click OK in the prompt. The system will perform a soft-reset and load to a live split-screen view. To upgrade firmware: 1) Copy the firmware file to an empty USB flash drive. The firmware file should not be in a folder. 2) Connect the USB flash drive to the USB port on the front panel of your system. 3) Open the System Menu (Main Menu>Advance>Maintain). 4) Click FIRMWARE UPDATE. The system will scan the USB flash drive and begin updating the firmware. Do not remove the USB flash drive while the upgrade is taking place. 5) Click SURE in the confirmation window. In the system prompt, click OK. The system will restart. PARAMETER EXPORT: Copy the system settings of the device to an empty USB flash drive. PARAMETER IMPORT: Import system settings from another device PTZ Use the PTZ Setup menu to configure settings for a connected PTZ camera (not included). NOTE: Consult the instruction manual of your PTZ camera for complete information about your camera, including protocol and baud rate. To configure a PTZ camera: 12/04/
 Under SETTINGS, select EVERY DAY, EVERY WEEK, or EVERY MONTH. The date drop-down menu appears. 3) Select the date for auto-reset from the drop-down menu.")
17 1) Connect a PTZ camera to the BNC and 485A (TX, +) and 485B (RX, -) ports and power outlet. For more details on connecting a PTZ camera. 2) Under PROTOCOL, select PELCO-D or PELCO-P for the selected channel. Click NEXT PAGE for additional channels (8-channel models only). 3) Under BAUD RATE, select 1200, 2400, 4800, or ) Under DATA BIT select 5, 6, 7, or 8. 5) Under STOP BIT, select 1 or 2. 6) Under VERIFY, select ODD, EVEN, MARK, SPACE, or NONE. 7) Under ADDRESS, enter an address from 001~255 using the Virtual Keyboard. Refer to your PTZ camera`s instruction manual for further details. 8) Click APPLY. Click CLOSE in the confirmation window. 9) Click EXIT in all menus until all windows are closed NETWORK Use the Network Setup menu to configure your network and DNS settings. Figure network setup UPNP UPnP Forum is an industry initiative designed to enable simple and robust connectivity among consumer electronics, intelligent appliances and mobile devices from many different vendors. NOTE: the router needs to support UPNP function. To configure UPNP settings: 1) Enable the UPNP function in your Router. 2) Under DVR GUI, Open the MAIN MENU and click ADVANCE. 3) From the Advanced Setup menu, click NETWORK. 4) Under UPNP, select OPEN. 5) Click APPLY to save your settings and then click OK in the confirmation window. 6) Using a remote PC, open Internet Explorer. 7) In the address bar, enter your Router WAN IP address immediately followed by: WEB PORT (no spaces). WAN IP):XXX(WEB PORT) 8) Enter your system ADMIN password and select INTERNET. NOTE: If you have not enabled passwords on the system, leave the password field blank. 9) Click LOGIN. To configure network settings: 1) Under TYPE, select DHCP, PPPoE, or STATIC. If DHCP, go to step 5. If PPPoE, go to step 2, if STATIC, go to step 3. NOTE: DHCP allows you to quickly connect to your network by obtaining an IP address from the router. After the initial setup, we recommend that you disable DHCP and set the IP address between 1~100. For example, if your IP address is , change the last digits to 90 (i.e ). This ensures that port forwarding will not change in the event of power failure or resetting of your network. 2) If you select PPPoE in step 1, enter your PPPoE user name and password in the respective fields using the Virtual Keyboard. 3) If you selected STATIC in step 1, enter your IP Address, Net mask, and Gateway in the respective fields using the Virtual Keyboard. NOTE: The default IP address of the system is /04/
 Under ADDRESS, enter an address from 001~255 using the Virtual Keyboard. Refer to your PTZ camera`s instruction manual for further details. 8) Click APPLY. Click CLOSE in the confirmation window.")
18 4) If necessary, change the Media and Web Ports. NOTE: For added security, we strongly recommend changing Web port 80 on the system to any desired port not blocked by your Internet service provider (ISP). Please note however, that you will also need to update the Web port in your browser and open this new port in your router. 5) Click APPLY. Click SURE in the confirmation window. 6) Click EXIT in all menus until all windows are closed. The system restarts automatically. Manual DNS Enter the Primary or Secondary DNS from your router. This is required for DDNS to function properly. To obtain your Primary or Secondary DNS: 1) In your web browser, log in to your router using its Default Gateway address. NOTE: Refer to your router`s manual or software for login information. You can also get the Default Gateway on your PC by selecting Start>Run. Type CMD and press Enter. In the Command Prompt window type ipconfig and press Enter. 2) View its WAN settings. Enter the Primary or Secondary DNS address in the MANUAL DNS field on your system. DDNS: A DDNS account allows you to set up a web site address that points back to your Local Network. NOTE: You must register DDNS service prior to configuring DDNS settings. Visit to register.. To configure DDNS settings: 1) From the Network Setup menu, enter Primary or Secondary DNS from the WAN settings of your router in the MANUAL DNS field. 2) Click DDNS SETTINGS. 3) Under DDNS, select ON. 4) Under SERVICE, select 3322, dyndns or perfecteyes. 5) Under DOMAIN NAME, enter your DDNS domain from the confirmation . For example, if your domain name is adam@dyndns.com, you need to enter adam@dyndns.com, in the text field. 6) Enter your DDNS user name and password in the respective fields. 7) Click APPLY. Click SURE in the confirmation window. 8) Click EXIT. The system will prompt you that it must restart. Click CLOSE. 12/04/
 Click EXIT in all menus until all windows are closed. The system restarts automatically. Manual DNS Enter the Primary or Secondary DNS from your router.")
19 8. Remote surveillance software The system features built-in browser-based software that allows you to access your system remotely over your local area network (LAN) or over the Internet using Internet Explorer. NOTE: To ensure PC stability when browsing the DVR, recommended operating systems are Windows XP, Windows Vista, Windows 7; recommended browsers are IE 6.0, IE 7.0, IE Connecting With your system connected to your local area network, you can now log in to your system using Internet Explorer. NOTES: Your system must be connected to your local or wide area network before attempting remote access. You must configure DDNS settings locally. To access your system: 1) Open Internet Explorer. In the address bar, enter the IP address (and port when different from 8080) of your system (e.g :2563). 2) You must install ActiveX in order to access your system. Click the attention bar at the top of the main page and select Install ActiveX Control. DVR Net viewer will reset. 3) In the warning box click Install. The login page appears. 4) Leave the password field blank (default). NOTE: If you have enabled passwords on your system, enter your USER or ADMIN password. However, only the ADMIN can change settings and options on the system. 5) Select LAN or INTERNET from the drop-down menu and click LOGIN. The process will take about 1~2 minutes. 8.2 Remote surveillance main screen Upon login, the Remote Surveillance main screen appears in your browser. 12/04/
 Open Internet Explorer.")
20 1) Modes: Click LIVE, PLAYBACK or SETUP. 2) Main Screen: Main display screen for live viewing and playback. 3) Time Stamp: Time stamp appears on each channel. 4) Channel: Channel number appears in the top left corner. 5) PTZ Control: PTZ control for any connected PTZ cameras (not included). 6) Functions: Click the icons to show/hide channels, take screen captures, and record. 7) Display Modes: Click the icons to view channels in single-channel full-screen, quad, and splitscreen configurations. 8) Volume/Mute: Select a channel (outlined in red) and then click the bars to increase/decrease volume; click the icon to mute/un-mute volume.* *Audio capable cameras (not included) required for audio listening and recording Live viewing By default, remote surveillance opens in Live Viewing mode (split-screen). To use Live Viewing: 1) Click LIVE at the top of the main screen. 2) Click the display mode icons to view the main screen in single-channel, quad, or split-screen configurations. You can also double-click a channel at any time to view it in single-channel. 3) Click to show or hide all the channel windows. 4) Click to start/stop manual recording to your PC on ALL channels. For more details see RECORDING. 5) Select a channel (outlined in red) and then click the audio bars to increase or decrease listen-in volume*. Click the icon to mute/un-mute. NOTE: The Talk function is not supported. *Audio capable camera (not included) required for listen-in audio RECORDING You can record video directly to your PC using the remote surveillance software. To record video to your PC: From Live viewing, click to start/stop manual recording to your PC on ALL channels NOTES: You will record video to your PC regardless of the recording mode on the system itself. By default, recorded files are saved in C:\DVR\[ip_address]\Record SUB-MENU Right-click any channel to open the sub-menu. The sub-menu contains the following options: Open Window Close Open All Close All Start Record Stop PTZ CONTROL You must have a PTZ camera (not included) connected to the system in order to use the PTZ controls. 12/04/
 Display Modes: Click the icons to view channels in single-channel full-screen, quad, and splitscreen configurations.")
p^db=`oj===pìééçêíáåñçêã~íáçå=
 p^db=`oj===pìééçêíáåñçêã~íáçå= How to Disable User Account Control (UAC) in Windows Vista You are attempting to install or uninstall ACT! when Windows does not allow you access to needed files or folders.
p^db=`oj===pìééçêíáåñçêã~íáçå=
 p^db=`oj===pìééçêíáåñçêã~íáçå= Error: "Could not connect to the SQL Server Instance" or "Failed to open a connection to the database." When you attempt to launch ACT! by Sage or ACT by Sage Premium for
Cameraserver mini. commissioning. Ihre Vision ist unsere Aufgabe
 Cameraserver mini commissioning Page 1 Cameraserver - commissioning Contents 1. Plug IN... 3 2. Turn ON... 3 3. Network configuration... 4 4. Client-Installation... 6 4.1 Desktop Client... 6 4.2 Silverlight
VGM. VGM information. HAMBURG SÜD VGM WEB PORTAL - USER GUIDE June 2016
 Overview The Hamburg Süd VGM-Portal is an application which enables to submit VGM information directly to Hamburg Süd via our e-portal web page. You can choose to insert VGM information directly, or download
VGM. VGM information. HAMBURG SÜD VGM WEB PORTAL USER GUIDE June 2016
 Overview The Hamburg Süd VGM Web portal is an application that enables you to submit VGM information directly to Hamburg Süd via our e-portal Web page. You can choose to enter VGM information directly,
Word-CRM-Upload-Button. User manual
 Word-CRM-Upload-Button User manual Word-CRM-Upload for MS CRM 2011 Content 1. Preface... 3 2. Installation... 4 2.1. Requirements... 4 2.1.1. Clients... 4 2.2. Installation guidelines... 5 2.2.1. Client...
NEWSLETTER. FileDirector Version 2.5 Novelties. Filing system designer. Filing system in WinClient
 Filing system designer FileDirector Version 2.5 Novelties FileDirector offers an easy way to design the filing system in WinClient. The filing system provides an Explorer-like structure in WinClient. The
Yealink W52 DECT IP Telefon
 Yealink W52 DECT IP Telefon Manuelle Neukonfiguration Dokumentenversion 1.0 Yealink W52 DECT IP Telefon Mauelle Neukonfiguration Copyright Hinweis Copyright 2016 finocom AG Alle Rechte vorbehalten. Jegliche
Tube Analyzer LogViewer 2.3
 Tube Analyzer LogViewer 2.3 User Manual Stand: 25.9.2015 Seite 1 von 11 Name Company Date Designed by WKS 28.02.2013 1 st Checker 2 nd Checker Version history Version Author Changes Date 1.0 Created 19.06.2015
Android APP NVR Viewer
 Android APP NVR Viewer User Manual DN-16111 DN-16112 DN16113 2 DN-16111, DN-16112, DN-16113 for Android User Manual Table of Contents Download the APP... 3 Running the app - Add NVR... 3 Running the app
1. General information... 2 2. Login... 2 3. Home... 3 4. Current applications... 3
 User Manual for Marketing Authorisation and Lifecycle Management of Medicines Inhalt: User Manual for Marketing Authorisation and Lifecycle Management of Medicines... 1 1. General information... 2 2. Login...
Ingenics Project Portal
 Version: 00; Status: E Seite: 1/6 This document is drawn to show the functions of the project portal developed by Ingenics AG. To use the portal enter the following URL in your Browser: https://projectportal.ingenics.de
ALL1681 Wireless 802.11g Powerline Router Quick Installation Guide
 ALL1681 Wireless 802.11g Powerline Router Quick Installation Guide 1 SET ALL1681 Upon you receive your wireless Router, please check that the following contents are packaged: - Powerline Wireless Router
Titelbild1 ANSYS. Customer Portal LogIn
 Titelbild1 ANSYS Customer Portal LogIn 1 Neuanmeldung Neuanmeldung: Bitte Not yet a member anklicken Adressen-Check Adressdaten eintragen Customer No. ist hier bereits erforderlich HERE - Button Hier nochmal
ONLINE LICENCE GENERATOR
 Index Introduction... 2 Change language of the User Interface... 3 Menubar... 4 Sold Software... 5 Explanations of the choices:... 5 Call of a licence:... 7 Last query step... 9 Call multiple licenses:...
Quick Installation Guide
 LevelOne WHG-1000 300Mbps Wireless PoE Hotspot Gateway Quick Installation Guide English Deutsch Table of Contents English... 3 Deutsch... 13 Default Settings IP Address-LAN1 192.168.1.254 IP Address-LAN2
VIDEO CALL CAMERA G-VCAM-01
 VIDEO CALL CAMERA G-VCAM-01 EN AUS GUTEM GRUND ENGLISH 07-10 2 SAFETY AND INFORMATION Safety 7 This camera is designed to transmit video and audio signals. All other uses are expressly prohibited. 7 Protect
Exercise (Part V) Anastasia Mochalova, Lehrstuhl für ABWL und Wirtschaftsinformatik, Kath. Universität Eichstätt-Ingolstadt 1
 Anastasia Mochalova, Lehrstuhl für ABWL und Wirtschaftsinformatik, Kath. Universität Eichstätt-Ingolstadt 1") Exercise (Part V) Notes: The exercise is based on Microsoft Dynamics CRM Online. For all screenshots: Copyright Microsoft Corporation. The sign ## is you personal number to be used in all exercises. All
Exercise (Part V) Notes: The exercise is based on Microsoft Dynamics CRM Online. For all screenshots: Copyright Microsoft Corporation. The sign ## is you personal number to be used in all exercises. All
Monitor VIS 3xx Kurzanleitung
 Monitor VIS 3xx Kurzanleitung 19.08.08 Art. Nr. 22261 Inhalt: 1. Spezifikationen...2 2. Tastenfunktionen...2 3. Menüführung und Einstellungen...3 Technik nach Maß Wöhler Monitor VIS 3xx 1. Spezifikationen
vcdm im Wandel Vorstellung des neuen User Interfaces und Austausch zur Funktionalität V
 vcdm im Wandel Vorstellung des neuen User Interfaces und Austausch zur Funktionalität V0.1 2018-10-02 Agenda vcdm User Interface History Current state of User Interface User Interface X-mas 2018 Missing
Bedienungsanleitung / Manual : LED-Nixie
 Bedienungsanleitung / Manual : LED-Nixie English please see below. Bei Neustart und gleichzeitig gedrückter Taste während der Versionsanzeige (halten bis Beep hörbar), erfolgt eine Zurücksetzung auf (Standard)
NVR Mobile Viewer for iphone/ipad/ipod Touch
 NVR Mobile Viewer for iphone/ipad/ipod Touch Quick Installation Guide DN-16111 DN-16112 DN16113 2 DN-16111, DN-16112, DN-16113 for Mobile ios Quick Guide Table of Contents Download and Install the App...
MANUAL_EN ANLEITUNG_DE PHONE SUITE SYNCHRONISATION SOFTWARE
 MANUAL_EN ANLEITUNG_DE PHONE SUITE SYNCHRONISATION SOFTWARE 2 PHONE SUITE MANUAL PHONE SUITE MANUAL 3 RESERVATION Technical Data is subject to change without notice. Changes, errors and misprints may not
Quick Guide Home Network Mode
 Quick Guide Home Network Mode English > 1 German > 3 About the Home Network Mode EN Tivizen Nano & iplug normally work on their own created networks (whose SSID starts with tivizentv or iplug ) in which
CABLE TESTER. Manual DN-14003
 CABLE TESTER Manual DN-14003 Note: Please read and learn safety instructions before use or maintain the equipment This cable tester can t test any electrified product. 9V reduplicated battery is used in
Anleitung zur Verwendung des Update-Tools für
 English version see below (page 10) Anleitung zur Verwendung des Update-Tools für - KW DDC Steuergeräte - KW DDC WLAN Module - KW DLC Steuergeräte - KW DLC WLAN Module Bitte beachten Sie: jedes Steuergerät
Snom 3xx/7xx Serie. Manuelle Neukonfiguration. Dokumentenversion 1.0
 Snom 3xx/7xx Serie Manuelle Neukonfiguration Dokumentenversion 1.0 Snom 3xx/7xx Serie Mauelle Neukonfiguration Copyright Hinweis Copyright 2016 finocom AG Alle Rechte vorbehalten. Jegliche technische Dokumentation,
Quick Start Guide. PoE IP Camera. Technical Support EN/DE QG4_B
 EN/DE Technical Support PoE IP Camera Quick Start Guide For Windows Client & Mac Client, please download the PC software: https://reolink.com/software-and-manual/ For advanced setup, please download the
150Mbps Micro Wireless N USB Adapter
 150Mbps Micro Wireless N USB Adapter TEW-648UBM ŸAnleitung zur Schnellinstallation (1) ŸTroubleshooting (6) 1.11 1. Bevor Sie anfangen Packungsinhalt ŸTEW-648UBM ŸCD-ROM (Dienstprogramm & Bedienungsanleitung)
Anleitung zur Schnellinstallation TFM-560X YO.13
 Anleitung zur Schnellinstallation TFM-560X YO.13 Table of Contents Deutsch 1 1. Bevor Sie anfangen 1 2. Installation 2 Troubleshooting 6 Version 06.08.2011 1. Bevor Sie anfangen Packungsinhalt ŸTFM-560X
Produktinformation _147PNdeen
 Produktinformation 201105_147PNdeen Neue Software für die TOUCH PC Auswuchtmaschinen BM 35 Touch, BM 45 Touch, BM 55 Touch Mit der Einführung der BM 11 Touch in die Nussbaum Produktlinie der Rad Auswuchtmaschinen
SanStore: Kurzanleitung / SanStore: Quick reference guide
 SanStore Rekorder der Serie MM, MMX, HM und HMX Datenwiedergabe und Backup Datenwiedergabe 1. Drücken Sie die Time Search-Taste auf der Fernbedienung. Hinweis: Falls Sie nach einem Administrator-Passwort
USB -> Seriell Adapterkabel Benutzerhandbuch
 USB -> Seriell Adapterkabel Benutzerhandbuch 1. Produkt Eigenschaften 1 2. System Vorraussetzungen 1 3. Treiber Installation (Alle Windows Systeme) 1 4. Den COM Port ändern 2 5. Einstellen eines RS232
USB Treiber updaten unter Windows 7/Vista
 USB Treiber updaten unter Windows 7/Vista Hinweis: Für den Downloader ist momentan keine 64 Bit Version erhältlich. Der Downloader ist nur kompatibel mit 32 Bit Versionen von Windows 7/Vista. Für den Einsatz
Anleitung zur Schnellinstallation TFM-561U
 Anleitung zur Schnellinstallation TFM-561U V1 Table of Contents Deutsch 1 1. Bevor Sie anfangen 1 2. Installation 2 Troubleshooting 5 Version 08.25.2010 1. Bevor Sie anfangen Packungsinhalt TFM-561U Treiber
Dexatek's Alexa Smart Home Skills Instruction Guide
 Dexatek's Alexa Smart Home Skills Instruction Guide Version 0.3 Author Esther Date 01/10/18 ~ 1 ~ Revision History Version Date Editor Remark 0.1 2017/04/05 Esther Initial version 0.2 2018/01/09 Esther
Hama GmbH & Co KG Postfach Monheim/Germany Tel. +49 (0)9091/502-0 Fax +49 (0)9091/
9091/502-0 Fax +49 (0)9091/") www.hama.de Hama GmbH & Co KG Postfach 80 86651 Monheim/Germany Tel. +49 (0)9091/502-0 Fax +49 (0)9091/502-274 hama@hama.de www.hama.de 00062249-05.05 Multimedia Kit für/for Mercedes Command 2.0 00062249
www.hama.de Hama GmbH & Co KG Postfach 80 86651 Monheim/Germany Tel. +49 (0)9091/502-0 Fax +49 (0)9091/502-274 hama@hama.de www.hama.de 00062249-05.05 Multimedia Kit für/for Mercedes Command 2.0 00062249
Installation Guide WLAN Interface
 Installation Guide 7106 7206 7010 WLAN Interface EN Installation Guide This guide explains how to install the Ethernet LAN card in your label printer. You should conult your dealer or distributor for more
Sepiola Mockups. Overview. Show notes. Primäre Navigation anklicken um zum gewünschten Mockups zu gehen. Backup usage. Overview.
 Show notes usage Incremental s Free 35% 30% 35% 711 MB 598 MB 739 MB Quota: 2 GB change quota under Settings schedule Last s Successfull Tuesday, 19.3.09 12:16 Successfull Wednesday, 19.3.09 12:25 Successfull
Analog GSM-Gateway TRF
 Analog GSM-Gateway TRF GSM gateway for voice- or fax transmission 1 2009 com.sat GmbH Kommunikationssysteme Schwetzinger Str. 19 D-68519 Viernheim www.comsat.de Tel: +49-(0)180-3-768837 The connecting
Cisco SSPA122. Installation und manuelle Rekonfiguration. Dokumentenversion 1
 Cisco SSPA122 Installation und manuelle Rekonfiguration Dokumentenversion 1 Placetel UC-One Cisco SPA122 Installation und manuelle Rekonfiguration Copyright Hinweis Copyright 2015 finocom AG Alle Rechte
SETUP TOOL. Bedienungsanleitung User s Manual
 Bedienungsanleitung User s Manual Bitte lesen Sie diese Anleitung vor der Inbetriebnahme sorgfältig durch Please read the instructions carefully before use 1. Eigenschaften Das Setup Tool ist ein speziell
How-To-Do. Hardware Configuration of the CC03 via SIMATIC Manager from Siemens
 How-To-Do Hardware Configuration of the CC03 via SIMATIC Manager from Siemens Content Hardware Configuration of the CC03 via SIMATIC Manager from Siemens... 1 1 General... 2 1.1 Information... 2 1.2 Reference...
Anleitung zur Schnellinstallation TFM-PCIV92A B1.21
 Anleitung zur Schnellinstallation TFM-PCIV92A B1.21 Table of Contents Deutsch 1 1. Bevor Sie anfangen 1 2. Installation 2 Troubleshooting 6 Version 05.11.2011 1. Bevor Sie anfangen Packungsinhalt ŸTFM-PCIV92A
Parameter-Updatesoftware PF-12 Plus
 Parameter-Updatesoftware PF-12 Plus Mai / May 2015 Inhalt 1. Durchführung des Parameter-Updates... 2 2. Kontakt... 6 Content 1. Performance of the parameter-update... 4 2. Contact... 6 1. Durchführung
Exercise (Part II) Anastasia Mochalova, Lehrstuhl für ABWL und Wirtschaftsinformatik, Kath. Universität Eichstätt-Ingolstadt 1
 Anastasia Mochalova, Lehrstuhl für ABWL und Wirtschaftsinformatik, Kath. Universität Eichstätt-Ingolstadt 1") Exercise (Part II) Notes: The exercise is based on Microsoft Dynamics CRM Online. For all screenshots: Copyright Microsoft Corporation. The sign ## is you personal number to be used in all exercises. All
Exercise (Part II) Notes: The exercise is based on Microsoft Dynamics CRM Online. For all screenshots: Copyright Microsoft Corporation. The sign ## is you personal number to be used in all exercises. All
300Mbps Wireless Outdoor PoE Access Point/Bridge Quick Installation Guide
 LevelOne WAB-5120 300Mbps Wireless Outdoor PoE Access Point/Bridge Quick Installation Guide English Deutsch - 1 - Table of Content English... - 3 - Deutsch... - 9 - This guide covers only the most common
Exercise (Part XI) Anastasia Mochalova, Lehrstuhl für ABWL und Wirtschaftsinformatik, Kath. Universität Eichstätt-Ingolstadt 1
 Anastasia Mochalova, Lehrstuhl für ABWL und Wirtschaftsinformatik, Kath. Universität Eichstätt-Ingolstadt 1") Exercise (Part XI) Notes: The exercise is based on Microsoft Dynamics CRM Online. For all screenshots: Copyright Microsoft Corporation. The sign ## is you personal number to be used in all exercises. All
Exercise (Part XI) Notes: The exercise is based on Microsoft Dynamics CRM Online. For all screenshots: Copyright Microsoft Corporation. The sign ## is you personal number to be used in all exercises. All
Anleitung zur Schnellinstallation TEW-623PI 3.02
 Anleitung zur Schnellinstallation TEW-623PI 3.02 Table of Contents Deutsch 1 1. Bevor Sie anfangen 2. Installation 1 2 3. Verwendung des drahtlosen Adapters 4 Troubleshooting 5 Version 02.05.2010 1. Bevor
Anleitung zur Schnellinstallation TU3-SA 1.01
 Anleitung zur Schnellinstallation TU3-SA 1.01 Table of Contents Deutsch 1 1. Bevor Sie anfangen 1 2. Installation der Hardware 2 3. Zugriff auf die Festplatten des TU3-SA 4 Troubleshooting 5 Version 02.15.2011
Application Note. Import Jinx! Scenes into the DMX-Configurator
 Application Note Import Jinx! Scenes into the DMX-Configurator Import Jinx! Scenen into the DMX-Configurator 2 The Freeware Jinx! is an user friendly, well understandable software and furthermore equipped
Quick Installation Guide for 4 and 7-Port Broadband Router
 Quick Installation Guide for 4 and 7-Port Broadband Router A. Hardware Installation 1. Setup LAN connection: connect an Ethernet cable from your computer s Ethernet port to one of the LAN ports of this
Panic Button Add-on Device Quickstart Guide
 Panic Button Add-on Device Quickstart Guide Model No. PNB1301 What s inside: 1x Panic Button 1x Lanyard All Home8 add-on devices have to work with Home8 systems. Deutsch Schritt 1: Setzen Sie Ihr Gerät
KURZANLEITUNG. Firmware-Upgrade: Wie geht das eigentlich?
 KURZANLEITUNG Firmware-Upgrade: Wie geht das eigentlich? Die Firmware ist eine Software, die auf der IP-Kamera installiert ist und alle Funktionen des Gerätes steuert. Nach dem Firmware-Update stehen Ihnen
Instruktionen Mozilla Thunderbird Seite 1
 Instruktionen Mozilla Thunderbird Seite 1 Instruktionen Mozilla Thunderbird Dieses Handbuch wird für Benutzer geschrieben, die bereits ein E-Mail-Konto zusammenbauen lassen im Mozilla Thunderbird und wird
prorm Budget Planning promx GmbH Nordring Nuremberg
 prorm Budget Planning Budget Planning Business promx GmbH Nordring 100 909 Nuremberg E-Mail: support@promx.net Content WHAT IS THE prorm BUDGET PLANNING? prorm Budget Planning Overview THE ADVANTAGES OF
Registration of residence at Citizens Office (Bürgerbüro)
") Registration of residence at Citizens Office (Bürgerbüro) Opening times in the Citizens Office (Bürgerbüro): Monday to Friday 08.30 am 12.30 pm Thursday 14.00 pm 17.00 pm or by appointment via the Citizens
Registration of residence at Citizens Office (Bürgerbüro) Opening times in the Citizens Office (Bürgerbüro): Monday to Friday 08.30 am 12.30 pm Thursday 14.00 pm 17.00 pm or by appointment via the Citizens
v i r t u A L C O M P o r t s
 v i r t u A L C O M P o r t s (HO720 / HO730) Installieren und Einstellen Installation and Settings Deutsch / English Installieren und Einstellen des virtuellen COM Ports (HO720 / HO730) Einleitung Laden
Installation Manual. Driver Installation USB-to-Serial Adapter WE2111. A en/de
 Installation Manual English Deutsch Driver Installation USB-to-Serial Adapter WE2111 A4012-1.0 en/de USB-to-Serial Adapter English 2 A4012-1.0 en/de USB-to-Serial Adapter 1 Installation in Windows 7...
LevelOne. Quick Installation Guide. EAP series Enterprise Access Point. Default Settings. IP Address
 LevelOne EAP series Enterprise Access Point Quick Installation Guide English Deutsch Default Settings IP Address 192.168.1.1 Username admin Password admin Figure 1-1 Figure 1-2 Figure 1-3 2 Figure 2-1
Power supply Interference suppressed acc. to DIN EN /- 4, EN 55011, EN CI. B, power factor corrected Power factor BöSha LED driver
 Operating Instructions LED Mast Double Luminaire Callisto SC DB, incl. Inclination Adjustment, Single-Chip Technology (Please, read carefully before starting operation) Version: 16.01.2017 Model 369-M
JTAGMaps Quick Installation Guide
 Index Index... 1 ENGLISH... 2 Introduction... 2 Requirements... 2 1. Installation... 3 2. Open JTAG Maps... 4 3. Request a free JTAG Maps license... 4 4. Pointing to the license file... 5 5. JTAG Maps
Magic Figures. We note that in the example magic square the numbers 1 9 are used. All three rows (columns) have equal sum, called the magic number.
 have equal sum, called the magic number.") Magic Figures Introduction: This lesson builds on ideas from Magic Squares. Students are introduced to a wider collection of Magic Figures and consider constraints on the Magic Number associated with such
Magic Figures Introduction: This lesson builds on ideas from Magic Squares. Students are introduced to a wider collection of Magic Figures and consider constraints on the Magic Number associated with such
Setup Manual Anleitung zur Konfiguration
 Setup Manual Anleitung zur Konfiguration Tap your language 1 Introduction 1. The difference between the MusicCast Smart Home skill and the MusicCast skill MusicCast Smart Home skill The MusicCast Smart
Guidance Notes for the eservice 'Marketing Authorisation & Lifecycle Management of Medicines' Contents
 Guidance Notes for the eservice 'Marketing Authorisation & Lifecycle Management of Medicines' Contents Login... 2 No active procedure at the moment... 3 'Active' procedure... 4 New communication (procedure
Der Adapter Z250I / Z270I lässt sich auf folgenden Betriebssystemen installieren:
 Installationshinweise Z250I / Z270I Adapter IR USB Installation hints Z250I / Z270I Adapter IR USB 06/07 (Laden Sie den Treiber vom WEB, entpacken Sie ihn in ein leeres Verzeichnis und geben Sie dieses
Electrical testing of Bosch common rail piezo injectors
 Applies to generation CRI 3: Bosch 10-position order number 0 445 115 = CRI 3-16 (CRI 3.0) 1600 bar 0 445 116 = CRI 3-18 (CRI 3.2) 1800 bar 0 445 117 = CRI 3-20 (CRI 3.3) 2000 bar Tools required: Hybrid
B/S/H/ Startfolie. B/S/H Bosch und Siemens Hausgeräte GmbH - KDT-T B/S/H Bosch und Siemens Hausgeräte GmbH KDT-T
 Startfolie B/S/H/ 1 Product division Event Location Refrigeration Side by Side USA B/S/H Bosch und Siemens Hausgeräte GmbH KDT-T 2 Side-by-Side Appliances Models: Bosch Siemens KAN 56V** KAN58A** KA58NA**with
Quick Installation Guide TBW-101UB TBW-102UB
 Quick Installation Guide TBW-101UB TBW-102UB Table of Contents Deutsch... 1. Bevor Sie anfangen... 2. Installation... 3. Cómo usar el adaptador Bluetooth... 1 1 2 4 Troubleshooting... 5 (Version 01.06.2006)
NTP Synchronisierung NTP Synchronizer
 Q-App: NTP Synchronisierung NTP Synchronizer Q-App zur automatischen Datums und Zeitsynchronisierung Q-App for automatic date and time synchronization Beschreibung Der Workflow hat 2 Ebenen eine Administratoren-
Die Bedeutung neurowissenschaftlicher Erkenntnisse für die Werbung (German Edition)
") Die Bedeutung neurowissenschaftlicher Erkenntnisse für die Werbung (German Edition) Lisa Johann Click here if your download doesn"t start automatically Download and Read Free Online Die Bedeutung neurowissenschaftlicher
Die Bedeutung neurowissenschaftlicher Erkenntnisse für die Werbung (German Edition) Lisa Johann Click here if your download doesn"t start automatically Download and Read Free Online Die Bedeutung neurowissenschaftlicher
iid software tools QuickStartGuide iid USB base driver installation
 iid software tools QuickStartGuide iid software tools USB base driver installation microsensys Nov 2016 Introduction / Einleitung This document describes in short form installation of the microsensys USB
Load balancing Router with / mit DMZ
 ALL7000 Load balancing Router with / mit DMZ Deutsch Seite 3 English Page 10 ALL7000 Quick Installation Guide / Express Setup ALL7000 Quick Installation Guide / Express Setup - 2 - Hardware Beschreibung
Benutzerhandbuch / User s Manual RUPS 2000 / -B1
 RUPS 2000 / RUPS 2000-B1 Benutzerhandbuch / User s Manual RUPS 2000 / -B1 Deutsch English Benutzerhandbuch RUPS 2000 / RUPS 2000-B1 Deutsch In diesem Benutzerhandbuch finden Sie eine Kurzanleitung zu Installation
TUNING GUIDE. ridefox.com
 TUNING GUIDE ridefox.com sag setting To achieve the best performance from your FOX suspension, adjust the air pressure to attain your proper sag setting. Sag is the amount your suspension compresses under
Weather forecast in Accra
 Weather forecast in Accra Thursday Friday Saturday Sunday 30 C 31 C 29 C 28 C f = 9 5 c + 32 Temperature in Fahrenheit Temperature in Celsius 2 Converting Celsius to Fahrenheit f = 9 5 c + 32 tempc = 21
Hama GmbH & Co KG Postfach Monheim/Germany Tel. +49 (0)9091/502-0 Fax +49 (0)9091/
9091/502-0 Fax +49 (0)9091/") www.hama.de Hama GmbH & Co KG Postfach 80 86651 Monheim/Germany Tel. +49 (0)9091/502-0 Fax +49 (0)9091/502-274 hama@hama.de www.hama.de 00062248-05.05 Multimedia Kit für/for Audi Naviplus/ VW/Seat/Skoda
www.hama.de Hama GmbH & Co KG Postfach 80 86651 Monheim/Germany Tel. +49 (0)9091/502-0 Fax +49 (0)9091/502-274 hama@hama.de www.hama.de 00062248-05.05 Multimedia Kit für/for Audi Naviplus/ VW/Seat/Skoda
Technische Information. Toolset Software und Cosworth Geräte
 Technische Information Technical Information 07/2014 911 GT3 Cup (991) Toolset Software und Cosworth Geräte Toolset software and Cosworth devices Fahrzeug / Vehicle: 911 GT3 Cup (991) Bauteil / Part: ICD
Where are we now? The administration building M 3. Voransicht
 Let me show you around 9 von 26 Where are we now? The administration building M 3 12 von 26 Let me show you around Presenting your company 2 I M 5 Prepositions of place and movement There are many prepositions
Table of Cont 6. 2 General Information... 4 Purpose...4 Documentation...4 Scope of Supply...5 Technical Data Safety Regulations...
 2 General Information........................ 4 Purpose........................................4 Documentation................................4 Scope of Supply................................5 Technical
Englisch-Grundwortschatz
 Englisch-Grundwortschatz Die 100 am häufigsten verwendeten Wörter also auch so so in in even sogar on an / bei / in like wie / mögen their with but first only and time find you get more its those because
SAMPLE EXAMINATION BOOKLET
 S SAMPLE EXAMINATION BOOKLET New Zealand Scholarship German Time allowed: Three hours Total marks: 24 EXAMINATION BOOKLET Question ONE TWO Mark There are three questions. You should answer Question One
ALL2282. Pan-Tilt MPEG4/MJPEG Network Camera. Quick Installation Guide
 ALL2282 Pan-Tilt MPEG4/MJPEG Network Camera Quick Installation Guide 1 Getting Started Package Contents Check the items contained in the package carefully. You should have the following items. Once any
DIBELS TM. German Translations of Administration Directions
 DIBELS TM German Translations of Administration Directions Note: These translations can be used with students having limited English proficiency and who would be able to understand the DIBELS tasks better
Order Ansicht Inhalt
 Order Ansicht Inhalt Order Ansicht... 1 Inhalt... 1 Scope... 2 Orderansicht... 3 Orderelemente... 4 P1_CHANG_CH1... 6 Function: fc_ins_order... 7 Plug In... 8 Quelle:... 8 Anleitung:... 8 Plug In Installation:...
Mini Cube HD Camera Add-on Device Quickstart Guide
 Mini Cube HD Camera Add-on Device Quickstart Guide Model No. IPC2202 What s inside: 1x Mini Cube HD Camera 1x Power Adapter 1x Power Cable Mounting Accessories All Home8 add-on devices have to work with
User Manual BB-anywhere
 User Manual BB-anywhere LOGIN PROCEDURE 1. Click the Start button, choose All Programs (right above the search box) and select BB-ANYWHERE from the Start menu: BB-anywhere in a nutshell Regardless whether
Exercise (Part I) Anastasia Mochalova, Lehrstuhl für ABWL und Wirtschaftsinformatik, Kath. Universität Eichstätt-Ingolstadt 1
 Anastasia Mochalova, Lehrstuhl für ABWL und Wirtschaftsinformatik, Kath. Universität Eichstätt-Ingolstadt 1") Exercise (Part I) Notes: The exercise is based on Microsoft Dynamics CRM Online. For all screenshots: Copyright Microsoft Corporation. The sign ## is you personal number to be used in all exercises. All
Exercise (Part I) Notes: The exercise is based on Microsoft Dynamics CRM Online. For all screenshots: Copyright Microsoft Corporation. The sign ## is you personal number to be used in all exercises. All
yasxtouch Firmware Update
 Inhaltsverzeichnis /Content Inhalt Inhaltsverzeichnis /Content... 1 1. Funktionsweise / Functionality... 2 2. Speichern der Einstellungen / Backup Settings... 2 2.1 Anmelden am Serveradmin / Login Serveradmin...
Bedienungsanleitung Manual
 NK ZSU 2 ZEITSCHALTUHR DIGITAL 51277 NK ZSU 3 ZEITSCHALTUHR DIGITAL IP44 51301 NK ZSU 4 ZEITSCHALTUHR DIGITAL 93256 NK ZSU 2 TIME SWITCH DIGITAL 51277 NK ZSU 3 TIME SWITCH DIGITAL IP44 51301 NK ZSU 4 TIME
Informationen zur Verwendung des TFE-Portals / Information for Using the TFE portal
 Informationen zur Verwendung des TFE-Portals / Information for Using the TFE portal Inhalt / Content Vorraussetzungen für Java Web Start /... 3 Prerequisited for Java-WebStart... 3 Datenempfang /... 3
How to access licensed products from providers who are already operating productively in. General Information... 2. Shibboleth login...
 Shibboleth Tutorial How to access licensed products from providers who are already operating productively in the SWITCHaai federation. General Information... 2 Shibboleth login... 2 Separate registration
Mock Exam Behavioral Finance
 Mock Exam Behavioral Finance For the following 4 questions you have 60 minutes. You may receive up to 60 points, i.e. on average you should spend about 1 minute per point. Please note: You may use a pocket
RECHNUNGSWESEN. KOSTENBEWUßTE UND ERGEBNISORIENTIERTE BETRIEBSFüHRUNG. BY MARTIN GERMROTH
 RECHNUNGSWESEN. KOSTENBEWUßTE UND ERGEBNISORIENTIERTE BETRIEBSFüHRUNG. BY MARTIN GERMROTH DOWNLOAD EBOOK : RECHNUNGSWESEN. KOSTENBEWUßTE UND Click link bellow and free register to download ebook: RECHNUNGSWESEN.
CNC ZUR STEUERUNG VON WERKZEUGMASCHINEN (GERMAN EDITION) BY TIM ROHR
 BY TIM ROHR") (GERMAN EDITION) BY TIM ROHR READ ONLINE AND DOWNLOAD EBOOK : CNC ZUR STEUERUNG VON WERKZEUGMASCHINEN (GERMAN EDITION) BY TIM ROHR PDF Click button to download this ebook READ ONLINE AND DOWNLOAD CNC ZUR
(GERMAN EDITION) BY TIM ROHR READ ONLINE AND DOWNLOAD EBOOK : CNC ZUR STEUERUNG VON WERKZEUGMASCHINEN (GERMAN EDITION) BY TIM ROHR PDF Click button to download this ebook READ ONLINE AND DOWNLOAD CNC ZUR
PONS DIE DREI??? FRAGEZEICHEN, ARCTIC ADVENTURE: ENGLISCH LERNEN MIT JUSTUS, PETER UND BOB
 Read Online and Download Ebook PONS DIE DREI??? FRAGEZEICHEN, ARCTIC ADVENTURE: ENGLISCH LERNEN MIT JUSTUS, PETER UND BOB DOWNLOAD EBOOK : PONS DIE DREI??? FRAGEZEICHEN, ARCTIC ADVENTURE: Click link bellow
Can I use an older device with a new GSD file? It is always the best to use the latest GSD file since this is downward compatible to older versions.
 EUCHNER GmbH + Co. KG Postfach 10 01 52 D-70745 Leinfelden-Echterdingen MGB PROFINET You will require the corresponding GSD file in GSDML format in order to integrate the MGB system: GSDML-Vx.x-EUCHNER-MGB_xxxxxx-YYYYMMDD.xml
Nachdem Sie die Datei (z.b. t330usbflashupdate.exe) heruntergeladen haben, führen Sie bitte einen Doppelklick mit der linken Maustaste darauf aus:
 heruntergeladen haben, führen Sie bitte einen Doppelklick mit der linken Maustaste darauf aus:") Deutsch 1.0 Vorbereitung für das Firmwareupdate Vergewissern Sie sich, dass Sie den USB-Treiber für Ihr Gerät installiert haben. Diesen können Sie auf unserer Internetseite unter www.testo.de downloaden.
Deutsch 1.0 Vorbereitung für das Firmwareupdate Vergewissern Sie sich, dass Sie den USB-Treiber für Ihr Gerät installiert haben. Diesen können Sie auf unserer Internetseite unter www.testo.de downloaden.