US FCC Part 15 Class B Verification Statement
|
|
|
- Michael Hofmeister
- vor 6 Jahren
- Abrufe
Transkript

1 MANUALE D USO OPERATING INSTRUCTIONS MANUEL D INSTRUCTIONS BEDIENUNGSANWEISUNG
2 US FCC Part 15 Class B Verification Statement NOTE: This equipment has been tested and found to comply with the limits for a Class B digital device, pursuant to Part 15 of the FCC Rules. These limits are designed to provide reasonable protection against harmful interference in a residential installation. This equipment generates, uses and can radiate radio frequency energy and, if not installed and used in accordance with the instructions, may cause harmful interference to radio communications. However, there is no guarantee that interference will not occur in a particular installation. If this equipment does cause harmful interference to radio or television reception, which can be determined by turning the equipment off and on, the user is encouraged to try to correct the interference by one or more of the following measures: -- Reorient or relocate the receiving antenna. -- Increase the separation between the equipment and receiver. -- Connect the equipment into an outlet on a circuit different from that to which the receiver is connected. -- Consult the dealer or an experienced radio/tv technician for help.
3 MANUALE D USO
4
5 INDICE 1 INTRODUZIONE Contenuto dell imballo Cosa contiene questo manuale Convenzioni tipografiche NORME DI SICUREZZA DATI DI MARCATURA DESCRIZIONE DEL RICEVITORE DTMRX2 (DTMRX224) Caratteristiche Apparecchi compatibili per l uso con il ricevitore Esempi di installazioni Cavi INSTALLAZIONE Apertura dell imballaggio Controllo della marcatura Dip-switch e Jumper di configurazione COLLEGAMENTO DELL ALIMENTAZIONE CONFIGURAZIONE DEL RICEVITORE Impostazione del numero di identificazione del ricevitore Impostazione della velocità di comunicazione Impostazione protocollo ricevitore Impostazione ausiliario come Wiper Impostazione della modalità di ricezione del ricevitore (RS232/RS485/COAX) Inserimento del carico nella linea RS Collegamento con l unità di comando Collegamento con linea RS Collegamento di più ricevitori in cascata (collegamento punto-punto) Più ricevitori per linea, collegamento con doppino twistato (collegamento multipunto) Configurazioni miste (punto-punto /multipunto) Collegamento con linea RS Collegamento per ricezione su cavo coassiale (COAX) Tipo di ottiche controllate e regolazione tensione di controllo ottiche Collegamento dei cavi del brandeggio e delle ottiche ACCENSIONE E SPEGNIMENTO MANUTENZIONE RISOLUZIONE DI PROBLEMI CARATTERISTICHE TECNICHE...19 Il produttore declina ogni responsabilità per eventuali danni derivanti da un uso improprio delle apparecchiature menzionate in questo manuale; si riserva inoltre il diritto di modificarne il contenuto senza preavviso. Ogni cura é stata posta nella raccolta e nella verifica della documentazione contenuta in questo manuale: tuttavia il produttore non può assumersi alcuna responsabilità derivante dall utilizzo della stessa. Lo stesso dicasi per ogni persona o società coinvolta nella creazione e nella produzione di questo manuale. Pag. 1
6 1 Introduzione 1.1 Contenuto dell imballo 1 ricevitore DTMRX2 (DTMRX224) 1 manuale d uso 2 tappi di chiusura PG11 4 staffe di fissaggio a muro con relative viti Alla consegna del prodotto verificare che l imballo sia integro e non abbia segni evidenti di cadute o abrasioni. In caso di evidenti segni di danno all imballo contattare immediatamente il fornitore. Controllare che il contenuto sia rispondente alla lista del materiale sopra indicata. 1.2 Cosa contiene questo manuale In questo manuale è descritto il ricevitore DTMRX2 (DTMRX224), con le particolari procedure di installazione, configurazione e utilizzo. E necessario leggere attentamente questo manuale, in particolar modo il capitolo concernente le norme di sicurezza, prima di installare ed utilizzare il ricevitore. 1.3 Convenzioni tipografiche Nel presente manuale si fa uso di diversi simboli grafici, il cui significato è riassunto di seguito: Rischio di scariche elettriche; togliere l alimentazione prima di procedere con le operazioni, se non é espressamente indicato il contrario. L operazione é molto importante per il corretto funzionamento del sistema: si prega di leggere attentamente la procedura indicata, ed eseguirla secondo le modalità previste. Descrizione delle caratteristiche del sistema: si consiglia di leggere attentamente per comprendere le fasi successive. Pag. 2
7 2 Norme di sicurezza Il ricevitore DTMRX2 (DTMRX224) é conforme alle normative vigenti all atto della pubblicazione del presente manuale per quanto concerne la sicurezza elettrica, la compatibilità elettromagnetica ed i requisiti generali. Si desidera tuttavia garantire gli utilizzatori (tecnico installatore e operatore) specificando alcune avvertenze per operare nella massima sicurezza: L installazione dell apparecchio (e dell intero impianto di cui esso fa parte) deve essere effettuata da personale tecnico adeguatamente qualificato L apparecchio deve essere aperto soltanto da personale tecnico qualificato. La manomissione dell apparecchio fa decadere i termini di garanzia Collegare ad una linea di alimentazione corrispondente a quella indicata sulle etichette di marcatura (vedere il successivo capitolo Dati di marcatura) Il collegamento del ricevitore alla rete di alimentazione deve essere effettuato mediante un interruttore di rete onnipolare con una separazione dei contatti di almeno 3 mm in ciascun polo La presa di alimentazione deve essere connessa a terra secondo le norme vigenti Prima di spostare o effettuare interventi tecnici sull apparecchio, togliere alimentazione al ricevitore L apparecchio si considera disattivato soltanto quando l alimentazione é disinserita e i cavi di collegamento con altri dispositivi sono stati rimossi Utilizzare cavi di sezione adeguata (vedi paragrafo cavi) Non utilizzare cavi di tensione con segni di usura o invecchiamento, in quanto rappresentano un grave pericolo per l incolumità degli utilizzatori L installazione dei cavi deve essere effettuata in maniera tale da non essere di intralcio per l operatore Non utilizzare l apparecchio in presenza di sostanze infiammabili Non permettere l uso dell apparecchio a bambini o incapaci Accertarsi che l apparecchio sia fissato in maniera solida e affidabile Per l assistenza tecnica rivolgersi esclusivamente al personale tecnico autorizzato Conservare con cura il presente manuale per ogni futura consultazione 3 Dati di marcatura Sul ricevitore è riportata una etichetta contenente: Codice di identificazione del prodotto Numero di serie del prodotto Tensione di alimentazione (Volt) Frequenza (Hertz) Consumo (Watt) Grado di protezione IP Sull imballo è presente una etichetta contenente: Codice di identificazione del prodotto (Codice a barre Extended 3/9) Numero di serie del prodotto (Codice a barre Extended 3/9) Breve descrizione del prodotto Tensione di alimentazione (Volt) Frequenza (Hertz) Consumo (Watt) Grado di protezione IP All atto dell installazione controllare se le caratteristiche di alimentazione del ricevitore corrispondono a quelle richieste. L uso di apparecchi non idonei può portare a gravi pericoli per la sicurezza del personale e dell impianto. Pag. 3
8 4 Descrizione del ricevitore DTMRX2 (DTMRX224) Il ricevitore DTMRX2 (DTMRX224) è un ricevitore di comandi a microprocessore per il controllo remoto di brandeggi e ottiche motorizzate. 4.1 Caratteristiche 12 Funzioni: UP, DOWN, LEFT, RIGHT, AUTO, ZOOM TELE, ZOOM WIDE, FOCUS NEAR, FOCUS FAR, IRIS OPEN, IRIS CLOSE, AUX AUX: contatto ausiliario pulito 1A 230 V~ / 1A 24 V~ 99 indirizzi selezionabili tramite Dip switch Comunicazione selezionabile tra RS232, RS485 e Coassiale Ripetitore RS232, RS485 per configurazione in cascata Velocità di comunicazione selezionabile (1200, 9600, 19200, Baud) Protocolli di comunicazione selezionabili: MACRO, Videotec standard, Pelco D (2400 Baud) e Coassiale Possibilità di usare sia ottiche funzionanti ad inversione di polarità che ottiche funzionanti a filo comune Contatto ausiliario AUX impostabile con funzionalità di Wiper EEPROM per memorizzazione opzioni attivate Led presenza alimentazione Led ricezione comando Led funzione attiva Per le caratteristiche strettamente tecniche (consumo, tensione di alimentazione ecc.) consultare il paragrafo Caratteristiche tecniche. 4.2 Apparecchi compatibili per l uso con il ricevitore DCS3, DCTEL, DCJ, DCT, DCIR: tastiere di controllo. SM42A, SM82A, SM84A, SM164A: matrici video con trasmissione dati telemetria su coassiale DCRE485: controllore di comunicazioni che permette di controllare a stella più ricevitori mediante un unica tastiera PTH310, PTH910, NXPTH210 brandeggi ricevitore versione DTMRX2 PTH311, PTH911, NXPTH211 brandeggi ricevitore versione DTMRX224 NOTA: Mediante il modulo d interfaccia DCFIT, è possibile controllare il ricevitore tramite tastiere modello DCS2 e DCMT8. Fare riferimento ai singoli manuali d uso per una descrizione completa delle caratteristiche degli apparecchi. Pag. 4
9 4.3 Esempi di installazioni Un operatore con più monitor, controlla una serie di brandeggi con ricevitori configurati in cascata con linea di telemetria RS485: MATERIALE Parte di controllo: K1: Tastiera di controllo DCJ Parte video: M1: Matrice video SM164A 2 monitor 3 telecamere Parte telemetria: R1,R2, R3: Ricevitori DTMRX2 PT1,PT2,PT3: Brandeggi PTH910 Un operatore con più monitor, controlla una serie di brandeggi con ricevitori funzionanti con telemetria su cavo coassiale proveniente dalla matrice: MATERIALE Parte di controllo: K1: Tastiera di controllo DCJ Parte video: M1: Matrice video SM164A 2 monitor 3 telecamere Parte telemetria: R1, R2, R3: Ricevitori DTMRX2 PT1,PT2,PT3: Brandeggi PTH910 Pag. 5
10 4.4 Cavi Negli schemi d esempio sono stati utilizzati di versi tipi di tratto per indicare cavi di diversa funzione: cavo video: coassiale RG 59 o cavo equivalente. cavo multipolare: ogni funzione di controllo del brandeggio viene attivata / disattivata da un relè interno al ricevitore. Stabilire il numero finale di cavi, seguendo le indicazioni seguenti: 7 fili per la movimentazione del brandeggio: destra, sinistra, alto, basso, autopan, comune, terra 6 fili di controllo per ottiche ad inversione di polarità (zoom, focus, iris) 4 fili di controllo per ottiche a filo comune (zoom, focus, iris) 2 fili per l ausiliare 3 fili per cavo alimentazione Nota: è consigliato l utilizzo di differenti cavi multipolari per le funzioni in bassa tensione ed in alta tensione. Sezione minima consigliata: 0,56 mm.² (AWG 20) per fili brandeggio in alta tensione (ricevitore DTMRX2) 0,75 mm.² (AWG 18) per fili brandeggio in bassa tensione (ricevitore DTMRX224) 0,34 mm.² (AWG 22) per fili in bassa tensione (ottica, ausiliare) 0,75 mm.² (AWG 18) per fili alimentazione DTMRX2 (LINE, NEUTRAL e Terra) 1,00 mm.² (AWG 16) per fili alimentazione DTMRX224 (LINE, NEUTRAL e Terra) cavo per la ricezione/trasmissione digitale dei comandi: 2 fili per la ricezione dall unità di comando (doppino telefonico twistato, sezione 0,22 mm.² AWG 24) 2 fili per la eventuale trasmissione al ricevitore successivo nelle configurazione in cascata (doppino telefonico twistato, sezione 0,22 mm.² AWG 24) Nota: la distanza massima del collegamento é di circa 15 m in RS232 e 1200 m in RS485. Quando più ricevitori sono collegati in cascata, è necessario utilizzare due cavi separati per la ricezione e la trasmissione digitale dei comandi ( non utilizzare cavi multicoppia ) tra i ricevitori Pag. 6
11 5 Installazione La fase di installazione deve essere effettuata solo da personale tecnico qualificato. Le seguenti procedure sono da effettuare in assenza di alimentazione, se non diversamente indicato. 5.1 Apertura dell imballaggio Se l imballo non presenta evidenti difetti (dovuti a cadute o abrasioni anomale), procedere al controllo del materiale in esso contenuto, secondo la lista fornita al paragrafo Contenuto dell imballo al capitolo Introduzione. I materiali d imballo sono costituiti interamente da materiale riciclabile. Sarà cura del tecnico installatore smaltirli secondo le modalità di raccolta differenziata o comunque secondo le norme vigenti nel Paese di utilizzo. 5.2 Controllo della marcatura Prima di procedere con l installazione controllare se il materiale fornito corrisponde alle specifiche richieste, esaminando le etichette di marcatura, secondo quanto descritto al capitolo Dati di marcatura. Non effettuare per nessun motivo alterazioni o collegamenti non previsti in questo manuale: l uso di apparecchi non idonei può portare a gravi pericoli per la sicurezza del personale e dell impianto. Pag. 7
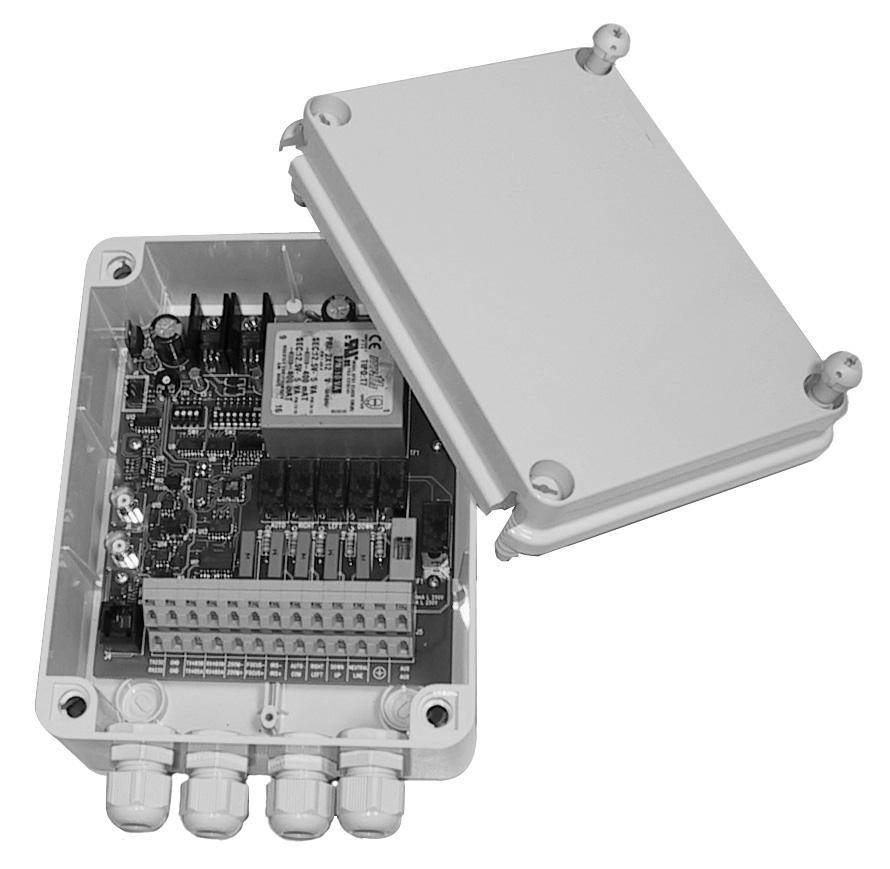
12 5.3 Dip-switch e Jumper di configurazione Nello schema seguente identificare i Dip-switch e i Jumpers di configurazione: Trimmer TR1 per regolazione tensione ottiche Bnc J1 e J2 per ricezione Coassiale Jumper JP4 Jumper JP3 Connettore J4 Serigrafie morsetti superiori Serigrafie morsetti inferiori Morsetti di alimentazione ricevitore Pag. 8
13 Nota sul morsetto J5 Foro cacciavite per morsetto superiore Il morsetto J5 presenta una doppia fila di connettori. La serigrafia relativa ai connettori superiori è la più vicina al relativo morsetto (ad Foro cacciavite esempio NEUTRAL è riferito al per morsetto inferiore morsetto superiore) mentre la serigrafia relativa ai connettori inferiori è la più distante (ad esempio COM è relativa al morsetto inferiore). Per inserire i cavi di collegamento nella morsettiera J5 utilizzare un cacciavite piano nelle fessure apposite come indicato in Figura 1. Fig. 1 Morsetto superiore Morsetto inferiore Pag. 9
14 6 Collegamento dell alimentazione Il collegamento deve essere eseguito utilizzando le relative terminazioni del morsetto J5 (LINE, NEUTRAL, ) come indicato nella figura di pagina 8. Attenzione! Durante il cablaggio predisporre il conduttore di terra di 2-3cm più lungo degli altri conduttori 7 Configurazione del ricevitore La fase di configurazione del ricevitore consente di predisporlo ad un funzionamento ottimale, in base alle necessità dell impianto. La configurazione deve essere fatta solo al momento dell installazione da parte del tecnico installatore. Si consiglia di procedere con ordine alla configurazione dei parametri, per evitare problemi di installazione. I parametri impostati in fase di configurazione sono: Numero di identificazione del ricevitore (indirizzo ricevitore) Impostazione della velocità di comunicazione (1200, 9600, o baud) Impostazione protocollo ricevitore (MACRO, Videotec, Pelco D o COAX) Impostazione Ausiliario o Wiper Modalità di ricezione del ricevitore (RS232/RS485/COAX) Inserimento del carico nella linea RS485 Collegamento delle ottiche Collegamento all unità di comando Regolazione della tensione di controllo dell ottica Collegamento dei cavi del brandeggio e delle ottiche Pag. 10
15 7.1 Impostazione del numero di identificazione del ricevitore Il ricevitore può essere configurato con un indirizzo compreso tra 1 e 99. assicurarsi che non sia presente l alimentazione ( led alimentazione spento) configurare i dip-switch di SW2 secondo la tabella seguente: DIP-SWITCH DIP-SWITCH DIP-SWITCH Impostazione della velocità di comunicazione Il ricevitore DTMRX2 (DTMRX224) può effettuare comunicazioni con quattro differenti velocità di comunicazione. Impostare di dip switch 1 e 2 di SW1 secondo la seguente tabella: Dip 1 Dip 2 Baud OFF OFF 9600 * OFF ON ON OFF 1200 ON ON * Impostazione di default Pag. 11
16 7.3 Impostazione protocollo ricevitore Il ricevitore DTMRX2 (DTMRX224) può operare con quattro tipi di protocollo diverso. Impostare di dip switch 3 e 4 di SW1 in base al tipo di protocollo desiderato e facendo riferimento alla seguente tabella: Dip 3 Dip 4 Protocollo OFF OFF MACRO* OFF ON Videotec ON OFF Pelco D ON ON COAX * Impostazione di default Protocollo Pelco D: il ricevitore imposta una velocità di comunicazione pari a 2400 baud, indipendentemente da ciò che si è impostato nei dip 1 e 2 di SW Impostazione ausiliario come Wiper Il ricevitore DTMRX2 (DTMRX224) consente di impostare il contatto Ausiliario (AUX) con funzionalità di Wiper (funzione attivabile solo da tastiere DCJ e DCT). Normalmente il contatto Ausiliario viene attivato dalle tastiere con il comando Aux 1 e disattivato ancora con Aux 1. Se è attivata la modalità Wiper, il contatto ausiliario funzionerà solo mediante pressione del tasto Wiper (tergicristallo). Al rilascio del tasto Wiper il contatto viene a mancare. L impostazione va fatta sul dip 8 di SW2 secondo la seguente tabella: Dip 8 OFF ON * Impostazione di default Funzione Aux1 Aux1* Wiper 7.5 Impostazione della modalità di ricezione del ricevitore (RS232/RS485/COAX) Impostazioni Jumper JP1 e JP2 per ricezione RS485: Impostazioni Jumper JP1 e JP2 per ricezione RS232: Per la ricezione COAX (telemetria su cavo coassiale) è sufficiente impostare i dip switch 3 e 4 di SW1 come indicato nel paragrafo Impostazione protocollo ricevitore. 7.6 Inserimento del carico nella linea RS485 NOTA: Questa impostazione è necessaria solo se si utilizza una linea di comunicazione RS485. Per la configurazione dei Jumper JP3 e JP4, fare riferimento alle seguenti impostazioni: Jumper in posizione A Jumper in posizione B Impostazioni: JP3 in posizione A: carico inserito in trasmissione RS485. JP3 in posizione B: carico disinserito in trasmissione RS485. JP4 in posizione A: carico inserito in ricezione RS485. JP4 in posizione B: carico disinserito in ricezione RS485. Pag. 12
17 7.7 Collegamento con l unità di comando Il connettore RJ11 presente nel ricevitore (vedi J4 a pag. 8) consente la ricezione e la trasmissione di dati digitali in RS485 o RS232 consentendo un rapido collegamento con le tastiere durante eventuali fasi di test, oppure per il collegamento di interfacce di conversione presenti sul mercato (RS232-fibra ottica). Per il collegamento finale con tastiere, utilizzare invece i morsetti presenti sulla morsettiera J5. Si consiglia di usare la modalità RS485 che consente di raggiungere una distanza massima di 1200 metri ed una comunicazione immune da disturbi provenienti dall esterno. Nella modalità di ricezione COAX è invece possibile raggiungere una distanza massima di 350 metri dall unità di comando (tramite matrici serie SMXXA). Infine nella modalità di ricezione RS232 è possibile coprire una distanza massima di 15 metri dall unità di comando (PC o tastiere modello DCS2 e DCMT8). 7.8 Collegamento con linea RS485 Le tastiere DCJ, DCT,DCTEL e il ricevitore DTMRX2 (DTMRX224) possono essere collegati direttamente tramite il cavo telefonico fornito con la tastiera utilizzando il connettore RJ11 (J4) presente nel circuito. Per un collegamento finale tra unità di comando e ricevitore, fare riferimento alla seguente procedura: Collegamento tastiera - ricevitore Collegare l uscita telemetria della tastiera mediante cavo telefonico in dotazione alla scatola di derivazione RJ- JACK. Collegare tramite doppino twistato i morsetti del ricevitore contrassegnati dalla serigrafia RX485A e RX485B alla scatola di derivazione RJ-JACK connessa precedentemente alla tastiera. Fare riferimento al seguente schema e alla tabella sottostante per una corretta installazione: Modalità di comunicazione RS485: Distanza massima 1200 metri. DCJ, DCT, DCTEL, DCIR (RJ11 A o B) DTMRX2 DTMRX224 Bianco TX-485A RX485A Giallo TX-485B RX485B Al connettore di telemetria della tastiera Morsetto Ricevitore Vengono di seguito presentate tre possibili installazioni d impianto: Collegamento punto punto (in cascata) Collegamento multipunto (in parallelo) Collegamento misto Pag. 13
18 7.8.1 Collegamento di più ricevitori in cascata (collegamento punto-punto) I ricevitori DTMRX2 (DTMRX224) possono rigenerare internamente il segnale ricevuto e rispedirlo su di una nuova linea di comunicazione verso il ricevitore successivo. Ognuno dei tre tratti di linea (L1, L2, L3) è considerato indipendente, e collega punto-punto solo due dispositivi, entrambi con carico inserito, per una lunghezza massima di 1200 metri. La distanza tra tastiera K1 e ricevitore R3 può quindi raggiungere i 3600 m (1200 m tra la tastiera K1 ed il ricevitore R1, 1200 m tra il ricevitore R1 ed il ricevitore R2, e altri 1200 m tra il ricevitore R2 ed il ricevitore R3, per un totale di 3600 m). Nota: I morsetti RX485A e RX485B che presentano il carico inserito, devono essere collegati, rispettivamente, ai morsetti TX485A e TX485B dell unità precedente, anch essi con il carico inserito. I morsetti TX485A e TX485B con carico inserito devono essere collegati rispettivamente ai morsetti RX485A e RX485B dell unità successiva (sempre con carico inserito): Dal ricevitore precedente Al ricevitore successivo NB: Nel caso del collegamento in questione (punto-punto) il malfunzionamento di uno dei ricevitori comporta l interruzione dei dispositivi in cascata Più ricevitori per linea, collegamento con doppino twistato (collegamento multipunto) Tutti i ricevitori collegati ad una stessa linea devono usare il medesimo protocollo di comunicazione RS485. Per ciascuna delle linee valgono le seguenti considerazioni: solo una delle tastiere (quella posta ad un capo della linea) presenta il carico inserito solo uno dei ricevitori (posto all altro capo della linea) presenta il carico inserito. la lunghezza complessiva della linea non deve superare i 1200 m. È stata utilizzata la linea A della tastiera K1 per la comunicazione verso la telemetria. Gli estremi (Tastiera K1 - Ricevitore R3) devono avere la resistenza di terminazione inserita. I ricevitori R1, R2 non devono avere la resistenza di terminazione inserita. La lunghezza massima della linea, da capo a capo (dalla tastiera K1 al ricevitore R3), è di 1200 metri. NB: Nel caso del collegamento in questione (multipunto), il malfunzionamento di uno dei dispositivi non influenza gli altri ricevitori. Pag. 14
19 7.8.3 Configurazioni miste (punto-punto /multipunto) Risulta essere una combinazione dei due modi di collegamento precedenti, e a seconda della combinazione scelta consente di sfruttare al meglio i vantaggi delle due tipi di collegamento riducendo in maniera anche significativa la possibilità di malfunzionamento. Ecco un esempio di collegamento misto: Nell esempio proposto, un eventuale blocco del ricevitore R3 (collegato in multipunto sulla linea L3) non causa il malfunzionamento del ricevitore R4. R3 non è ai capi della linea L3, e quindi non deve essere terminato. Se il ricevitore R2 dovesse bloccarsi, essendo questo il generatore della linea L3, tutti i ricevitori ad esso collegati in cascata (R3 ed R4) non riceveranno comandi. 7.9 Collegamento con linea RS232 Il ricevitore DTMRX2 (DTMRX224) può essere controllato mediante linea RS232 da PC o da tastiere che integrano la comunicazione RS232 (DCS2 e DCMT8). Si ricorda che la distanza massima con la linea seriale RS232 è di 15 metri. Fare riferimento alla seguente tabella di collegamento: DCS2/DCMT8 DTMRX2 RJ-JACK Nero Tx RS RX232 Verde GND RS GND Per collegamenti di ricevitori in cascata, collegare il morsetto RX232 al morsetto TX232 dell unità precedente e collegare il morsetto TX232 al morsetto RX232 dell unità successiva. Collegare assieme le masse (GND). Fare comunque riferimento al seguente schema di collegamento: Dal ricevitore precedente Al ricevitore successivo Pag. 15
20 7.10 Collegamento per ricezione su cavo coassiale (COAX) Il ricevitore DTMRX2 (DTMRX224) integra una ricezione di telemetria su cavo coassiale (RG59 o equivalente). La distanza massima raggiungibile con una comunicazione coassiale è di 350 metri (distanza Matrice Telecamera). Non è consentito interporre dei dispositivi di amplificazione del segnale video (per esempio video distributori). Per una corretta configurazione dell impianto: Collegare il BNC J1 del ricevitore (vedi pag. 8) all uscita video della telecamera. Collegare il BNC J2 del ricevitore (vedi pag. 8) all ingresso video della matrice corrispondente all indirizzo impostato nel ricevitore (ad esempio il ricevitore n 1 verrà collegato all ingresso video n 1 della matrice, il ricevitore n 2 all ingresso video n 2 della matrice ecc.) Impostare i dip switch SW1 per una comunicazione COAX (vedi impostazioni protocollo ricevitore) e impostare l indirizzo del ricevitore con il dip SW2 (vedi paragrafo impostazione del numero di identificazione ricevitore). Impostare la matrice (ed eventualmente la tastiera) con una telemetria di tipo Coassiale. NOTA: La comunicazione COAX è possibile solamente con le matrici modello SMXXA (SM42A, SM82A, SM84A e SM164A). Fare riferimento ai manuali della matrice per la configurazione della stessa Tipo di ottiche controllate e regolazione tensione di controllo ottiche stesse. ATTENZIONE: Il collegamento errato del tipo di ottiche può causare il danneggiamento delle ottiche Il DTMRX2 (DTMRX224) è in grado di controllare sia ottiche a inversione di polarità, sia a filo comune. In caso di ottiche funzionanti a filo comune collegare il filo comune a FOCUS Regolazione della tensione di controllo dell ottica inserire un carico tra i morsetti FOCUS+ e FOCUS- che assorba almeno 10mA (utilizzare una resistenza di valore compreso tra 100 e 1000 ohm). collegare il cavo di alimentazione e alimentare l unità DTMRX2 o DTMRX224 (Led alimentazione acceso) posizionare i puntali del tester sui morsetti FOCUS+ e FOCUS- tenere premuto il tasto FOCUS NEAR sull unità di comando regolare la tensione di controllo dell ottica agendo sul trimmer TR1 (vedi schema pag. 8; default 12V=) NB: evitare di regolare la tensione a vuoto (senza inserire il carico) altrimenti la regolazione risulterà errata Collegamento dei cavi del brandeggio e delle ottiche ATTENZIONE: Prima di effettuare le seguenti operazioni assicurarsi che la tensione di controllo del brandeggio e l impostazione del tipo di ottiche utilizzati siano corretti Togliere alimentazione all unità Effettuare i collegamenti con ottica e brandeggio Alimentare l unità NB: Si raccomanda di utilizzare cavi flessibili di sezione adeguata (vedi paragrafo cavi). Pag. 16
21 8 Accensione e spegnimento Prima di fornire alimentazione: controllare se il materiale fornito corrisponde alle specifiche richieste, esaminando le etichette di marcatura, secondo quanto descritto al capitolo Descrizione della marcatura. controllare che il fusibile di protezione del ricevitore sia integro controllare che il ricevitore e gli altri componenti dell impianto siano chiusi e sia quindi impossibile il contatto diretto con parti in tensione. accertarsi che tutte le parti siano fissate in maniera solida ed affidabile i cavi di alimentazione non devono essere d intralcio alle normali operazioni del tecnico installatore ed al movimento del brandeggio controllare che le fonti di alimentazione ed i cavi di collegamento siano in grado di sopportare il consumo del sistema Pag. 17
22 9 Manutenzione Il ricevitore DTMRX2 (DTMRX224) non necessita di particolare manutenzione. Si raccomanda di utilizzarlo poggiato su una base solida, con i cavi di alimentazione e di collegamento in posizione tale da non essere causa di intralcio all operatore. 10 Risoluzione di problemi Il ricevitore DTMRX2 (DTMRX224) è caratterizzato da una notevole facilità d uso, ma ciononostante possono insorgere dei problemi sia in fase di installazione, di configurazione o durante l uso. PROBLEMA PROBABILE CAUSA RIMEDIO Il led alimentazione è spento Non vengono eseguiti i comandi in RS485 e il led di alimentazione è acceso Non vengono eseguiti i comandi in RS232 e il led di alimentazione è acceso Non vengono eseguiti i comandi in modalità COAX e il led di alimentazione è acceso Manca alimentazione Fusibile bruciato Configurazione errata della ricezione Velocità o protocollo errati Indirizzo ricevitore errato Cablaggio errato Configurazione errata della ricezione Velocità o protocollo errati Indirizzo ricevitore errato Cablaggio errato Errata configurazione del protocollo Errata configurazione dell indirizzo ricevitore Cablaggio errato Controllare il cavo di alimentazione Sostituire il fusibile F1 Controllare l impostazione dei Jumper JP2 e JP4. Controllare le impostazioni del Dip Switch SW1 Controllare l indirizzo impostato nel ricevitore (DIP SW2) Controllare i cablaggi nei morsetti RX485A e RX485B di J5 Controllare l impostazione del Jumper JP1 Controllare le impostazioni del Dip Switch SW1 Controllare l indirizzo impostato nel ricevitore (DIP SW2) Controllare i cablaggi nei morsetti RX232 e GND Controllare il dip switch SW1 Controllare le impostazioni del dip SW2 e accertarsi che l indirizzo impostato corrisponda al canale video in ingresso della matrice Controllare il cavo coassiale (lunghezza massima 350 m). Non usare dispositivi di amplificazione video tra matrice, ricevitore e telecamera. Il brandeggio non funziona Alimentazione del brandeggio errata Controllare che la tensione di alimentazione del brandeggio corrisponda a quella fornita dal ricevitore L ottica non funziona Tensione ottica errata Controllare la regolazione del trimmer TR1 In un collegamento a cascata, le unità successive non ricevono comandi Collegamento non corretto Configurazione errata della ricezione Velocità o protocollo errati Indirizzo errato Controllare i cavi di collegamento Controllare le impostazioni dei Jumper Verificare l impostazione di SW1 Controllare l indirizzo impostato nelle unità non funzionanti Pag. 18
23 11 Caratteristiche tecniche Caratteristiche generali Portata massima linea telemetria RS m Portata massima linea telemetria RS232 15m Portata massima ricezione COAX 350m Portata Contatto Ausiliario 1A 230V~ / 1A 24V Numero massimo di ricevitori indirizzabili 99 Regolazione Tensione ottica 3= - 14 V= max 100mA Consumo massimo 10 W Massima potenza commutabile 100 W Temperatura di funzionamento Da 20 C a +50 C Grado di protezione IP IP56 Peso netto 850 g Dimensioni 225 (L) x 154 (W) x 81 (H) mm Conformità EN55022 classe B, EN EN60065, FCC part 15 Class B Caratteristiche specifiche del ricevitore DTMRX2 Tensione di alimentazione Tensione di alimentazione brandeggio Fusibile F1 230V~ 50Hz 230V~ 50Hz F 250mA L 250V Caratteristiche specifiche del ricevitore DTMRX224 Tensione di alimentazione Tensione di alimentazione brandeggio Fusibile F1 24V~ 50/60Hz 24V~ 50/60Hz F 2.5 A L 250V Pag. 19
24 Pag. 20
25 OPERATING INSTRUCTIONS
26
27 CONTENTS 1 INTRODUCTION Contents of the package The contents of this manual Typographical conventions SAFETY RULES IDENTIFICATION DATA DESCRIPTION OF THE DTMRX2 (DTMRX224) RECEIVER Features Appliances compatible for use with the receiver Examples of installation Cables INSTALLATION Opening the package Checking the markings Configuration DIP switches and Jumpers CONNECTING THE POWER SUPPLY CONFIGURING THE RECEIVER Setting the receiver identification number Setting the communication rate Setting the receiver protocol Setting the auxiliary as Wiper Setting receiver reception mode (RS232/RS485/COAX) Inserting the load on the RS485 line Connecting the control unit Connection with the RS485 line Connecting more than one receiver in cascade (point-to-point connection) More than one receiver per line, connection with twisted pair (multi-point connection) Mixed configurations (point-to-point /multi-point) Connection with the RS232 line Connection for reception by coaxial cable (COAX) Type of controlled lenses and adjusting the lens control voltage Connecting the pan & tilt and lens cables SWITCHING ON AND OFF MAINTENANCE TROUBLESHOOTING TECHNICAL SPECIFICATIONS...19 The manufacturer declines all responsibility for any damage caused by improper use of the appliances mentioned in this manual; furthermore, the manufacturer reserves the right to change the contents without prior notice. All due caution has been taken in gathering and checking the documentation contained in this manual; the manufacturer, however, cannot assume any liability arising from its use. This statement also holds for any person or company concerned with the creation and production of this manual. Page 1
28 1 Introduction 1.1 Contents of the package 1 DTMRX2 (DTMRX224) receiver 1 user s manual 2 PG11closure plugs 4 wall fastening brackets with corresponding screws When the product is delivered make sure the package is intact and has no obvious signs of dropping, scrapes or scratches. If the package is obviously damaged contact the supplier immediately. Make sure the contents correspond to the list of materials as above. 1.2 The contents of this manual This manual describes the DTMRX2 (DTMRX224) receiver, with its specific procedures for installation, configuration and use. Read this manual carefully, especially the section regarding safety rules, before installing and using the receiver. 1.3 Typographical conventions This manual makes use of different graphics symbols, the meaning of which is summarised as follows: Hazard of electric shock; disconnect the power supply before proceeding with any operation, unless specified otherwise. This operation is very important for correct operation of the system: please read the procedure described carefully, and carry it out as instructed. Description of system specifications: we strongly advise reading this part carefully so as to understand the stages that follow. Page 2
29 2 Safety rules The DTMRX2 (DTMRX224) receiver complies with current legislation and standards regarding electrical safety, electromagnetic compatibility and general requirements in force at the time of this manual s publication. Nevertheless, in order to ensure the users safety (installer technician and operator) the following warnings are specified in order to work in maximum safety: The appliance (and the whole system of which it forms part) must only be installed by authorised, skilled technical personnel. The appliance must only be opened by authorised, skilled personnel. Tampering with the appliance will invalidate the terms of the guarantee Connect the system to a power supply that corresponds to the indications on the identification labels (see the next section Identification data) The receiver should be connected to the power supply network using a multipolar switch with a minimum open contact distance of 3mm for each pole. The power supply outlet should be connected to earth in accordance with the legislation in force Before moving or carrying out technical work on the appliance, disconnect the power supply to the receiver The appliance is to be considered OFF only when the power supply is disconnected and the connection cables to other devices have been removed Use cables with an appropriate cross section (see the section on cables) Do not use power cables with signs of wear or ageing, since they could expose the user to serious safety hazards Install the cables so they do not get in the way of the operator Do not use the appliance in the presence of inflammable substances Do not allow children or incompetent persons to use the appliance Make sure the appliance is fixed firmly and safely For technical services refer only and exclusively to authorised technical personnel Keep this manual carefully for future consultation 3 Identification data There is a label on the receiver containing: Product identification code Product serial number Power supply voltage (Volts) Frequency (Hertz) Consumption (Watts) IP protection rating There is a label on the package containing: Product identification code (Extended 3/9 Bar-code) Product serial number (Extended 3/9 Bar-code) Short description of the product Power supply voltage (Volts) Frequency (Hertz) Consumption (Watts) IP protection rating Before installing, make sure that the receiver s power supply specifications correspond to the specifications required. The use of inappropriate equipment may subject personnel and the system itself to serious safety hazards. Page 3
30 4 Description of the DTMRX2 (DTMRX224) receiver The DTMRX2 (DTMRX224) receiver is microprocessor-controlled receiver for remote control of pan & tilt and motorised lenses. 4.1 Features 12 Functions: UP, DOWN, LEFT, RIGHT, AUTO, ZOOM TELE, ZOOM WIDE, FOCUS NEAR, FOCUS FAR, IRIS OPEN, IRIS CLOSE, AUX AUX: clean auxiliary contact 1A 230 V~ / 1A 24 V~ 99 addresses selected by DIP switch Choice of communication between RS232, RS485 and Coaxial RS232, RS485 repeater for cascade configuration Choice of communication rate (1200, 9600, 19200, Baud) Choice of communication protocols: MACRO, Videotec standard, Pelco D (2400 Baud) and Coaxial Possibility of using both lenses operating in reverse polarity and lenses operating on common wire Auxiliary contact AUX can be set for Wiper operation EEPROM for storage of activated options Power supply LED Control reception LED Active function LED For strictly technical specifications (consumption, power supply voltage etc.) see the section on Technical specifications. 4.2 Appliances compatible for use with the receiver DCS3, DCTEL, DCJ, DCT, DCIR: control keyboards. SM42A, SM82A, SM84A, SM164A: video matrixes with coaxial telemetry data transmission DCRE485: communications controller used for star control of more than one receiver using a single keyboard PTH310, PTH910, NXPTH210 pan & tilt for DTMRX2 version receiver PTH311, PTH911, NXPTH211 pan & tilt for DTMRX224 version receiver NOTE: Using the DCFIT interface module, it is possible to control the receiver via the DCS2 and DCMT8 model receivers. See the individual instruction manuals for complete descriptions of the appliance specifications. Page 4
31 4.3 Examples of installation One operator, with more than one monitor, controls a series of pan & tilt with receivers configured in cascade using a RS485 telemetry line: MATERIALS Control part: K1: DCJ control keyboard Video part: M1: SM164A video matrix 2 monitors 3 cameras Telemetry part: R1,R2, R3: DTMRX2 Receivers PT1,PT2,PT3: Pan & Tilt PTH910 One operator, with more than one monitor, controls a series of pan & tilt with receivers operating with telemetry on coaxial cable from the matrix: MATERIALS Control part: K1: DCJ control keyboard Video part: M1: SM164A video matrix 2 monitors 3 cameras Telemetry part: R1, R2, R3: DTMRX2 Receivers PT1,PT2,PT3: Pan & Tilt PTH910 Page 5
32 4.4 Cables In the diagrams given as examples different types of lines have been used to show cables with different functions: video cable: coaxial RG 59 or equivalent cable. multipolar cable: each pan & tilt control function is activated /deactivated by a relay inside the receiver. Determine the final number of cables by following the instructions given below: 7 wires for pan & tilt movements: right, left, up, down, autopan, common, earth 6 wires for lens control with reverse polarity (zoom, focus, iris) 4 wires for lens control with common wire (zoom, focus, iris) 2 wires for the auxiliary 3 wires for the power supply cable Note: we advise the use of different multipolar cables for low voltage and high voltage functions. Minimum recommended cross section: 0.56 mm² (AWG 20) for high voltage pan & tilt wires (DTMRX2 receiver) 0.75 mm² (AWG 18) for low voltage pan & tilt wires (DTMRX224 receiver) 0.34 mm² (AWG 22) for low voltage wires (lens, auxiliary) 0.75 mm² (AWG 18) for power supply wires DTMRX2 (LINE, NEUTRAL and Earth) 1.00 mm² (AWG 16) for power supply wires DTMRX224 (LINE, NEUTRAL and Earth) cable for digital reception/transmission of controls: 2 wires for reception from the control unit (twisted pair telephone cable, section 0.22 mm² AWG 24) 2 wires for transmission, if any, to the next receiver in cascade configuration (twisted pair telephone cable, section 0.22 mm² AWG 24) Note: the maximum length of the connection is approx. 15 m in RS232 and 1200 m in RS485. When more than one receiver is connected in cascade, it is necessary to use two separate cables for reception and digital transmission of the controls between receivers (do not use multiple twin cables) Page 6
33 5 Installation Installation must only be carried out only by skilled, authorised technicians. The following procedures should be carried out with the power supply disconnected, unless indicated otherwise. 5.1 Opening the package If the packing is not obviously damaged (due to dropping or abnormal scrapes and scratches), check the material contained in it against the list provided in the Package contents section of the Introduction. The packing materials are completely recyclable. The installer will be responsible for disposing of them by recycling or according to the legislation in force in the country where the appliance is used. 5.2 Checking the markings Before proceeding further with installation, check the identification labels to make sure the supplied material corresponds with the required specifications, as described in the section Identification data. Never, under any circumstances, make any changes or connections that are not described in this manual: the use of inappropriate appliances may expose personnel and the system to serious safety hazards. Page 7
34 5.3 Configuration DIP switches and Jumpers In the following diagram identify the configuration DIP switches and Jumpers: Trimmer TR1 for adjusting lens voltage BNC J1 and J2 for coaxial reception Jumper JP4 Jumper JP3 Connector J4 Screen printing for top row terminals Screen printing for bottom row terminals Terminals for receiver power supply Page 8
35 Note on terminal J5 Terminal J5 has a double row of connectors. The screen printing regarding the top row of connectors is that nearest to the related terminal (for example, NEUTRAL refers to the upper terminal) while the screen printing regarding the bottom row of connectors is that further away (for example COM refers to the lower terminal). To insert the connecting cables in the terminal board J5 use a flat screwdriver in the appropriate slots as shown in Figure 1. Screwdriver hole for upper terminal Screwdriver hole for lower terminal Fig. 1 Upper terminal Lower terminal Page 9
36 6 Connecting the power supply The connection should be made using the corresponding terminations of terminal J5 (LINE, NEUTRAL, ) as shown in the diagram on page 8. Warning! When wiring up prepare the earth conductor to be 2-3 cm longer than the other conductors 7 Configuring the receiver The configuration stage for the receiver makes it possible to set it up for optimum performance, according to system needs. Configuration must only be carried out at the installation stage by the installer technician. We advise proceeding with parameter configuration in an orderly manner to prevent installation problems. The parameters that will be set at the configuration stage are: Receiver identification number (receiver address) Communication rate setting (1200, 9600, or baud) Receiver protocol setting (MACRO, Videotec, Pelco D or COAX) Auxiliary or Wiper setting Receiver reception mode (RS232/RS485/COAX) Load insertion on the RS485 line Lens connection Control unit connection Adjustment of lens control voltage Connection of pan & tilt and lens cables Page 10
37 7.1 Setting the receiver identification number The receiver can be configured with an address between 1 and 99. make sure the power supply is disconnected (power supply LED off) configure the DIP switches of SW2 according to the following table : DIP SWITCH DIP SWITCH DIP SWITCH Setting the communication rate The DTMRX2 (DTMRX224) receiver is able to carry out communications with four communication rates. Set DIP switches 1 and 2 of SW1 according to the following table: DIP 1 DIP 2 Baud OFF OFF 9600 * OFF ON ON OFF 1200 ON ON * Default setting Page 11
38 7.3 Setting the receiver protocol The DTMRX2 (DTMRX224) receiver is able to operate with four different types of protocol. Set DIP switches 3 an4 of SW1 according to the desired type of protocol and referring to the following table: DIP 3 DIP 4 Protocol OFF OFF MACRO* OFF ON Videotec ON OFF Pelco D ON ON COAX * Default setting Pelco D Protocol: the receiver sets a communication rate of 2400 baud, irrespective of the DIP 1 and DIP 2 settings for SW Setting the auxiliary as Wiper The DTMRX2 (DTMRX224) receiver allows the Auxiliary contact (AUX) to be set for Wiper operation (this function can only be activated from DCJ and DCT keyboards). Normally the Auxiliary contact is activated from the keyboards with the AUX 1 command and is then deactivated with AUX 1. If Wiper mode is activated, the auxiliary contact will only operate when the Wiper key is pressed. When the wiper key is released the contact is deactivated. The setting is made on DIP 8 of SW2 according to the following table: DIP 8 OFF ON * Default setting Aux1 Function Aux1* Wiper 7.5 Setting receiver reception mode (RS232/RS485/COAX) Jumper JP1 and JP2 settings for RS485 reception: Jumper JP1 and JP2 settings for RS232 reception: For COAX reception (telemetry on coaxial cable) just set DIP switches 3 and 4 of SW1 as shown in the section on setting the receiver protocol. 7.6 Inserting the load on the RS485 line NOTE: This setting is only necessary if a RS485 communication line is used. To configure Jumpers JP3 and JP4, refer to the following settings: Jumper in position A Jumper in position B Settings: JP3 in position A: load inserted in RS485 transmission. JP3 in position B: no load inserted in RS485 transmission. JP4 in position A: load inserted in RS485 reception. JP4 in position B: no load inserted in RS485 reception. Page 12
39 7.7 Connecting the control unit The RJ11 connector present on the receiver (see J4 on page 8) is used for reception and transmission of digital data in RS485 or RS232 thus allowing a rapid connection with the keyboards during any test stages, or for connecting conversion interfaces that are available on the market (RS232-optic fibre). For definitive connection with the keyboards, on the other hand, use the terminals present on the J5 terminal board. We advise using RS485 mode which is able to reach a maximum distance of 1200 metres and communication is immune to external interference. In COAX reception mode, on the other hand, it is possible to reach a maximum distance of 350 metres from the control unit (via SMXXA series matrixes). Lastly, in RS232 reception mode it is possible to cover a maximum distance of 15 metres from the control unit (PC or DCS2 and DCMT8 model keyboards). 7.8 Connection with the RS485 line The DCJ, DCT, DCTEL keyboards and the DTMRX2 (DTMRX224) receiver can be connected directly by the telephone cable supplied with the keyboard and using the RJ11 (J4) connector present on the circuit. For a definitive connection between control unit and receiver, refer to the following procedure: Keyboard receiver connection Connect the telemetry outlet of the keyboard to the RJ-JACK shunt box using the supplied telephone cable. Use a twisted pair cable to connect the receiver terminals marked by screen printing RX485A and RX485B to the RJ-JACK shunt box that has already been connected to the keyboard. Refer to the following diagram and the table below to make a correct installation; RS485 communication mode: Maximum distance 1200 metres. DCJ, DCT, DCTEL, DCIR (RJ11 A o B) DTMRX2 DTMRX224 White TX-485A RX485A Yellow TX-485B RX485B To the keyboard telemetry connector Receiver Terminal Three possible system installations are illustrated below: Point-to-point connection (in cascade) Multi-point connection (in parallel) Mixed connection Page 13
40 7.8.1 Connecting more than one receiver in cascade (point-to-point connection) The DTMRX2 (DTMRX224) receivers are able to regenerate the received signal internally and retransmit it on a new communication line to the next receiver. Each of the three stages of the line (L1, L2, L3) is considered independent, and connects only two devices point-to-point, each with the load inserted, over a maximum distance of 1200 metres. The distance between keyboard K1 and receiver R3 may therefore reach 3600m (1200 m between keyboard K1 and receiver R1, 1200 m between receiver R1 and R2, and a further 1200 m between receiver R2 and receiver R3, for a total of 3600 m). Note: Terminals RX485A and RX485B, which have the load inserted, should be connected to terminals TX485A and TX485B respectively on the previous unit, and these also have the load inserted. Terminals TX485A and TX485B with the load inserted should be connected to terminals RX485A and RX485B respectively on the subsequent unit (always with the load inserted): From previous receiver To subsequent receiver N.B,: For the connection under consideration (point-to-point), faulty operation of one of the receivers implies that the devices in cascade will be cut off More than one receiver per line, connection with twisted pair (multi-point connection) All receivers connected to the same line should use the same communication protocol, RS485. For each of the lines, the following observations should be taken into consideration: only one of the keyboards (the one at an end of the line) has the load inserted only one of the receivers (the one at the other end of the line) has the load inserted. the total length of the line should not exceed 1200m. Line A of keyboard K1 has been used for communication with the telemetry. The ends (Keyboard K1 - Receiver R3) should have the termination resistance inserted. Receivers R1, R2, should not have the termination resistance inserted. The maximum length of the line, from end to end (from keyboard K1 to receiver R3), is 1200 metres. N.B.: For the connection in question (multi-point), faulty operation of one of the devices does not influence the other receivers. Page 14
41 7.8.3 Mixed configurations (point-to-point /multi-point) This is a combination of the two previous connection methods and, depending on the chosen combination, makes it possible to exploit to the full the advantages of the two types of connection, also significantly reducing the probability of faulty operation. The following is an example of mixed connection: In the example shown, if receiver R3 is blocked (connected in multi-point on line L3) it does not cause a malfunction in receiver R4. R3 is not at the ends of line L3 and therefore should not be terminated. If receiver R2 fails, because this is the generator of line L3 all receivers connected to it in cascade (R3 and R4) will not receive the controls. 7.9 Connection with the RS232 line The DTMRX2 (DTMRX224) receiver can be controlled by means of a RS232 line from a PC or from keyboards that integrate RS232 communication (DCS2 and DCMT8). Bear in mind that the maximum distance with the RS232 serial line is 15 metres. Refer to the following connection table. DCS2/DCMT8 DTMRX2 RJ-JACK Black Tx RS RX232 Green GND RS GND For connecting the receivers in cascade, connect terminal RX232 to terminal TX232 of the previous unit and connect terminal TX232 to terminal RX232 of the subsequent unit. Connect the earths together (GND). In any case refer to the following connection diagram: From previous receiver To subsequent receiver Page 15
42 7.10 Connection for reception by coaxial cable (COAX) The DTMRX2 (DTMRX224) receiver integrates telemetry reception on coaxial cable (RG59 or equivalent). The maximum distance that can be reached by a coaxial communication is 350 metres (Matrix Camera distance). It is not possible to insert video signal amplification devices (video distributors for example). To configure the system correctly: Connect BNC J1 on the receiver (see page 8) to the camera video outlet. Connect BNC J2 on the receiver (see page 8) to the video input on the matrix corresponding to the address setting in the receiver (for example receiver No. 1 will be connected to video input No. 1 on the matrix, receiver No. 2 to video input No. 2 on the matrix etc.) Set DIP switch SW1 for COAX communication (see receiver protocol settings) and set the receiver address with DIP switch SW2 (see the section on setting the receiver identification number). Set the matrix (and the keyboard if necessary) with coaxial type telemetry. NOTE: COAX communication is only possible with the SMXXA (SM42A, SM82A, SM84A and SM164A) model matrixes. Refer to its own manual to configure the matrix itself Type of controlled lenses and adjusting the lens control voltage WARNING: Failure to connect the type of lenses correctly could cause damage to the lenses themselves. The DTMRX2 (DTMRX224) is able to control both reverse polarity and common wire lenses. For lenses operating with a common wire, connect the common wire to FOCUS Adjusting the lens control voltage insert a load between terminals FOCUS+ and FOCUS- that absorbs at least 10mA (use a resistance sized between 100 and 1000 ohm). connect the power supply cable and power the DTMRX2 or DTMRX224 unit (power supply LED on) position the tester prods on terminals FOCUS+ and FOCUS- keep the FOCUS NEAR button on the control unit pressed adjust the lens control voltage by adjusting trimmer TR1 (see diagram page 8; default 12V=) NB: do not adjust a loadless voltage (without inserting the load) otherwise the adjustment will be incorrect Connecting the pan & tilt and lens cables WARNING : Before carrying out the following operations make sure that the pan & tilt control voltage and the setting for lens type are correct Disconnect the power supply to the unit Make the connections with the lens and pan & tilt Power the unit N.B.: We recommend using flexible cables with an appropriate cross section (see the section on cables). Page 16
43 8 Switching on and off Before switching on: examine the markings to make sure the supplied material corresponds with the required specifications, as described in the section Checking the markings. make sure the safety fuse is intact make sure that the receiver and the other components of the system are closed and there is therefore no possibility of direct contact with live parts. make sure that all parts are fastened down firmly and safely the power supply cables should not hamper normal operations on the part of the installer technician or pan & tilt movements make sure the power source and connecting cables are able to handle the system s power consumption Page 17
44 9 Maintenance The DTMRX2 (DTMRX224) receiver does not require any particular maintenance. When using it we recommend it rests on a solid base, with the power supply and connecting cables positioned so as not to get in the way of the operator. 10 Troubleshooting A great feature of the DTMRX2 (DTMRX224) receiver is that it is very easy to use, nevertheless some problems could arise at the installation or configuration stage, or in use. PROBLEM PROBABLE CAUSE REMEDY Power supply LED off Controls in RS485 are not carried out and the power supply LED is on No power Fuse blown Incorrect configuration for reception Incorrect baud rate or protocol Incorrect receiver address Incorrect wiring Check the power supply cable Replace fuse F1 Check the settings of Jumpers JP2 and JP4. Check the settings of DIP Switch SW1 Check the address setting in the receiver (DIP SW2) Check the wiring to terminals RX485A and RX485B of J5 Controls in RS232 are not carried out and the power supply LED is on Incorrect configuration for reception Incorrect baud rate or protocol Incorrect receiver address Incorrect wiring Check the setting of Jumper JP1 Check the settings of DIP Switch SW1 Check the address setting in the receiver (DIP SW2) Check the wiring to terminals RX232 and GND Controls in COAX mode are not carried out and the power supply LED is on o Incorrect configuration for protocol Incorrect configuration for receiver address Incorrect wiring Check DIP switch SW1 Check the settings of DIP Switch SW2 and make sure the address setting corresponds to the input video channel of the SMXXA matrix Check the coaxial cable (maximum length 350 m). Do not use video amplification devices between matrix, receiver and camera. Pan & tilt does not work Incorrect pan & tilt power supply Make sure the power supply voltage for pan & tilt corresponds to that supplied by the receiver The lens does not work Incorrect lens voltage Check adjustment of trimmer TR1 In a cascade connection, subsequent units do not receive the controls Incorrect connection Incorrect configuration for reception Incorrect baud rate or protocol Incorrect address Check the connecting cables Check the Jumper settings Check the setting for SW1 Check the address settings in the units that are not working Page 18
45 11 Technical specifications General specifications Maximum capacity of RS485 telemetry line 1200 m Maximum capacity of RS232 telemetry line 15m Maximum capacity for COAX reception 350m Capacity of Auxiliary Contact 1A 230V~ / 1A 24V Maximum number of addressable receivers 99 Lens voltage adjustment 3= - 14 V= max 100mA Maximum consumption 10 W Maximum switchable power 100 W Operating temperature From 20 C to +50 C IP protection rating IP56 Net weight 850 g Dimensions 225 (L) x 154 (W) x 81 (H) mm Conformity EN55022 classe B, EN EN60065, FCC part 15 Class B Technical specifications for the DTMRX2 receiver Power supply voltage Pan & tilt power supply voltage Fuse F1 230V~ 50Hz 230V~ 50Hz F 250mA L 250V Technical specifications for the DTMRX224 receiver Power supply voltage Pan & tilt power supply voltage Fuse F1 24V~ 50/60Hz 24V~ 50/60Hz F 2.5 A L 250V Page 19
46 Page 20
47 MANUEL D INSTRUCTIONS
48
49 SOMMAIRE 1 INTRODUCTION Contenu de l'emballage Contenu du manuel Conventions typographiques NORMES DE SÉCURITÉ DONNÉES DE MARQUAGE DESCRIPTION DU RÉCEPTEUR DTMRX2 (DTMRX224) Caractéristiques Utilisation d'appareils compatibles avec le récepteur Exemples d'installations Câbles INSTALLATION Ouverture de l'emballage Contrôle marquage Dip-switch et Jumper de configuration CONNEXION DE L ALIMENTATION CONFIGURATION DU RÉCEPTEUR Configuration du numéro d'identification du récepteur Configuration de la vitesse de communication Configuration protocole récepteur Configuration auxiliaire comme Wiper Configuration du mode de réception du récepteur (RS232/RS485/COAX) Activation charge sur ligne RS Connexion avec l'unité de commande Connexion avec ligne RS Connexion de plusieurs récepteurs en cascade (connexion point-point) Plusieurs récepteurs par ligne, connexion avec câble torsadé (connexion multipoint) Configurations mixtes (point-point /multipoint) Connexion avec ligne RS Connexion pour réception sur câble coaxial (COAX) Type d'optique contrôlée et régulation tension de contrôle optique Connexion des câbles tourelle et optique MARCHE ET ARRÊT ENTRETIEN RÉSOLUTION DES PROBLÈMES CARACTÉRISTIQUES TECHNIQUES...19 Le fabricant décline toute responsabilité en cas de dommages dus à une utilisation incorrecte des appareils décrits dans ce manuel, et se réserve le droit d'en modifier le contenu sans préavis. La documentation de ce manuel a été sélectionnée et contrôlée avec une extrême attention ; le fabricant décline néanmoins toute responsabilité concernant l'utilisation de cette documentation, ainsi qu'au sujet des personnes ou sociétés ayant participé à la conception et à la réalisation de ce manuel. Page 1
50 1 Introduction 1.1 Contenu de l'emballage 1 récepteur DTMRX2 (DTMRX224) 1 manuel d'utilisation 2 couvercles de fermeture PG11 4 étriers de fixation murale avec vis Lors de la livraison du produit, contrôler que l'emballage est intact et ne porte aucun signe de chute ou éraflure. Si l'emballage est endommagé, contacter immédiatement le fournisseur. Contrôler que le contenu correspond à la liste matériel indiquée plus haut. 1.2 Contenu du manuel Ce manuel contient la description du récepteur DTMRX2 (DTMRX224), et des opérations nécessaires à son installation, sa configuration et son utilisation. Il est indispensable de lire ce manuel avec attention, et en particulier le chapitre concernant les normes de sécurité, avant de procéder à l'installation et à l'utilisation du dispositif. 1.3 Conventions typographiques À l'intérieur de ce manuel sont utilisés différents symboles graphiques dont la signification est indiquée cidessous: Risque de choc électrique; sauf indication contraire expresse, couper l'alimentation avant de procéder aux opérations prévues. Cette opération est essentielle au fonctionnement correct du système. Il est conseillé de lire avec attention la description des opérations et de se conformer aux indications données. Description des caractéristiques du système : il est conseillé de procéder à une lecture attentive pour une meilleure compréhension des phases suivantes. Page 2
51 2 Normes de sécurité Le récepteur DTMRX2 (DTMRX224) est conforme aux normes en vigueur lors de la publication de ce manuel en ce qui concerne la sécurité électrique, la compatibilité électromagnétique et les conditions générales nécessaires. Il est toutefois nécessaire de donner aux utilisateurs (techniciens installateurs et opérateurs) plusieurs indications leur permettant d'opérer dans des conditions de sécurité maximales : L installation de l'appareil (et de la totalité de l'installation dont il fait partie) doit être effectuée par un personnel technique qualifié. L'appareil ne doit être ouvert que par un personnel technique qualifié. Toute manipulation de l'appareil entraînera l'annulation de la garantie. Connecter les appareils du système à une ligne d'alimentation correspondant aux indications des étiquettes de marquage (voir chapitre suivant Données de marquage). La connexion du récepteur au réseau d'alimentation en énergie électrique doit être effectuée au moyen d'un interrupteur unipolaire avec séparation des contacts de 3 mm min. à chaque pôle. La prise d'alimentation doit être branchée à la terre conformément aux normes en vigueur. Débrancher la fiche d'alimentation avant tout déplacement ou intervention technique sur l'appareil. L'appareil ne peut être considéré comme désactivé que si l'alimentation est coupée et les câbles de connexion aux autres dispositifs déconnectés. Utiliser des câbles d'une section adéquate (voir paragraphe se rapportant aux câbles). Ne pas utiliser de câbles de tension présentant des signes d'usure ou d'endommagement, ces derniers comportant des risques graves pour la sécurité des utilisateurs. L installation des câbles doit être effectuée de façon à ne pas représenter un obstacle pour les opérateurs. Ne pas utiliser l'appareil en présence de substances inflammables. Ne pas laisser l'appareil à portée des enfants ou de personnes non qualifiées. Contrôler que l'appareil est fixé de façon solide et fiable. Pour toute assistance technique, s'adresser exclusivement au personnel technique autorisé. Conserver ce manuel avec soin pour toute nécessité de consultation. 3 Données de marquage Sur le récepteur est appliquée une étiquette indiquant : Code d'identification du produit Numéro de série du produit Tension d'alimentation (Volts) Fréquence (Hertz) Consommation (Watts) Degré de protection IP Sur l'emballage est appliquée une étiquette indiquant : Code d'identification du produit (Code barres Extended 3/9) Numéro de série du produit (Code barres Extended 3/9) Brève description du produit Tension d'alimentation (Volts) Fréquence (Hertz) Consommation (Watts) Degré de protection IP Lors de l'installation, contrôler que les caractéristiques d'alimentation du récepteur correspondent aux caractéristiques nécessaires. L'utilisation d'appareils non adéquats peut comporter des risques graves pour le matériel et pour la sécurité du personnel. Page 3
52 4 Description du récepteur DTMRX2 (DTMRX224) Le récepteur DTMRX2 (DTMRX224) est un récepteur de commandes à microprocesseur pour le contrôle à distance de tourelles et optiques motorisées. 4.1 Caractéristiques 12 fonctions : UP, DOWN, LEFT, RIGHT, AUTO, ZOOM TELE, ZOOM WIDE, FOCUS NEAR, FOCUS FAR, IRIS OPEN, IRIS CLOSE, AUX AUX : contact auxiliaire sec 1A 230 V~ / 1A 24 V~ 99 adresses sélectionnables par Dip-switch Communication sélectionnable entre RS232, RS485 et coaxiale Répétiteur RS232, RS485 pour configuration en cascade Vitesse de communication sélectionnable (1200, 9600, 19200, Bauds) Protocoles de communication sélectionnables : MACRO, Videotec standard, Pelco D (2400 Bauds) et coaxial Possibilité d'utiliser des optiques fonctionnant à inversion de polarité ou à fil commun Contact auxiliaire AUX configurable avec fonctions de Wiper EEPROM pour mémorisation options activées. LED présence alimentation LED réception commande LED fonction active En ce qui concerne les caractéristiques strictement techniques (consommation, tension d'alimentation, etc.), se reporter au paragraphe Caractéristiques techniques. 4.2 Utilisation d'appareils compatibles avec le récepteur DCS3, DCTEL, DCJ, DCT, DCIR: pupitres de contrôle. SM42A, SM82A, SM84A, SM164A: matrices vidéo avec transmission des données de télémétrie sur coaxial. DCRE485: contrôleur de communications pour le contrôle en étoile de plusieurs récepteurs au moyen d'un seul pupitre. PTH310, PTH910, NXPTH210 tourelles récepteur version DTMRX2 PTH311, PTH911, NXPTH211 tourelles récepteur version DTMRX224 REMARQUE : le module d'interface DCFIT permet de contrôler le récepteur au moyen des pupitres modèle DCS2 et DCMT8. Se reporter aux manuels d'utilisation pour la description complète des caractéristiques des appareils. Page 4
53 4.3 Exemples d'installations Un opérateur contrôle au moyen de plusieurs moniteurs une série de tourelles avec récepteurs configurés en cascade et ligne de télémétrie RS485: MATÉRIEL Partie de contrôle: K1 : pupitre de contrôle DCJ Partie vidéo: M1 : Matrice vidéo SM164A 2 moniteurs 3 caméras Partie télémétrie: R1,R2, R3 : Récepteurs DTMRX2 PT1,PT2,PT3 : Tourelles PTH910 Un opérateur contrôle au moyen de plusieurs moniteurs une série de tourelles avec récepteurs fonctionnant en télémétrie sur câble coaxial provenant de la matrice : MATÉRIEL Partie de contrôle: K1 : Pupitre de contrôle DCJ Partie vidéo: M1 : Matrice vidéo SM164A 2 moniteurs 3 caméras Partie télémétrie: R1, R2, R3 : Récepteurs DTMRX2 PT1,PT2,PT3 : Tourelles PTH910 Page 5
54 4.4 Câbles Sur les schémas en exemple, plusieurs types de traits ont été utilisés pour indiquer les différentes fonctions des câbles: câble vidéo: coaxial RG 59 ou câble équivalent. câble multipolaire: chacune des fonctions de contrôle de la tourelle est activée / désactivée par un relais installé à l'intérieur du récepteur. Définir le nombre définitif de câbles en se conformant aux indications suivantes: 7 fils pour les mouvements de tourelle : droite, gauche, haut, bas, autopan, commun, terre 6 fils de contrôle pour optiques à inversion de polarité (zoom, focus, iris) 4 fils de contrôle pour optiques à fil commun (zoom, focus, iris) 2 fils pour l'auxiliaire 3 fils pour câble d'alimentation Remarque : il est conseillé d'utiliser des câbles multipolaires différents pour les fonctions en basse tension et en haute tension. Section minimale conseillée: 0,56 mm² (AWG 20) pour fils tourelle à haute tension (récepteur DTMRX2) 0,75 mm² (AWG 18) pour fils tourelle à basse tension (récepteur DTMRX224) 0,34 mm² (AWG 22) pour fils à basse tension (optique, auxiliaire) 0,75 mm² (AWG 18) pour fils alimentation DTMRX2 (LINE, NEUTRAL et terre) 1,00 mm² (AWG 16) pour fils alimentation DTMRX224 (LINE, NEUTRAL et terre) câble pour réception/transmission numérique des commandes: 2 fils pour la réception par l'unité de commande (câble téléphonique torsadé, section 0,22 mm² AWG 24) 2 fils pour la transmission au récepteur suivant dans le cas de configuration en cascade (câble téléphonique torsadé, section 0,22 mm² AWG 24) Remarque: la distance maximale de connexion est d'environ 15 m sur RS232, et de 1200 m sur RS485. Si plusieurs récepteurs sont connectés en cascade, il est nécessaire d'utiliser deux câbles séparés pour la réception et la transmission numérique des commandes (ne pas utiliser de câbles multicouplage) entre les récepteurs Page 6
55 5 Installation La phase d installation ne doit être effectuée que par un personnel technique qualifié. Sauf indication contraire expresse, les opérations suivantes doivent être effectuées avec l alimentation coupée. 5.1 Ouverture de l'emballage Si l emballage ne présente aucun défaut apparent (chute ou éraflure), contrôler que le matériel contenu est conforme à la liste fournie au paragraphe Contenu de l'emballage du chapitre Introduction. Les matériaux d'emballage sont entièrement recyclables, et le technicien installateur devra éliminer ces derniers selon les modalités de collecte sélective prévues, ou conformément aux normes en vigueur dans le pays concerné. 5.2 Contrôle marquage Avant de procéder à l installation, contrôler que le matériel fourni correspond à la commande et examiner les étiquettes de marquage selon les indications du chapitre Description de marquage. N effectuer sous aucun prétexte des modifications ou connexions non prévues dans ce manuel : l utilisation d appareils inadéquats peut comporter des risques sérieux pour les appareils et la sécurité du personnel. Page 7
56 5.3 Dip-switch et Jumper de configuration Identifier les Dip-switch et les Jumper de configuration sur le schéma ci-dessous: Trimmer TR1 pour réglage tension optique Bnc J1 et J2 pour réception coaxial Jumper JP4 Jumper JP3 Connecteur J4 Identification bornes supérieures Identification bornes inférieures Bornes d'alimentation récepteur Page 8
57 Remarque sur la borne J5 La borne J5 présente une double rangée de connecteurs. L'identification des connecteurs supérieurs est la plus proche de la borne correspondante (par ex., NEUTRAL fait référence à la borne supérieure), tandis que l'identification des connecteurs inférieurs est la plus éloignée (par ex., COM fait référence à la borne inférieure). Pour insérer les câbles de connexion dans la borne J5, utiliser un tournevis plat dans les fentes prévues comme indiqué à la Figure 1. Orifice tournevis pour borne supérieure Orifice tournevis pour borne inférieure Fig. 1 Borne supérieure Borne inférieure Page 9
58 6 Connexion de l alimentation La connexion doit être effectuée au moyen des terminaisons correspondantes de la borne J5 (LINE, NEUTRAL, ) comme indiqué à la figure page 8. Attention! Durant le câblage, prévoir pour le conducteur de terre une longueur supérieure de 2 ou 3 cm aux autres conducteurs. 7 Configuration du récepteur La phase de configuration permet de prédisposer l'unité en vue d'un fonctionnement optimal, en fonction des nécessités de l'installation. La configuration doit exclusivement être effectuée par le technicien chargé de l'installation et seulement au moment de l'installation. Pour éviter tout problème durant l'installation, il est conseillé de procéder par ordre à la configuration des paramètres. Les paramètres définis en phase de configuration sont les suivants : Numéro d'identification du récepteur (adresse récepteur) Configuration de la vitesse de communication (1200, 9600, ou bauds) Configuration du protocole récepteur (MACRO, Videotec, Pelco D ou COAX) Configuration Auxiliaire ou Wiper Mode de réception du récepteur (RS232 / RS485/ COAX) Activation charge sur ligne RS485 Connexion de l'optique Connexion à l'unité de commande Régulation de la tension de contrôle de l'optique Connexion des câbles tourelle et optique Page 10
59 7.1 Configuration du numéro d'identification du récepteur Le récepteur peut être configuré avec une adresse comprise entre 1 et 99. contrôler l'absence d'alimentation (DEL alimentation éteinte) configurer les Dip-switch de SW2 conformément au tableau ci-dessous : DIP-SWITCH DIP-SWITCH DIP-SWITCH Configuration de la vitesse de communication Le récepteur DTMRX2 (DTMRX224) peut effectuer des opérations de communication avec quatre vitesses de communication différentes. Définir les Dip-switch 1 et 2 de SW1 conformément au tableau ci-dessous : Dip 1 Dip 2 Baud OFF OFF 9600 * OFF ON ON OFF 1200 ON ON * Configuration par défaut Page 11
60 7.3 Configuration protocole récepteur Le récepteur DTMRX2 (DTMRX224) peut fonctionner avec quatre types de protocole différent. Définir les Dipswitch 3 et 4 de SW1 en fonction du type de protocole désiré et en se reportant au tableau ci-dessous : Dip 3 Dip 4 Protocole OFF OFF MACRO* OFF ON Videotec ON OFF Pelco D ON ON COAX * Configuration par défaut Protocole Pelco D : le récepteur définit une vitesse de communication de 2400 bauds indépendamment de la configuration des Dips 1 et 2 de SW Configuration auxiliaire comme Wiper Le récepteur DTMRX2 (DTMRX224) permet de configurer le contact Auxiliaire (AUX) avec fonction de Wiper (fonction pouvant uniquement être activée sur les pupitres DCJ et DCT). Le contact Auxiliaire est généralement activé sur les pupitres au moyen de la commande Aux 1, et désactivé au moyen de la commande Aux 1. Si le mode Wiper est activé, le contact auxiliaire ne peut fonctionner qu'avec la pression de la touche Wiper (essuie-glace). Le contact s'interrrompt si la touche Wiper est relâchée. La configuration doit être effectuée sur le Dip 8 de SW2 conformément au tableau ci-dessous : Dip 8 OFF ON * Configuration par défaut Fonction Aux1 Aux1* Wiper 7.5 Configuration du mode de réception du récepteur (RS232/RS485/COAX) Configurations Jumper JP1 et JP2 pour réception RS485: Configurations Jumper JP1 et JP2 pour réception RS232: Pour la réception COAX (télémétrie sur câble coaxial), il suffit de configurer les Dip-switch 3 et 4 de SW1 comme indiqué au paragraphe Configuration protocole récepteur. 7.6 Activation charge sur ligne RS485 REMARQUE : Cette configuration n'est nécessaire qu'en cas d'utilisation d'une ligne de communication RS485. Pour la configuration des Jumper JP3 et JP4, se reporter aux configurations suivantes: Jumper en position A Jumper en position B Configurations: JP3 en position A : charge activée en transmission RS485. JP3 en position B : charge désactivée en transmission RS485. JP4 en position A : charge activée en réception RS485. JP4 en position B : charge désactivée en réception RS485. Page 12
61 7.7 Connexion avec l'unité de commande Le connecteur RJ11 du récepteur (voir J4 page 8) permet la réception et la transmission des données numériques sur RS485 ou RS232, ainsi que la connexion rapide avec les pupitres durant les phases d'essai éventuelles ou la connexion d'interfaces de conversion disponibles dans le commerce (RS232-fibre optique) Pour la connexion finale avec les pupitres, utiliser en revanche les bornes du bornier J5. Il est conseillé d'utiliser le mode RS485 permettant d'atteindre une distance maximale de 1200 mètres et une communication sans perturbations externes. Le mode de réception COAX permet par contre d'atteindre une distance maximale de 350 mètres de l'unité de commande (avec matrices série SMXXA). Enfin, le mode de réception RS232 permet de couvrir une distance maximale de 15 mètres de l'unité de commande (PC ou pupitres modèle DCS2 et DCMT8). 7.8 Connexion avec ligne RS485 Les pupitres DCJ, DCT,DCTEL et le récepteur DTMRX2 (DTMRX224) peuvent être directement connectés au moyen du câble téléphonique fourni avec le pupitre et du connecteur RJ11 (J4) prévu sur le circuit. Pour une connexion finale entre unité de commande et récepteur, se reporter aux opérations indiquées ci-dessous: Connexion pupitre - récepteur Au moyen du câble téléphonique fourni, connecter la sortie télémétrie du pupitre à la boîte de dérivation RJ- JACK. Au moyen d'un câble torsadé, connecter les bornes du récepteur identifiées comme RX485A et RX485B à la boîte de dérivation RJ-JACK connectée préalablement au pupitre. Se reporter au schéma suivant et au tableau ci-dessous pour une installation correcte : Mode de communication RS485 : Distance maximale 1200 mètres. DCJ, DCT, DCTEL, DCIR (RJ11 A o B) DTMRX2 DTMRX224 Blanc TX-485A RX485A Jaune TX-485B RX485B Au connecteur de télémétrie du pupitre Borne récepteur On trouvera ci-dessous trois exemples d'installation possibles : Connexion point-point (en cascade) Connexion multipoint (en parallèle) Connexion mixte Page 13
62 7.8.1 Connexion de plusieurs récepteurs en cascade (connexion point-point) Les récepteurs DTMRX2 (DTMRX224) peuvent régénérer de façon interne le signal reçu et le renvoyer sur une nouvelle ligne de communication vers le récepteur suivant. Chacune des trois portions de ligne (L1, L2, L3) est considérée comme indépendante et assure la connexion point-point de deux dispositifs seulement, tous deux avec la charge activée, sur une longueur maximale de 1200 mètres. La distance entre le pupitre K1 et le récepteur R3 peut donc atteindre 3600 m (1200 m entre le pupitre K1 et le récepteur R1, 1200 m entre le récepteur R1 et le récepteur R2, et encore 1200 m entre le récepteur R2 et le récepteur R3, pour un total de 3600 m). Remarque : Les bornes RX485A et RX485B présentant la charge activée doivent être respectivement connectées aux bornes TX485A et TX485B de l'unité précédente, ces dernières également avec la charge activée. Les bornes TX485A et TX485B avec la charge activée doivent être respectivement connectées aux bornes RX485A et RX485B de l'unité suivante (toujours avec la charge activée): Du récepteur précédent Au récepteur suivant NB : Avec ce type de connexion (point-point), le dysfonctionnement de l'un des récepteurs entraîne l'interruption des dispositifs en cascade Plusieurs récepteurs par ligne, connexion avec câble torsadé (connexion multipoint) Tous les récepteurs connectés à une même ligne doivent utiliser le même protocole de communication RS485. Pour chaque ligne valent les considérations suivantes: seul l'un des pupitres (celui placé à une extrémité de la ligne) présente la charge connectée. seul l'un des récepteurs (placé à l'autre extrémité de la ligne) présente la charge connectée. la longueur totale de la ligne ne peut dépasser 1200 m. La ligne A du pupitre K1 a été utilisée pour la communication vers la télémétrie. Les extrémités (Pupitre K1 - Récepteur R3) doivent avoir la résistance de terminaison connectée. Les récepteurs R1, R2 ne doivent pas avoir la résistance de terminaison connectée. La longueur maximale de la ligne, d'une extrémité à l'autre (du pupitre K1 au récepteur R3), est de 1200 mètres. NB: Dans ce cas précis de connexion (multipoint), le dysfonctionnement de l'un des dispositifs n'a aucune influence sur les autres récepteurs. Page 14
63 7.8.3 Configurations mixtes (point-point /multipoint) Il s'agit d'une combinaison des deux modes de connexion précédents permettant, en fonction de la combinaison choisie, d'exploiter de façon optimale les avantages des deux types de connexion et de réduire également de façon sensible les risques de dysfonctionnement. Voici un exemple de connexion mixte: Sur cet exemple, le blocage éventuel du récepteur R3 (connecté en multipoint sur la ligne L3) n'entraîne aucun dysfonctionnement du récepteur R4. R3 ne se trouve pas aux extrémités de la ligne L3, et ne doit donc pas être terminé. En cas de blocage du récepteur R2, ce dernier étant le "générateur" de la ligne L3, aucun des récepteurs qui lui sont connectés en cascade (R3 et R4) ne recevront les commandes. 7.9 Connexion avec ligne RS232 Le récepteur DTMRX2 (DTMRX224) peut être contrôlé avec une ligne RS232 au moyen d'un PC ou d'un pupitre prévoyant la communication RS232 (DCS2 et DCMT8). Ne pas oublier que la distance maximale avec la ligne sérielle RS232 est de 15 mètres. Se reporter au tableau de connexion ci-dessous : DCS2/DCMT8 DTMRX2 RJ-JACK Noir Tx RS RX232 Vert GND RS GND Pour la connexion des récepteurs en cascade, connecter la borne RX232 à la borne TX232 de l'unité précédente, et connecter la borne TX232 à la borne RX232 de l'unité suivante. Connecter les masses entre elles (GND). Se reporter au schéma de connexion ci-dessous : Du récepteur précédent Au récepteur suivant Page 15
64 7.10 Connexion pour réception sur câble coaxial (COAX) Le récepteur DTMRX2 (DTMRX224) comprend une réception de télémétrie sur câble coaxial (RG59 ou équivalent). La distance maximale pouvant être atteinte avec une communication coaxiale est de 350 mètres (distance Matrice Caméra). Aucun dispositif d'amplification du signal vidéo ne peut être installé (par ex., distributeurs vidéo). Pour une configuration correcte de l'installation, procéder comme suit : Connecter le BNC J1 du récepteur (voir page 8) à la sortie vidéo de la caméra. Connecter le BNC J2 du récepteur (voir page 8) à l'entrée vidéo de la matrice correspondant à l'adresse configurée dans le récepteur (par ex., le récepteur n 1 sera connecté à l'entrée vidéo n 1 de la matrice, le récepteur n 2 à l'entrée vidéo n 2 de la matrice, etc.) Configurer les Dip-switch SW1 pour une communication COAX (voir configurations protocole récepteur) et configurer l'adresse du récepteur avec le Dip SW2 (voir paragraphe configuration du numéro d'identification récepteur). Configurer la matrice (et si nécessaire le pupitre) avec une télémétrie de type Coaxial. REMARQUE: La communication COAX n'est possible qu'avec les matrices modèle SMXXA (SM42A, SM82A, SM84A e SM164A). Se reporter au manuel de chaque matrice pour la configuration de cette dernière Type d'optique contrôlée et régulation tension de contrôle optique ATTENTION: Toute connexion incorrecte de l'optique risque d'endommager cette dernière. Le DTMRX2 (DTMRX224) peut contrôler des optiques à inversion de polarité ou à fil commun. En cas d'optique fonctionnant à fil commun, connecter le fil commun à FOCUS Régulation de la tension de contrôle de l'optique activer une charge entre les bornes FOCUS+ et FOCUS- absorbant au minimum 10mA (utiliser une résistance d'une valeur comprise entre 100 et 1000 ohms). connecter le câble d'alimentation et placer l'unité DTMRX2 ou DTMRX224 sous alimentation (DEL alimentation allumée) positionner les pointes du tester sur les bornes FOCUS+ et FOCUS- maintenir enfoncée la touche FOCUS NEAR sur l'unité de commande réguler la tension de contrôle de l'optique au moyen du trimmer TR1 (voir schéma page 8; par défaut 12V=) NB : pour une régulation correcte, éviter de réguler la tension à vide (sans activer la charge) Connexion des câbles tourelle et optique ATTENTION: Avant de procéder aux opérations suivantes, contrôler que la tension de contrôle tourelle et la configuration du type d'optique utilisées sont correctes. Couper l'alimentation de l'unité Effectuer les connexions optiques et tourelle Placer l unité sous alimentation NB: Il est recommandé d'utiliser des câbles flexibles d'une section adéquate (voir paragraphe câbles). Page 16
65 8 Marche et arrêt Avant de mettre sous alimentation : contrôler que le matériel fourni correspond à la commande, et examiner les étiquettes de marquage en se reportant au chapitre Description du marquage. contrôler que le fusible de protection du récepteur est intact. contrôler que le récepteur et les autres composants de l'installation sont fermés, et que tout contact direct avec les parties sous tension est impossible. contrôler que tous les éléments sont solidement fixés. les câbles d'alimentation ne doivent pas gêner les opérations d'installation ni le mouvement de la tourelle. contrôler que les sources d'alimentation et les câbles de connexion sont en mesure de supporter la consommation du système. Page 17
66 9 Entretien Le récepteur DTMRX2 (DTMRX224) n'exige aucun entretien particulier. Il est recommandé de l'installer sur une base solide et d'éviter que les câbles d'alimentation et de connexion ne constituent une gêne au passage de l'opérateur. 10 Résolution des problèmes Le récepteur DTMRX2 (DTMRX224) se caractérise par une grande facilité d'utilisation, ce qui n'empêche que des problèmes peuvent se présenter durant ses phases d'installation et de configuration, ou durant son utilisation. PROBLÈME CAUSE PROBABLE SOLUTION La DEL d'alimentation est éteinte Absence d'alimentation Fusible grillé Les commandes du Configuration incorrecte de la RS485 ne répondent pas réception et la DEL d'alimentation Vitesse ou protocole incorrect est allumée Adresse récepteur incorrect Câblage incorrect Contrôler le câble d'alimentation Remplacer le fusible F1 Contrôler la configuration des Jumper JP2 et JP4. Contrôler la configuration du Dipswitch SW1 Contrôler l adresse configurée dans le récepteur (DIP SW2) Contrôler les câblages des bornes RX485A et RX485B de J5 Les commandes du RS232 ne répondent pas et la DEL d'alimentation est allumée Configuration incorrecte de la réception Vitesse ou protocole incorrect Adresse récepteur incorrect Câblage erroné Contrôler la configuration du cavalier JP1 Contrôler les configurations du Dip-switch SW1 Contrôler l adresse configurée dans le récepteur (DIP SW2) Contrôler le câblage des bornes RX232 et GND Les commandes en mode COAX ne répondent pas et la DEL d'alimentation est allumée La tourelle ne fonctionne pas L'optique ne fonctionne pas Dans une connexion en cascade, les unités suivantes ne reçoivent pas les commandes Configuration incorrecte du protocole Configuration incorrecte de l'adresse récepteur Câblage incorrect Contrôler le Dip-switch SW1 Contrôler la configuration du Dip SW2 et s'assurer que l adresse définie correspond au canal vidéo d'entrée de la matrice SMXXA Contrôler le câble coaxial (longueur maximale 350 m). Ne pas utiliser de dispositifs d'amplification vidéo entre matrice, récepteur et caméra. Alimentation tourelle incorrecte Contrôler que la tension d'alimentation de la tourelle correspond à celle fournie par le récepteur Tension optique incorrecte Contrôler le réglage du trimmer TR1 Connexion incorrecte Configuration incorrecte de la réception Vitesse ou protocole incorrects Adresse incorrecte Contrôler les câbles de connexion Contrôler la configuration des Jumper Vérifier la configuration de SW1 Contrôler l adresse configurée dans les unités non en fonctionnement Page 18
67 11 Caractéristiques techniques Caractéristiques générales Débit maximal ligne télémétrie RS m Débit maximal ligne télémétrie RS232 15m Débit maximal réception COAX 350m Débit contact auxiliaire 1A 230V~ / 1A 24V Nbre max. de récepteurs adressables 99 Régulation tension optique 3= - 14 V= max 100mA Consommation maximale 10 W Puissance maximale de commutation 100 W Température de fonctionnement De 20 C à +50 C Degré de protection IP IP56 Poids net 850 g Dimensions 225 (L) x 154 (W) x 81 (H) mm Conformité EN55022 classe B, EN EN60065, FCC part 15 Class B Caractéristiques spécifiques du récepteur DTMRX2 Tension d'alimentation Tension d'alimentation tourelle Fusible F1 230V~ 50Hz 230V~ 50Hz F 250mA L 250V Caractéristiques spécifiques du récepteur DTMRX224 Tension d'alimentation Tension d'alimentation tourelle Fusible F1 24V~ 50/60Hz 24V~ 50/60Hz F 2.5 A L 250V Page 19
68 Page 20
69 BEDIENUNGSANWEISUNG
70
71 INHALTSVERZEICHNIS 1 EINFÜHRUNG Inhalt der Verpackung Inhalt des Handbuches Schreibweisen SICHERHEITSVORSCHRIFTEN KENNZEICHNUNGSDATEN BESCHREIBUNG DES EMPFÄNGERS DTMRX2 (DTMRX224) Eigenschaften Mit dem Empfänger kompatible Geräte Installationsbeispiele Kabel INSTALLATION Öffnen der Verpackung Überprüfung der Kennzeichnung Dip-Schalter und Jumper für die Konfigurierung NETZANSCHLUSS KONFIGURIEREN DES EMPFÄNGERS Vorgabe einer Kennnummer für den Empfänger Einstellung der Übertragungsgeschwindigkeit Einstellung Empfängerprotokoll Einstellung Hilfsfunktion als Wiper Einstellung des Betriebsmodus beim Empfänger (RS232/RS485/COAX) Beschaltung der Leitung RS485 mit Abschlußwiderstand Verbindung mit Steuereinheit Verbindung mit einer Leitung RS Anschluß mehrerer in Kaskade geschalteter Empfänger (Punkt-zu-Punkt-Verbindung) Mehrere Empfänger je Leitung, Verbindung mit verdrillter Doppelader (Mehrpunkt-Verbindung) Mischkonfigurationen (Punkt-zu-Punkt/Mehrpunkt) Verbindung mit Leitung RS Verbindung für Empfang über Koaxialkabel (COAX) Art der gesteuerten Optiken und Einstellung Steuerspannung für Optiken Anschluß der Kabel für den Schwenk-Neige-Kopf und die Optiken EIN- UND AUSSCHALTEN WARTUNG PROBLEMLÖSUNG TECHNISCHE EIGENSCHAFTEN...19 Der Hersteller lehnt jede Verantwortung für Schäden ab, die auf den unsachgemäßen Gebrauch der in diesem Handbuch genannten Apparate zurückzuführen sind. Er behält sich außerdem das Recht vor, den Inhalt des Handbuches ohne Vorankündigung zu ändern. Die in diesem Handbuch enthaltene Dokumentation wurde mit aller nur erdenklichen Sorgfalt zusammengetragen und geprüft. Dennoch kann der Hersteller, ebenso wie die Personen oder Firmen, die an der Erstellung und der Herstellung dieses Handbuches mitgewirkt haben, keine Haftung für die Nutzung der Dokumentation übernehmen. Seite 1
72 1 Einführung 1.1 Inhalt der Verpackung 1 Empfänger DTMRX2 (DTMRX224) 1 Betriebshandbuch 2 Verschlußstopfen PG11 4 Wandbefestigungsbügel mit den dazugehörigen Schrauben Bei der Anlieferung des Produktes ist zu prüfen, ob die Verpackung intakt ist und keine deutlichen Sturzspuren oder Abschabungen aufweist. Falls die Verpackung beschädigt ist, muß sofort der Lieferanten davon unterrichtet werden. Kontrollieren Sie, ob der Inhalt mit der obigen Materialliste übereinstimmt. 1.2 Inhalt des Handbuches In diesem Handbuch wird der Empfänger DTMRX2 (DTMRX224) mitsamt den Einzelheiten für die Installation, die Konfiguration und die Bedienung beschrieben. Dieses Handbuch ist sorgfältig zu lesen, insbesondere das Kapitel, das sich mit den Sicherheitsaspekten befaßt. Erst dann darf der Empfänger installiert und benutzt werden. 1.3 Schreibweisen In diesem Handbuch werden verschiedene graphische Symbole benutzt, deren Bedeutung nachstehend zusammengefaßt wird: Gefahr elektrischer Entladungen; Falls nicht ausdrücklich das Gegenteil angegeben ist, unterbrechen Sie die Stromversorgung, bevor die beschriebenen Arbeiten durchgeführt werden. Der genannte Vorgang hat große Bedeutung für den einwandfreien Betrieb des Systems: es wird gebeten, die Beschreibung sorgfältig zu lesen und zu beherzigen. Beschreibung der Anlagenmerkmale: Eine sorgfältige Lektüre wird empfohlen, um das Verständnis der nachfolgenden Phasen zu erleichtern. Seite 2
73 2 Sicherheitsvorschriften Der Empfänger DTMRX2 (DTMRX224) entspricht den Vorschriften zur elektrischen Sicherheit, elektromagnetischen Verträglichkeit und den allgemeinen Anforderungen, die zum Zeitpunkt der Veröffentlichung dieses Handbuches Gültigkeit besaßen. Trotzdem werden den Benutzern (Installationstechniker und Bediener) einige Hinweise an die Hand gegeben, die es ihm ermöglichen, unter den sichersten Bedingungen mit der Anlage zu arbeiten: Die Installation des Gerätes (und der gesamten Anlage, zu der es gehört), ist qualifizierten technischen Fachleuten vorbehalten Das Gerät darf ausschließlich von Fachleuten geöffnet werden. Manipulationen am Gerät führen zum Verfall der Gewährleistungsrechte Vorgeschrieben ist der Anschluß an eine Versorgungsleitung, deren Eigenschaften den Angaben auf den Kennzeichnungsetiketten entsprechen (siehe das nachfolgende Kapitel Kennzeichnungsdaten) Der Empfänger ist über einen allpoligen Netzschalter an das Versorgungsnetz anzuschließen. Der Kontaktabstand bei jedem Pol muß mindestens 3 mm betragen. Die Stromversorgungsdose muß vorschriftsgemäß geerdet sein Bevor der Apparat umgestellt wird oder technische Eingriffe vorgenommen werden, ist die Stromversorgung zu unterbrechen. Das Gerät gilt erst dann als deaktiviert, wenn die Stromversorgung ausgeschaltet und die Verbindungskabel zu anderen Einrichtungen entfernt wurden Verwenden Sie Kabel mit angemessenem Querschnitt (siehe Abschnitt Kabel) Verwenden Sie keine spannungsführenden Kabel mit Verschleiß- oder Alterungsspuren, weil sie eine schwere Gefahr für Benutzer darstellen. Das Kabel muß so installiert werden, daß es dem Bediener nicht hinderlich ist. Das Gerät darf nicht in der Nähe entflammbarer Substanzen benutzt werden Das Gerät darf nicht von Kindern oder vermindert zurechnungsfähigen Personen benutzt werden Vergewissern Sie sich, daß der Apparat solide und zuverlässig befestigt ist Anfragen bezüglich des technischen Kundendienstes richten Sie bitte nur an autorisierte Fachleute. Das Handbuch ist für künftige Einsichtnahme pfleglich aufzubewahren. 3 Kennzeichnungsdaten Auf dem Empfänger befindet sich ein Etikett mit folgendem Inhalt: Identifikationscode des Produktes Seriennummer des Produktes Versorgungsspannung (Volt) Frequenz (Hertz) Verbrauch (Watt) Schutzart IP Auf der Verpackung befindet sich ein Etikett mit folgendem Inhalt: Identifikationscode des Produktes (Strichcode Extended 3/9) Seriennummer des Produktes (Strichcode Extended 3/9) Kurze Produktbeschreibung Versorgungsspannung (Volt) Frequenz (Hertz) Verbrauch (Watt) Schutzart IP Bei der Installation ist zu kontrollieren, ob die Stromversorgungsmerkmale des Empfängers mit den erforderlichen Werten übereinstimmen. Der Gebrauch ungeeigneten Gerätes kann die Sicherheit des Personals und der Anlage stark gefährden. Seite 3
74 4 Beschreibung des Empfängers DTMRX2 (DTMRX224) Der Empfänger DTMRX2 (DTMRX224) ist ein Steuergerät mit Mikroprozessor zur Fernbedienung von motorisierten Schwenk-Neige-Köpfen und Optiken. 4.1 Eigenschaften 12 Funktionen : UP, DOWN, LEFT, RIGHT, AUTO, ZOOM TELE, ZOOM WIDE, FOCUS NEAR, FOCUS FAR, IRIS OPEN, IRIS CLOSE, AUX AUX: potentialfreier Hilfskontakt 1A 230 V~ / 1A 24 V~ 99 mit Dip-Schaltern einstellbare Adressen Übertragungsalternativen RS232, RS485 und Koaxial Repeater RS232, RS485 für kaskadierte Konfiguration Einstellbare Übertragungsgeschwindigkeiten (1200, 9600, 19200, Baud) Einstellbare Übertragungsprotokolle: MACRO, Videotec Standard, Pelco D (2400 Baud) und Koaxial Möglichkeit zur Benutzung von Optiken mit Polaritätsumschaltung oder gemeinsamem Draht Hilfskontakt AUX einrichtbar für Betriebsart Wiper EEPROM für die Speicherung aktivierter Optionen Led Spannungs-Anzeige Led Steuerungsempfang Led Funktion aktiv Rein technische Eigenschaften (Verbrauch, Versorgungsspannung etc.) entnehmen Sie bitte dem Abschnitt Technische Eigenschaften. 4.2 Mit dem Empfänger kompatible Geräte DCS3, DCTEL, DCJ, DCT, DCIR: Bedientastaturen. SM42A, SM82A, SM84A, SM164A: Videomatrizen mit koaxialer Telemetriedatenübertragung DCRE485: Kommunikations-Controller zur sterngeschalteten Kontrolle mehrerer Empfänger mit einer Tastatur PTH310, PTH910, NXPTH210 Schwenk-Neige-Köpfe Empfänger Version DTMRX2 PTH311, PTH911, NXPTH211 Schwenk-Neige-Köpfe Empfänger Version DTMRX224 ANMERKUNG: Wird das Schnittstellenmodul DCFIT verwendet, läßt sich der Empfänger über die Tastenmodelle DCS2 und DCMT8 bedienen. Eine umfassende Beschreibung der Geräteeigenschaften finden Sie in den einzelnen Bedienungshandbüchern. Seite 4
75 4.3 Installationsbeispiele Ein Bediener mit mehreren Monitoren steuert eine Reihe von Schwenk-Neige-Köpfen über eine Telemetrieleitung RS485 mit kaskadierten Empfängern: MATERIAL Bedienung: K1: Bedientastatur DCJ Video: M1: Videomatrix SM164A 2 Monitore 3 Kameras Telemetrie: R1,R2, R3: Empfänger DTMRX2 PT1,PT2,PT3: Schwenk-Neige-Köpfe PTH910 Ein Bediener mit mehreren Monitoren steuert eine Reihe von Schwenk-Neige-Köpfen mit Empfängern in der Betriebsart Telemetrie über Koax-Kabel, von Matrix kommend: MATERIAL Bedienung: K1: Bedientastatur DCJ Video: M1: Videomatrix SM164A 2 Monitore 3 Kameras Telemetrie: R1, R2, R3: Empfänger DTMRX2 PT1,PT2,PT3: Schwenk-Neige-Köpfe PTH910 Seite 5
76 4.4 Kabel In den Beispielen sind die Kabelstrecken unterschiedlicher Funktion verschiedenartig dargestellt: Videokabel: Koaxialkabel RG 59 oder gleichwertiges Kabel. Mehrleiterkabel: Jede Steuerfunktion der Schwenk-Neige-Einrichtung wird von einem empfängerinternen Relais aktiviert / deaktiviert. Die endgültige Anzahl der Kabel wird nach folgenden Daten bestimmt: 7 Drähte für die Bewegung der Schwenk-Neige-Einrichtung: rechts, links, auf, ab, Autopan, common, Erde 6 Steuerdrähte für Optiken mit Polaritätsumschaltung (Zoom, Focus, Iris) 4 Steuerdrähte für die Optiken mit gemeinsamem Draht (Zoom, Focus, Iris) 2 Drähte für jeden benutzten Hilfsschaltkreis 3 Drähte für Netzkabel Anmerkung: Es wird empfohlen, für die Funktionen in Nieder- und Hochspannung unterschiedliche Mehrleiter- Kabel zu benutzen. Empfohlener Mindestquerschnitt: 0,56 mm.² (AWG 20) für Hochspannungsdrähte Schwenk-Neige-Kopf (Empfänger DTMRX2 ) 0,75 mm.² (AWG 18) für Niederspannungsdrähte Schwenk-Neige-Kopf (Empfänger DTMRX224) 0,34 mm.² (AWG 22) für Niederspannungsdrähte (Optik, Hilfsschaltkreis) 0,75 mm.² (AWG 18) für Netzversorgungsdrähte DTMRX2 (LINE, NEUTRAL und Erde) 1,00 mm.² (AWG 16) für Netzversorgungsdrähte DTMRX224 (LINE, NEUTRAL und Erde) Kabel für digitales Empfangen / Senden der Steuerbefehle: 2 Drähte für den Empfang von der Steuereinheit (verdrillte Telefondoppelader, Querschnitt 0,22 mm.² AWG 24) 2 Drähte bedarfsweise für die Übertragung zum nachfolgenden Empfänger in der kaskadierten Konfiguration (verdrillte Telefondoppelader, Querschnitt 0,22 mm.² AWG 24) Anmerkung: Die Höchstentfernung für die Verbindung beträgt beim Übertragungssprotokoll RS232 etwa 15 m, bei RS485 etwa 1200 m. Sind mehrere Empfänger in einer Kaskade hintereinandergeschaltet, müssen zwei separate Kabel für den Digitalempfang und die Digitalübertragung der Steuersignale zwischen den Empfängern verwendet werden (keine mehrpaarigen Kabel benutzen). Seite 6
77 5 Installation Die Installation darf nur von technisch versierten Fachleuten vorgenommen werden. Die folgenden Tätigkeiten sind bei unterbrochener Stromversorgung vorzunehmen, soweit nichts Gegenteiliges genannt ist. 5.1 Öffnen der Verpackung Weist die Verpackung keine offensichtlichen Schäden auf (z. B. Sturzspuren oder starke Abschabungen), kann anhand der Liste im Kapitel Einführung Abschnitt Inhalt der Verpackung der Inhalt überprüft werden. Das Verpackungsmaterial ist voll receyclingfähig. Es ist Sache des Installationstechnikers, die Verpackungsstoffe materialgerecht zu sortieren und nach den geltenden Landesvorschriften zu entsorgen. 5.2 Überprüfung der Kennzeichnung Vor Beginn der Installationsarbeiten ist zu kontrollieren, ob das gelieferte Material den jeweiligen Anforderungen entspricht. Zu erkennen ist dies anhand des Kennzeichnungsetiketts, wie es im Kapitel Beschreibung der Kennzeichnung beschrieben wird. Unter keinen Umständen dürfen Änderungen oder Anschlüsse vorgenommen werden, die in diesem Handbuch nicht genannt sind: Der Gebrauch ungeeigneten Gerätes kann eine schwere Gefahr für die Sicherheit des Personals und der Anlage bedeuten. Seite 7
78 5.3 Dip-Schalter und Jumper für die Konfigurierung Im folgenden Schema sind die Dipschalter und Jumper für die Konfiguration dargestellt: Trimmer TR1 für Spannungsregelung Optiken Bnc J1 und J2 für Koax-Empfang Jumper JP4 Jumper JP3 Steckbuchse J4 Serigrafien obere Klemmen Serigrafien untere Klemmen Klemmen zur Empfängerspeisung Seite 8
, während die Serigrafie zu den unteren Buchsen die entferntere ist (z.")
79 Anmerkung zu Klemme J5 Jumper J5 hat eine doppelte Steckbuchsenreihe. Die Serigrafie zu den oberen Buchsen liegt der entsprechenden Klemme am nächsten (NEUTRAL bezieht sich etwa auf die obere Klemme), während die Serigrafie zu den unteren Buchsen die entferntere ist (z. B. bezieht sich COM auf die untere Klemme). Zum Einfügen der Anschlußkabel in den Klemmenblock J5 benutzen Sie in den zugehörigen Öffnungen einen Schlitzschraubendreher (siehe Abb. 1). Schraubendreheröffnug für obere Klemme Schraubendreheröffnug für untere Klemme Abb. 1 Obere Klemme Untere Klemme Seite 9
80 6 Netzanschluss Der Anschluß muß mit den passenden Endkontakten der Klemme J5 vorgenommen werden (LINE, NEUTRAL, ), wie es in der Abbildung auf Seite 8 dargestellt ist. Achtung! Bei der Verkabelung den Erdleiter 2-3cm länger als die anderen Leitungen ausführen. 7 Konfigurieren des Empfängers Durch die Konfigurierung wird der Empfänger optimal auf die Anlage abgestimmt. Diese Einrichtung muß während der Installation vom Installationstechniker vorgenommen werden. Es ist empfehlenswert, nach einer gewissen Reihenfolge zu parametrieren, um Installationsfehler zu vermeiden. Während der Konfigurierung werden folgende Parameter eingerichtet: Kennnummer des Empfängers (Empfängeradresse) Einstellung der Übertragungsgeschwindigkeit (1200, 9600, oder baud) Einstellung Empfängerprotokoll (MACRO, Videotec, Pelco D oder COAX) Einstellung Aux oder Wiper Empfangsmodus ( RS232 / RS485/ COAX) Leitung RS485 mit Abschlußwiderstand beschalten Anschluß der Optiken Anschluß an die Steuereinheit Einstellung der Steuerspannung für die Optik Anschluß der Kabel für Schwenk-Neige-Kopf und Optiken Seite 10
81 7.1 Vorgabe einer Kennnummer für den Empfänger Der Empfänger kann mit einer Adresse zwischen 1 und 99 versehen werden. Stellen Sie sicher, daß die Netzversorgung unterbrochen ist ( Spannungs-Led aus) Die Dipschalter SW2 nach der folgenden Tabelle konfigurieren: DIP-SWITCH DIP-SWITCH DIP-SWITCH Einstellung der Übertragungsgeschwindigkeit Der Empfänger DTMRX2 (DTMRX224) kann Übertragungen mit vier verschiedenen Geschwindigkeiten vornehmen. Stellen Sie die Dipschalter 1 und 2 von SW1 nach der folgenden Tabelle ein: Dip 1 Dip 2 Baud OFF OFF 9600 * OFF ON ON OFF 1200 ON ON * Werkseinstellung Seite 11
82 7.3 Einstellung Empfängerprotokoll Der Empfänger DTMRX2 (DTMRX224) kann mit vier verschiedenen Protokollarten betrieben werden. Passen Sie die Stellung der Dipschalter 3 und 4 von SW1 nach der folgenden Tabelle an das gewünschte Protokoll an: Dip 3 Dip 4 Protokoll OFF OFF MACRO* OFF ON Videotec ON OFF Pelco D ON ON COAX * Werkseinstellung Protokoll Pelco D: Der Empfänger arbeitet mit einer Übertragungsgeschwindigkeit von 2400 baud, unabhängig von der Einstellung, die mit den Dipschaltern 1 und 2 von SW1 vorgegeben wird. 7.4 Einstellung Hilfsfunktion als Wiper Beim Empfänger DTMRX2 (DTMRX224) kann der Hilfskontakt (AUX) mit der Wiperfunktion geschaltet werden (eine Funktion, die nur von den Bedientastaturen DCJ und DCT aus aktivierbar ist). Normalerweise wird der Hilfskontakt von den Tastaturen aus mit dem Befehl Aux 1 aktiviert und auch deaktiviert. Wenn der Wipermodus aktiviert ist, spricht der Hilfskontakt nur bei Betätigung der Taste Wiper (Scheibenwischer) an. Beim Loslassen der Taste Wiper wird der Kontakt gelöst. Die Einstellung wird am Dipschalter 8 (SW2) nach der folgenden Tabelle vorgenommen: Dip 8 OFF ON * Werkseinstellung Funktion Aux1 Aux1* Wiper 7.5 Einstellung des Betriebsmodus beim Empfänger (RS232/RS485/COAX) Einstellungen Jumper JP1 und JP2 für Empfang RS485: Einstellungen Jumper JP1 und JP2 für Empfang RS232: Für den Empfang COAX (Telemetrie über Koax-Kabel) reicht es aus, die Dipschalter 3 und 4 von SW1 so einzurichten, wie im Abschnitt Einstellung Empfängerprotokoll beschrieben. 7.6 Beschaltung der Leitung RS485 mit Abschlußwiderstand ANMERKUNG: Diese Einstellung ist nur erforderlich, wenn eine Übertragungsleitung RS485 genutzt wird. Für die Konfigurierung der Jumper JP3 und JP4 siehe die folgenden Einstellungen: Jumper in Stellung A Jumper in Stellung B Einstellungen: JP3 in Stellung A: Abschlußwiderstand eingeschaltet bei Übertragung RS485. JP3 in Stellung B: Abschlußwiderstand ausgeschaltet bei Übertragung RS485. JP4 in Stellung A: Abschlußwiderstand eingeschaltet bei Empfang RS485. JP4 in Stellung B: Abschlußwiderstand ausgeschaltet bei Empfang RS485. Seite 12
83 7.7 Verbindung mit Steuereinheit Über die Steckbuchse RJ11 des Empfängers (siehe J4 auf S. 8) lassen sich Digitaldaten im Modus RS485 oder RS232 empfangen und übertragen. Die Bedientastaturen können während der Testphasen schnell angeschlossen werden, ebenso lassen sich handelsübliche Konvertierungs-Schnittstellen anbinden (RS232- Lichtleitfaser). Für die eigentliche Verbindung mit den Tastaturen verwenden Sie hingegen die Klemmen in Klemmenblock J5. Es wird empfohlen, den Modus RS485 zu benutzen, mit dem eine Höchstdistanz von 1200 Meter überbrückt werden kann und der immun ist gegen externe Störungen. Im Empfangsmodus COAX lassen sich bis zu 350 Meter Entfernung von der Steuereinheit erreichen (mit Matrizen der Serie SMXXA). Im Empfangsmodus RS232 schließlich beträgt die Entfernung zur Steuereinheit bis zu 15 Meter (PC oder Tastaturmodelle DCS2 und DCMT8). 7.8 Verbindung mit einer Leitung RS485 Die Bedientastaturen DCJ, DCT, DCTEL und der Empfänger DTMRX2 (DTMRX224) lassen sich unmittelbar über ein Telefonkabel verbinden, das dem Lieferumfang der Tastatur beigefügt ist. Zu verwenden ist die Steckverbindung RJ11 (J4) auf der Schaltung. Für die eigentliche Verbindung zwischen Steuereinheit und Empfänger gilt die folgende Vorgehensweise: Verbindung Bedientastatur - Empfänger Verbinden Sie den Telemetrieausgang der Bedientastatur über das beiliegende Telefonkabel mit dem Abzweigkasten RJ-JACK. Die mit der Serigrafie RX485A und RX485B gekennzeichneten Klemmen des Empfängers werden über eine verdrillte Doppelader mit dem gleichen Abzweigkasten verbunden, der zuvor an die Bedientastatur angebunden wurde. Für eine korrekte Installation siehe das folgende Diagramm und die nachstehende Tabelle: Übertragungsmodus RS485: Höchstdistanz 1200 Meter. DCJ, DCT, DCTEL, DCIR (RJ11 A o B) DTMRX2 DTMRX224 Weiß TX-485A RX485A Gelb TX-485B RX485B An den Telemetrieanschluß der Bedientastatur Klemme Empfänger Im Folgenden werden drei mögliche Anlagengestaltungen beschrieben: Punkt-zu-Punkt-Verbindung (kaskadiert) Mehrpunkt-Verbindung (parallel) Mischverbindung Seite 13
84 7.8.1 Anschluß mehrerer in Kaskade geschalteter Empfänger (Punkt-zu-Punkt-Verbindung) Die Empfänger DTMRX2 (DTMRX224) können das empfangene Signal intern regenerieren und auf einer anderen Verbindungsleitung an den nächsten Empfänger weiterreichen. Jede der drei Leitungsstrecken (L1, L2, L3) ist unabhängig und verbindet ausschließlich zwei Einrichtungen, beide mit eingeschaltetem Abschlußwiderstand, von Punkt zu Punkt über eine Höchstentfernung von 1200 Meter. Die Distanz zwischen der Bedientastatur K1 und dem Empfänger R3 kann bis zu 3600 m betragen (1200 m zwischen Bedientastatur K1 und Empfänger R1, 1200 m zwischen Empfänger R1 und Empfänger R2, sowie weitere 1200 m zwschen Empfänger R2 und Empfänger R3, also insgesamt 3600 m). Anmerkung: Die Klemmen RX485A und RX485B, die den eingeschalteten Abschlußwiderstand darstellen, müssen mit den Klemmen TX485A und TX485B der vorangegangenen Einheit verbunden werden, auch diese mit eingeschaltetem Widerstand. Die Klemmen TX485A und TX485B mit eingeschaltetem Widerstand müssen an die Klemmen RX485A und RX485B der nachfolgenden Einheit angeschlossen werden (auch diese mit eingeschaltetem Abschluß): Vom vorigen Empfänger Zum nächsten Empfänger Zur Beachtung: Bei dieser Verbindungsart (Punkt-zu-Punkt) führt der Ausfall eines Empfängers zur Unterbrechung der kaskadierten Geräteschaltung Mehrere Empfänger je Leitung, Verbindung mit verdrillter Doppelader (Mehrpunkt-Verbindung) Alle an dieselbe Leitung angeschlossenen Empfänger müssen mit demselben Kommunikationsprotokoll RS485 arbeiten. Für jede dieser Leitungen gelten folgende Betrachtungen: Der Belastungswiderstand nur einer der Tastaturen (an einem Leitungsende) ist eingeschaltet Nur einer der Empfänger (am anderen Leitungsende gelegen) hat einen eingeschalteten Belastungswiderstand. Die Gesamtlänge der Leitung darf 1200 m nicht überschreiten. Verwendet wurde die Leitung A von der Bedientastatur K1 für die Kommunikation in Richtung Telemetrie. An den Endpunkten (Bedientastatur K1 - Empfänger R3) muß der Abschlußwiderstand eingeschaltet sein. Bei den Empfängern R1, R2 darf er hingegen nicht eingeschaltet sein. Die Höchstlänge der Leitung von einem zum anderen Ende (von der Bedientastatur K1 bis zum Empfänger R3) beträgt 1200 Meter. Zur Beachtung: Bei dieser Verbindung (Mehrpunkt) beeinträchtigt der Ausfall eines der Geräte nicht den Betrieb der anderen Empfänger. Seite 14
85 7.8.3 Mischkonfigurationen (Punkt-zu-Punkt/Mehrpunkt) Die Kombination aus den beiden oben beschriebenen Verbindungsarten gestattet es, deren Vorzüge optimal auszunutzen und die Störungsanfälligkeit beträchtlich herabzusetzen. Nachstehend ist eine Mischverbindung bespielhaft dargestellt: In diesem Beispiel hat der Ausfall des Empfängers R3 (Mehrpunkt-Anschluß an Leitung L3) keine negativen Auswirkungen auf den Empfänger R4. R3 befindet sich nicht am Ende der Leitung L3, braucht also nicht abgeschlossen zu werden. Sollte Empfänger R2 ausfallen, mithin der Generator von Leitung L3, können sämtliche mit ihm in Kaskade geschalteten Empfänger (R3 und R4) keine Befehle mehr empfangen. 7.9 Verbindung mit Leitung RS232 Der Empfänger DTMRX2 (DTMRX224) kann über die Leitung RS232 von einem PC oder Bedientastaturen gesteuert werden, welche den Kommunikationsstandard RS232 unterstützen (DCS2 und DCMT8). Es sei daran erinnert, daß höchstens 15 Meter Distanz mit der seriellen Leitung RS232 überbrückt werden. Siehe hierzu die folgende Anschlußtabelle: DCS2/DCMT8 DTMRX2 RJ-JACK Schwarz Tx RS RX232 Grün GND RS GND Für kaskadierte Empfängerverbindungen schließen Sie Klemme RX232 an die Klemme TX232 der vorangehenden Einheit an und Klemme TX232 an die Klemme RX232 der folgenden Einheit. Verbinden Sie die Massen (GND). Siehe auch das folgende Anschlußbild: Vom vorigen Empfänger Zum nächsten Empfänger Seite 15
86 7.10 Verbindung für Empfang über Koaxialkabel (COAX) Der Empfänger DTMRX2 (DTMRX224) unterstützt den Telemetriedatenempfang über Koaxialkabel (RG59 oder gleichwertige). Mit einer Koax-Verbindung lassen sich bis zu 360 m Distanz überbrücken (Distanz Matrix Kamera). Nicht zulässig ist die Zwischenschaltung von Geräten zur Verstärkung von Videosignalen (zum Beispiel Videoverteiler). Folgende Hinweise sind für die einwandfreie Konfigurierung der Anlage zu beachten: BNC J1 des Empfängers (siehe S. 8) an den Videoausgang der Kamera anschließen. BNC J2 des Empfängers (siehe S. 8) an den Videoeingang der Matrix anschließen, deren Adresse der gespeicherten Empfängeradresse entspricht (z. B. wird Empfänger 1 an den Videoeingang 1 der Matrix angeschlossen, Empfänger 2 an den Videoeingang 2 der Matrix usw.) Richten Sie die Dipschalter SW1 für eine COAX-Verbindung ein (siehe Einstellung Empfängerprotokoll) und die Empfängeradresse mit Dipschalter SW2 (siehe Abschnitt Einstellung der Empfängerkennnummer). An der Matrix (und bei Bedarf an der Bedientastatur) die Telemetrieübertragung des Typs Koaxial einstellen. ANMERKUNG: Eine KOAX-Verbindung ist nur mit Matrizen der Modelle SMXXA möglich (SM42A, SM82A, SM84A und SM164A). Zur Matrixkonfiguration siehe die entsprechenden Handbücher Art der gesteuerten Optiken und Einstellung Steuerspannung für Optiken ACHTUNG: Bei einem fehlerhaften Anschluß des Optiktyps können die Optiken selbst Schaden nehmen. Der Empfänger DTMRX2 (DTMRX224) ist fähig, sowohl Optiken mit Polaritätsumschaltung als auch Optiken mit gemeinsamem Draht zu steuern. Bei Optiken mit Betrieb über gemeinsamen Draht wird dieser an FOCUS angeschlossen. Einstellung der Steuerspannung für die Optik Einschalten eines Belastungswiderstandes zwischen den Klemmen FOCUS+ und FOCUS-, der mindestens 10mA aufnimmt (verwenden Sie einen Widerstand mit einem Wert zwischen 100 und 1000 Ohm). Schließen Sie das Versorgungskabel an und speisen Sie die Einheit DTMRX2 oder DTMRX224 ( Spannungs-Led an) Die Tastköpfe des Testgerätes an die Klemmen FOCUS+ und FOCUS- anlegen. Die Taste FOCUS NEAR an der Steuereinheit gedrückt halten Die Steuerspannung der Optik mit dem Trimmer TR1 regeln (siehe das Schema auf S. 8; Werkseinstellung 12V= ) Zur Beachtung: Die Spannung sollte nicht im Leerlauf eingestellt werden (ohne eingeschalteten Abschlußwiderstand), weil dann Fehler auftreten Anschluß der Kabel für den Schwenk-Neige-Kopf und die Optiken ACHTUNG: Vor den folgenden Tätigkeiten ist sicherzustellen, daß die Steuerspannung des Schwenk- Neige-Kopfes und der benutzte Optiktyp korrekt eingestellt sind Den Stromkreis der Einheit unterbrechen Die Verbindungen mit der Optik und dem Schwenk-Neige-Kopf herstellen Die Einheit mit Strom versorgen Zur Beachtung: Es wird empfohlen, biegsame Kabel mit passendem Querschnitt zu verwenden (siehe Abschnitt Kabel). Seite 16
87 8 Ein- und Ausschalten Bevor die Stromversorgung hergestellt wird: Anhand der Kennzeichnungsetiketten ist zu prüfen, ob das Liefermaterial den beim Auftrag gemachten Angaben entspricht, siehe die Ausführungen in Kapitel Beschreibung der Kennzeichnung. Prüfen, ob die Schutzsicherung des Empfängers unversehrt ist Prüfen, ob der Empfänger und die anderen Anlagenkomponenten geschlossen sind, damit der direkte Kontakt mit spannungsführenden Teilen ausgeschlossen ist. Stellen Sie sicher, daß alle Teile solide und zuverlässig befestigt sind Die Speisekabel dürfen dem Installationstechniker bei den normalen Arbeiten ebenso wenig hinderlich sein, wie der Bewegung des Schwenk-Neige-Kopfes Prüfen Sie, ob die Versorgungsquellen und die Verbindungskabel dem Systemverbrauch angemessen sind Seite 17
88 9 Wartung Der Empfänger DTMRX2 (DTMRX224) bedarf keiner aufwendigen Wartung. Es wird empfohlen, ihn beim Betrieb auf eine soliden Unterlage zu stellen, die Netz- und Verbindungskabel so untergebracht, daß sie dem Bediener nicht hinderlich sind. 10 Problemlösung Der Empfänger DTMRX2 (DTMRX224) ist sehr bedienerfreundlich, was aber nicht ausschließt, daß bei der Installation, der Konfigurierung und der Bedienung Probleme auftreten können. PROBLEM VERMUTLICHE URSACHE ABHILFE Die Spannungs-Led ist aus Keine Netzversorgung Schmelzsicherung durchgebrannt Netzkabel prüfen Schmelzsicherung F1 ersetzen Die Steuerbefehle werden Fehlerhafte Empfangskonfiguration Einstellung der Jumper JP2 und in RS485 nicht ausgeführt, Geschwindigkeit oder Protokoll falsch JP4 prüfen. die Spannungs-Led ist an Empfängeradresse fehlerhaft Einstellungen der Dipschalter Verkabelung fehlerhaft SW1 prüfen Im Empfänger eingestellte Adresse überprüfen (DIP SW2) Die Kabelverbindung in den Klemmen RX485A und RX485B von J5 prüfen Die Steuerbefehle werden Fehlerhafte Empfangskonfiguration Einstellung des Jumpers JP1 in RS232 nicht ausgeführt, Geschwindigkeit oder Protokoll falsch prüfen die Spannungs-Led ist an Empfängeradresse fehlerhaft Einstellungen des Dipschalters Verkabelung fehlerhaft SW1 prüfen Im Empfänger eingestellte Adresse prüfen (DIP SW2) Die Kabelverbindung in den Klemmen RX232 und GND prüfen Die Steuerbefehle werden Falsches Protokoll Dipschalter SW1 kontrollieren im Modus COAX nicht Fehlerhafte Empfängeradresse Die Einstellungen des Dip SW2 ausgeführt, die Verkabelung fehlerhaft prüfen und sicherstellen, daß die Spannungs-Led ist an eingestellte Adresse dem Videokanal am Eingang der Matrix SMXXA entspricht Koax-Kabel prüfen (Höchstlänge 350 m). Keine Geräte zur Verstärkung des Videosignals zwischen Matrix, Empfänger und Kamera benutzen. Der Schwenk-Neige-Kopf Fehlerhafte Stromspeisung des Prüfen, ob die Versorgungsspannung funktioniert nicht Schwenk-Neige-Kopfes des Schwenk-Neige-Kopfes dem vom Empfänger bereitgestellten Wert entspricht Die Optik funktioniert nicht Fehlerhafte Spannung der Optik Die Einstellung des Trimmers TR1 kontrollieren In einer Fehlerhafter Anschluß Verbindungskabel prüfen Kaskadenverbindung Fehlerhafte Empfangskonfiguration Jumper-Einstellungen prüfen empfangen die Geschwindigkeit oder Protokoll falsch Einstellung SW1 prüfen nachfolgenden Einheiten Falsche Adresse Adresse der nicht funktionierenden keine Steuerbefehle Einheiten überprüfen Seite 18
89 11 Technische Eigenschaften Gemeinsame Merkmale Höchste Reichweite Telemetrieleitung RS m Höchste Reichweite Telemetrieleitung RS232 15m Höchste Empfangsreichweite COAX 350m Stromfestigkeit Hilfskontakt 1A 230V~ / 1A 24V Höchstzahl adressierbarer Empfänger 99 Spannungsregulierung Optik 3= - 14 V= max 100mA Höchster Verbrauch 10 W Maximal umschaltbare Leistung 100 W Betriebstemperatur Von 20 C bis +50 C Schutzart IP IP56 Nettogewicht 850 g Abmessungen 225 (L) x 154 (W) x 81 (H) mm Konformität EN55022 Klasse B, EN EN60065, FCC part 15 Class B Spezifische Merkmale des Empfängers DTMRX2 Versorgungsspannung Versorgungsspannung Schwenk-Neige-Kopf Schmelzsicherung F1 230V~ 50Hz 230V~ 50Hz F 250mA L 250V Spezifische Merkmale des Empfängers DTMRX224 Versorgungsspannung Versorgungsspannung Schwenk-Neige-Kopf Schmelzsicherung F1 24V~ 50/60Hz 24V~ 50/60Hz F 2.5 A L 250V Seite 19
90 Seite 20

91 Videotec s.r.l. Sede Legale: Via Lago Maggiore, 15 - I SCHIO (VI) Unità Produttiva: Via Lago di Albano, 45 - I SCHIO (VI) Telefono Telefax R.E.A. n /Vicenza - Registro Imprese n //VI116 M/VI Capitale Sociale L int. Versato Codice Fiscale Partita I.V.A. IT info@videotec.com - url: Dichiarazione di conformità Declaration of conformity La Ditta Videotec srl, Via Lago Maggiore 15 Schio (VI), dichiara sotto la sua responsabilità che i prodotti: Videotec srl, having its head office in Schio (VI) Italy Via Lago Maggiore 15, declares under its responsibility that the products: DTMRX2/DTMRX224 ricevitore di comandi per il controllo di brandeggio e ottica a 12 funzioni 12 functions digital control receiver driver for pan & tilt and zoom lenses ai quali questa dichiarazione si riferisce sono conformi ai seguenti documenti normativi: to whom this declaration refers are in conformity with the following standards: EN :1992 Compatibilità elettromagnetica Norma generica sull emissione Parte 1: Ambienti residenziali, commerciali e dell industria leggera Electromagnetic compatibility - Generic emission standard Part 1: Residential, commercial and light industry EN :1995 Sistemi d'allarme - Parte 4: Compatibilità elettromagnetica Norma per famiglia di prodotto: Requisiti di immunità per componenti di sistemi antincendio, antintrusione e di allarme personale Alarm systems Part 4: Electromagnetic compatibility Product family standard: Immunity requirements for components of fire, intruder and social alarm system EN : 1998 Prescrizioni di sicurezza per apparecchi elettronici e loro accessori collegati alla rete per uso domestico e analogo uso generale Safety requirements for mains operated electronic and related apparatus for household and similar general use. In base a quanto previsto dalle seguenti direttive comunitarie CEE: With reference to what it is provided for the following EEC-directives: - 89/336/CEE. - 92/31/CEE. - 93/68/CEE. - 73/23/CEE. Schio 22/12/2003 Firma Signature Alessio Grotto (Presidente)
Markengeschichte. Hingabe unterscheidet uns. Hartnäckigkeit beschreibt uns.
 Bedienungsanleitung Mit unserem Glauben gehen wir voran. Mit unserer Leidenschaft steigern wir unsere Erfahrung. Vergessen die eigenen Fehlschläge, aber nicht das unerfüllte Potential. Die Leidenschaft
Bedienungsanleitung. Xperia P TV Dock DK21
 Bedienungsanleitung Xperia P TV Dock DK21 Inhaltsverzeichnis Einführung...3 TV Dock Anschlüsse...3 Erste Schritte...4 LiveWare -Manager...4 Aktualisieren von LiveWare -Manager...4 Verwendung von TV Dock...5
RS232-Verbindung, RXU10 Herstellen einer RS232-Verbindung zwischen PC und Messgerät oder Modem und Messgerät
 Betriebsanleitung RS232-Verbindung, RXU10 Herstellen einer RS232-Verbindung zwischen PC und Messgerät oder Modem und Messgerät ä 2 Operating Instructions RS232 Connection, RXU10 Setting up an RS232 connection
Release Notes BRICKware 7.5.4. Copyright 23. March 2010 Funkwerk Enterprise Communications GmbH Version 1.0
 Release Notes BRICKware 7.5.4 Copyright 23. March 2010 Funkwerk Enterprise Communications GmbH Version 1.0 Purpose This document describes new features, changes, and solved problems of BRICKware 7.5.4.
www.snom.com User Manual Bedienungsanleitung snom Wireless Headset Adapter snom Schnurlos-Headset-Adapter Deutsch English
 English snom Wireless Headset Adapter snom Schnurlos-Headset-Adapter Deutsch User Manual Bedienungsanleitung 2007 snom technology AG All rights reserved. Version 1.01 www.snom.com English snom Wireless
CABLE TESTER. Manual DN-14003
 CABLE TESTER Manual DN-14003 Note: Please read and learn safety instructions before use or maintain the equipment This cable tester can t test any electrified product. 9V reduplicated battery is used in
E asyline by Hama GmbH & Co KG Postfach 80 86651 Monheim/Germany Tel. +49 (0)9091/502-0 Fax +49 (0)9091/502-274 hama@hama.de www.hama.
9091/502-0 Fax +49 (0)9091/502-274 hama@hama.de www.hama.") 00021024-10.06 E asyline by Hama GmbH & Co KG Postfach 80 86651 Monheim/Germany Tel. +49 (0)9091/502-0 Fax +49 (0)9091/502-274 hama@hama.de www.hama.com Gamepad Thunderstorm II 0021024 l Bedienungsanleitung
00021024-10.06 E asyline by Hama GmbH & Co KG Postfach 80 86651 Monheim/Germany Tel. +49 (0)9091/502-0 Fax +49 (0)9091/502-274 hama@hama.de www.hama.com Gamepad Thunderstorm II 0021024 l Bedienungsanleitung
Cisco SSPA122. Installation und manuelle Rekonfiguration. Dokumentenversion 1
 Cisco SSPA122 Installation und manuelle Rekonfiguration Dokumentenversion 1 Placetel UC-One Cisco SPA122 Installation und manuelle Rekonfiguration Copyright Hinweis Copyright 2015 finocom AG Alle Rechte
Installation Instructions
 EN DE Installation Instructions WLAN Installation Kit, 300 Mbps, 5 GHz, 16 dbi AK-4 Wireless Kit Scope of delivery Junction box AK-4 (1x) 1 Connection board AK-4 CB with 12VDC power supply unit (1x) 2
Parameter-Updatesoftware PF-12 Plus
 Parameter-Updatesoftware PF-12 Plus Mai / May 2015 Inhalt 1. Durchführung des Parameter-Updates... 2 2. Kontakt... 6 Content 1. Performance of the parameter-update... 4 2. Contact... 6 1. Durchführung
Aufgabenstellung Mit welchen SICLOCK Produkten kann ich einen PC Zeitsynchronisieren?
 SICLOCK Application Note AN-0005 Titel Synchronisation von PCs mit SICLOCK Aufgabenstellung Mit welchen SICLOCK Produkten kann ich einen PC Zeitsynchronisieren? Schlüsselwörter SICLOCK DCFRS, WinGPS, GPS1000,
Anleitung zur Schnellinstallation TFM-560X YO.13
 Anleitung zur Schnellinstallation TFM-560X YO.13 Table of Contents Deutsch 1 1. Bevor Sie anfangen 1 2. Installation 2 Troubleshooting 6 Version 06.08.2011 1. Bevor Sie anfangen Packungsinhalt ŸTFM-560X
2 & 4 Port Monitor Splitters
 2 & 4 Port Monitor Splitters User Manual Benutzerhandbuch Manuel Utilisateur Manuale d uso English Deutsch Francais Italiano LINDY No. 32407, 32408 www.lindy.com LINDY ELECTRONICS LIMITED & LINDY-ELEKTRONIK
p^db=`oj===pìééçêíáåñçêã~íáçå=
 p^db=`oj===pìééçêíáåñçêã~íáçå= Error: "Could not connect to the SQL Server Instance" or "Failed to open a connection to the database." When you attempt to launch ACT! by Sage or ACT by Sage Premium for
E/A-Bedieneinheit. I/O Control unit 658552 DE/GB 08/02
 E/A-Bedieneinheit I/O Control unit 527429 658552 DE/GB 08/02 Best.-Nr.: 658552 Benennung: DATENBLATT Bezeichnung: D:LP-BED.EINH.-E/A-DE/GB Stand: 08/2002 Autoren: Christine Löffler Grafik: Doris Schwarzenberger
C R 2025 C LOSE PUSH OPEN
 3V C R 2025 C LOSE PUSH OPEN ) ) ) 25 222 3V C R 2025 C LOSE PUSH OPEN 25 222 3V C R 2025 C LOSE PUSH OPEN 25 222 Den här symbolen på produkten eller i instruktionerna betyder att den elektriska
ALL1681 Wireless 802.11g Powerline Router Quick Installation Guide
 ALL1681 Wireless 802.11g Powerline Router Quick Installation Guide 1 SET ALL1681 Upon you receive your wireless Router, please check that the following contents are packaged: - Powerline Wireless Router
ONLINE LICENCE GENERATOR
 Index Introduction... 2 Change language of the User Interface... 3 Menubar... 4 Sold Software... 5 Explanations of the choices:... 5 Call of a licence:... 7 Last query step... 9 Call multiple licenses:...
TomTom WEBFLEET Tachograph
 TomTom WEBFLEET Tachograph Installation TG, 17.06.2013 Terms & Conditions Customers can sign-up for WEBFLEET Tachograph Management using the additional services form. Remote download Price: NAT: 9,90.-/EU:
Alveo Micro. Installation Sheet Installationshandbuch Scheda di installazione
 Alveo Micro Installation Sheet Installationshandbuch Scheda di installazione ENGLISH Package checklist: - ThinKnx Micro server - Power Adapter - BUS terminal connector - Installation Sheet Technical data:
TVHD800x0. Port-Weiterleitung. Version 1.1
 TVHD800x0 Port-Weiterleitung Version 1.1 Inhalt: 1. Übersicht der Ports 2. Ein- / Umstellung der Ports 3. Sonstige Hinweise Haftungsausschluss Diese Bedienungsanleitung wurde mit größter Sorgfalt erstellt.
Ingenics Project Portal
 Version: 00; Status: E Seite: 1/6 This document is drawn to show the functions of the project portal developed by Ingenics AG. To use the portal enter the following URL in your Browser: https://projectportal.ingenics.de
p^db=`oj===pìééçêíáåñçêã~íáçå=
 p^db=`oj===pìééçêíáåñçêã~íáçå= How to Disable User Account Control (UAC) in Windows Vista You are attempting to install or uninstall ACT! when Windows does not allow you access to needed files or folders.
Cable Tester NS-468. Safety instructions
 Cable Tester NS-468 Safety instructions Do not use the cable tester NS-468 if it is damaged. This device is only for use inside dry and clean rooms. This device must be protected from moisture, splash
How-To-Do. Hardware Configuration of the CC03 via SIMATIC Manager from Siemens
 How-To-Do Hardware Configuration of the CC03 via SIMATIC Manager from Siemens Content Hardware Configuration of the CC03 via SIMATIC Manager from Siemens... 1 1 General... 2 1.1 Information... 2 1.2 Reference...
1. General information... 2 2. Login... 2 3. Home... 3 4. Current applications... 3
 User Manual for Marketing Authorisation and Lifecycle Management of Medicines Inhalt: User Manual for Marketing Authorisation and Lifecycle Management of Medicines... 1 1. General information... 2 2. Login...
Wireless Charging Plate WCH10
 Bedienungsanleitung Wireless Charging Plate WCH10 Inhaltsverzeichnis Einführung...3 Laden leicht gemacht...3 Verwenden der drahtlosen Ladetafel...4 Laden des Geräts...4 Status der Benachrichtigungsleuchte...4
Instruktionen Mozilla Thunderbird Seite 1
 Instruktionen Mozilla Thunderbird Seite 1 Instruktionen Mozilla Thunderbird Dieses Handbuch wird für Benutzer geschrieben, die bereits ein E-Mail-Konto zusammenbauen lassen im Mozilla Thunderbird und wird
XAIR-Bridge: Installationshinweise XAIR-Bridge: Short Installation Guide (English Version on Page 10)
") XAIR-Bridge: Installationshinweise XAIR-Bridge: Short Installation Guide (English Version on Page 10) Bridge Ergänzung zu XAIR LOS GEHT S/GETTING STARTED Ziel und Zweck Diese Installationshinweise beschreiben
XAIR-Bridge: Installationshinweise XAIR-Bridge: Short Installation Guide (English Version on Page 10) Bridge Ergänzung zu XAIR LOS GEHT S/GETTING STARTED Ziel und Zweck Diese Installationshinweise beschreiben
UWC 8801 / 8802 / 8803
 Wandbedieneinheit Wall Panel UWC 8801 / 8802 / 8803 Bedienungsanleitung User Manual BDA V130601DE UWC 8801 Wandbedieneinheit Anschluss Vor dem Anschluss ist der UMM 8800 unbedingt auszuschalten. Die Übertragung
KURZANLEITUNG. Firmware-Upgrade: Wie geht das eigentlich?
 KURZANLEITUNG Firmware-Upgrade: Wie geht das eigentlich? Die Firmware ist eine Software, die auf der IP-Kamera installiert ist und alle Funktionen des Gerätes steuert. Nach dem Firmware-Update stehen Ihnen
eurex rundschreiben 094/10
 eurex rundschreiben 094/10 Datum: Frankfurt, 21. Mai 2010 Empfänger: Alle Handelsteilnehmer der Eurex Deutschland und Eurex Zürich sowie Vendoren Autorisiert von: Jürg Spillmann Weitere Informationen zur
CAN-Bus RPM adapter. User Manual Anwender-Beschreibung
 CAN-Bus RPM adapter COT02 User Manual Anwender-Beschreibung Stand: 12.02.03 GRABAU Computertechnik GmbH Elsener Str. 30 33102 Paderborn Tel: +49 5251 1367-0 Fax: +49 5251 1367-30 Email: info@grabau.de
GmbH, Stettiner Str. 38, D-33106 Paderborn
 Serial Device Server Der Serial Device Server konvertiert die physikalische Schnittstelle Ethernet 10BaseT zu RS232C und das Protokoll TCP/IP zu dem seriellen V24-Protokoll. Damit können auf einfachste
MindestanforderungenanDokumentationvon Lieferanten
 andokumentationvon Lieferanten X.0010 3.02de_en/2014-11-07 Erstellt:J.Wesseloh/EN-M6 Standardvorgabe TK SY Standort Bremen Standard requirements TK SY Location Bremen 07.11.14 DieInformationenindieserUnterlagewurdenmitgrößterSorgfalterarbeitet.DennochkönnenFehlernichtimmervollständig
Outdoor Netzteil 24 VAC Installationsanleitung
 Outdoor Netzteil 24 VAC Installationsanleitung Version 1.0 (09/2009) TV8379 1. Vorwort Sehr geehrte Kundin, sehr geehrter Kunde, wir bedanken uns für den Kauf dieses 24VAC Outdoor Netzteils. Mit diesem
SENSORI MAGNETICI MAGNETIC SENSORS MAGNETSCHALTER
 SENSORI MAGNETICI SENSORI MAGNETICI SENSORI Sensori di prossimità con interruttore meccanico REED od elettronici magnetoresistivi con uscita statica PNP, per montaggio su cilindri pneumatici con cava a
v i r t u A L C O M P o r t s
 v i r t u A L C O M P o r t s (HO720 / HO730) Installieren und Einstellen Installation and Settings Deutsch / English Installieren und Einstellen des virtuellen COM Ports (HO720 / HO730) Einleitung Laden
Bedienungsanleitung Netzwerkkabeltester ST-45 v2
 Bedienungsanleitung Netzwerkkabeltester ST-45 v2 Einführung Geehrter Kunde, wir möchten Ihnen zum Erwerb Ihres neuen Kabeltesters gratulieren! Mit dieser Wahl haben Sie sich für ein Produkt entschieden,
iid software tools QuickStartGuide iid USB base RFID driver read installation 13.56 MHz closed coupling RFID
 iid software tools QuickStartGuide iid software tools USB base RFID driver read installation write unit 13.56 MHz closed coupling RFID microsensys Jun 2013 Introduction / Einleitung This document describes
User Manual Bedienungsanleitung. www.snom.com. snom Wireless Headset Adapter snom Schnurlos-Headset-Adapter. English. Deutsch
 English snom Wireless Headset Adapter snom Schnurlos-Headset-Adapter Deutsch User Manual Bedienungsanleitung 2007 snom technology AG All rights reserved. Version 1.00 www.snom.com English snom Wireless
Ein- und Ausgangsspannung 220-240V / Leistung: 800 VA / Abmessungen: 203 x 147 x 445mm / Gewicht: 20kg / Normenzertifikate: EN 60950, EN 60601-1
 Produktinformationen Powervar ABCE800-22IEC USV POWERVAR Unterbrechungsfreier Strommanager Der neue Security One USM oder unterbrechungsfreier Strommanager, hat viele neue Funktionen zu bieten. Sie können
Technical Information
 Firmware-Installation nach Einbau des DP3000-OEM-Kits Dieses Dokument beschreibt die Schritte die nach dem mechanischen Einbau des DP3000- OEM-Satzes nötig sind, um die Projektoren mit der aktuellen Firmware
RS-232 SERIAL EXPRESS CARD 1-PORT. Expansion 111829
 RS-232 SERIAL EXPRESS CARD 1-PORT Expansion 111829 1. Introduction equip RS-232 Serial Express Card works with various types of RS-232 serial devices including modems, switches, PDAs, label printers, bar
SERVICE INFORMATION NO. SID4-020/1
 Diamond Aircraft Industries G.m.b.H. DAI SID4-020/1 N.A. Otto-Straße 5 Page 1 of 2 A-2700 Wiener Neustadt 06-Sep-2004 SERVICE INFORMATION NO. SID4-020/1 SUPERSEDES SERVICE INFORMATION NO. SID4-020 I. TECHNICAL
300Mbps Wireless Outdoor PoE Access Point/Bridge Quick Installation Guide
 LevelOne WAB-5120 300Mbps Wireless Outdoor PoE Access Point/Bridge Quick Installation Guide English Deutsch - 1 - Table of Content English... - 3 - Deutsch... - 9 - This guide covers only the most common
Kurzanleitung um Transponder mit einem scemtec TT Reader und der Software UniDemo zu lesen
 Kurzanleitung um Transponder mit einem scemtec TT Reader und der Software UniDemo zu lesen QuickStart Guide to read a transponder with a scemtec TT reader and software UniDemo Voraussetzung: - PC mit der
150Mbps Micro Wireless N USB Adapter
 150Mbps Micro Wireless N USB Adapter TEW-648UBM ŸAnleitung zur Schnellinstallation (1) ŸTroubleshooting (6) 1.11 1. Bevor Sie anfangen Packungsinhalt ŸTEW-648UBM ŸCD-ROM (Dienstprogramm & Bedienungsanleitung)
fastpim 1 H fast switching H bridge module Features: - 1 Phase Input Rectifier Bridge - 1 Phase fast switching IGBT + FRED full H bridge - NTC
 fast switching H bridge module Features: - 1 Phase Input Rectifier Bridge - 1 Phase fast switching IGBT + FRED full H bridge - NTC Copyright by Vincotech 1 Revision: 1 module types / Produkttypen Part-Number
Leister SYSTEM SINGLE PATCH MODULE SPM 01
 D GB Leister SYSTEM SINGLE PATCH MODULE SPM 01 Leister Process Technologies Galileo-Strasse 10 CH-05 Kaegiswil/Switzerland Tel. +41-41 4 4 Fax +41-41 4 1 www.leister.com sales@leister.com Einbauanleitung
BLK-2000. Quick Installation Guide. English. Deutsch
 BLK-2000 Quick Installation Guide English Deutsch This guide covers only the most common situations. All detail information is described in the user s manual. English BLK-2000 Quick Installation Guide
Load balancing Router with / mit DMZ
 ALL7000 Load balancing Router with / mit DMZ Deutsch Seite 3 English Page 10 ALL7000 Quick Installation Guide / Express Setup ALL7000 Quick Installation Guide / Express Setup - 2 - Hardware Beschreibung
SmartClass Firmware-Update Vorgehensweise
 Benutzeranweisungen SmartClass Firmware-Update Vorgehensweise 2008.01 (V 1.x.x) Deutsch Please direct all enquiries to your local JDSU sales company. The addresses can be found at: www.jdsu.com/tm-contacts
ReadMe zur Installation der BRICKware for Windows, Version 6.1.2. ReadMe on Installing BRICKware for Windows, Version 6.1.2
 ReadMe zur Installation der BRICKware for Windows, Version 6.1.2 Seiten 2-4 ReadMe on Installing BRICKware for Windows, Version 6.1.2 Pages 5/6 BRICKware for Windows ReadMe 1 1 BRICKware for Windows, Version
n e t w o r k r e p e a t e r w i r e l e s s 3 0 0 n 3 0 0 m b p s
 n e t w o r k r e p e a t e r w i r e l e s s 3 0 0 n 3 0 0 m b p s H A N D B U C H N I - 7 0 7 5 4 7 D E U T S C H n e t w o r k r e p e a t e r w i r e l e s s 3 0 0 n 3 0 0 m b p s Zuallererst möchten
INSTALLATION AND OPERATING INSTRUCTIONS FOR LPS203-M LPS203-M 操 作 指 示
 BEDIENUNGSANLEITUNG To comply with the published safety standards, the following must be observed when using this power supply. Um den zur Zeit gültigen Sicherheitsbestimmungen zu genügen, müssen die nachstehenden
www.infoplc.net AC500 Application Example Scalable PLC for Individual Automation AC500-eCo Modbus TCP/IP Data Exchange between two AC500-eCo CPUs
 Application Example AC500 Scalable PLC for Individual Automation AC500-eCo Modbus TCP/IP Data Exchange between two AC500-eCo CPUs Content 1 Disclaimer...2 1.1 For customers domiciled outside Germany /
USB Treiber updaten unter Windows 7/Vista
 USB Treiber updaten unter Windows 7/Vista Hinweis: Für den Downloader ist momentan keine 64 Bit Version erhältlich. Der Downloader ist nur kompatibel mit 32 Bit Versionen von Windows 7/Vista. Für den Einsatz
PCTV DVB-S2 Stick (461e) Quick Start Guide Kurzanleitung
 Quick Start Guide Kurzanleitung") PCTV DVB-S2 Stick (461e) Quick Start Guide Kurzanleitung 2013 PCTV Systems S.à r.l. QI-461E-V1-4LANG Lieferumfang 1 2 3 4 5 6 Installation I. II. III. IV. V. VI. Lieferumfang* Beispielhafte Abbildungen
PCTV DVB-S2 Stick (461e) Quick Start Guide Kurzanleitung 2013 PCTV Systems S.à r.l. QI-461E-V1-4LANG Lieferumfang 1 2 3 4 5 6 Installation I. II. III. IV. V. VI. Lieferumfang* Beispielhafte Abbildungen
AVANTEK. Indoor HDTV Antenna DVB-T Zimmerantenne. Instruction Manual Bedienungsanleitung
 AVANTEK Indoor HDTV Antenna DVB-T Zimmerantenne Instruction Manual Bedienungsanleitung EN 1 Illustration AC Adapter Connecting Box EN 2 Product Introduction This indoor antenna brings you access to free
rs232 DIN rail adapter für Thyro-s, thyro-a und thyro-ax
 1 rs232 DIN rail adapter für Thyro-s, thyro-a und thyro-ax August 2014 DE/EN - V2 2 INHALTSVERZEICHNIS Ansprechpartner 3 1. Einleitung 4 2. Lieferumfang 4 3. Merkmale 4 4. Anschlüsse 5 5. Inbetriebnahme
Robotino View Kommunikation mit OPC. Communication with OPC DE/EN 04/08
 Robotino View Kommunikation mit OPC Robotino View Communication with OPC 1 DE/EN 04/08 Stand/Status: 04/2008 Autor/Author: Markus Bellenberg Festo Didactic GmbH & Co. KG, 73770 Denkendorf, Germany, 2008
Verpackungsinhalt. Klebepads zur Wandmontage (4) HDMI Kabel (2) Netzteile (2) Empfänger. Sender. Trockenbauschrauben (2) Bedienungsanleitung
 HDMI Kabel (2) Netzteile (2) Empfänger. Sender. Trockenbauschrauben (2) Bedienungsanleitung") WirelessHD Adapter Verpackungsinhalt Sender Empfänger Klebepads zur Wandmontage (4) HDMI Kabel (2) Netzteile (2) Trockenbauschrauben (2) Bedienungsanleitung WirelessHD Adapter Wand-/Deckenhalterungen (2)
WirelessHD Adapter Verpackungsinhalt Sender Empfänger Klebepads zur Wandmontage (4) HDMI Kabel (2) Netzteile (2) Trockenbauschrauben (2) Bedienungsanleitung WirelessHD Adapter Wand-/Deckenhalterungen (2)
NVR Mobile Viewer for iphone/ipad/ipod Touch
 NVR Mobile Viewer for iphone/ipad/ipod Touch Quick Installation Guide DN-16111 DN-16112 DN16113 2 DN-16111, DN-16112, DN-16113 for Mobile ios Quick Guide Table of Contents Download and Install the App...
miditech midiface 4x4
 miditech midiface 4x4 4In-/4 Out USB MIDI Interface 4 x MIDI In / 4 x MIDI Out USB MIDI Interface 64 MIDI Kanäle 4 LEDs für MIDI Input 4 LEDs für MIDI Output Power LED USB Powered, USB 1, 2 und 3 kompatibel
https://portal.microsoftonline.com
 Sie haben nun Office über Office365 bezogen. Ihr Account wird in Kürze in dem Office365 Portal angelegt. Anschließend können Sie, wie unten beschrieben, die Software beziehen. Congratulations, you have
Art.-Nr. 4450900300 greentea. Art.-Nr. 4450900200 whitemusk MAGICUS. 1 Stück/piece 2,5. 4 x 4 x 4 x. 1 x
 MAGICUS Art.-Nr. 4450900300 greentea 1 Stück/piece Art.-Nr. 4450900200 whitemusk 2,5 4 x 4 x 4 x 1 x 1. 2. 1 x Option 2 Option 1 3. 1 3 4 2 4. I AUTO RUN Mo Tu We Th Fr Sa Su OK + Clear R 230VAC, 50Hz
NEWSLETTER. FileDirector Version 2.5 Novelties. Filing system designer. Filing system in WinClient
 Filing system designer FileDirector Version 2.5 Novelties FileDirector offers an easy way to design the filing system in WinClient. The filing system provides an Explorer-like structure in WinClient. The
Quick Start Guide RED 50
 Quick Start Guide RED 50 RED 50 Sophos RED Appliances Before you begin, make sure you have a working Internet connection. 1. Preparing the installation Congratulations on your purchase of the Sophos RED
ALL0256N. 150Mbps Wireless Outdoor Access Point. Benutzerhandbuch
 ALL0256N 150Mbps Wireless Outdoor Access Point Benutzerhandbuch Inhaltsverzeichnis 1. PRODUKTÜBERSICHT... 3 1.3 LIEFERUMFANG... 4 1.4 SYSTEMANFORDERUNGEN... 4 1.5 LEDS... 4 1.6 ANSCHLÜSSE... 5 1.6 VERKABELUNG...
miditech 4merge 4-fach MIDI Merger mit :
 miditech 4merge 4-fach MIDI Merger mit : 4 x MIDI Input Port, 4 LEDs für MIDI In Signale 1 x MIDI Output Port MIDI USB Port, auch für USB Power Adapter Power LED und LOGO LEDs Hochwertiges Aluminium Gehäuse
Installation guide for Cloud and Square
 Installation guide for Cloud and Square 1. Scope of delivery 1.1 Baffle tile package and ceiling construction - 13 pcs. of baffles - Sub construction - 4 pcs. of distance tubes white (for direct mounting)
EEX Kundeninformation 2002-08-30
 EEX Kundeninformation 2002-08-30 Terminmarkt - Eurex Release 6.0; Versand der Simulations-Kits Kit-Versand: Am Freitag, 30. August 2002, versendet Eurex nach Handelsschluss die Simulations -Kits für Eurex
Titelbild1 ANSYS. Customer Portal LogIn
 Titelbild1 ANSYS Customer Portal LogIn 1 Neuanmeldung Neuanmeldung: Bitte Not yet a member anklicken Adressen-Check Adressdaten eintragen Customer No. ist hier bereits erforderlich HERE - Button Hier nochmal
USBASIC SAFETY IN NUMBERS
 USBASIC SAFETY IN NUMBERS #1.Current Normalisation Ropes Courses and Ropes Course Elements can conform to one or more of the following European Norms: -EN 362 Carabiner Norm -EN 795B Connector Norm -EN
FOR ENGLISCH VERSION PLEASE SCROLL FORWARD SOME PAGES. THANK YOU!
 FOR ENGLISCH VERSION PLEASE SCROLL FORWARD SOME PAGES. THANK YOU! HELPLINE GAMMA-SCOUT ODER : WIE BEKOMME ICH MEIN GERÄT ZUM LAUFEN? Sie haben sich für ein Strahlungsmessgerät mit PC-Anschluss entschieden.
PC Spectro II SpectroDirect
 Programm-/Methoden- update Allgemeine Informationen: Um das Gerät mit einem neuen Programm und/oder neuen Methoden, hier firmware genannt, zu versehen, benötigen Sie das "Flash-Tool" HEXLoad und das zu
CONTROLLER RECEIVER REPEATER PAIRING SLIM CLIP
 ANLEITUNGEN // INSTRUCTIONS CONTROLLER RECEIVER REPEATER PAIRING SLIM CLIP BEDIENUNGSANLEITUNG // INSTRUCTION MANUAL MONTAGEANLEITUNG // ASSEMBLY INSTRUCTION MONTAGEANLEITUNG // ASSEMBLY INSTRUCTION KOPPLUNG
Batterie-Identifikations-Modul EL-BIM
 Bedienungs- und Montageanleitung Batterie-Identifikations-Modul EL-BIM 1.0 Allgemeines Das Batterie-Identifikations-Modul EL-BIM ermöglicht eine eindeutige Zuordnung von Ladevorgang und Batterie in den
Getting started with MillPlus IT V530 Winshape
 Getting started with MillPlus IT V530 Winshape Table of contents: Deutsche Bedienungshinweise zur MillPlus IT V530 Programmierplatz... 3 English user directions to the MillPlus IT V530 Programming Station...
Die Installation erfolgt in wenigen Schritten
 Bedienungsanleitung Die Installation erfolgt in wenigen Schritten 1 Laden Sie die App DriveDeck Sport aus dem Apple App Store oder Google Play Store auf Ihr Smartphone. DriveDeck Sport 3 2 Eingabe der
Software-Update Version 1.0.10 manual. In order to keep your door systems updated, please proceed with the following changes.
 Software-Update Version 1.0.10 manual In order to keep your door systems updated, please proceed with the following changes. 1. Exchange CPU -Z1 (E60-0228-10) by the new one you already received. Front
-SOFTWARE-PROGRAMM FÜR ADAPTER 7
 C A R D B U S A D A P T E R W I R E L E S S 3 0 0 N 3 0 0 M B P S H A N D B U C H N I - 7 0 7 5 2 4 D E U T S C H - L I E F E R U M FA N G 4 - T E C H N I S C H E D AT E N 4 - A N W E N D U N G S B E R
VDE Prüf- und Zertifizierungsinstitut Gutachten mit Fertigungsüberwachung
 Blatt / page 2 Dieses Blatt gilt nur in Verbindung mit Blatt 1 des Gutachtens mit Fertigungsüberwachung Nr.. surveillance No.. Steckverbinder für PV-Systeme, AC-Anwendung (COC) Connector for PV-Systems,
VH110 Bedienungsanleitung
 VH110 Bedienungsanleitung Inhaltsverzeichnis Headset im Überblick...5 Einführung...6 Laden...7 Ein- und Ausschalten...8 Koppeln des Headsets...9 Koppeln des Headsets mit einem Telefon...9 Headset einschalten...10
Geometrie und Bedeutung: Kap 5
 : Kap 5 21. November 2011 Übersicht Der Begriff des Vektors Ähnlichkeits Distanzfunktionen für Vektoren Skalarprodukt Eukidische Distanz im R n What are vectors I Domininic: Maryl: Dollar Po Euro Yen 6
Doc. N. 1SDH001000R0513 - L7835. SACE Emax 2. Ekip Synchrocheck - E1.2-E2.2-E4.2-E6.2 E1.2 - E2.2 - E4.2 - E6.2
 Doc. N. SDH00000R05 - L785 SACE Emax Ekip Synchrocheck - E.-E.-E4.-E6. E. - E. - E4. - E6. OK OK Staccare alimentazione dell Ekip Supply. Disconnect power from the Ekip Supply module. Die Speisung von
Fleet Manager 100 Bedienungsanleitung User Manual Hardware
 Bedienungsanleitung User Manual Hardware 1. Bedienung im Fahrzeug... 2 2. Signale des Bordcomputers (LED, Summer)... 4 3. Fehlersuche... 5 1. Operation in the vehicle... 7 2. Buzzer codes... 9 3. Troubleshooting...
M-Bus Micro-Master USB
 M-Bus Micro-Master USB Der M-Bus Micro-Master USB ist eine Weiterentwicklung des bewährten Micro-Masters mit RS232C-Schnittstelle für den Einsatz an den USB-Schnittstellen moderner PC s und Laptops. Das
Kurzanleitung Ersatzgerät Guide succinct de l appareil de remplacement Breve guida all dispositivo di sostituzione
 Kurzanleitung Ersatzgerät Guide succinct de l appareil de remplacement Breve guida all dispositivo di sostituzione Das Ersatzgerät kann als zweites Gerät für die Nutzung des E-Bankings eingesetzt werden
Effizienz im Vor-Ort-Service
 Installation: Anleitung SatWork Integrierte Auftragsabwicklung & -Disposition Februar 2012 Disposition & Auftragsabwicklung Effizienz im Vor-Ort-Service Disclaimer Vertraulichkeit Der Inhalt dieses Dokuments
LWL Transceiver 9 x 1 SIP 650nm
 LWL Transceiver 9 x 1 SIP 650nm Bild/Pic. 1 1 Allgemeine Beschreibung Der 9 x 1 Transceiver ist speziell geeignet für Anwendungen mit dem 1mm Standard- Kunststofflichtwellenleiter. Bestückt mit einer schnellen
Montageanleitung zum Einbau und Betrieb der seriellen QUATECH PC-High-Speed Schnittstellenkarte
 Montageanleitung zum Einbau und Betrieb der seriellen QUATECH PC-High-Speed Schnittstellenkarte Fitting Instructions for the installation and operation of the QUATECH PC serial high-speed interface card
Aggiunta per il manuale d uso Ergänzung zur Bedienungsanleitung Addision to the user s guide
 Aggiunta per il manuale d uso Ergänzung zur Bedienungsanleitung Addision to the user s guide HDTVSTC HDTV LCD Multituner Digitale SAT + Digitale Terrestre + Digitale via Cavo + Analogico Terrestre Digital
1,2-1,8 TON TWIST 100 TWIST 100
 1,2-1,8 TWIST 100 L attuatore idraulico bi-direzionale Cangini permette di inclinare attrezzature o attacchi rapidi fino ad un angolazione di, facilitando le operazioni di scavo, anche in posizioni difficili
MATLAB driver for Spectrum boards
 MATLAB driver for Spectrum boards User Manual deutsch/english SPECTRUM SYSTEMENTWICKLUNG MICROELECTRONIC GMBH AHRENSFELDER WEG 13-17 22927 GROSSHANSDORF GERMANY TEL.: +49 (0)4102-6956-0 FAX: +49 (0)4102-6956-66
BZ 873. Trainline Interface. Ident Nr.: 3EH-116802 R0001
 Ident Nr.: 3EH-116802 R0001 CH-8108 Dällikon Tel: +41(0)44 8440355 www.bahnelektronik.ch Seite: 1/8 Dritte oder andere Verwertung dieses Dokumentes sind ohne unsere ausdrückliche Zustimmung verboten. B+Z
Universal Funksender (Kamera) Profiline 2,4GHz / 5,8GHz
 Profiline 2,4GHz / 5,8GHz") Universal Funksender (Kamera) Profiline 2,4GHz / 5,8GHz Version 1.1 TV5722 TV5723 Sehr geehrter Kunde, wir beglückwünschen Sie zum Kauf dieses hochwertigen Produktes. Mit dem Erwerb dieser neuen Komponente
Universal Funksender (Kamera) Profiline 2,4GHz / 5,8GHz Version 1.1 TV5722 TV5723 Sehr geehrter Kunde, wir beglückwünschen Sie zum Kauf dieses hochwertigen Produktes. Mit dem Erwerb dieser neuen Komponente