PAVILLON 3X6M BEDIENUNGSANLEITUNG
|
|
|
- Pamela Heintze
- vor 6 Jahren
- Abrufe
Transkript

1 PAVILLON 3X6M BEDIENUNGSANLEITUNG

2 Sehr geehrter Kunde, zunächst möchten wir Ihnen zum Erwerb Ihres Gerätes gratulieren. Bitte lesen Sie die folgenden Aufbauund Anwendungshinweise sorgfältig durch und befolgen Sie diese um möglichen technischen Schäden vorzubeugen. Teile-Übersicht # Beschreibung Stk. 1 Neigungsleiste Ø3,8cm, pulverbeschichtet 8 2 Horizontale Strebe (2) Ø3,8cm, pulverbesch. 9 3 Horizontale Strebe (3) Ø3,8cm, pulverbesch. 9 4 Vertikale Strebe Ø4,8cm, pulverbeschichtet 8 5 Vertikale Strebe Ø4,8cm, pulverbeschichtet 8 6 Stützrohr für Vordach, unterer Teil 3 7 Stützrohr für Vordach, oberer Teil 3 8 / A Eckstück für horizontale Streben 2 9 / A Eckstück für vertikale Streben 4 10 / B 4-Wege-Eckstück 6 11 / C Fuß-Platte 8 12 Schraube für Fuß-Platte 8 2
3 13 Befestigungsgummi mit Ballende Spannschnur für Vordach 3 15 Hering für Spannschnur 3 16 Dach-Plane 1 17 Lange Seitenplane ohne Tür 1 18 Lange Seitenplane mit Tür 1 19 Vorder- und rückseitige Planen 2 Aufbau Ordnen Sie die Stangen (1, 2 und 3) zusammen mit den Eckstücken (A und B) nach dem untenstehenden Schema auf dem Boden an: 3
4 Verbinden Sie zunächst die Streben 2 und 3 jeweils miteinander und fixieren Sie die Verbindungen mit den M8x50-Schrauben Die Streben haben federnde Knöpfe, die klickend in den Eckstücken einrasten, sobald die Strebe an ihrem Platz ist (siehe Abbildung): Stecken Sie die vertikalen Pfosten wie hier abgebildet zusammen und dann in die Eckstücke am künftigen Dach sowie in die Fußplatten ein. Verschrauben Sie die Pfosten mit den M8x60-Schrauben. 4
5 Ziehen Sie die Dach-Plane (16) über das Dach. Bringen Sie nun an der anderen Seite die Beine an. Gehen Sie dabei genauso vor wie in Schritt 2. Befestigen Sie die Plane am Rahmen, indem Sie aus den Befestigungsgummis (13) Schlaufen formen (siehe Abbildung unten). 5
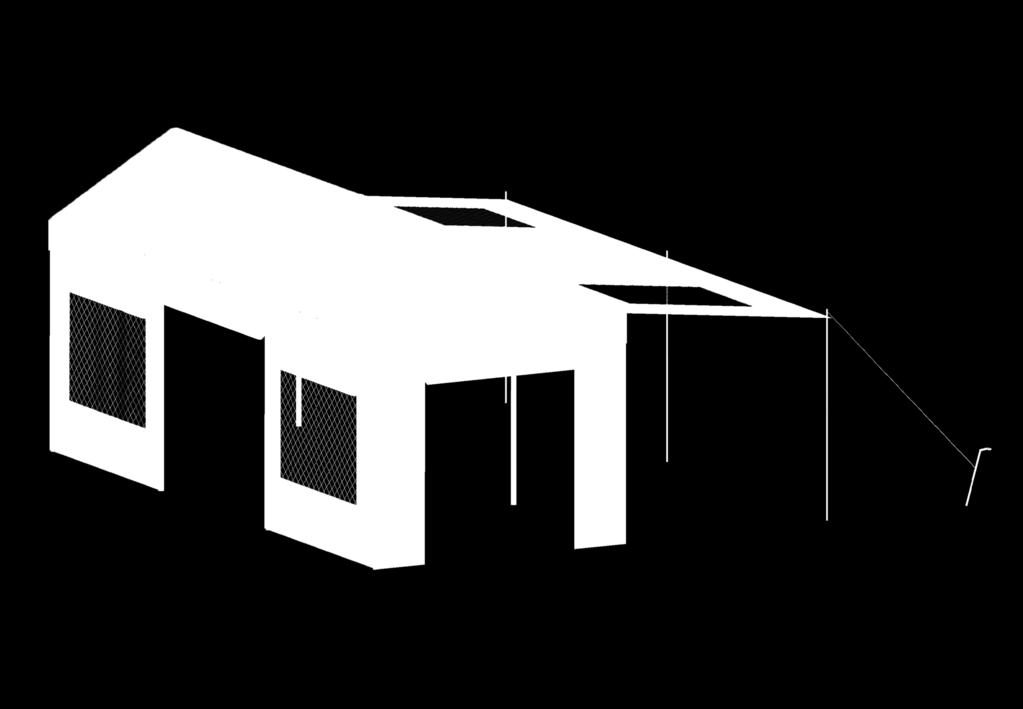
6 Bringen Sie die Seitenteile mit den Befestigungsgummis am Gerüst an. Das Seitendach aufrichten An der Unterseite der Längswand ohne Tür (17) befinden sich drei Ösen. Stecken Sie die drei Stützrohre für das Vordach zusammen (6 & 7) und stecken Sie den oberen Zapfen durch je eine der Ösen. Führen Sie nun die Spannschnur für das Vordach über jene Ösen und vertauen Sie es mit den Heringen im Boden (siehe Titelbild), um die Längswand als Dach zu nutzen und zu stabilisieren. Sicherheitshinweise Kochen Sie nicht unter dem Pavillon. Offenes Feuer oder sehr heiß werdende Geräte dürfen nicht unter dem Pavillon benutzt werden. der Pavillon ist nicht Maschinen-waschbar. Nicht im Heißlufttrockner trocknen! Nicht Bügeln! Nicht bleichen! Bauen Sie den Pavillon vor stürmischem Wetter ab. Fegen Sie liegengebliebenen Schnee ggf. vom Dach herunter. Der Pavillon ist kein Schutz vor Sturm und Gewitter. Hersteller CHAL-TEC Vertriebs- + Handels GmbH, Wallstraße 16, Berlin, Deutschland 6
7 Dear Customer, Congratulations on purchasing this product. Please read and follow these instructions, in order to avoid damaging the item. We do not cover any damages that may arise from improper use of the item or the disregard of the safety instructions. Parts Overview # Description Pcs 1 Incline bar (3.8cm powder coated) 8 2 Horizontal bar (3.8cm powder coated) No Horizontal bar (3.8cm powder coated) No Post (4.8cm powder coated) No Post (4.8cm powder coated) No Shadow support pipe bottom part 3 7 Shadow support pipe upper part 3 8 / A 3 way corners for horizontal bar (powder coated) 2 9 / A 3 way corners for post (powder coated) 4 10 / B 4 way corners for post (powder coated) 6 11 / C Base plate (powder coated) 8 12 Nut and bolt for base plate (galvanized steel) 8 7
8 13 Elastic ball strap (nylon) Shadow roof rope 3 15 Shadow roof rope peg 3 16 Roof panel (PE) 1 17 Long side panel w/o door (PE) 1 18 Long side panel with door (PE) 1 19 Front & Back panel (PE) 2 Assembly Each bar (1, 2 & 3) has a spring-activated button for locking into the corner pieces. First connect pipe No.2, 3 with M8X50 screw, then Insert bars into corner pieces as shown below and the spring-activated button will lock into the corner pieces (see figures top right and middle right). 8
9 9 Insert posts into corners on one side as shown left. Connect upper part and bottom part with M8X60 screws, connect the foot C to leg with plastic head screws and nuts.
10 Spread the top roof over the inclined frame Insert posts into corners on the other side. Attach the roof panel to the frame with elastic ball straps. (See diagrams below) First, insert the strap through the grommet on the canopy. Wrap the strap around the bar and then around the ball to lock the ball in place. Insert posts into the base plates as shown. Lock the posts and the base plates with the nuts and bolts. There are two optional holes on the bottom of the posts. Level the frame by choosing the proper holes in the posts. 10

11 Attach the canopy walls to the frames with elastic ball straps. Raise the side wall There are three grommet at the bottom of the sidewall(with window, but no door). Connect pipe No.6 and No.7, then use the spigot go through the grommet, then use rope and peg to tight to the ground, then the sidewall is raised to get more shadow. Important Security Advice Do not cook beneath the canopy. Open fire or any other sources of great heat may not be used in/ beneath the canopy. Do not machine wash the canopy. Do not tumble-dry. Do not iron. Do not bleach. Disassemble before stormy weather. The canopy is no shelter from storm or thunderstorm. Brush snow off the roof. Manufacturer CHAL-TEC Vertriebs- + Handels GmbH, Wallstraße 16, Berlin, Germany 11
12 MANUFACTURER CHAL-TEC VERTRIEBS- + HANDELS GMBH WALLSTRASSE BERLIN
4M Economy INSTRUCTION MANUAL
 4M Economy INSTRUCTION MANUAL Part List Part no. Qty 4x4m 4x6m 4x8m 4x10m No.1 6 8 10 12 No.2 6 9 12 15 No.3 6 8 10 12 No.4 6 6 6 6 No.5 3 6 9 12 No.6 56 64 72 80 No.7 30 42 54 66 Nr.8 4 4 4 4 No.9 4 4
5M Economy INSTRUCTION MANUAL
 5M Economy INSTRUCTION MANUAL Part List Part no. Qty 5x6 5x8 5x10 5x12 No.1 16 20 24 28 No.2 9 12 15 18 No.3 8 10 12 14 No.4 8 10 12 14 No.5 2 2 2 2 No.6 4 4 4 4 No.7 2 3 4 5 No.8 4 6 8 10 No.9 56 64 72
Montageanleitung Assembly Instruction Werkbank mit 6 Schubladen/ 2 Türen
 1 Montageanleitung Assembly Instruction Werkbank mit 6 Schubladen/ 2 Türen Art. 25733 Art. 45700 Allgemeine Hinweise: Prüfen Sie bitte vor Zusammenbau, ob alle Teile vorhanden und unbeschädigt sind. Sollte
Aufbauanleitung Pavillon Verona 10x x 422 cm. Assembly Manual Sunshelter 10 x 14 ft.
 Assembly Manual Sunshelter 0 x 4 ft. Exact dimension of the roof, corner-to-corner: 6.4 x 66.6 inch Min. dimension required for the base: 3.9 x 63.3 inch Aufbauanleitung Pavillon Verona 0x4 300 x 422 cm
FR777 Differenzial-Kulissenauszug Bodenmontage, 200 kg Tragkraft, mit Gegenführung
 http://www.fulterer.com http://www.fultererusa.com Instructions F777 Differenzial-Kulissenauszug Bodenmontage, 00 kg Tragkraft, mit Gegenführung F777 Progressive-Action Pantry Pull-out, Bottom Mount 450
CABLE TESTER. Manual DN-14003
 CABLE TESTER Manual DN-14003 Note: Please read and learn safety instructions before use or maintain the equipment This cable tester can t test any electrified product. 9V reduplicated battery is used in
BMW F 800 GS Motorschutzbügel Nr.: schwarz Nr.: titan
 Motorschutzbügel Nr.: 50.65 00 0 schwarz Nr.: 50.65 00 99 titan Der Bausatz umfaßt die folgenden Teile: Stück Bestellnr. Bezeichnung 705.50 Motorschutzbügel links 705.5 Motorschutzbügel rechts Schraubensatz:
Instant Roof INSTRUCTION AUFBAUANLEITUNG
 Instant Roof INSTRUCTION AUFBAUANLEITUNG 1 1 6 5 1 x Sides wall X Seitenwand x Front wall X 1 Vorderwand 1x x Mud guard x Windschutz x Storm strap x 7 Sturmabspannung 7x x roof x 1 Dachstange 1x x 1 Keder
HPS.04.696.10000/B Revision: 01. Hauptständer KTM 990 SM-T / SM-R '09 Center Stand KTM 990 SM-T / SM-R '09
 Hauptständer KTM 0 SM-T / SM-R '0 Center Stand KTM 0 SM-T / SM-R '0 Montagehinweise Revision: 01 Mounting Instruction Achtung: Die Kurven- und Bodenfreiheit kann durch einen Hauptständer eingeschränkt
Installation manual for Conen height adjustable spring tension mechanism for interactive whiteboards Montageanleitung für Conen höhenverstellbare
 Installation manual for Conen height adjustable spring tension mechanism for interactive whiteboards Montageanleitung für Conen höhenverstellbare Federzugsysteme für interaktive Whiteboards 1. Introduction
Installation manual / Montageanleitung WBC2 splice patch with Fibertray Spleissung/Rangierung mit Fibertray
 Content of Assembly Instruction I. Required tools II. Required parts III. Installation Inhalt der Montageanleitung I. Benötigte Werkzeuge II. Benötigte Teile III. Installation I. Required tools: I. Benötigtes
AUFBAUANLEITUNG ASSEMBLY INSTRUCTIONS
 MORELL AUFBAUANLEITUNG ASSEMBLY INSTRUCTIONS D/AT/CH SEHR GEEHRTE DAMEN UND HERREN, Wir freuen uns, dass Sie sich für ein Qualitätsprodukt der Naturmatratzen- und Betten-Manufaktur dormiente entschieden
TriASS Schreibtische. TriASS Schreibtischsystem Montageanleitung. TriASS Desking System Assembly Instructions. Das Assmann Prinzip. Gute Arbeit.
 Das Assmann Prinzip. Gute Arbeit. TriASS Schreibtischsystem Montageanleitung TriASS Desking System Assembly Instructions The Assmann principle. Designed to work well. TriASS Desks Schreibtisch, Typ ST16
Aufbauanleitung Pavillon Verona 10x x 298 cm. Assembly Manual Sunshelter 10 x 10 ft.
 Assembly Manual Sunshelter 0 x 0 ft. Exact dimension of the roof, corner-to-corner: 6.4 x 6.4 inch Min. dimension required for the base: 3.9 x 3.9 inch Aufbauanleitung Pavillon Verona 0x0 298 x 298 cm
Mast- / Wandmontage Kit Einbauanleitung Pole- / Wallmount Kit Installation Guide
 Alpha ATROX Mast- / Wandmontage Kit Einbauanleitung Pole- / Wallmount Kit Installation Guide Ihr Partner für Energieversorgungslösungen Mast- und Wandmontage Kit Alpha ATROX Pole- and Wall Mount Kit Alpha
AUFBAUANLEITUNG ASSEMBLY INSTRUCTIONS
 MOLA AUFBAUANLEITUNG ASSEMBLY INSTRUCTIONS D/AT/CH SEHR GEEHRTE DAMEN UND HERREN, Wir freuen uns, dass Sie sich für ein Qualitätsprodukt der Naturmatratzen- und Betten-Manufaktur dormiente entschieden
User Manual Bedienungsanleitung. www.snom.com. snom Wireless Headset Adapter snom Schnurlos-Headset-Adapter. English. Deutsch
 English snom Wireless Headset Adapter snom Schnurlos-Headset-Adapter Deutsch User Manual Bedienungsanleitung 2007 snom technology AG All rights reserved. Version 1.00 www.snom.com English snom Wireless
Seitenkoffer Topcases Gepäckträger Lock it System Softbags Aluminiumkoffer Lederkoffer Schutzbügel Hauptständer Chopper-Parts Accessoires
 Gepäckbrückenplatte Art.-Nr.: 650.974 0 0 schwarz Montage Seitenkoffer Topcases Gepäckträger Lock it System Aluminiumkoffer Lederkoffer Schutzbügel Hauptständer Chopper-Parts Accessoires Der Bausatz umfaßt
Installation manual for Conen height adjustable pylon systems for interactive whiteboards Montageanleitung für Conen höhenverstellbare Pylonensysteme
 Installation manual for Conen height adjustable pylon systems for interactive whiteboards Montageanleitung für Conen höhenverstellbare Pylonensysteme für interaktive Whiteboards 1. Introduction Einleitung
Seitenkoffer Topcases Gepäckträger Lock it System Softbags Aluminiumkoffer Lederkoffer Schutzbügel Hauptständer Chopper-Parts Quad-Parts Accessoires
 Gepäckbrücke Alu-Rack ab Baujahr 008 Artikel-Nr.: 650.3518 01 01 schwarz/silber Montage Seitenkoffer Topcases Gepäckträger Lock it System Aluminiumkoffer Lederkoffer Schutzbügel Hauptständer Chopper-Parts
M90/60 Spare Parts Catalog SPC-M90-01
 1 M90/60 Spare Parts Catalog SPC-M90-01 Notice: i. The Spare Parts prices are subject to change without notice. ii. The Spare Parts & Assembly Groups are subject to change without notice. iii. The drawings
1 Allgemeine Information
 1 Allgemeine Information ACHTUNG! Der Betriebsdruck der Klasse 867 ist 6 bar. Sollte der Druck Ihrer Versorgungsleitung höher als 6 bar sein, muss der Druck an der Versorgungseinheit der Nähmaschine auf
Krauser GmbH An der Steinmauer 6 D Pirmasens Tel.:
 Motorschutzbügel 50.544 00 0 chrom 3008.007.0 chrom Montage Der Bausatz umfaßt die folgenden Teile: Stück Bestellnr. Bezeichnung 70000849 Motorschutzbügel links 700008430 Motorschutzbügel rechts 4 50.930
Montageanleitung DORMA PT 10 Unterer Eckbeschlag DORMA PT 20 Oberer Eckbeschlag
 Montageanleitung DORMA PT 10 Unterer Eckbeschlag DORMA PT 20 Oberer Eckbeschlag Installation instruction DORMA PT 10 Bottom patch fitting DORMA PT 20 Top patch fitting / 003620 800.2.368.6.32 Wichtige
GSPublisherVersion ASSEMBLY MANUAL E509
 ASSEMBLY MANUAL E509 Frame parts list /3 Farbe Color Einheit Unit Menge quantity E509 50x50x3mm 275 2a 50x50x3mm 230 2b 50x50x3mm 80 3 50x50x3mm 95 4 50x50x3mm 95 5 50x50x3mm 2877 6 50x50x3mm 2877 7L 50x50x3mm
Einbauanleitung & Radioblende Doppel-/1-DIN Honda Civic
 Einbauanleitung 14070 & 14120 Radioblende Doppel-/1-DIN Honda Civic 2006-2010 Mounting instructions 14070 & 14120 Radio frame double/1-din Honda Civic 2006-2010 Lieferumfang / Kit components A) Radiorahmen,
p^db=`oj===pìééçêíáåñçêã~íáçå=
 p^db=`oj===pìééçêíáåñçêã~íáçå= Error: "Could not connect to the SQL Server Instance" or "Failed to open a connection to the database." When you attempt to launch ACT! by Sage or ACT by Sage Premium for
Level 2 German, 2015
 91126 911260 2SUPERVISOR S Level 2 German, 2015 91126 Demonstrate understanding of a variety of written and / or visual German text(s) on familiar matters 2.00 p.m. Friday 4 December 2015 Credits: Five
KURZANLEITUNG. Firmware-Upgrade: Wie geht das eigentlich?
 KURZANLEITUNG Firmware-Upgrade: Wie geht das eigentlich? Die Firmware ist eine Software, die auf der IP-Kamera installiert ist und alle Funktionen des Gerätes steuert. Nach dem Firmware-Update stehen Ihnen
1. General information... 2 2. Login... 2 3. Home... 3 4. Current applications... 3
 User Manual for Marketing Authorisation and Lifecycle Management of Medicines Inhalt: User Manual for Marketing Authorisation and Lifecycle Management of Medicines... 1 1. General information... 2 2. Login...
Thermalright. Macho 120
 Thermalright Macho 120 Macho 120 Assembly package 4 1 4 4 4 7 5 4 4 4 1 Chill Factor 1 1 2 1 8 Macho 120 Intel 775/1155/1156/1366 Exploded View Important! Before proceeding with installation, please check
Bedienungsanleitung Hydraulischer Rangier-Wagenheber
 Einführung Geehrter Kunde, wir möchten Ihnen zum Erwerb Ihres neuen Wagenhebers gratulieren! Mit dieser Wahl haben Sie sich für ein Produkt entschieden, welches ansprechendes Design und durchdachte technische
Montageanleitung DORMA PT 30. Oberlichtbeschlag. Installation instruction DORMA PT 30. Overpanel patch fitting
 Montageanleitung DORMA PT 30 Oberlichtbeschlag Installation instruction DORMA PT 30 Overpanel patch fitting Stand/Issue 09.0 / 00331 00.5.371.6.3 Wichtige Informationen: Important information: 1 = Bauteil/Baugruppe
Seitenkoffer Topcases Gepäckträger Lock it System Softbags Aluminiumkoffer Lederkoffer Schutzbügel Hauptständer Chopper-Parts Quad-Parts Accessoires
 Motorschutzbügel Artikel-Nr.: 01.0 00 0 chrom Montage Seitenkoffer Topcases Gepäckträger Lock it System Aluminiumkoffer Lederkoffer Schutzbügel Hauptständer Chopper-Parts Quad-Parts Accessoires Der Bausatz
Montageanleitung / Mounting Instructions. CELSIUS M / R / V / W Rack Kit
 Montageanleitung / Mounting Instructions System CELSIUS M / R / V / W Rack Kit Congratulations on your purchase of an innovative product from Fujitsu. The latest information about our products, tips, updates
Montageanleitung Racing Lenkerstummelsatz
 Montageanleitung Racing Lenkerstummelsatz Bei Verwendung der Racing Lenkerstummel muss erst ein Loch (Bild 2) zur Befestigung der Armaturen gebohrt werden. Durchmesser = 3,5 mm / Abstand vom Lenkerende
Anleitung für den Desigo Würfel
 Anleitung für den Desigo Würfel (Find the English Version below) 1. Schritt: Desigo Fläche zurechtdrehen Zuerst muss die Desigo Seite so vollständig gemacht werden, dass die Kanten immer einfarbig sind
schwarz schwarz Montage 1 Vorbereitung: Soziussitzbank abnehmen. Zündspule herausnehmen, um die darunterliegenden Muttern der Kenn
 60.7501 schwarz 4007.006.11 schwarz Montage Der Bausatz umfaßt die folgenden Teile: Stück Bestellnr. Bezeichnung 70000706 C-Bow schwarz 1 70000771 C-Bow Halteadapter vorne links 1 7000077 C-Bow Halteadapter
fastpim 1 H fast switching H bridge module Features: - 1 Phase Input Rectifier Bridge - 1 Phase fast switching IGBT + FRED full H bridge - NTC
 fast switching H bridge module Features: - 1 Phase Input Rectifier Bridge - 1 Phase fast switching IGBT + FRED full H bridge - NTC Copyright by Vincotech 1 Revision: 1 module types / Produkttypen Part-Number
Anleitung / User Manual
 3,5 USB HDD Enclosure Anleitung / User Manual Die Sicherung von Daten innerhalb der Festplatte ist nicht durch den Hersteller garantiert. Wir sind nicht verantwortlich für Datenverlust, fertigen Sie regelmäßig
HONDA NC 700 X HONDA NC 700 X
 Hauptständer Artikel Nr.: 505.97 Artikel Nr.: 00.057.50 Montage Der Bausatz umfaßt die folgenden Teile: St. Bestellnr. Bezeichnung 700007869 Hauptständer NC 700 X 700007870 Haltebolzen 70000787 Federplatte
Beipackzettel Instruction leaflet
 Beipackzettel Instruction leaflet Montage an einen Wandarm Mounting to wall arm Pepperl+Fuchs GmbH Antoniusstr. 21 D-73249 Wernau Germany Tel.: +49(0) 621 776-3712 Fax: +49(0) 621 776-3729 www.pepperl-fuchs.com
1: Descrew the org device of the E53 (non navi model) and cutout the plastic frame till vertical side plates (next pic), best use a dremel like tool
 and cutout the plastic frame till vertical side plates (next pic), best use a dremel like tool") Mounting- Instruction BMW E53 Doppel-DIN 31.6.2009 This mounting instruction shows you the best way for an exclusive installation for the double- DIN device, good luck!!! 1 1: Descrew the org device of
Mounting- Instruction BMW E53 Doppel-DIN 31.6.2009 This mounting instruction shows you the best way for an exclusive installation for the double- DIN device, good luck!!! 1 1: Descrew the org device of
German/English. Schnüranleitung Lacing instruction
 German/English Schnüranleitung Lacing instruction Tips für das patentierte HAIX Schnürsystem Verwenden Sie zum Reinigen der Reißverschlussketten eine harte Nylonbürste. Keine Drahtbürste verwenden! Mit
Seitenkoffer Topcases Gepäckträger Lock it System Softbags Aluminiumkoffer Lederkoffer Schutzbügel Hauptständer Chopper-Parts Accessoires
 Gepäckbrücke Alu-Rack Artikel-Nr.: 650.666 00 schwarz Montage Seitenkoffer Topcases Gepäckträger Lock it System Aluminiumkoffer Lederkoffer Schutzbügel Hauptständer Chopper-Parts Accessoires Der Bausatz
rear view server cabinet perforated steel door, divided
 19 Server Cabinet Standard Page 1 of 5 Art.-No. 693126.60P1P2.. 693147.82P2 depth rail + traverse for high max. load front view server cabinet perforated steel door, one-part rear view server cabinet perforated
FEM Isoparametric Concept
 FEM Isoparametric Concept home/lehre/vl-mhs--e/folien/vorlesung/4_fem_isopara/cover_sheet.tex page of 25. p./25 Table of contents. Interpolation Functions for the Finite Elements 2. Finite Element Types
MONTAGEANLEITUNG / SHORT INSTRUCTION MANUAL
 1. Sichere Position des Statives / Secure position of tripod 2. Bestandteile für Montage der Kranstütze / Parts for assembling of column 3. 2 Teflonscheiben auflegen / Assembling of two teflon-coated discs
Seitenkoffer Topcases Gepäckträger Lock it System Softbags Aluminiumkoffer Lederkoffer Schutzbügel Hauptständer Chopper-Parts Quad-Parts Accessoires
 Gepäckbrücke Alu-Rack Artikel-Nr.: 650.95 0 0 schwarz/silber Montage Seitenkoffer Topcases Gepäckträger Lock it System Aluminiumkoffer Lederkoffer Schutzbügel Hauptständer Chopper-Parts Quad-Parts Accessoires
SW-MOTECH GmbH & Co. KG Ernteweg 8/ Rauschenberg Germany. Tel. +49 (0) 64 25/ Fax +49 (0) 64 25/
 64 25/ Fax +49 (0) 64 25/") ATTENTION: The assembly of this product can be complicated and requires a good technical understanding. If you are not sure of how to do this, have a s pecialty garage perform the mounting and service.
ATTENTION: The assembly of this product can be complicated and requires a good technical understanding. If you are not sure of how to do this, have a s pecialty garage perform the mounting and service.
VICTOR STRINGING PATTERN 72-HOLES. Starting Point lengthwise. Ending cross point (C6)
") VICTOR STRINGING PATTERN 72-HOLES Starting Point lengthwise Ending cross point (C6) C6 Tie off cross after two cross lines. Starting Point cross (B8) VICTOR STRINGING PATTERN 76-HOLES Starting Point lengthwise
VICTOR STRINGING PATTERN 72-HOLES Starting Point lengthwise Ending cross point (C6) C6 Tie off cross after two cross lines. Starting Point cross (B8) VICTOR STRINGING PATTERN 76-HOLES Starting Point lengthwise
After sales product list After Sales Geräteliste
 GMC-I Service GmbH Thomas-Mann-Str. 20 90471 Nürnberg e-mail:service@gossenmetrawatt.com After sales product list After Sales Geräteliste Ladies and Gentlemen, (deutsche Übersetzung am Ende des Schreibens)
Steckdosenleiste Wand/ Ecke (923.0XX)
") Übersicht Overview Vue d ensemble Visión general Privire de ansamblu Overzicht -70565 Stuttgart Seite 1 von 2 Übersicht Overview Vue d ensemble Visión general Privire de ansamblu Overzicht Nr. Beschreibung
Übersicht Overview Vue d ensemble Visión general Privire de ansamblu Overzicht -70565 Stuttgart Seite 1 von 2 Übersicht Overview Vue d ensemble Visión general Privire de ansamblu Overzicht Nr. Beschreibung
Seitenkoffer Topcases Gepäckträger Lock it System Softbags Aluminiumkoffer Lederkoffer Schutzbügel Hauptständer Chopper-Parts Quad-Parts Accessoires
 Gepäckbrücke Alu-Rack Artikel-Nr.: 650.76 0 0 schwarz/silber Montage Seitenkoffer Topcases Gepäckträger Lock it System Aluminiumkoffer Lederkoffer Schutzbügel Hauptständer Chopper-Parts Quad-Parts Accessoires
FOX-150/E... FOX-350/E Solar Laderegler
 FOX-150/E... FOX-350/E Solar Laderegler Solar Charge Regulator Einbauanleitung mounting guidelines Einbauanleitung Diese Anleitung ist eine Ergänzung zu folgenden Installationsanleitungen: D "FOX-150
Level 2 German, 2013
 91126 911260 2SUPERVISOR S Level 2 German, 2013 91126 Demonstrate understanding of a variety of written and / or visual German text(s) on familiar matters 9.30 am Monday 11 November 2013 Credits: Five
CLE. Heatpipe-System Kühlleistung > 30W. Heatpipe-System Kühlleistung > 25W. Heatpipe-System Kühlleistung > 25W. Heatpipe-System Kühlleistung > 20W
 LED FORTIMO KÜHLKÖRPER led fortimo heat sink system www.cardanlight.com CLE CARDAN LIGHT EUROPE CLE FORTIMO ADAPTER IP20 XFFO100....GR..SW..WS silbergrau weiß 19,90 CLE FORTIMO Adapter für CLE kardanische
Introduction FEM, 1D-Example
 Introduction FEM, 1D-Example home/lehre/vl-mhs-1-e/folien/vorlesung/3_fem_intro/cover_sheet.tex page 1 of 25. p.1/25 Table of contents 1D Example - Finite Element Method 1. 1D Setup Geometry 2. Governing
Seitenkoffer Topcases Gepäckträger Lock it System Softbags Aluminiumkoffer Lederkoffer Schutzbügel Hauptständer Chopper-Parts Quad-Parts Accessoires
 Gepäckbrücke Alurack Art.-Nr. 650.937/ 945 00 schwarz Art.-Nr. 650.938/ 946 00 schwarz HONDA CBF 600 ab Baujahr 008 Art.-Nr. 650.953 00 schwarz Art.-Nr. 650.943/ 947 00 schwarz Montage Seitenkoffer Topcases
M1.2 x 8 mm M1.4 x 10 mm M0.5 - M1.2 mm
 NORMTEILE / HARDWARE 0 Muttern / 0 nuts 0 Muttern / 0 nuts 0 Muttern / 0 nuts Edelstahl VA / stainless steel Edelstahl VA / stainless steel Edelstahl VA / stainless steel M M.8 mm M.0 mm M. mm SW. mm SW.
Anwendungsbeispiele FW 50 +.SI / FW 60 +.SI Examples for FW 50 +.SI / FW 60 +.SI
 Schüco 21 Anwendungsbeispiele FW +.SI / FW 60 +.SI Examples for FW +.SI / FW 60 +.SI Die hier gezeigten Elementsymbole geben eine Übersicht der möglichen Bauformen. Alle auf dieser Seite angegebenen Zahlen
Level 1 German, 2016
 90886 908860 1SUPERVISOR S Level 1 German, 2016 90886 Demonstrate understanding of a variety of German texts on areas of most immediate relevance 2.00 p.m. Wednesday 23 November 2016 Credits: Five Achievement
Seitenkoffer Topcases Gepäckträger Lock it System Softbags Aluminiumkoffer Lederkoffer Schutzbügel Hauptständer Chopper-Parts Accessoires
 Motorschutzbügel ab Bj. 06 Art.-Nr.: 0.0 000 schwarz Ausführung B Montageanleitung Seitenkoffer Topcases Gepäckträger Lock it System Aluminiumkoffer Lederkoffer Schutzbügel Hauptständer Chopper-Parts Accessoires
Description of the PHOTOSONICS 4B - 35mm Highspeed Camera
 Description of the PHOTOSONICS 4B - 35mm Highspeed Camera Page 1/3 Framing Rates: Operating Voltage: Current Draw: Film: Magazines: Exposure Time: Movement: Image Steadyness: From 420 to 2.100 fps at five
Level 1 German, 2012
 90886 908860 1SUPERVISOR S Level 1 German, 2012 90886 Demonstrate understanding of a variety of German texts on areas of most immediate relevance 9.30 am Tuesday 13 November 2012 Credits: Five Achievement
E asyline by Hama GmbH & Co KG Postfach 80 86651 Monheim/Germany Tel. +49 (0)9091/502-0 Fax +49 (0)9091/502-274 hama@hama.de www.hama.
9091/502-0 Fax +49 (0)9091/502-274 hama@hama.de www.hama.") 00021024-10.06 E asyline by Hama GmbH & Co KG Postfach 80 86651 Monheim/Germany Tel. +49 (0)9091/502-0 Fax +49 (0)9091/502-274 hama@hama.de www.hama.com Gamepad Thunderstorm II 0021024 l Bedienungsanleitung
00021024-10.06 E asyline by Hama GmbH & Co KG Postfach 80 86651 Monheim/Germany Tel. +49 (0)9091/502-0 Fax +49 (0)9091/502-274 hama@hama.de www.hama.com Gamepad Thunderstorm II 0021024 l Bedienungsanleitung
Cable Tester NS-468. Safety instructions
 Cable Tester NS-468 Safety instructions Do not use the cable tester NS-468 if it is damaged. This device is only for use inside dry and clean rooms. This device must be protected from moisture, splash
AUSTRALIA 415 G BARBECUE CULTURE 1 OUTDOORCHEF.COM
 24 23 1 4 2 5 3 44 10 6 9 11 28 27 22 26 25 12 21 20 15 14 32 33 29 38 30 41 34 37 31 36 40 30 39 29 16 19 18 17 42 8 7 45 43 35 13 46 BARBECUE CULTURE 1 OUTOORCHEF.COM 1 B LI ECKEL Pos. Art. Nr. escription
Umschaltadapter/ Changeover / Trennadapter Disconnection Adapter für LSA-PLUS NT for LSA-PLUS NT. Montageanweisung Mounting Instructions
 Umschaltadapter/ Changeover / Trennadapter Disconnection Adapter für LSA-PLUS NT for LSA-PLUS NT Montageanweisung Mounting Instructions Der Umschalter dient zum unterbrechungsfreien Umschalten von Installations-drähten
Classic 9 Elegant C-Profil- Röhrenlaufwerke
 Classic 9 Elegant C-Profil- Röhrenlaufwerke 57 Inhaltsverzeichnis Classic 9 Elegant - C-Profil- Röhrenlaufwerke Laufschienen, Rollapparate, Anschraubplatten S. 58-59 Glasklemmhalter, Stopper, Muffen S.
Bedienungsanleitung Ferngesteuerter GT-Rennwagen McTrack Challange
 Bedienungsanleitung Ferngesteuerter GT-Rennwagen McTrack Challange Einführung Geehrter Kunde, wir möchten Ihnen zum Erwerb Ihres neuen GT-Rennwagen gratulieren! Mit dieser Wahl haben Sie sich für ein Produkt
Thermalright. Archon SB-E X2
 Thermalright Archon SB-E X2 Archon SB-E X2 Assembly package 1 1 1 8 4 4 4 4 1 4 1 1 1 1 4 4 8 Thermalright Archon SB-E X2 Intel 775/1155/1156/1366 Exploded view Important! Before proceeding with installation,
Führungssäule (f6) ohne Nut nach DIN 9833, Form D. Führungssäulen (f6) mit Nut für Sicherungsplatte Guide posts (f6) with groove for safety plate
 ohne Nut nach DIN 9833, Form D. Führungssäulen (f6) mit Nut für Sicherungsplatte Guide posts (f6) with groove for safety plate") Säulen - Tragzapfen Guide posts - Trunnions 17 Führungssäule (f6) ohne Nut nach DIN 9, Form D Guide posts (f6) without groove acc. to DIN 9, style D Führungssäulen (f6) mit Nut für Sicherungsplatte Guide
Säulen - Tragzapfen Guide posts - Trunnions 17 Führungssäule (f6) ohne Nut nach DIN 9, Form D Guide posts (f6) without groove acc. to DIN 9, style D Führungssäulen (f6) mit Nut für Sicherungsplatte Guide
Level 1 German, 2014
 90886 908860 1SUPERVISOR S Level 1 German, 2014 90886 Demonstrate understanding of a variety of German texts on areas of most immediate relevance 9.30 am Wednesday 26 November 2014 Credits: Five Achievement
BODY CHASSIS. Ihr Ersatzteilspezialist im Internet
 BODY CHASSIS 4 4 0 8 8 9 4 48 4 9 4 4 4 49 4 8 4 9 4 4 44 4 9 9 0 40 9 4 8 Seat 98 Hinge, Seat E00 Retainer x4 4 Lockwasher 8x Bolt, Hex x4 Plate, Seat Switch 99 Spring, Compression 4x 8 Glide, Seat Spring
torqeedo heckmotorhalterung stern-motor-bracket holiday/explorer Riverstar, adventure
 torqeedo heckmotorhalterung stern-motor-bracket holiday/explorer Riverstar, adventure MONTAGEANLEITUNG Assembly instructions Besitzer/Name: Owner/name: PLZ, Ort: Post code, town: Straße, Nr.: Street, nr:
Montageanleitung DORMA PT 40. Winkeloberlichtbeschlag. Installation instruction DORMA PT 40. Patch fitting for overpanel and sidelight
 Montageanleitung DORMA PT 40 Winkeloberlichtbeschlag Installation instruction DORMA PT 40 Patch fitting for overpanel and sidelight Stand/Issue 09.0 / 00331 00.5.37..3 Wichtige Informationen: Important
Downpipe Honda Civic Type R Kit-Nr.:
 190001063 - Einbauanleitung / Installation Instruction - Downpipe Honda Civic Type R Kit-Nr.: 500001021 Wichtige Hinweise! Diese Montageanleitung ist unbedingt vor Beginn der Einbauarbeiten zu lesen. Die
Serie/Series L-BV5. Typ / Type 2BV5 110 2BV5 111 2BV5 121 2BV5 131 2BV5 161. Alle Rechte vorbehalten. All rights reserved.
 Flüssigkeitsring -Vakuumpumpen/ - Kompressoren Liquid ring vacuum pumps/ compressors Ersatzteilliste Spare part list Serie/Series L-BV5 Typ / Type 2BV5 110 2BV5 111 2BV5 121 2BV5 131 2BV5 161 Gardner Denver
Parameter-Updatesoftware PF-12 Plus
 Parameter-Updatesoftware PF-12 Plus Mai / May 2015 Inhalt 1. Durchführung des Parameter-Updates... 2 2. Kontakt... 6 Content 1. Performance of the parameter-update... 4 2. Contact... 6 1. Durchführung
Gartenleuchte in Stein-Optik
 Gartenleuchte in Stein-Optik 10027662 10027664 10027666 10027668 10030343 10030344 10030345 10030346 10030347 Sehr geehrter Kunde, wir gratulieren Ihnen zum Erwerb Ihres Gerätes. Lesen Sie die folgenden
Krauser GmbH An der Steinmauer 6 D Pirmasens Tel.: Fax:
 60.967 schwarz 60.965 schwarz 4001.050.11 schwarz 4001.048.11 schwarz Montage Der Bausatz umfaßt die folgenden Teile: Stück Bestellnr. Bezeichnung 70000706 C-Bow schwarz 1 70000759 Halteadapter links 1
Motorschutzplatte Artikel-Nr.: Montage Vorbereitung: Original Unterfahrschutz entfernen,er entfällt. Die beiden hinteren original Silentblöcke v
 Motorschutzplatte Motorschutzplatte Artikel-Nr.: 80.67 Montage BMW R 00 GS bis 007 Artikel-Nr.: 005.007.0 BMW R 00 GS ab 008 Artikel-Nr.: 005.00.0 Artikel-Nr.: 005.04.0 Der Bausatz umfaßt die folgenden
Honeywell AG Hardhofweg. D-74821 Mosbach MU1H-1220GE23 R1001
 BA 95 Einbau-Anleitung Installation Instructions Einbau Installation Einbaubeispiel Installation example Ablaufleitung vorsehen Install discharge pipework Durchflussrichtung beachten! Consider direction
series COF combiflex Serie COF combiflex COF Combiflex Die Combiflex-Gehäuse bestehen aus 2 U-Profil-Strangpressprofilen,
 COF Serie COF combiflex series COF combiflex COF Combiflex Die Combiflex-Gehäuse bestehen aus 2 U-Profil-Strangpressprofilen, die sich beliebig miteinander kombinieren lassen, und zwei Abschlussdeckeln,
Installation Instructions
 EN DE Installation Instructions WLAN Installation Kit, 300 Mbps, 5 GHz, 16 dbi AK-4 Wireless Kit Scope of delivery Junction box AK-4 (1x) 1 Connection board AK-4 CB with 12VDC power supply unit (1x) 2
ERHARD is a company of. Datasheet ERHARD ECR check valve
 ERHARD is a company of Datasheet The compact check valve for clamping The is clamped between two flanges as a reflux preventer. It has two vanes which, for example, open on starting a pump and will iediately
Titelmasterformat Object Generator durch Klicken bearbeiten
 Titelmasterformat Object Generator durch Klicken bearbeiten How to model 82 screws in 2 minutes By Pierre-Louis Ruffieux 17.11.2014 1 Object Generator The object generator is usefull tool to replicate
BODY CHASSIS. Ihr Ersatzteilspezialist im Internet
 BODY CHASSIS 2 4 4 0 2 2 8 8 9 4 48 4 9 42 4 4 49 42 8 2 2 2 29 4 4 44 4 2 9 9 0 40 9 4 8 Seat 99 2 Hinge, Seat E0 Retainer x4 4 Lockwasher 8x Bolt, Hex x4 Plate, Seat Switch 99Z Spring, Compression 4x2
PERTH 4+G PERTH 4+G B2 B3. B Lid Deckel. Pos. Art. Nr. Description Beschreibung
 PERTH 4+G PERTH 4+G Spare Parts Ersatzteil-Liste 1 18.610.20 Lid, black Deckel, schwarz 2 18.600.50 Lid handle tube, stainless steel Griffrohr, Edelstahl 3 18.822.50 Logo plate Logoplatte 4 18.850.19 Heat
Rätsel 1: Buchstabensalat klassisch, 5 5, A C (10 Punkte) Puzzle 1: Standard As Easy As, 5 5, A C (10 points)
 Puzzle 1: Standard As Easy As, 5 5, A C (10 points)") Rätsel 1: uchstabensalat klassisch, 5 5, (10 Punkte) Puzzle 1: Standard s Easy s, 5 5, (10 points) Rätsel 2: uchstabensalat klassisch, 5 5, (5 Punkte) Puzzle 2: Standard s Easy s, 5 5, (5 points) Rätsel
Rätsel 1: uchstabensalat klassisch, 5 5, (10 Punkte) Puzzle 1: Standard s Easy s, 5 5, (10 points) Rätsel 2: uchstabensalat klassisch, 5 5, (5 Punkte) Puzzle 2: Standard s Easy s, 5 5, (5 points) Rätsel
Installation guide for Cloud and Square
 Installation guide for Cloud and Square 1. Scope of delivery 1.1 Baffle tile package and ceiling construction - 13 pcs. of baffles - Sub construction - 4 pcs. of distance tubes white (for direct mounting)
Bilderschienen picture rails. Bilderschienen
 Bilderschienen Bilderschienen möller deco-technik möller deco-technique Bilderschienen Der Einsatz von Bilderschienen, im Wohn- und Objektbereich, findet immer mehr Anklang. Diese Schienen werden mittels
Monteringsanvisning. Assembly instructions. Aufbauanleitung
 Monteringsanvisning Assembly instructions Aufbauanleitung 11 600-0 Viktig säkerhetsinformation Pallstället måste vara fastbultat i golvet (se tillverkarens instruktioner) Bakre bärbalk måste vara fastbultad
Bebilderter Teilekatalog, Aktenvernichter bls - 244cc - Illustrated Parts List, Document Shredder bls - 244cc -
 Bebilderter Teilekatalog, Aktenvernichter bls - cc - Illustrated Parts List, Document Shredder bls - cc - -Systeme BERNHARD LAUFENBERG Maschinen- und Apparatebau GmbH Luisental 73 Tel. (066) 9-0 Telefax
Schnell-Start-Anleitung Quick Start Guide
 Schnell-Start-Anleitung Quick Start Guide 3 1. Cube anschließen Schließen Sie den Cube an die Stromversorgung an. Verbinden Sie den Cube mit dem Router. Die Power- und die Internet-LED beginnen zu blinken,
RS232-Verbindung, RXU10 Herstellen einer RS232-Verbindung zwischen PC und Messgerät oder Modem und Messgerät
 Betriebsanleitung RS232-Verbindung, RXU10 Herstellen einer RS232-Verbindung zwischen PC und Messgerät oder Modem und Messgerät ä 2 Operating Instructions RS232 Connection, RXU10 Setting up an RS232 connection
MACO RUSTICO. Vario-Lamellenbeschlag Lamellenstück eingefräst Vario-louvre fittings Louvre end piece routed-in LADENBESCHLÄGE SHUTTER HARDWARE
 TECHNIK DIE BEWEGT TECHNOLOGY IN MOTION MACO RUSTICO LADENBESCHLÄGE SHUTTER HARDWARE MONTAGEHINWEISE INSTALLATION INSTRUCTIONS Ablängen der Profilstangen Ablänghilfe bis zum Anschlag drehen. Verschluss-
Komponenten. Components. Kapitel I Ascher Chapter I Ashtrays
 Komponenten Components Kapitel I Ascher Chapter I Ashtrays Sachwortverzeichnis Index Sachwortverzeichnis Seite Index Page A Aufschraub-Ascher 1 D Distanzrahmen 7 E Einbau-Ascher 2-6, 12 G Griff-Ascher-Set
Anleitung zur Schnellinstallation TFM-560X YO.13
 Anleitung zur Schnellinstallation TFM-560X YO.13 Table of Contents Deutsch 1 1. Bevor Sie anfangen 1 2. Installation 2 Troubleshooting 6 Version 06.08.2011 1. Bevor Sie anfangen Packungsinhalt ŸTFM-560X