MARKISEN AWNINGS STORES TOLDOS TENDALINI
|
|
|
- Harald Jaeger
- vor 7 Jahren
- Abrufe
Transkript

1 Montage- und Gebrauchsanleitung Installation and use instructions Instructions de montage et mode d emploi Instruciones de montaje y uso Istruzioni di montaggio e d uso MARKIS AWNINGS STOR TOLDOS TDALINI fiamma.com POLAR WHE TANIUM FIAMMASTOR A0\IS\ rev.b
2 VERPACKUNGSINHALT PACKAGE CONTTS CONTU L EMBALLAGE CONTIDO L EMBALAJE CONTUTO LL IMBALLO 1x 1x 2x RAFTER 4x 1x Optional Standard x M6 M6 M6x50 M6 M6 M6x mm M6x50 80 mm M6 400 mm M6x mm 2x 1x 2x 1x S Standard Standard Standard 450 Um die Markise optimal nutzen zu k önnen, lesen Sie bitte die Bedienungsanleitung aufmerksam durch und bewahren Sie zur späteren Verwendung gut auf. To use the awning in the best way, read the user s instructions carefully and keep them on hand for consultation in the future. Pour tirer le meilleur parti de votre store, nous vous invitons à lire attentivement les notices d emploi et à les conserver pour toute consultation ultérieure. Para usar el toldo en lo mejor de los modos, os invitamos a leer atentamente las instrucciones de uso, guardandolas en caso de necesidad. Per utilizzare al meglio il tendalino, vi invitiamo a leggere attentamente le istruzioni d uso e a conservarle in caso di necessita. 2
3 MONTAGEANLEUNG INSTALLATION INSTRUCTION 1. Die Montage soll von fachkundigem Personal durchgeführt werden. 2. Suchen Sie zur Anbringung der Markise die Stellen mit den Wandverstärkungen aus. 3. Wählen Sie gemäß des Dachprofils Ihres Fahrzeugs die passende Halterung aus. 4. Markieren Sie außen am Fahrzeug die Befestigungspunkte der Halterungen (Abb. A). Um die Zugkraft der Gelenkarme aufzufangen, müssen die Adapterplatten genau da montiert werden, wo die Aufschrift SUPPORT auf der Kassette geklebt ist. Darauf achten, dass die Platten gleich weit entfernt voneinander angebracht werden (d). Die Markisenkassette muß waagerecht montiert werden. 5. Vergewissern Sie sich vor dem Bohren der Montagelöcher, dass im Inneren des Fahrzeugs an den vorgesehenen Stellen keine Hindernisse, insbesondere Gas- oder Stromleitung, liegen. 6. Ziehen Sie die Blockierschrauben der Halterung nicht zu fest an (Abb. B) 7. Positionieren Sie die Markise auf die Halterungen und befestigen Sie diese wie auf der Abbildung beschrieben (Abb. C). 1. The installation must be carried out by qualified persons. 2. Check the wall of the vehicle and verify the position of the reinforced points or ask for this information to the dealer of your vehicle. 3. After confirming the correct reinforced points, choose the appropriate brackets. 4. Mark the fastening points on the outside wall of the vehicle (FIG. A), keeping in mind to receive the pulling force of the retractable arms, the brackets need to be fixed exactly behind the stickers SUPPORT which are on the awning. It is necessary that the brackets are fixed equidistant from one another (d). Make sure that the awning is installed horizontally. 5. Before drilling, make sure that there are no obstacles on the inside (e.g. Electric cables, gas pipes etc). 6. Fasten the brackets, but be careful not to over tighten the lock nuts of the bracket plates (FIG. B). 7. Place the awning on the brackets and fasten it as per illustration (FIG. C). 3
4 INSTRUCTIONS MONTAGE INSTRUCCION MONTAJE 1. Le montage doit être effectué par des techniciens compétents 2. Testez la paroi du véhicule et vérifiez la position des points renforcés ou informez-vous auprès du concessionnaire de votre véhicule. 3. Après avoir evalué le profil du camping-car, choisissez le pattes de fixation les plus adaptées. 4. Marquez les points de fixation sur la paroi extérieure du véhicule (FIG. A), en tenant compte que les pattes de fixation doivent être fixées au niveau de l inscription SUPPORT inscrite sur le store et qu elles doivent être équidistantes (d). Vérifiez que le store est monté bien horizontalement. 5. Avant de percer, assurez-vous qu il n y a pas d obstacles à l intérieur du véhicule (par ex. câbles électriques, tubes de gaz, etc.) 6. Fixez les pattes de fixations en faisant attention à ne pas serrer excessive-ment les écrous de blocage des pattes de fixation (FIG. B). 7. Positionnez le store sur les pattes de fixation et le fixer comme indiqué sur le schéma (FIG. C). 1. El montaje tiene que ser eseguito por el personal competente 2. Sondar la pared del vehículo y verificar los puntos reforzados o informarse cerca del revendedor del propio vehículo. 3. Una vez valutado el perfil del vehículo, elegir la mejor solución de estribos. 4. Señar los puntos de sujeción en la pared exterior del vehículo (FIG. A), teniendo en cuenta que los estribos deben encontrarse a nivel de la escrita SUPPORT del toldo y deben estar equidistantes (d).montar el toldo perfectamente horizontal. 5. Antes que taladrar, asegurarse que no haya obstaculos en el interior (cables electricos, tubos..). 6. Fijar los estribos, poniendo atención en no estrechar excesivamente los dados de blocaje (FIG. B). 7. Colocar el toldo sobre los estribos y fijarlo como en la figura (FIG. C). 4
5 ISTRUZIONI DI MONTAGGIO 1. Il montaggio deve essere eseguito da personale competente. 2. Sondare la parete del mezzo e verificare i punti rinforzati oppure informarsi presso il rivenditore del proprio mezzo. 3. Valutato il profilo del mezzo, scegliere la migliore soluzione di staffaggi. 4. Segnare i punti di fissaggio sulla parete esterna del mezzo (FIG. A), tenendo conto che le staffe si devono trovare in corrispondenza della scritta SUPPORT del tendalino e che siano equidistanti (d). Accertarsi che il tendalino venga montato orizzontalmente. 5. Prima di forare, accertarsi che non vi siano ostacoli all interno (es. cavi elettrici, tubi gas, ecc.). 6. Fissare le staffe, facendo attenzione non stringere eccessivamente i dadi di bloccaggio delle staffe (FIG. B). 7. Posizionare il tendalino sulle staffe e fissarlo come da figura (FIG. C). 5
6 Standardmäßige Montage Standard installation Montage standard Montaje estandar Montaggio standard S Standard S HALTERUNG BRACKETS SUPPORTS TRIBOS STAFFE SUPPORT SUPPORT SUPPORT d d d d Beim Anbringen der Markise darauf achten, dass sich die Halterungen an den Markierungen SUPPORT und an den Anbringungspunkten der Arme im Gehäuse befinden. When installing the awning, please make sure that the brackets are in correspondence with the sign SUPPORT and in correspondence with the arms fixing points in the box. Pendant l installation du store, assurez-vous que les supports sont bien en face de l inscription SUPPORT et des points de fixation des bras sur le boîtier. Durante el montaje, asegurarse de que los estribos se encuentren a nivel de la escrita SUPPORT y a nivel de los puntos de fijación de los brazos. Durante l installazione del tendalino, assicurarsi che le staffe si trovino in corrispondenza della scritta SUPPORT ed in corrispondenza al punto di fissaggio delle braccia sul cassonetto. 6
7 -L OK NON NO NEIN SILICONE SILICONE Um ein einwandfreies Schließen der Markise gewährleisten zu können, müssen bei leicht gebogener Fahrzeugwand Distanzstücke zwischen den Halterungen und der Fahrzeugwand eingesetzt werden, damit die Markise gerade montiert werden kann (siehe oben). In case the wall of the vehicle is not perfectly straight, please place some spacers between the bracket and the wall of the vehicle (see here above). Si la paroi du véhicule est légèrement bombée, et pour un montage corret il sera nécessaire de placer des entretoises entre les supports et la paroi afin d obtenir une ligne droite (voir ci-dessus). En el caso de que la pared del vehículo no sea perfectamente lineal, usar los distanciadores para obtener un montaje correcto (como en figura). In caso la parete del mezzo non sia perfettamente lineare, utilizzare dei distanziali per ottenere un montaggio corretto (come da figura). 7
8 PATT PDING PATT PDING PATT PDING PATT PDING PATT PDING PATT PDING Es ist immer ratsam, die 3 Halteplatten vom Montagesatz bei der Installation der Markise zu benutzen, was aber unentbehrlich für eine sichere Befestigung der längeren Markisen (ab 400) ist. We recommend to use always the 3 brackets when installing the awning: this is absolutely necessary for a safe installation of longer awnings (from 400). Il est toujours préférable d utiliser les 3 étriers pour fixer le store. Cela devient indispensable pour les stores d une longueur de 400 et plus. Es aconsejable usar siempre los 3 estribos incluidos en la confección para montar el toldo, en cambio es absolutamente necesario usarlos en caso de toldos largos (de 400). d d È sempre consigliabile utilizzare le 3 staffe incluse nella confezione per installare il tendalino, è assolutamente necessario invece per il fissaggio sicuro dei tendalini lunghi (da 400 in poi) mm 80 mm 120 mm mm d = d = mm mm 80 mm 120 mm mm d = d = mm mm 120 mm 400 mm mm d d = = mm 8
 notwending die einfachere Bohrung")
9 SILICONE A B Ø 6.5 mm M6x50 M6 SILICONE 10 C 1 2 Die Halterungen sind bereits mit 2 Bohrungen vorgesehen: für die Anbringung der Markise ist nur eine Schraube (in der Ausstattung) notwending die einfachere Bohrung verwenden. The brackets have two holes: to install the awning only one screw (supplied) is necessary; use the most convenient hole. Les etriers possèdent deux trous: un seul vis (fourni en dotation) est necessaire à la fixation du store ; utiliser le trou le plus adapté. En los estribos se encuentran dos agujeros: para la fijación del toldo es suficiente un sólo tornillo (incluido). Se puede usar el agujero más cómodo. 3 Ø 5.2 mm M5x12 4 M5 5 8 Le staffe sono predisposte con due fori: per il fissaggio del tendalino è necessaria una sola vite (in dotazione); utilizzare il foro più comodo. 9
10 Sonderhalterungen Extra fixing brackets Supports en option Tipos de estribos de fijación Tipi di staffe di fissaggio (opcional) (optional) 175 mm T + B T+B 80 mm T + C T+C T + + D B T+B+D T + F T+F 10
11 U 15 + B U+B U + C U+C Y 30 + B Y+B R 11
12 PATT PDING PATT PDING Montage der Adapter T Adapters T installation Montage du support T Montaje adaptador T Montaggio staffa T T T+B d d HALTERUNG BRACKETS ETRIERS TRIBOS STAFFE d d SUPPORT SUPPORT SUPPORT d d = = A 12 Ø 6.5 mm
13 B M6 10 SILICONE M6x65 T+D T+D+B Ø 6.5 mm C M6x50 SILICONE M M5 M5x Ø 5.2 mm 13
14 Montage der Adapter R Adapters R installation Montage du support R Montaje adaptador R Montaggio staffa R R R 1 4 Max cm Ø5mm Ø4mm SILICONE M6x50 5,2x25 Ø 6.5 mm 10 14
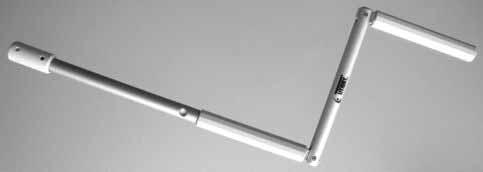
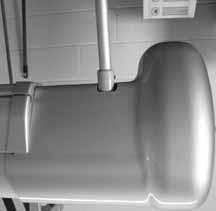
15 GEBRAUCHSANLEUNG Abb.1 : Um die Markise, aber vor allem die Fahrzeugwand, nicht sinnlos zu belasten, müssen - nach ungefähr 1m Auszug - die Stützbeine auf den Boden gesetzt werden. Anschließend weiter ausdrehen und die Stützen gemäß dem erreichten Auszug versetzen. Abb.2 : Die Rändelschrauben lösen, damit die Arme aus dem Trägerprofil gleiten können. Abb.3 : Den Stützarm ganz in der Nähe des Scharnierpunktes halten und horizontal zu sich ziehen. Abb.4 : Bei dieser Aktion kommt das Gelenk frei, der Arm gleitet aus seinem Trägerprofil hinaus und schwankt nach unten. Abb.5 : Die Markise komplett ausdrehen und die Stützarme mit der Rändelschraube auf die gewünschte Höhe einstellen. Abb.6 : Um zu verhindern, dass die Markise bei plötzlichem Wind hochfliegt, wobei die Stützarme das Fahrzeug beschädigt werden können, ist es unbedingt notwendig, die Stützarme mit den Erdnägeln am Boden zu befestigen. Es ist sehr empfehlenswert, als zusätzliche Sicherheit oben an den Stützarmen Sturmbänder einzusetzen oder das Fiamma Tie- Down Kit (Sicherheitsband), das ebenfalls am Boden befestigt wird, über das Tuch zu spannen. Abb.7 : Die Stützarme können auch in die Wandhalterungen eingesetzt werden. Die Wandhalterungen können nur an verstärkten Stellen angebracht werden. Abb.8 : Eine Markise ist ein Sonnenschutz, deshalb muss sie bei kräftigem Wind, starkem Regen oder Schnee eingefahren werden! Andernfalls nach folgender Maßnahme handeln: Die Markise an einer Seite hinunterneigen, damit Wasser abfließen kann und die Rafter Spannstange anbringen (die Spannstange liegt nur bei einigen Markisenmodellen serienmäßig vor). Abb.9 : Sich vergewissern, dass die Markise korrekt aufgerollt werden kann. Die roten Anzeiger an den Seiten der Frontleiste sind bei komplett aufgerollter Markise nicht sichtbar. Wenn das Tuch beschädigt ist, kann die Markise nicht richtig aufgerollt werden. Verwenden Sie die Markise mit beschädigtem Tuch in keinem Fall. Das Tuch nur mit mildem Reinigungsmittel reinigen. Bei eventuell auftretenden Problemen wenden Sie sich bitte an den Händler in Ihrer Nähe oder an die, auf der letzten Seite, stehenden Anschrift. ACHTUNG Eine Markise ist ein Sonnenschutz, deshalb muss sie bei kräftigem Wind, starkem Regen oder Schnee eingefahren werden! 15
16 INSTRUCTIONS FOR USE Fig.1:In order to avoid unnecessary strain on the awning as well as on the vehicle side, we suggest to take out the legs at about 1 m from the opening. Fig. 2 : Unscrew the leg knob to slide the leg out of its seat. Fig. 3 : Grasp the leg near its hinge-joint and pull it in a horizontal direction. Fig. 4 : Lower the leg as shown in the figure. Fig. 5 : After unrolling the awning completely, adjust the legs at the chosen height. Fig. 6 :To avoid that the awning is lifted up by an unexpected gust of wind, it is necessary to secure the legs to the ground with the provided hooks. For safety s sake, we strongly advise you also use some storm cords in the upper part of each support leg or anchor the awning with the Fiamma Tie-Down Kit strap. Fig.7:Ifyouwant to fasten the support legs to the vehicle, put the terminals into the wall brackets. The brackets can be fixed only in reinforced points. Fig.8:Weremind you that the awning is a sun protection, so please roll up your awning in case of rain, wind or snow. Otherwise, please take the following precautions: lower one side of your awning, so that water can flow away and place the tension rafter as shown in the figure (not included for all awning lengths). Fig. 9 : Make sure that the awning perfectly rolls up: when it is, the red indicators in the front profile ends are no longer visible. A damaged fabric does not allow the awning to perfectly roll up. Never use the awning with a damaged canopy. Wash the canopy with light cleaning detergent. In case of problems, please contact the dealer closest to you or the address in the last page. ATTTION We remind you that the awning is designed to protect from the sun, and not from rain, wind or snow. In these cases, we recommend to roll it up! 16
17 MO D EMPLOI Fig. 1 : Pour éviter de forcer sur le store ou sur la paroi du véhicule, il est nécessaire de sortir les pieds du store dès qu il est déroulé d environ 1m. Fig. 2 : Dévissez l écrou de fixation des pieds du store pour leur permettre de glisser hors de la barre de charge. Fig. 3 : Saisir un pied tout près de l articulation et l extraire en tirant horizontalement vers soi. Fig. 4 : Abaisser le pied comme indiqué dans le schéma. Fig. 5 : Après avoir déroulé complètement le store, réglez les pieds à la hauteur voulue à l aide des écrous. Fig. 6 : Pour éviter que le store ne soit soulevé par une rafale de vent, il est nécessaire d ancrer les pieds au sol à l aide des piquets fournis. Pour plus de sécurité, nous vous conseillons vivement d attacher des sangles en haut de chaque pied et de tendre le Tie-Down Kit de Fiamma (sangles de tension) de la toile vers le sol. Fig. 7 : Les pieds peuvent également être fixés à des étriers placés sur la paroi du véhicule. Les étriers peuvent être installés uniquement si la paroi est renforcée au niveau des points de fixation. Fig.8:N oubliez pas que votre store a été conçu comme protection du soleil et, de ce fait, il doit être fermé lors d intempéries. Dans le cas contraire, il faut prendre les précautions suivantes: abaissez un côté de votre store de façon à ce que l eau de pluie puisse s écouler ou utilisez le tendeur de toile rafter (le tendeur est livré d origine seulement pour certaines longueurs de store). Fig. 9 : Assurez-vous que le store est bien fermé: dans ce cas, les indicateurs rouges sur les côtés du store ne doivent pas être visibles. Une toile endommagée ne permet pas une bonne fermeture correcte du store. N utilisez jamais le store si la toile est endommagée. Lavez la toile de votre store avec un détergent délicat. En cas de problème, contactez l adresse indiquée sur la dernière page ou le revendeur le plus proche domicile. ATTTION Un store est conçu pour protéger du soleil. De ce fait, il doit être refermé en cas d intempérie! 17
18 INSTRUCCION USO Fig.1 : Para evitar un esfuerzo excesivo del toldo y de la pared del vehículo, aconsejamos extraer las patas cerca a un m de la apertura. Fig.2 : Aflojar el pomo de la pata para extraerla. Fig.3 : Coger la pata por la parte de la articulación y traerla horizontalmente hacia sí. Fig.4 : Bajar la pata como en figura.. Fig.5 : Completar la apertura del toldo y regolar las patas a la altura deseada. Fig.6 : Para que el toldo no se levante por una ráfaga de viento repentina, es necesario anclar las patas al suelo con las piquetas incluidas. Para mayor seguridad, aconsejamos usar los vientos tensores en la parte superior de las patas o anclar el toldo con el Tie-Down Kit. Fig.7 : Para fijar las patas del toldo al vehículo, insertar los terminales en los enganches de la pared. Los enganches de la pared pueden ser montados solo si la pared es reforzada en los puntos requeridos. Fig.8 : Acordarse que el toldo ha sido concebido para repararse del sol. Por consiguiente se aconseja cerrarlo en caso de viento, lluvia o nieve. Diversamente, tomar las debidas precauciones, bajando una pata para que el agua fluya y montando la vara de tensión como en figura (la vara no es incluidas en todos los modelos de toldos). Fig.9 : Asegurarse que el toldo se cierre perfectamente, cuando el toldo está perfectamente cerrado las banderillas rojas no se veen. Un cierre imperfecto del toldo puede ser causado por la lona estropeada. No usar el toldo con la lona estropeada. Se aconseja lavar la lona con detersivo delicado. En caso de problemas, contactar la dirección en la última página indicada o el revendedor más cercano. ATCION Acordarse que el toldo ha sido creado para protegerse del sol y no de la lluvia, del viento o de la nieve. En estos casos aconsejamos siempre cerrar el toldo! 18
19 ISTRUZIONI D USO Fig. 1 : Per evitare uno sforzo eccessivo del tendalino così come della parete del mezzo, consigliamo di estrarre le paline dopo circa 1m dall apertura. Fig. 2 : Allentare il pomello della palina per estrarre la stessa dalla sede. Fig. 3 : Afferrare la palina dalla parte dello snodo e tirarla orizzontalmente verso di sé. Fig. 4 : Abbassare la palina come da figura. Fig. 5 : Completare l apertura del tendalino e regolare le paline all altezza desiderata. Fig. 6 : Per evitare che il tendalino venga sollevato da una raffica di vento improvvisa, é necessario fissare le paline al terreno con i picchetti in dotazione. Per maggior sicurezza, consigliamo di utilizzare anche delle corde di tensione nella parte superiore delle paline o di ancorare il tendalino con il Tie-Down Kit. Fig. 7: Volendo fissare le paline del tendalino al mezzo, inserire i terminali negli attacchi a parete. Gli attacchi a parete possono essere montati solo se la parete è rinforzata nei punti richiesti. Fig. 8 : Ricordare che il tendalino è stato concepito per ripararsi dal sole. Pertanto é consigliabile chiuderlo in caso di vento, pioggia o neve. Diversamente, prendere le adeguate precauzioni, abbassando una palina per permettere alla pioggia di defluire, e montando il rafter di tensione come da figura (il rafter non è di serie in tutti i modelli di tendalini). Fig. 9 : Accertarsi che il tendalino si chiuda perfettamente: a tendalino completamente chiuso i segnalatori rossi non devono essere visibili. Una chiusura imperfetta del tendalino può essere causata dal telo danneggiato. Non utilizzare il tendalino con il telo danneggiato. Si consiglia di lavare il telo con Fiamma BRILL. In caso di problemi contattare l indirizzo in ultima pagina o il rivenditore più vicino. ATTZIONE Ricordare che il tendalino è stato concepito per ripararsi dal sole e non dalla pioggia, dal vento oppure dalla neve. In questi casi, si consiglia di chiudere il tendalino! 19
20 GEBRAUCHSANLEUNG INSTRUCTIONS FOR USE MO D EMPLOI MODO EMPLEO ISTRUZIONI D USO Um die Markise, aber vor allem die Fahrzeugwand, nicht sinnlos zu belasten, müssen - nach ungefähr 1 m Auszug - die Stützbeine auf den Boden gesetzt werden. 1m In order to avoid unnecessary strain on the awning as well as on the vehicle side, we suggest to take out the legs at about 1 m from the opening. 1 Pour éviter de forcer sur le store ou la paroi du véhicule, il est nécessaire d extraire les pieds du store dès qu il est déroulé d environ 1m. Para evitar un esfuerzo excesivo de la pared del vehículo, aconsejamos, donde posible, extraer las patas a una distancia de cerca 1 m. Per evitare uno sforzo eccessivo sulla parete del mezzo, consigliamo, ove possibile, di estrarre le paline dopo circa 1m dall apertura. 20
21 ANBRINGUNG D ZUBEHÖRS ZUR SPANNUNG R MARKISE INSTALLATION OF AWNING TSION ACCSORI INSTALLATION D ACCSOIR POUR UNE TSION OPTIMALE DU STORE MONTAJE LOS ACCORIOS PARA LA TSION L TOLDO MONTAGGIO GLI ACCSORI PER IL TSIONAMTO L TDALINO 6 TIE DOWN K PLUS OPTIONAL 21
22 ANBRINGUNG R SPANNARMAUFLAGE INSTALLATION OF WALL BRACKETS INSTALLATION D PIEDS SUPPORT SUR LA PAROI MONTAJE LOS GANCH PARA LA PARED MONTAGGIO GLI ATTACCHI A PARETE 7 5x30 mm Ø 10 mm
23 ANBRINGUNG R RAFTER FÜR DIE MARKISE INSTALLATION OF AWNING TSION RAFTER INSTALLATION D TURS TOILE POUR LE STORE MONTAJE LA VARA TSION L TOLDO MONTAGGIO L RAFTER PER IL TDALINO RAFTER RAFTER PRO 03616A01- OPTIONAL ACHTUNG: Die Rafter Pro Spannstange wird nur für gelegentlichem Gebrauch empfohlen. ATTTION: we advise to use the tension rafter PRO temporarily. ATTTION: Nous conseillons d utiliser le tendeur rafter PRO seulement occasionnellement. ATCION: la vara de tensión rafter PRO es aconsejable sólo por un uso temporal. ATTZIONE: Il rafter PRO è consigliato solo per uso temporaneo. 23
24 9 A Bei ausgefahrener Markise ist die rote Anzeige sichtbar. The awning is open.the red flag is visible. Les store est ouvert. La languette rouge est visible. El toldo es abierto. La banderilla roja es visible Il tendalino è aperto. Il segnalatore rosso è visibile. B Kurz vor dem Einfahren ist die rote Anzeige sichtbar. The awning is about to close. The red flag is visible. Le store va se fermer. La languette rouge est visible. El frontal del toldo está para cerrarse. La banderilla roja es visible. Il frontale del tendalino è prossimo alla chiusura. Il segnalatore è visibile. C Bei komplett eingefahrener Markise ist die rote Anzeige nicht mehr sichtbar. Die Markise ist jetzt verriegelt. Die Verriegelung erfolgt ohne spürbaren Widerstand. When the awning is completely closed, the red flag is no longer visible. The awning is now properly closed. The closure runs smoothly without problems. Quand le store est completement fermé, l indicateur rouge n est plus visibile. Le store est maintenant bien bloqué, la fermeture se fait sans résistance particulière. Cuando el toldo está completamente cerrado, la banderilla roja no es visible. El cierre se realiza sin obstáculos. A tendalino completamente chiuso il segnalatore rosso non é piú visibile; il tendalino é ora completamente chiuso. La chiusura avviene senza particolari resistenze. 24
25 PATT PDING PATT PDING REPARATURHILF TROUBLHOOTING QUE FAIRE CAS PROBLÈME INTERVCION CASO PROBLEMAS INTERVTI IN CASO DI PROBLEMI ALLE MARKIS VON FIAMMA WERD AB WERK M EINER OPTIMAL GRUNINSTELLUNG R ARMREGULIERUNG AUSGELIEFERT. SOLLT SICH BEI R BUTZUNG KLEINE ABWEICHUNG ZEIG GEH SIE BTE NACH UNSERER EMPFEHLUNG VOR OR KONTAKTIER SIE IHR HÄNDLER. FIAMMA AWNINGS LEAVE OUR WAREHOUSE WH OPTIMUM REGULATION. HOWEVER, OVER A PERIOD OF TIME, SOME ANOMALI COULD APPEAR. HERE CLOSED THERE IS A LIST WH SOME EXAMPL, ONLY FOR THE WE RECOMD HOW TO WORK. WE SUGGT TO CONTACT A FIAMMA RETAILER FOR MORE SERIOUS PROBLEMS. L STOR FIAMMA SORTT NOTRE USINE AVEC UN RÉGLAGE OPTIMAL. TOUTEFOIS, L UTILISATION RÉPÉTÉE DU STORE PEUT G- DRER D DISFONCTIONNEMTS. VOUS TROUVEREZ CI-DSOUS UNE LISTE D EXEMPL POUR LQUELS IL T POSSIBLE D INTERVIR IMMÉDIATEMT GRÂCE À NOS INDICATIONS. POUR L PROBLÈM PLUS GRAV, NOUS VOUS CONSEILLONS PRDRE CONTACT AVEC UN REVUR AGRÉÉ FIAMMA. LOS TOLDOS SAL FIAMMA MANERA OPTIMAL, PERO CON EL USO SE PUED VERIFICAR UNAS ANOMALIAS. SEGUIDA UMERAMOS UNAS ELLAS, INDICANDO COMO OPERAR INMEDIATAMTE. SI EL PROBLEMA MAS SERIO SE ACONSEJA CONTACTAR UN REVDOR FIAMMA. I TDALINI CONO DALLA FIAMMA CON REGOLAZIONE OTTIMALE. TUTTAVIA, CON L USO, SI POSSONO VERIFICARE ALCUNE ANOMALIE. DI SEGUO NE ELCHIAMO ALCUNE INDICANDO COME INTERVIRE IMMEDIATAMTE. SE IL PROBLEMA E PIU SERIO SI CONSIGLIA DI CONTATTARE UN RIVDORE FIAMMA. F45 ti 350 PLATINUM S/N : F A00 Im Notfall bitte folgende Nummer angeben. In case of trouble, please give this number. En cas de problème, merci de communiquer ce numéro de référence. En caso de problemas, comunicar los datos, sobre la etiqueta. In caso di problemi, comunicare i dati riportati sulla targhetta. 25
26 PATT PDING PATT PDING PROBLEM PROBLEM PROBLÈME PROBLEMA PROBLEMA 1 ARMREGULIERUNG ARM ADJUSTMT RÉGLAGE DU BRAS REGULACION L BRAZO REGOLAZIONE L BRACCIO DIE FIAMMA MARKIS WERD M OPTIMALER ARMREGULIERUNG AUS M WERK GELIEFERT - BEIM BUTZ KÖNN SICH DIE ARME ABSK. - BTE WIE ABGEBILT REGULIER. FIAMMA AWNINGS LEAVE OUR WAREHOUSE WH OPTIMUM REGULATION.THE ARM MAY LOWER SELF WH THE WEAR AND TEAR OF TIME.REPOSION THE ARM AS FOLLOWS. L STOR FIAMMA SORTT NOTRE USINE AVEC UN RÉGLAGE OPTIMAL D BRAS. - L UTILISATION DU STORE PEUT PROVOQUER UNE INCLINAISON D BRAS. RÉGLER L BRAS COMME INDIQUÉ CI-DSOUS. LOS TOLDOS SAL FIAMMA CON REGULACION OPTIMAL - CON EL USO EL BRAZO PODRIA BAJARSE. REGULAR EL BRAZO COMO LAS SIGU FIGURAS. I TDALINI CONO DALLA FIAMMA CON REGOLAZIONE OTTIMALE. NELL USO IL BRACCIO PUÒ ABBASSARSI. - REGOLARE COME FIGURE SEGUTI. A PATT PDING 26 13
27 PATT PDING PATT PDING PATT PDING PATT PDING PATT PDING PATT PDING PATT PDING PATT PDING Mutter A an- oder abschrauben, um die Höhe des Arms richtig einzustellen. Screw/unscrew nut A to reposition the arm. Visser/dévisser l écrou A pour régler le bras. Regolar el dado A por la altura del brazo Regolare il dado A per l altezza del braccio. A A Sich vergewissern, dass sich die Frontleiste der Markise beim Auskurbeln in waagerechter Stellung befindet. Make sure that the front profile comes out horizontally when unrolling the awning. S assurer que la barre de charge du store s abaisse horizontalement lors de l ouverture du store. Abriéndolo, verificar que el frontal sea horizontal.. Assicurarsi che il frontale in apertura sia orizzontale. ok 27

28 PROBLEM PROBLEM PROBLÈME PROBLEMA PROBLEMA 2 TUCH REGULIERUNG CANOPY ADJUSTMT RÉGLAGE LA TOILE REGULACION LA LONA REGOLAZIONE L TELO ANLEUNG ÜBER DIE EINSTELLUNG D TUCH Fiamma Markisen verlassen die Qualitätskontrolle mit einwandfrei eingestellter und korrekt schließender Frontblende. Sollte sich das Tuch, z.b. durch Witterungseinflüsse oder ähnlichem im Laufe der Zeit etwas ausdehnen und dadurch ein 100%iges Schließen nicht mehr gewährleistet sein, kann es durch das neue Rollenregulierungssystem PRTO FIX ausgeglichen werden. Bitte nach folgenden Schritten vorgehen, um das Problem zu beheben. ROLLER REGULATION CAP PRTO FIX All Fiamma awnings are properly adjusted. However, over a period of time, the canopy could loose on the sides and the closing could be not perfect. Only for this problem you can work properly on the roller regulation cup PRTO FIX (following the pictures) and the canopy s closing will be perfect. We suggest to use the roller regulation cup with moderation. BOUTON RÉGLAGE DU STORE PRTO FIX Tous les stores Fiamma ont été réglés de manière très précise. Toutefois, avec le temps, la toile peut se détendre sur les côtés et il se peut que le store ne se ferme plus parfaitement. Afin de résoudre ce problème, on peut agir sur le bouton de réglage du store PRTO FIX (cf. schéma) afin de retrouver une fermeture idéale. Réglage à effectuer avec modération. TAPON REGULACION PRTO FIX Todos los toldos salen de Fiamma de manera optimal. Todavía, a medida que pasa el tiempo, la lona podría aflojarse a nivel de los lados, causando un cierre imperfecto del toldo. En este caso, trabajando oportunamente sobre el tapón de regulación PRTO FIX, como ilustrado, se ajusta el cierre del frontal. Se aconseja una regulación moderada. TAPPO REGOLAZIONE RULLO PRTO FIX i TDALINI Fiamma sono regolate in modo ottimale. Tuttavia, nel tempo, il telo potrebbe leggermente cedere sui lati causando una chiusura del tendalino non perfetto. In questo caso agendo opportunamente sul tappo regolazione rullo PRTO FIX, come illustrato, si recupera il gioco del telo ottenendo una chiusura ottimale. Si consiglia una regolazione moderata. PROBLEM - Auf der linken Seite schließt die Markise nicht ordnungsgemäß PROBLEM - Lead Bar does not close on the side opposite the winch PROBLEME - Le store ne feme pas bien du côté opposé à celui du treuil PROBLEMA -El toldo no cierra bienen el lado opuesto del molinete PROBLEMA - Il tendalino non chiude sul lato opposto arganello A 28


29 Das Markisentuch komplett ausrollen Unroll completely the awning Dérouler entièrement le store Abrir completamente el toldo Estendere completamente il tendalino B Mit einem Schraubenzieher vorsichtig die Verzahnung des Presto Fix ein wenig nach unten drehen Work with a screwdriver on the ruller regulation cup À l aide d un tournevis, agir sur le bouton de réglage Con un destornillador trabajar sobre el tapón de regulación PRTO FIX Con un cacciavite - Agire sul tappo regolazione C A B PRTO-FIX 29
 Rotating the nut A on a clockwise direction, the roller B will move widening (see the picture) Tourner la pièce A dans le sens des aiguilles d une montre.")
 Die Frontblende schließt wieder ordnungsgemäß The awning close again correctly Le store se referme correctement El toldo se vuelve cerrado I tendalino ritorna")
30 Funktionszweck Operation way Principe de fonctionnement Principio de funcionamiento Principio di funzionamento 3 D A B PRTO-FIX Die Spannschraube A bewegt sich im Uhrzeigersinn und die Rolle B verbreitert sich (siehe Abbildung) Rotating the nut A on a clockwise direction, the roller B will move widening (see the picture) Tourner la pièce A dans le sens des aiguilles d une montre. Le rouleau B se déplace et s élargit (schéma) Ruotando el anillo A en el sentido horario, el rodillo B se mueve ampliándose (ver las figuras) Ruotando la ghiera A in senso orario, il rullo B si sposta allargandosi (come da figura) Die Frontblende schließt wieder ordnungsgemäß The awning close again correctly Le store se referme correctement El toldo se vuelve cerrado I tendalino ritorna chiusa E 30
31 PATT PDING PATT PDING PATT PDING PROBLEM PROBLEM PROBLÈME PROBLEMA PROBLEMA 3 AUSTAUSCH VON REPLACEMT OF THE REMPLACEMT DU SUSTUCION L SOSTUZIONE L Der Shock-Absorber dient gleichzeitig auch als Sollbruchstelle, um möglichere weitere, gravierende Schäden an der Markise zu verhindern. The dual shock-absorber functions as a damper, and if it should break, it avoids serious damages on the awning. Le dual shock-absorber a un rôle d amortisseur. La rupture éventuelle de cette pièce permettrait d eviter des dégats plus sérieux au store. El dual shock-absorber es un amortiguador; su eventual rotura permite evitar problemas más graves. Il dual shock-absorber ha la funzione di ammortizzatore; la sua eventuale rottura permette di evitare problemi più gravi al tendalino. Das Markisentuch komplett ausrollen Unroll the awning completely Dérouler entièrement le store avant d intervenir Antes que operar, abrir completamente el toldo Prima di operare, estendere completamente il tendalino PATT PDING PATT PDING 3 PATT PDING 31
32 GEBRAUCHSANWEISUNG UND RATSCHLÄGE Alle unsere Markisen werden auf höchsten Anspruch Made in Fiamma hergestellt. Zu unseren strengen Qualitätskontrollen, lassen wir unsere Artikel auch ständig von unabhängigen Instituten kontrollieren, um sich von der Reißfestigkeit, der Wasserdichte, der Farbfestigkeit und Widerstandsfähigkeit bei Umwelteinflüssen zu überzeugen. Und damit auch Sie sich auf lange Zeit über Ihre Markise, auch Jahre nach dem Erwerb, freuen können, bitten wir Sie die folgende, einfache Ratschläge zu beachten: ANLEUNG ZUR PFLEGE UND NSTANDHALTUNG IHRER MARKISE 1. Grundlagen zur Reinigung der Markise und des Vorzeltes Bitte verpacken Sie Ihre Markise nur wenn diese trocken und möglichst sauber ist. Feuchtigkeit kann Flecken verursachen. Bleibt Ihnen dennoch nichts anderes übrig, als die Markise feucht ëinzufahren, ist es sinnvoll, diese nach max. 12 Stundenauszufahren, um sie zu trocknen. Der meiste Schmutz ist oberflächlich und kann mit sauberem Wasser und einem Lappen oder einer Bürste beseitigt werden. Sollte das Tuch sehr schmutzig sein, fügen Sie ein mildes Reinigungsmittel hinzu. Bitte benützen Sie nie aggressive Chemikalien oder Hochdruckreinigungsgeräte. Dies sind unsere Vorschläge zur Reinigung von Spezialmaterialen. Wir empfehlen Ihnen, die Markise nicht unter 0 C benützen. 2. Zusätzliche Informationen für den Endverbraucher Die Markise Zip und das Privacy-Room Fiamma sind sorgfältig hergestellte Artikel. Dennoch ist es möglich, dass sich Besonderheiten der Materialien feststellen, welche als Unvollkommenheit angesehen werden könnten, die jedoch von den eigenen Materialien und den spezifischen Arbeitsprozessen abhängen. Diese Besonderheiten treten, trotz der Anwendung von fortgeschrittenen Maschinen und Techniken für Produktion und Konfektion, welche immer auf den neusten Stand sind, dennoch hin und wieder auf. 3. Folgende Eigenschaften sind keine Gründe zur Reklamation: Um eine absolute Dichte zu gewähren, werden die Stoffe mehrfach beschichtet und gewalzt. Während dieses Prozesses ist es möglich, dass sich einzelne Farbpigmente verschieben und somit Lichtpünktchen verursachen, welches nur Unregelmäßigkeiten des Stoffes, technisch leider unvermeidbar, sind. Die Wasserdichte wird jedoch in keinster Weise beeinträchtigt. Somit ist die Markise und die Seitenteile absolut hermetisch, auch an diesen Stellen. Bei der Bearbeitung des Materiales können sich Falten bilden, welche vor allem bei hellen Stoffen mit Gegenlicht dunkel wirken können. Auch helle Streifen (der sogenannte Weißbruch ) lassen sich mit/bei diesem Material nicht vermeiden. Die wetterbedingten Einflüsse können mit der Zeit eine Abänderung der Farbe verursachen. 32
33 GARANTIE FIAMMA 1. FIAMMA garantiert nur für Produkte, die innerhalb 24 Monate ab Kaufdatum durch den Endverbraucher reklamiert werden und durch Kaufbescheinigung nachgewiesen werden können. 2. FIAMMA erkennt die Garantie nur bei Schäden, verursacht durch Material- oder Produktionsfehlern an. 3. Garantie wird nicht gewährleistet bei betroffenen Teilen durch Abnutzung oder bei natürlicher Abnutzung durch den Gebrauch; bei Nichtberücksichtigung der Gebrauchsanweisung oder Anbringung, bei nichtgerechter Handhabung, bei Einsatz von Ersatzteilen die nicht Original FIAMMA sind, bei Eingriff einer nicht qualifizierten Person, bei eventueller Abänderung des Produktes durch den Endverbraucher oder Dritte ohne die Berechtigung durch Fiamma. 4. Für den Fall, das das Recht der Garantie berechtigt ist, sieht FIAMMA die Regelung des Schadens vor, es ist aber FIAMMA, die entscheidet, ob eine Reparatur oder ein Austausch der defekten Teile durchgeführt wird. 5. Bei Reklamationen bitte an den Händler wenden, bei welchem das Produkt erworben wurde. Dabei muss immer die Seriennummer des Produktes, die Rechnung oder der Kassenzettel (FIAMMA ist berechtigt eine Kopie anzufordern) und eine genaue Beschreibung des Schadens (Fotos sind hier die beste Lösung) anzugeben. Bei unvollständiger oder Falschangabe wird das Recht von Garantieanspruch von FIAMMA einbehalten. 6. FIAMMA ist berechtigt, sich das Produkt zur Überprüfung des Garantieanspruches jederzeit zuschicken zu lassen. Frachtkostenerstattung des schadhaften Produktes wir nur bei berechtigter Reklamation von FIAMMA getragen, zusätzlich zu der Entschädigung. Ist der Anspruch der Garantie nicht berechtigt, werden die Reparaturkosten bzw. eine Entschädigung des Produktes, mittels eines Kostenvoranschlages durch den Kunden selbst getragen. 33
34 MAINTANCE INSTRUCTIONS All our awnings are Made in Italy and manufactured following high standards. Apart from our strict quality controls, we also have our fabrics continuously controlled by independent institutes to ensure that the fabric is tear resistant, they can hold the weight of water, the colours don t fade and it is resistent against atmospheric agents. In order to enjoy your awning for a long time, even for many years after the purchase date, we ask you to take note of and follow the simple advices below: MAINTANCE INSTRUCTIONS FOR YOUR AWNINGS 1. Basic guideline to clean the fabric of the awning and the Privacy-Room Make sure that your awning is completely dry and clean before closing it. The remaining humidity could cause stains. If however you have no choice but closing the awning when it is still wet, make sure to open it for drying within 12 hours maximum. Most of the dirt is superficial and can be removed with clean water and a cloth or a brush. If the fabric is very dirty, add some light cleaning detergent. Be aware never to use any aggressive chemical substances and never to clean the fabric with a high pressure machine. We recommend not to use the awning at a temperature below 0 C. 2. Additional information for the consumer The awnings are made with precision, but some of the characteristics of the materials, which could be interpreted as defects, derive from the materials and from the specific work processes, and these characteristics occur even though Fiamma uses advanced and innovative production machines and techniques. 3. The following characteristics are not grounds for reclamation: To guarantee a perfect quality, the fabrics are waxed or laminated several times. During this operation, single coloured pigments could move and thus create small bright spots in the material, which are only irregularities that are technically inevitable to avoid, but do not influence the impermeability of the fabric. The awning and the walls are therefore completely hermetic, also in these spots. During the production of the material, small creases could form, which especially on bright fabric in backlight could seem dark. Bright stripes (the so called white crease) are inevitable with these materials. With time the influence of weather could cause change in colour. 34
35 WARRANTY FIAMMA 1. FIAMMA products have a guarantee of 24 months from the date the product is purchased by the final consumer. 2. The FIAMMA warranty covers claims for damages that are due to defective material or production failures. 3. The warranty is not valid under the following circumstances: natural wear of the product, if proper installation instructions have not been followed, in cases of negligence or improper use, if non original FIAMMA spare parts have been used, if the damage comes from transporting the product with improper packaging not authorised by FIAMMA, in the case of intervention by a non qualified person, or when the final user or anyone else has modified the product without the proper authorisation of FIAMMA. 4. If the claim is covered under warranty, FIAMMA reserves the right to decide whether to repair or replace the defective part(s). 5. The claim should be submitted to the supplier, from which the product was originally purchased. It is vital to always provide the following information: serial number of the product, proof of purchase (FIAMMA could ask for a copy) and a precise description of the damage (together with some digital photos to help substantiate the claim). In case of false or incomplete information, FIAMMA reserves the right to refuse the claim. 6. FIAMMA reserves the right to ask for return of the products in order to verify the warranty claim. The cost and risks/insurance of transportation is to be paid by the client. If the warranty request is then verified, FIAMMA will pay for the transport, i.e. cost of sending and returning the part, as well as costs for repairing/replacing the part. If the warranty claim is not accepted, the cost of repair and replacement of the part or product, as indicated beforehand by the client, will be paid by the client. 35
36 INSTRUCTIONS ET CONSEILS Tous nos stores sont fabriqués en Italie Made in Italy selon des standards de grande exigence. En plus de nos contrôles très sévères sur la qualité, nous faisons contrôler nos tissus régulièrement par des instituts indépendants afin de nous assurer de la bonne résistance aux déchirures, à la pression de l'eau, et pour garantir la tenue des couleurs aux différents facteurs atmosphériques. Pour pouvoir profiter de votre store durant de longues années, nous vous demandons de bien vouloir observer les simples règles suivantes : INSTRUCTIONS D'TRETI ET MANUTTION POUR VOTRE STORE: 1. Principes de base pour l'entretien du store Rangez votre store seulement s'il est sec et si possible propre. L'humidité restante peut provoquer des taches. Si vous êtes cependant obligé d'enrouler votre store encore humide, étendez-le ensuite pour le sécher dans les 12 heures qui suivent. La saleté est genéralement superficielle et peut être éliminée à l'eau propre à l'aide d'une éponge ou d'une brosse. Si le tissu est encore sale, ajoutez à l'eau un détergent délicat. N'utilisez jamais de substances chimiques agressives ni d'appareils à haute pression pour le nettoyage. Nous vous conseillons de ne pas utiliser le store au-dessous de 0 C. 2. Informations supplémentaires pour le consommateur Les stores ont été conçus avec grand de soin; vous pouvez toutefois rencontrer certaines particularités sur les matériaux qui pourraient être perçues comme des imperfections mais qui dépendent des matériaux-mêmes et des processus de fabrication ; ces particularités se vérifient parfois bien que Fiamma utilise des outils et des techniques de production et de confection avancées et innovatrices. 3. Les caractéristiques suivantes non sont pas sujettes à réclamation: Pour garantir une tenue absolue les tissus sont enduits et laminés plusieurs fois. Durant cette opération, des pigments colorés peuvent se déplacer créant dans les matériaux des petits points lumineux, qui sont de simples irrégularités des tissus techniquement inévitables et qui ne compromettent en rien l'imperméabilité du tissu. Le toit et les côtés sont donc absolument hermétiques, même en ces endroits. Durant le travail des matériaux, des plis peuvent se former qui, surtout sur les tissus clairs à contre jour, semblent sombres. Aussi, la formation de bandes claires (pli blanc) ne peut être évitée avec ces matériaux. Les conditions météorologiques peuvent provoquer dans le temps des modifications de couleurs. 36
37 GARANTIE FIAMMA 1. FIAMMA garantit ses produits pour une période de 24 mois à partir de la date d'achat effectué par le consommateur final. 2. Fiamma reconnaît la garantie pour des dommages dus à un défaut du matériel ou à une non-conformité de production. 3. Aucune garantie n'est acceptée pour les pièces sujettes à usure naturelle, au cas où le mode d'emploi et les instructions d'installation n'ont pas été respectès, pas été utilisé pour son usage initial ou s'il n'a pas été correctement entretenu. Si des pièces détachées autres que cettes de marque Fiamma, ont ètè utilisées si l'emballage ou le transport n'ont pas été conformes ou s'ils n'ont pas été autorisés par Fiamma, en cas d'intervention d'une personne non qualifiée, si l'utilisateur final ou que quelqu'un d'autre a apporté des modifications au produit sans l'autorisation de Fiamma. 4. Quand le recours en garantie peut effectivement être appliqué, Fiamma résoudra le problème: Fiamma décidera d'effectuer une réparation ou de remplacer la pièce défectueuse. 5. Pour effectuer une réclamation, veuillez vous adresser au revendeur où vous avez effectué votre achat. Vous devrez toujours indiquer le numéro de série du produit, la référence de la facture ou du ticket de caisse (Fiamma pourra vous en demander une copie) et une description précise du dommage (des photos numériques seraient la meilleure solution). En cas d'informations fausses et/ou incomplètes, Fiamma ne pourra pas appliquer les conditions de recours en garantie. 6. Fiamma peut demander le retour du produit pour vérifier la validité du recours en garantie. Les frais et les risques d'expédition sont à la charge du client. Si la demande d'application de garantie est retenue comme valide, Fiamma payera les frais de transport, c est à dire les coûts d'envoi et de restitution en plus des frais de la réparation des dommages. Dans le cas où la garantie ne pourrait être appliquée, les coûts de réparation et de restitution du produit, qui seront communiqués au client, seront à sa charge. 37
38 ADVERTCIAS Y SUGERCIAS Todos nuestros toldos son Made in Italy y fabricados según estandares muy exigentes. Trás de pasar nuestros severos controles de calidad, nuestras telas vienen controladas por institutos independientes para garantizar una lona completamente estanca a los desgarros, a la presión del agua, tienen colores duraderos, resistentes a la luz y al lavado. Para disfrutar por mucho tiempo de su toldo incluso por muchos años despues de la compra, Le rogamos seguir los siguientes simples consejos: INSTRUCCION PARA LA CURA Y EL MANTIMO LOS TOLDOS 1. Principios basilares para la limpieza de los toldos Por favor, cierre su toldo solo si está seco y posiblemente lindo. La humedad residual puede causar manchas. De todas formas si está obligado a empaquetar su toldo cuando está todavía humedo, después de 12 horas, tendría que tenderla para que se seque. La mayor parte de la suciedad es superficial y se puede eliminar con agua, un estropajo o un cepillo. Si la lona tuviese que ser demasiado sucia, añada un detersivo delicado al agua. Por favor, no use nunca sustancias químicas agresivas y no use nunca un aparato para la limpieza de alta presión. Se aconseja no utilizar los toldos bajo 0 C. 2. Informaciones adicionales para el consumidor. Fiamma produce todos los toldos con esmero, pero unas particularidades del material, que podrán ser interpredadas como imperfecciones, dipenden delos mismos materiales y de los procesos de producción aunque Fiamma use maquinarias y técnicas de producción avanzadas y siempre inovadivas. 3 Las siguientes características no son causa de reclamación: para garantizar un mantenimiento absoluto las telas vienen laminadas o untadas más veces. Durante esta operación los singulos pigmientos colorados pueden desplazarse y esto crea muy pequeños puntos luminosos, que son sólo irregularidades de los tejidos tecnicamente inevitables y que no comprometen la impermeabilidad de la lona. El techo y la paredes son absolutamente herméticos,también en estos puntos. Durante la confección de la lona pueden fomarse unas arrugas, que, sobretodo en los tejidos claros, al trasluz, parecen oscurarse. También las tiras claras (las denominadas tiras blancas) no se pueden evitar usando estos tejidos. A medida que pasa el tiempo los influjos meterélogicos pueden causar variaciones en los colores. 38
39 GARANTIA FIAMMA 1. FIAMMA garantiza los propios productos por un periodo de 24 meses a partir de la fecha de adquisición 2. FIAMMA reconoce la garantía por averías debidas a defectos de la lona o que no son en conformidad de producción. 3. No se reconoce garantía en caso de partes dañadas por desgaste y en caso de consunción natural debida al uso, en caso de negligencia o de utilización inadecuada, en caso de uso de recambios no originales Fiamma, a consecuencia de un embalaje por el transporte inadecuado o no autorizado por Fiamma, en caso de intervención de una persona no cualificada, en el caso de que los que efectivamente utilizan los productos aporten modificaciones sin la autorización Fiamma. 4. En el caso de que el producto resulte en garantía, Fiamma se preocupará de eliminar la avería, decidiendo si repararlo o sustituir la parte defectuosa. 5. Para la exhibición del reclamo, dirigirse al revendedor donde se ha comprado el producto. Se debe siempre indicar el número de serie del producto, la referencia de la factura o del ticket de caja (FIAMMA podrá pedir una copia) y una descripción precisa de la avería (lo mejor son las fotos digitales).en caso de informaciones falsas o incompletas FIAMMA no aplicará los derechos de garantía 6. FIAMMA puede pedir el regreso del producto para verificar la existencia de los derechos de garantía. Los gastos y los riesgos de la expedición son a cargo del cliente. Si la petición de aplicación de la garantía vendrá valutada válida, FIAMMA sostendrá los gastos de transporte, es decir los gastos de envío y de devolución, además de los gastos para la eliminación de la avería. En caso de no aplicabilidad de los derechos de garantía,el cliente tendrá que sostener los gastos de reparación y de devolución del producto. 39
40 AVVERTZE E SUGGERIMTI Tutti i nostri tendalini sono Made in Italy `e fabbricati secondo standard esigentissimi. Oltre ai nostri severi controlli della qualità, facciamo controllare i nostri tessuti continuamente da istituti indipendenti per accertarne la resistenza allo strappo, resistenza alla pressione dell'acqua, solidità dei colori e resistenza agli agenti atmosferici. Ed affinché anche Lei possa godere a lungo del Suo tendalino anche molti anni dopo l acquisto, La preghiamo di osservare i seguenti, semplici consigli: ISTRUZIONI PER LA CURA E LA MANUTZIONE I TDALINI 1. Principi basilari per la pulizia di tendalini e verande Per favore chiuda il Suo tendalino solo se è asciutto e possibilmente pulito. L'umidità residua può provocare macchie. Se comunque é costretto ad impacchettare il Suo tendalino ancora umido, dopo 12 ore al massimo dovrebbe stenderlo per farlo asciugare. La maggior parte dello sporco è superficiale e si può eliminare con acqua pulita ed un panno o una spazzola. Se il tessuto dovesse essere molto sporco, aggiunga un detersivo delicato all'acqua. Per favore non usi mai sostanze chimiche aggressive e non utilizzi mai un apparecchio per la pulizia ad alta pressione. Si consiglia di non utilizzare il tendalino ad una temperatura inferiore agli 0 C. 2. Informazioni supplementari per il consumatore I tendalini sono prodotti accuratamente, ma certe particolarità dei materiali, che potrebbero essere interpretare come imperfezioni, dipendono dai materiali stessi e dagli specifici processi di lavorazione, e si verificano nonostante il fatto che Fiamma utilizzi macchinari e tecniche di produzione e di confezione avanzate e sempre innovative. 3. Le seguenti caratteristiche non sono motivo di reclamo: Per garantire una tenuta assoluta, i tessuti vengono spalmati o laminati più volte. Durante questa operazione, singoli pigmenti colorati possono spostarsi e ciò crea nei materiali piccolissimi punti luminosi, che sono solo irregolarità dei tessuti tecnicamente inevitabili e che non compromettono minimamente l'impermeabilità del tessuto. Il tetto e le pareti sono quindi assolutamente ermetici, anche in questi punti. Nella lavorazione di materiali, possono formarsi pieghe, che specialmente con tessuti chiari in controluce sembrano scure. Anche strisce chiare (la cosiddetta piega bianca) non si possono evitare con questi materiali. Gli influssi metereologici possono nel tempo provocare cambiamenti di colore. 40
41 GARANZIA FIAMMA 1. FIAMMA garantisce i propri prodotti per un periodo di 24 mesi dalla data di acquisto da parte del consumatore finale. 2. FIAMMA riconosce la garanzia per guasti dovuti a difetti del materiale o non conformità di produzione. 3. Non si riconosce alcuna garanzia in caso di parti soggette a usura e in caso di logoramento naturale dovuto all'uso, a seguito dell'inosservanza delle istruzioni d'uso e installazione, in caso di negligenza o di utilizzo improprio, in caso di impiego di ricambi non originali FIAMMA, a seguito di un imballaggio per il trasporto improprio e non autorizzato da FIAMMA, in caso di intervento di una persona non qualificata, nell'eventualità in cui l'utilizzatore finale o chiunque altro abbiano apportato modifiche al prodotto senza la preventiva autorizzazione di FIAMMA. 4. Nel caso in cui siano applicabili i diritti di garanzia, FIAMMA provvederà all'eliminazione del guasto, ma potrà decidere se effettuare una riparazione o una sostituzione della parte difettosa. 5. Per la presentazione di un reclamo rivolgersi al rivenditore presso cui è stato acquistato il prodotto. Si dovrà sempre indicare il numero di serie del prodotto, il riferimento della fattura o dello scontrino fiscale (FIAMMA potrà richiederne una copia) e una descrizione precisa del guasto (alcune fotografie digitali sono la soluzione migliore). In caso di informazioni false o incomplete FIAMMA non riterrà valide le condizioni di applicabilità dei diritti di garanzia. 6. FIAMMA può richiedere il rientro del prodotto per verificare la sussistenza dei diritti di garanzia. Le spese e i rischi di spedizione sono a carico del cliente. Se la richiesta di applicazione della garanzia sarà ritenuta valida, FIAMMA sosterrà i costi di trasporto ovvero i costi di invio e di restituzione, oltre alle spese dovute all'eliminazione del guasto. In caso di non applicabilità dei diritti di garanzia, i costi di riparazione e di restituzione del prodotto, preventivamente segnalati al cliente, saranno a carico del cliente. 41
42 INFORMATION ZUM UMWELTSCHUTZ. INFORMATION ABOUT THE VIRONMTAL PROTECTION. CONSEILS POUR LA PROTECTION L VIRONNEMT. INFORMACION PARA LA PROTECCION L AMBE. CONSIGLI PER LA SALVAGUARDIA LL AMBE. TSORGUNG VON VERPACKUNGSMATERIALI Das Verpackungmaterial ist zu 100% wiederverwertbar. Werfen Sie das Verpackungsmaterial deshalb nicht einfacht fort, sondern entsorgen Sie es so, wie es die verantwortlichen Stellen vorschlagen. DISPOSAL OF PACKAGING MATERIALS The packaging material is 100% recyclable. Therefore packing materials should not be dissipated in the environment but disposed of as directed by local authorities. ÉLIMINATION D EMBALLAG Les matériaux d emballage sont entièrement recyclables. Ne les jetez donc jamais dans la nature mais conformez-vous aux réglementations locales en vigueur en matière d élimination des déchets. ELIMINACION L EMBALAJE El material de embalaje es reciclable al 100%. Las diferentes partes del embalaje no tienen que dispersarse en en el ambiente, sino tienen que ser eliminadas en conformidad con las normas establecidas por las autoridades locales. SMALTIMTO IMBALLAGGIO Il materiale di imballaggio è riciclabile al 100%. Le diverse parti dell imballaggio non devono quindi essere disperse nell ambiente, ma smaltite in conformità alle norme stabilite dalle autorità locali. 42


43 Im Rücksendungsfall bitte die Markise wie folgt verpacken: In case of goods return please take care that the awning is packed as follows: how to wrap the awning in case of returns: En cas de retour, veuillez svp emballer le store comme indiqué ci-dessous: Como embalar un toldo en caso de devolución: Come imballare il tendalino in caso di reso:
44 ERSATZTEIL SPARE PARTS PIEC TACHE RECAMBIOS RICAMBI 03797B01A R P P P P P P P P P P P P450 BLUE OCEAN LUXE GREY AZZURRA SUNSET TURQUOISE OCEAN PLATINUM 03158B01N 03158B01T 03158B01Q 03158L01N 03158C01N 03158D01N 03158I01N 03158L01T 03158C01T 03158D01T 03158I01T 03158L01Q 03158C01Q 03158D01Q 03158I01Q 03158B01C 03158L01C 03158B01L C01C 03158D01C 03158I01C 03158L01L 03158C01L 03158D01L 03158I01L B01A 03158B01B L01A 03158L01B C01A 03158C01B D01A 03158D01B I01A 03158I01B 01828P01T 01828P01N 01828P01Q P01A 01828P01B 01828P01L 01828P01C L A A K R (400) (450) A R K A01A } 05577F01A L A A A F01- } A A G R K K A L R G K A L K K A L R POLAR WHE P P P P P P L } } 05577A A
45 ERSATZTEIL SPARE PARTS PIEC TACHE RECAMBIOS RICAMBI T 03797B01T R A B C G A01A A A01B A01C A01G A450 BLUE OCEAN LUXE GREY AZZURRA SUNSET TURQUOISE OCEAN PLATINUM 03158B01N 03158B01T 03158L01T 03158B01Q 03158L01N 03158C01N 03158D01N 03158I01N T 03158C01T 03158D01T 03158I01T 01828P01T 01828P01N 03158L01Q 03158C01Q 03158D01Q 03158I01Q 03158B01C 03158L01C 03158B01L 03158C01C 03158D01C 03158I01C 03158L01L 03158C01L 03158D01L 03158I01L B01A 03158B01B L01A 03158L01B C01A 03158C01B D01A 03158D01B I01A 03158I01B 01828P01Q P01A 01828P01B 01828P01L 01828P01C 05527A01T L A A K R (400) (450) A R K A01A } 05577F01A L T A A A F01- } A T G R K K A L R G 05484A01T K } 05577A A L K K A L R TANIUM A A A01A A01B A01C A L } T 45


46 OPTIONAL MOTOR K 12V 12Vdc 46
VW CRAFTER MERCEDES SPRINTER High Roof VERSION U.K. 98655-746 KIT 98655-889 KIT
 fiamma.com 98655-746 K VW RFTR MR SPRINTR igh Roof 98655-889 K VRSIN U.K. für die alterungen for brackets pattes Instrucciones de instalacion de los estribos staffe Fiamma F65 Fiamma F65 fiamma.com für
08/12. Gebrauchsanleitung Trekkingrucksäcke Trekking rucksacks Instructions for use Notice d'emploi pour sacs à dos de trek
 08/12 Gebrauchsanleitung Trekkingrucksäcke Trekking rucksacks Instructions for use Notice d'emploi pour sacs à dos de trek X-TRANSITION Bedingungen der JACK WOLFSKIN 3-Jahres-Gewährleistung Terms and
 Verwenden Sie nur Original-KRONE-Ersatzteile! Das gibt Sicherheit und spart Kosten! Use Original-KRONE parts only This will increase operational reliability and help to save costs! N'utiliser que des piéces
 Verwenden Sie nur Original-KRONE-Ersatzteile! Das gibt Sicherheit und spart Kosten! Use Original-KRONE parts only This will increase operational reliability and help to save costs! N'utiliser que des piéces
 Verwenden Sie nur Original-KRONE-Ersatzteile! Das gibt Sicherheit und spart Kosten! Use Original-KRONE parts only This will increase operational reliability and help to save costs! N'utiliser que des piéces
 Verwenden Sie nur Original-KRONE-Ersatzteile! Das gibt Sicherheit und spart Kosten! Use Original-KRONE parts only This will increase operational reliability and help to save costs! N'utiliser que des piéces
MARKISEN AWNINGS STORES TOLDOS TENDALINI
 Montage und Gebrauchsanleitung Installation and uses instructions Instructions de montage et mode d emploi Instrucciones de montaje y uso Istruzioni di montaggio e d uso MARKIS AWNINGS STOR TOLDOS TDALINI
SHIMMER mensole e consolle
 SHIMMER mensole e consolle DESIGN PATRICIA URQUIOLA Istruzioni di montaggio ed utilizzo Assembling and use instruction SHIMMER mensole e consolle DESIGN PATRICIA URQUIOLA SHI05/SHI06 Accessori / Tools
2 IP X4 WLS/FL IP24. Montage-Anleitung Instructions de montage Assembling instructions. 225 cm. 60 cm 0
 WLS/FL IP Arbeiten an den elektrischen Anlagen dürfen nur von autorisierten Fachleuten nach den örtlichen Vorschriften ausgeführt werden. Für nicht fachgerechte Installation wird jegliche Haftung abgelehnt.
POLAR WHITE TITANIUM ZIP. Montage und Gebrauchsanleitung Installation and use instructions Instructions de montage et mode d emploi.
 fiamma.com Markisen Awnings Stores Montage und Gebrauchsanleitung Installation and use instructions Instructions de montage et mode d emploi Toldos Instrucciones de montaje y uso Tendalini Istruzioni di
1,2-1,8 TON TWIST 100 TWIST 100
 1,2-1,8 TWIST 100 L attuatore idraulico bi-direzionale Cangini permette di inclinare attrezzature o attacchi rapidi fino ad un angolazione di, facilitando le operazioni di scavo, anche in posizioni difficili
IMPORTANT / IMPORTANT:
 Replacement of the old version 2.50. Procedure of installation and facility updates. New presentation. Remplacer l ancienne version 2.50. Procédure d installation et de mise à jour facilitée. Nouvelle
VW T5 MULTIVAN VW T5 CALIFORNIA
 fiamma.com Markisen Awnings Stores Montage und Gebrauchsanleitung Installation and use instructions Instructions de montage et mode d emploi Toldos y uso Tendalini Istruzioni di montaggio e uso VW T5 MULTIVAN
11 EN 81-70 Page 1 of 2 Standard: INTERPRETATION RELATED TO. Clause(s): 5.4.2.3
: 5.4.2.3") CEN RELATED TO 11 Page 1 of 2 Standard: Edition: 2003 Clause(s): 5.4.2.3 Valid from: 15/09/2010 Date of modification: Key-word(s): Car operating panel, Two entrance lift Replacing interpretation No.: QUESTION
CEN RELATED TO 11 Page 1 of 2 Standard: Edition: 2003 Clause(s): 5.4.2.3 Valid from: 15/09/2010 Date of modification: Key-word(s): Car operating panel, Two entrance lift Replacing interpretation No.: QUESTION
NEU! PCS 950 win. Der Nachfolger des bewährten Eingabegeräts PCS 950
 NEU! PCS 950 win Der Nachfolger des bewährten Eingabegeräts PCS 950 Das PCS 950 hat viele Jahre lang hervorragende Dienste bei der Herstellung vielseitigster Gitterprodukte geleistet. Ein technisch aufbereitetes
GROUND ZERO. PLUTONIUM- Series GZPC Mobile Entertainment. Power Cap with Digital Voltmeter. Power Cap avec voltmètre nummérique
 GROUND ZERO Mobile Entertainment Power Cap with Digital Voltmeter Power Cap avec voltmètre nummérique PLUTONIUM- Series GZPC 1500 2 GROUND ZERO Mobile Entertainment Achtung/ Warning/ Attention! Wenn Sie
2 IP X4 TAI/LED IP44, CH IP24. Montage-Anleitung Instructions de montage Assembling instructions. 225 cm. 60 cm 0
 Montage-Anleitung Instructions de montage Assembling instructions TAI/LED IP, CH IP Sensor-Schalter aussen unten rechts Interrupteur sensitif en bas à l'extérieur à droite Sensor switch outside right below
Magische weiße Karten
 Magische weiße Karten Bedienungsanleitung Ein Stapel gewöhnlicher Karten wird aufgedeckt, um die Rückseite und die Vorderseite zu zeigen. Wenn eine Karte ausgewählt wurde, ist der Magier in der Lage, alle
Sage 30 (Winway Z) Update-Installationsanleitung Installation de l update Installazione per l update
 Update-Installationsanleitung Installation de l update Installazione per l update") Sage 30 (Winway Z) Update-Installationsanleitung Installation de l update Installazione per l update Betriebswirtschaftliche Gesamtlösungen für Selbständige und kleine Unternehmen Logiciels de gestion
Sage 30 (Winway Z) Update-Installationsanleitung Installation de l update Installazione per l update Betriebswirtschaftliche Gesamtlösungen für Selbständige und kleine Unternehmen Logiciels de gestion
D: MONTAGEANLEITUNG DER SPEICHER-VERKLEIDUNG KERAMIK GB: INSTRUCTION SHEET OF THE THERMAL SAFETY COVER CERAMIC
 D: MONTAGEANLEITUNG DER SPEICHER-VERKLEIDUNG KERAMIK GB: INSTRUCTION SHEET OF THE THERMAL SAFETY COVER CERAMIC F : NOTICE DE MONTAGE DES PROTECTIONS THERMIQUES CÉRAMIQUE Hinweis: Notice: Wir empfehlen
Anleitung für FTP-Zugriff auf Apostroph Group
 Anleitung für FTP-Zugriff auf Apostroph Group 1. Den Microsoft Windows-Explorer (NICHT Internet-Explorer) starten 2. In der Adresse -Zeile die Adresse ftp://ftp.apostroph.ch eingeben und Enter drücken:
 Disc Repair Pro II Bediienungsanlleiitung Sehr geehrter Kunde, Sehr geehrte Kundin, wir danken Ihnen für den Kauf dieses Produktes. Sie haben ein Produkt erworben, das entwickelt wurde, um den höchsten
Istruzioni di regolazione e montaggio Easy 3D-S. Montage und Verstellanleitung Easy 3D-S. Instructions de montage et de réglage Easy 3D-S
 Istruzioni di regolazione e montaggio Montage und Verstellanleitung Instructions de montage et de réglage SASSBA 67,6 Schemi di foratura per anta Effettuare la foratura o manualmente con dima o con CNC.
p^db=`oj===pìééçêíáåñçêã~íáçå=
 p^db=`oj===pìééçêíáåñçêã~íáçå= Error: "Could not connect to the SQL Server Instance" or "Failed to open a connection to the database." When you attempt to launch ACT! by Sage or ACT by Sage Premium for
POLAR WHITE TITANIUM ZIP. Montage und Gebrauchsanleitung Installation and usage instructions Instructions de montage et mode d emploi.
 fiamma.com Markisen Awnings Stores Montage und Gebrauchsanleitung Installation and usage instructions Instructions de montage et mode d emploi Toldos Instrucciones de montaje y uso Tendalini Istruzioni
Components RWS. Bedienungsanleitung User Manual Mode d emploi V
 Components RWS Bedienungsanleitung User Manual Mode d emploi V2016.03 Inhaltsverzeichnis / Table of Content / Table de Matiéres Deutsch......................................... 1 English..........................................
Pressespiegel. für die. INSM Initiative Neue Soziale Marktwirtschaft GmbH
 Pressespiegel für die INSM Initiative Neue Soziale Marktwirtschaft GmbH 12. Februar 2014 Inhaltsverzeichnis Print 1 Der Kampf geht weiter [Neue Energie - 10.02.2014] 3 Social Media 2 Thx @jottes f.tip
IP X4 MOA/SL/FL IP44, CH IP24. Montage-Anleitung Instructions de montage Assembling instructions. 225 cm. 60 cm 0
 MOA/SL/FL IP44, CH IP4 Arbeiten an den elektrischen Anlagen dürfen nur von autorisierten Fachleuten nach den örtlichen Vorschriften ausgeführt werden. Für nicht fachgerechte Installation wird jegliche
Nr. 12 March März Mars 2011
 Nr. 12 March März Mars 2011 Sound Edition Benz Patent Motor Car 1886 - Limited edition Highly detailed precision model of the first Benz automobile, in an elegant Mercedes- Benz Museum gift box and limited
Uhrenbeweger Watch winders. Crystal
 Uhrenbeweger Watch winders Crystal Sehr geehrter Kunde, unsere Uhrenbeweger sind so konstruiert, dass sie trotz kompakter Abmessungen nur geringe Laufgeräusche verursachen. Jeder Antrieb erzeugt jedoch
Installation manual / Montageanleitung WBC2 splice patch with Fibertray Spleissung/Rangierung mit Fibertray
 Content of Assembly Instruction I. Required tools II. Required parts III. Installation Inhalt der Montageanleitung I. Benötigte Werkzeuge II. Benötigte Teile III. Installation I. Required tools: I. Benötigtes
Analogtechnik 2, Semestertest Technique analogique 2, Test de semestre
 Analogtechnik 2, Semestertest Technique analogique 2, Dr. Theo Kluter 05. 06. 2011 Name/Nom : Vorname/Prénom : Klasse/Classe : Aufgabe/ Punkte maximal/ Punkte erreicht/ Problème : Points maximaux : Points
CABLE TESTER. Manual DN-14003
 CABLE TESTER Manual DN-14003 Note: Please read and learn safety instructions before use or maintain the equipment This cable tester can t test any electrified product. 9V reduplicated battery is used in
MIT UNS KÖNNEN SIE FESTE FEIERN! AVEC NOUS, VOUS POUVEZ ORGANISER VOS FÊTES!
 MIT UNS KÖNNEN SIE FESTE FEIERN! AVEC NOUS, VOUS POUVEZ ORGANISER VOS FÊTES! Das beste Schweizer Grill-Poulet! Le meilleur poulet rôti Suisse! FESTE FEIERN MIT NATURA GÜGGELI UND SIE HEBEN SICH AB! FÊTEZ
AUFBAUANLEITUNG ASSEMBLY INSTRUCTIONS
 MORELL AUFBAUANLEITUNG ASSEMBLY INSTRUCTIONS D/AT/CH SEHR GEEHRTE DAMEN UND HERREN, Wir freuen uns, dass Sie sich für ein Qualitätsprodukt der Naturmatratzen- und Betten-Manufaktur dormiente entschieden
USB -> Seriell Adapterkabel Benutzerhandbuch
 USB -> Seriell Adapterkabel Benutzerhandbuch 1. Produkt Eigenschaften 1 2. System Vorraussetzungen 1 3. Treiber Installation (Alle Windows Systeme) 1 4. Den COM Port ändern 2 5. Einstellen eines RS232
Dosenadapter Can Adapter Adaptateur pour boites EBI DA
 Dosenadapter Can Adapter Adaptateur pour boites EBI DA EBI DA Deutsch Vorwort Dieser Dosenadapter kann für Dosen jeglicher Art eingesetzt werden. Er adaptiert einen EBI-Logger so an die Dose, dass die
MARKISEN AWNINGS STORES TOLDOS TENDALINI
 Montage und Gebrauchsanleitung Installation and use instructions Instructions de montage et mode d emploi Instrucciones de montaje y uso Istruzioni di montaggio e d uso MARKIS AWNINGS STOR TOLDOS TDALINI
VGM. VGM information. HAMBURG SÜD VGM WEB PORTAL - USER GUIDE June 2016
 Overview The Hamburg Süd VGM-Portal is an application which enables to submit VGM information directly to Hamburg Süd via our e-portal web page. You can choose to insert VGM information directly, or download
Bedienungsanleitung User Manual. System AED Plus
 Bedienungsanleitung User Manual System AED Plus INHALTSVERZEICHNIS TABLE OF CONTENTS Einleitung Sicherheitshinweise Verwendungszweck... 3 Lieferumfang Technische Daten Zubehör.... 4 Montage. 5 Bedienung
Network premium POP UP Display
 Premium Pop Up System seamless graphic precision very compact and versatile pop-up system quick to set up at any location comes in a number of different shapes; straight, curved, wave-shaped, stair formations,
Magisches Ufo Bedienungsanleitung
 Magisches Ufo Bedienungsanleitung Trick 1: Einmal ein magisches Schütteln und ein Zahnstocher springt von einem Loch zum anderen direkt vor Ihren Augen! Das Geheimnis: Auf den beiden Seiten ist jeweils
Electronic components within the VLT are susceptible to Electrostatic Discharge
 VLT Instruction LCP Remote kit VLT 5000 Series and VLT 6000 HVAC Compact IP 54 Drives and Controls Montering, Mounting, Montage, Installation VLT 5001-5006, 200/240 V, VLT 5001-5011, 380/500 V VLT 6002-6005,
Schraube DIN 84, screw DIN 84, vis DIN 84 Konus, cone, cône Kabel, cable, cable. Klemmblech, clamping plate, bride de serrage
 VDE Nr. 4940-900-a wf VDE Nr. 4940-900-a DBP 867 Zugentlastende klemme D Die preiswerteste und sicherste Kabeldurchführung der Welt The most reasonable and safest cable entry in the world L entrée de câble
L Montageanleitung Assembly instructions Instruction de montage EASYHOMESYSTEM TH-EHS. Änderungen vorbehalten Alle Rechte vorbehalten
 L-09-1-50 Montageanleitung Assembly instructions Instruction de montage EASYHOMESYSTEM TH-EHS Änderungen vorbehalten Alle Rechte vorbehalten Komponenten / Components / Composants / Componenti PGD Touch
www.okw.com assembly instruction instruction de montage
 www.okw.com assembly instruction instruction de montage MONTAGEANLEITUNG datec-control M/L GEHÄUSE / ENCLOSURE / BOÎTIER Seite / page Best.-Nr./Part-No./Réf. M L DATEC-CONTROL M/L 4 A 90 78 107 A 90 79
Der Adapter Z250I / Z270I lässt sich auf folgenden Betriebssystemen installieren:
 Installationshinweise Z250I / Z270I Adapter IR USB Installation hints Z250I / Z270I Adapter IR USB 06/07 (Laden Sie den Treiber vom WEB, entpacken Sie ihn in ein leeres Verzeichnis und geben Sie dieses
VLT REAL TIME CLOCK OPTION. VLT Series Bookstyle... page 2. Compact IP page 6. Compact IP page 16. Instruction
 VLT Instruction Drives and Controls REAL TIME CLOCK OPTION VLT Series 6000 Montering, Mounting, Montage, Installation Bookstyle... page 2 Compact IP 20... page 6 Compact IP 54... page 16 Advarsel! Real
Hazards and measures against hazards by implementation of safe pneumatic circuits
 Application of EN ISO 13849-1 in electro-pneumatic control systems Hazards and measures against hazards by implementation of safe pneumatic circuits These examples of switching circuits are offered free
BD Bedienungsanleitung Bohrerschleifgerät Modell 313 / 314. Mode d'emploi Affûteurs de mèches Modèles 313 / 314
 BD351 2012 05 Bedienungsanleitung Bohrerschleifgerät Modell Mode d'emploi Affûteurs de mèches Modèles Maschinenbeschrieb Spannzangen- und Bohrerhalter Spannzangenfach Aufnahme für Zentrumschliff des Bohrers
TECHNISCHE FICHE CONTACT CONTACTOR
 TECHNISCHE FICHE CONTACT CONTACTOR 02-01-02-00 voorbeeld gegevens klant: Type machine:... Serie nr. machine:... prijsaanvraag bestelling CODE: AT-CT x D1 x L1 x L2 x AT-TI x AT-PL x AT-GA x TA x D2 x B
PRO SCAN WASSERANALYSE PER SMARTPHONE WATER ANALYSIS BY SMARTPHONE ANALYSE DE L EAU PAR SMARTPHONE
 N02 WASSERANALYSE PER SMARTPHONE WATER ANALYSIS BY SMARTPHONE ANALYSE DE L EAU PAR SMARTPHONE NO 2 NO 3 ph Cl 2 CO 2 ANALYSE DIAGNOSE LÖSUNG ANALYSIS DIAGNOSIS SOLUTION THE NEW GENERATION ph KH GH N03
F B. Scheda montaggio
 Chat double L F B NO Fig. 1 Fig. 2 OK Fig. 3 n - Togliere la struttura dall imballo e capovolgerla come in fig.1. Montare i 4 inserti L fissando le viti M8 (fig.4-5) facendo molta attenzione al senso di
Honeywell AG Hardhofweg. D-74821 Mosbach MU1H-1220GE23 R1001
 BA 95 Einbau-Anleitung Installation Instructions Einbau Installation Einbaubeispiel Installation example Ablaufleitung vorsehen Install discharge pipework Durchflussrichtung beachten! Consider direction
SEPA-Firmenlastschrift-Mandat SEPA Business-to-Business Direct Debit Mandate Mandat de domiciliation européenne SEPA B2B
 Ausfertigung für Execution for Copie pour SEPA-Firmenlastschrift-Mandat SEPA Business-to-Business Direct Debit Mandate Mandat de domiciliation européenne SEPA B2B Page 1/2 Wiederkehrende Zahlungen Recurrent
p^db=`oj===pìééçêíáåñçêã~íáçå=
 p^db=`oj===pìééçêíáåñçêã~íáçå= How to Disable User Account Control (UAC) in Windows Vista You are attempting to install or uninstall ACT! when Windows does not allow you access to needed files or folders.
Infoblatt: Hochschulsport
 ***Scroll down for the English version*** Infoblatt: Hochschulsport Den Internetauftritt des Hochschulsports finden Sie unter www.sport.uni-bonn.de. Alle Termine des Semesters finden Sie im Kasten rechts,
Ingenics Project Portal
 Version: 00; Status: E Seite: 1/6 This document is drawn to show the functions of the project portal developed by Ingenics AG. To use the portal enter the following URL in your Browser: https://projectportal.ingenics.de
https://portal.microsoftonline.com
 Sie haben nun Office über Office365 bezogen. Ihr Account wird in Kürze in dem Office365 Portal angelegt. Anschließend können Sie, wie unten beschrieben, die Software beziehen. Congratulations, you have
Art / 6954 / 8000 piano vetro allungabile extension glass top ausziehbare glasplatte
 ISTRUZIONI DI MONTAGGIO Assembling instructions Montageanleitung Art. 6951 / 6954 / 8000 piano vetro allungabile extension glass top ausziehbare glasplatte Articolo/Item/Artikel 6951 Articolo/Item/Artikel
TravelKid. TravelKid. Packaging Batman. 3616301912 Photos non contractuelles.
 Packaging Batman TM TM TM TM TM TravelKid TravelKid TravelKid Siège auto groupe 0/1 pour les enfants de 0 a 18 Kg de la naissance à 4 ans. Ce siège auto est un dispositif de retenue pour enfants de la
Jeep Wrangler (2007>) Solo per elettrificazione degli alzacristalli manuali / Only for replacement of manual window regulators
 Solo per elettrificazione degli alzacristalli manuali / Only for replacement of manual window regulators") Power Windows Leve-glace Electrique Elektrische Fensterheber Elevalunas Electricos Dê Poder a Janelas Alzacristalli Elettrici 2 doors, front doors (4d) - 2 portes, portes avant (4p) - 2 türen, vordere
Power Windows Leve-glace Electrique Elektrische Fensterheber Elevalunas Electricos Dê Poder a Janelas Alzacristalli Elettrici 2 doors, front doors (4d) - 2 portes, portes avant (4p) - 2 türen, vordere
S-Digicash Payez mobile depuis votre compte courant! Mobil bezahlen, direkt von Ihrem Girokonto aus! Pay mobile from your current account!
 S-Digicash Payez mobile depuis votre compte courant! Mobil bezahlen, direkt von Ihrem Girokonto aus! Pay mobile from your current account! Payez mobile depuis votre compte courant BCEE! Scannez le QR Code
MARKISEN - AWNINGS - STORES - VERANDE
 PATENT PENNG UAL SHOCK-ABSORBER fp : xxxxxx A00 60 S/N : 000000 XXXXXX Montageanleitung nstallation instructions nstructions de ontage struzioni di ontaggio UAL SHOCK-ABSORBER PATENT PENNG MARKSEN - AWNNGS
KURZANLEITUNG. Firmware-Upgrade: Wie geht das eigentlich?
 KURZANLEITUNG Firmware-Upgrade: Wie geht das eigentlich? Die Firmware ist eine Software, die auf der IP-Kamera installiert ist und alle Funktionen des Gerätes steuert. Nach dem Firmware-Update stehen Ihnen
Aufgabe: Que faut-il faire? SK-Beispielaufgabe_Haustiere.docx
 Aufgabe: Que faut-il faire? SK-Beispielaufgabe_Haustiere.docx Lisez bien le sujet avant de vous précipiter sur votre copie et élaborez votre plan afin de préparer votre brouillon. On vous demande donc
NETWORK PREMIUM POP UP DISPLAY
 Premium Pop Up System seamless graphic precision very compact and versatile pop-up system quick to set up at any location comes in a number of different shapes; straight, curved, wave-shaped, stair formations,
HPS.04.696.10000/B Revision: 01. Hauptständer KTM 990 SM-T / SM-R '09 Center Stand KTM 990 SM-T / SM-R '09
 Hauptständer KTM 0 SM-T / SM-R '0 Center Stand KTM 0 SM-T / SM-R '0 Montagehinweise Revision: 01 Mounting Instruction Achtung: Die Kurven- und Bodenfreiheit kann durch einen Hauptständer eingeschränkt
Montageanleitung Racing Lenkerstummelsatz
 Montageanleitung Racing Lenkerstummelsatz Bei Verwendung der Racing Lenkerstummel muss erst ein Loch (Bild 2) zur Befestigung der Armaturen gebohrt werden. Durchmesser = 3,5 mm / Abstand vom Lenkerende
1_Togliere il. 2_Mettere le lampadine. Put the bulbs. 3_Mettere il vetro e riporre
 _Togliere il lamierino. Take off the metal tab. _Mettere le lampadine. Put the bulbs. _Mettere il vetro e riporre lamierino. Put the glass and the metal tab. 5_Fissare staffa e fare cablare. Secure the
RS232-Verbindung, RXU10 Herstellen einer RS232-Verbindung zwischen PC und Messgerät oder Modem und Messgerät
 Betriebsanleitung RS232-Verbindung, RXU10 Herstellen einer RS232-Verbindung zwischen PC und Messgerät oder Modem und Messgerät ä 2 Operating Instructions RS232 Connection, RXU10 Setting up an RS232 connection
SWISS MADE CORPORATE WATCHES E-CATALOGUE 2010. Version 2.1
 CORPORATE WATCHES E-CATALOGUE 2010 Version 2.1 ITS TIME ist eine Schweizer Uhrenfirma aus Grenchen, die sich auf «Corporate Watches«spezialisiert hat. «Swiss Made», versteht sich. Inzwischen sind wir Marktleader
TESTA RADIALE CON AZIONAMENTO MECCANICO A CARRELLO SINGOLO
 TESTA RADIALE R GENERAL INFORMATION TESTA RADIALE CON AZIONAMENTO MECCANICO A CARRELLO SINGOLO I Tipo: Testa radiale per recessi Applicazione: La testa radiale è utilizzata su macchine transfer nelle lavorazioni
UFX-31.IR. Deutsch: 4-12 Français: 13-22
 UFX-31.IR IR-Fernbedienung für iphone/ipad/ipod Dongle télécommande pour iphone/ipad/ipod Deutsch: 4-12 Français: 13-22 11/2011 - LG//TH//SS - GS Ihre neue IR-Fernbedienung Sehr geehrte Kundin, sehr geehrter
1. UPS FIRMWARE UPGRADE. Step 1. Step 2. Eaton /6000
 Page 2 1. UPS FIRMWARE UPGRADE Step 1 Eaton 9135 5000/6000 Connect the RS232 cable to the UPS and serial port of the computer. Brancher le câble RS232 sur l ASI et sur le port série de l ordinateur. Schließen
MARDERSCHUTZ SENSOR 737
 Bedienungsanweisung Mode d'emploi EN Bedienungsanweisung User manual ZUERICH FR HJH TRAING AG Bedienungsanweisung Bedienungsanleitung SWISS MAE E1 10R-04 6887 672056 MARERSCHUTZ VERSION 4.2 ÄNERUNGEN VORBEHALTEN
à traction latérale Trägermontage Montage du support Anzeichnen Traçage nabstand mind. 100 mm 1/2 Bestellbreite (1/2 Gesamtbreite) 1/2 Bestellbreite -
 1/2 Bestellbreite -") MONTAGE- UND BEDIENANLEITUNG Notice de montage et d' utilisation Rollo BIG Seitenzug-Rollo und Elektro-Rollo 230 V manoeuvre latérale et enrouleur électrique 230 V Modell mit Trägermontage Modèle avec
MONTAGE- UND BEDIENANLEITUNG Notice de montage et d' utilisation Rollo BIG Seitenzug-Rollo und Elektro-Rollo 230 V manoeuvre latérale et enrouleur électrique 230 V Modell mit Trägermontage Modèle avec
Bedienungsanleitung Instruction Manual K 106/1 & 2
 Auf dem Knapp 46 Tel.: ++49 (0)2191/907-0 D-42855 Remscheid Fax: ++49 (0)2191/907-141 Bedienungsanleitung Instruction Manual K 106/1 & 2 WE.3347_C Version 1.c 7/01 Auf dem Knapp 46 Tel.: ++49 (0)2191/907-0
Kurzanleitung Ersatzgerät Guide succinct de l appareil de remplacement Breve guida all dispositivo di sostituzione
 Kurzanleitung Ersatzgerät Guide succinct de l appareil de remplacement Breve guida all dispositivo di sostituzione Das Ersatzgerät kann als zweites Gerät für die Nutzung des E-Bankings eingesetzt werden
BT 4. Bügelschellen U-bolt clamps Collier arceau
 Bügelschellen U-bolt clamps Collier arceau BT 4 BT 4.1. Rundstahlbügelschellen ähnlich DIN 3570 BT 4.1. U-bolt clamps similar to DIN 3570 BT 4.1. Collier arceau semblable à DIN 3570 BT 4.2. Flachstahlbügelschellen
ReadMe zur Installation der BRICKware for Windows, Version 6.1.2. ReadMe on Installing BRICKware for Windows, Version 6.1.2
 ReadMe zur Installation der BRICKware for Windows, Version 6.1.2 Seiten 2-4 ReadMe on Installing BRICKware for Windows, Version 6.1.2 Pages 5/6 BRICKware for Windows ReadMe 1 1 BRICKware for Windows, Version
Hama GmbH & Co KG D-86651 Monheim/Germany www.hama.com
 Hama GmbH & Co KG D-86651 Monheim/Germany www.hama.com d Bedienungsanleitung 2 4. Funktionserläuterung 10 11 7 1 5 2 4 3 6 9 8 Presenter Modus Media Player Modus 1 Seite vor Vorherige Media-Datei in der
BEDIENUNGSANLEITUNG Internes 5.25'' Multi Panel 6 in 1 Card Reader mit USB Hub USB 2 Port Port + Audio
 BEDIENUNGSANLEITUNG Internes 5.25'' Multi Panel 6 in 1 Card Reader mit USB Hub USB 2 Port + 1394 1 Port + Audio Kapitel 1 Installation Hardware: Anschlüsse: 1. IEEE 1394 2. USB 1.1 (2Ports) 3. Karteneinschub
Zuladung: max. 100kg Load rating: 100kg
 Montageanleitung zum Vollauszugbeschlag Dispensa-VVS für feste und höhenverstellbare Tragrahmen Art.-Nr.: 04235 mit Schnellmontagetechnik Mounting instructions for full-extension top- and bottom runner
Installation. Memory Card Retainer for PanelView Terminals. Fixation de carte mémoire pour terminaux PanelView
 Installation Memory Card Retainer for PanelView Terminals English....................................... Page 2 Fixation de carte mémoire pour terminaux PanelView Français.......................................
Cameraserver mini. commissioning. Ihre Vision ist unsere Aufgabe
 Cameraserver mini commissioning Page 1 Cameraserver - commissioning Contents 1. Plug IN... 3 2. Turn ON... 3 3. Network configuration... 4 4. Client-Installation... 6 4.1 Desktop Client... 6 4.2 Silverlight
NEWSLETTER. FileDirector Version 2.5 Novelties. Filing system designer. Filing system in WinClient
 Filing system designer FileDirector Version 2.5 Novelties FileDirector offers an easy way to design the filing system in WinClient. The filing system provides an Explorer-like structure in WinClient. The
Exercise (Part II) Anastasia Mochalova, Lehrstuhl für ABWL und Wirtschaftsinformatik, Kath. Universität Eichstätt-Ingolstadt 1
 Anastasia Mochalova, Lehrstuhl für ABWL und Wirtschaftsinformatik, Kath. Universität Eichstätt-Ingolstadt 1") Exercise (Part II) Notes: The exercise is based on Microsoft Dynamics CRM Online. For all screenshots: Copyright Microsoft Corporation. The sign ## is you personal number to be used in all exercises. All
Exercise (Part II) Notes: The exercise is based on Microsoft Dynamics CRM Online. For all screenshots: Copyright Microsoft Corporation. The sign ## is you personal number to be used in all exercises. All
Hinweisblatt indication sheet
 Seite page 1 von of 7 Hinweisblatt indication sheet Typ: / type: Leuchtstoffleuchten (z.b.: 50010400, 53500100) Kurzbezeichnung: Lampenwechsel bei Leuchtstoffleuchten short term: exchange of fluorescent
Liebe Kolleginnen Liebe Kollegen
 Von: nebis-bibliotheken-request@nebis.ch im Auftrag von Gross Christine An: nebis-bibliotheken@nebis.ch Thema: NEBIS / Aleph V20: Neuerungen - Aleph V20: nouveautés Datum: Montag, 8. November 2010 15:57:57
UNIVERSAL REGENDUSCHE
 UNIVERSAL REGENDUSCHE D MONTAGEANLEITUNG GB ASSEMBLY INSTRUCTIONS F INSTRUCTIONS DE MONTAGE D WichtigeHinweise! GB IMPORTANT ROCOMMENDATIONS! F RECOMMANDATIONS IMPORTANTES! Halten Sie Kinder vom Verpackungsmaterial
Easyliner. zubehör. divers accessories. accessori. 10,0 m 2. schutz- und abdeckvlies
 Material: Textilfaser Maler aus Textilfasern mit rutschhemmender Unterseite, einseitig mit Folie kaschiert. Easyliner ist wiederverwendbar. Ideal zur Abdeckung von zu schützenden Untergründen/Bodenbelägen,
Kurzanleitung / Instructions Auswechseln des Kupplungsystems / Exchange of the clutch system
 Kurzanleitung / Instructions Auswechseln des Kupplungsystems / Exchange of the clutch system Kupplungssystem Version 2 / Clutch System - Version 2 Bitte beachten Sie, dass diese Anleitung zum austauschen
DAS ZUFRIEDENE GEHIRN: FREI VON DEPRESSIONEN, TRAUMATA, ADHS, SUCHT UND ANGST. MIT DER BRAIN-STATE-TECHNOLOGIE DAS LEBEN AUSBALANCIEREN (GE
 DAS ZUFRIEDENE GEHIRN: FREI VON DEPRESSIONEN, TRAUMATA, ADHS, SUCHT UND ANGST. MIT DER BRAIN-STATE-TECHNOLOGIE DAS LEBEN AUSBALANCIEREN (GE READ ONLINE AND DOWNLOAD EBOOK : DAS ZUFRIEDENE GEHIRN: FREI
Exercise (Part XI) Anastasia Mochalova, Lehrstuhl für ABWL und Wirtschaftsinformatik, Kath. Universität Eichstätt-Ingolstadt 1
 Anastasia Mochalova, Lehrstuhl für ABWL und Wirtschaftsinformatik, Kath. Universität Eichstätt-Ingolstadt 1") Exercise (Part XI) Notes: The exercise is based on Microsoft Dynamics CRM Online. For all screenshots: Copyright Microsoft Corporation. The sign ## is you personal number to be used in all exercises. All
Exercise (Part XI) Notes: The exercise is based on Microsoft Dynamics CRM Online. For all screenshots: Copyright Microsoft Corporation. The sign ## is you personal number to be used in all exercises. All
Prediction Market, 28th July 2012 Information and Instructions. Prognosemärkte Lehrstuhl für Betriebswirtschaftslehre insbes.
 Prediction Market, 28th July 2012 Information and Instructions S. 1 Welcome, and thanks for your participation Sensational prices are waiting for you 1000 Euro in amazon vouchers: The winner has the chance
EISENRAHMEN CADRE EN FER
 Gratis-Fax 0800 300 444 Telefon 071 913 94 94 Online bestellen www.wilerrahmen.ch 2015 295 Herstellung der Eisenrahmen in unserer Werkstatt Fabrication des cadres en fer dans notre atelier Das Eisenprofil
DOWNLOAD. Me and my body. Erste Schritte in Englisch. Anne Scheller. Downloadauszug aus dem Originaltitel: Klasse 3 4
 DOWNLOAD Anne Scheller Me and my body Erste Schritte in Englisch Klasse 3 4 auszug aus dem Originaltitel: Mit Geschichten, vielfältigen Übungen und Materialien zur Portfolio-Arbeit THE TERRIBLE TOM Luke