NVR2 QUICK INSTALLATION GUIDE 3 KORTE HANDLEIDING 13 GUIDE D'INSTALLATION RAPIDE 23 GUÍA RÁPIDA 33 SCHNELLEINSTIEG 43
|
|
|
- Manuela Fiedler
- vor 8 Jahren
- Abrufe
Transkript

1 6/12-CHANNEL HD NETWORK VIDEO RECORDER HDMI ONVIF EAGLE EYES PUSH VIDEO HD NETWERK VIDEORECORDER MET 6/12 KANALEN HDMI ONVIF EAGLE EYES PUSH VIDEO ENREGISTREUR VIDÉO RÉSEAU HD À 6/12 CANAUX - HDMI - ONVIF - EAGLE EYES PUSH VIDEO GRABADOR DE VÍDEO EN RED DE ALTA DEFINICIÓN DE 6/12 CANALES - HDMI - ONVIF - EAGLE EYES PUSH VIDEO 6/12-KANAL HOCHAUFLÖSENDER NETZWERK-VIDEOREKORDER - HDMI - ONVIF - EAGLE EYES PUSH VIDEO QUICK INSTALLATION GUIDE 3 KORTE HANDLEIDING 13 GUIDE D'INSTALLATION RAPIDE 23 GUÍA RÁPIDA 33 SCHNELLEINSTIEG 43

2 V /03/ Velleman nv
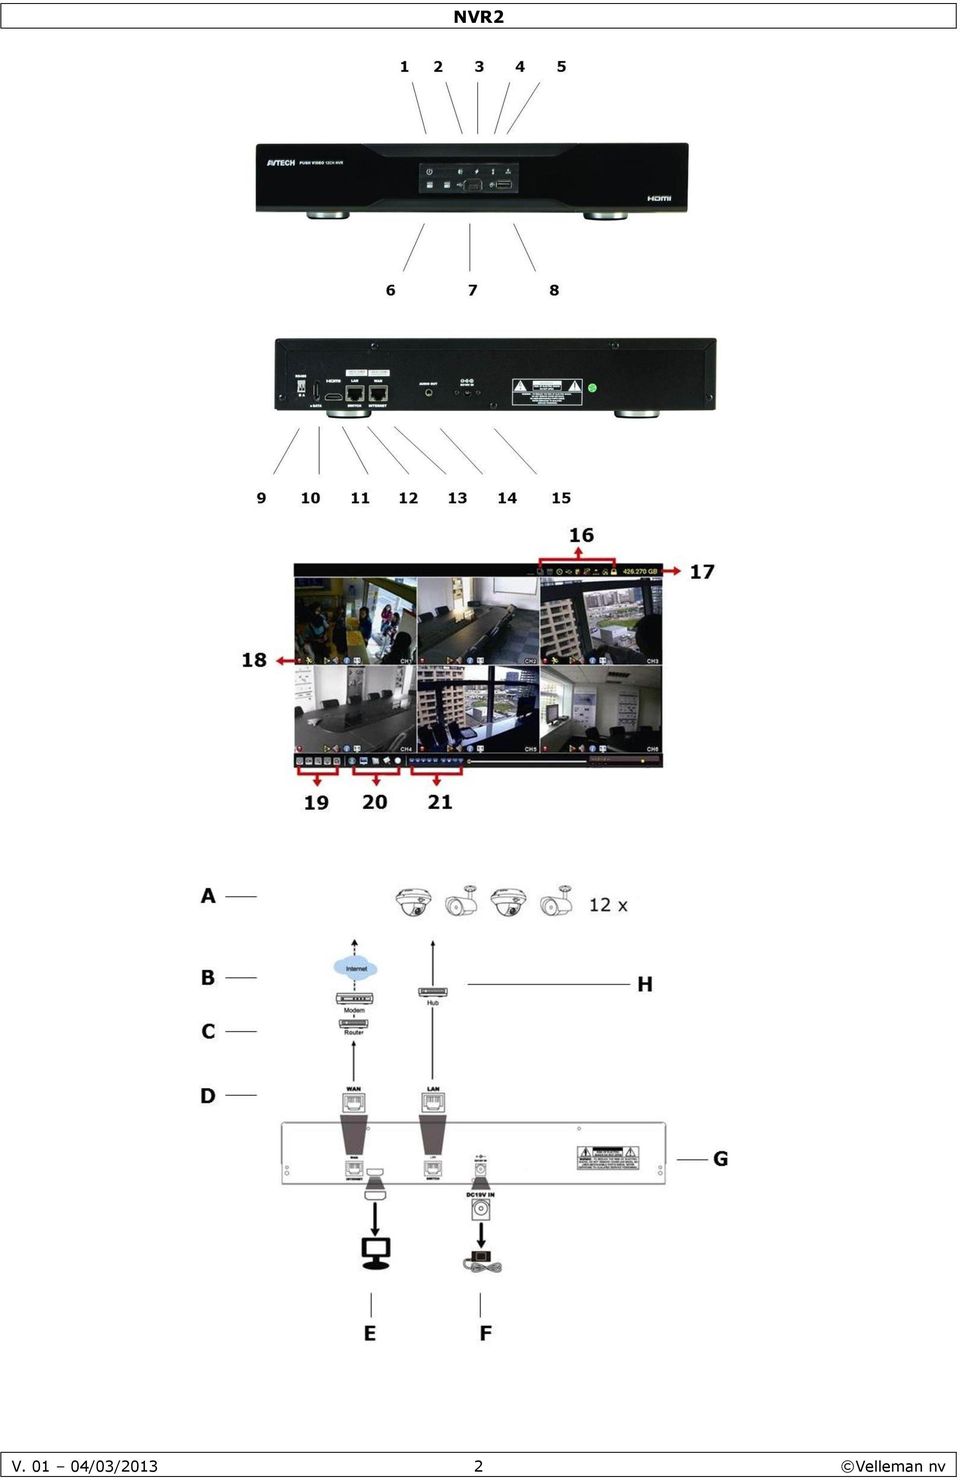
3 QUICK INSTALLATION GUIDE 1. Introduction To all residents of the European Union Important environmental information about this product This symbol on the device or the package indicates that disposal of the device after its lifecycle could harm the environment. Do not dispose of the unit (or batteries) as unsorted municipal waste; it should be taken to a specialized company for recycling. This device should be returned to your distributor or to a local recycling service. Respect the local environmental rules. If in doubt, contact your local waste disposal authorities. Thank you for choosing Velleman! Please read the manual thoroughly before bringing this device into service. If the device was damaged in transit, don't install or use it and contact your dealer. 2. Safety Instructions Keep this device away from children and unauthorized users. Risk of electroshock when opening the cover. Touching live wires can cause life-threatening electroshocks. Always disconnect mains power when device not in use or when servicing or maintenance activities are performed. Handle the power cord by the plug only. 3. General Guidelines Refer to the Velleman Service and Quality Warranty on the last pages of this manual. Indoor use only. Keep this device away from rain, moisture, splashing and dripping liquids. Never put objects filled with liquid on top of or close to the device. Keep this device away from dust and extreme temperatures. Make sure the ventilation openings are clear at all times. For sufficient air circulation, leave at least 1 (±2.5 cm) in front of the openings. Protect this device from shocks and abuse. Avoid brute force when operating the device. Familiarise yourself with the functions of the device before actually using it. All modifications of the device are forbidden for safety reasons. Damage caused by user modifications to the device is not covered by the warranty. Only use the device for its intended purpose. Using the device in an unauthorised way will void the warranty. Damage caused by disregard of certain guidelines in this manual is not covered by the warranty and the dealer will not accept responsibility for any ensuing defects or problems. Keep this manual for future reference. DO NOT use this product to violate privacy laws or perform other illegal activities. 4. Features high definition recording recording throughput: 12 channel mode: 720 x 480 pixels: ± 360 IPS 1280 x 720 pixels: ± 120 IPS 6 channel mode: 720 x 480 pixels: ± 180 IPS 1280 x 720 pixels: ± 180 IPS 1920 x 1080: ± 90 IPS mobile surveillance via free EagleEyes software on iphone, ipad, and Android mobile phone connection via GPRS, 3G data or Wi-Fi GUI (Graphical User Interface) display and USB mouse high compatibility and offsite backup: compatible with all major IP cameras that are ONVIF certified V /03/ Velleman nv

4 offsite backup local and remote control completely independent HDMI video output resolution up to 1080P optional monitor: MONSCA8 adapter: PAC916T NVR2 HDMI cable: Professional or Premium optional hard disk: HD500GB/S, HD1TB/S, HD2TB/S USB mouse: included IR remote control: included IP cameras: suitable: CAMIP11, CAMIP12 added NAS function to back up all kind of IP cameras on the internet works with free Central Management System (CMS) software for also compatible with: CAMIP9, CAMIP13, CAMIP14 & ONVIF cameras compatible with powerline adapter: EM8017, EM8024, EM8025, EM8026 optional router: EM4542, EM4553, EM4570, PCRT1 5. Overview Refer to the illustrations on page 2 of this manual. Front panel 1 POWER LED indicator: the NVR is switched on 2 ALARM LED indicator: an alarm event occurs 3 WAN LED indicator: the NVR is connected to internet 4 LAN LED indicator: the NVR is connected to the LAN 5 SATA LED indicator: SATA hard disk is active 6 HDD1/HDD2 LED indicator: up to two hard disks are installed in the NVR and connected well 7 USB port 8 mouse port Insert a mouse (included). Insert a compatible USB flash drive for video backup. Note: For the list of compatible USB flash drives, refer to the full manual on the CD-ROM. Back panel 9 RS485 RS 485 port 10 SATA Connect an external SATA hard disk 11 HDMI video output port Connect to a monitor that supports high-definition video output (HDMI port). Note: Use an appropriate adapter (not incl.) to connect a monitor with VGA or composite connectors. 12 LAN Connect to local IP cameras via an 8P8C (RJ45) network cable. 13 WAN Connect to internet via an 8P8C (RJ45) network cable 14 AUDIO OUT Connect to an amplifier audio line-in. 15 DC 19V IN Connect to the power supply adapter (incl.). 6. Installing the hard disk drive 1. Obtain a suitable hard disk (not included), type ESATA (Serial Advanced Technology Attachment). The hard disk must be formatted. 2. Make sure to unplug the device from the mains before servicing and do not touch any electronic circuitry to avoid electrostatic discharge. 3. Loosen the screws and remove the top cover. 4. Find the hard disk bracket in the NVR, and insert the hard disk in the bracket. 5. With the PCB side facing up, connect the hard disk to the power connector and the data connector. 6. Fasten the hard disk with the supplied screws, two for each side. V /03/ Velleman nv

5 7. To install a second hard disk, find the supplied hard disk brackets in the package, and fix them to the NVR base. 8. With the PCB side facing up, connect the hard disk to the power connector and data connector. 9. Place the hard disk in the brackets and fasten it with the supplied screws, two for each side. 10. Put the top cover back in place and fasten the screws. 7. Connection Diagram Note: To ensure that automatic configuration works well, connect and switch on the IP cameras first. Only then switch on the NVR. You can up to 12 IP cameras. Refer to the illustrations on page 2 of this manual. A IP camera E monitor supporting high-definition video B Modem F 19VDC power supply adapter C Router G NVR back panel D 8P8C (RJ45) network cable H hub/switch Connecting the IP camera (plug and play) 1. Connect the camera to a hub/switch. 2. Wait until the camera is configured automatically and the images appear on the monitor. 8. Information and Panels on the Monitor Refer to the illustrations on page 2 of this manual. 16 NVR status key lock channel lock USB flash drive / device connected timer recording on overwrite on sequence mode on PTZ mode on key unlock channel unlock no USB device connected timer recording off overwrite off sequence mode off PTZ mode off CPU load V /03/ Velleman nv

6 network status (WAN) internet connected (WAN) internet disconnected (WAN) local connection (LAN) auto mode Mbit/s (LAN) DHCP / static IP mode (LAN) auto mode Gbit/s (LAN) camera disconnected 17 available hard disk space 18 channel status auto search on live audio on audio playback on original size recording alarm event live information auto search off audio off audio playback off fit to screen human detection event motion event playback information 19 quick operation Click to show the power-off panel to stop or reboot the system. Click to show the channel switch panel and select the channel you want. Switch to the channel you want first, then click to enter zoom mode. Click and drag the red frame on the bottom left of the screen to move to the area where you want to zoom in. Click to enter PTZ mode and show the PTZ camera control panel. Click to open the IP search window and check the connection status of each channel. 20 main menu QUICK START SYSTEM EVENT INFORMATION ADVANCED CONFIG SCHEDULE SETTING Click to set the status display, image settings, and date & time. Click to set the system configuration. Click to enter the event search menu. Click to set CONNECTION, CAMERA, DETECTION, ALERT, NETWORK, DISPLAY, RECORD and NOTIFY. Click to set the recording timer. 21 playback panel fast forward fast rewind play/pause stop Click to fast forward at 4 to 32 times normal speed. Click to fast rewind at 4 to 32 times normal speed. Click to play the latest recorded video clip. Click again to pause. In pause mode, click once to go one frame forward, or to go one frame backward. Click to stop the video playback. V /03/ Velleman nv

 and start playing the earliest video clip recorded during this hour.")
7 slow playback previous/next hour quick search Click once to play at 1/4 normal speed, click twice for 1/8 normal speed. Click to jump to the next/previous one-hour time interval (for example, 11:00 ~ 12:00 or 14:00 ~ 15:00) and start playing the earliest video clip recorded during this hour. Click to enter the quick search menu. 8.2 Key lock / unlock To lock or unlock NVR local operation, click (lock) or (unlock) on the NVR status panel [15]. When you unlock NVR local operation, the system asks you to enter a user name and password. Note: The default user name and password are admin. Different user types have different access rights to NVR functions. For details, refer to the full manual on the CD-ROM. 9. Configuration of camera on LAN Port plug and play Note: This configuration method applies to ETS cameras. 9.1 Automatic Configuration The NVR will automatically configure the IP address of an ETS camera connected by LAN if: The default IP configuration method of the camera is DHCP. The camera is powered on before the NVR is powered on. If not, you can configure the IP address of your camera manually as described further below. 9.2 Manual Configuration If the NVR does not configure the IP address of your camera automatically as described above, the default IP configuration method of your IP camera may not be set to DHCP. To solve this, reconfigure the camera s IP address to xx (xx ranges from 11 ~ 253), in the same network segment as the NVR. 1. In the quick operation panel [18], click. You ll see the list of every connected IP camera with its connection status and MAC address. 2. Select an IP address that is not used (UNUSED), and click SETUP. V /03/ Velleman nv
![Click to enter the quick search menu. 8.2 Key lock / unlock To lock or unlock NVR local operation, click (lock) or (unlock) on the NVR status panel [15].](/docs-images/40/829176/images/page_7.jpg "When you unlock NVR local operation, the system asks you to enter a user name and password. Note: The default user name and password are admin.")
8 1. Select STATIC in NETWORK TYPE, and change the IP address to xx (xx ranges from 11 ~ 253). 2. Click APPLY and EXIT to save your changes. 3. Wait until the NVR detects the IP camera and displays images. 9.3 Configuring a remote internet camera Via internet you can record video images from an IP camera in a remote location. 1. Make sure that the IP camera is accessible outside its LAN network via a dynamic domain name (for example ip_office.ddns.eagleeyes.tw). 2. In the main menu [19], click (ADVANCED CONFIG) and select CONNECTION. 3. To assign a channel to a remote IP camera, click URI to enter the address of the camera and its port number. 4. Click SETUP to enter the access information of the camera. 5. Enter the user name (USER NAME) and password (PASSWORD) to access the IP camera. 6. Click GET TYPE to detect the camera and make sure the access information is correct. 7. Select the image size (IMAGE SIZE), image quality (QUALITY), and images per second (I.P.S.). Note: The available options depend on the camera you want to connect. 8. Click GET TYPE to detect the camera and make sure the access information is correct. 9. Optional: for a camera with audio recording, set AUDIO to ON or OFF. 10. Quick Operation 10.1 Switching on/off and Rebooting To power off or reboot the NVR: In the quick operation panel [18], click and then click (power off) or (reboot). V /03/ Velleman nv
 and select CONNECTION. 3. To assign a channel to a remote IP camera, click URI to enter the address of the camera and its port number. 4.")
9 10.2 Viewing a Channel in Full-Screen Mode To view a channel in full screen mode, you can: NVR2 Click directly on the channel image to see that channel in full screen mode. Double-click the image to restore the previous overview. In the quick operation panel [18], click. On the control panel that appears, select the channel you want to display in full screen mode. Click to restore the previous overview Playing Recorded Video Clips 1. Make sure that manual and/or event recording is enabled: in the main menu [19], click (ADVANCED CONFIG) and select RECORD to check or adjust the settings. 2. In the playback panel [20], press the play button. The recorded files are shown. 3. The fast forward and fast rewind buttons increase/decrease the playback speed. Press the button repeatedly to increase/decrease the speed to 4x, 8x, 16x, or 32x (max.). 4. Press the pause button to pause playback. 5. Press the stop button to stop playback and return to live monitoring. 11. Push Video configuration 11.1 Configuring the WAN port 1. Make sure the NVR is properly connected to the router with a RJ45 network cable. 2. From your NVR, select (ADVANCED CONFIG), and select Network WAN. V /03/ Velleman nv
 and select RECORD to check or adjust the settings. 2.")
10 3. Select DHCP, and configure the DNS setting and port number. The default port number is 80. Typically, the TCP port used by HTTP is 80. However in some cases, it is better to change this port number for added flexibility or security. 4. Then, note down the IP address shown in IP. This is the IP address assigned to your NVR by the router. You ll need it later for port forwarding. 5. Go to DDNS, and select eagleeyes in SYSTEM NAME. 6. Note down the whole address under CURRENT HOST ADDRESS, such as This will be the address used to access your NVR remotely. 7. Select EXIT to return to the live view, and continue to the next step for port forwarding. 8. From the web browser of your PC, enter the IP address of your router to access your router. 9. Enter the user name and password if needed. 10. In the router setting interface, go to the port forwarding (or virtual server) rule configuration page. The naming of port forwarding or virtual server may vary based on different router brands. To know where it is, refer to the user manual of your router. 11. Enter the NVR IP address and the port number you just noted down and enable this rule Configuring a push video trigger Go to Advanced Config > Notify > tab Push Video You can have the NVR send a push video to your mobile device for every channel. For every channel, you can, depending on the type of alarm sensor: Send a push video for a normal open contact (NO) Send a push video for a normal closed contact (NC) Select OFF to turn off push video for a channel. V /03/ Velleman nv

11 11.3 Installing the EagleEyes app Prerequisites Before installing EagleEyes to your mobile phone for remote surveillance, make sure you have checked the following: You have subscribed to and you can access mobile internet services for your mobile phone. Note: You might be charged for internet access via wireless or 3G networks. For the internet access rate details, check with your local network operator or service provider. You have noted down the IP address, port number, user name and password used to access your network camera from the internet. Where to download 1. Connect to from your mobile device, and sign in. Please do not try to download EagleEyes from your computer. o o For Android, select the download link from the website to start downloading. For iphone and ipad, two versions of EagleEyes are available: EagleEyesHD Plus (at a fee), and EagleEyesHD Lite (free). 2. Select the version you want, and you will be directed to the App Store to download the application. 3. When the download is completed, EagleEyes will install automatically to the default location or any location you choose. For more details about configuring and operating EagleEyes, visit the official website Configuration Before configuring push video, make sure: 4. The DVR system is set up as described in point 3 Connection and Setup in the full manual on the included CD-ROM. 5. The DVR is connected to the internet. 6. The EagleEyes app is installed on your mobile device (see Installing the EagleEyes app above). 7. Open EagleEyes, and add this DVR to the EagleEyes address book. For more details about EagleEyes operation, visit 8. In the EagleEyes app, enable push video as described below. 9. Trigger the alarm sensor to see if you successfully receive push video. 12. Technical Specifications video compression video input video output recording mode multiplex operation audio I/O motion detection area motion detection sensitivity pre-alarm recording backup device hard disk storage web interface H.264 / MPEG4 / MJPEG 1 LAN port up to 12 channels with a hub/switch HDMI output 1920 x 1080 pixels manual / timer / motion / alarm live display, record, playback, backup and network 1 audio output (mono) 22 x 18 grid per camera 10 adjustable variables with precise calculation for motion detection yes USB 2.0 backup and network remote backup built-in SATA type: supports 2 x HDD, supported HDD capacity over 3 TB (HDD not incl.) external esata: external hard disk or disk array (Linux system support) supports free CMS software (Windows & Mac OS) V /03/ Velleman nv

12 mobile surveillance remote alarm notification network connection power source power consumption all major internet browsers via Java, QuickTime and VLC plug-in (Internet Explorer, Firefox, Safari, Google Chrome) software available on smart phones: push video: on ipad, ipod touch, iphone, Android phone & tablet remote login via all smart phone platforms (Apple, Android, BlackBerry, Nokia Symbian and Windows Mobile) computer: CMS (Central Management System): remote surveillance to monitor up to 20 different IP addresses (Windows & Mac OS) web browser: Internet Explorer, Firefox, Google Chrome and Safari via Java, Quicktime or VLC plug-in SMS message, and image uploading to FTP sites supports TCP/IP, PPPoE, DHCP and DDNS function 19 VDC / 2.1 A (incl.) < 40 W operating temperature 10 C ~ 40 C system recovery dimensions system auto recovery after power reconnected 375 x 68 x 264 mm Use this device with original accessories only. Velleman nv cannot be held responsible in the event of damage or injury resulted from (incorrect) use of this device. For more info concerning this product and the latest version of this manual, please visit our website The information in this manual is subject to change without prior notice. COPYRIGHT NOTICE The copyright to this manual is owned by Velleman nv. All worldwide rights reserved. No part of this manual or may be copied, reproduced, translated or reduced to any electronic medium or otherwise without the prior written consent of the copyright holder. V /03/ Velleman nv
: remote surveillance to monitor up to 20 different IP addresses (Windows & Mac OS) web browser: Internet Explorer, Firefox, Google Chrome and Safari via Java,")
13 KORTE HANDLEIDING 1. Inleiding Aan alle ingezetenen van de Europese Unie Belangrijke milieu-informatie betreffende dit product Dit symbool op het toestel of de verpakking geeft aan dat, als het na zijn levenscyclus wordt weggeworpen, dit toestel schade kan toebrengen aan het milieu. Gooi dit toestel (en eventuele batterijen) niet bij het gewone huishoudelijke afval; het moet bij een gespecialiseerd bedrijf terechtkomen voor recyclage. U moet dit toestel naar uw verdeler of naar een lokaal recyclagepunt brengen. Respecteer de plaatselijke milieuwetgeving. Hebt u vragen, contacteer dan de plaatselijke autoriteiten betreffende de verwijdering. Dank u voor uw aankoop! Lees deze handleiding grondig voor u het toestel in gebruik neemt. Werd het toestel beschadigd tijdens het transport, installeer het dan niet en raadpleeg uw dealer. 2. Veiligheidsinstructies Houd dit toestel buiten het bereik van kinderen en onbevoegden. Elektrocutiegevaar bij het openen van het toestel. Raak geen kabels aan die onder stroom staan om dodelijke elektroshocks te vermijden. Trek de stekker uit het stopcontact (trek niet aan de kabel!) voordat u het toestel reinigt en als u het niet gebruikt. Houd de voedingskabel altijd vast bij de stekker en niet bij de kabel. 3. Algemene richtlijnen Raadpleeg de Velleman service- en kwaliteitsgarantie achteraan deze handleiding. Gebruik het toestel enkel binnenshuis. Bescherm het toestel tegen regen, vochtigheid en opspattende vloeistoffen. Plaats geen objecten gevuld met vloeistof op of naast het toestel. Bescherm dit toestel tegen stof en extreme temperaturen. Zorg dat de verluchtingsopeningen niet verstopt geraken. Voorzie een ruimte van minstens 1" (± 2,5 cm) tussen het toestel en elk ander object. Bescherm het toestel tegen schokken. Vermijd brute kracht tijdens de bediening van het toestel. Leer eerst de functies van het toestel kennen voor u het gaat gebruiken. Om veiligheidsredenen mag u geen wijzigingen aanbrengen aan het toestel. Schade door wijzigingen die de gebruiker heeft aangebracht aan het toestel valt niet onder de garantie. Gebruik het toestel enkel waarvoor het gemaakt is. Bij onoordeelkundig gebruik vervalt de garantie. De garantie geldt niet voor schade door het negeren van bepaalde richtlijnen in deze handleiding en uw dealer zal de verantwoordelijkheid afwijzen voor defecten of problemen die hier rechtstreeks verband mee houden. Bewaar deze handleiding voor verdere raadpleging. Installeer en gebruik deze camera NIET voor illegale praktijken en respecteer ieders privacy. 4. Eigenschappen opnames in hoge resolutie capaciteit: 12 kanaalsmodus: 720 x 480 pixels: ± 360 IPS 1280 x 720 pixels: ± 120 IPS 6 kanaalsmodus: 720 x 480 pixels: ± 180 IPS 1280 x 720 pixels: ± 180 IPS 1920 x 1080: ± 90 IPS bewaking op afstand via gratis EagleEyes-software op iphone, ipad en Android aansluiting met de gsm via GPRS, 3G of Wi-Fi display met grafische gebruikersinterface (GUI) en USB-muis V /03/ Velleman nv
 niet bij het gewone huishoudelijke afval; het moet bij een gespecialiseerd bedrijf terechtkomen voor recyclage.")
14 NVR2 hoge compatibiliteit en off-site back-up: compatibel met de voornaamste IP-camera's die ONVIFgecertificeerd zijn het internet voor off-site back-ups beheer ter plaatse en op afstand, volledig onafhankelijk HDMI-uitvoerresolutie tot 1080P optioneel scherm: MONSCA8 adapter: PAC916T HDMI-kabel: Professional of Premium optionele harde schijf: HD500GB/S, HD1TB/S, HD2TB/S USB-muis: meegeleverd IR-afstandsbediening: meegeleverd IP-camera's: voor: CAMIP11, CAMIP12 netwerkopslagfunctie voor back-ups van allerhande IP-camera's op werkt met de gratis CMS-software (Central Management System) ook compatibel met: CAMIP9, CAMIP13, CAMIP14 & ONVIF-camera's compatibel met powerline adapter: EM8017, EM8024, EM8025, EM8026 optionele router: EM4542, EM4553, EM4570, PCRT1 5. Omschrijving Raadpleeg de afbeeldingen op pagina 2 van deze handleiding. Frontpaneel 1 POWER Led-indicator: de videorecorder is ingeschakeld 2 ALARM LED-indicator: een alarm treedt op 3 WAN LED-indicator: de videorecorder is verbonden met het internet 4 LAN LED-indicator: de videorecorder is verbonden met het LAN-netwerk 5 SATA LED-indicator: SATA harde schijf is actief 6 HDD1/HDD2 LED-indicator: er zijn twee harde schijven geïnstalleerd en correct aangesloten 7 USB-poort Plaats een compatibele USB flash drive voor videoback-up. Opmerking: Voor een lijst van compatibele USB flash drives, raadpleeg de volledige handleiding op de CD-ROM. 8 muispoort Sluit een muis aan (meegeleverd). Achterpaneel 9 RS485 RS 485-poort 10 SATA Sluit een externe SATA harde schijf aan 11 HDMI-uitvoerpoort Sluit aan op een scherm met high-definition video-ondersteuning (HDMI-poort). Opmerking: Gebruik een geschikte adapter (niet meegelev.) voor schermen met VGA- of composietvideoconnectoren. 12 LAN Verbind met lokale IP-camera s via een 8P8C (RJ45) netwerkkabel. 13 WAN Verbind met internet via een 8P8C (RJ45) netwerkkabel. 14 AUDIO OUT Verbind met de Audio Line-ingang van een versterker. 15 DC 19V IN Verbind met de voedingsadapter (meegelev.). 6. De hard disk drive (HDD) installeren 1. Gebruik een compatibele harde schijf (niet meegelev.), type esata (Serial Advanced Technology Attachment). Formatteer eerst de harde schijf. 2. Zorg ervoor dat u het toestel ontkoppelt van het lichtnet. Raak geen elektronische circuits aan om elektrostatische ontladingen te voorkomen. 3. Schroef het bovendeksel los en neem het weg. V /03/ Velleman nv

15 4. Plaats de harde schijf in de voorziene montagebeugel. 5. Plaats de harde schijf met de printplaat naar boven en sluit de voedings- en dataconnector aan. 6. Bevestig de harde schijf met de meegeleverde schroeven, twee aan elke kant. 7. Gebruik de extra meegeleverde montagebeugels om een tweede harde schijf te installeren. Bevestig ze aan de onderkant van de videorecorder. 8. Plaats de harde schijf met de printplaat naar boven en sluit de voedings- en dataconnector aan. 9. Plaats de harde schijf in de montagebeugels en bevestig met de meegeleverde schroeven, twee aan elke kant. 10. Plaats het bovendeksel terug en schroef vast. 7. Aansluitdiagram Opmerking: Om zeker te zijn dat de automatische configuratie goed werkt, sluit eerst de IP-camera s aan en schakel ze in. Schakel pas dan de videorecorder in. U kunt tot 12 IP-camera s aansluiten. Raadpleeg de afbeeldingen op pagina 2 van deze handleiding. A IP-camera E scherm met high-definition videoondersteuning B modem F 19VDC-voedingsadapter C router G achterpaneel videorecorder D 8P8C (RJ45) netwerkkabel H hub/switch De IP-camera aansluiten (Plug-and-Play) 1. Verbind de camera met een hub/switch. 2. Wacht tot de camera automatisch geconfigureerd is en de beelden op het scherm verschijnen. 8. Symbolen Raadpleeg de afbeeldingen op pagina 2 van deze handleiding. 16 NVR-status vergrendeling actief kanaalvergrendeling actief USB flash drive / apparaat aangesloten tijdsgeschakelde opname actief vergrendeling inactief kanaalvergrendeling inactief geen USB-apparaat aangesloten tijdsgeschakelde opname inactief V /03/ Velleman nv

16 functie overschrijven actief sequentiemodus actief PTZ-modus actief functie overschrijven inactief sequentiemodus inactief PTZ-modus inactief CPU-belasting netwerkstatus (WAN) met internet verbonden (WAN) niet met internet verbonden (WAN) lokale verbinding (LAN) auto-modus - Mbit/s (LAN) DHCP / statische IP-modus (LAN) auto-modus - Gbit/s (LAN) camera niet aangesloten 17 beschikbare ruimte op harde schijf 18 kanaalstatus automatisch zoeken actief live-geluid actief geluid afspelen actief originele grootte opname actief een alarm doet zich voor live-beelden automatisch zoeken inactief geluid inactief geluid afspelen inactief passend op scherm menselijke aanwezigheid wordt gedetecteerd beweging wordt gedetecteerd afspelen van opgenomen beelden 19 snelmenu Klik om het uitschakelmenu weer te geven en het apparaat uit te schakelen of opnieuw op te starten. Klik om het kanaalkeuzevenster weer te geven en een kanaal te kiezen. Selecteer eerst het gewenste kanaal, klik dan op om in te zoomen. Klik en sleep het rode kadertje onderaan links in het scherm om het gewenste gebied weer te geven. Klik om de PTZ-modus te activeren en het PTZ-bedieningspaneel weer te geven. Klik om het IP-zoekvenster te openen en de verbindingsstatus van elk kanaal te controleren. 20 hoofdmenu QUICK START SYSTEM EVENT INFORMATION ADVANCED CONFIG SCHEDULE SETTING Klik om de statusweergave, het beeld, de datum en de tijd in te stellen. Klik om de systeemconfiguratie in te stellen. Klik om het zoekmenu voor events te activeren. Klik voor het instellen van verbindingen (CONNECTION), camera (CAMERA), detectie (DETECTION), meldingen (ALERT), netwerk (NETWORK), weergave (DISPLAY), opname (RECORD) en informatieberichten (NOTIFY). Klik om tijdsgeschakelde opnames in te stellen. V /03/ Velleman nv

17 21 Weergavemenu snel vooruit snel achteruit afspelen/pauze stoppen vertraagde weergave vorige/volgende uur snel zoeken Klik om versneld vooruit af te spelen aan 4 tot 32 keer de normale snelheid. Klik om versneld achteruit af te spelen aan 4 tot 32 keer de normale snelheid. Klik om de laatst opgenomen videoclip af te spelen. Klik opnieuw om te onderbreken. In pauzemodus, klik één keer op om één beeldje vooruit te springen, of op voor één beeldje achteruit. Klik om de weergave te stoppen. Klik één keer om de clip af te spelen aan 1/4 van de normale snelheid, klik twee keer voor 1/8 van de normale snelheid. Klik om naar het vorige/volgende interval van één uur te springen (bijvoorbeeld, 11:00 ~ 12:00 of 14:00 ~ 15:00) en de eerste videoopname in dat tijdsinterval af te spelen. Klik om het menu te activeren. 8.2 Toetsvergrendeling In het statusmenu [15], klik op (vergrendelen) om de bediening van de videorecorder te vergrendelen, of klik op (ontgrendelen) om de bediening weer vrij te geven. Wanneer u de bediening weer vrijgeeft, moet u een gebruikersnaam en wachtwoord ingeven. Opmerking: De standaard gebruikersnaam en het standaard wachtwoord is admin. Verschillende gebruikers hebben verschillende toegangsrechten. Raadpleeg de volledige handleiding (beschikbaar op de CD-ROM) voor meer informatie. 9. Camera op LAN-poort instellen (Plug-and-Play) Opmerking: Deze configuratie bedoeld voor ETS-camera's. 9.1 Automatische configuratie De videorecorder zal automatisch het IP-adres instellen van een ETS-camera die verbonden is via LAN op voorwaarde dat: de standaard IP-configuratiemethode van de camera DHCPis. de camera ingeschakeld is alvorens de videorecorder ingeschakeld wordt. U kunt altijd het IP-adres van de camera manueel instellen zoals verderop beschreven. 9.2 Manuele configuratie Als de videorecorder het IP-adres van uw camera niet automatisch instelt zoals hierboven beschreven, dan is de standaard IP-configuratiemethode van uw camera niet ingesteld op DHCP. Om dit te verhelpen moet u het IP-adres van de camera opnieuw instellen op xx (met xx binnen het bereik 11 ~ 253), in hetzelfde netwerksegment als de videorecorder. 1. In het snelmenu [18], kik op. U ziet een lijst van alle verbonden IP-camera's met hun verbindingsstatus en MAC-adres. V /03/ Velleman nv

18 2. Selecteer een IP-adres dat niet gebruikt wordt (UNUSED), en klik op SETUP. 1. Selecteer STATIC voor NETWORK TYPE, en verander het IP-adres in xx (met xx binnen het bereik 11 ~ 253). 2. Klik op APPLY en EXIT om de wijzigingen op te slaan. 3. Wacht tot de videorecorder de IP-camera detecteert en de beelden weergeeft. 9.3 Een camera met internetverbinding instellen Via internet kunnen beelden van een IP-camera opgenomen worden. 1. Verzeker u ervan dat de IP-camera toegankelijk is buiten het LAN-netwerk waaraan ze verbonden is. Dit kan via een dynamische domeinnaam (bijvoorbeeld ip_officd.ddns.eagleeyes.tw). 2. In het hoofdmenu [19], klik op (ADVANCED CONFIG) en kies CONNECTION. 3. Om een kanaal toe te wijzen aan een IP-camera, klik op URI en geef het IP-adres en poortnummer van de camera in. 4. Klik op SETUP om de beveiligingsinformatie van de camera in te geven. 5. Geef een gebruikersnaam (USER NAME) en een wachtwoord (PASSWORD) in om toegang te krijgen tot de IP-camera. 6. Klik op GET TYPE om de camera te detecteren en te controleren of de beveiligingsinformatie correct is. V /03/ Velleman nv
. 2.")
19 7. Kies de beeldgrootte (IMAGE SIZE), de beeldkwaliteit (QUALITY), en het aantal beelden per seconde (I.P.S.). Opmerking: De beschikbare opties zijn afhankelijk van het type camera dat u wilt aansluiten. 8. Klik op GET TYPE om de camera te detecteren en te controleren of de beveiligingsinformatie correct is. 9. Optioneel: voor een camera met geluidsopname, zet het geluid (AUDIO) aan (ON) of uit (OFF). 10. Snelmenu 10.1 In/uitschakelen en herstarten Om de videorecorder uit te schakelen of te herstarten: In het snelmenu[18], klik op en klik op (uitschakelen) of (herstarten) Een kanaal op volledig scherm bekijken Om een kanaal op volledig scherm te bekijken: Klik direct op het beeld van het kanaal om het kanaal op volledig scherm te bekijken. Dubbelklik op het beeld om het overzicht van de 6 kanalen opnieuw weer te geven. In het snelmenu [18], klik op. Op het bedieningspaneel dat verschijnt, kies het kanaal dat u op het volledige scherm wilt bekijken. Klik op om het overzicht van de 6 kanalen weer te geven Opgenomen videoclips afspelen 1. Verzeker u ervan dat manuele en/of event opnames actief zijn: in het hoofdmenu [19], klik op (ADVANCED CONFIG) en kies RECORD om de instellingen te controleren of aan te passen. 2. In het weergavemenu [20], klik op de afspeelknop. De opgenomen bestanden worden getoond. 3. De knoppen snel vooruit en snel achteruit verhogen/verlagen de afspeelsnelheid. Klik meermaals op de knop om de snelheid 4x, 8x, 16x, of 32x (max.) te verhogen/verlagen. 4. Klik op om het afspelen te onderbreken. 5. Klik op om het afspelen te stoppen en naar live-weergave terug te keren. V /03/ Velleman nv
![10. Snelmenu 10.1 In/uitschakelen en herstarten Om de videorecorder uit te schakelen of te herstarten: In het snelmenu[18], klik op en klik op (uitschakelen) of (herstarten). 10.2 Een kanaal op volledig scherm bekijken Om een kanaal op volledig scherm te bekijken: Klik direct op het beeld van het kanaal om het kanaal op volledig scherm te bekijken.](/docs-images/40/829176/images/page_19.jpg "Dubbelklik op het beeld om het overzicht van de 6 kanalen opnieuw weer te geven. In het snelmenu [18], klik op.")
20 11. Push Video instellen 11.1 De WAN-poort instellen 1. Zorg ervoor dat de videorecorder correct is aangesloten op de router met een RJ45-netwerkkabel. 2. Vanaf uw videorecorder, selecteer (ADVANCED CONFIG), en selecteer "Network" "WAN". 3. Selecteer "DHCP", en configureer de DNS-instelling en poortnummer. Het standaard poortnummer is 80. Gewoonlijk wordt TCP-poort 80 gebruikt. Hoewel het soms beter is om dit poortnummer te wijzigen voor extra flexibiliteit of veiligheid. 4. Vervolgens, noteer het IP-adres dat weergegeven wordt in "IP". Dit is het IP-adres dat is toegewezen aan uw videorecorder door de router. U hebt het nodig voor poortdoorschakeling (port forwarding). 5. Ga naar "DDNS", en selecteer "eagleeyes" in "SYSTEM NAME". 6. Noteer het volledige adres onder "CURRENT HOST ADDRESS, zoals bijv. MAC000E5318B3F0@ddns.dvrtw.com.tw. Dit is het IP-adres om toegang te krijgen tot uw videorecorder vanop afstand. 7. Selecteer "EXIT" om naar live-weergave terug te keren, en ga verder met poortdoorschakeling (port forwarding). 8. Vanaf de webbrowser van uw pc, geef het IP-adres in van uw router om toegang te krijgen tot uw router. 9. Indien nodig, geef de gebruikersnaam en wachtwoord in. 10. In de interface van de router, ga naar de configuratiepagina met de instellingen van de functie poortdoorschakeling (of virtuele server). Het definiëren van de poortdoorschakeling (port forwarding) of virtuele server kan variëren en is afhankelijk van het type router. Voor meer informatie, raadpleeg de gebruikershandleiding van uw router. 11. Geef het IP-adres van de camera en het poortnummer in die u noteerde en activeer deze instelling. V /03/ Velleman nv
.")
21 11.2 Een push video trigger configureren Ga naar Advanced Config > Notify > tab Push Video U kunt een pushbericht sturen naar uw mobiele telefoon voor elk kanaal. Afhankelijk van het type alarmsensor is het mogelijk om voor elk kanaal: een pushbericht te sturen voor een normaal open contact (NO) een pushbericht te sturen voor een normaal gesloten contact (NC) Selecteer OFF om de functie push video uit te schakelen voor een kanaal De EagleEyes-applicatie installeren Vereisten Voordat u EagleEyes voor bewaking op afstand installeert op uw mobiele telefoon, zorg ervoor dat u het volgende hebt gecontroleerd: Mobiele internetdiensten zijn ingeschreven en beschikbaar om te gebruiken voor uw mobiele telefoon. Opmerking: De kosten voor internettoegang via draadloze of 3G-netwerken kunnen mogelijk in rekening worden gebracht. Voor details over de toegangstarieven tot het internet, neem contact op met uw lokale netwerk- of serviceprovider. U hebt het IP-adres, poortnummer, gebruikersnaam en wachtwoord genoteerd om toegang te krijgen tot uw DVR- of netwerkcamera via het internet. Waar te downloaden 10. Ga naar vanaf uw mobiele telefoon en log in. Probeer niet om EagleEyes vanaf uw computer te downloaden. o o Voor Android, selecteer de download-link van de website om het downloaden te starten. Voor iphone and ipad, zijn twee versies van EagleEyes beschikbaar: EagleEyesHD Plus (tegen betaling), en EagleEyesHD Lite (gratis). 11. Selecteer de gewenste versie, en u wordt naar de "App Store" doorgestuurd om de applicatie te downloaden. 12. Wanneer het downloaden voltooid is, zal EagleEyes automatisch worden geïnstalleerd op de locatie waar alle toepassingen standaard in uw telefoon zijn opgeslagen, of waar u opgeeft. Opmerking: Voor meer details over de configuratie en het gebruik van dit programma, raadpleeg de officiële website Configuratie Voor u de functie push video configureert, zorg ervoor dat: 13. Het DVR-systeem is ingesteld zoals beschreven in punt 3 Aansluiting en instelling van de volledige handleiding op de meegeleverde CD-ROM. 14. De DVR is aangesloten op het internet. 15. De EagleEyes-applicatie is geïnstalleerd op uw mobiele toestel (zie De EagleEyes-applicatie installeren hierboven). 16. Open EagleEyes, en voeg deze DVR toe aan het EagleEyes-adresboek. Voor meer details over het gebruik van EagleEyes, raadpleeg de website In de EagleEyes-applicatie, activeer de functie push video zoals beschreven hieronder. 18. Trigger de alarmsensor om na te gaan of u pushberichten ontvangt. 12. Technische specificaties beeldcompressie video-ingang video-uitgang opnamemodus H.264 / MPEG / MJPEG 1 LAN-poort, tot 12 kanalen via hub/switch HDMI-uitvoer 1920 x 1080 pixels manueel / timer / beweging / alarm V /03/ Velleman nv
22 mutliplex werking audio I/O zone voor bewegingsdetectie gevoeligheid bewegingsdetectie pre-alarmopname back-uptoestel opslagruimte harde schijf webinterface mobiele bewaking alarmbericht op afstand netwerkaansluiting voeding verbruik NVR2 live-weergave, opname, afspelen, back-up en netwerk 1 audio-invoer, 1 audio-uitvoer (mono) raster 22 x 18 per camera 10 instelbare variabelen met precisieberekening voor bewegingsdetectie ja USB 2.0 en back-up op afstand via het netwerk ingebouwd SATA type, ondersteunt 2 x HDD, capaciteit van HDD is meer dan 3 TB (HDD niet meegelev.) externe esata: externe harde schijf of disk array (ondersteunt Linux) ondersteunt gratis CMS-software (Windows & Mac OS) alle belangrijke internetbrowsers via Java, QuickTime en VLC plug-in (Internet Explorer, Firefox, Safari, Google Chrome) software beschikbaar op smartphones: push video: op ipad, ipod touch, iphone en Android telefoon & tablet beheer op afstand vanaf alle smartphoneplatforms (Apple, Android, BlackBerry, Nokia Symbian en Windows Mobile) computer: CMS (Central Management System): bewaking op afstand tot 20 verschillende IP-adressen (Windows & Mac OS) webbrowser: Internet Explorer, Firefox, Google Chrome en Safari via Java, Quicktime of VLC plug-in SMS, en uploaden van beelden naar FTP-sites ondersteunt TCP/IP, PPPoE, DHCP en DDNS-functie 19 VDC / 2.1 A (meegelev.) < 40 W werktemperatuur 10 C ~ 40 C systeemherstel afmetingen automatisch systeemherstel na herinschakeling van de voeding 375 x 68 x 264 mm Gebruik dit toestel enkel met originele accessoires. Velleman nv is niet aansprakelijk voor schade of kwetsuren bij (verkeerd) gebruik van dit toestel. Voor meer informatie over dit product en de laatste versie van deze handleiding, zie De informatie in deze handleiding kan te allen tijde worden gewijzigd zonder voorafgaande kennisgeving. AUTEURSRECHT Velleman nv heeft het auteursrecht voor deze handleiding. Alle wereldwijde rechten voorbehouden. Het is niet toegestaan om deze handleiding of gedeelten ervan over te nemen, te kopiëren, te vertalen, te bewerken en op te slaan op een elektronisch medium zonder voorafgaande schriftelijke toestemming van de rechthebbende. V /03/ Velleman nv
23 1. Introduction Aux résidents de l'union européenne NVR2 GUIDE D'INSTALLATION RAPIDE Des informations environnementales importantes concernant ce produit Ce symbole sur l'appareil ou l'emballage indique que l élimination d un appareil en fin de vie peut polluer l'environnement. Ne pas jeter un appareil électrique ou électronique (et des piles éventuelles) parmi les déchets municipaux non sujets au tri sélectif ; une déchèterie traitera l appareil en question. Renvoyer cet appareil à votre fournisseur ou à un service de recyclage local. Il convient de respecter la réglementation locale relative à la protection de l environnement. En cas de questions, contacter les autorités locales pour élimination. Nous vous remercions de votre achat! Lire la présente notice attentivement avant la mise en service de l appareil. Si l appareil a été endommagé pendant le transport, ne pas l installer et consulter votre revendeur. 2. Consignes de sécurité Garder l'appareil hors de la portée des enfants et des personnes non autorisées. Risque d électrocution lors de l ouverture du boîtier. Toucher un câble sous tension peut causer des électrochocs mortels. Toujours débrancher l appareil s il n est pas utilisé et avant du nettoyage ou l'entretien. Tirer sur la fiche pour débrancher l'appareil ; non pas sur le câble. 3. Directives générales Se référer à la garantie de service et de qualité Velleman en fin de notice. Utiliser cet appareil uniquement à l'intérieur. Protéger de la pluie, de l humidité et des projections d eau. Ne jamais placer d objets remplis de liquides au-dessus ou à proximité de l appareil. Protéger contre la poussière et les températures extrêmes. Veiller à ce que les fentes de ventilation ne soient pas bloquées. Laisser une distance de minimum 2,5 cm entre l appareil et tout autre objet. Protéger l appareil des chocs. Traiter l'appareil avec circonspection pendant l opération. Se familiariser avec le fonctionnement de l appareil avant de l utiliser. Il est interdit de modifier l'appareil pour des raisons de sécurité. Les dommages occasionnés par des modifications par le client ne tombent pas sous la garantie. N utiliser l'appareil qu à sa fonction prévue. Un usage impropre annule d'office la garantie. La garantie ne s applique pas aux dommages survenus en négligeant certaines directives de cette notice et votre revendeur déclinera toute responsabilité pour les problèmes et les défauts qui en résultent. Garder ce mode d'emploi pour toute référence ultérieure. Installer et utiliser la caméra en respectant la législation et la vie privée des tiers. 4. Caractéristiques enregistrement de haute résolution capacité : mode à 12 canaux : 720 x 480 pixels : ± 360 IPS 1280 x 720 : ± 120 IPS mode à 6 canaux : 720 x 480 pixels : ± 180 IPS 1280 x 720 pixels : ± 180 IPS 1920 x 1080 : ± 90 IPS surveillance à distance depuis le logiciel EagleEyes gratuit disponible sur iphone, ipad et Android connexion avec le téléphone mobile via GPRS, 3G ou WiFi affichage GUI (Graphical User Interface) et pilotage par souris USB V /03/ Velleman nv
24 NVR2 haute compatibilité et sauvegarde hors site : compatible avec toutes les caméras IP qui sont certifiées ONVIF IP sur l'internet pour les sauvegardes hors site pilotages local et à distance entièrement séparés résolution de sortie HDMI jusqu'à 1080P moniteur optionnel : MONSCA8 adaptateur : PAC916T fonction de stockage en réseau NAS pour sauvegarder toute caméra compatible avec le logiciel CMS gratuit (Central Management System) câble HDMI : Professionel ou Premium disque dur optionnel : HD500GB/S, HD1TB/S, HD2TB/S souris USB : livrée télécommande IR : livrée caméras IP : pour : CAMIP11, CAMIP12 également compatible avec : CAMIP9, CAMIP13, CAMIP14 & caméras ONVIF compatible avec adaptateur powerline : EM8017, EM8024, EM8025, EM8026 routeur optionnel : EM4542, EM4553, EM4570, PCRT1 5. Description Se référer aux illustrations en page 2 de cette notice. Panneau frontal 1 POWER Indicateur LED : l'enregistreur est allumé 2 ALARM Indicateur LED : un événement d'alarme survient 3 WAN Indicateur LED : l'enregistreur est connecté à l'internet 4 LAN Indicateur LED : l'enregistreur est connecté au réseau LAN 5 SATA Indicateur LED : le disque dur SATA est actif 6 HDD1/HDD2 Indicateur LED : jusqu'à 2 disques durs sont installés et connectés correctement 7 Port USB Insérer une clé USB pour la sauvegarde vidéo. Remarque : Consulter le mode d'emploi complet sur le CD-ROM pour voir la liste des clés USB compatibles. 8 Port souris Connecter une souris (livrée). Panneau arrière 9 RS485 Port RS SATA Connecter un disque dur externe SATA 11 Porte de sortie vidéo HDMI Connecter à un moniteur supportant des images de haute résolution (port HDMI). Remarque : Utiliser un adaptateur approprié (non incl.) pour connecter au moniteur avec des connecteurs VGA ou vidéo composite. 12 LAN Connecter aux caméras IP locales avec un câble réseau 8P8C (RJ45). 13 WAN Connecter à l'internet avec un câble réseau 8P8C (RJ45) 14 AUDIO OUT Connecter à l'entrée ligne audio d'un amplificateur. 15 DC 19V IN Connecter à l'adaptateur réseau (livré). 6. Installer le disque dur (HDD) 1. Utiliser un disque dur compatible (non incl.), type ESATA (Serial Advanced Technology Attachment). Formatter le disque dur. 2. S'assurer de déconnecter d'abord l'appareil du secteur. Ne pas toucher les circuits électriques pour éviter des décharges électrostatiques. 3. Dévisser et enlever le couvercle supérieur. V /03/ Velleman nv
25 4. Installer le disque dur dans le support de montage. NVR2 5. Positionner le disque dur avec le côté de la carte du circuit imprimé dirigé vers le haut et connecter les connecteurs d'alimentation et de données. 6. Fixer le disque dur avec les vis livrées, deux de chaque côté. 7. Utiliser les supports de montage supplémentaires pour installer un deuxième disque dur. Fixer les sur la partie inférieure de l'enregistreur. 8. Positionner le disque dur avec le côté de la carte du circuit imprimé dirigé vers le haut et connecter les connecteurs d'alimentation et de données. 9. Placer le disque dur dans les supports de montage et fixer avec les vis livrées, deux de chaque côté. 10. Replacer le couvercle supérieur et serrer les vis. 7. Diagramme de connexion Remarque : Il faut d'abord connecter et allumer les caméras IP pour s'assurer que la configuration automatique fonctionne bien. Puis allumer l'enregistreur. Il est possible de connecter jusqu'à 12 caméras IP. Se référer aux illustrations en page 2 de cette notice. A Caméra IP E Moniteur supportant des images de haute résolution B Modem F Adaptateur réseau de 19VCC C Routeur G Panneau arrière de l'enregistreur D Câble de réseau 8P8C (RJ45) H Hub/interrupteur Connecter la caméra IP (Plug and Play) 1. Connecter la caméra à un hub/interrupteur. 2. Patienter jusqu'à ce la caméra soit configurée automatiquement et les images apparaissent à l'écran. 8. Symboles Se référer aux illustrations en page 2 de cette notice. 16 Etat de l'enregistreur l'enregistreur est verrouillé les canaux sont verrouillés clé USB / dispositif est connecté enregistrement temporisé est activé l'enregistreur est déverrouillé les canaux sont déverrouillés pas de dispositif USB connecté enregistrement temporisé est désactivé V /03/ Velleman nv
26 fonction écraser activée affichage séquentiel activé mode PTZ activé fonction écraser désactivée affichage séquentiel désactivé mode PTZ désactivé charge CPU Etat du réseau (WAN) connexion à l'internet (WAN) Internet déconnecté (WAN) connexion locale (LAN) mode automatique - Mbit/s (LAN) DHCP / mode IP statique (LAN) mode automatique - Gbit/s (LAN) caméra déconnectée 17 Espace disponible sur le disque dur 18 Etat des canaux la fonction "recherche automatique" est activée la fonction "audio en direct" est activée la fonction "lecture audio" est activée format original enregistrement alarme informations en direct la fonction "recherche automatique" est désactivée la fonction "audio" est désactivée la fonction "lecture audio" est désactivée ajuster à l'écran détection de personnes détection de mouvements lecture des informations 19 pilotage rapide Cliquer pour afficher l'icône de désactivation et pour éteindre ou réinitialiser l'appareil. Cliquer pour afficher le panneau de sélection de canal et pour sélectionner le canal souhaité. Sélectionner d'abord le canal souhaité, puis cliquer sur pour entrer en mode "zoom". Cliquer et déplacer le cadre rouge pour afficher la zone sélectionnée. Cliquer pour entrer en mode PTZ et pour afficher le panneau de contrôle de la caméra PTZ. Cliquer pour ouvrir la fenêtre de recherche IP et pour vérifier l'état de connexion de chaque canal. 20 menu principal QUICK START SYSTEM EVENT INFORMATION ADVANCED CONFIG SCHEDULE SETTING Cliquer pour régler l'affichage de l'état, les images, la date et l'heure. Cliquer pour régler la configuration du système. Cliquer pour accéder au menu de recherche d'événements. Cliquer pour régler la connexion (CONNECTION), la caméra (CAMERA), la détection (DETECTION), l'alarme (ALERT), le réseau (NETWORK), l'écran (DISPLAY), l'enregistrement (RECORD) et les notifications (NOTIFY). Cliquer pour régler l'heure d'enregistrement. V /03/ Velleman nv
27 21 menu de lecture avancer reculer lecture / pause arrêter lecture au ralenti heure précédente/suivante recherche rapide Cliquer pour avancer à une vitesse entre 4 et 32 fois plus rapide que la vitesse normale. Cliquer pour reculer à une vitesse entre 4 et 32 fois plus rapide que la vitesse normale. Cliquer pour lire la dernière vidéo enregistrée. Cliquer de nouveau pour interrompre. En mode pause, cliquer une fois sur pour avancer image par image ou sur pour reculer image par image. Cliquer pour arrêter la lecture. Cliquer une fois pour une lecture à ¼ de la vitesse normale, doublecliquer pour une lecture à 1/8 de la vitesse normale. Cliquer pour passer à l'intervalle précédente/suivante d'une heure (p. ex., 11:00 ~ 12:00 ou 14:00 ~ 15:00) et lire la première vidéo enregistrée durant cet intervalle. Cliquer pour accéder au menu de recherche rapide. 8.2 Verrouiller / déverrouiller l'appareil Dans le menu d'état [15], cliquer sur (verrouiller) ou sur (déverrouiller) pour verrouiller ou déverrouiller l'enregistreur. Introduire un nom d'utilisateur et le mot de passe pour déverrouiller l'enregistreur. Remarque: Par défaut, le nom d'utilisateur et le mot de passe sont "admin". Différents types d'utilisateurs ont différents droits d'accès. Pour obtenir plus d'informations, consulter le mode d'emploi complet sur le CD-ROM. 9. Configurer la caméra sur un port LAN (Plug and Play) Remarque: Cette configuration convient aux caméras ETS. 9.1 Configuration Automatique L'enregistreur configure automatiquement l'adresse IP d'une caméra ETS connectée par LAN si : Le méthode de configuration IP par défaut de la caméra est DHCP. La caméra est activée avant d'allumer l'enregistreur. Si ce n'est pas le cas, il est possible de configurer l'adresse IP de la caméra manuellement (voir ci-après). 9.2 Configuration manuelle Si l'enregistreur ne configure pas l'adresse IP de la caméra automatiquement (voir ci-dessus), il est possible que la méthode de configuration IP par défaut de la caméra IP ne soit pas réglée sur DHCP. Pour résoudre cela, régler l'adresse IP de la caméra sur xx (xx entre 11~ 253), dans la même segmentation réseau que l'enregistreur. 1. Dans la barre de menu rapide [18], cliquer sur. Une liste s'affiche de toutes les caméras IP connectées avec l'état de connexion et l'adresse MAC. 2. Sélectionner une adresse IP qui n'est pas utilisée (UNUSED), et cliquer sur SETUP. V /03/ Velleman nv
28 1. Sélectionner STATIC dans NETWORK TYPE, et modifier l'adresse IP vers 10.1.xx (xx range de 11 ~ 253). 2. Cliquer sur APPLY et EXIT pour sauvegarder les modifications. 3. Patienter jusqu'à ce que l'enregistreur détecte la caméra IP et affiche des images. 9.3 Configurer une caméra avec connexion depuis l'internet Il est possible d'enregistrer des images depuis le réseau d'une caméra IP. 1. S'assurer que la caméra IP soit accessible hors du réseau LAN par DDNS (par exemple ip_office.ddns.eagleeyes.tw). 2. Dans le menu principal [19], cliquer sur (ADVANCED CONFIG) et sélectionner CONNECTION. 3. Pour assigner un canal à une caméra IP à distance, cliquer sur URI pour introduire l'adresse de la caméra et le numéro de port. 4. Cliquer sur SETUP pour introduire l'information d'accès de la caméra. 5. Introduire le nom d'utilisateur (USER NAME) et mot de passe (PASSWORD) pour accéder à la caméra IP. 6. Cliquer sur GET TYPE pour détecter la caméra et s'assurer que la l'information d'accès soit correcte. 7. Sélectionner le format de l'image (IMAGE SIZE), la qualité de l'image (QUALITY), et le nombre d'images par seconde (I.P.S.). Remarque: Les options disponibles dépendent du type de caméra à connecter. 8. Cliquer sur GET TYPE pour détecter la caméra et s'assurer que l'information d'accès soit correcte. V /03/ Velleman nv
29 9. Optionnel: pour une caméra avec enregistrement d'audio, régler AUDIO sur ON ou OFF. 10. Barre de menu rapide 10.1 Allumer / éteindre et réinitialiser Pour éteindre ou réinitialiser l'enregistreur : Dans la barre de menu rapide [18], cliquer sur et puis cliquer sur (éteindre) ou (réinitialiser) Afficher un canal en mode plein écran (Full-Screen) Pour afficher un canal en mode plein écran : Cliquer directement sur l'image du canal. Double-cliquer sur l'image pour retourner à l'affichage des 6 canaux. Dans la barre de menu rapide [18], cliquer sur. Dans le panneau de contrôle qui apparaît, sélectionner le canal à afficher en mode plein écran. Cliquer sur pour retourner à l'affichage des 6 canaux Lire les images enregistrées 1. S'assurer que l'enregistrement manuel et/ou l'enregistrement d'événements soit activé : dans le menu principal [19], cliquer sur (ADVANCED CONFIG) et sélectionner RECORD pour vérifier ou modifier les réglages. 2. Dans le menu de lecture [20], appuyer sur le bouton de lecture. Les fichiers enregistrés s'affichent 3. Avec le bouton avancer et reculer, la vitesse de lecture peut être augmentée/diminuée. Appuyer plusieurs fois sur le bouton pour augmenter/diminuer la vitesse 4x, 8x, 16x, ou 32x (max.) 4. Appuyer sur pour interrompre la lecture. 5. Appuyer sur pour arrêter la lecture et pour retourner à l'affichage en direct. V /03/ Velleman nv
30 11. Configurer la fonction push video 11.1 Configurer le port WAN 1. S'assurer que l'enregistreur soit proprement connecté au routeur avec un câble de réseau RJ Depuis votre enregistreur, sélectionner (ADVANCED CONFIG), et sélectionner "Network" "WAN". 3. Sélectionner "DHCP", et configurer le réglage DNS et numéro de port. Le numéro de port par défaut est 80. Normalement, le protocole HTTP utilise le port TCP 80. Toutefois dans certains cas, il est préférable d'ajuster ce numéro de port pour plus de flexibilité ou de sécurité. 4. Ensuite, noter les adresses IP affichées dans "IP". C'est l'adresse IP assignée à votre enregistreur par le routeur. Vous en aurez besoin pour la redirection de port. 5. Aller à "DDNS", et sélectionner "eagleeyes" dans "SYSTEM NAME". 6. Noter toute l'adresse au-dessous de "CURRENT HOST ADDRESS", comme p. ex. Cette adresse sera utilisée pour accéder à votre enregistreur à distance. 7. Sélectionner "EXIT" pour retourner à l'affichage en direct, et continuer à l'étape suivante pour la redirection de port. 8. Depuis le navigateur Web de votre ordinateur, introduire l'adresse IP de votre routeur pour accéder à votre routeur. 9. Si nécessaire, introduire le nom d'utilisateur et le mot de passe. 10. Dans l'interface du routeur, sélectionner la page de configuration de la fonction redirection de port (ou serveur virtuel). V /03/ Velleman nv
31 Le nom de la redirection de port ou serveur virtuel peut varier et dépend de la marque du routeur. Pour obtenir plus d'informations, consulter le mode d'emploi de votre routeur. 11. Introduire l'adresse IP de la caméra et le numéro de port que vous avez notés et marquer la case Configurer une alarme push video Sélectionner Advanced Config Config > Notify > onglet Push Video Il est possible d'envoyer une notification push à votre téléphone mobile pour chaque canal depuis l'enregistreur. Pour chaque canal, selon le type de capteur d'alarme, il est possible de : Envoyer une notification push pour un contact normalement ouvert (NO) Envoyer une notification push pour un contact normalement fermé (NC) Sélectionner OFF pour désactiver la fonction push video pour un canal Installer l'application EagleEyes Conditions préalables Avant d'installer EagleEyes sur votre téléphone mobile pour la vidéosurveillance mobile, s'assurer de vérifier les points suivants : Les services d'internet mobile sont souscrits et accessibles pour votre téléphone mobile. Remarque : Il est possible d'être facturé pour l'accès à l'internet par les réseaux 3G ou sans fil. Pour les détails sur la vitesse d'accès à l'internet, consulter votre gestionnaire de réseau local ou votre fournisseur d'accès. Noter l'adresse IP, le numéro de port, le nom d'utilisateur et le mot de passe utilisés pour accéder à votre caméra de réseau depuis l'internet. Où télécharger 19. Aller à depuis votre téléphone mobile et se connecter. Ne pas essayer de télécharger EagleEyes depuis votre ordinateur. o o Pour Android, sélectionner le lien de téléchargement depuis le site web pour lancer le téléchargement. Pour iphone et ipad, deux versions de EagleEyes sont disponibles : EagleEyesHD Plus (payant), et EagleEyesHD Lite (gratuit). 20. Sélectionner la version souhaitée et vous serez redirigé vers " App Store" pour télécharger l'application. 21. Noter l'adresse IP, le numéro du port, le nom d'utilisateur et le mot de passe utilisés pour accéder à votre DVR ou à votre caméra réseau depuis l'internet. Pour plus d'informations sur la configuration et le fonctionnement d'eagleeyes, consulter le site web officiel Configuration Avant de configurer la fonction video push, s'assurer que : 22. Le système DVR system soit réglé comme décrit en point 3 Connexion et Configuration dans le mode d'emploi complet sur le CD-ROM. 23. Le DVR soit connecté à l'internet. 24. L'application EagleEyes soit installée sur le téléphone mobile (consulter Installer l'application EagleEyes ci-dessus). 25. Ouvrir EagleEyes, et ajouter ce DVR au carnet d'adresses d'eagleeyes. Pour plus d'informations sur le fonctionnement d'eagleeyes, consulter le site web Dans l'application EagleEyes, activer la fonction video push comme décrit ci-après. 27. Déclencher le capteur d'alarme pour vérifier si vous recevez des notifications push. 12. Spécifications techniques compression de vidéo entrée vidéo H.264 / MPEG4 / MJPEG 1 port LAN, jusqu'à 12 canaux depuis hub/interrupteur V /03/ Velleman nv
32 sortie vidéo mode d'enregistrement fonctions multiplex audio I/O zone de détection de mouvements sensibilité de la détection de mouvement enregistrement pré-alarme système de sauvegarde capacité disque dur interface web surveillance mobile notification d'alarme à distance connexion réseau alimentation consommation NVR2 sortie HDMI 1920 x 1080 pixels manuel / programmé / mouvement / alarme affichage en direct, enregistrement, lecture, sauvegarde et réseau 1 audio sortie (mono) grille de 22 x 18 par caméra 10 paramètres ajustables pour un calcul précis de la détection de mouvement oui sauvegarde USB 2.0 et sauvegarde par le réseau type SATA intégré : supporte 2 disques durs, supporte une capacité de disque dur de plus de 3 To (HDD non incl.) esata externe : disque dur externe ou grappe de disques (supporte Linux) supporte le logiciel CMS gratuit (Windows & Mac OS) tous les navigateurs importants par Java, QuickTime et plug-in VLC (Internet Explorer, Firefox, Safari, Google Chrome) logiciel disponible sur smartphones : push vidéo : sur ipad, ipod touch, iphone, téléphone Android & tablette connexion à distance depuis toutes les plateformes du smartphone (Apple, Android, BlackBerry, Nokia Symbian et Windows Mobile) ordinateur : CMS (Central Management System) : surveillance à distance jusqu'à 20 différentes adresses IP (Windows & Mac OS) navigateur web : Internet Explorer, Firefox, Google Chrome et Safari depuis Java, Quicktime ou plugin VLC message SMS, images par courriel et téléchargement vers site FTP supporte TCP/IP, PPPoE, DHCP et DDNS 19 VCC / 2,1 A (incl.) < 40 W température de service 10 C ~ 40 C rétablissement du système dimensions rétablissement automatique du système après la remise sous tension 375 x 68 x 264 mm N employer cet appareil qu avec des accessoires d origine. SA Velleman ne sera aucunement responsable de dommages ou lésions survenus à un usage (incorrect) de cet appareil. Pour plus d information concernant cet article et la dernière version de cette notice, visiter notre site web Les spécifications et le contenu de cette notice peuvent être modifiés sans avis préalable. DROITS D AUTEUR SA Velleman est l ayant droit des droits d auteur pour cette notice. Tous droits mondiaux réservés. Toute reproduction, traduction, copie ou diffusion, intégrale ou partielle, du contenu de cette notice par quelque procédé ou sur tout support électronique que ce soit est interdite sans l accord préalable écrit de l ayant droit. V /03/ Velleman nv
33 GUÍA RÁPIDA 1. Introducción A los ciudadanos de la Unión Europea Importantes informaciones sobre el medio ambiente concerniente a este producto Este símbolo en este aparato o el embalaje indica que, si tira las muestras inservibles, podrían dañar el medio ambiente. No tire este aparato (ni las pilas, si las hubiera) en la basura doméstica; debe ir a una empresa especializada en reciclaje. Devuelva este aparato a su distribuidor o a la unidad de reciclaje local. Respete las leyes locales en relación con el medio ambiente. Si tiene dudas, contacte con las autoridades locales para residuos. Gracias por elegir Velleman! Lea atentamente las instrucciones del manual antes de usar el aparato. Si ha sufrido algún daño en el transporte no lo instale y póngase en contacto con su distribuidor. 2. Instrucciones de seguridad Mantenga el aparato lejos del alcance de personas no capacitadas y niños. riesgo de descargas eléctricas al abrir la caja. Puede sufrir una peligrosa descarga eléctrica al tocar un cable conectado a la red eléctrica Desconecte siempre el aparato de la red eléctrica si no va a usarlo durante un largo período de tiempo y antes de su limpieza o mantenimiento. Tire siempre del enchufe para desconectar el cable de red, nunca del propio cable. 3. Normas generales Véase la Garantía de servicio y calidad Velleman al final de este manual del usuario. Utilice el aparato sólo en interiores. No exponga este equipo a lluvia, humedad ni a ningún tipo de salpicadura o goteo. Nunca ponga un objeto con líquido en el aparato. No exponga este equipo a polvo ni temperaturas extremas. Asegúrese de que los orificios de ventilación no estén bloqueados. Deje una distancia de mín. 2,5 cm entre el aparato y cualquier otro objeto para asegurar una ventilación suficiente. No agite el aparato. Evite usar excesiva fuerza durante el manejo y la instalación. Familiarícese con el funcionamiento del aparato antes de utilizarlo. Por razones de seguridad, las modificaciones no autorizadas del aparato están prohibidas. Los daños causados por modificaciones no autorizadas, no están cubiertos por la garantía. Utilice sólo el aparato para las aplicaciones descritas en este manual. Su uso incorrecto anula la garantía completamente. Los daños causados por descuido de las instrucciones de seguridad de este manual invalidarán su garantía y su distribuidor no será responsable de ningún daño u otros problemas resultantes. Guarde este manual del usuario para cuando necesite consultarlo. Instale y utilice la cámara al respetar la legislación et la vida privada de terceros. 4. Características grabaciones de alta resolución capacidad: modo de 12 canales: 720 x 480 píxeles: ± 360 IPS 1280 x 720 píxeles: ± 120 IPS modo de 6 canales: 720 x 480 píxeles: ± 180 IPS 1280 x 720 píxeles: ± 180 IPS 1920 x 1080: ± 90 IPS vigilancia a distancia por el software gratis 'EagleEyes' en iphone, ipad y Android conexión con móvil por GPRS, 3G o WiFi pantalla con interfaz gráfica de usuario (GUI/Graphical User Interface) y ratón USB V /03/ Velleman nv
34 NVR2 alta compatibilidad y copias de seguridad remotas: compatible con todas las cámaras IP, que cumplen con la norma ONVIF función de almacenamiento conectado a redes (NAS) para hacer una copia de seguridad de todo tipo de cámaras IP en internet para copia de seguridad remota control local y control a distancia, completamente independiente resolución de salida HDMI hasta 1080P monitor opcional: MONSCA8 adaptador: PAC916T cable HDMI: Professional o Premium discos duros opcionales: HD500GB/S, HD1TB/S, HD2TB/S ratón USB: incl. mando a distancia IR: incl. cámaras IP: para: CAMIP11, CAMIP12 funciona con el software Central Management System (CMS) gratis también compatible con: CAMIP9, CAMIP13, CAMIP14 & cámaras ONVIF compatible con adaptador Powerline: EM8017, EM8024, EM8025, EM8026 router opcional: EM4542, EM4553, EM4570, PCRT1 5. Descripción Véase las figuras en la página 2 de este manual del usuario. Panel Frontal 1 POWER indicador LED: el aparato está activado 2 ALARM indicador LED: la alarma está activada 3 WAN indicador LED: el aparato está conectado a internet 4 LAN indicador LED: el NVR está conectado a la red LAN 5 SATA indicador LED: el disco duro SATA está activado 6 HDD1/HDD2 indicador LED: dos discos duros están instalados y conectados correctamente 7 puerto USB 8 puerto para el ratón Conecte una unidad flash USB compatible para copias de seguridad. Observación: Para la lista de unidades flash USB compatibles, consulte el amplio manual del usuario en el CD-ROM. Para conectar un ratón (incl.). Panel trasero 9 RS485 puerto RS SATA Para conectar un disco duro SATA externo 11 puerto de salida de vídeo HDMI Para la conexión a un monitor que soporta HDMI para salida de vídeo de altadefinición (puerto HDMI). Observación: Utilice un adaptador de red adecuado (no incl.) para conectar un monitor que soporta VGA o Composite. 12 LAN Para la conexión a cámaras IP locales con un cable de red 8P8C (RJ45). 13 WAN Para la conexión a internet con un cable de red 8P8C (RJ45). 14 AUDIO OUT Para la conexión a la entrada de línea de audio de un amplificador. 15 DC 19V IN Para la conexión a un adaptador de red (incl.). 6. Instalar el disco duro (HDD) 1. Utilice un disco duro compatible (no incl.), tipo ESATA (Serial Advanced Technology Attachment). Si fuera necesario, formatee el disco duro. 2. Desconecte el aparato de la red antes del mantenimiento y no toque el circuito electrónico para evitar descargas eléctricas. V /03/ Velleman nv
35 3. Desatornille los tornillos y saque la tapa superior. 4. Introduzca el disco duro en el soporte. NVR2 5. Instale el disco duro con el circuito impreso hacia arriba y conéctelo al conector de alimentación y el conector de datos. 6. Fije el disco duro con los tornillos incluidos (dos para cada lado). 7. Utilice los soportes adicionales (incl.) para instalar un segundo disco duro y fíjelos a la parte inferior del NVR. 8. Instale el disco duro con el circuito impreso hacia arriba y conéctelo al conector de alimentación y el conector de datos. 9. Fije el disco duro con los tornillos incluidos (dos para cada lado). 10. Vuelva a poner la tapa superior y atornille los tornillos. 7. Esquema de conexión Observación: Para asegurarse de que la configuración automática funcione correctamente, conecte las cámaras IP y actívelas. Luego, active el NVR. Es posible conectar hasta 12 cámaras IP. Véase las figuras en la página 2 de este manual del usuario. A cámara IP E monitor que soporta vídeos de alta definición B módem F adaptador de red de 19VDC C router G panel trasero del NVR D cable de red 8P8C (RJ45) H hub/switch Conectar la cámara IP (plug-and-play/enchufar y listo) 1. Conecte la cámara a un hub/switch. 2. Espere hasta que se haya terminado la configuración automática de la cámara y que se visualicen las imágenes en la pantalla. 8. Símbolos en la pantalla Véase las figuras en la página 2 de este manual del usuario. 16 Estado del NVR el NVR está bloqueado los canales están bloqueados unidad flash USB / un aparato USB está conectado el NVR está desbloqueado los canales están desbloqueados no está conectado un aparato USB V /03/ Velleman nv
36 la grabación con temporizador está activada la función «sobre-escribir» está activada el modo de secuencia está activado el modo PTZ está activado la grabación con temporizador está desactivada la función «sobre-escribir» está desactivada el modo de secuencia está desactivado el modo PTZ está desactivado carga CPU Estado de la red (WAN) conexión a internet (WAN) internet desconectado (WAN) conexión local (LAN) modo automático Mbit/s (LAN) DHCP / modo IP estático (LAN) modo automático Gbit/s (LAN) la cámara está desconectada 17 Espacio disponible en el disco duro 18 Estado de los canales la función «búsqueda automática» está activada la función «audio en directo» está activada la función «reproducción de audio» está activada tamaño original grabación alarma informaciones en directo la función «búsqueda automática» está desactivada la función «audio en directo» está desactivada la función «reproducción de audio» está desactivada ajustar a la pantalla detección de personas detección de movimientos reproducción de las informaciones 19 Barra con el menú rápido Haga clic para visualizar el icono de desactivación y para desactivar o reiniciar el aparato. Haga clic para visualizar la ventana de selección de canales y seleccione el canal deseado. Primero, seleccione el canal deseado. Luego, haga clic en para entrar en el modo «zoom». Haga clic en el cuadro rojo de la parte inferior izquierdo de la pantalla y arrástrelo para visualizar la zona seleccionada. Haga clic para entrar en el modo PTZ y para visualizar el panel de control de la cámara PTZ. Haga clic para abrir la ventana de búsqueda IP y para controlar el estado de conexión de cada canal. 20 Menú principal QUICK START SYSTEM EVENT INFORMATION ADVANCED CONFIG Haga clic para ajustar la visualización del estado, las imágenes, la fecha & el tiempo. Haga clic para ajustar la configuración del sistema. Haga clic para entrar en el menú de búsqueda de eventos. Haga clic para ajustar la conexión (CONNECTION), la cámara (CAMERA), la detección (DETECTION), la alarma (ALERT), la red (NETWORK), la pantalla (DISPLAY), la grabación (RECORD) y las notificaciones (NOTIFY),. V /03/ Velleman nv
37 SCHEDULE SETTING Haga clic para ajustar el tiempo de grabación. 21 Menú de reproducción avanzar retroceder reproducir / hacer una pausa parar reproducción lenta hora siguiente/anterior búsqueda rápida Haga clic para avanzar a una velocidad entre 4 y 32 veces más rápida de lo normal. Haga clic para retroceder a una velocidad entre 4 y 32 veces más rápida de lo normal. Haga clic para reproducir el último vídeo grabado. Vuelva a hacer clic para hacer una pausa. En el modo pausa, haga una vez clic en para avanzar un fotograma. Haga clic en para retroceder un fotograma. Haga clic para desactivar la reproducción. Haga clic una vez para una reproducción a 1/4 de la velocidad normal. Haga clic dos veces para una reproducción a 1/8 de la velocidad normal. Haga clic para ir al intervalo de una hora siguiente/anterior (p.ej. 11:00 ~ 12:00 ó 14:00 ~ 15:00) y inicie la reproducción del primer vídeo grabado durante este intervalo. Haga clic para entrar en el menú de búsqueda rápida. 8.2 Bloquear / desbloquear el aparato En el menú de estado, haga clic en (bloquear) o (desbloquear) para bloquear o desbloquear el NVR. Introduzca el nombre de usuario y la contraseña para desbloquear el NVR. Observación: El nombre de usuario y la contraseña por defecto es admin. Diferentes tipos de usuarios tienen diferentes derechos de acceso a las funciones. Para obtener más información, consulte el amplio manual del usuario en el CD-ROM. 9. Ajustar la cámara en un puerto LAN (Plug and Play) Observación: Este método de configuración vale para cámaras ETS. 9.1 Configuración automática El NVR configura la dirección IP automáticamente de una cámara ETS conectada por LAN si: El método de configuración IP por defecto de la cámara es DHCP. Active la cámara antes de que active el NVR. Si no fuera el caso, puede configurar la dirección IP de la cámara manualmente (véase a continuación). 9.2 Configuración manual Si el NVR no configura la dirección IP de la cámara automáticamente (véase arriba), es posible que el método de configuración IP por defecto de la cámara IP camera no esté en DHCP. Para solucionar esto, ajuste la dirección IP de la cámara en xx (xx entre 11 ~ 253), en el mismo segmento de red que el NVR. 1. En la barra con el menú rápido, haga clic en. Se visualiza una lista de todas las cámaras IP conectadas con el estado de conexión y la dirección MAC. 2. Seleccione una dirección IP no utilizada (UNUSED) y haga clic en SETUP. V /03/ Velleman nv
38 1. Seleccione STATIC en NETWORK TYPE y modifique la dirección IP en xx (xx en el rango de 11 ~ 253)). 2. Haga clic en APPLY y EXIT para guardar las modificaciones. 3. Espere hasta que el NVR detecte la cámara IP y visualice imágenes. 9.3 Configurar una cámara con conexión desde internet Es posible grabar imágenes por la red desde una cámara IP. 1. Asegúrese de que la cámara IP camera sea accesible fuera de la red LAN por DDNS (p.ej. ip_office.ddns.eagleeyes.tw). 2. En el menú principal, haga clic en (ADVANCED CONFIG) y seleccione CONNECTION. 3. Para asignar un canal a una cámara IP remota, haga clic en URI para introducir la dirección de la cámara y el número de puerto. 4. Haga clic en SETUP para introducir la información de acceso de la cámara. 5. Introduzca el nombre de usuario (USER NAME) y la contraseña (PASSWORD) para acceder a la cámara IP. 6. haga clic en GET TYPE para detectar la cámara y asegúrese de que la información de acceso sea correcta. V /03/ Velleman nv
39 7. Seleccione el tamaño de la imagen (IMAGE SIZE), la calidad de la imagen (QUALITY), y el número de imágenes por segundo (I.P.S.). Observación: Las opciones disponibles dependen del tipo de cámara que quiere conectar. 8. Haga clic en GET TYPE para detectar la cámara y asegúrese de que la información de acceso sea correcta. 9. Opcional: para una cámara con grabación de audio, ponga AUDIO en ON u OFF. 10. Barra con menú rápida 10.1 Activar/desactivar y reiniciar Para desactivar o reiniciar el NVR: Utilice el interruptor ON/OFF del panel trasero del NVR o, En la barra con menú rápido, haga clic en y luego en (desactivar) o (reiniciar) Visualizar un canal en el modo de pantalla completa (Full-Screen) Para visualizar un canal en modo de pantalla completa: Haga clic directamente en la imagen del canal. Haga clic dos veces en la imagen para volver a la visualización anterior. En la barra con menú rápido, haga clic en. En el panel de control que aparece, seleccione el canal que quiere visualizar en modo de pantalla completa. Haga clic en para volver a la visualización anterior Reproducir las imágenes grabadas 1. Asegúrese de que esté activada la grabación manual y/o la grabación de eventos: En el menú principal], haga clic en (ADVANCED CONFIG) y seleccione RECORD para controlar o modificar los ajustes. 2. En el menú de reproducción, pulse el botón de reproducción. Los ficheros grabados se visualizan. 3. Con el botón para avanzar y retroceder puede aumentar/disminuir la velocidad de reproducción. Pulse el botón repetidas veces para aumentar/disminuir la velocidad 4x, 8x, 16x o 32x (máx.). 4. Pulse el botón para hacer una pausa. V /03/ Velleman nv
40 5. Pulse el botón para desactivar la reproducción y volver al monitoreo en vivo. 11. Configurar la función Push Video 11.1 Configurar el puerto WAN 1. Asegúrese de que el NVR esté correctamente conectado al router con un cable de red RJ En el NVR, seleccione (ADVANCED CONFIG) y luego «Network» «WAN». 3. Seleccione «DHCP» y configure el ajuste DNS y el número de puerto. El puerto por defecto es 80. Normalmente, el puerto TCP utilizado por el protocolo HTTP es 80. Sin embargo, en algunos casos es mejor modificar el número de puerto para aumentar la flexibilidad o la seguridad. 4. Luego, apunte la dirección IP que se visualiza en «IP». Es la dirección IP que el router ha atribuido al NVR. Necesitará esta información más tarde para la redirección de puertos (Port forwarding). 5. Seleccione «DDNS» y luego «EagleEyes» en «SYSTEM NAME». 6. Apunte la dirección completa que aparece en «CURRENT HOST ADDRESS» como p.ej. MAC000E5318B3F0@ddns.dvrtw.com.tw. Esta es la dirección IP por defecto que tiene que utilizar para acceder al NVR a distancia. 7. Seleccione «EXIT» para volver a la visualización en directo y seleccione el paso siguiente (Port forwarding). 8. En el navegador del PC, introduzca la dirección IP del router para acceder al router. 9. Si fuera necesario, introduzca el nombre de usuario y la contraseña. 10. En el menú de configuración del router, seleccione la página de configuración para la redirección de puertos (o el servidor virtual). V /03/ Velleman nv
41 El significado de la redirección de puertos o del servidor virtual puede variar según la marca de enrutador. Véase el manual del usuario de su router para más información. 11. Introduzca la dirección IP y el número de puerto apuntados y marque la casilla Configurar la notificación «Push Video» Seleccione Advanced Config > Notify > tab Push Video El NVR envía una notificación al dispositivo móvil para cada canal. Es posible seleccionar lo siguiente para cada canal (según el tipo de sensor de alarma): Enviar una notificación «Push Video» en caso de un contacto normalmente abierto (NA) Enviar una notificación «Push Video» en caso de un contacto normalmente cerrado (NC) Seleccione OFF para desactivar la función «Push Video» de un canal 11.3 Instalar «EagleEyes» Prerrequisitos Antes de instalar EagleEyes en el teléfono móvil para la vigilancia a distancia, asegúrese de que ha comprobado lo siguiente: Tiene suscritos y disponibles para utilizar servicios de Internet en su teléfono móvil. Observación: El acceso a Internet a través de Wireless o redes 3G le costará dinero. Consulte el detalle de las tarifas de acceso a Internet con su proveedor de red. Para más detalles sobre las tasas de acceso a internet, consulte a su operador de red local o a su proveedor de servicios. Ha anotado la dirección IP, número de puerto, nombre de usuario y contraseña utilizados para acceder a su cámara de red desde el internet. Dónde descargar el software 28. Conéctese a la página web desde su teléfono y regístrese. No intente descargar EagleEyes desde su ordenador. o o Para Android, seleccione el enlace de descarga que puede encontrar en la página web para iniciar la descarga. Para iphone y ipad, existen dos versiones: EagleEyesHD Plus (versión de pago) y EagleEyesHD Lite (versión gratuita). 29. Seleccione la versión que quiera y se abre la App Store para descargar la aplicación. 30. Cuando la descarga se haya completado, EagleEyes se instalará automáticamente en la ubicación por defecto en la que se guardan todas las aplicaciones en su teléfono móvil, o bien donde usted especifique. Para más informaciones sobre la configuración y el uso de EagleEyes, visite la página web oficial Configuración Antes de configurar la función «push video», asegúrese de que: 31. Haya configurado el DVR de manera correcto (consulte Conexión y Configuración del manual del usuario amplio en el CD-ROM incluido). 32. El DVR esté conectado a internet. 33. La app EagleEyes esté instalado en el teléfono móvil (consulte Instalar la app EagleEyes arriba). 34. Abra EagleEyes y añada este DVR a la libreta de direcciones EagleEyes. Para más informaciones sobre el uso de EagleEyes, visite En la app EagleEyes, active «push video» (véase abajo). 36. Active la alarma para ver si recibe un aviso de notificación. 12. Especificaciones formato de compresión vídeo H.264 / MPEG4 / MJPEG V /03/ Velleman nv
42 entrada de vídeo salida de vídeo modo de grabación funciones multiplex audio E/S zona de detección de movimiento sensibilidad de detección de movimientos grabación prealarma aparato 'backup' capacidad disco duro interfaz web vigilancia a distancia por el móvil notificación de alarma a distancia conexión de red alimentación consumo temperatura de funcionamiento restablecimiento dimensiones 1 puerto LAN, hasta 12 canales por hub/switch salida HDMI 1920 x 1080 píxeles manual / temporizador / movimiento / alarma reproducción en directa, grabación, reproducción, copia de seguridad y red 1 salida de audio (mono) rejilla de 22 x 18 por cámara 10 variables ajustables para un cálculo preciso de la detección de movimiento sí copia de seguridad USB 2.0 y copia de seguridad por la red tipo SATA incluido: soporta 2 discos duros, soporta una capacidad de disco duro de más de 3 TB (disco duro no incl.) esata externo: disco duro externo o disk array (soporta Linux) soporta el software CMS gratis (Windows & Mac OS) todos los navegadores importantes por Java, QuickTime y plug-in VLC (Internet Explorer, Firefox, Safari, Google Chrome) el software está disponible en smartphones: push video: ipad, ipod touch, iphone, Android & tablet conexión a distancia por cualquier plataforma de smartphone (Apple, Android, BlackBerry, Nokia Symbian y Windows Mobile) ordenador: CMS (Central Management System): manejo central de hasta 20 direcciones IP (Windows & Mac OS) navegador: Internet Explorer, Firefox, Google Chrome y Safari mediante Java, Quicktime o plug-in VLC mensaje SMS, imágenes por correo electrónico y cargar a página FTP soporta TCP/IP, PPPoE, DHCP y DDNS 19 VDC / 2.1 A (incl.) < 40 W 10 C ~ 40 C restablecimiento automático del sistema después de haber activado la alimentación de nuevo 375 x 68 x 264 mm Utilice este aparato sólo con los accesorios originales. Velleman NV no será responsable de daños ni lesiones causados por un uso (indebido) de este aparato. Para más información sobre este producto y la versión más reciente de este manual del usuario, visite nuestra página Se pueden modificar las especificaciones y el contenido de este manual sin previo aviso. DERECHOS DE AUTOR Velleman NV dispone de los derechos de autor para este manual del usuario. Todos los derechos mundiales reservados. Está estrictamente prohibido reproducir, traducir, copiar, editar y guardar este manual del usuario o partes de ello sin previo permiso escrito del derecho habiente. V /03/ Velleman nv
43 SCHNELLEINSTIEG 1. Einführung An alle Einwohner der Europäischen Union Wichtige Umweltinformationen über dieses Produkt Dieses Symbol auf dem Produkt oder der Verpackung zeigt an, dass die Entsorgung dieses Produktes nach seinem Lebenszyklus der Umwelt Schaden zufügen kann. Entsorgen Sie die Einheit (oder verwendeten Batterien) nicht als unsortiertes Hausmüll; die Einheit oder verwendeten Batterien müssen von einer spezialisierten Firma zwecks Recycling entsorgt werden. Diese Einheit muss an den Händler oder ein örtliches Recycling-Unternehmen retourniert werden. Respektieren Sie die örtlichen Umweltvorschriften. Falls Zweifel bestehen, wenden Sie sich für Entsorgungsrichtlinien an Ihre örtliche Behörde. Vielen Dank, dass Sie sich für Velleman entschieden haben! Lesen Sie diese Bedienungsanleitung vor Inbetriebnahme sorgfältig durch. Überprüfen Sie, ob Transportschäden vorliegen. Sollte dies der Fall sein, verwenden Sie das Gerät nicht und wenden Sie sich an Ihren Händler. 2. Sicherheitshinweise Halten Sie Kinder und Unbefugte vom Gerät fern. Stromschlaggefahr beim Öffnen des Gehäuses. das Berühren von unter Spannung stehenden Leitungen könnte zu lebensgefährlichen elektrischen Schlägen führen. Trennen Sie das Gerät bei Nichtbenutzung und vor jeder Reinigung vom Netz. Fassen Sie dazu den Netzstecker an der Grifffläche an und ziehen Sie nie an der Netzleitung. 3. Allgemeine Richtlinien Siehe Velleman Service- und Qualitätsgarantie am Ende dieser Bedienungsanleitung. Verwenden Sie das Gerät nur im Innenbereich. Schützen Sie das Gerät vor Regen und Feuchte. Setzen Sie das Gerät keiner Flüssigkeit wie z.b. Tropf- oder Spritzwasser, aus. Stellen Sie keine mit Flüssigkeit befüllten Gegenstände auf das Gerät. Schützen Sie das Gerät vor Staub und extremen Temperaturen. Beachten Sie, dass die Lüftungsschlitze nicht blockiert werden. Beachten Sie eine minimale Entfernung von 2,5 cm zwischen dem Gerät und jedem anderen Gegenstand. Vermeiden Sie Erschütterungen. Vermeiden Sie rohe Gewalt während der Installation und Bedienung des Gerätes. Nehmen Sie das Gerät erst in Betrieb, nachdem Sie sich mit seinen Funktionen vertraut gemacht haben. Eigenmächtige Veränderungen sind aus Sicherheitsgründen verboten. Bei Schäden verursacht durch eigenmächtige Änderungen erlischt der Garantieanspruch. Verwenden Sie das Gerät nur für Anwendungen beschrieben in dieser Bedienungsanleitung sonst kann dies zu Schäden am Produkt führen und erlischt der Garantieanspruch. Bei Schäden, die durch Nichtbeachtung der Bedienungsanleitung verursacht werden, erlischt der Garantieanspruch. Für daraus resultierende Folgeschäden übernimmt der Hersteller keine Haftung. Bewahren Sie diese Bedienungsanleitung für künftige Einsichtnahme auf. Installieren und verwenden Sie das Gerät nicht für illegale Praktiken und beachten Sie die Intimsphäre aller 4. Eigenschaften hochauflösende Aufzeichnungen Leistung: 12-Kanal-Modus: 720 x 480 Pixel: ± 360 IPS 1280 x 720 Pixel: ± 120 IPS 6-Kanal-Modus: 720 x 480 Pixel: ± 180 IPS 1280 x 720 Pixel: ± 180 IPS 1920 x 1080: ± 90 IPS V /03/ Velleman nv
44 NVR2 Fernüberwachung über die gratis EagleEyes-Software auf iphone, ipad und Android Anschluss mit Handy über GPRS, 3G oder Wi-Fi Display mit graphischer Benutzerschnittstelle (GUI/Graphical User Interface) und USB-Maus hohe Kompatibilität und Offsite-Backup: mit allen wichtigsten IP-Kameras, die der ONVIF-Norm entsprechen, kompatibel System) für Offsite-Backup lokale Kontrolle und Fernkontrolle, völlig unabhängig HDMI-Ausgangsauflösung bis 1080P optionaler Monitor: MONSCA8 Adapter: PAC916T NAS-Funktion für Sicherungskopie von allerlei IP-Kameras funktioniert mit der gratis CMS-Software (Central Management HDMI-Kabel: Professional oder Premium optionale Festplatten: HD500GB/S, HD1TB/S, HD2TB/S USB-Maus: mitgeliefert IR-Fernbedienung: mitgeliefert IP-Kameras: für: CAMIP11, CAMIP12 auch kompatibel mit: CAMIP9, CAMIP13, CAMIP14 & ONVIF-Kameras kompatibel mit Powerline-Adapter: EM8017, EM8024, EM8025, EM8026 optionaler Router: EM4542, EM4553, EM4570, PCRT1 5. Beschreibung Siehe Abbildungen, Seite 2 dieser Bedienungsanleitung. Vorderseite 1 POWER LED: Der NVR ist eingeschaltet 2 ALARM LED-Anzeige: der Alarm wird ausgelöst 3 WAN LED-Anzeige: der NVR ist mit Internet verbunden 4 LAN LED-Anzeige: der NVR ist mit dem LAN-Netzwerk verbunden 5 SATA LED-Anzeige: die SATA-Festplatte ist aktiv 6 HDD1/HDD2 7 USB-Port LED-Anzeige: es sind zwei Festplatten installiert und korrekt angeschlossen worden Schließen Sie ein kompatibles USB Flash-Laufwerk für Video-Backup an. Bemerkung: Die Liste mit den kompatiblen USB Flash-Laufwerken, finden Sie in der ausführlichen Bedienungsanleitung auf der CD-ROM. 8 Maus-Port Zum Anschließen einer Maus (mitgeliefert). Rückseite 9 RS485 RS 485-Port 10 SATA Zum Verbinden mit einer externen SATA-Festplatte LAN HDMI Video- Ausgangsport Zum Verbinden mit einem Monitor, der HDMI für hochauflösenden- Videoausgang unterstützt. (HDMI-Port). Bemerkung: Verwenden Sie ein geeignetes Netzteil (nicht mitgeliefert), um einen Monitor, der VGA oder Composite unterstützt, anzuschließen. Zum Anschließen des NVR über ein 8P8C-Netzwerkkabel (RJ45) an lokale IP- Kameras. 13 WAN Zum Anschließen des NVR über ein 8P8C-Netzwerkkabel (RJ45) an Internet 14 AUDIO OUT Zum Anschließen des NVR an einen Audio Line-Eingang eines Verstärkers. 15 DC 19V IN Zum Anschließen des NVR über das Netzteil (mitgeliefert) am Stromnetz. V /03/ Velleman nv
45 6. Die Festplatte installieren (HDD) NVR2 1. Verwenden Sie eine geeignete Festplatte (nicht mitgeliefert), Typ SATA (Serial Advanced Technology Attachment). Wenn nötig, dann formatieren Sie die Festplatte. 2. Trennen Sie das Gerät zuerst vor Wartung vom Netz. Berühren Sie keinen elektronischen Kreis, um Stromschläge zu vermeiden. 3. Lockern Sie die Schrauben der Oberseite und entfernen Sie den Deckel. 4. Legen Sie die Festplatte in den Montagebügel ein. 5. Installieren Sie die Festplatte mit der Leiterplatte nach oben und verbinden Sie diese dann mit dem Stromversorgungs- und Datenanschluss. 6. Befestigen Sie die Festplatte mit den mitgelieferten Schrauben (zwei für jede Seite). 7. Verwenden Sie die anderen mitgelieferten Montagebügel, wenn Sie eine zweite Festplatte montieren möchten. Befestigen Sie diese Bügel an der Unterseite des NVR. 8. Installieren Sie die Festplatte mit der Leiterplatte nach oben und verbinden Sie diese dann mit dem Stromversorgungs- und Datenanschluss. 9. Befestigen Sie die Festplatte mit den mitgelieferten Schrauben (zwei für jede Seite). 10. Setzen Sie den Deckel wieder auf und schrauben Sie die Schrauben fest. 7. Anschlussdiagramm Bemerkung: Um sicherzustellen, dass die automatische Konfiguration korrekt funktioniert, schließen Sie zuerst die IP-Kameras an und schalten Sie diese ein. Schalten Sie erst danach den NVR ein. Es können bis zu 12 IP-Kameras angeschlossen werden. Siehe Abbildungen, Seite 2 dieser Bedienungsanleitung. A IP-Kamera E B Modem F 19VDC-Netzteil Monitor, der hochauflösende Videos unterstützt C Router G Rückseite des NVR D 8P8C-Netzwerkkabel (RJ45) H Hub/Switch Die IP-Kamera anschließen (Plug-and-Play/sofort betriebsbereit) 1. Verbinden Sie die Kamera mit einem Hub/Switch 2. Warten Sie bis die Kamera automatisch konfiguriert worden ist und die Bilder im Display erscheinen. 8. Symbole im Bildschirm Siehe Abbildungen, Seite 2 dieser Bedienungsanleitung. V /03/ Velleman nv
46 16 NVR-Status Verriegelung Kanal verriegelt USB Flash-Laufwerk / Gerät verbunden Timer-Aufnahme eingeschaltet die Funktion «überschreiben» ist eingeschaltet Sequenzmodus eingeschaltet PTZ-Modus eingeschaltet Entriegelung Kanal entriegelt kein USB-Gerät angeschlossen Timer-Aufnahme ausgeschaltet die Funktion «überschreiben» ist ausgeschaltet Sequenzmodus ausgeschaltet PTZ-Modus ausgeschaltet CPU-Last Netzwerkstatus (WAN) mit Internet verbunden (WAN) nicht mit Internet verbunden (WAN) lokale Verbindung (LAN) Auto-Modus Mbit/s (LAN) DHCP / Statischer IP-Modus (LAN) Auto-Modus Gbit/s (LAN) Kamera nicht angeschlossen 17 verfügbarer Speicherplatz 18 Kanalstatus «Automatische Suche» eingeschaltet «Automatische Suche» ausgeschaltet «Live Audio» eingeschaltet Audio ausgeschaltet Audiowiedergabe eingeschaltet Originalgröße Aufzeichnung Alarm Live-Informationen Audiowiedergabe ausgeschaltet An den Bildschirm anpassen Personenerkennung Bewegungserfassung Wiedergabe Informationen 19 Schnellmenüleiste Klicken Sie, um das Ausschaltmenü anzuzeigen und das Gerät auszuschalten oder neu zu starten. Klicken Sie, um das Kanalwechselfenster anzuzeigen und den gewünschten Kanal auszuwählen. Schalten Sie zuerst auf den gewünschten Kanal um. Klicken Sie dann auf um den Zoom- Modus aufzurufen. Klicken und ziehen den roten Rahmen links unten im Bildschirm, um den gewünschten Bereich anzuzeigen. Klicken Sie, um den PTZ-Modus aufzurufen und das PTZ-Kamerasteuerungsfenster anzuzeigen. Klicken Sie, um das IP-Suchfenster zu öffnen und den Verbindungsstatus jedes Kanals zu überprüfen. 20 Hauptmenü QUICK START SYSTEM Klicken Sie, um die Statusanzeige, die Bilder, das Datum & die Uhrzeit einzustellen. Klicken Sie, um die Systemkonfiguration einzustellen. V /03/ Velleman nv
47 EVENT INFORMATION ADVANCED CONFIG SCHEDULE SETTING Klicken Sie, um in das Ereignis-Suchmenü zu gelangen. Klicken Sie, um die Verbindung (CONNECTION), die Kamera (CAMERA), die Erfassung (DETECTION), den Alarm (ALERT), das Netzwerk (NETWORK), den Bildschirm (DISPLAY), die Aufzeichnung (RECORD) und die Meldungen (NOTIFY) einzustellen. Klicken Sie, um den Aufnahme-Timer einzustellen. 21 Wiedergabe-Menü Schneller Vorlauf Schneller Rücklauf wiedergeben / pausieren Stopp Langsame Wiedergabe Vorige/nächste Stunde Schnellsuche Klicken Sie, um mit einer 4 bis 32facher Geschwindigkeit vorzuspulen. Klicken Sie, um mit einer 4 bis 32facher Geschwindigkeit zurückzuspulen. Klicken Sie, um die letzte Video-Aufzeichnung abzuspielen. Klicken Sie wieder, um zu unterbrechen. Im Pause-Modus, klicken Sie ein Mal auf um ein Bild vorwärts zu gehen oder klicken Sie auf um ein Bild rückwärts zu gehen. Klicken Sie, um die Wiedergabe zu anzuhalten. Klicken Sie ein Mal, um die Abspielgeschwindigkeit um 1/4 zu reduzieren. Klicken Sie zwei Mal, um die Abspielgeschwindigkeit auf 1/4 zu verringern. Klicken Sie, um zum nächsten/vorigen Stundenintervall zu springen (z.b. 11:00 ~ 12:00 oder 14:00 ~ 15:00) und starten Sie die Wiedergabe des ersten innerhalb dieser Stunde aufgenommenen Videoclips. Klicken Sie, um das Menü aufzurufen. 8.2 Verriegelung / Entriegelung Klicken Sie auf (verriegeln) oder im Statusmenü, um den NVR zu verriegeln bzw. zu entriegeln.. Geben Sie den Benutzernamen und das Passwort nach Entriegelung ein. Bemerkung: Der Standard-Benutzername und das Standard-Passwort ist admin. Verschiedene Benutzer haben eine unterschiedliche Zugangsberechtigung. Mehr Informationen finden Sie in der ausführlichen Bedienungsanleitung auf der CD-ROM. 9. Konfiguration durch LAN (Plug and Play) Bemerkung: diese Konfigurationsmethode eignet sich für ETS-Kameras 9.1 Automatische Konfiguration Der NVR konfiguriert die IP-Adresse einer über LAN angeschlossenen ETS-Kamera automatisch, wenn: Die Standard IP-Konfigurationsmethode der Kamera DHCP DHCP ist. Die Kamera vor dem NVR eingeschaltet wird. Ist dies nicht der Fall, so konfigurieren Sie die IP-Adresse Ihrer Kamera manuell (siehe unten). 9.2 Manuelle Konfiguration Konfiguriert der NVR die IP-Adresse Ihrer Kamera nicht automatisch (siehe oben), dann ist die IP- Konfigurationsmethode der IP-Kamera nicht auf DHCP eingestellt. Um das Problem zu lösen, konfigurieren Sie die IP-Adresse zu xx (xx zwischen 11 ~ 253), im gleichen Netzwerksegment wie der NVR. 1. In der Schnellmenüleiste, klicken Sie auf. Eine Liste aller angeschlossenen IP-Kameras mit Verbindungsstatus und MAC-Adresse wird angezeigt. V /03/ Velleman nv
. 2. Klicken Sie auf APPLY und EXIT um die Änderungen zu speichern. 3. Warten Sie bis der NVR die IP-Kamera erkennt und die Bilder Anzeigt s. 9.")
48 2. Wählen Sie eine IP-Adresse die nicht benutzt wird (UNUSED)und klicken Sie aufsetup. 1. Wählen Sie STATIC in NETWORK TYPE und ändern Sie die IP-Adresse zu xx (xx zwischen 11 ~ 253). 2. Klicken Sie auf APPLY und EXIT um die Änderungen zu speichern. 3. Warten Sie bis der NVR die IP-Kamera erkennt und die Bilder Anzeigt s. 9.3 Eine Kamera mit Internetverbindung einstellen Über Internet können Bilder einer IP-Kamera aufgenommen werden. 1. Beachten Sie, dass die IP-Kamera außerhalb des LAN-Netzwerks über DDNS zugänglich ist (z.b. ip_office.ddns.eagleeyes.tw).. 2. Im Hauptmenü, klicken Sie auf (ADVANCED CONFIG) und wählen Sie CONNECTIONaus. 3. Um einen Kanal einer IP-Kamera zuzuweisen, klicken Sie auf URI, um die Adresse der Kamera und die Portnummer einzugeben. 4. Klicken Sie auf SETUP, um die Zugangsinformation der Kamera aufzurufen. V /03/ Velleman nv

49 5. Geben Sie den Benutzernamen(USER NAME) und das Passwort (PASSWORD) ein, um auf die IP-Kamera zuzugreifen. 6. Klicken Sie auf GET TYPE, um die Kamera zu erfassen und beachten Sie, dass die Zugangsinformation korrekt ist. 7. Wählen Sie die Bildgröße (IMAGE SIZE), die Bildqualität (QUALITY), und die Anzahl Bilder pro Sekunde (I.P.S.) aus. Bemerkung: die verfügbaren Optionen hängen von der Kamera, die Sie anschließen möchten, ab. 8. Klicken Sie auf GET TYPE um die Kamera zu erfassen und beachten Sie, dass die Zugangsinformation korrekt ist. 9. Optional: für eine Kamera mit Audio-Aufnahme, stellen Sie AUDIO auf ON oder OFF. 10. Schnellmenüleiste 10.1 Einschalten/ausschalten und neu starten Um den NVR ein-/auszuschalten oder neu zu starten: Verwenden Sie den Ein/AUS-Schalter auf der Rückseite oder ]In der Schnellmenüleiste, klicken Sie auf und dann auf (ausschalten) oder (neu starten) Einen Kanal im Vollbildmodus anzeigen (Full-Screen) Um einen Kanal im Vollbildmodus anzuzeigen: Klicken Sie direkt auf das Kanalbild, um es in Vollbild anzuzeigen. Klicken Sie zwei Mal auf das Bild, um zur vorigen Anzeige zurückzukehren In der Schnellmenüleiste, klicken Sie auf. Im Bedienfeld, das erscheint, wählen Sie den Kanal, den Sie im Vollbildmodus anzeigen möchten. Klicken Sie auf, um zur vorigen Anzeige zurückzukehren. V /03/ Velleman nv
DVR / QuickQuide Adroid
 DVR 351.154/351.155 QuickQuide Adroid INSTRUCTION MANUAL GEBRUIKSAANWIJZING BEDIENUNGSANLEITUNG ENGLISH Setup IP-Camviewer Lite on IOS. 351.154 and 351.155. Start with searching the right app IP-camviewer
microsoft.com/hardware/support
 2015 Microsoft microsoft.com/hardware/support X20-44043-01 Back Cover Front Cover Set up Note: You can wirelessly connect Wi-Fi CERTIFIED Miracast enabled devices to a TV or monitor (available HDMI port
Cameraserver mini. commissioning. Ihre Vision ist unsere Aufgabe
 Cameraserver mini commissioning Page 1 Cameraserver - commissioning Contents 1. Plug IN... 3 2. Turn ON... 3 3. Network configuration... 4 4. Client-Installation... 6 4.1 Desktop Client... 6 4.2 Silverlight
Quick guide 360-45011
 Quick guide A. KEUZE VAN DE TOEPASSING EN: SELECTION OF APPLICATION CHOIX D UNE APPLICATION DE: AUSWAHL DER ANWENDUNGSPROGRAMME DIM Memory Off DIM Memory = Off User: Display: 1. EXIT Press Niko (Back light)
p^db=`oj===pìééçêíáåñçêã~íáçå=
 p^db=`oj===pìééçêíáåñçêã~íáçå= Error: "Could not connect to the SQL Server Instance" or "Failed to open a connection to the database." When you attempt to launch ACT! by Sage or ACT by Sage Premium for
ALL1681 Wireless 802.11g Powerline Router Quick Installation Guide
 ALL1681 Wireless 802.11g Powerline Router Quick Installation Guide 1 SET ALL1681 Upon you receive your wireless Router, please check that the following contents are packaged: - Powerline Wireless Router
DVR / QuickQuide Adroid
 DVR 351.154/351.155 QuickQuide Adroid INSTRUCTION MANUAL GEBRUIKSAANWIJZING BEDIENUNGSANLEITUNG ENGLISH Setup IP-Camviewer Lite on Android. 351.154 en 351.155. Start with searching the right app IP-camviewer
Android APP NVR Viewer
 Android APP NVR Viewer User Manual DN-16111 DN-16112 DN16113 2 DN-16111, DN-16112, DN-16113 for Android User Manual Table of Contents Download the APP... 3 Running the app - Add NVR... 3 Running the app
Quick Installation Guide
 LevelOne WHG-1000 300Mbps Wireless PoE Hotspot Gateway Quick Installation Guide English Deutsch Table of Contents English... 3 Deutsch... 13 Default Settings IP Address-LAN1 192.168.1.254 IP Address-LAN2
NVR5 QUICK INSTALLATION GUIDE 3 KORTE HANDLEIDING 14 GUIDE D'INSTALLATION RAPIDE 25 GUÍA RÁPIDA 36 SCHNELLEINSTIEG 47
 EN 4/8/16-CHANNEL HD NETWORK VIDEO RECORDER HDMI ONVIF EAGLE EYES PUSH VIDEO NL HD NETWERK VIDEORECORDER MET 4/8/16 KANALEN HDMI ONVIF EAGLE EYES PUSH VIDEO FR ENREGISTREUR VIDÉO RÉSEAU HD À 4/8/16 CANAUX
Quick Start Guide. PoE IP Camera. Technical Support EN/DE QG4_B
 EN/DE Technical Support PoE IP Camera Quick Start Guide For Windows Client & Mac Client, please download the PC software: https://reolink.com/software-and-manual/ For advanced setup, please download the
NVR Mobile Viewer for iphone/ipad/ipod Touch
 NVR Mobile Viewer for iphone/ipad/ipod Touch Quick Installation Guide DN-16111 DN-16112 DN16113 2 DN-16111, DN-16112, DN-16113 for Mobile ios Quick Guide Table of Contents Download and Install the App...
VGM. VGM information. HAMBURG SÜD VGM WEB PORTAL - USER GUIDE June 2016
 Overview The Hamburg Süd VGM-Portal is an application which enables to submit VGM information directly to Hamburg Süd via our e-portal web page. You can choose to insert VGM information directly, or download
VGM. VGM information. HAMBURG SÜD VGM WEB PORTAL USER GUIDE June 2016
 Overview The Hamburg Süd VGM Web portal is an application that enables you to submit VGM information directly to Hamburg Süd via our e-portal Web page. You can choose to enter VGM information directly,
Quick Setup Guide Windows XP
 Quick Setup Guide Windows XP Installation der WLAN-Adapters unter Windows XP Installing the WLAN adapter in Windows XP Installation de la clé WLAN sous Windows XP Installatie van de WLAN-adapter onder
Anleitung für FTP-Zugriff auf Apostroph Group
 Anleitung für FTP-Zugriff auf Apostroph Group 1. Den Microsoft Windows-Explorer (NICHT Internet-Explorer) starten 2. In der Adresse -Zeile die Adresse ftp://ftp.apostroph.ch eingeben und Enter drücken:
Quick Guide Home Network Mode
 Quick Guide Home Network Mode English > 1 German > 3 About the Home Network Mode EN Tivizen Nano & iplug normally work on their own created networks (whose SSID starts with tivizentv or iplug ) in which
Tube Analyzer LogViewer 2.3
 Tube Analyzer LogViewer 2.3 User Manual Stand: 25.9.2015 Seite 1 von 11 Name Company Date Designed by WKS 28.02.2013 1 st Checker 2 nd Checker Version history Version Author Changes Date 1.0 Created 19.06.2015
VIDEO CALL CAMERA G-VCAM-01
 VIDEO CALL CAMERA G-VCAM-01 EN AUS GUTEM GRUND ENGLISH 07-10 2 SAFETY AND INFORMATION Safety 7 This camera is designed to transmit video and audio signals. All other uses are expressly prohibited. 7 Protect
p^db=`oj===pìééçêíáåñçêã~íáçå=
 p^db=`oj===pìééçêíáåñçêã~íáçå= How to Disable User Account Control (UAC) in Windows Vista You are attempting to install or uninstall ACT! when Windows does not allow you access to needed files or folders.
LUPUSNET - LE930/940 Kurzanleitung User manual Guide Rapide
 LUPUSNET - LE930/940 Kurzanleitung User manual Guide Rapide 1/16 A. Monitor Einstellungen 1. Klicken Sie mit der rechten Maustaste auf die Desktopoberfläche. Wählen Sie Eigenschaften aus dem Menu und setzen
Hama GmbH & Co KG D Monheim/Germany
 Hama GmbH & Co KG D-86651 Monheim/Germany www.hama.com All listed brands are trademarks of the corresponding companies. Errors and omissions excepted, and subject to technical changes. Our general terms
Word-CRM-Upload-Button. User manual
 Word-CRM-Upload-Button User manual Word-CRM-Upload for MS CRM 2011 Content 1. Preface... 3 2. Installation... 4 2.1. Requirements... 4 2.1.1. Clients... 4 2.2. Installation guidelines... 5 2.2.1. Client...
Installation Guide WLAN Interface
 Installation Guide 7106 7206 7010 WLAN Interface EN Installation Guide This guide explains how to install the Ethernet LAN card in your label printer. You should conult your dealer or distributor for more
MANUAL_EN ANLEITUNG_DE PHONE SUITE SYNCHRONISATION SOFTWARE
 MANUAL_EN ANLEITUNG_DE PHONE SUITE SYNCHRONISATION SOFTWARE 2 PHONE SUITE MANUAL PHONE SUITE MANUAL 3 RESERVATION Technical Data is subject to change without notice. Changes, errors and misprints may not
Cisco SSPA122. Installation und manuelle Rekonfiguration. Dokumentenversion 1
 Cisco SSPA122 Installation und manuelle Rekonfiguration Dokumentenversion 1 Placetel UC-One Cisco SPA122 Installation und manuelle Rekonfiguration Copyright Hinweis Copyright 2015 finocom AG Alle Rechte
300Mbps Wireless Outdoor PoE Access Point/Bridge Quick Installation Guide
 LevelOne WAB-5120 300Mbps Wireless Outdoor PoE Access Point/Bridge Quick Installation Guide English Deutsch - 1 - Table of Content English... - 3 - Deutsch... - 9 - This guide covers only the most common
Bedienungsanleitung... Seite 3 Bitte bewahren Sie die Anleitung auf!
 i-r Receive Connect Bedienungsanleitung... Seite 3 Bitte bewahren Sie die Anleitung auf! Operating Instructions... page 21 Please keep these instructions in a safe place! Notice d utilisation... page 39
iid software tools QuickStartGuide iid USB base driver installation
 iid software tools QuickStartGuide iid software tools USB base driver installation microsensys Nov 2016 Introduction / Einleitung This document describes in short form installation of the microsensys USB
EINBAUHINWEISE INSTALLATION INSTRUCTIONS
 EINBAUHINWEISE INSTALLATION INSTRUCTIONS FÜR JEDEN ANSPRUCH DAS RICHTIGE FAHRWERK. KW automotive GmbH Aspachweg 14 74427 Fichtenberg Telefon: +49 7971 9630-0 Telefax: +49 7971 9630-191 www.kwsuspensions.de
NEWSLETTER. FileDirector Version 2.5 Novelties. Filing system designer. Filing system in WinClient
 Filing system designer FileDirector Version 2.5 Novelties FileDirector offers an easy way to design the filing system in WinClient. The filing system provides an Explorer-like structure in WinClient. The
USB -> Seriell Adapterkabel Benutzerhandbuch
 USB -> Seriell Adapterkabel Benutzerhandbuch 1. Produkt Eigenschaften 1 2. System Vorraussetzungen 1 3. Treiber Installation (Alle Windows Systeme) 1 4. Den COM Port ändern 2 5. Einstellen eines RS232
Load balancing Router with / mit DMZ
 ALL7000 Load balancing Router with / mit DMZ Deutsch Seite 3 English Page 10 ALL7000 Quick Installation Guide / Express Setup ALL7000 Quick Installation Guide / Express Setup - 2 - Hardware Beschreibung
USB Treiber updaten unter Windows 7/Vista
 USB Treiber updaten unter Windows 7/Vista Hinweis: Für den Downloader ist momentan keine 64 Bit Version erhältlich. Der Downloader ist nur kompatibel mit 32 Bit Versionen von Windows 7/Vista. Für den Einsatz
TVHD800x0. Port-Weiterleitung. Version 1.1
 TVHD800x0 Port-Weiterleitung Version 1.1 Inhalt: 1. Übersicht der Ports 2. Ein- / Umstellung der Ports 3. Sonstige Hinweise Haftungsausschluss Diese Bedienungsanleitung wurde mit größter Sorgfalt erstellt.
rtube.nl/red975 Sold separately MN180008_ Off Price GmbH Rodenkirchener Str Hürth Copyright MICRO-USB RCD2002
 RCD2002 MICRO-USB 1x 1x 1x Sold separately A B QR rtube.nl/red975 1/4 1/8 A W B F = W - 4 cm F = W - 4,5 cm W Min. W = 50 cm Min. W = 50 cm 1 2 W F = W - 4 cm F F 3 4 0,5 cm 5 F - 1,0 cm 2/4 2/8 A B 1
VN7640 FlexRay/CAN/LIN/Ethernet Interface Quick Start Guide. Version 1.1 English/Deutsch
 VN7640 FlexRay/CAN/LIN/Ethernet Interface Quick Start Guide Version 1.1 English/Deutsch Quick Start Guide VN7640 ENGLISH 1 ENGLISH 1.1 Installation Step by Step Procedure Please use the drivers from the
Snom 3xx/7xx Serie. Manuelle Neukonfiguration. Dokumentenversion 1.0
 Snom 3xx/7xx Serie Manuelle Neukonfiguration Dokumentenversion 1.0 Snom 3xx/7xx Serie Mauelle Neukonfiguration Copyright Hinweis Copyright 2016 finocom AG Alle Rechte vorbehalten. Jegliche technische Dokumentation,
Gamperl & Hatlapa GmbH Modem/WiFi settings
 1. Log in - Anmelden Pic001 device front / Gerätevorderseite Pic002 Login screen / Anmeldebildschirm Connect your computer to one of the Ethernetports on the front (Pic001) of the modem. Start your browser
LevelOne. Quick Installation Guide. EAP series Enterprise Access Point. Default Settings. IP Address
 LevelOne EAP series Enterprise Access Point Quick Installation Guide English Deutsch Default Settings IP Address 192.168.1.1 Username admin Password admin Figure 1-1 Figure 1-2 Figure 1-3 2 Figure 2-1
150Mbps Micro Wireless N USB Adapter
 150Mbps Micro Wireless N USB Adapter TEW-648UBM ŸAnleitung zur Schnellinstallation (1) ŸTroubleshooting (6) 1.11 1. Bevor Sie anfangen Packungsinhalt ŸTEW-648UBM ŸCD-ROM (Dienstprogramm & Bedienungsanleitung)
1. General information... 2 2. Login... 2 3. Home... 3 4. Current applications... 3
 User Manual for Marketing Authorisation and Lifecycle Management of Medicines Inhalt: User Manual for Marketing Authorisation and Lifecycle Management of Medicines... 1 1. General information... 2 2. Login...
Yealink W52 DECT IP Telefon
 Yealink W52 DECT IP Telefon Manuelle Neukonfiguration Dokumentenversion 1.0 Yealink W52 DECT IP Telefon Mauelle Neukonfiguration Copyright Hinweis Copyright 2016 finocom AG Alle Rechte vorbehalten. Jegliche
How-To-Do. Hardware Configuration of the CC03 via SIMATIC Manager from Siemens
 How-To-Do Hardware Configuration of the CC03 via SIMATIC Manager from Siemens Content Hardware Configuration of the CC03 via SIMATIC Manager from Siemens... 1 1 General... 2 1.1 Information... 2 1.2 Reference...
Bedienungsanleitung... Seite 3 Bitte bewahren Sie die Anleitung auf!
 iveo Receive Plug Bedienungsanleitung... Seite 3 Bitte bewahren Sie die Anleitung auf! Operating Instructions... page 13 Please keep these instructions in a safe place! Notice d utilisation... page 23
Quick Installation Guide for 4 and 7-Port Broadband Router
 Quick Installation Guide for 4 and 7-Port Broadband Router A. Hardware Installation 1. Setup LAN connection: connect an Ethernet cable from your computer s Ethernet port to one of the LAN ports of this
Der Adapter Z250I / Z270I lässt sich auf folgenden Betriebssystemen installieren:
 Installationshinweise Z250I / Z270I Adapter IR USB Installation hints Z250I / Z270I Adapter IR USB 06/07 (Laden Sie den Treiber vom WEB, entpacken Sie ihn in ein leeres Verzeichnis und geben Sie dieses
C8CHIPSKIT C Kanal-IP-Überwachungskit. Highlights. Specifications
 8-Kanal-IP-Überwachungskit Das 8-Kanal-IP-Überwachungskit von Conceptronic bietet eine ideale Möglichkeit zum Überwachen eines großen Wohn- oder Geschäftshauses, in dem professionelle Überwachung erforderlich
ONLINE LICENCE GENERATOR
 Index Introduction... 2 Change language of the User Interface... 3 Menubar... 4 Sold Software... 5 Explanations of the choices:... 5 Call of a licence:... 7 Last query step... 9 Call multiple licenses:...
Quick Installation Guide Installatie handleiding Guide d installation rapide Kurzanleitung Installation
 Quick Installation Guide Installatie handleiding Guide d installation rapide Kurzanleitung Installation English Uitbreidingsmodule Nederlands Leveringsomvang schroef Uitbreidingsmodule tiptel KM-38
Anleitung zur Schnellinstallation TFM-560X YO.13
 Anleitung zur Schnellinstallation TFM-560X YO.13 Table of Contents Deutsch 1 1. Bevor Sie anfangen 1 2. Installation 2 Troubleshooting 6 Version 06.08.2011 1. Bevor Sie anfangen Packungsinhalt ŸTFM-560X
Quick Installation Guide TU2-ET100
 Quick Installation Guide TU2-ET100 Table of of Contents Contents... 1. Bevor Sie anfangen... 2. Installation... 1 1 2 Troubleshooting... 6 Version 08.30.2006 1. Bevor Sie anfangen Packungsinhalt TU2-ET100
Walter Buchmayr Ges.m.b.H.
 Seite 1/10 Chapter Description Page 1 Advantages 3 2 Performance description 4 3 Settings 5 4 Options 6 5 Technical data 7 6 Pictures 8 http://members.aon.at/buchmayrgmbh e-mail: walter.buchmayr.gmbh@aon.at
How-To-Do. OPC-Server with MPI and ISO over TCP/IP Communication. Content. How-To-Do OPC-Server with MPI- und ISO over TCP/IP Communication
 How-To-Do OPC-Server with MPI and ISO over TCP/IP Content OPC-Server with MPI and ISO over TCP/IP... 1 1 General... 2 1.1 Information... 2 1.2 Reference... 2 2 Procedure for the Setup of the OPC Server...
150-in-1. Handbuch / Manual / Manuel. Externer Card Reader USB 2.0
 Handbuch / Manual / Manuel Vielen Dank, dass Sie sich für ein Produkt von ultron entschieden haben. Wir wünschen Ihnen viel Freude mit Ihrem neuen Gerät! CE-Erklärung und Hinweise Hiermit erklärt die
WIRELESS SURVEILLANCE SYSTEM DRAADLOZE CAMERA- EN MONITORSET SYSTEME DE SURVEILLANCE SANS FIL DRAHTLOSE ÜBERWACHUNGSANLAGE INSTRUCTION MANUAL
 WIRELESS SURVEILLAN SYSTEM DRAADLOZE CAMERA- EN MONITORSET SYSTEME DE SURVEILLAN SANS FIL DRAHTLOSE ÜBERWACHUNGSANLAGE 351.023 INSTRUCTION MANUAL GEBRUIKSAANWIJZING MANUEL D UTILISATION BEDIENUNGSANLEITUNG
Released energy meters for PIKO IQ / PLENTICORE plus
 Released energy meters for PIKO IQ / PLETICORE plus Version: 03/2018 / Released energy meters Inverter B+G E-Tech GmbH SDM630-Modbus TQ-System GmbH B-control EM 300 LR 1 The energy meter can be used instead
Quick Start Guide. Wireless IP Camera. Technical Support EN/DE QG4_B
 EN/DE Technical Support Wireless IP Camera Quick Start Guide For Windows Client & Mac Client, please download the PC software: https://reolink.com/software-and-manual/ For advanced setup, please download
Table of Cont 6. 2 General Information... 4 Purpose...4 Documentation...4 Scope of Supply...5 Technical Data Safety Regulations...
 2 General Information........................ 4 Purpose........................................4 Documentation................................4 Scope of Supply................................5 Technical
esense Compatibility Information
 esense Compatibility Information Last Update July 2017 ios devices compatible with esense Apple iphone 4S or higher Apple ipad (from 2 nd generation) Apple ipod touch 5 th generation or higher Important
EINBAUHINWEISE INSTALLATION INSTRUCTIONS
 EINBAUHINWEISE INSTALLATION INSTRUCTIONS FÜR JEDEN ANSPRUCH DAS RICHTIGE FAHRWERK. KW automotive GmbH Aspachweg 14 74427 Fichtenberg Telefon: +49 7971 9630-0 Telefax: +49 7971 9630-191 www.kwsuspensions.de
Anleitung zur Schnellinstallation TFM-561U
 Anleitung zur Schnellinstallation TFM-561U V1 Table of Contents Deutsch 1 1. Bevor Sie anfangen 1 2. Installation 2 Troubleshooting 5 Version 08.25.2010 1. Bevor Sie anfangen Packungsinhalt TFM-561U Treiber
Anleitung zur Verwendung des Update-Tools für
 English version see below (page 10) Anleitung zur Verwendung des Update-Tools für - KW DDC Steuergeräte - KW DDC WLAN Module - KW DLC Steuergeräte - KW DLC WLAN Module Bitte beachten Sie: jedes Steuergerät
CABLE TESTER. Manual DN-14003
 CABLE TESTER Manual DN-14003 Note: Please read and learn safety instructions before use or maintain the equipment This cable tester can t test any electrified product. 9V reduplicated battery is used in
SmartClass Firmware-Update Vorgehensweise
 Benutzeranweisungen SmartClass Firmware-Update Vorgehensweise 2008.01 (V 1.x.x) Deutsch Please direct all enquiries to your local JDSU sales company. The addresses can be found at: www.jdsu.com/tm-contacts
11 EN 81-70 Page 1 of 2 Standard: INTERPRETATION RELATED TO. Clause(s): 5.4.2.3
: 5.4.2.3") CEN RELATED TO 11 Page 1 of 2 Standard: Edition: 2003 Clause(s): 5.4.2.3 Valid from: 15/09/2010 Date of modification: Key-word(s): Car operating panel, Two entrance lift Replacing interpretation No.: QUESTION
CEN RELATED TO 11 Page 1 of 2 Standard: Edition: 2003 Clause(s): 5.4.2.3 Valid from: 15/09/2010 Date of modification: Key-word(s): Car operating panel, Two entrance lift Replacing interpretation No.: QUESTION
How to access licensed products from providers who are already operating productively in. General Information... 2. Shibboleth login...
 Shibboleth Tutorial How to access licensed products from providers who are already operating productively in the SWITCHaai federation. General Information... 2 Shibboleth login... 2 Separate registration
NVR4 QUICK INSTALLATION GUIDE 3 KORTE HANDLEIDING 13 GUIDE D'INSTALLATION RAPIDE 23 GUÍA RÁPIDA 33 SCHNELLEINSTIEG 43
 EN 16-CHANNEL HD NETWORK VIDEO RECORDER HDMI ONVIF EAGLE EYES NL HD NETWERK VIDEORECORDER MET 16 KANALEN HDMI ONVIF EAGLE EYES FR ENREGISTREUR VIDÉO RÉSEAU HD À 16 CANAUX - HDMI - ONVIF - EAGLE EYES ES
Datenblatt - Fiche technique - Data sheet
 Datenblatt - Fiche technique - Data sheet 21.19.7310 ROLINE 4 Kanal NVR mit 4-Port PoE, RNR0104P, Netzwerk-Video-Recorder mit 4 Kanälen und 1 Festplatteneinschub, 4 Port PoE Switch, lokaler VGA/HDMI Bildschirmanschluss
ALL2282. Pan-Tilt MPEG4/MJPEG Network Camera. Quick Installation Guide
 ALL2282 Pan-Tilt MPEG4/MJPEG Network Camera Quick Installation Guide 1 Getting Started Package Contents Check the items contained in the package carefully. You should have the following items. Once any
Programmieranleitung CADAS 100 LPG 158
 Kupfer Programmieranleitung CADAS 100 LPG 158 Küvetten-Test LCK 529 Seite 1 Ausgabe 98/04 Achtung! Das Ausgabedatum dieser Programmieranleitung muß mit dem Ausgabedatum der Arbeitsvorschrift der Reagenzien
SanStore: Kurzanleitung / SanStore: Quick reference guide
 SanStore Rekorder der Serie MM, MMX, HM und HMX Datenwiedergabe und Backup Datenwiedergabe 1. Drücken Sie die Time Search-Taste auf der Fernbedienung. Hinweis: Falls Sie nach einem Administrator-Passwort
24-Port 10/100Mbps Web Smart PoE Switch with 4 Gigabit Ports and 2 Mini-GBIC Slots TPE-224WS
 24-Port 10/100Mbps Web Smart PoE Switch with 4 Gigabit Ports and 2 Mini-GBIC Slots TPE-224WS ŸAnleitung zur Schnellinstallation (1) ŸTroubleshooting (3) 1.12 1. Bevor Sie anfangen Packungsinhalt ŸTPE-224WS
Analog GSM-Gateway TRF
 Analog GSM-Gateway TRF GSM gateway for voice- or fax transmission 1 2009 com.sat GmbH Kommunikationssysteme Schwetzinger Str. 19 D-68519 Viernheim www.comsat.de Tel: +49-(0)180-3-768837 The connecting
German English Firmware translation for T-Sinus 154 Access Point
 German English Firmware translation for T-Sinus 154 Access Point Konfigurationsprogramm Configuration program (english translation italic type) Dieses Programm ermöglicht Ihnen Einstellungen in Ihrem Wireless
DLNA Setup. Screencasting from DLNA compatible devices
 Models: dgimd13 DLNA Setup Screencasting from DLNA compatible devices Please read these instructions carefully prior to installation Important Note: This procedure was written in conjunction with an iphone
Ingenics Project Portal
 Version: 00; Status: E Seite: 1/6 This document is drawn to show the functions of the project portal developed by Ingenics AG. To use the portal enter the following URL in your Browser: https://projectportal.ingenics.de
Exercise (Part V) Anastasia Mochalova, Lehrstuhl für ABWL und Wirtschaftsinformatik, Kath. Universität Eichstätt-Ingolstadt 1
 Anastasia Mochalova, Lehrstuhl für ABWL und Wirtschaftsinformatik, Kath. Universität Eichstätt-Ingolstadt 1") Exercise (Part V) Notes: The exercise is based on Microsoft Dynamics CRM Online. For all screenshots: Copyright Microsoft Corporation. The sign ## is you personal number to be used in all exercises. All
Exercise (Part V) Notes: The exercise is based on Microsoft Dynamics CRM Online. For all screenshots: Copyright Microsoft Corporation. The sign ## is you personal number to be used in all exercises. All
Softwareupdate-Anleitung // AC Porty L Netzteileinschub
 1 Softwareupdate-Anleitung // AC Porty L Netzteileinschub Softwareupdate-Anleitung // AC Porty L Netzteileinschub HENSEL-VISIT GmbH & Co. KG Robert-Bunsen-Str. 3 D-97076 Würzburg-Lengfeld GERMANY Tel./Phone:
Montageanleitung Installation Instructions Notice de Montage
 Montageanleitung Installation Instructions Notice de Montage R Reflexlichtschranke / Reflexlichttaster Retro-reflective sensor / Diffuse reflection sensor Système réflex / Système réflexion directe OE
Programmieranleitung CADAS 100 LPG 210
 Programmieranleitung CADAS 100 LPG 210 Küvetten-Test LCK 555 Seite 1 BSB 5 BSB [n] Ausgabe 9804 Achtung! Das Ausgabedatum dieser Programmieranleitung muß mit dem Ausgabedatum der Arbeitsvorschrift der
DLNA Setup. For all UPnP & DLNA compatible devices
 Models: dgimd132 DLNA Setup For all UPnP & DLNA compatible devices Please read these instructions carefully prior to installation Important Note: These steps are for devices running Apple ios 7. The steps
v i r t u A L C O M P o r t s
 v i r t u A L C O M P o r t s (HO720 / HO730) Installieren und Einstellen Installation and Settings Deutsch / English Installieren und Einstellen des virtuellen COM Ports (HO720 / HO730) Einleitung Laden
Benutzerhandbuch / User s Manual RUPS 2000 / -B1
 RUPS 2000 / RUPS 2000-B1 Benutzerhandbuch / User s Manual RUPS 2000 / -B1 Deutsch English Benutzerhandbuch RUPS 2000 / RUPS 2000-B1 Deutsch In diesem Benutzerhandbuch finden Sie eine Kurzanleitung zu Installation
CNC ZUR STEUERUNG VON WERKZEUGMASCHINEN (GERMAN EDITION) BY TIM ROHR
 BY TIM ROHR") (GERMAN EDITION) BY TIM ROHR READ ONLINE AND DOWNLOAD EBOOK : CNC ZUR STEUERUNG VON WERKZEUGMASCHINEN (GERMAN EDITION) BY TIM ROHR PDF Click button to download this ebook READ ONLINE AND DOWNLOAD CNC ZUR
(GERMAN EDITION) BY TIM ROHR READ ONLINE AND DOWNLOAD EBOOK : CNC ZUR STEUERUNG VON WERKZEUGMASCHINEN (GERMAN EDITION) BY TIM ROHR PDF Click button to download this ebook READ ONLINE AND DOWNLOAD CNC ZUR
C R 2025 C LOSE PUSH OPEN
 3V C R 2025 C LOSE PUSH OPEN ) ) ) 25 222 3V C R 2025 C LOSE PUSH OPEN 25 222 3V C R 2025 C LOSE PUSH OPEN 25 222 Den här symbolen på produkten eller i instruktionerna betyder att den elektriska
UCON UCON Kurzanleitung Inbetriebnahme
 UCON UCON Kurzanleitung Inbetriebnahme copyright G&D 24/08/2005 Irrum und techn. Änderungen vorbehalten 1. Was Sie zur Installation benötigen - UCON - 1:1 belegtes CAT-x Patchkabel - Kaltgerätekabel -
USB-C Multiport Adapter
 USB-C Multiport Adapter User Guide English USB-C Multiport Adapter Unlock the full potential of your Apple MacBook MINIX s USB-C Multiport Adapter is the world s most advanced USB-C adapter, delivering
Panic Button Add-on Device Quickstart Guide
 Panic Button Add-on Device Quickstart Guide Model No. PNB1301 What s inside: 1x Panic Button 1x Lanyard All Home8 add-on devices have to work with Home8 systems. Deutsch Schritt 1: Setzen Sie Ihr Gerät
Monitor VIS 3xx Kurzanleitung
 Monitor VIS 3xx Kurzanleitung 19.08.08 Art. Nr. 22261 Inhalt: 1. Spezifikationen...2 2. Tastenfunktionen...2 3. Menüführung und Einstellungen...3 Technik nach Maß Wöhler Monitor VIS 3xx 1. Spezifikationen
Dexatek's Alexa Smart Home Skills Instruction Guide
 Dexatek's Alexa Smart Home Skills Instruction Guide Version 0.3 Author Esther Date 01/10/18 ~ 1 ~ Revision History Version Date Editor Remark 0.1 2017/04/05 Esther Initial version 0.2 2018/01/09 Esther
mobilcom-debitel SmartHome Schnell-Start-Anleitung Quick Start Guide
 mobilcom-debitel SmartHome Schnell-Start-Anleitung Quick Start Guide 1. Cube anschließen 1. Connect Cube n Schließen Sie den Cube an die Stromversorgung an. n Legen Sie die Batterien polungsrichtig in
Hama GmbH & Co KG D-86651 Monheim/Germany www.hama.com
 Hama GmbH & Co KG D-86651 Monheim/Germany www.hama.com d Bedienungsanleitung 2 4. Funktionserläuterung 10 11 7 1 5 2 4 3 6 9 8 Presenter Modus Media Player Modus 1 Seite vor Vorherige Media-Datei in der
Electrical testing of Bosch common rail piezo injectors
 Applies to generation CRI 3: Bosch 10-position order number 0 445 115 = CRI 3-16 (CRI 3.0) 1600 bar 0 445 116 = CRI 3-18 (CRI 3.2) 1800 bar 0 445 117 = CRI 3-20 (CRI 3.3) 2000 bar Tools required: Hybrid
Effizienz im Vor-Ort-Service
 Installation: Anleitung SatWork Integrierte Auftragsabwicklung & -Disposition Februar 2012 Disposition & Auftragsabwicklung Effizienz im Vor-Ort-Service Disclaimer Vertraulichkeit Der Inhalt dieses Dokuments
Exercise (Part XI) Anastasia Mochalova, Lehrstuhl für ABWL und Wirtschaftsinformatik, Kath. Universität Eichstätt-Ingolstadt 1
 Anastasia Mochalova, Lehrstuhl für ABWL und Wirtschaftsinformatik, Kath. Universität Eichstätt-Ingolstadt 1") Exercise (Part XI) Notes: The exercise is based on Microsoft Dynamics CRM Online. For all screenshots: Copyright Microsoft Corporation. The sign ## is you personal number to be used in all exercises. All
Exercise (Part XI) Notes: The exercise is based on Microsoft Dynamics CRM Online. For all screenshots: Copyright Microsoft Corporation. The sign ## is you personal number to be used in all exercises. All