Eisbaer 420 Eisbaer 280 Eisbaer 360 Eisbaer 240. Eisbaer 140 Eisbaer 120
|
|
|
- Bertold Engel
- vor 6 Jahren
- Abrufe
Transkript


1 EISBAER
2

![AM3 / AM3+ / AM4 [RYZEN] / FM1 / FM2 / FM2+ / 940 / C32 / G34 mounting](/docs-images/65/52669791/images/3-1.jpg "kit for 2011-3 Narrow ILM is available separately EAN: 4250197125314")


3 Alphacool Eisbaer Intel Socket 775 /1156 / 1155 / 1150 / 1151 / 1366 / 2011 / / 2066 / 604 / 771 AMD Socket 754 / 939 / AM2 / AM2+ / AM3 / AM3+ / AM4 [RYZEN] / FM1 / FM2 / FM2+ / 940 / C32 / G34 mounting kit for Narrow ILM is available separately EAN: Eisbaer 420 Eisbaer 280 Eisbaer 360 Eisbaer 240 Eisbaer 140 Eisbaer 120 Read the safety instructions before starting the installation. Lesen Sie die Sicherheitshinweise, bevor Sie mit der Insatallation beginnen. Lisez les instructions de sécurité avant de commencer l installation. 3


4 mounting material - Montagematerial - Matériel de montage PWM-adapter version varies depending on the product you purchased AMD screws Intel 2011 / screws Intel 775 / 1156 / 1155 / 1150 / 1151 / 1366 / 604 / 771 screws springs washers 0.8 mm washers 2.0 mm Intel backplate AMD bracket Intel bracket nuts thermal grease radiator screws number varies depending on the product you purchased 4


5 functionality / technology - Funktionsweise/ Technologie - fonctionnalité / technologie The cooler bottom is crossed with very fine cooling fins for optimal cooling performance. The reservoir sits directly above, with its DC-LT 2600 Ultra Low Noise ceramic pump. An opening for filling is located on top, making it easy to clean, refi ll, and expand the system.. Der Kühlerboden ist durchzogen von sehr feinen Kühlfi nnen um eine optimale Kühlleistung zu erreichen. Direkt darüber sitzt der Ausgleichsbehälter mit einer DC-LT 2600 Ultra low noise Ceramic Pumpe. Eine Öffnung zum Befüllen befindet sich auf der Oberseite. So kann man leicht das System reinigen, neu befüllen und erweitern. La base du refroidisseur contient beaucoup d ailettes de refroidissement très fines afin d obtenir une performance de refroidissement optimale. Le réservoir avec une pompe DC-LT 2600 ultra low noise en céramique se trouve directement au-dessus. Une ouverture pour le remplissage se trouve dans la partie supérieure. Ainsi le système peut facilement être nettoyé, rerempli et agrandi. Alphacool DC-LT Power consumption: 2,04W Operating voltage: 7-13,5V Flow rate: max. 60L/h Pressure head at 12V: 0,80m 5


6 functionality / technology - Funktionsweise/ Technologie - fonctionnalité / technologie Full-copper radiator The use of copper in all important areas, like the front chamber, the cooling fins and also the corresponding channels, raises cooling performance to a whole new level. This has been shown in many tests by independent media. Vollkupfer Radiator Durch die Verwendung von Kupfer in allen wichtigen Bereichen, wie der Vorkammer, den Kühlfinnen und auch den dazugehörigen Kanälen, wurde die Kühlleistung auf ein neues Niveau gehoben. Dies bestätigen viele Tests von unabhängigen Medien. Radiateur entièrement en cuivre L utilisation du cuivre dans toutes les parties importantes, comme la préchambre, les ailettes et les canaux augmente la performance de refroidissement d une manière importante. Ceci a été confirmé par des médias indépendantes. 6


7 functionality / technology - Funktionsweise/ Technologie - fonctionnalité / technologie Quick release Fitting The hoses are encased in anti-kink springs to prevent bending and the resulting blockage of the water flow. The nylon safety quick-locking closure offers a quick and simple way to expand the cooling loop. This gives you the highest degree of flexibility. Schnellverschlusskupplung Die Schläuche sind mit Knickschutzfedern ummantelt um ein abknicken und damit ein blockieren des Wasserlaufs zu verhindern. Der Sicherheitsschnellverschluss aus Nylon bietet eine einfache und schnelle Möglichkeit den Kreislauf zu erweitern. So erreicht man die höchstmögliche Flexibilität. Raccord rapide Les tuyaux sont entourés par des ressorts anti-pli pour éviter des plis et un blocage de la circulation d eau. Le ressort rapide de sécurité en nylon offre la possibilité d agrandir le système vite et facilement. Ainsi l on obtient une flexibilité maximale 7

8 functionality / technology - Funktionsweise/ Technologie - fonctionnalité / technologie Fans The Eiswind fans were developed specifically to fit the requirements of radiators, and can be controlled through a PWM connection. The corresponding cable is included so that all fans can be controlled simultaneously over one connection. This way, the fans can be adjusted to your exact specifi cations. Lüfter Die Eiswind Lüfter wurden speziell für die Anforderungen von Radiatoren angepasst und lassen sich über einen PWM-Anschluss regeln. Damit alle Lüfter gleichzeitig über einen Anschluss geregelt werden können, liegt ein entsprechendes Kabel bei. So lassen sich die Lüfter optimal nach eigenen Wünschen regeln. Ventilateurs Les ventilateurs Eiswind (vent glacé) ont été adaptés spécialement pour l utilisation sur des radiateurs. Ils sont réglables par le connecteur PWM. Un câble spécial est inclus afin de pouvoir régler tous les ventilateurs en même temps. Ainsi les ventilateurs sont réglables selon les besoins individuels. 8
9 installation - Montage - montage Intel 775 / 1156 / 1155 / 1150 / 1151 / 1366 / 604 / Intel 2011 / / AMD 754 / 939 / AM2 / AM2+ / AM3 / AM3+ / FM1 / FM2 / FM2+ / 940 / C32 / G AMD AM4 [RYZEN]


10 screw mounting - Schraubenmontage - montage de vis Intel M4 7,5 M3 Select corresponding bracket + screws 1. Plug bracket together 2. Place compression springs and washers onto screws + attach to bracket with nuts Passende Halterung + Schrauben wählen 1. Halterung zusammenstecken 2. Druckfedern und Unterlegscheiben auf Schrauben aufstecken + mit Muttern an Halterung befestigen Choisir support et vis 1. Assembler support 2. Enfiler ressorts et rondelles sur vis + fixer avec des écrous sur support screw spring washer 0.8 nut 10
 4.")
 4.")
 4.")
11 CPU mounting - CPU Montage - montage de CPU Intel Spread thermal grease on the CPU (< 0,5mm coating thickness) 4. Mount the cooler using the included backplate onto the socket Hand-tighten screws crosswise 3. Wärmeleitpaste auf CPU auftragen (< 0,5mm Schichtdicke) 4. Kühler - mit Hilfe der beiliegenden Backplate - am Sockel montieren Schrauben kreuzweise, handfest anziehen 3. Appliquer la graisse thermique sur le CPU (< 0,5mm épaisseur) 4. Installer refroidisseur à socket à l aide de plaque arrière incluse Serrez les vis de manière croisé à la main 11


12 screw mounting - Schraubenmontage - montage de vis Intel M4 2 Select corresponding bracket + screws 1. Plug bracket together 2. Place compression springs and washers onto screws + attach to bracket with nuts Passende Halterung + Schrauben wählen 1. Halterung zusammenstecken 2. Druckfedern und Unterlegscheiben auf Schrauben aufstecken + mit Muttern an Halterung befestigen screw spring washer 0.8 Choisir support et vis 1. Assembler support 2. Enfiler ressorts et rondelles sur vis + fixer avec des écrous sur support nut 12
 4. Kühler am Sockel montieren Schrauben kreuzweise, handfest anziehen 3. Appliquer la graisse thermique sur le CPU (< 0,5mm épaisseur) 4.")
13 CPU mounting - CPU Montage - montage de CPU Intel Spread thermal grease on the CPU (< 0,5mm coating thickness) 4. Mount the cooler onto the socket Hand-tighten screws crosswise 3. Wärmeleitpaste auf CPU auftragen (< 0,5mm Schichtdicke) 4. Kühler am Sockel montieren Schrauben kreuzweise, handfest anziehen 3. Appliquer la graisse thermique sur le CPU (< 0,5mm épaisseur) 4. Installer refroidisseur à socket Serrez les vis de manière croisé à la main 13


14 screw mounting - Schraubenmontage - montage de vis AMD AM2 AM2+ AM3 AM3+ FM1 FM2 FM C32 G M4 UNC ,5 Select corresponding bracket + screws 1. Plug bracket together 2. Place compression springs and washers onto screws + attach to bracket with nuts Passende Halterung + Schrauben wählen 1. Halterung zusammenstecken 2. Druckfedern und Unterlegscheiben auf Schrauben aufstecken + mit Muttern an Halterung befestigen screw spring washer 0.8 nut Choisir support et vis 1. Assembler support 2. Enfiler ressorts et rondelles sur vis + fixer avec des écrous sur support 14
15 CPU mounting - CPU Montage - montage de CPU AMD Spread thermal grease on the CPU (< 0,5mm coating thickness) 4. Mount the cooler using the backplate (included with the motherboard) onto the socket Hand-tighten screws crosswise 3. Wärmeleitpaste auf CPU auftragen (< 0,5mm Schichtdicke) 4. Kühler - mit Hilfe der Backplate (liegt dem Mainboard bei) - am Sockel montieren Schrauben kreuzweise, handfest anziehen 3. Appliquer la graisse thermique sur le CPU (< 0,5mm épaisseur) 4. Installer refroidisseur à socket à l aide de plaque arrière (incluse avec la carte mère) Serrez les vis de manière croisé à la main 15


16 screw mounting - Schraubenmontage - montage de vis AM4 RYZEN 1 M4 UNC 6-32 AMD 10,5 2 Select corresponding bracket + screws 1. Plug bracket together 2. Place compression springs and two different washers onto screws + attach to mount with nuts Passende Halterung + Schrauben wählen 1. Halterung zusammenstecken 2. Druckfedern und zwei verschiedene Unterlegscheiben auf Schrauben aufstecken + mit Muttern an Halterung befestigen Choisir support et vis 1. Assembler support 2. Enfiler ressorts et deux rondelles différentes sur vis + fixer avec des écrous sur support screw spring washer 0.8 washer 2.0 nut 16
 onto the socket Hand-tighten screws crosswise 3.")
 - am Sockel montieren Schrauben kreuzweise, handfest anziehen 3.")
17 CPU mounting - CPU Montage - montage de CPU AMD Spread thermal grease on the CPU (< 0,5mm coating thickness) 4. Mount the cooler using the backplate (included with the motherboard) onto the socket Hand-tighten screws crosswise 3. Wärmeleitpaste auf CPU auftragen (< 0,5mm Schichtdicke) 4. Kühler - mit Hilfe der Backplate (liegt dem Mainboard bei) - am Sockel montieren Schrauben kreuzweise, handfest anziehen 3. Appliquer la graisse thermique sur le CPU (< 0,5mm épaisseur) 4. Installer refroidisseur à socket à l aide de plaque arrière (incluse avec la carte mère) Serrez les vis de manière croisé à la main 17


 18 1.")


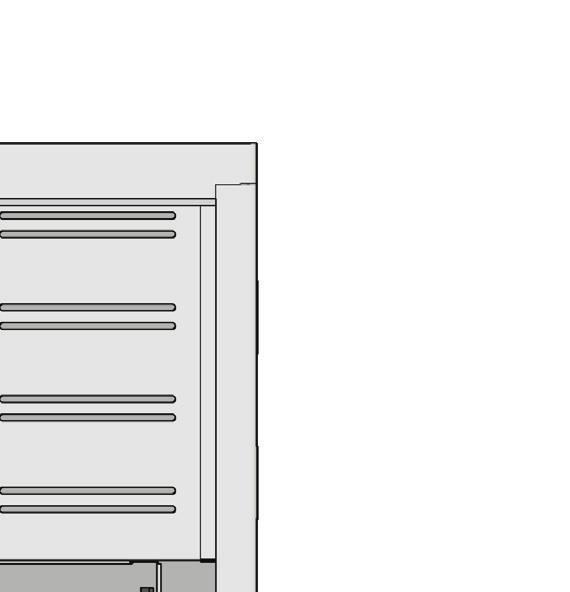
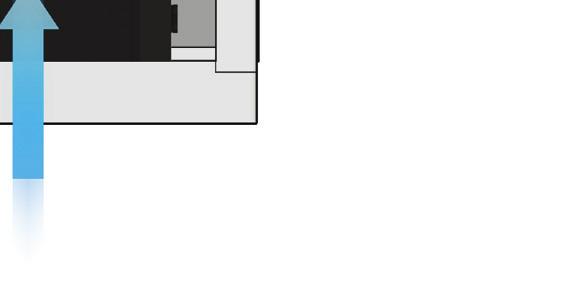
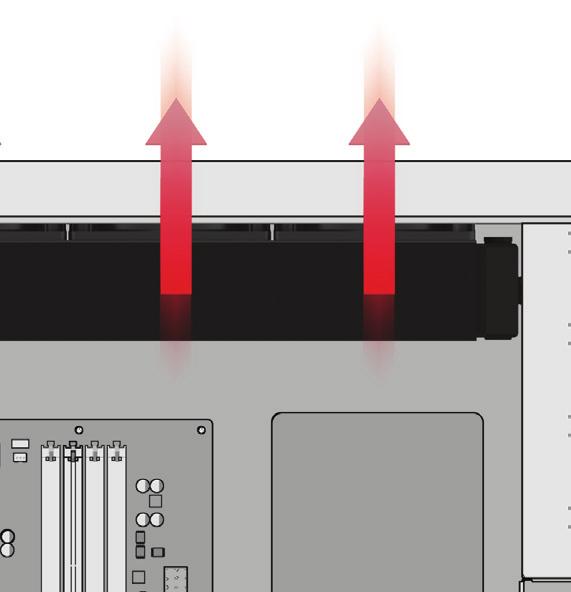
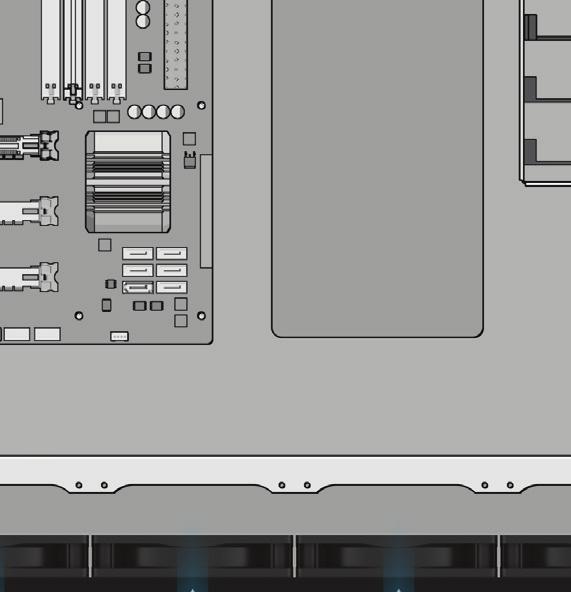
18 radiator mounting - Radiator Montage - montage de radiateur 1. Choose suitable place in your case 2. Mount the radiator with M3 screws 3. The direction of the fans can be selected individually. We recommend to mount the fan so that they blow out of the case. Make sure the fans blow in the same direction in Push&Pull mode. (See Radiator Placement Tips p.14) Passende Öffnung im Gehäuse wählen 2. Radiator mit M3 Schrauben montieren 3. Die Ausrichtung der Lüfter kann individuell gewählt werden. Wir empfehlen, die Lüfter so zu montieren, dass sie aus dem Gehäuse heraus blasen. Achten Sie bei Push&Pull Betrieb darauf, dass die Lüfter in die gleiche Richtung blasen. (Siehe Radiator Platzierungs Tipps S.14) 1. Sélectionner ouverture appropriée dans le boîtier 2. Installer le radiateur avec des vis M3 3. L orientation des ventilateurs peut être sélectionné individuellement. Nous vous recommandons de monter le ventilateur de sorte qu ils soufflent au dehors. Assurez-vous les ventilateurs soufflent dans la même direction durant l opération du Push&Pull. (voir Conseils de radiateur placement p.14)


19 connecting fans & pump - Lüfter & Pumpe anschließen - brancher ventilateur & pompe fan adapter pump 1. Connect fans with PWM adapter 2. Connect the fan + pump to mainboard 1. Lüfter mit PWM Adapter verbinden 2. Lüfter + Pumpe am Mainboard anschließen 1. Connecter les fans avec adaptateur PWM 2. Connecter les ventilateurs + pompe à mainboard 19
 3. Insert graphics card with Eiswolf cooler 4.")

 3.")


 avec entrée Eiswolf (bleu) 5.")
20 expanding with Eiswolf AiO - Erweitern mit Eiswolf AiO - expansion avec Eiswolf AiO 1. Switch off the PC 2. Loosen the quick release connector (attention, 1-2 drops of water may leak) 3. Insert graphics card with Eiswolf cooler 4. Link Eisbaer outlet (red) with Eiswolf inlet (blue) 5. Connect the radiators to a closed circuit Always combine red with blue quick release parts Further expansion possibilities: - Eisbaer Ready Radiators (pre-filled) - Standard GPX Cooler with Eisbaer Extension Set or Quick-Connect Extension Kit 1. PC ausschalten 2. Schnellverschluss lösen (beachten Sie, dass beim Lösen der Kupplungen, 1-2 Tropfen Wasser austreten können) 3. Grafikkarte mit Eiswolf Kühlung einsetzen 4. Eisbaer Auslass (rot) mit Eiswolf Einlass (blau) verbinden 5. Radiatoren zu geschlossenem Kreislauf verbinden Es werden immer rote mit blauen Schnellverschlussteilen gekoppelt weitere Erweiterungsmöglichkeiten: - Eisbaer Ready Radiatoren (vorbefüllt) - Standard GPX Kühler mit Eisbaer Extension Set oder Quick-Connect Extension Kit 1. Arrêter l ordinateur 2. Desserrer verrouillage rapide (attention, 1-2 gouttes d eau peuvent fuite) 3. Insérez carte graphique avec Eiswolf refroidisseur 4. Combiner Eisbaer outlet (rouge) avec entrée Eiswolf (bleu) 5. Raccorder les radiateurs à un circuit fermé Toujours combiner le rouge avec les parties bleues de dégagement rapide Autres possibilités d'expansion: - Eisbaer Ready Radiateur (pré-rempli) - Standard GPX refroidisseur avec Eisbaer Extension Set ou Quick-Connect Extension Kit 20


21 radiator placement tips - Radiator Platzierungs Tipps - Conseils de radiateur placement 21
22
23 Imprint: Alphacool International GmbH Marienberger Str Braunschweig Head Office: +49 (0) Fax: +49 (0) info@alphacool.com General Manager: Fabian Noelte WEEE-Reg.-Nr.: DE Trade Register: Amtsgericht Braunschweig HRB VAT.ID.Nr.: DE Tax number: 13/207/02047
Alphacool Eisbaer. Intel Socket LGA 2011/2011-3/775/1366/1156/1155/1150/1151 AMD Socket AM2/AM2+/AM3/AM3+/FM1/FM2/FM2+/G34/C32/604/771
 EISBAER Alphacool Eisbaer Intel Socket LGA 2011/2011-3/775/1366/1156/1155/1150/1151 AMD Socket AM2/AM2+/AM3/AM3+/FM1/FM2/FM2+/G34/C32/604/771 mounting kit for 2011-3 Narrow ILM is available separately
Contents - Inhaltsverzeichnis - Sommaire
 EISSTATION Contents - Inhaltsverzeichnis - Sommaire Scope of delivery Lieferumfang Contenu de la livraison 4-5 Installation DC-LT Pump Pumpenmontage DC-LT Installation pompe DC-LT 5-6 Installation VPP
Alphacool Eisbaer. Details. Aufbau: CPU - Kühleinheit. Schnellverschluss für unkomplizierte Erweiterbarkeit. integriertes Reservoir mit Pumpe
 Alphacool Eisbaer Was ist das? Die Alphacool Eisbaer ist eine erweiterbare und wiederbefüllbare CPU All in One Wasserkühlung mit einem Vollkupferradiator. Zusätzlich lässt sich die Eisbaer mit weiteren
Alphacool Eisbaer LT
 Alphacool Eisbaer LT Was ist das? Die Alphacool Eisbaer LT ist eine erweiterbare und kompakte Wasserkühlung für CPUs. Durch die Schnellverschlüsse ist sie erweiterbar und mit anderen Produkten der Eisbaer
Thermalright. Macho 120
 Thermalright Macho 120 Macho 120 Assembly package 4 1 4 4 4 7 5 4 4 4 1 Chill Factor 1 1 2 1 8 Macho 120 Intel 775/1155/1156/1366 Exploded View Important! Before proceeding with installation, please check
EISBECHER HELIX. Reservoir
 EISBECHER HELIX Reservoir Helix Reservoir: Composition - Aufbau - Structure rubber plug aluminium cover PMMA cap o-ring helix cathodic tube cathode PMMA tube o-ring PMMA base aluminium cover rubber plug
Thermalright. Archon SB-E X2
 Thermalright Archon SB-E X2 Archon SB-E X2 Assembly package 1 1 1 8 4 4 4 4 1 4 1 1 1 1 4 4 8 Thermalright Archon SB-E X2 Intel 775/1155/1156/1366 Exploded view Important! Before proceeding with installation,
Thermalright. Macho Rev. A PCGH
 Thermalright Macho Rev. A PCGH Macho Rev. A PCGH Assembly package 4 1 4 4 4 7 5 4 4 4 1 1 1 1 2 1 8 Macho Rev.A PCGH Intel 775/1155/1156/1366 Exploded View Important! Before proceeding with installation,
Einbausatz Hub montieren
 Einbausatz Hub montieren Die Hub-Halterung bietet Platz für zwei Hubs. Es können nur Hubs eingebaut werden, die über den Konfigurator bzw. Rack-Architekt bestellbar sind. Der Lieferumfang besteht im Grundausbau
Contents - Inhaltsverzeichnis - Sommaire
 Eisblock XPX Contents - Inhaltsverzeichnis - Sommaire Scope of delivery Lieferumfang Contenu de la livraison 4-5 Functionality / Technology Funktionsweise/ Technologie Fonctionnalité / Technologie 6 Preparing
Thermalright Macho X2
 Thermalright Macho X2 Macho X2 Assembly package 4 1 4 8 4 7 5 4 4 4 1 1 1 1 4 1 8 1 Macho X2 Intel 775/1156/1366/1155/1150 Exploded View TY-142 Anti-Vibration Pads Fan Clip Macho Heatsink Body M3 L6 Screw
Quertraverse entfernen: Bevor Sie die Quertraverse entfernen, sollte das Kühlerpaket unterfüttert werden. (Getriebeheber o.ä.)
") Wir beglückwünschen Sie zum Kauf unseres Ladeluftkühler-Kits. Wir haben uns bei der Entwicklung und Fertigung bemüht, das bestmöglichste passend für Ihr Fahrzeug herzustellen. Für den Einbau des Ladeluftkühler
Wir beglückwünschen Sie zum Kauf unseres Ladeluftkühler-Kits. Wir haben uns bei der Entwicklung und Fertigung bemüht, das bestmöglichste passend für Ihr Fahrzeug herzustellen. Für den Einbau des Ladeluftkühler
11 kw** E82MV222_4B kw**
 EDK82ZWKN4 00459189 10/02 Netzschleifklemme Typ E82ZWKN4 Diese Anleitung enthält wichtige Hinweise für den Einsatz der Netzschleifklemme E82ZWKN4 und beschreibt deren Montage. ist nur gültig - für Netzschleifklemmen
1 Allgemeine Information
 1 Allgemeine Information ACHTUNG! Der Betriebsdruck der Klasse 867 ist 6 bar. Sollte der Druck Ihrer Versorgungsleitung höher als 6 bar sein, muss der Druck an der Versorgungseinheit der Nähmaschine auf
Thermalright. Silver Arrow IB-E
 Thermalright Silver Arrow IB-E Silver Arrow IB-E Assembly Package 8 7 5 6 8 Silver Arrow IB-E Intel 775/50/55/56/66 Exploded View Important! Before proceeding with installation, please check for the most
Toyota Genuine Audio
 Toyota Genuine Audio EINBAUANLEITUNG VON.DIN AUDIO.DIN AUDIO INSTALLATION INSTRUCTIONS INSTRUCTIONS D INSTALLATION DE L AUDIO.DIN FÜR / FOR / POUR RAV (LHD) **A2 * L Manual Ref. Nr. A3LA2-.DIN-0-3700 TOYOTA
CLE. Heatpipe-System Kühlleistung > 30W. Heatpipe-System Kühlleistung > 25W. Heatpipe-System Kühlleistung > 25W. Heatpipe-System Kühlleistung > 20W
 LED FORTIMO KÜHLKÖRPER led fortimo heat sink system www.cardanlight.com CLE CARDAN LIGHT EUROPE CLE FORTIMO ADAPTER IP20 XFFO100....GR..SW..WS silbergrau weiß 19,90 CLE FORTIMO Adapter für CLE kardanische
HEATKILLER IV Montageanleitung / Assembly Instructions. 1. Beschreibung. 1. Description
 HEATKILLER IV Montageanleitung / 1 Assembly Instructions 1. Beschreibung Die HEATKILLER IV - Serie setzt neue Maßstäbe im Bereich Leistung, Qualität und Montagefreundlichkeit. Die Entwicklung der neuen
FOX-150/E... FOX-350/E Solar Laderegler
 FOX-150/E... FOX-350/E Solar Laderegler Solar Charge Regulator Einbauanleitung mounting guidelines Einbauanleitung Diese Anleitung ist eine Ergänzung zu folgenden Installationsanleitungen: D "FOX-150
Rue Gurnigel 48 CH-2501 Bienne Tél.: +41 (0) Fax: +41 (0)
 Fax: +41 (0)") OPTISCHE MESSTECHNIK OPTICAL MEASURING SYSTEMS SYSTEMES DE MESURE OPTIQUE marcel - aubert - sa Rue Gurnigel 48 CH-2501 Bienne Tél.: +41 (0)32 365 51 31 Fax: +41 (0)32 365 76 20 E-mail: info@marcel-aubert-sa.ch
OPTISCHE MESSTECHNIK OPTICAL MEASURING SYSTEMS SYSTEMES DE MESURE OPTIQUE marcel - aubert - sa Rue Gurnigel 48 CH-2501 Bienne Tél.: +41 (0)32 365 51 31 Fax: +41 (0)32 365 76 20 E-mail: info@marcel-aubert-sa.ch
Programmieranleitung CADAS 100 LPG 158
 Kupfer Programmieranleitung CADAS 100 LPG 158 Küvetten-Test LCK 529 Seite 1 Ausgabe 98/04 Achtung! Das Ausgabedatum dieser Programmieranleitung muß mit dem Ausgabedatum der Arbeitsvorschrift der Reagenzien
Schraube DIN 84, screw DIN 84, vis DIN 84 Konus, cone, cône Kabel, cable, cable. Klemmblech, clamping plate, bride de serrage
 VDE Nr. 4940-900-a wf VDE Nr. 4940-900-a DBP 867 Zugentlastende klemme D Die preiswerteste und sicherste Kabeldurchführung der Welt The most reasonable and safest cable entry in the world L entrée de câble
150-in-1. Handbuch / Manual / Manuel. Externer Card Reader USB 2.0
 Handbuch / Manual / Manuel Vielen Dank, dass Sie sich für ein Produkt von ultron entschieden haben. Wir wünschen Ihnen viel Freude mit Ihrem neuen Gerät! CE-Erklärung und Hinweise Hiermit erklärt die
Zubehörpaket Schmierstoff-Kompaktanlage ECO 1500
 Art.-Nr. 135.0056.402 Zubehörpaket Schmierstoff-Kompaktanlage ECO 1500 D Zubehörpaket Schmierstoff-Kompaktanlage ECO 1500 l Deutsch 2-4 GB Accessory Package - Compact Lubricant System ECO 1500 l English
Ladeluftkühler / Intercooler Ford Focus Mk3 1.6 Ecoboost Kit-Nr.:
 190001076 - Einbauanleitung / Installation Instruction - Ladeluftkühler / Intercooler Ford Focus Mk3 1.6 Ecoboost Kit-Nr.: 200001104 Wichtige Hinweise! Diese Montageanleitung ist unbedingt vor Beginn der
Art : 23P BPI 001 => 16,-
 Universal Brake Pad Wear Indicator for single or double cable systems. kit can be retrofitted at any time to V-Maxx Autosport Big Brake Kit Universal Bremsbelag-Verschleißanzeige für 1 oder 2 Kabel Systeme.
Postfach / P.O.Box 1430 D Markdorf Tel.: / Fax: / 6218 Internet: Mail:
 Postfach / P.O.Box 43 D - 8867 Markdorf Tel.: + 49 7544 / 964 Fax: + 49 7544 / 68 Internet: http://www.linnig.com Mail: webinfo@linnig.com Montageanleitung LINNIG Elektromagnetkupplung LA4. / LA6. housing
Einbauanleitung / Installation Instructions Ladeluftkühler - Kit Ford Focus RS MK 2 Intercooler - Kit Ford Focus RS MK2
 Einbauanleitung / Installation Instructions Ladeluftkühler - Kit Ford Focus RS MK 2 Intercooler - Kit Ford Focus RS MK2 Wir beglückwünschen Sie zum Kauf unseres Ladeluftkühler-Kits. Wir haben uns bei der
Ladeluftkühler/ Intercooler Kit Mini Cooper S R56 Facelift Kit-Nr.:
 190001011 -Einbauanleitung / Installation Instruction - Ladeluftkühler/ Intercooler Kit Mini Cooper S R56 Facelift Kit-Nr.: 200001025 200001049 Wichtige Hinweise! Diese Montageanleitung ist unbedingt vor
TriASS Schreibtische. TriASS Schreibtischsystem Montageanleitung. TriASS Desking System Assembly Instructions. Das Assmann Prinzip. Gute Arbeit.
 Das Assmann Prinzip. Gute Arbeit. TriASS Schreibtischsystem Montageanleitung TriASS Desking System Assembly Instructions The Assmann principle. Designed to work well. TriASS Desks Schreibtisch, Typ ST16
HEATKILLER IV INTEL Montageanleitung / Assembly Instructions. 1. Beschreibung. 1. Description
 HEATKILLER IV INTEL Montageanleitung / 1 Assembly Instructions 1. Beschreibung Die HEATKILLER IV - Serie setzt neue Maßstäbe im Bereich Leistung, Qualität und Montagefreundlichkeit. Die Entwicklung der
Montageanleitung Installation Instructions Notice de Montage
 Montageanleitung Installation Instructions Notice de Montage R Reflexlichtschranke / Reflexlichttaster Retro-reflective sensor / Diffuse reflection sensor Système réflex / Système réflexion directe OE
Electrical testing of Bosch common rail solenoid valve (MV) injectors
 injectors") Applies to MV injector, generation: -CRI 1.0 / 2.0 / 2.1 / 2.2 -CRIN 1 / 2 / 3, with K oder AK plug Bosch 10-position order number Bosch-Bestellnummer CRI: 0 445 110 xxx Bosch-Bestellnummer CRIN: 0 445
Applies to MV injector, generation: -CRI 1.0 / 2.0 / 2.1 / 2.2 -CRIN 1 / 2 / 3, with K oder AK plug Bosch 10-position order number Bosch-Bestellnummer CRI: 0 445 110 xxx Bosch-Bestellnummer CRIN: 0 445
Tilt Wall. Montage- und Gebrauchsanleitung. Assembly instructions and manual.
 Tilt Wall Montage- und Gebrauchsanleitung Assembly instructions and manual www.nyta.eu Montagehinweise & Begriffserklärung Assembly direction and glossary Vor der Montage alle stromführenden Leitungen
rtube.nl/red975 Sold separately MN180008_ Off Price GmbH Rodenkirchener Str Hürth Copyright MICRO-USB RCD2002
 RCD2002 MICRO-USB 1x 1x 1x Sold separately A B QR rtube.nl/red975 1/4 1/8 A W B F = W - 4 cm F = W - 4,5 cm W Min. W = 50 cm Min. W = 50 cm 1 2 W F = W - 4 cm F F 3 4 0,5 cm 5 F - 1,0 cm 2/4 2/8 A B 1
Aufsatzwände Typenreihe PLL additional platform gates type series PLL parois latérale supplémentaires série type PLL
 Pongratz Trailer-Group GmbH, A-877 Traboch, An der Bundesstraße 34 Tel. +43 (0)3843 6033, Fax DW 40, www.pongratz-anhaenger.com Montageanleitung installation instructions les instructions d'installation
REPARATURANLEITUNG REPAIR INSTRUCTIONS MANUEL DE RÉPARATION
 REPARATURANLEITUNG REPAIR INSTRUCTIONS MANUEL DE RÉPARATION Weitwinkel-Gelenkwellenschutz mit Flexo-Element Wide-angle PTO drive shaft guard with flexo-element Protecteur pour transmission grand angle
Aufbaudose mit Schalter Spacing box with switch. Montageanleitung mounting instructions
 Aufbaudose mit Schalter Spacing box with switch Montageanleitung mounting instructions body head Aufbaudose mit Schalter Montageanleitung S. 2 mounting instructions p. 9 $ 0.2m Sicherheitshinweise Die
TACJET NOZZLE WATERJET-TECHNOLOGY
 Cross jet nozzles 1000 bar Kreuzstrahldüsen 1000 bar Buses jets croisés 1000 bar 03.060 Cross jet nozzles 1000 bar The cross jet enz golden jet nozzle (with brake jet) is applied for industrial cleaning
CELSIUS M / R / V Rack Kit. Mounting Instructions
 CELSIUS M / R / V Rack Kit Mounting Instructions Are there...... any technical problems or other questions you need clarified? Please contact: our Hotline/Help Desk (see the included Help Desk list or
Montage YAMAHA MT / ABS. Art.-Nr.: schwarz
 Art.-Nr.: 670.4543 schwarz Montage Der Bausatz umfaßt die folgenden Teile: Stück Bestellnr. Bezeichnung 1 700008830 Gepäckplatte 1 700008831 Gepäckplattenunterbau Bitte vor jeder Fahrt den festen Sitz
FR777 Differenzial-Kulissenauszug Bodenmontage, 200 kg Tragkraft, mit Gegenführung
 http://www.fulterer.com http://www.fultererusa.com Instructions F777 Differenzial-Kulissenauszug Bodenmontage, 00 kg Tragkraft, mit Gegenführung F777 Progressive-Action Pantry Pull-out, Bottom Mount 450
Montage. Motorschutzplatte. Motorschutzplatte. YAMAHA XT 1200 Z Super Tenere. YAMAHA XT 1200 Z Super Tenere. Artikel-Nr.:
 Motorschutzplatte Artikel-Nr.:810.4531 Motorschutzplatte Artikel-Nr.: 3004.038.301 Montage Der Bausatz umfaßt die folgenden Teile: Stück Bestellnr. Bezeichnung 1 700007404 Halter vorne 1 700007405 Halter
Electrical testing of Bosch common rail piezo injectors
 Applies to generation CRI 3: Bosch 10-position order number 0 445 115 = CRI 3-16 (CRI 3.0) 1600 bar 0 445 116 = CRI 3-18 (CRI 3.2) 1800 bar 0 445 117 = CRI 3-20 (CRI 3.3) 2000 bar Tools required: Hybrid
Attention :Installez le logiciel fourni avant d'installer le lecteur de carte multislot!
 Manuel d utilisation Lecteur de carte 3,5 9 en 1, USB 2.0 Attention :Installez le logiciel fourni avant d'installer le lecteur de carte multislot! Installation du logiciel Insérez le CD-ROM fourni dans
Hama GmbH & Co KG D Monheim/Germany
 Hama GmbH & Co KG D-86651 Monheim/Germany www.hama.com All listed brands are trademarks of the corresponding companies. Errors and omissions excepted, and subject to technical changes. Our general terms
Anbauanleitung für Barcodeleser Teilesatz Fitting Instructions Barcode Reader Kit
 1 Komponenten des Teilesatzes Menge Bezeichnung Material-Nr. Der Teilesatz besteht aus folgenden Bauteilen: 1 9850 911006 Scanner Barcode 1 0911 562810 Winkel 2 9202 021648 Zylinder Schraube M3 x 5 2 9231
Walter Buchmayr Ges.m.b.H.
 Seite 1/10 Chapter Description Page 1 Advantages 3 2 Performance description 4 3 Settings 5 4 Options 6 5 Technical data 7 6 Pictures 8 http://members.aon.at/buchmayrgmbh e-mail: walter.buchmayr.gmbh@aon.at
Sixpack with NTC. Features / Eigenschaften. power range up to 1,2 kv / 25 A (trench) 3 Phase IGBT FRED Inverter Bridge 6-Pack flow concept NTC
 3 Phase IGBT FRED Inverter Bridge 6-Pack flow concept NTC") Sixpack with NTC flowpack 0 Features / Eigenschaften power range up to 1,2 kv / 25 A (trench) 3 Phase IGBT FRED Inverter Bridge 6-Pack flow concept NTC Copyright Tyco by Electronics Vincotech Finsinger
Sixpack with NTC flowpack 0 Features / Eigenschaften power range up to 1,2 kv / 25 A (trench) 3 Phase IGBT FRED Inverter Bridge 6-Pack flow concept NTC Copyright Tyco by Electronics Vincotech Finsinger
AKTIVE DVB-T ZIMMERANTENNE ANSCHLUSSHINWEISE ACTIVE DVB-T INDOOR ANTENNA CONNECTION INSTRUCTIONS
 K la vi er l ac ko p tik AKTIVE DVB-T ZIMMERANTENNE ANSCHLUSSHINWEISE ACTIVE DVB-T INDOOR ANTENNA CONNECTION INSTRUCTIONS ZA 8970 DRUCKS0682.indd 1 05.09.12 15:15 VerpAckunGsinhAlT UKW / UHF / VHF Flachantenne
mobilcom-debitel SmartHome Schnell-Start-Anleitung Quick Start Guide
 mobilcom-debitel SmartHome Schnell-Start-Anleitung Quick Start Guide 1. Cube anschließen 1. Connect Cube n Schließen Sie den Cube an die Stromversorgung an. n Legen Sie die Batterien polungsrichtig in
Technical Documentation and Operation Manual. Kühlgehäuse der Pyrometerserie Metis Cooling jacket for pyrometer series Metis (KG10-00)
") Beschreibung und Bedienungsanleitung Technical Documentation and Operation Manual Kühlgehäuse der Pyrometerserie Metis Cooling jacket for pyrometer series Metis (KG10-00) Inhalt S./P. 1. Beschreibung /
Beschreibung und Bedienungsanleitung Technical Documentation and Operation Manual Kühlgehäuse der Pyrometerserie Metis Cooling jacket for pyrometer series Metis (KG10-00) Inhalt S./P. 1. Beschreibung /
Montageanleitung / Mounting Instruction
 Montageanleitung / Mounting Instruction FR 771, Differential-Kulissenauszug Bodenmontage, 125 kg Tragkraft, mit Gegenführung FR 771, Progressive-Action Pantry Pullout, Bottom Mount 275 LBS. Capacity, with
CABLE TESTER. Manual DN-14003
 CABLE TESTER Manual DN-14003 Note: Please read and learn safety instructions before use or maintain the equipment This cable tester can t test any electrified product. 9V reduplicated battery is used in
Eurocube Eurocube FIN EST SLO UAE RUS Design & Quality Engineering GROHE Germany
 19 898 Eurocube 19 896 Eurocube D...1 I...2 N...3 GR...5 TR...6 BG...7 RO...9 GB...1 NL...2 FIN...4 CZ...5 SK...6 EST...8 CN...9 F...1 S...3 PL...4 H...5 SLO...7 LV...8 UA...9 E...2 DK...3 UAE...4 P...6
Ladeluftkühler / Intercooler Renault Megane RS Kit-Nr.:
 190001049 - Einbauanleitung / Installation Instruction - Ladeluftkühler / Intercooler Renault Megane RS 250-275 Kit-Nr.: 200001072 Wichtige Hinweise! Diese Montageanleitung ist unbedingt vor Beginn der
Einbau- und Montageanleitung Wanddurchführungs-Set Seite 3-4 Assembly instructions and mounting guide Wall pipe set Page 5-6
 Einbau- und Montageanleitung Wanddurchführungs-Set Seite 3-4 Assembly instructions and mounting guide Wall pipe set Page 5-6 Wanddurchführung/wall pipe set DORW2072 05.03.2009 1 / 8 Wanddurchführung/wall
Partyzelt
 10029443 10029444 Partyzelt Sehr geehrter Kunde, wir gratulieren Ihnen zum Erwerb Ihres Gerätes. Lesen Sie die folgenden Hinweise sorgfältig durch und befolgen Sie diese, um möglichen Schäden vorzubeugen.
Installation guide for Cloud and Square
 Installation guide for Cloud and Square 1. Scope of delivery 1.1 Baffle tile package and ceiling construction - 13 pcs. of baffles - Sub construction - 4 pcs. of distance tubes white (for direct mounting)
Qualitätsmanagement-Handbuch Serviceinformation: _Serviceinformation H0201_1_Batterietrennschalter.doc Formblatt. ÜS;Linearlifte AL1
 Serviceinformation Thema Batterietrennschalter 200185065 kann brechen Seite:1/7 Produktgruppe ÜS;Linearlifte AL1 Artikelnummer Produktgruppencode H0201 Servicecode 200185065 H0201 K0012 A0001 Verfasser
FlightSim Commander Database Manager 9.5
 FlightSim Commander Database Manager 9.5 Compatible with Lookheed Martin Prepar3D 1.0, 1.4 and Prepar3D v 2.0 The most recently updated database of the Prepar3D version is at the start of FlightSim Commander
Seitenkoffer Topcases Gepäckträger Lock it System Softbags Aluminiumkoffer Lederkoffer Schutzbügel Hauptständer Chopper-Parts Accessoires
 Artikel-Nr.: 60.454 00 0 chrom Montage Seitenkoffer Topcases Gepäckträger Lock it System Aluminiumkoffer Lederkoffer Schutzbügel Hauptständer Chopper-Parts Accessoires Der Bausatz umfaßt die folgenden
High Technology for Professionals
 LMKAS 10 10 9.8 6.2 0.2 1.2 3 10 13 623 LMKAS 13 13 12 7.2 0.2 1.4 3 13 20 624 LMKAS 16 16 15.8 10.5 0.3 1.5 3 23 30 LMKAS 16 i 16 15.8 10.5 0.15 1.4 3 3 4.5 625-634 LMKAS 16 a 16 15.8 10.5 0.2 1.35 3
Programmieranleitung CADAS 100 LPG 158
 Wasserhärte Programmieranleitung CADAS 100 LPG 158 Küvetten-Test LCK 327 Seite 1 Ausgabe 97/06 Achtung! Das Ausgabedatum dieser Programmieranleitung muß mit dem Ausgabedatum der Arbeitsvorschrift der Reagenzien
Mast- / Wandmontage Kit Einbauanleitung Pole- / Wallmount Kit Installation Guide
 Alpha ATROX Mast- / Wandmontage Kit Einbauanleitung Pole- / Wallmount Kit Installation Guide Ihr Partner für Energieversorgungslösungen Mast- und Wandmontage Kit Alpha ATROX Pole- and Wall Mount Kit Alpha
Handbuch. Wir freuen uns, dass Sie sich für ein ultron Produkt entschieden haben und wünschen Ihnen viel Freude mit Ihrem neuen Gerät.
 Handbuch Wir freuen uns, dass Sie sich für ein ultron Produkt entschieden haben und wünschen Ihnen viel Freude mit Ihrem neuen Gerät. CE-Erklärung und Hinweise Hiermit erklärt die ultron AG, dass sich
List pumps. Table of contents. Si-61. Si-30. Si-63
 List pumps Table of contents Si-61 Si-30 Si-63 Si-61 Compact design Art-.Nr. SI61CE01UN23 The Si-61 is a piston pump with built-in tank (0,37l) designed to remove acidic condensates from gas condensing
HEATKILLER D5-TOP Montageanleitung / Assembly Instructions. 1. Beschreibung. 1. Description
 HEATKILLER D5-TOP Montageanleitung / 1 Assembly Instructions 1. Beschreibung Die HEATKILLER D5-TOP ist die ideale Ergänzung für D5 Pumpen. Eine farbige Montageanleitung im PDF- Format finden Sie im Servicebereich
Installation Instructions
 EN DE Installation Instructions WLAN Installation Kit, 300 Mbps, 5 GHz, 16 dbi AK-4 Wireless Kit Scope of delivery Junction box AK-4 (1x) 1 Connection board AK-4 CB with 12VDC power supply unit (1x) 2
Bausatz Lichtschranke Kit Light Barrier
 Verwendung des Nachrüstsatzes Der Bausatz Lichtschranke - Teile Nr. 0806 49000 ist für Nähanlagen der Klasse 806 vorgesehen. Inhalt des Teilesatzes Lichtschranke für Transferplatte Lichtschranke für automatisches
11 EN 81-70 Page 1 of 2 Standard: INTERPRETATION RELATED TO. Clause(s): 5.4.2.3
: 5.4.2.3") CEN RELATED TO 11 Page 1 of 2 Standard: Edition: 2003 Clause(s): 5.4.2.3 Valid from: 15/09/2010 Date of modification: Key-word(s): Car operating panel, Two entrance lift Replacing interpretation No.: QUESTION
CEN RELATED TO 11 Page 1 of 2 Standard: Edition: 2003 Clause(s): 5.4.2.3 Valid from: 15/09/2010 Date of modification: Key-word(s): Car operating panel, Two entrance lift Replacing interpretation No.: QUESTION
Delta 2.4 W-Lan EINBAUANLEITUNG MOUNTINGINSTRUCTIONS
 Delta 2.4 W-Lan EINBAUANLEITUNG MOUNTINGINSTRUCTIONS Installation des Antennensystems DELTA 2.4 W-Lan Installationsvarianten Das DELTA 2.4 W-Lan System kann in verschiedenen Varianten installiert werden:
MTD Products Aktiengesellschaft Saarbrücken Germany
 1 3 4 5 6 D03 FORM NO. 769-00356 MTD Products Aktiengesellschaft Saarbrücken Germany 7 8 1.. 9 10 11 1 13 14 15 16 DE Montage Grasfangkorb an 500er Serie Beachten Sie die Sicherheitshinweise in der Bedienungsanleitung
Alphacool Cool Answer Kits - with DDC pump
 Alphacool Cool Answer Kits - with DDC pump Alphacool Cool Answer Kits - with DDC pump Liquid Tubing Fan Radiator Reservoir Pump CPU Cooler Fittings 3 Content - Inhalt - Teneur Alphacool NexXxoS XP³ Light
1: Descrew the org device of the E53 (non navi model) and cutout the plastic frame till vertical side plates (next pic), best use a dremel like tool
 and cutout the plastic frame till vertical side plates (next pic), best use a dremel like tool") Mounting- Instruction BMW E53 Doppel-DIN 31.6.2009 This mounting instruction shows you the best way for an exclusive installation for the double- DIN device, good luck!!! 1 1: Descrew the org device of
Mounting- Instruction BMW E53 Doppel-DIN 31.6.2009 This mounting instruction shows you the best way for an exclusive installation for the double- DIN device, good luck!!! 1 1: Descrew the org device of
SAN DIEGO Akazie massiv acacia massif acacia solid
 SAN DIEGO Akazie massiv acacia massif acacia solid 4.47 Traversen traverses bars 12 cm : cm n s s: cm Einlegetiefe hauteur encastrable insertion depth: 16 cm 16 cm Wir empfehlen beim Einsatz von preisgünstigen
iid software tools QuickStartGuide iid USB base driver installation
 iid software tools QuickStartGuide iid software tools USB base driver installation microsensys Nov 2016 Introduction / Einleitung This document describes in short form installation of the microsensys USB
Ladeluftkühler/Intercooler Ford Mustang Ecoboost EVO 1 Kit Kit-Nr.:
 190001047 - Einbauanleitung/Installation Instruction - Ladeluftkühler/Intercooler Ford Mustang Ecoboost EVO 1 Kit Kit-Nr.: 200001073 Wichtige Hinweise! Diese Montageanleitung ist unbedingt vor Beginn der
Magische weiße Karten
 Magische weiße Karten Bedienungsanleitung Ein Stapel gewöhnlicher Karten wird aufgedeckt, um die Rückseite und die Vorderseite zu zeigen. Wenn eine Karte ausgewählt wurde, ist der Magier in der Lage, alle
BEDIENUNGSANLEITUNG Internes 5.25'' Multi Panel 6 in 1 Card Reader mit USB Hub USB 2 Port Port + Audio
 BEDIENUNGSANLEITUNG Internes 5.25'' Multi Panel 6 in 1 Card Reader mit USB Hub USB 2 Port + 1394 1 Port + Audio Kapitel 1 Installation Hardware: Anschlüsse: 1. IEEE 1394 2. USB 1.1 (2Ports) 3. Karteneinschub
Programmieranleitung CADAS 100 LPG 210
 Programmieranleitung CADAS 100 LPG 210 Küvetten-Test LCK 555 Seite 1 BSB 5 BSB [n] Ausgabe 9804 Achtung! Das Ausgabedatum dieser Programmieranleitung muß mit dem Ausgabedatum der Arbeitsvorschrift der
Anfi-tec drei CPU03. Coloured assembly instructions are provided as a PDF-file in the service area of our homepage:
 Montageanleitung Assembly Instructions Anfi-tec drei CPU03 Wir freuen uns, dass Sie sich für einen Anfitec CPU Wasserkühler entschieden haben. Der CPU-Kühler verwendet ein aufwändiges Schlitzkanalprinzip
Delta 2.4 W-LAN EINBAUANLEITUNG MOUNTINGINSTRUCTIONS
 Delta 2.4 W-LAN EINBAUANLEITUNG MOUNTINGINSTRUCTIONS Installation des Antennensystems DELTA 2.4 W-LAN Installationsvarianten Das DELTA 2.4 W-LAN System kann in verschiedenen Varianten installiert werden:
hanit Assembly Instruction - Sandbox System Thar -
 Thank you for purchasing a hanit recycling plastic product, We wish you a lot of pleasure with that product. Please find below important installation instructions which need to be taken into consideration
Ladeluftkühler / Intercooler Honda Civic Type R Kit-Nr.:
 190001056 - Einbauanleitung / Installation Instruction - Ladeluftkühler / Intercooler Honda Civic Type R Kit-Nr.: 200001086 Wichtige Hinweise! Diese Montageanleitung ist unbedingt vor Beginn der Einbauarbeiten
IMPORTANT / IMPORTANT:
 Replacement of the old version 2.50. Procedure of installation and facility updates. New presentation. Remplacer l ancienne version 2.50. Procédure d installation et de mise à jour facilitée. Nouvelle
New items in this catalog! Mercedes Car
 New items in this catalog! Mercedes Car PICTURE OE NO. DESCRIPTION TT C NO. RELEASED 202 820 9242 Innenraumgebläse / Fan, interior 02.59.111 Mar 12 13 Rep. Satz Querlenker, Vorderachse / Rep. Kit track
Schnell-Start-Anleitung Quick Start Guide
 Schnell-Start-Anleitung Quick Start Guide 3 1. Cube anschließen Schließen Sie den Cube an die Stromversorgung an. Verbinden Sie den Cube mit dem Router. Die Power- und die Internet-LED beginnen zu blinken,
HPS.04.696.10000/B Revision: 01. Hauptständer KTM 990 SM-T / SM-R '09 Center Stand KTM 990 SM-T / SM-R '09
 Hauptständer KTM 0 SM-T / SM-R '0 Center Stand KTM 0 SM-T / SM-R '0 Montagehinweise Revision: 01 Mounting Instruction Achtung: Die Kurven- und Bodenfreiheit kann durch einen Hauptständer eingeschränkt
GKN Walterscheid GmbH REPARATURANLEITUNG REPAIR INSTRUCTIONS MANUEL DE RÉPARATION. Gelenk Joint Joint
 GKN Walterscheid GmbH REPARATURANLEITUNG REPAIR INSTRUCTIONS MANUEL DE RÉPARATION Gelenk DEMONTAGE DISMANTLING DÉMONTAGE Sicherungsringe durch Hammerschläge auf Austreiber SW28 (A) entspannen. Relieve
Installation manual for Conen height adjustable pylon systems for interactive whiteboards Montageanleitung für Conen höhenverstellbare Pylonensysteme
 Installation manual for Conen height adjustable pylon systems for interactive whiteboards Montageanleitung für Conen höhenverstellbare Pylonensysteme für interaktive Whiteboards 1. Introduction Einleitung
Aweso Aperto 264. Beschläge für Schalteranlagen mit Hängeschiebetüren. Ferrements pour installations de guichets avec portes suspendues
 GLASBESChläge ferrements pour vitrages Aweso Aperto 264 Beschläge für Schalteranlagen mit Hängeschiebetüren Für 6-mm-Glas, in Stahl Ferrements pour installations de guichets avec portes suspendues Pour
Installation manual for Conen height adjustable spring tension mechanism for interactive whiteboards Montageanleitung für Conen höhenverstellbare
 Installation manual for Conen height adjustable spring tension mechanism for interactive whiteboards Montageanleitung für Conen höhenverstellbare Federzugsysteme für interaktive Whiteboards 1. Introduction
Mounting- Instruction BMW E90-93 Doppel-DIN
 Mounting- Instruction BMW E90-93 Doppel-DIN 6.9.200 This mounting instruction shows you the best way for an exclusive installation for the double- DIN device, good luck!!! : demount the front panel with
 Verwenden Sie nur Original-KRONE-Ersatzteile! Das gibt Sicherheit und spart Kosten! Use Original-KRONE parts only This will increase operational reliability and help to save costs! N'utiliser que des piéces
 Verwenden Sie nur Original-KRONE-Ersatzteile! Das gibt Sicherheit und spart Kosten! Use Original-KRONE parts only This will increase operational reliability and help to save costs! N'utiliser que des piéces
 Verwenden Sie nur Original-KRONE-Ersatzteile! Das gibt Sicherheit und spart Kosten! Use Original-KRONE parts only This will increase operational reliability and help to save costs! N'utiliser que des piéces
Montageanleitung Assembly Instruction Artikel: Werkstattschrank mit 2 Türen
 1 Montageanleitung Assembly Instruction Artikel: Werkstattschrank mit 2 Türen Allgemeine Hinweise: Prüfen Sie bitte vor Zusammenbau, ob alle Teile vorhanden und unbeschädigt sind. Sollte das nicht der
Montageanleitung Assembly Instruction Werkbank mit 6 Schubladen/ 2 Türen
 1 Montageanleitung Assembly Instruction Werkbank mit 6 Schubladen/ 2 Türen Art. 25733 Art. 45700 Allgemeine Hinweise: Prüfen Sie bitte vor Zusammenbau, ob alle Teile vorhanden und unbeschädigt sind. Sollte
Anbauanleitung Seilwindenanbausatz Fitting instruction winch mounting kit Nissan Navara 2,5L D401 D40 - R51
 Am Schwimmbad 8 95326 Kulmbach Tel. 09221 / 95620 Fax 09221 / 956222 e-mail: verkauf@taubenreuther.de Anbauanleitung Seilwindenanbausatz Fitting instruction winch mounting kit Nissan Navara 2,5L D401 D40